Dashboard is a web-based Kubernetes user interface.
Official documents; Web Interface (Dashboard) | Kubernetes
Dashboard features:
- Deploy container applications to the Kubernetes cluster.
- Error-shooting applied to containers.
- Get an overview of the applications running in the cluster.
- Create or modify Kubernetes resources such as Deployment, Job, DaemonSet, and so on.
- Manage cluster resources such as resilient scaling, rolling upgrades, restarting Pod, and so on.
Deploy Dashboard UI
Set all worker nodes as a stain first so that dashboard is deployed only on server nodes, otherwise subsequent access settings will be cumbersome.
# Set k8s-node-1 as a stain
$ kubectl taint nodes k8s-node-1 note=void-dashboard:NoSchedule
node/k8s-node-1 tainted
# Set k8s-node-2 as a stain
$ kubectl taint nodes k8s-node-2 note=void-dashboard:NoSchedule
node/k8s-node-2 tainted
stay kubernetes/dashboard: General-purpose web UI for Kubernetes clusters (github.com) View the current version of Dashboard.
Deploy using the following commands:
# Download yaml file
$  wget https://raw.githubusercontent.com/kubernetes/dashboard/v2.5.0/aio/deploy/recommended.yaml
# Deploy dashboard
$ kubectl create -f recommended.yaml

# Successful deployment will output the following
namespace/kubernetes-dashboard created
serviceaccount/kubernetes-dashboard created
service/kubernetes-dashboard created
secret/kubernetes-dashboard-certs created
secret/kubernetes-dashboard-csrf created
secret/kubernetes-dashboard-key-holder created
configmap/kubernetes-dashboard-settings created
role.rbac.authorization.k8s.io/kubernetes-dashboard created
clusterrole.rbac.authorization.k8s.io/kubernetes-dashboard created
rolebinding.rbac.authorization.k8s.io/kubernetes-dashboard created
clusterrolebinding.rbac.authorization.k8s.io/kubernetes-dashboard created
deployment.apps/kubernetes-dashboard created
service/dashboard-metrics-scraper created
deployment.apps/dashboard-metrics-scraper created
Yaml is a K8S resource manifest file, and what attributes each object has can be edited in yaml.
If you can't download properly due to network reasons, you can open recommended on github. Yaml, then copy the code and save it locally to execute.
View pod status:
$ kubectl get pod --namespace kubernetes-dashboard -o wide
NAME                                        READY   STATUS    RESTARTS   AGE    IP           NODE      NOMINATED NODE   READINESS GATES
dashboard-metrics-scraper-c45b7869d-dx4xm   1/1     Running   0          104s   10.42.0.22   k8s-s01   <none>
<none>
kubernetes-dashboard-764b4dd7-vcvkc         1/1     Running   0          104s   10.42.0.23   k8s-s01   <none>
<none>
If STATUS displays ImagePullBackOff, which means the pull mirror failed, you can wait for an automatic retry until the state becomes Running. Running indicates that the container is created and that the Pod has been dispatched to a Node.
View svc services and ports:
$ kubectl get svc -n kubernetes-dashboard
NAME                        TYPE        CLUSTER-IP      EXTERNAL-IP   PORT(S)    AGE
kubernetes-dashboard        ClusterIP   10.43.237.71    <none>        443/TCP    9m51s
dashboard-metrics-scraper   ClusterIP   10.43.236.225   <none>        8000/TCP   9m51s
Enable Dashboard access using the kubectl command line tool:
# Foreground boot, will occupy terminal window
$ kubectl proxy
Starting to serve on 127.0.0.1:8001
Note: Currently the UI can only be accessed by the machine that executes this command.
Open a new terminal window and try to access Dashboard locally:
$ curl http://localhost:8001/api/v1/namespaces/kubernetes-dashboard/services/https:kubernetes-dashboard:/proxy/
# Success returns page content
<!--
Copyright 2017 The Kubernetes Authors.
...
--><!DOCTYPE html><html lang="en" dir="ltr"><head>
  <meta charset="utf-8">
  <title>Kubernetes Dashboard</title>
...
Access is OK, now you can remove the stain settings on the worker node:
$ kubectl taint nodes k8s-node-1 note=void-dashboard:NoSchedule-
node/k8s-node-1 untainted
$ kubectl taint nodes k8s-node-2 note=void-dashboard:NoSchedule-
node/k8s-node-2 untainted
Dashboard RBAC Configuration
Reference resources: Kubernetes Dashboard| Rancher Document
To protect cluster data, by default, Dashboard deploys with a minimum RAB configuration. Currently, Dashboard only supports Bearer token login.
RBAC is Role-Based Access Control. In RBAC, privileges are associated with roles, and users get privileges for those roles by becoming members of the appropriate roles. This greatly simplifies the management of privileges. Privileges are assigned to roles, while roles are assigned to users. Such privileges are clearly designed and easily managed.
Create login Token for demo samples
Create the following resource manifest file:
dashboard.admin-user.yml
apiVersion: v1
kind: ServiceAccount
metadata:
  name: admin-user
  namespace: kubernetes-dashboard
The above configuration will create a service account named admin-user, with a home namespace of kubernetes-dashboard.
dashboard.admin-user-role.yml
apiVersion: rbac.authorization.k8s.io/v1
kind: ClusterRoleBinding
metadata:
  name: admin-user
roleRef:
  apiGroup: rbac.authorization.k8s.io
  kind: ClusterRole
  name: cluster-admin
subjects:
  - kind: ServiceAccount
    name: admin-user
    namespace: kubernetes-dashboard
Note: In most cases, ClusterRole cluster-admin is automatically created when a cluster is configured using kops, kubeadm, or other popular tools. If it does not exist, you need to create it manually and grant the necessary permissions.
Deploy the above configuration:
$ kubectl create -f dashboard.admin-user.yml -f dashboard.admin-user-role.yml

serviceaccount/admin-user created
clusterrolebinding.rbac.authorization.k8s.io/admin-user created
Get Bearer Token:
$ kubectl -n kubernetes-dashboard describe secret admin-user-token | grep '^token'
token:      eyJhbGciOiJSUzI1NiIsImtpZCI6Im5WWmdqdm1RVC0xVTRfOXRwYzJKNnZCVkN4Q1lWcmdYWFZQMldPeFdlbU0ifQ.eyJpc3MiOiJrdWJlcm5ldGVzL3NlcnZpY2VhY2NvdW50Iiwia3ViZXJuZXRlcy5pby9zZXJ2aWNlYWNjb3VudC9uYW1lc3BhY2UiOiJrdWJlcm5ldGVzLWRhc2hib2FyZCIsImt1YmVybmV0ZXMuaW8vc2VydmljZWFjY291bnQvc2VjcmV0Lm5hbWUiOiJhZG1pbi11c2VyLXRva2VuLWhqdGJtIiwia3ViZXJuZXRlcy5pby9zZXJ2aWNlYWNjb3VudC9zZXJ2aWNlLWFjY291bnQubmFtZSI6ImFkbWluLXVzZXIiLCJrdWJlcm5ldGVzLmlvL3NlcnZpY2VhY2NvdW50L3NlcnZpY2UtYWNjb3VudC51aWQiOiI0ODY2OGM5Yi0zNmNmLTQwNjMtYjVjNi0xZTI0OTI0MzViYTMiLCJzdWIiOiJzeXN0ZW06c2VydmljZWFjY291bnQ6a3ViZXJuZXRlcy1kYXNoYm9hcmQ6YWRtaW4tdXNlciJ9.RIFgQHv_wImASJ2uWtGVKvVBu9-C1YNF_bQsn6bEjPYTChbp_ryEkD-qr276HHXrcFM83Ynfg3juXrTTq_NRjqfoHf8CciknZr0l2Ifo0IFalxinAvm8PqYu7_eVU5JEt6vN_u07N3w6zz0DNOBxzxerwyOTZ6mGyTmmHGlfax8iheYevsxSWIftpml975QLx32ZsT6aMVAmO2H0bz0OhOQWh6Ddj3sg8y7hrI2NsJUDJdA9WS8Rrs-lP7viF9e-Eokc5KgvCRwWEyREWnhGfQqkpiFKoBKz8_zkhCH2Vex203JFQHKzYCzMYXn_cZtyKG1fRxecrMPNVdPZbHpxCw
Remote access dashboard via port forwarding:
# Set Port Forwarding
$ sudo kubectl port-forward --namespace kubernetes-dashboard --address 0.0.0.0 service/kubernetes-dashboard 10443:443
Use browser access https://IP:10443/
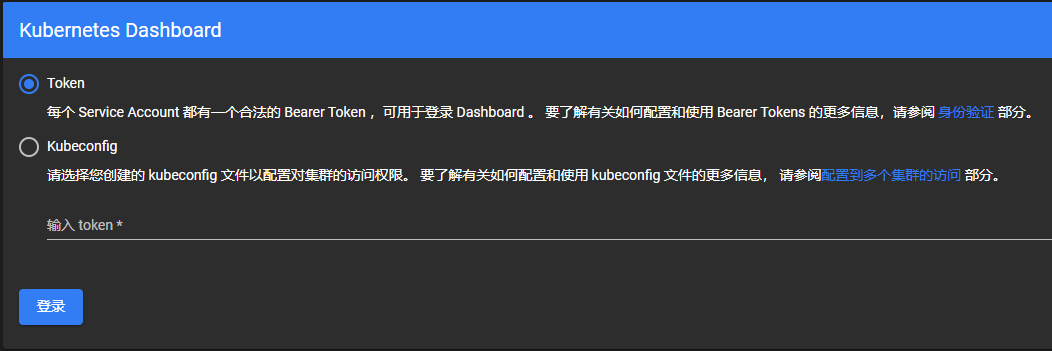
Enter the Token you obtained earlier and click Login.
After testing, you can run the following command to remove the Administrator Service Account and ClusteterRoleBinding for the presentation:
$ kubectl -n kubernetes-dashboard delete serviceaccount admin-user
$ kubectl -n kubernetes-dashboard delete clusterrolebinding admin-user