1, Preparatory work
1. Prepare the server
It's best to prepare multiple machines with slightly higher configuration for building K8s cluster. Here, I use Google cloud to create three 2-core 4G servers for experiments. Of course, I can also use virtual machines for experiments.

The versions of software used in the server and system are as follows:
| name | edition |
|---|---|
| operating system | CentOS7 |
| docker | 20.10.6 (latest by default) |
| Kubeadm | 1.21.1 (latest by default) |
| Kubelet | 1.21.1 (latest by default) |
One of them is the master node and the other is the node node. At this time, the three machines can access each other. The nodes and ip addresses are as follows:
| node | ip |
|---|---|
| master1 | 34.80.118.209 |
| node1 | 35.189.182.143 |
| node2 | 104.199.196.26 |
2. Initialization of all servers
# *Is optional
# 1. Turn off the firewall
systemctl stop firewalld
systemctl disable firewalld

# 2. Turn off selinux function
sed -i 's/enforcing/disabled/' /etc/selinux/config  # Permanent closure
setenforce 0  # Temporarily Closed

# 3. Close swap
sed -ri 's/.*swap.*/#&/' /etc/fstab    # Permanent closure
swapoff -a  # Temporarily Closed

# *4. Set the host name according to the plan. I will use k8s master, k8s node1 and k8s node2 here
hostnamectl set-hostname <hostname>

# 5. Add hosts in the master
cat >> /etc/hosts << EOF
34.80.118.209 k8s-master
35.189.182.143 k8s-node1
104.199.196.26 k8s-node2
EOF

# 6. Deliver the bridged IPv4 traffic to the iptables chain
cat > /etc/sysctl.d/k8s.conf << EOF
net.bridge.bridge-nf-call-ip6tables = 1
net.bridge.bridge-nf-call-iptables = 1
EOF
sysctl --system  # take effect

# 7. For time synchronization, install the package first. I use Alibaba cloud time server here
yum install ntpdate -y
ntpdate ntp1.aliyun.com

# *8. Install wget
yum install wget
2, Start to build K8s cluster
1. Install Docker, kubedm, Kubelet and Kubectl on all machines
1.1 installing Docker
(1) Installation
# Add docker warehouse source. Alibaba cloud can be used in China
wget https://mirrors.aliyun.com/docker-ce/linux/centos/docker-ce.repo -O /etc/yum.repos.d/docker-ce.repo

# I use the Google cloud server here, so the download speed from foreign image points is fast, so I use the official source according to the official prompt of docker:
yum install -y yum-utils
yum-config-manager --add-repo https://download.docker.com/linux/centos/docker-ce.repo

# Update mirror source
yum clean all && yum makecache && yum -y update

# View docker CE version
yum list docker-ce --showduplicates | sort -r

# Install docker. If the version is not specified, install the latest version. Let me use the latest version here
yum install docker-ce-<version> docker-ce-cli-<version> containerd.io

# Direct installation of the latest version:
yum install docker-ce docker-ce-cli containerd.io

# Start docker and set startup
systemctl enable docker && systemctl start docker

# View docker version
docker --version
# I automatically install the latest version 20.10.6 here
Docker version 20.10.6, build 370c289

# Check whether the docker process is started
ps aux |grep docker
(2) If domestic servers are used, it is best to configure Alibaba cloud docker image source:
# Alibaba cloud docker image source
cat > /etc/docker/daemon.json << EOF
{
  "registry-mirrors": ["https://b9pmyelo.mirror.aliyuncs.com"]
}
EOF
1.2 installation of Kubelet, kubedm and kubectl
(1) Configure the kubernetes source. I don't need the domestic source here. Use the k8s official recommended source:
# Alibaba cloud k8s source
cat > /etc/yum.repos.d/kubernetes.repo << EOF
[kubernetes]
name=Kubernetes
baseurl=https://mirrors.aliyun.com/kubernetes/yum/repos/kubernetes-el7-x86_64
enabled=1
gpgcheck=0
repo_gpgcheck=0
gpgkey=https://mirrors.aliyun.com/kubernetes/yum/doc/yum-key.gpg https://mirrors.aliyun.com/kubernetes/yum/doc/rpm-package-key.gpg
EOF
# k8s official source
cat <<EOF > /etc/yum.repos.d/kubernetes.repo
[kubernetes]
name=Kubernetes
baseurl=https://packages.cloud.google.com/yum/repos/kubernetes-el7-x86_64
enabled=1
gpgcheck=1
repo_gpgcheck=1
gpgkey=https://packages.cloud.google.com/yum/doc/yum-key.gpg https://packages.cloud.google.com/yum/doc/rpm-package-key.gpg
EOF
(2) Start installing Kubelet, kubedm, kubectl
yum install -y kubelet kubeadm kubectl

# Set to kubelet startup
systemctl enable kubelet
2. K8s master node initialization
(1) Specify the docker driver of all nodes as systemcmd. If not, it will be reported Step on the 8ks cluster deployment collection Error in 2.
Check:
docker info |grep Cgroup
Open docker configuration file:
vim /usr/lib/systemd/system/docker.service
Change here and add before - H:
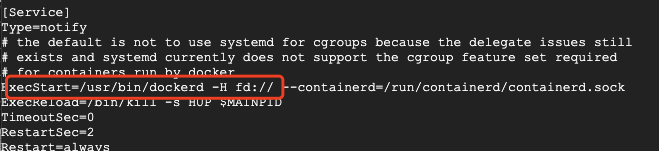
Replace with:
ExecStart=/usr/bin/dockerd --exec-opt native.cgroupdriver=systemd
Then restart docker:
systemctl daemon-reload
# View again
docker info | grep Cgroup
As follows:

(2) Execute the following command on the master node. The ip is the external network ip of the master, and the version number is kubelet version number. The last two parameters do not conflict.
kubeadm init \
  --kubernetes-version v1.21.1 \
  --service-cidr=10.96.0.0/16 \
  --pod-network-cidr=10.244.0.0/16
Note: it is necessary to specify the image source in China, but I didn't try, and errors may occur. See the following [note] stepping on the pit collection for details:
--image-repository registry.aliyuncs.com/google_containers
[note] a hole is stepped here: the field -- apiserver address = 34.80.118.209 \ cannot be specified. If this field is specified, a problem occurs: see k8s deployment cluster stepping on the pit collection.
If init fails, you need to reset it before the next execution:
# Reset kubedm before executing init every time, which is equivalent to cleaning up the failed initialization
kubeadm reset
View status:
systemctl status kubelet
success:
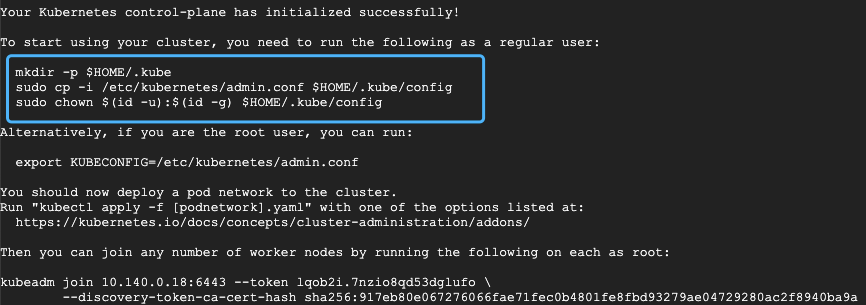
(3) Follow the prompts in the blue box above and use the kubectl tool:
mkdir -p $HOME/.kube
cp -i /etc/kubernetes/admin.conf $HOME/.kube/config
chown $(id -u):$(id -g) $HOME/.kube/config
# Check the nodes
kubectl get nodes

(4) Copy the last instruction to join the cluster and use it for the following node nodes to join the cluster:
kubeadm join 10.140.0.18:6443 --token lqob2i.7nzio8qd53dglufo \
        --discovery-token-ca-cert-hash sha256:917eb80e067276066fae71fe80b4801fe0fbd53379ae04729280ac2f8140ba9a
# The default token is valid for one day. After expiration, you need to use the following command to create a new token
kubeadm token create --print-join-command
(4) After installation, run docker images to see the existing images of the master node as follows:

[note] Finally, note the uninstallation method of k8s. It is assumed that the existing docker images after installing k8s are as follows:

kubeadm reset
# uninstall
yum erase -y kubelet kubectl kubeadm kubernetes-cni
# When deleting, note that the version number is the same as that in docker images
docker rmi -f k8s.gcr.io/kube-apiserver:v1.19.0
docker rmi -f k8s.gcr.io/kube-controller-manager:v1.19.0
docker rmi -f k8s.gcr.io/kube-scheduler:v1.19.0
docker rmi -f k8s.gcr.io/kube-proxy:v1.19.0
docker rmi -f k8s.gcr.io/pause:3.2
docker rmi -f k8s.gcr.io/etcd:3.4.9-1
docker rmi -f k8s.gcr.io/coredns:1.7.0
3. Add node nodes to the cluster
(1) In all node nodes, execute the following command to join the cluster:
kubeadm join 10.140.0.18:6443 --token lqob2i.7nzio8qd53dglufo \
        --discovery-token-ca-cert-hash sha256:917eb80e067276066fae71fec0b4801fe8fbd93279ae04729280ac2f8940ba9a
Complete as follows:

(2) View in the master node:
kubectl get nodes
You can see all nodes joining the cluster. At this time, it is NotReady.

(3) Configure CNI network plug-in, as shown below:
# Install network plug-ins
kubectl apply -f https://raw.githubusercontent.com/coreos/flannel/master/Documentation/kube-flannel.yml

(4) Check the operation of pods
# Wait for a while to check the operation of the current pods
kubectl get pods -n kube-system
The display is as follows:

At this point, execute again, and the status is displayed as Ready:
kubectl get nodes

4. Use nginx to test k8s cluster
(1) Installing nginx
# Installing nginx
kubectl create deployment nginx --image=nginx
# External exposure port
kubectl expose deployment nginx --port=80 --type=NodePort
(2) View pod
# View pod
kubectl get pod,svc
The display is as follows:

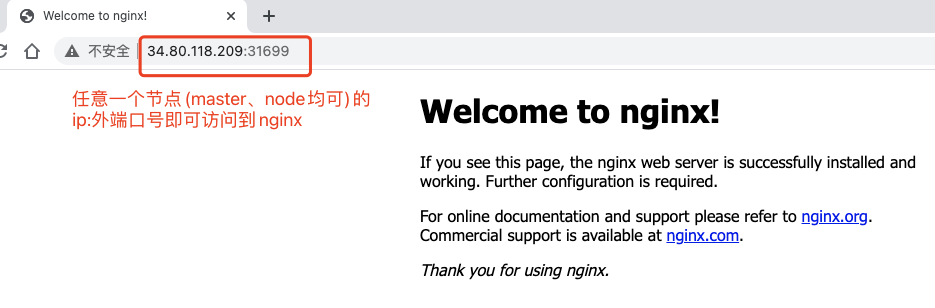
(3) At this time, nginx can be accessed through the ip + port number 31699 of any node. Successfully set up the cluster.