catalogue
1, Introduction to Volumes
The files in the container are temporarily stored on disk, which brings some problems to the special applications running in the container. First, when the container crashes, kubelet will restart the container and the files in the container will be lost because the container will be rebuilt in a clean state. Second, when multiple containers are running simultaneously in a Pod, it is often necessary to share files between these containers. Kubernetes abstracts the Volume object to solve these two problems.
The Kubernetes volume has a clear lifecycle, the same as the Pod that wraps it. Therefore, the volume has a longer lifetime than any container running in the Pod, and the data is retained when the container restarts. Of course, when a Pod no longer exists, the volume will no longer exist. Perhaps more importantly, Kubernetes can support many types of volumes, and Pod can use any number of volumes at the same time.
A volume cannot be mounted to or hard linked to other volumes. Each container in the Pod must independently specify the mount location of each volume.
2, emptyDir volume
Introduction to emptyDir
When the Pod is assigned to a node, an emptyDir volume is created first, and the volume will always exist as long as the Pod runs on the node. As its name indicates, the volume is initially empty. Although the containers in the Pod may have the same or different paths to mount the emptyDir volume, these containers can read and write the same files in the emptyDir volume. When the Pod is deleted from the node for some reason, the data in the emptyDir volume will also be permanently deleted.
Usage scenario of emptyDir:
- Cache space, such as disk based merge sort.
- Checkpoints are provided for long-time computing tasks, so that tasks can easily recover from the pre crash state.
- When the Web server container service data, save the file obtained by the content manager container.
By default, the emptyDir volume is stored on the media used to support the node; Depending on your environment, this media can be disk or SSD or networked storage. However, you can put emptyDir Set the media field to "Memory" to tell Kubernetes to install tmpfs (Memory based file system) for you. Although tmpfs is very fast, it should be noted that it is different from disk. tmpfs will be cleared when the node restarts, and all files you write are accounted for the Memory consumption of the capacity, which is constrained by the capacity Memory limit.
emptyDir example
kubectl get pod
kubectl delete pod mypod
kubectl delete deployments.apps  my-nginx
Delete unused pod


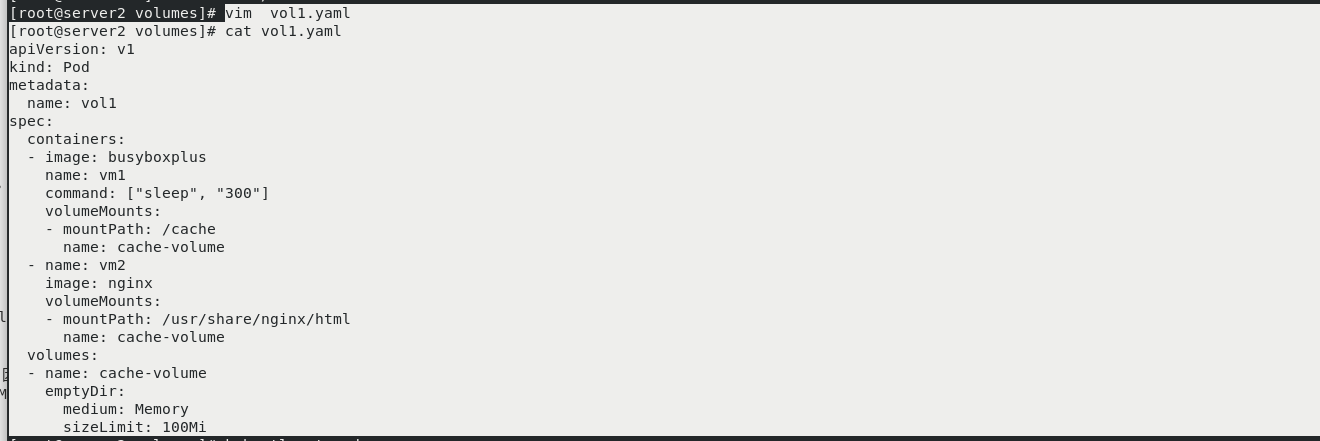
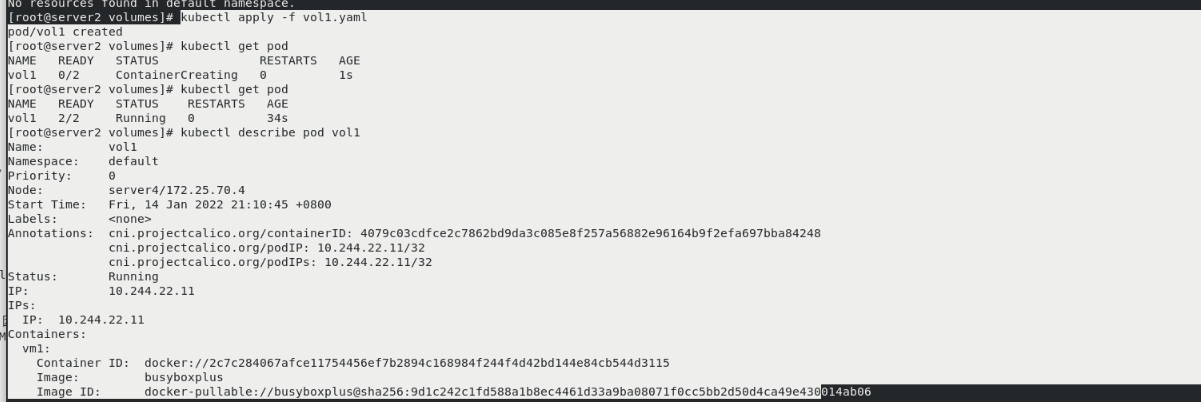
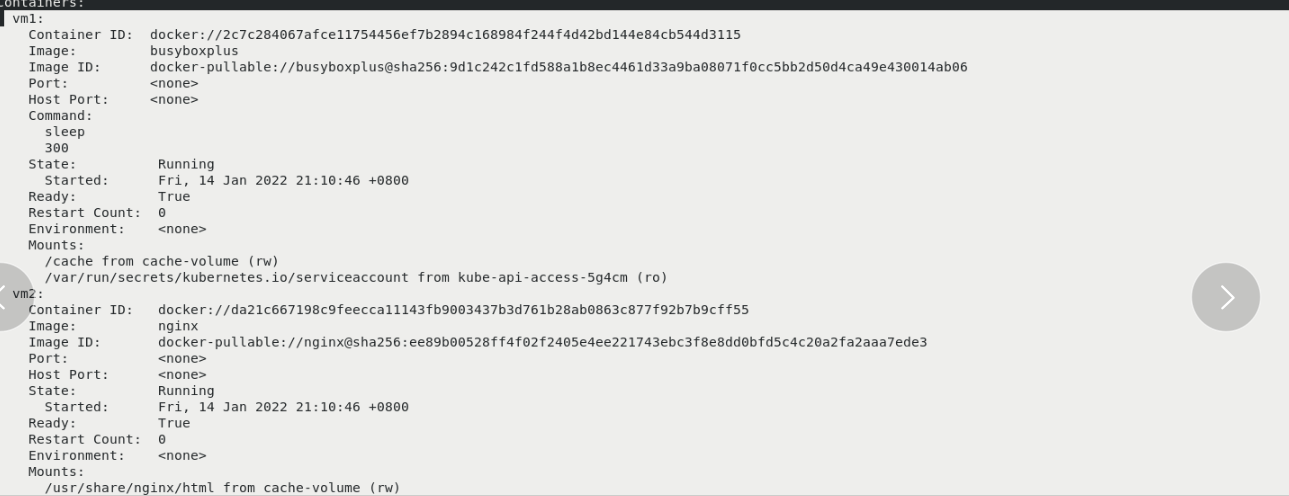
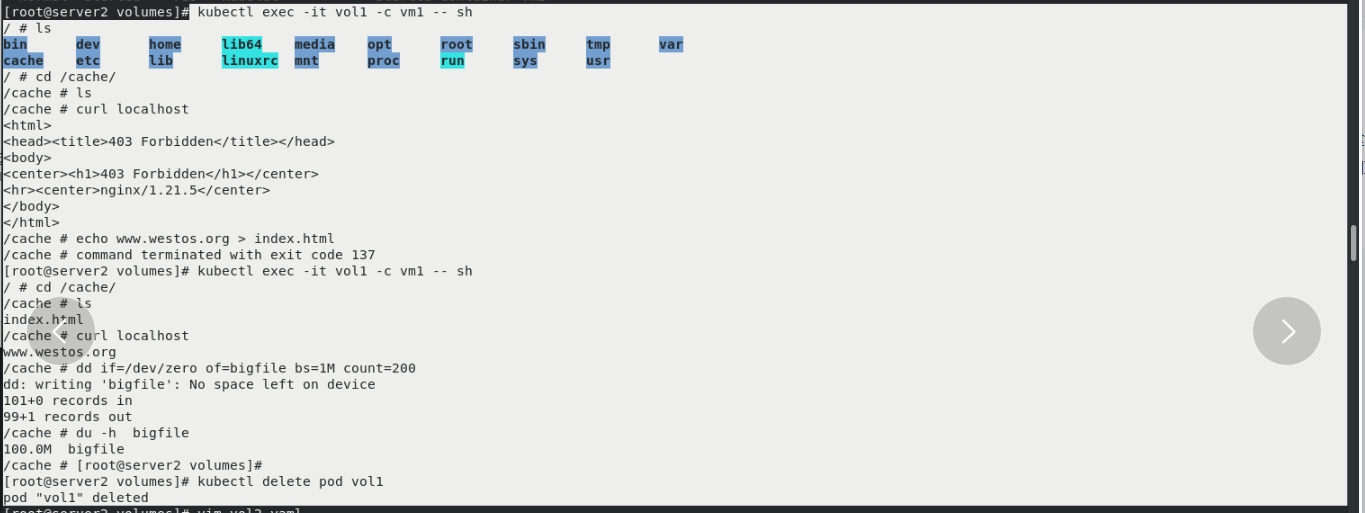
vim  vol1.yaml
kubectl apply -f vol1.yaml
kubectl get pod

kubectl describe pod vol1
You can see two containers inside, vm1 and vm2,The mounted paths are different, but the back-end mounted volumes are the same

kubectl exec -it vol1 -c vm1 -- sh
--/ # ls
--/ # cd /cache/
--/cache # ls

--/cache # curl localhost
 same pod The network stack is shared between content containers

--/cache # echo www.westos.org > index.html
--/cache # ls

--/cache # curl localhost
 You can access the page just now, which means that another container has read this page because it is shared

--/cache # dd if=/dev/zero of=bigfile bs=1M count=200

--/cache # du -h  bigfile
The default is 100 megabytes, so the prompt has no space

kubectl delete pod vol1
3, hostPath volume
The hostPath volume can mount files or directories on the file system of the host node into your Pod. Although this is not what most pods need, it provides a powerful escape Pod for some applications.
Some uses of hostPath are:
- Run a container that needs to access the internal mechanism of the Docker engine and mount the / var/lib/docker path.
- Mount / sys as hostPath when you run the coadvisor in the container.
- Allow Pod to specify whether a given hostPath should exist before running Pod, whether it should be created, and how it should exist.
In addition to the required path attribute, the user can optionally specify the type for the hostPath volume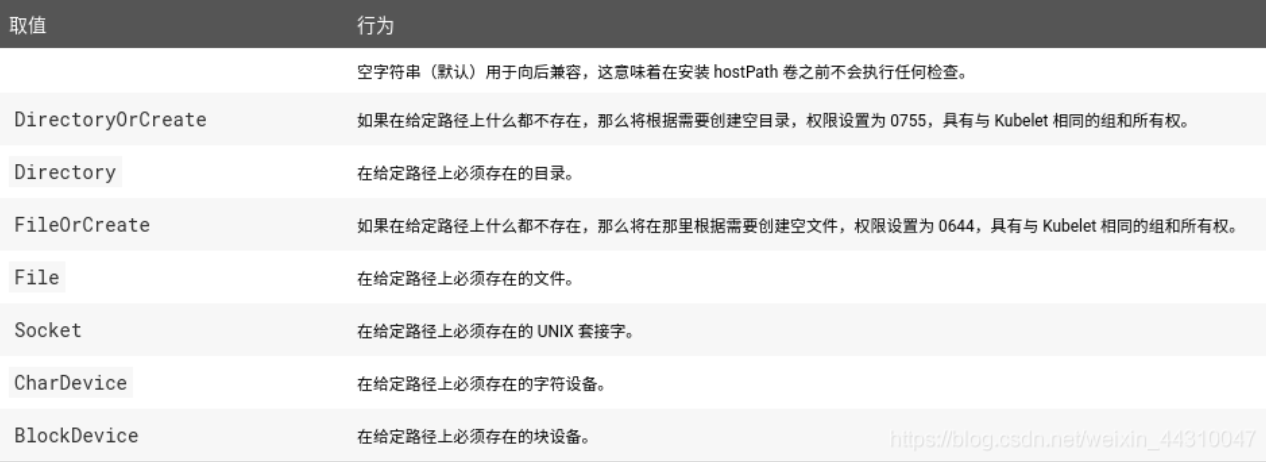
Be careful when using this type of volume because:
- Multiple pods with the same configuration (for example, created from a podTemplate) will behave differently on different nodes due to different files on the nodes.
- When Kubernetes adds resource aware scheduling according to the plan, such scheduling mechanism will not consider the resources used by hostPath.
- Files or directories created on the underlying host can only be written by root. You need to root in the privilege container
- Run the process as, or modify the file permissions on the host so that you can write to the hostPath volume.
hostPath example
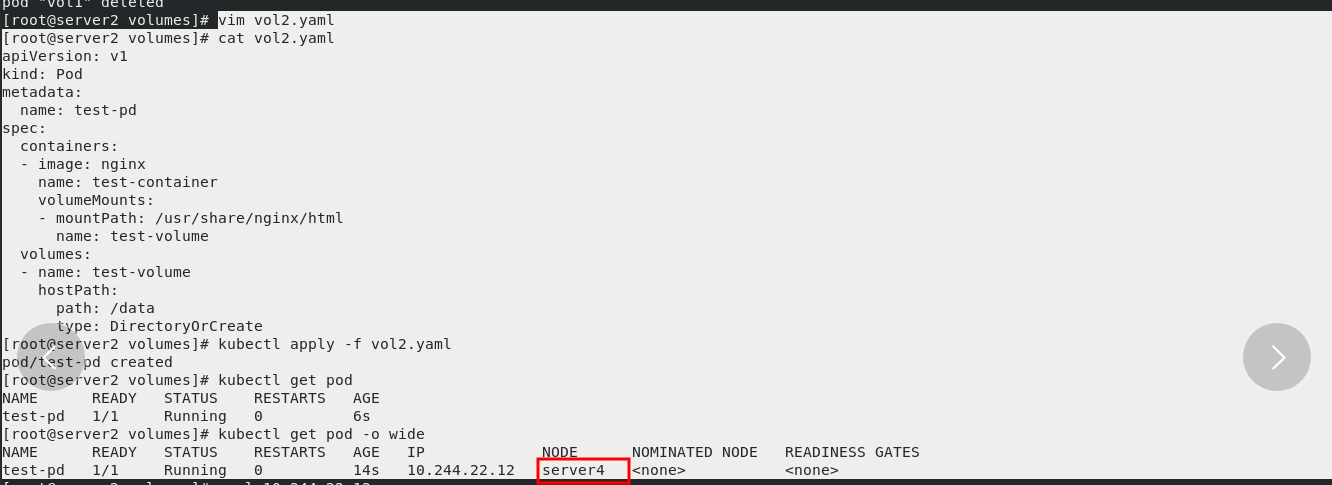
vim vol2.yaml
kubectl apply -f vol2.yaml
kubectl get pod
kubectl get pod -o wide
View assigned to server4 node
server4:
cd /data/
#server4 creates its own / data directory
echo server4 > index.html

server2:
curl 10.244.22.12
 The interview was just in server4 Newly created page on

kubectl delete -f vol2.yaml
vim vol2.yaml  [appoint server3 Node]
kubectl apply -f vol2.yaml
kubectl get pod -o wide
pod Scheduled to the specified node server3 upper


server3:
cd /data/
echo server3 > index.html

server2:
curl 10.244.141.206
kubectl delete -f vol2.yaml

4, NFS example
server1:
Deploy storage
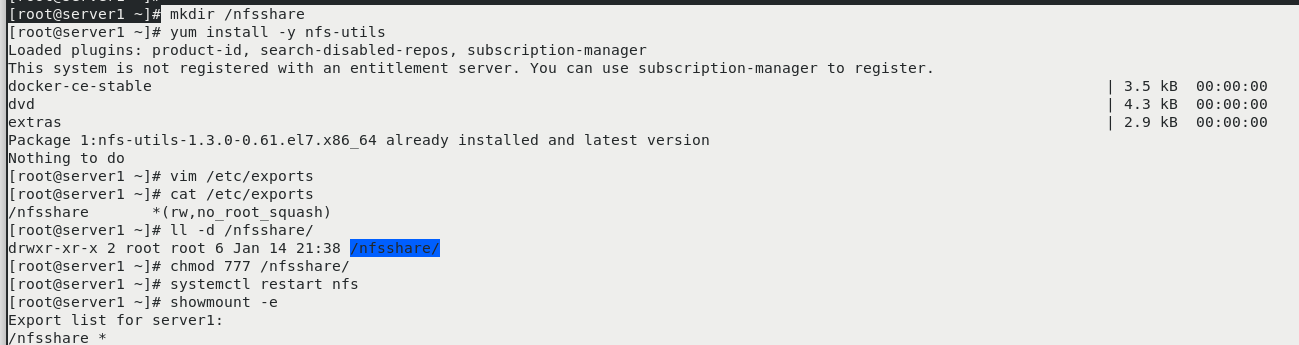
mkdir /nfsshare
yum install -y nfs-utils
vim /etc/exports
ll -d /nfsshare/
chmod 777 /nfsshare/
systemctl restart nfs
showmount -e
server2:
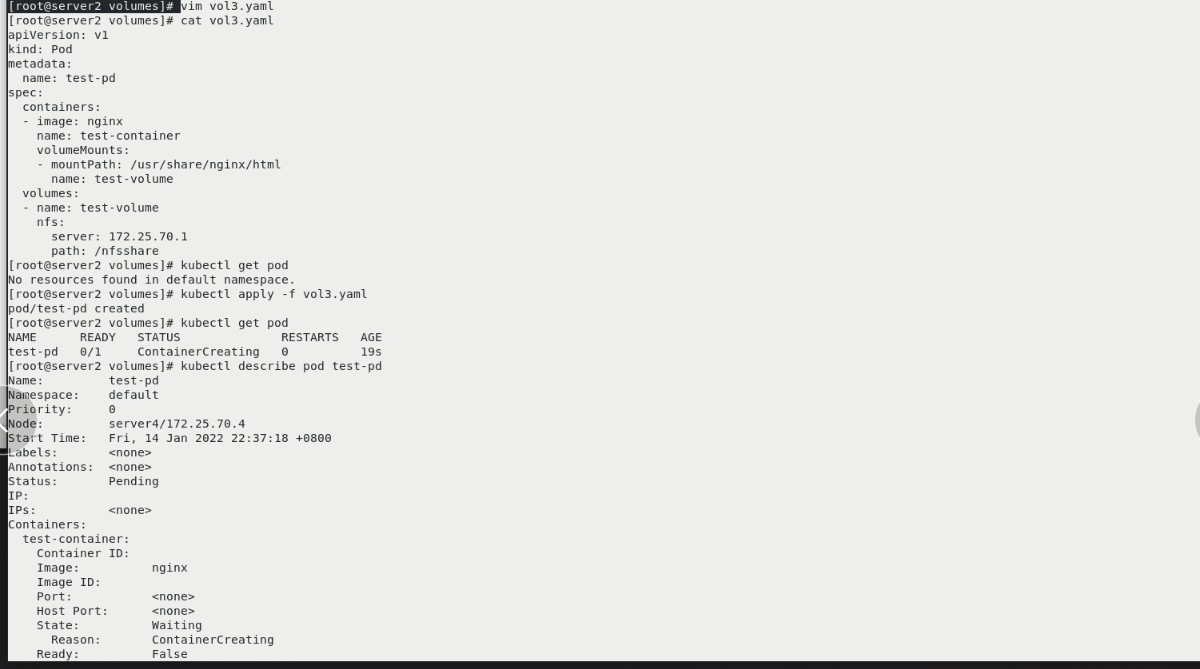
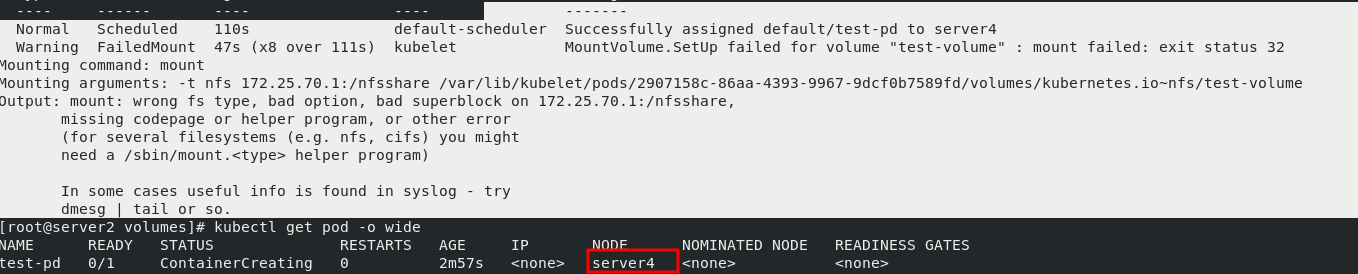
vim vol3.yaml
kubectl get pod
kubectl apply -f vol3.yaml

kubectl get pod
 The status is not ready yet

kubectl describe pod test-pd
nfs Client installation required nfs tool

kubectl get pod -o wide
View in server4 node
server3,4:
yum install -y nfs-utils


server2:
kubectl delete -f vol3.yaml
kubectl apply -f vol3.yaml
kubectl get pod
The status is ready

server1:
cd /nfsshare/
echo www.westos.org > index.html

server2
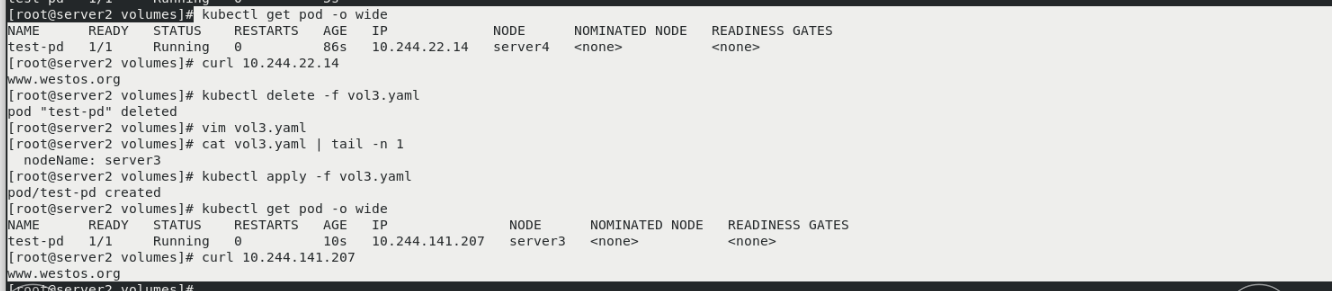
kubectl get pod -o wide

curl 10.244.22.14
 It can be accessed, no matter which node it is scheduled to, and it is suspended nfs storage

kubectl delete -f vol3.yaml
vim vol3.yaml [Let schedule to server3 [top]
kubectl apply -f vol3.yaml

kubectl get pod -o wide
You can see in server3 upper

curl 10.244.141.207
 Follow server4 Same as the page accessed on
 V. persistent volume
Persistent volume (PV) is a part of the network storage provided by the administrator in the cluster. Like the nodes in the cluster, PV is also a resource in the cluster. Like volume, it is a volume plug-in, but its life cycle is independent of the Pod using it. PV is an API object that captures the implementation details of NFS, ISCSI, or other cloud storage systems.
Persistent volume claim (PVC) is a storage request of users. It is similar to pod. Pod consumes Node resources, while PVC consumes PV resources. Pod can request specific resources (such as CPU and memory). PVC can request the specified size and access mode (which can be mapped to one read-write or multiple read-only).
There are two ways PV is provided: static and dynamic.
- Static PV: the Cluster Administrator creates multiple PVS, which carry the details of real storage, which is available to cluster users. They exist in the Kubernetes API and can be used for storage.
- Dynamic PV: when the static PV created by the administrator does not match the user's PVC, the cluster may try to supply volume specifically to the PVC. This provisioning is based on StorageClass.
The binding of PVC and PV is a one-to-one mapping. If no matching PV is found, the PVC will be unbound and unbound indefinitely
 use: Pod use PVC Like using volume Same. Cluster check PVC,Find bound PV,And map PV to Pod. Support multiple access modules for
 Formal PV,You can specify the mode you want to use. Once the user has a PVC,also PVC Is bound, so as long as the user needs it, PV Always
 Belongs to this user. User scheduling Pod,Through in Pod of volume Block contains PVC To visit PV.

Release: when the user uses PV After that, they can pass API To delete PVC Object. When PVC After being deleted, the corresponding PV Is considered to have
 Yes“ released"Yes, but you can't give another one yet PVC use. previous PVC The of still exists in the PV In, it must be disposed of according to the policy.

Recycling: PV The recycling strategy tells the cluster in PV How should the cluster handle this after it is released PV. Currently, PV Can be Retained(Reserved)
Recycled(Reuse) or Deleted(Delete). Reservations allow resources to be declared again manually. For those that support deletion PV Volume, delete operation
 Make a meeting from Kubernetes Remove from PV Object and corresponding external storage (such as AWS EBS,GCE PD,Azure Disk,perhaps Cinder
volume). Dynamically provisioned volumes are always deleted.
Static PV
server1:
rm -f index.html
mkdir pv1
mkdir pv2
mkdir pv3

server2:
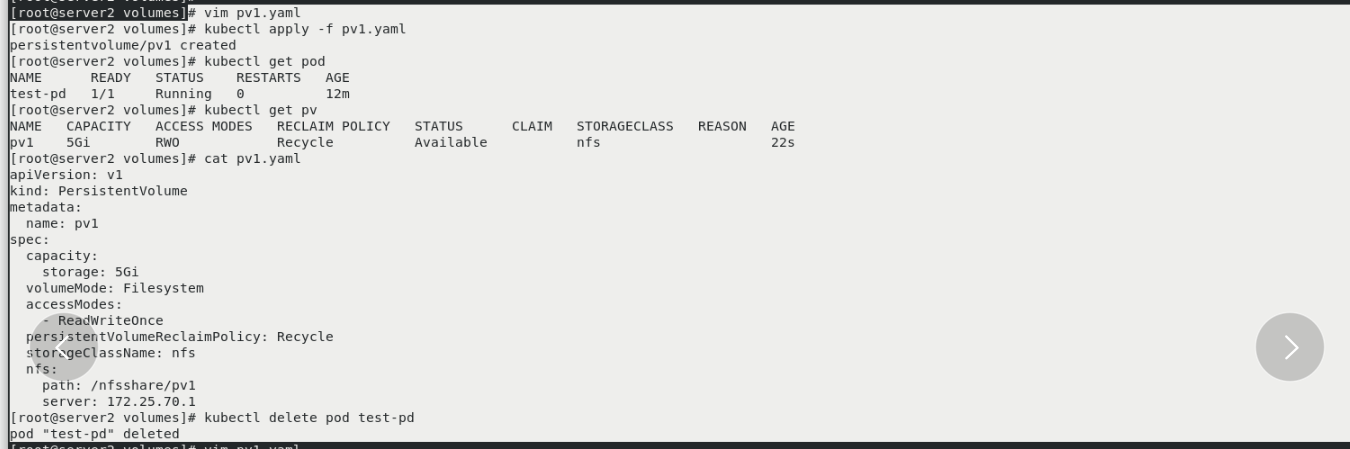
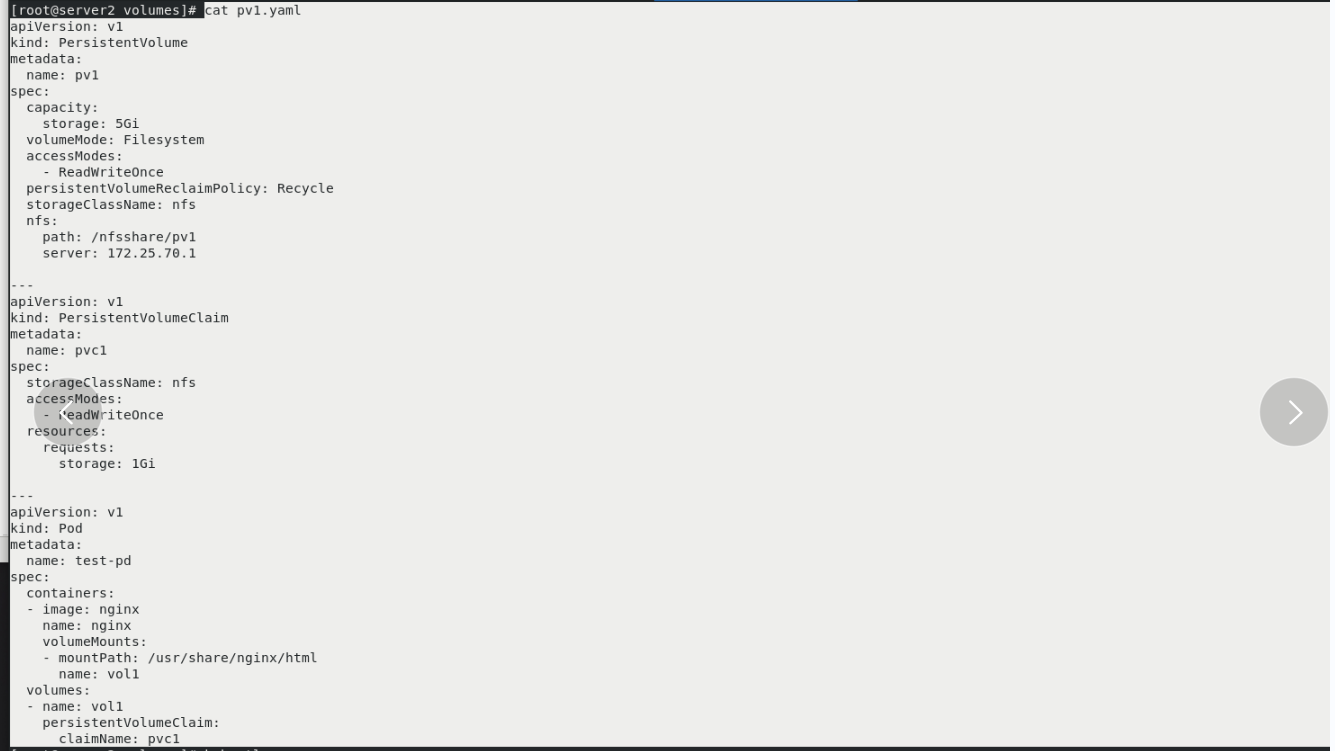
vim pv1.yaml
kubectl apply -f pv1.yaml
kubectl get pod
kubectl get pv
kubectl delete pod test-pd
Create pvc
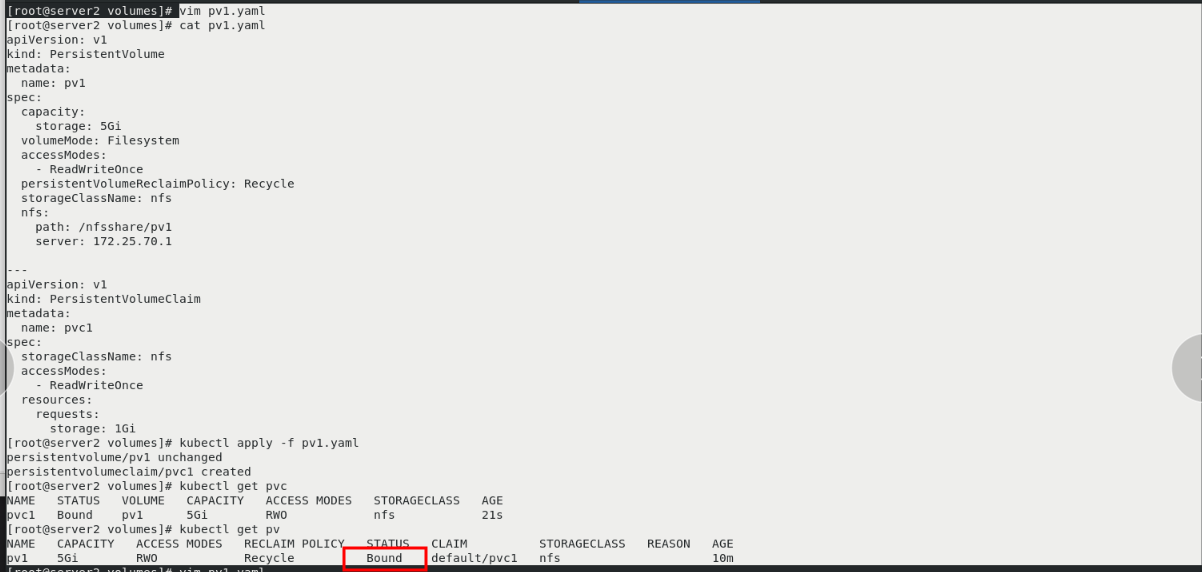
vim pv1.yaml
kubectl apply -f pv1.yaml
kubectl get pvc
kubectl get pv
 see pv The status of is bound,Already and pvc Bound
Pod mount PV:
vim pv1.yaml
kubectl apply -f pv1.yaml
kubectl get pod

server1:
cd pv1
echo pv1 > index.html

server2
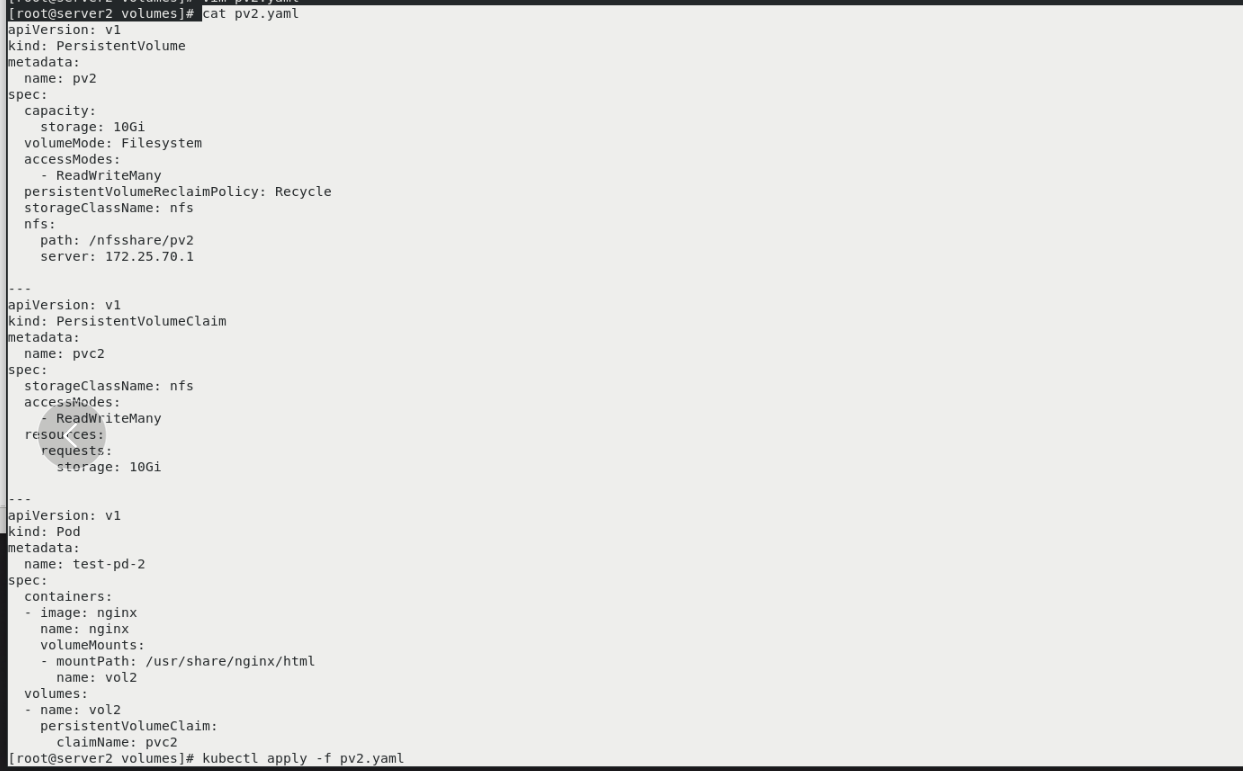
kubectl get pod -o wide
curl 10.244.22.15
cp pv1.yaml pv2.yaml
vim pv2.yaml
kubectl apply -f pv2.yaml


server1:
cd ..
cd pv2/
echo pv2 > index.html

server2
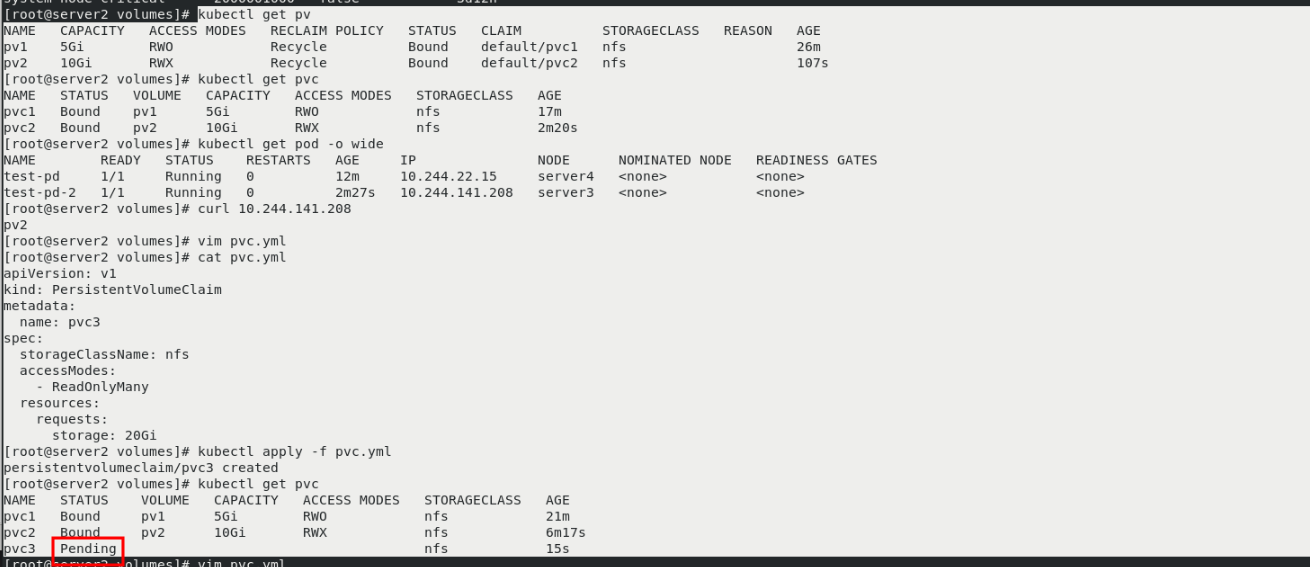
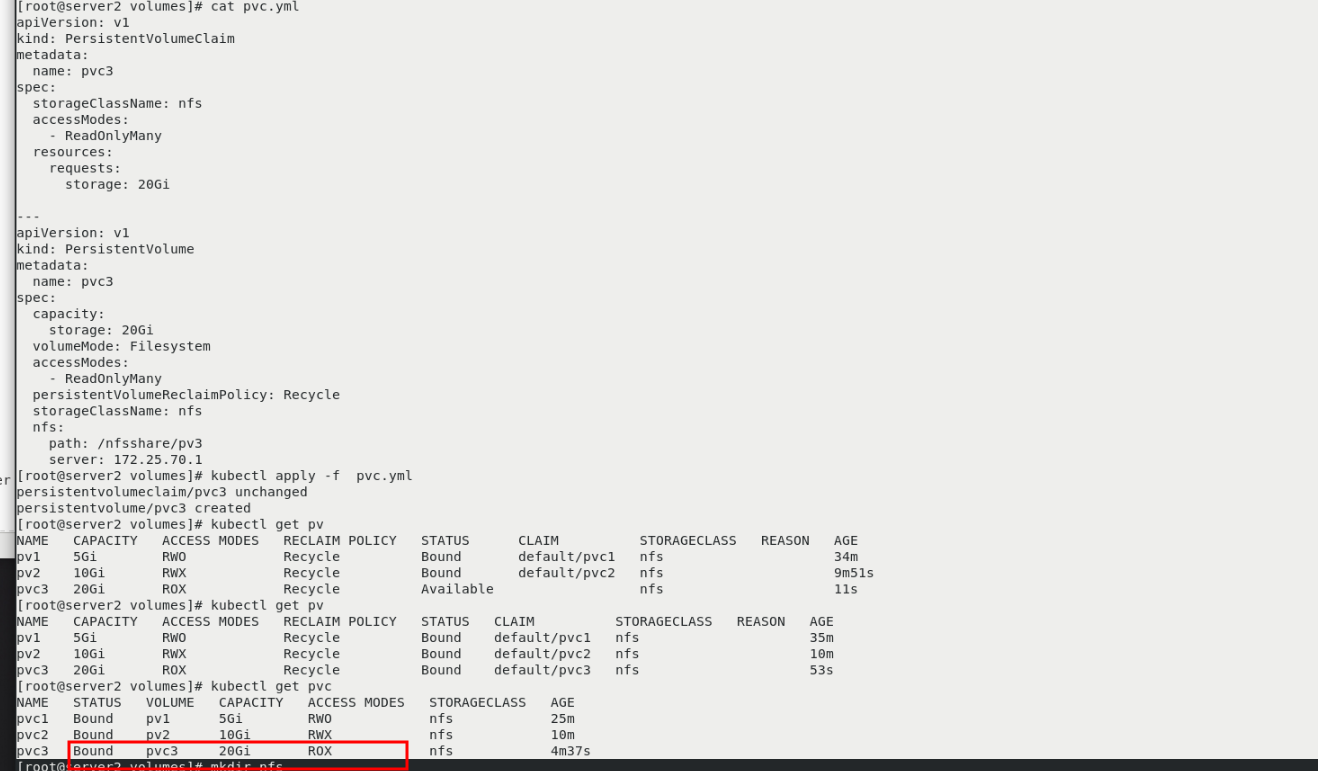
kubectl get pv
 You can see two pv

kubectl get pvc
kubectl get pod -o wide
curl 10.244.141.208
vim pvc.yml
kubectl apply -f pvc.yml

kubectl get pvc
 Can see pvc3 Unbound pv

vim pvc.yml
kubectl apply -f  pvc.yml
kubectl get pv
 You can see that a pv3(Multipoint (read only) and pvc3 Bound
NFS dynamic allocation PV
mkdir nfs
cd nfs/
kubectl get pod
cd ..
ls
kubectl delete -f pv1.yaml
kubectl delete -f pv2.yaml
kubectl delete -f pvc.yml
Delete redundant resources
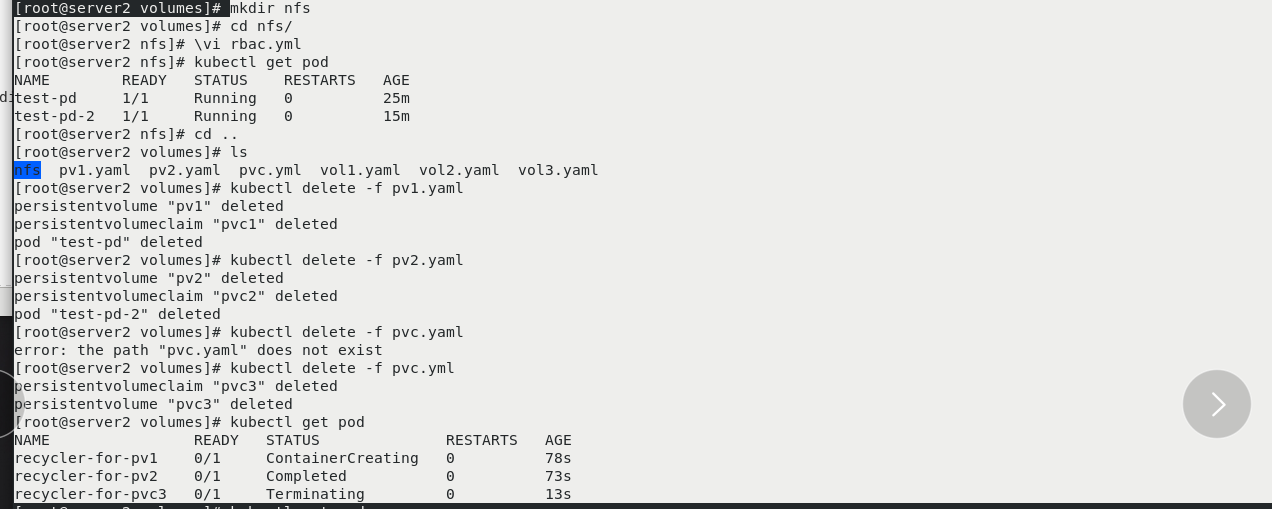
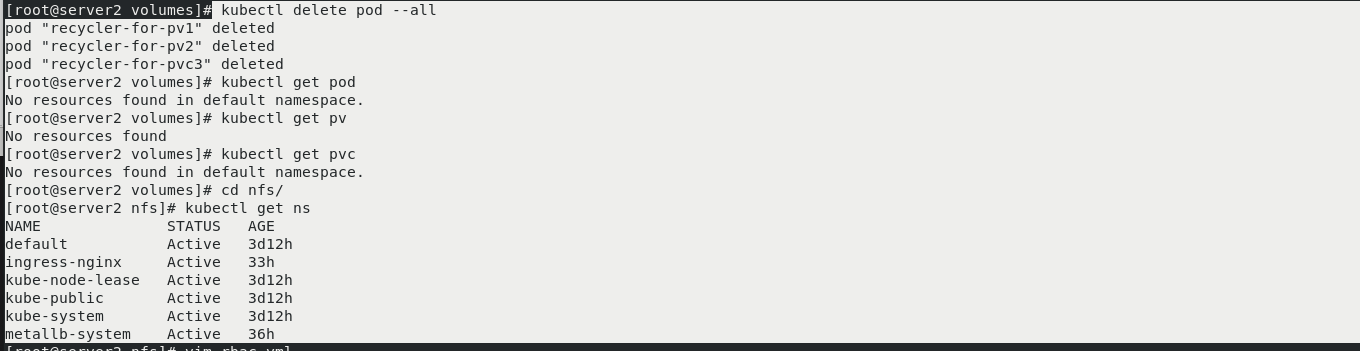
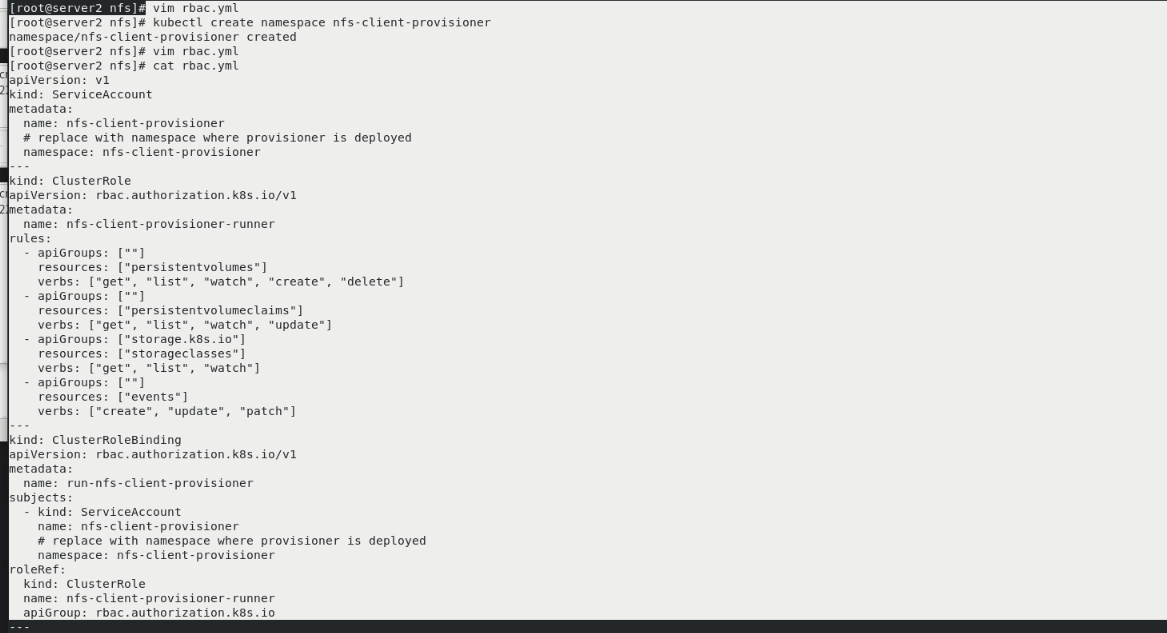
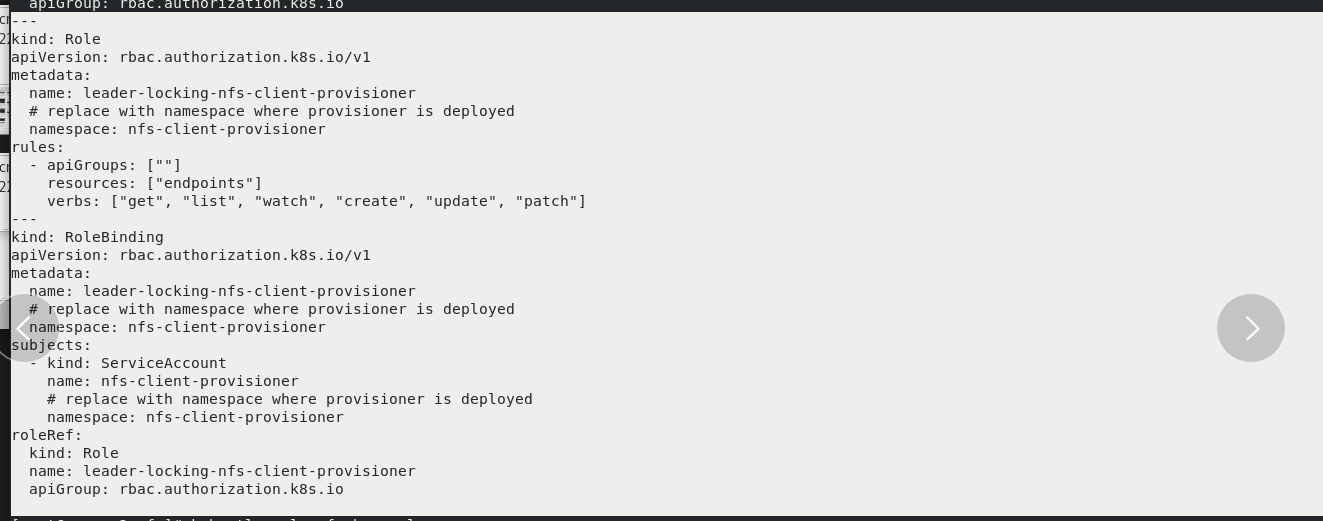
kubectl delete pod --all
kubectl get pod
kubectl get pv
kubectl get pvc
cd nfs/
kubectl create namespace nfs-client-provisioner
vim rbac.yml
kubectl apply -f rbac.yml
kubectl -n nfs-client-provisioner get sa

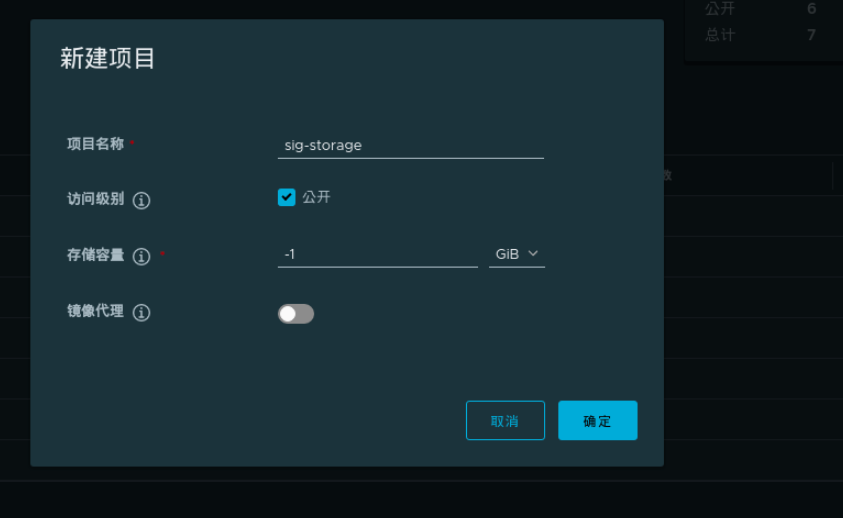
Create a new sig storage project on the web page
server1:
docker load -i nfs-provisioner-v4.0.2.tar
docker push reg.westos.org/sig-storage/nfs-subdir-external-provisioner:v4.0.2

server2
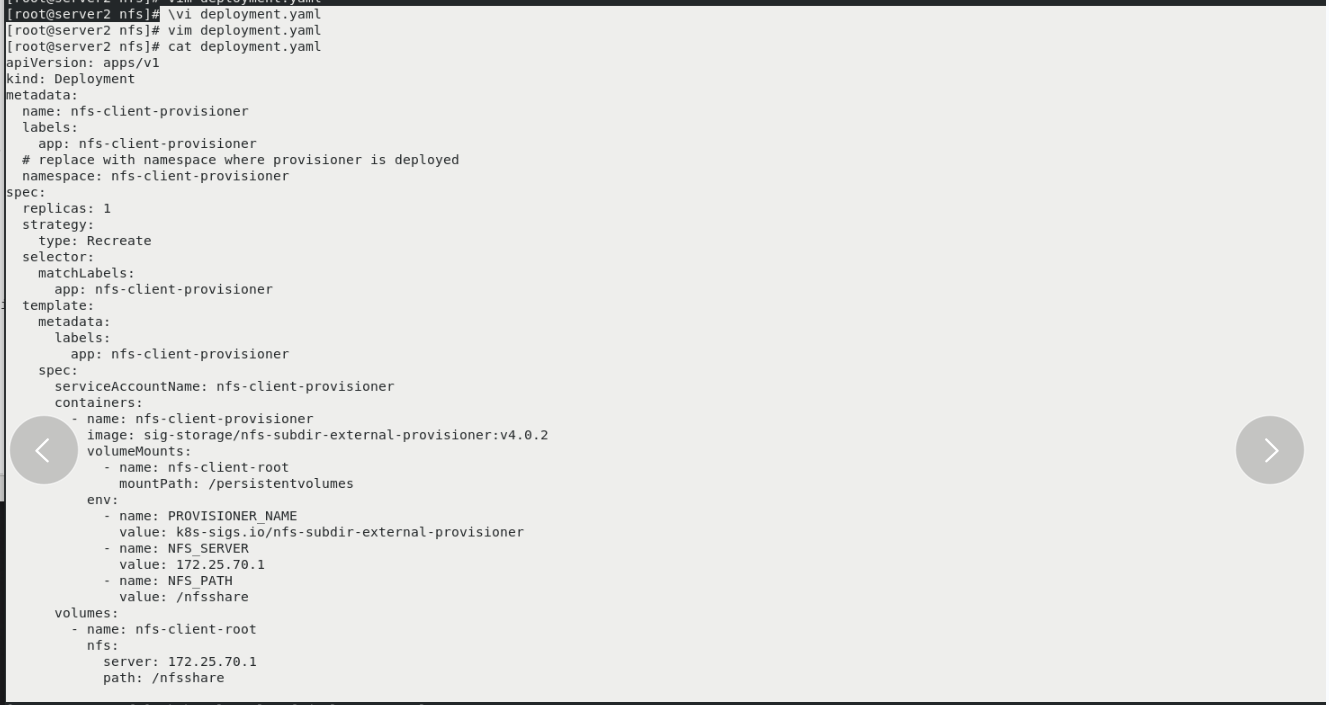
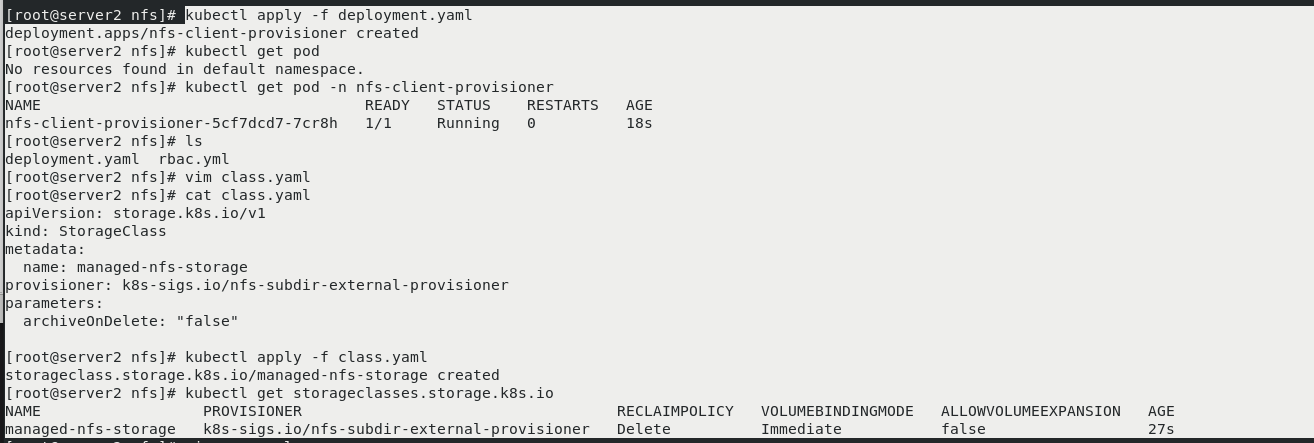
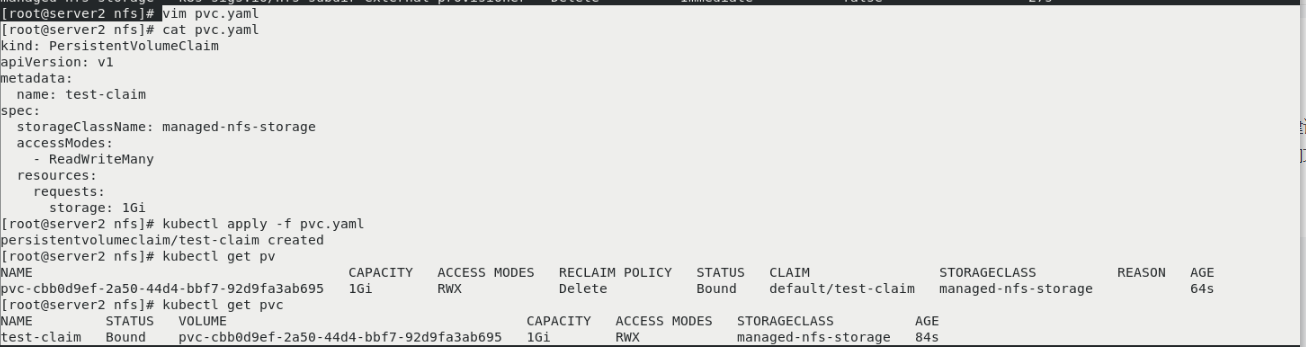
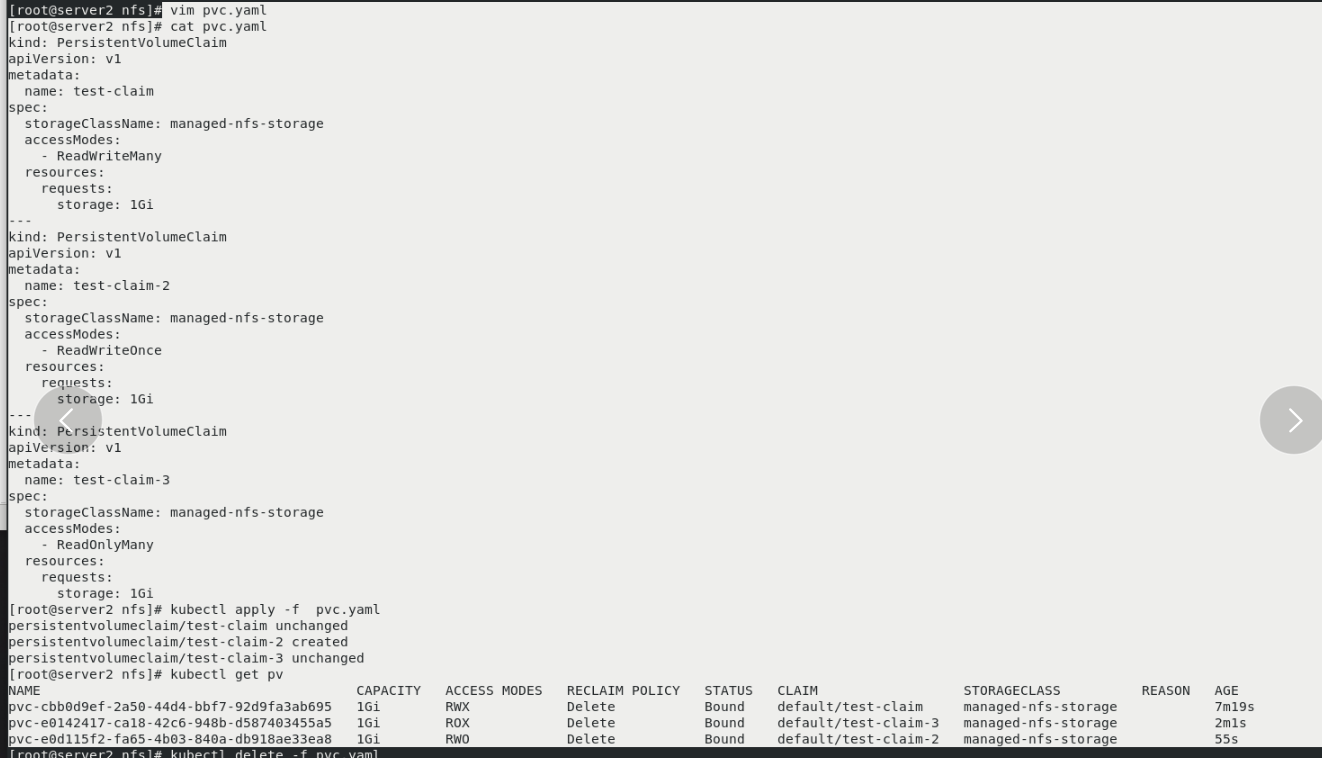
\vi deployment.yaml
vim deployment.yaml
kubectl apply -f deployment.yaml
kubectl get pod -n nfs-client-provisioner
vim class.yaml [No packaging, no backup]
kubectl apply -f class.yaml
kubectl get storageclasses.storage.k8s.io
vim pvc.yaml
kubectl apply -f pvc.yaml
kubectl get pv
kubectl get pvc
server1
cd /nfsshare/
ls
 You can see the automatically created directory

server2
vim pvc.yaml
kubectl apply -f pvc.yaml
kubectl get pv
server1:
ls
 You can see the dynamically created directory

server2
kubectl delete -f pvc.yaml
kubectl get pvc
kubectl get pv
 In delete pvc You'll be connected when you're ready pv Delete together

server1:
ls
 The directory has also been deleted
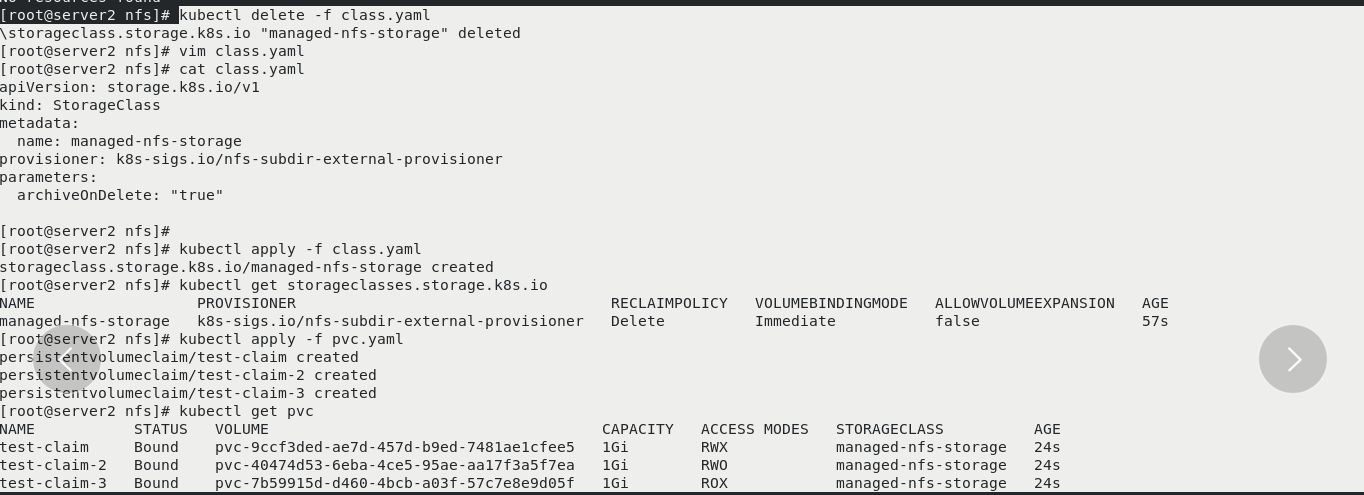
Backup storage after deletion:
kubectl delete -f class.yaml
vim class.yaml [archiveOnDelete: "true"]
kubectl apply -f class.yaml
kubectl get storageclasses.storage.k8s.io
kubectl apply -f pvc.yaml
take effect pvc
kubectl get pvc
server1:
ls
 You can see the dynamically created directory

server2:
kubectl delete -f pvc.yaml
recovery

server1:
ls
 The directory is still there. It's backed up
rm -rf *
[Do not want to delete manually]
