Note: the content of this study note is from the dark horse k8s video,
The video link is as follows:
The purpose of recording is to apply relevant knowledge in work and retrieve it quickly
Chapter 1 Introduction to Kubernetes
1.1 evolution of deployment mode
Physical machine deployment
Virtual machine deployment (each virtual machine has a separate operating system, wasting system resources)
Container deployment (shared operating system)
advantage:Each container has its own file system,cpu,Memory,Process space, etc

The resources needed to run the application are wrapped in containers,And decouple from the underlying infrastructure

Containerized applications can cross cloud services,Span linux Operating system deployment
Container scheduling problem:
- Vessel failure shutdown
- Concurrent access increases and containers expand horizontally Volume reduction
Container choreography tools: Swarm(Docker's own container choreography tool), Mesos(Apache),Kubernetes(Google open source)
1.2 introduction to kubernetes
kubernetes is a new distributed architecture scheme based on container technology
kubernetes is essentially a group of service clusters Each node in the cluster runs a specific container to manage the containers in the node The functions are as follows:
- Self repair
- Elastic expansion
- Load balancing: the service starts multiple containers, which can automatically realize the load balancing of requests
- Service discovery: a service can find its dependent services in the form of automatic discovery
- Version fallback: if there is a problem with the new version, you can fallback to the original version
- Storage Orchestration: storage volumes can be automatically created according to the needs of the container itself
1.3 Kubernetes components
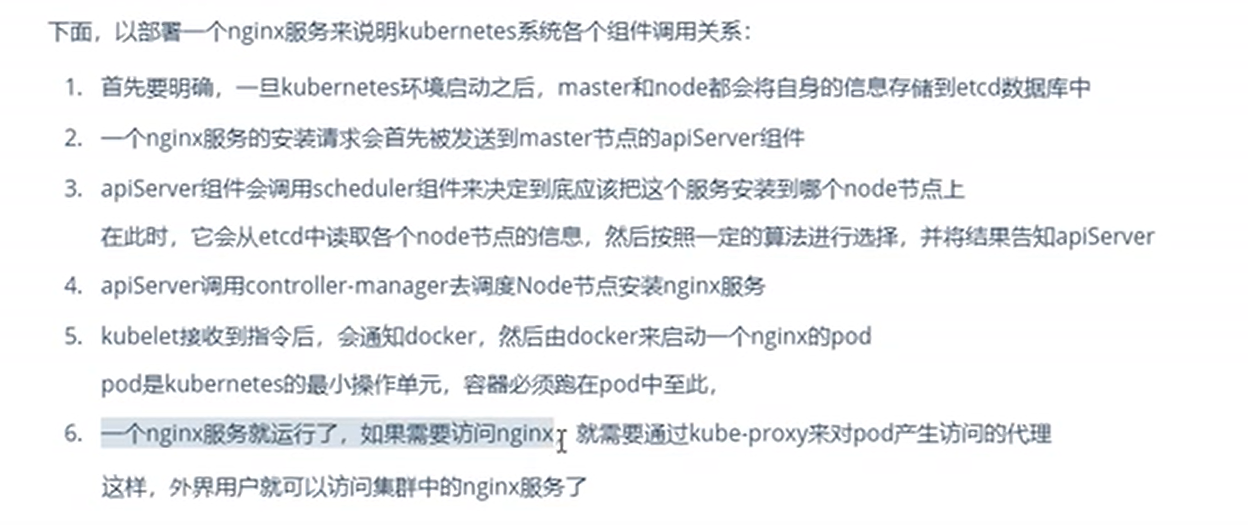
Kubernetes consists of a master node and a node node. Each node installs different components
master: the control plane of the cluster, which is responsible for the decision-making (Management) of the cluster
- ApiServer: the only entry for resource operation. It accepts commands entered by users and controls docker to create update destruction containers
- Scheduler: it is responsible for the cluster resource scheduling and scheduling the pod to the node node according to the scheduling policy
- ControllerManager: responsible for maintaining cluster status, program deployment arrangement, fault detection, automatic expansion and rolling update
- Etcd: responsible for storing the information of various resource objects in the cluster
node: the data plane of the cluster, which is responsible for providing the running environment for the cluster
- Kubelet: responsible for maintaining the life cycle of containers, creating, updating and destroying containers by controlling docker s
- KubeProxy: responsible for providing service discovery and load balancing within the cluster
- Docker: responsible for various operations of containers on nodes

1.4 Kubernetes concept
- Master: cluster control node. At least one master node is required to control the cluster
- Node: workload node
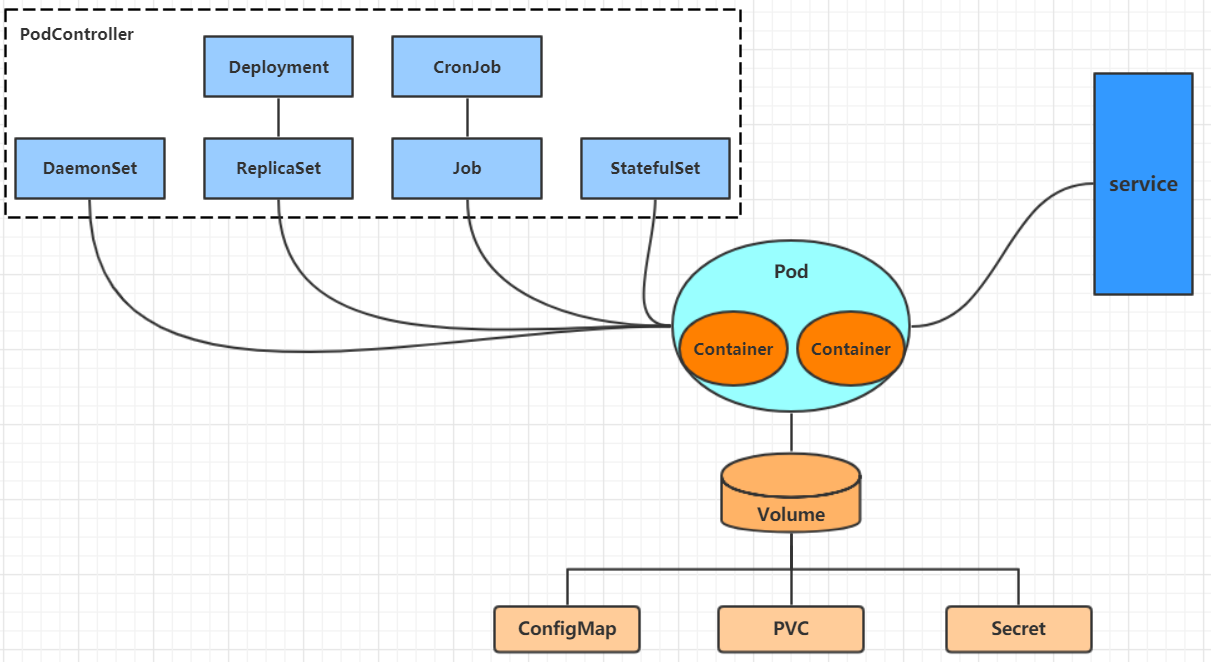
- Pod: the smallest control unit of kubernetes Containers run in a pod. A pod can have one or more containers
- Controller: controller, which is used to manage the pod, start the pod, stop the pod, scale the number of pods, etc. (more than one controller)
- Service: the unified entrance of pod external service
- Label: label, used to classify pods (narrow sense). The same kind of pods have the same label
- NameSpace: NameSpace, used to isolate the running environment of pod
Chapter II cluster environment construction
2.1 environmental planning
2.1.1 cluster type
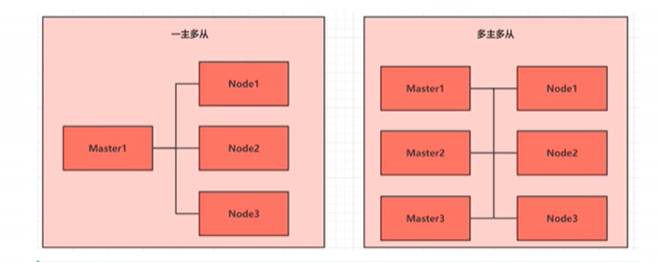
kubernetes: one master multi-slave and multi master multi-slave
- One master and many slaves:
- Multi master and multi slave: multi master and multi node, responsible for construction and high security

Installation method:
- Minicube: quick build single node kubernetes tool
- Kubedm: a tool for quickly building kubernetes clusters
- Binary package: download the binary package of components and install them in sequence (learn and recommend this scheme)
- One command to install the high availability k8s cluster offline https://github.com/fanux/sealos
2.2 environment construction
2.2.1 host installation (omitted)
Installing and configuring virtual machines (installing k8s clusters using kubedm requires CentOS version 7.5 or above)
2.2.2 environment initialization
2.2.2.1 host name resolution
/etc/hosts file
DNS resolution (recommended)
2.2.2.2 time synchronization
kubernetes requires that the time of nodes in the cluster be accurate and consistent. You can use chronyd service to synchronize the time from the network
systemctl start chronyd
systemctl enable chronyd
Recommendation: configure time synchronization server
2.2.2.3 disable selinux
/etc/selinux/config
SELINUX=disabled
2.2.2.4 disable swap partition
2.2.2.5 modify Linux kernel parameters
2.2.2.6 configure ipvs function
kubernetes service has two agent models, one based on iptables and the other based on ipvs
# Install ipset and ipvsadmin
yum install -y ipset ipvsadm
# Write the module to be added to the script file
2.2.2.7 configure system time zone
# Set the system time zone to China / Shanghai
timedatectl set-timezone Asia/Shanghai
# Writes the current UTC time to the hardware clock
timedatectl set-local-rtc 0
# Restart services that depend on system time
systemctl restart rsyslog
systemctl restart crond
2.3 installing docker
yum install -y yum-utils device-mapper-persistent-data lvm2

yum-config-manager --add-repo http://mirrors.aliyun.com/docker-ce/linux/centos/docker-ce.repo

yum install -y docker-ce

## Create / etc/docker directory
mkdir /etc/docker

cat > /etc/docker/daemon.json <<EOF
{
"exec-opts": ["native.cgroupdriver=systemd"],
"log-driver": "json-file",
"log-opts": {
"max-size": "100m"
}
}
EOF
mkdir -p /etc/systemd/system/docker.service.d
# Restart docker service
systemctl daemon-reload && systemctl restart docker && systemctl enable docker
2.4 installing kubedm
cat <<EOF > /etc/yum.repos.d/kubernetes.repo
[kubernetes]
name=Kubernetes
baseurl=http://mirrors.aliyun.com/kubernetes/yum/repos/kubernetes-el7-x86_64
enabled=1
gpgcheck=0
repo_gpgcheck=0
gpgkey=http://mirrors.aliyun.com/kubernetes/yum/doc/yum-key.gpg
http://mirrors.aliyun.com/kubernetes/yum/doc/rpm-package-key.gpg
EOF

yum install -y kubelet kubeadm kubectl && systemctl enable kubelet
Chapter III resource management
3.1 introduction to resource management
In kubernetes, all contents are abstracted as resources, and users need to manage kubernetes through resources

kubernetes Is essentially a cluster system. Users can deploy various services in the cluster. The so-called deployment service is actually in the cluster kubernetes Run containers one by one in the cluster and run the specified program in the container.
study k8s Core of,Is to learn how to Pod,Pod controller,Service,Storage and other resources
3.2 yaml grammar learning
YAML is a markup language similar to XML and JSON. It emphasizes data centric rather than focusing on identification language. Therefore, the definition of YAML itself is relatively simple, known as "a humanized data format language".
YAML syntax:
- Case sensitive
- Use indents to indicate hierarchical relationships
- tab is not allowed for indentation, only spaces can be used (lower version limit)
- The number of indented spaces is not important, the same level of alignment
- #Indicates a comment
- You need to add a space after the colon
- Multi segment configuration is placed in the same yaml file. You need to add -
YAML supports data types:
- Scalar: single, non separable value (string, Boolean, integer, floating point, Null, time, date)
- Objects: collections of key value pairs
# Form I (recommended):
heima:
  age: 15
  address: Beijing
# Form 2 (understanding):
heima: {age: 15,address: Beijing}
- Array: a set of values arranged in order, also known as a sequence
# array
# Form I (recommended):
address:
  - Shunyi
  - Changping
# Form 2 (understanding):
address: [Shunyi,Changping]
Json and yaml file comparison conversion website
3.3 resource management mode
- Imperative object management
Use commands directly to manipulate kubernetes resources
kubectl run nginx-pod --image=nginx:1.17.1 --port=80
- Imperative object configuration
Operate kubernetes resources through command configuration and configuration files
kubectl create/patch -f nginx-pod.yaml
- Declarative object configuration
Operate kubernetes resources through the apply command and configuration file
kubectl apply -f nginx-pod.yaml
3.3.1 imperative object management
kubectl command
kubectl is the command line tool of kubenetes cluster. It can manage the cluster itself and install and deploy containerized applications on the cluster The syntax is as follows:
kubectl [command] [type] [name] [flags]
command: Specifies the operations to be performed on resources, such as create,get,delete
Type: Specifies the resource type, such as deployment, pod, and service
Name: Specifies the name of the resource, which is case sensitive
flags: specify additional optional parameters
# View all pods
kubectl get pod
# View a pod
kubectl get pod {pod_name}
# View a pod and display the results in yaml format
kubectl get pod {pod_name} -o yaml
# View k8s resources, information
kubectl api-resources
k8s common resources are as follows:
| Resource classification | Resource name | abbreviation |
|---|---|---|
| Cluster level resources | nodes | no |
| Namespace | namespaces | ns |
| pod resources | pods | po |
| pod resource controller | replicationcontrollers | rc |
| replicasets | rs | |
| deployments | deploy | |
| daemonsets | ds | |
| jobs | ||
| cronjobs | cj | |
| Service discovery resources | services | svc |
| ingress | ing | |
| Storage resources | volumeattachments | |
| Resource allocation | configmaps | cm |
| secrets |
operation
kubernetes allows multiple operations on resources
kubectl --help
Common operations:
| command | effect |
|---|---|
| create | establish |
| edit | edit |
| get | obtain |
| patch | to update |
| delete | delete |
| run | function |
| expose | expose |
| describe | describe |
| logs | view log |
| cp | copy |
| apply | rc |
| label | label |
| cluster-info | Cluster information |
| version | edition |
Instance: creation and deletion of a namespace/pod
# Create a namespace
kubectl create namespace dev
# Get namespace
kubectl get ns
# Create and run your pod in this namespace
kubectl run pod --image=nginx:latest -n dev
kubectl run --generator=deployment/apps.v1 is DEPRECATED and will be removed in a future version. Use kubectl run --generator=run-pod/v1 or kubectl create instead.
deployment.apps/pod created
# View the newly created pod
kubectl get pod -n dev
# Delete the specified pod
kubectl delete pod pod-864f9875b9-pcw7x
# Deletes the specified namespace
kubectl delete ns dev
3.3.2 command object configuration
Imperative object configuration is to use commands to operate kubernetes resources together with configuration files
- Create an nginxpod Yaml, as follows:
apiVersion: v1
kind: Namespace
metadata:
  name: dev

---

apiVersion: v1
kind: Pod
metadata:
  name: nginxpod
  namespace: dev
spec:
  containers:
  - name: nginx-containers
    image: nginx:latest
- Execute the create command to create resources:
kubectl create -f nginxpod.yaml
namespace/dev created
pod/nginxpod created
- Execute the get command to view resources:
[root@master ~]#  kubectl get -f nginxpod.yaml
NAME            STATUS   AGE
namespace/dev   Active   18s

NAME            READY   STATUS    RESTARTS   AGE
pod/nginxpod    1/1     Running   0          17s
- Execute the delete command to delete resources
[root@master ~]# kubectl delete -f nginxpod.yaml
namespace "dev" deleted
pod "nginxpod" deleted
3.3.3 declarative object configuration
Declarative object configuration has only one command, apply
# Execute once to create a resource, which is equivalent to kubectl create
kubectl apply -f nginxpod.yaml
# Execute it again. There is no change in the resource. If there is a change, the resource will be updated Equivalent to kubectl patch
 kubectl apply -f nginxpod.yaml
Extension: can kubectl run on node nodes
# kubectl needs configuration to run, and the configuration file is $home / kube
[root@beebird-kubeflow-test-30 ~]# find / -name .kube
/root/.kube
 Need to master of.kube Copy files to node On node,Can be executed
Recommended usage
Create / update resources: use declarative object configuration
kubectl apply -f ***.yaml
Deleting resources: configuring with imperative objects
kubectl delete -f ***.yaml
Querying resources: using imperative object management
kubectl get(describe) Resource name