In fluent, almost every Widget has a key. Although we rarely use this key in daily development, in fact, the existence of key is very necessary. So what exactly is key? What does it do? In which scenarios are keys necessary?
Next, let's talk about key in detail.
Trampled pit
For a List, such as bank card List, news List, etc., the UI components of individual elements in the List are generally encapsulated and reused. In this way, many widget instances of the same level will appear during circular reference. At this time, note that when the reused widget is a Stateful widget, we must specify a key to uniquely identify it, otherwise unexpected bugs will appear due to the reuse mechanism. Similarly, if another statefulwidget is used in the shared statefulwidget, the key must also be specified for the other statefulwidget during application, otherwise there will be problems in state management.
Generally speaking, the Key specified in the above scenario can use ValueKey, and the parameter can be passed to a unique id, such as id.
What is Key
In fluent, keys cannot be reused, so keys are generally used as unique identifiers. When a component is updated, its status is saved mainly by judging whether the component type or key value is consistent. Therefore, when the types of components are different, the types are enough to distinguish different components. At this time, we don't need to use keys. However, if there are multiple controls of the same type at the same time, the type can no longer be used as a condition to distinguish, we need to use the key.
For a simple example, if you randomly disrupt two table tennis balls a and B and pick one of them, do you know whether you get an a or B? However, if the letters A and B are marked on the two table tennis balls, it will be clear at a glance. This is the meaning of Key's existence. At this time, you may ask, if you don't use the Key as the unique identification, you will get it wrong if you get it wrong. What are the consequences?
What happens without a Key
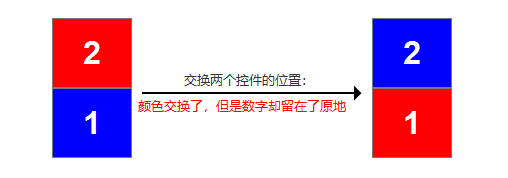
Let's take a look at an example: two stateful components of the same type are placed vertically in a Column layout, where color is directly used as the property of statefulwedge, and count exists in state. When exchanging the positions of two controls, the situation is shown in the following figure:
The corresponding code of the control is as follows:
class CustomButton extends StatefulWidget {
  final Color color;
  CustomButton(this.color);

  @override
  _CustomButtonState createState() => _CustomButtonState();
}

class _CustomButtonState extends State<StatefulContainer> {
  int count = 0;

  @override
  Widget build(BuildContext context) {
    return InkWell(
      onTap: () {
        setState(() {
          count++;
        });
      },
      child: Container(
        width: 100,
        height: 100,
        color: widget.color,
        child: Text("$count", style: TextStyle(fontSize: 20, color: Colors.white)),
      ),
    );
  }
}
I was in Widget, the cornerstone of building the fluent interface As described in, the interface rendering of FLUENT is inseparable from three trees: Widget, Element and RenderObject. When the Widget is loaded, it will not be drawn immediately, but its corresponding Element will be created first, and then the Element will generate a RenderObject at the corresponding position according to the configuration information of the Widget, so as to draw:
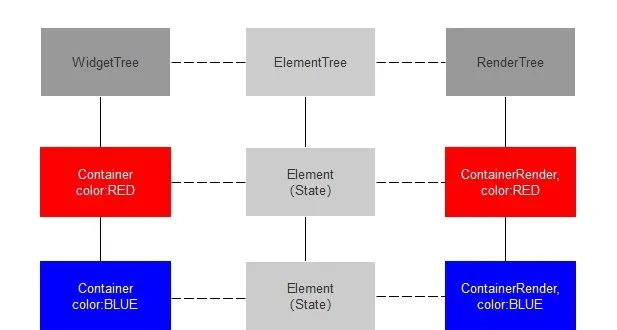
I am Widget, the cornerstone of building the fluent interface Widget, Element and RenderObject have been described in detail in. Here is a brief description:
1. Widget is mainly used to configure the immutable information of components, such as the color information in the above example. The many Widgets we write are nested with each other and will eventually be combined into a tree. The system determines what this page should look like by analyzing the structure of the current Widgets tree. The widget itself only exists as a carrier of configuration information, and the following RenderObject is really responsible for UI rendering.
2. Element. When creating a widget, an element will be created at the corresponding location (for Stateful widgets, state is stored in the element), and the element will generate an instance of renderobject at the corresponding location according to the widget configuration information. In each element, the corresponding widget and renderobject references are held, It is a bridge between the two.
3. RenderObject saves the layout related information such as the color and size of the widget for final UI rendering.
Explanation of reuse mechanism based on Element
In fluent, the Widget is immutable. It only exists as the carrier of configuration information, and any change in configuration or state will lead to the destruction and reconstruction of the Widget. Fortunately, the Widget itself is very lightweight, so the actual performance consumption is very small. On the contrary, RenderObject is different. The cost of instantiating a RenderObject is very high. Frequent instantiation and destruction of RenderObject has a great impact on performance. Therefore, in order to build a user interface with high performance, fluent uses the reuse mechanism of Element to reduce the frequent creation and destruction of RenderObject as much as possible. When the Widget is changed, the Element will judge whether the old Widget is consistent with the new Widget through the component type and the corresponding Key:
1. If the old Widget at a certain location is inconsistent with the new Widget, the Element will be re created, and the RenderObject will be reconstructed when the Element is reconstructed;
2. If the old Widget in a certain location is consistent with the new Widget, but the configuration changes. For example, the color of the component changes. At this time, the Element will be reused. You only need to modify the color setting in the RenderObject of the Element corresponding to the Widget, and there is no need to rebuild the RenderObject which consumes a lot of performance.
Let's take another look at the above example. When we exchange the positions of two components without specifying the Key, because the component type has not changed, the element with the number 2 is stored in the first position in the element tree. It is found that the new widget in the first position in the widget tree is consistent with the old widget in the RenderObject it creates (because the type is the same), Therefore, the corresponding relationship is established and the numbers in the state are reused; Similarly, the element with the number 1 stored in the second position in the element tree finds that the new widget in the second position in the widget tree is consistent with the old widget in the RenderObject he created, which establishes a corresponding relationship and reuses the numbers in the state. The final result is that although the location of the widget is exchanged, all elements are reused according to the original location; At the same time, due to the reuse of elements, when the color changes, the RenderObject will not be destroyed and rebuilt, but the color configuration will be modified and then rendered to the UI.
After adding Key
Modify the construction method of the component CustomButton in the above example:
...
CustomButton(this.color, {Key key}) : super(key: key);
...
When using:
Column(
  children: [
    CustomButton(Colors.red, key:ValueKey('A'),),
    CustomButton(Colors.blue, key:ValueKey('B'),),
  ],
);
After exchanging the positions of the two components again, we find that the color and number have changed. This is because after using the Key, the Element with the number 2 stored in the first position in the Element tree finds that the latest widget in the first position in the widget tree is inconsistent with the old widget in the RenderObject it creates (because the Key is different). At this time, the Element will not be destroyed immediately, Instead, it will continue to search one by one in the same level directory. If a new widget consistent with the old widget can be found, the Element will still be saved and reused, and the corresponding relationship between the Element and the new widget location will be re established; On the contrary, if no consistent is found, the old Element will be destroyed and recreated. Once the Element is destroyed, the saved state will be lost and the corresponding old RenderObject will be destroyed.
As described above, the element with the number 2 stored in the first position in the element tree will continue to compare the widgets in the second position in the widget tree. At this time, if it is found to be consistent (because the keys are consistent), a corresponding relationship will be established and the element will be reused; Similarly, the element with the number 1 stored in the second position in the element tree is compared. It is found that the widget in the first position in the widget tree is consistent with the old widget, and a corresponding relationship is established and the element is reused. In this way, finally, because the Key is added, the element is accurately mapped to the new widget with the Key (it can also be understood that the new widget accurately finds the element corresponding to the old widget through the Key).
It should be noted that the key used above is ValueKey. If UniqueKey is used, you will find that the corresponding number is cleared after each location exchange. This is because UniqueKey will regenerate another new value every time the page is refreshed, that is, the key changes, so the comparison between new and old widgets in each location is different, Then the Element will be destroyed and regenerated.
Next, let's look at an example of deleting a control when there is no Key:
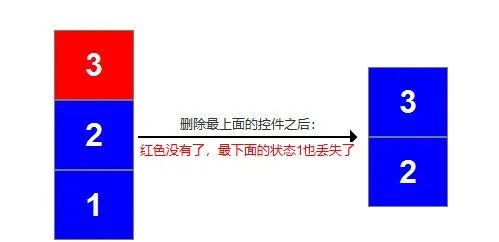
After deleting the top red component, the Element with the number 3 stored in the first position in the Element tree finds that the new widget in the first position in the widget tree is consistent with the old widget in the RenderObject he created, so a corresponding relationship is established and the number in the state is reused; Similarly, the Element with the number 2 is stored in the second position in the Element tree. It finds that the new widget in the second position in the widget tree is consistent with the old widget in the RenderObject it creates, so it also establishes a corresponding relationship and reuses the numbers in the state; If the Element with the number 1 stored in the third position in the Element tree finds that the widget in the corresponding position in the widget tree does not exist, it will be considered that the widget in the third position in the widget tree has been deleted (in fact, the first widget has been deleted, but because there is no key for unique identification, the Element can not distinguish who is who), At this time, the Element with the number 1 stored in the third position in the corresponding Element tree will be deleted.
The same is true when adding components, which will not be repeated here.
To sum up, the existence of Key is meaningful only in some specific scenarios. In most cases, we do not need to use Key. However, when we need to add, remove or reorder multiple StatefulWidget components of the same type under the same level directory, we need to use Key, otherwise unexpected problems will occur. A typical scenario is that the Item component in the ListView component is public.
So, how do we create a Key?
Type and usage of Key
Generally speaking, the key s in the fluent can be divided into the following two types:
- Local key: ValueKey, ObjectKey, UniqueKey
- GlobalKey: GlobalObjectKey
1,ValueKey
ValueKey is a Key distinguished by a specific Value, as follows:
key: ValueKey(1),
key: ValueKey("2"),
key: ValueKey(true),
key: ValueKey(0.1),
key: ValueKey(Person()), // Custom class instance
You can see that the value of ValueKey can be of any type, or even an instance of our custom class.
For example, there is a ListView list showing all student information. Each student corresponds to a single attribute, such as student ID and ID card number. Then itemWidget can be used in ValueKey. Its value is the corresponding student ID number or ID number.
When the type is a user-defined object, the basis for judging whether two keys are equal is the result of the = = operation of the two objects.
For example, the custom Student class is as follows, which contains only one name parameter:
class Student {
  final String name;
  Student(this.name);
}
Now I create two new objects with the same value assigned to the name attribute:
Student s1 = Student(name: "gpf");
Student s2 = Student(name: "gpf");
print(s1==s2);  // Returns false because the addresses of the two objects are different in memory
It can be seen that two objects with equal attribute values may still be different.
Now let's look at the following two valuekeys:
// Each time the page is refreshed, a new object will be created, so the following writing is similar to UniqueKey()
CustomButton(Colors.blue, key: ValueKey(new Student('gpf'))),
CustomButton(Colors.red, key: ValueKey(new Student('gpf'))),
For the above code writing method, when exchanging positions, the Element will judge that the keys of the new and old widget s are different (because each refresh has a new student object, and the two student objects are not equal through = =), so the Element will not be reused, so the state will be lost. In order to avoid state loss, we can put the created Student object outside and reference it in the ValueKey, so that the student object will not be re created with the page refresh, and the object will be the same before and after the refresh. At this time, the position of the exchange component will find that the state and color have been exchanged.
However, if we override the = = judgment and hashCode functions in the user-defined Student class, the judgment rules are specified as follows:
class Student {
  final String name;
  Student(this.name);

  @override
  bool operator ==(Object o) =>
      identical(this, o) ||
      o is Student && runtimeType == o.runtimeType && name == o.name;

  @override
  int get hashCode => name.hashCode;
}
At this time, if you compare two objects with the same attributes, you will find:
print(s1==s2); // It returns true. Although = = comparison returns true, the addresses of the two objects in memory are still different
Although s1 and s2 are equal at this time, the addresses of the two objects in memory are still different.
In this way, the same wording:
CustomButton(Colors.blue, key: ValueKey(new Student('gpf'))),
CustomButton(Colors.red, key: ValueKey(new Student('gpf'))),
We will find that an exception occurs because the key s of the two components are the same.
2,ObjectKey
The usage scenarios of ObjectKey are as follows:
There is a ListView list of all student information. Each student has no unique attribute (such as student ID number and ID card number). Each attribute can be duplicated with another student, and only multiple attributes can be combined to locate a student. Then, it is most appropriate to use ObjectKey at this time. itemWidget
ObjectKey determines whether two keys are the same based on whether two objects have the same memory address:
CustomButton(Colors.blue, key: ObjectKey(new Student('gpf'))),
CustomButton(Colors.red, key: ObjectKey(new Student('gpf'))),
For the above code, whether the = = operator judgment is rewritten by the custom object Student or not, it will be regarded as different keys. After the position is exchanged, refresh the page, and all numbers will be cleared.
Unless the created Student object is placed outside the build method and then referenced in the ObjectKey, the object in the same memory address is referenced before and after the page is refreshed. The Key is the same before and after the refresh. At this time, the numbers will be exchanged with the color, as follows:
Student s1 = Student(name: "gpf");
Student s2 = Student(name: "gpf");
.....
CustomButton(Colors.red, key: ObjectKey(s1)),
CustomButton(Colors.blue, key: ObjectKey(s2)),
3,UniqueKey
As the name suggests, UniqueKeyshi is a unique Key without parameters, and a new Key will be generated every time it is refreshed.
A typical usage scenario is the AnimatedSwitcher:
AnimatedSwitcher(
  duration: Duration(milliseconds: 1000),
  child: Container(
    key: UniqueKey(),
    height: 100,
    width: 100,
    color: Colors.red,
  ),
)
By default, the animation effect of the AnimatedSwitcher component will only appear when the child changes. The change here refers to the change of the type or key of the child component. For example, if you want to trigger animation after refreshing every time you modify the height of the Container component, you must ensure that the key of the child component is different before and after each refresh (because the component type has never changed). At this time, the UniqueKey is just right, otherwise there will be no animation effect.
4,GlobalKey && GlobalObjectKey
The rules for determining whether the GlobalObjectKey is equal to the above local key ObjectKey are the same, and the usage is also similar. There is no excessive explanation for GlobalObjectKey here. Let's take a look at the use of GlobalKey.
GlobalKey is a globally unique key. Generally speaking, GlobalKey has the following purposes:
Purpose 1: obtain information such as configuration, status and component position and size
class MainPage extends StatelessWidget {

  final GlobalKey<_CounterState> _globalKey = GlobalKey();

  @override
  Widget build(BuildContext context) {
    return Material(
      child: Column(
        children: [
          SizedBox(
            height: 80,
          ),
          Center(
            child: Counter(
              fontSize: 26,
              key: _globalKey,
            ),
          ),
          RaisedButton(
            child: Text("Get and update control status"),
            onPressed: () {
              final _CounterState _counterState = _globalKey.currentState;
              print("Current status: ${_counterState._count}");
              // Update component status
              _counterState.setState(() {
                _counterState._count++;
              });
            },
          ),
          RaisedButton(
            child: Text("Get control blueprint information"),
            onPressed: () {
              final Counter counterWidget = _globalKey.currentWidget;
              print("The current font size is: ${counterWidget.fontSize}");
            },
          ),
          RaisedButton(
            child: Text("Get control size and position"),
            onPressed: () {
              RenderBox renderBox = _globalKey.currentContext.findRenderObject();
              print("Width of component: ${renderBox.size.width}");
              print("Height of components: ${renderBox.size.height}");
              double dx = renderBox.localToGlobal(Offset.zero).dx;
              double dy = renderBox.localToGlobal(Offset.zero).dy;
              print("Component x Coordinates: $dx");
              print("Component y Coordinates: $dy");
            },
          ),
        ],
      ),
    );
  }
}

class Counter extends StatefulWidget {
  double fontSize;
  Counter({this.fontSize, Key key}) : super(key: key);

  @override
  _CounterState createState() => _CounterState();
}

class _CounterState extends State<Counter> {
  int _count = 0;

  @override
  Widget build(BuildContext context) {
    return InkWell(
      child: Container(
        child: Text(
          '$_count',
          style: TextStyle(fontSize: widget.fontSize),
        ),
      ),
      onTap: () {
        setState(() {
          _count++;
        });
      },
    );
  }
}
(1)_ globalKey.currentWidget: get the configuration information of the current component (stored in the widget tree)
(2)_ globalKey.currentState: get the state information of the current component (existing in the Element tree)
(3)_ globalKey.currentContext: get the size and location information of the current component.
Purpose 2: to realize the local refresh of the control
Separate the widget s that need to be refreshed separately from the complex layout, and then pass the GlobalKey reference, so that the cross component refresh can be realized through the GlobalKey.
Examples are as follows:
import 'package:flutter/material.dart';

class TestGpfPage extends StatefulWidget {
  @override
  _TestGpfPageState createState() => _TestGpfPageState();
}

class _TestGpfPageState extends State<TestGpfPage> {

  int _count=0;
  GlobalKey<_TextWidgetState> textKey = GlobalKey();

  @override
  void initState() {
    super.initState();
  }

  @override
  Widget build(BuildContext context) {
    return Scaffold(
      appBar: AppBar(
        title: Text("flutter Local refresh"),
      ),
      body: Center(
        child: Column(
          mainAxisAlignment: MainAxisAlignment.center,
          children: <Widget>[
            TextWidget(textKey),///Text to update
            SizedBox(height: 20,),
            Text(_count.toString(),style: TextStyle(fontSize: 20),), ///This Text will not be refreshed, only the TextWidget above will be refreshed
            SizedBox(height: 20,),
            RaisedButton(
              child: Text("count++"),
              onPressed: (){
                _count++;
                ///Call the refreshCount method of the StatefulWidget type component corresponding to the key to refresh the display
                textKey.currentState.refreshCount(_count);
              },
            ),
          ],
        ),
      ),
    );
  }
}

class TextWidget extends StatefulWidget {

  TextWidget(Key key) : super(key: key);

  @override
  _TextWidgetState createState() => _TextWidgetState();
}

class _TextWidgetState extends State<TextWidget> {

  String _text="0";

  @override
  Widget build(BuildContext context) {
    return Center(
      child: Text(_text,style: TextStyle(fontSize: 20),),
    );
  }

  void refreshCount(int count) {
    setState(() {
      _text = count.toString();
    });
  }
}