1.jwt Introduction
Introduction is partly reproduced from Ruan Yifeng's Introduction to JSON Web Token Tutorial
0.session login
1. Users send user names and passwords to the server.
2. After the server is authenticated, save relevant data in the current session, such as user role, login time and so on.
3. The server returns a session_id to the user and writes the user's Cookie.
4. Each subsequent request of the user will pass the session_id back to the server through a Cookie.
5. The server receives session_id and finds pre-saved data to know the user's identity.
1. Problems with session login
The problem with this pattern is that scaling is not good.Of course, there is no problem with a single machine. If it is a server cluster or a cross-domain service-oriented architecture, session data sharing is required, and each server can read sessions.
For example, Web sites A and B are associated services of the same company.Now, users are required to log in automatically as long as they log in to one of the websites and then visit another website. How can I do this?
One solution is session data persistence, writing to a database or other persistence layer.When services receive requests, they request data from the persistence layer.The advantage of this scheme is clear structure, but the disadvantage is large amount of project.In addition, if the persistence layer hangs up, it will fail a bit.
Another option is that the server simply does not save session data, all data is saved on the client, and each request is sent back to the server.JWT is a representative of this scenario.
2. Principles
The principle of JWT is that after server authentication, a JSON object is generated and sent back to the user as follows.
{
  "Name": "Zhang San",
  Role: Administrator,
  "Due time": "0:0 on July 1, 2018"
}
The JSON object will be sent back later when the user communicates with the server.The server identifies users solely on this object.To prevent users from tampering with data, the server will sign this object when it is generated (see later).
The server does not hold any session data, that is, the server becomes stateless, which makes it easier to extend.
3. Data structure of JWT
The actual JWT looks like this.

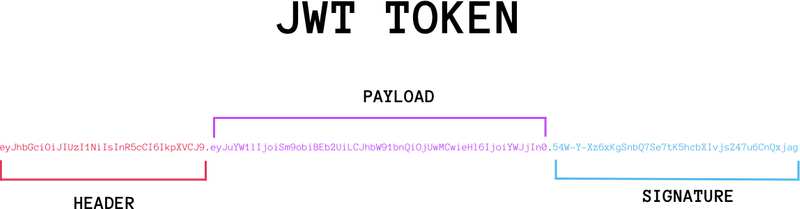
It is a long string with three parts separated by dots (.).Note that there is no line break inside the JWT, it is just written in a few lines for display purposes.
The three parts of JWT are listed below.
- Header (Header)
- Payload
- Signature
Write one line, just like the following.
Header.Payload.Signature
These three sections are described in turn below.
3.1 Header
The Header section is a JSON object that describes the metadata of the JWT, usually as shown below.
{
  "alg": "HS256",
  "typ": "JWT"
}
In the code above, the alg attribute represents the signature algorithm, which is HMAC SHA256 (written as HS256) by default; the type attribute represents the type of this token, and the JWT token is uniformly written as JWT.
Finally, the JSON object above is converted to a string using the Base64URL algorithm (see later).
3.2 Payload
The Payload section is also a JSON object that holds the data that actually needs to be passed.JWT specifies seven official fields for selection.
- iss (issuer): issuer
- exp (expiration time): expiration time
- sub (subject): subject
- aud (audience): audience
- nbf (Not Before): Effective time
- Issued At: Issuance time
- jti (JWT ID): Number
In addition to official fields, you can also define private fields in this section. Here is an example.
{
  "sub": "1234567890",
  "name": "John Doe",
  "admin": true
}
Note that JWT is unencrypted by default and can be read by anyone, so don't put secret information in this section.
This JSON object is also converted to a string using the Base64URL algorithm.
3.3 Signature
The Signature part is the signature of the first two parts to prevent data tampering.
First, you need to specify a secret key.This key is known only to the server and cannot be leaked to the user.Then, use the signature algorithm specified in Header (default is HMAC SHA256) to generate the signature using the following formula.
HMACSHA256(
  base64UrlEncode(header) + "." +
  base64UrlEncode(payload),
  secret)
After calculating the signature, spell the Header, Payload, Signature parts into a string, and separate each part with a dot (.) to return to the user.
3.4 Base64URL
As mentioned earlier, the algorithm for Header and ayload serialization is Base64 URL.This algorithm is similar to the Base64 algorithm, but has some minor differences.
As a token, JWT may be placed in a URL in some situations (such as api.example.com/?token=xxx).Base64 has three characters, +, /and=, which have special meaning in the URL, so it needs to be replaced: =omitted, +replaced with-, /replaced with.This is the Base64 URL algorithm.
4. How to use JWT
The client receives the JWT returned by the server, which can be stored in a Cookie or in a local store.
Thereafter, every time a client communicates with the server, it takes this JWT with it.You can automatically send it in a Cookie, but it doesn't cross domains, so it's better to put it in the Authorization field of the header information of an HTTP request.
Authorization: Bearer <token>
Another option is to place the JWT in the body of the POST request when crossing domains.
5. Several features of JWT
(1) JWT is not encrypted by default, but it can also be encrypted.Once the original Token has been generated, it can be encrypted again with the key.
(2) Secret data cannot be written to JWT without encryption.
(3) JWT can be used not only for authentication but also for information exchange.Effective use of JWT can reduce the number of times the server queries the database.
(4) The biggest disadvantage of JWT is that because the server does not save session state, it is not possible to invalidate a token or change its permissions during use.That is, once a JWT is signed, it will always be valid until it expires unless the server deploys additional logic.
(5) The JWT itself contains authentication information, and once it is disclosed, anyone can obtain all the rights of the token.To reduce theft, the validity period of the JWT should be set relatively short.For some of the more important privileges, the user should be authenticated again when used.
(6) In order to reduce theft, JWT should not use HTTP protocol for plain code transmission, but use HTTPS protocol for transmission.
2.Using jwt in koa 2
1.json webtoken plug-in
This plugin provides the ability to generate, verify and decode jwt.In the project, we only need the ability to generate and decode jwts.That's it.
Generate token
const jsonwebtoken = require('jsonwebtoken');

const USER = {
  username: 'zhangsan',
  password: '123456',
  id: 100
}

const SECRET = 'laotie666'; //Input at will

const token = jsonwebtoken.sign(
          { name: USER.username, id: USER.id },  // Encrypt userToken
          SECRET,
          { expiresIn: '1h' }
        )
This produces a string of strings, and token now has a value of:
"eyJhbGciOiJIUzI1NiIsInR5cCI6IkpXVCJ9.eyJuYW1lIjoiemhhbmdzYW4iLCJpZCI6MTAwLCJpYXQiOjE1ODg1MTM2NTksImV4cCI6MTU4ODUxNzI1OX0.jFXifMFFizqRUK0V5clFql4VrtrQiTaD_wpsogNi6TY"
If I want to get this information, I don't need to know the secret key, just use the jsonwebtoken plug-in.
const jsonwebtoken = require('jsonwebtoken');

const token = "eyJhbGciOiJIUzI1NiIsInR5cCI6IkpXVCJ9.eyJuYW1lIjoiemhhbmdzYW4iLCJpZCI6MTAwLCJpYXQiOjE1ODg1MTM2NTksImV4cCI6MTU4ODUxNzI1OX0.jFXifMFFizqRUK0V5clFql4VrtrQiTaD_wpsogNi6TY"

console.log(jsonwebtoken.decode(token)); // { name: 'zhangsan', id: 100, iat: 1588511684, exp: 1588515284 }
2. Use of koa-jwt Middleware
This middleware provides a checking method that can be checked globally in a project, and two lines of code are done.
const koa = require('koa');
const koajwt = require('koa-jwt');
const app = new koa();

const SECRET = 'laotie666'; // demo, replaceable

app.use(koajwt({ secret: SECRET }).unless({
  // Logon interface does not require authentication
  path: [/^\/api\/login/]
}));
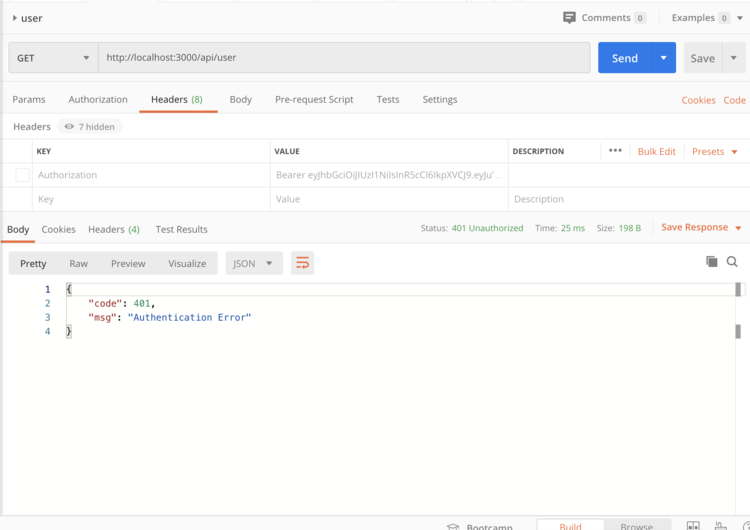
When we send the request, we place the token we just generated on the request header Authorization. If the secret key in this token is equal to the secret attribute in the first parameter in koajwt, it can be verified by the user, otherwise a 401 error is returned.
If you want to customize the handling of this error, you can add a middleware above to capture the 401 error with next().catch()
const koa = require('koa');
const koajwt = require('koa-jwt');
const app = new koa();

const SECRET = 'laotie666'; // demo, replaceable

app.use(async (ctx, next) => {
  return next().catch((err) => {
    if (err.status === 401) {
      // Custom Return Results
      ctx.status = 401;
      ctx.body = {
        code: 401,
        msg: err.message
      }
    } else {
      throw err;
    }
  })
});

app.use(koajwt({ secret: SECRET }).unless({
  // Logon interface does not require authentication
  path: [/^\/api\/login/]
}));
3. Combining
There are several steps
-
Introduce appropriate plug-ins
const koa = require('koa'); const koajwt = require('koa-jwt'); const jsonwebtoken = require('jsonwebtoken'); const koabody = require('koa-body'); const app = new koa(); -
Set a secret key
const SECRET = 'laotie666';
-
Make a fake message without connecting to the database
const USER = { username: 'zhangsan', password: '123456', id: 100 } -
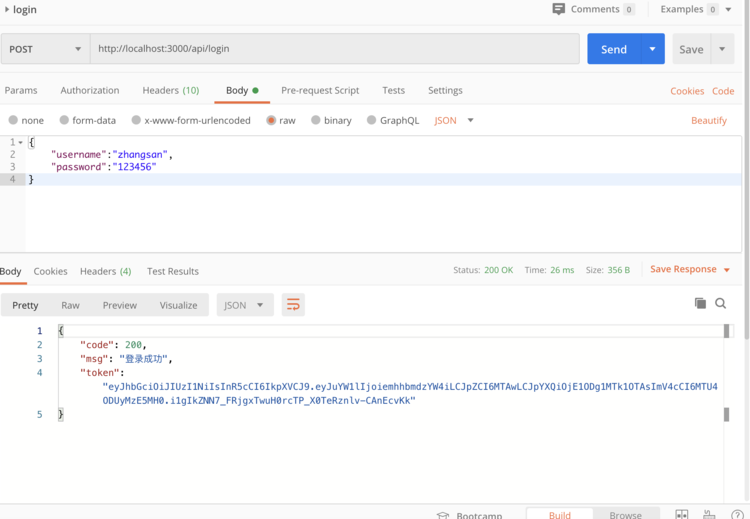
First, we login, get the username password in the body, and compare it with the database. If it is correct, we use the jwt plug-in to generate token and save it by the browser locationstage.
app.use(async (ctx, next) => { if (ctx.path === '/api/login' && ctx.method === 'POST') { // Sign in // Determine if the username password matches let checkUser = ctx.request.body.username == USER.username && ctx.request.body.password == USER.password; if (checkUser) { ctx.body = { code: 200, msg: 'Login Successful', token: jsonwebtoken.sign( { name: USER.username, id: USER.id }, // Encrypt userToken SECRET, { expiresIn: '1h' } ) } } else { // Logon failure, incorrect username password ctx.body = { code: 400, msg: 'User name password mismatch' } } -
Next time we send another request, we'll take the token out, put it in the Authorization in the request header, and add Bearer and a space in front of the token.
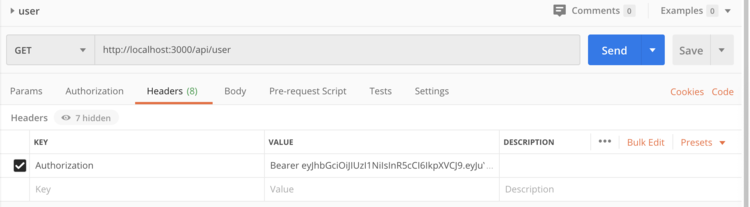
-
This allows the koa-jwt plug-in to validate the token by checking if the keys are equal, which can then be requested.
// Middleware on 401 error app.use(async (ctx, next) => { return next().catch((err) => { if (err.status === 401) { ctx.status = 401; ctx.body = { code: 401, msg: err.message } } else { throw err; } }) }); app.use(koajwt({ secret: SECRET }).unless({ // Logon interface does not require authentication path: [/^\/api\/login/] })); -
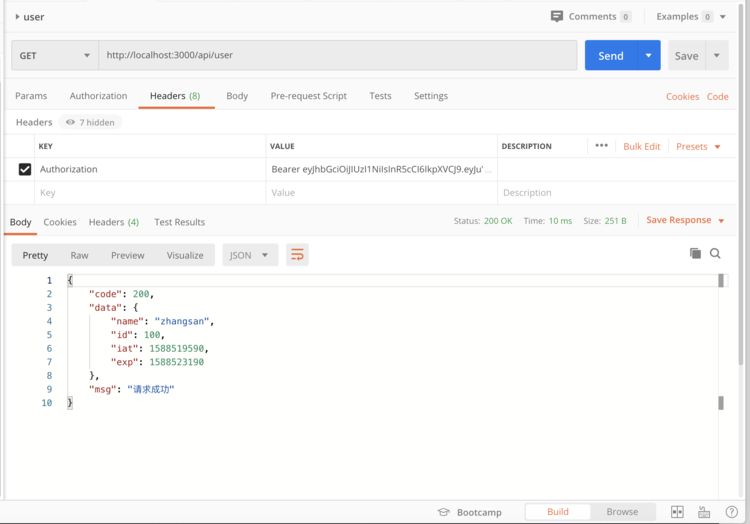
Specific Requests
else if (ctx.path === '/api/user' && ctx.method === 'GET') { // Get user information // Middleware Unified Verification token let token = ctx.header.authorization; let payload = await util.promisify(jsonwebtoken.verify)(token.split(' ')[1], SECRET); console.log(payload); ctx.body = { code: 200, data: payload, msg: 'Request succeeded' } } -
Logon Request
-
Do not carry token
-
Carry token
4. Full code
The service can be started by executing the node file name.js directly.
const koa = require('koa');
const koajwt = require('koa-jwt');
const jsonwebtoken = require('jsonwebtoken');
const util = require('util');
const koabody = require('koa-body');
const app = new koa();

const SECRET = 'laotie666'; // demo, replaceable

app.use(koabody());

// Middleware validates token
app.use(async (ctx, next) => {
  return next().catch((err) => {
    if (err.status === 401) {
      ctx.status = 401;
      ctx.body = {
        code: 401,
        msg: err.message
      }
    } else {
      throw err;
    }
  })
});

app.use(koajwt({ secret: SECRET }).unless({
  // Logon interface does not require authentication
  path: [/^\/api\/login/]
}));

// Example
const USER = {
  username: 'zhangsan',
  password: '123456',
  id: 100
}
// Logon interface issues token, for ease of use without router
app.use(async (ctx, next) => {
  if (ctx.path === '/api/login' && ctx.method === 'POST') {
    // Sign in
    // Determine if the username password matches
    let checkUser = ctx.request.body.username == USER.username && ctx.request.body.password == USER.password;
    if (checkUser) {
      ctx.body = {
        code: 200,
        msg: 'Login Successful',
        token: jsonwebtoken.sign(
          { name: USER.username, id: USER.id },  // Encrypt userToken
          SECRET,
          { expiresIn: '1h' }
        )
      }
    } else {
      // Logon failure, incorrect username password
      ctx.body = {
        code: 400,
        msg: 'User name password mismatch'
      }
    }
  } else if (ctx.path === '/api/user' && ctx.method === 'GET') {
    // Get user information
    // Middleware Unified Verification token
    let token = ctx.header.authorization;
    let payload = await util.promisify(jsonwebtoken.verify)(token.split(' ')[1], SECRET);
    console.log(payload);
    ctx.body = {
      code: 200,
      data: payload,
      msg: 'Request succeeded'
    }
  }
})
app.listen(3000, function () {
  console.log('listening 3000');
});