Kubedm builds k8s cluster [offline version] v1 eighteen point six
Kubernetes overview
In 2014, the open-source container management platform, called 8kernets for short, was developed by Google
k8s is used for deployment, expansion and management of container applications.
k8s provides a series of functions such as container arrangement, resource scheduling, elastic scaling, deployment management, service discovery and so on
kubernetes aims to make deploying containerized applications simple and efficient
Kubernetes properties
Self repair
In case of node failure, restart the failed container, replace and redeploy, and ensure the expected number of copies; Kill the container that fails the health check, and will not process the client request until it is ready to ensure that the online service is not interrupted.
Flexibility
Use commands, UI or automatically and quickly expand and shrink application instances based on CPU usage to ensure high availability during peak concurrency of application services; Business recovers resources at low peak and runs services at the lowest cost.
Automatic deployment and rollback
K8S uses the rolling update strategy to update the application, updating one Pod at a time instead of deleting all pods at the same time. If there is a problem in the update process, the change will be rolled back to ensure that the upgrade will not affect the business.
Service discovery and load balancing
K8S provides a unified access portal (internal IP address and a DNS name) for multiple containers, and load balances all associated containers, so that users do not need to consider the container IP problem.
Confidentiality and configuration management
Manage confidential data and application configuration without exposing sensitive data in the image, so as to improve the security of sensitive data. Some commonly used configurations can be stored in K8S to facilitate the use of applications.
Storage orchestration
Attaching external storage systems, whether from local storage, public cloud (such as AWS) or network storage (such as NFS, GlusterFS and Ceph), is used as a part of cluster resources, which greatly improves the flexibility of storage use.
Batch processing
Provide one-time tasks and scheduled tasks; Meet the scenario of batch data processing and analysis.
Kubedm overview
Kubedm is a cluster construction tool built by Kubernetes project, which is responsible for implementing the necessary basic steps of building a minimized available cluster and starting it. Kubedm is a management tool for the whole life cycle of Kubernetes cluster, which can be used to realize the deployment, upgrade, downgrade and demolition of clusters. Kubedm deploys Kubernetes clusters to run most resources in pod mode. For example, Kube proxy, Kube controller manager, Kube scheduler, Kube apiserver and flannel all run in pod mode.
Kubedm only cares about how to initialize and start the cluster. Other operations, such as installing Kubernetes Dashboard, monitoring system, log system and other necessary add-on components, are not considered by kubedm and need to be deployed by the administrator.
Kubedm integrates tools and programs such as kubedm init and kubedm join. Kubedm init is used for the rapid initialization of the cluster. Its core function is to deploy various components of the Master node, while kubedm join is used to quickly join nodes to the specified cluster. They are the "fast path" of the best practice of creating Kubernetes cluster. In addition, kubedm token can manage the authentication token used to join the cluster after the cluster is built, and the function of kubedm reset command is to delete the files generated during the cluster construction to reset back to the initial state.
Kuberadm offline deployment k8s cluster
Architecture diagram
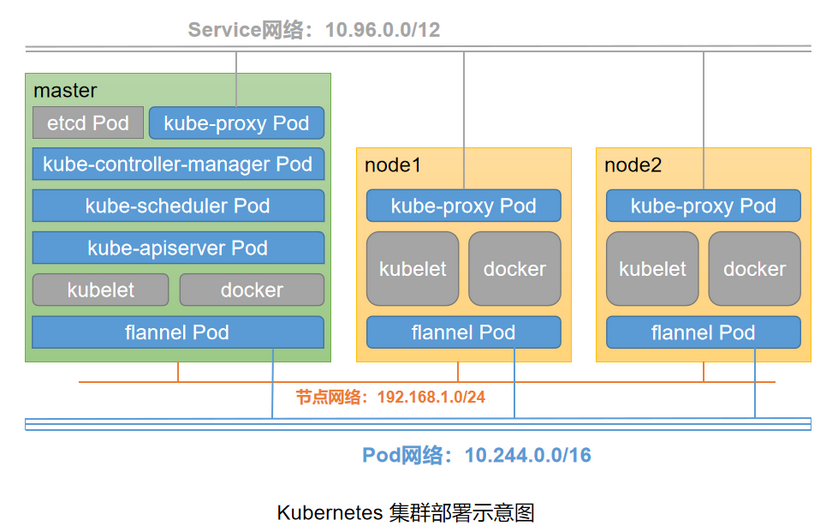
Environmental planning#
operating system	            IP	            CPU/MEM	 host name	    role
CentOS 7.7-x86_64	192.168.1.14	2/4G	k8s-master	Master
CentOS 7.7-x86_64	192.168.1.15	2/4G	k8s-node1	Work node
CentOS 7.7-x86_64	192.168.1.16	2/4G	k8s-node2	Work node
[software package version number]
name version
Docker 3:19.03.13
kubeadm v1.18.6
kubernetes v1.18.6
Installation prerequisites
Centos 7.x minimize installation
Clock synchronization
Download offline packages
To update and repair, please download k8s-kubeadmin.com Zip package!!!
Link: https://pan.baidu.com/s/1Q3jbJcgq0rH8jK-LTpa6Vg Extraction code: hhhh
Deploy Master node
Execute automatic installation script
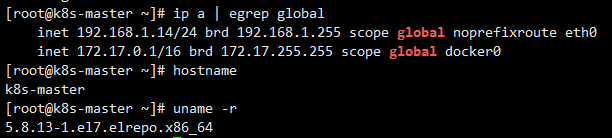
Copy the downloaded package to the k8s master node and unzip it. The master node here is 192.168.1.14
[root@localhost ~]# ip a | egrep global
    inet 192.168.1.14/24 brd 192.168.1.255 scope global noprefixroute eth0
[root@localhost ~]# ls
anaconda-ks.cfg  k8s-kubeadm.tar.gz
[root@localhost ~]# tar xf k8s-kubeadm.tar.gz
[root@localhost ~]# cd k8s-kubeadm
[root@localhost k8s-kubeadm]# ls
docker-ce-19.03.12.tar.gz  flannel-v0.12.0-linux-amd64.tar.gz  install.sh  k8s-imagesV1.18.6.tar.gz  k8s-V1.18.6.tar.gz  kube-flannel.yml packages.tar.gz
Execute the script/ install.sh [hostname]
[root@localhost k8s-kubeadm]# ./install.sh k8s-master
Wait for the script to execute automatic installation...
After execution, the following prompt will appear:

Because the kernel has been upgraded, please restart the server.
After restart, the kernel version is updated to 5.8.13
Initialize the cluster using kubedm
kubeadm init --kubernetes-version=v1.18.6 --apiserver-advertise-address=192.168.1.14 --pod-network-cidr=10.244.0.0/16 --service-cidr=10.96.0.0/12
Wait for cluster initialization to complete...
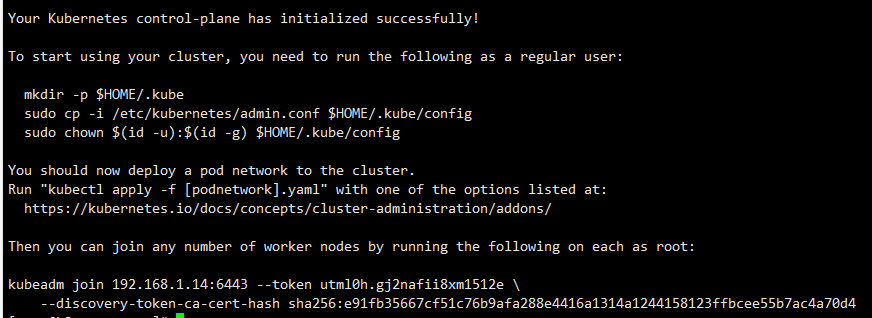
kubeadm join 192.168.1.14:6443 --token utml0h.gj2nafii8xm1512e \
    --discovery-token-ca-cert-hash sha256:e91fb35667cf51c76b9afa288e4416a1314a1244158123ffbcee55b7ac4a70d4
The above command is recorded, which is the execution command of adding node nodes to the cluster.
When the above prompt appears, the cluster is initialized successfully, and execute the prompt command:
[root@k8s-master ~]# mkdir -p $HOME/.kube
[root@k8s-master ~]# cp -i /etc/kubernetes/admin.conf $HOME/.kube/config
[root@k8s-master ~]# chown $(id -u):$(id -g) $HOME/.kube/config
View nodes using kubectl
[
root@k8s-master ~]# kubectl get nodes
NAME         STATUS     ROLES    AGE   VERSION
k8s-master   NotReady   master   74s   v1.18.6
Initialize the network plug-in flannel
Enter the compressed directory
[root@k8s-master ~]# cd k8s-kubeadm/
#Start flannel initialization installation
[root@k8s-master k8s-kubeadm]# kubectl apply -f kube-flannel.yml
podsecuritypolicy.policy/psp.flannel.unprivileged created
clusterrole.rbac.authorization.k8s.io/flannel created
clusterrolebinding.rbac.authorization.k8s.io/flannel created
serviceaccount/flannel created
configmap/kube-flannel-cfg created
daemonset.apps/kube-flannel-ds created
After the flannel initialization is completed, check the nodes status:
[root@k8s-master k8s-kubeadm]# kubectl get nodes
NAME         STATUS   ROLES    AGE     VERSION
k8s-master   Ready    master   3m58s   v1.18.6
At this point, the master node is initialized and installed through kubedm. The next node is very simple.
Deploy node node#
Copy the downloaded compressed package to the node node for execution
[root@k8s-master ~]# scp k8s-kubeadm.tar.gz 192.168.1.15:/root/

------following node Node execution------
[root@localhost ~]# ls
anaconda-ks.cfg  k8s-kubeadm.tar.gz
[root@localhost ~]# tar xf k8s-kubeadm.tar.gz
[root@localhost ~]# cd k8s-kubeadm/
./install.sh host name
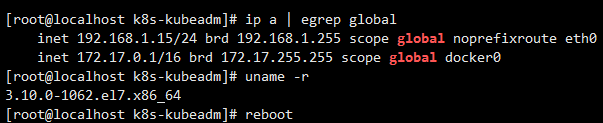
[root@localhost k8s-kubeadm]# ./install.sh k8s-node1
Here is the same as the above master initialization. Restart the host after completion.
After the restart, execute the join command to join the cluster
It's the command recorded above
kubeadm join 192.168.1.14:6443 --token utml0h.gj2nafii8xm1512e \
    --discovery-token-ca-cert-hash sha256:e91fb35667cf51c76b9afa288e4416a1314a1244158123ffbcee55b7ac4a70d4
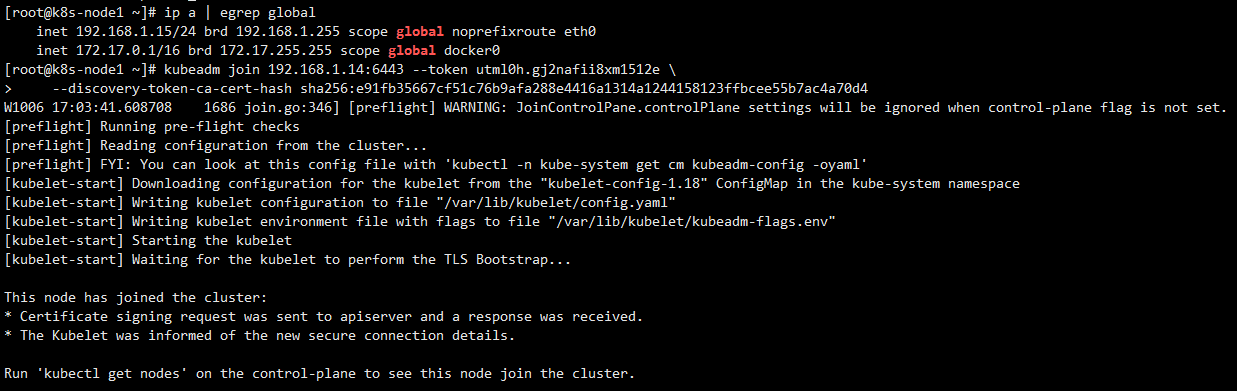
Switch to k8s master to check whether k8s-node1 joins the cluster

k8s-node1 successfully joins the cluster, and the remaining node nodes operate the same.
So far, the k8s environment has been built through kubedm.
Simple test of k8s cluster
Note: the test in this section requires the network to pull the image. You can copy the image to the host through the network. The required image: nginx:alpine / busybox
Here is a simple test to prove that the cluster is running normally and healthily.
Create an nginx pod
[root@k8s-master ~]# kubectl run nginx-deploy --image=nginx:alpine
pod/nginx-deploy created
[root@k8s-master ~]# kubectl get pods
NAME           READY   STATUS    RESTARTS   AGE
nginx-deploy   1/1     Running   0          11s
[root@k8s-master ~]# kubectl get pods -o wide
NAME           READY   STATUS    RESTARTS   AGE   IP           NODE        NOMINATED NODE   READINESS GATES
nginx-deploy   1/1     Running   0          18s   10.244.1.2   k8s-node1   <none>           <none>
Create a service for nginx pod
[root@k8s-master ~]# kubectl expose pod nginx-deploy --name=nginx --port=80 --target-port=80 --protocol=TCP
service/nginx exposed
[root@k8s-master ~]# kubectl get service
NAME         TYPE        CLUSTER-IP      EXTERNAL-IP   PORT(S)   AGE
kubernetes   ClusterIP   10.96.0.1       <none>        443/TCP   21m
nginx        ClusterIP   10.106.14.253   <none>        80/TCP    9s
[root@k8s-master ~]# curl 10.106.14.253
<!DOCTYPE html>
<html>
<head>
<title>Welcome to nginx!</title>
<style>
    body {
        width: 35em;
        margin: 0 auto;
        font-family: Tahoma, Verdana, Arial, sans-serif;
    }
</style>
</head>
<body>
<h1>Welcome to nginx!</h1>
<p>If you see this page, the nginx web server is successfully installed and
working. Further configuration is required.</p>

<p>For online documentation and support please refer to
<a href="http://nginx.org/">nginx.org</a>.<br/>
Commercial support is available at
<a href="http://nginx.com/">nginx.com</a>.</p>

<p><em>Thank you for using nginx.</em></p>
</body>
</html>
Create a busybox pod to access through the nginx service name
[root@k8s-master ~]# kubectl run client --image=busybox -it
If you don't see a command prompt, try pressing enter.

------ Access by service name nginx service ------
/ # wget -O - -q nginx
<!DOCTYPE html>
<html>
<head>
<title>Welcome to nginx!</title>
<style>
    body {
        width: 35em;
        margin: 0 auto;
        font-family: Tahoma, Verdana, Arial, sans-serif;
    }
</style>
</head>
<body>
<h1>Welcome to nginx!</h1>
<p>If you see this page, the nginx web server is successfully installed and
working. Further configuration is required.</p>

<p>For online documentation and support please refer to
<a href="http://nginx.org/">nginx.org</a>.<br/>
Commercial support is available at
<a href="http://nginx.com/">nginx.com</a>.</p>

<p><em>Thank you for using nginx.</em></p>
</body>
</html>

/ # cat /etc/resolv.conf
nameserver 10.96.0.10
search default.svc.cluster.local svc.cluster.local cluster.local
options ndots:5
The test passed, and the network and dns services were normal. The cluster is in normal health.