Main points:
1. Environment Package Preparation
2. Deploy etcd storage
3. Deploy flannel network components
1. Environmental preparation:
| Host | Software to be installed |
| master(192.168.109.138) | kube-apiserver,kube-controller-manager,kube-scheduler,etcd |
| node02(192.168.109.131) | kubelet,kube-proxy,docker ,flannel ,etcd |
| node02(192.168.109.132) | kubelet,kube-proxy,docker ,flannel ,etcd |
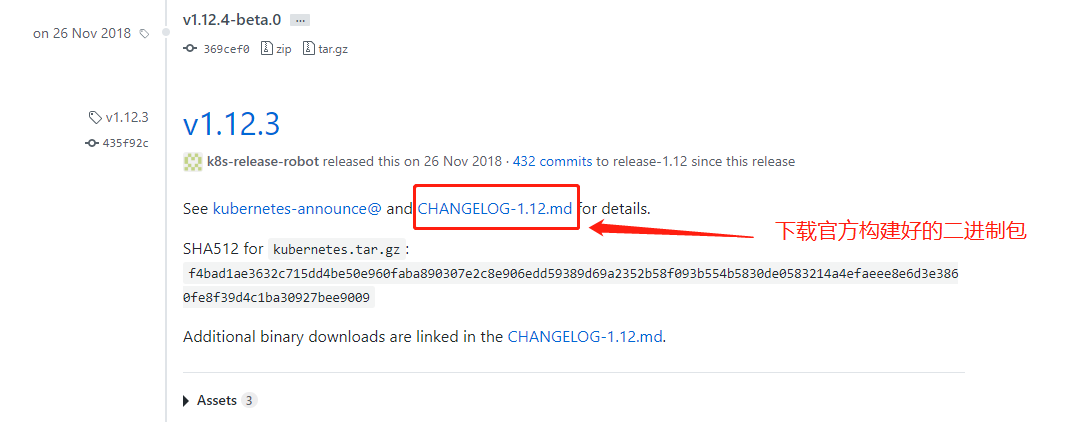
The following is the official source package download address: https://github.com/kubernetes/kubernetes/releases?after=v1.13.1

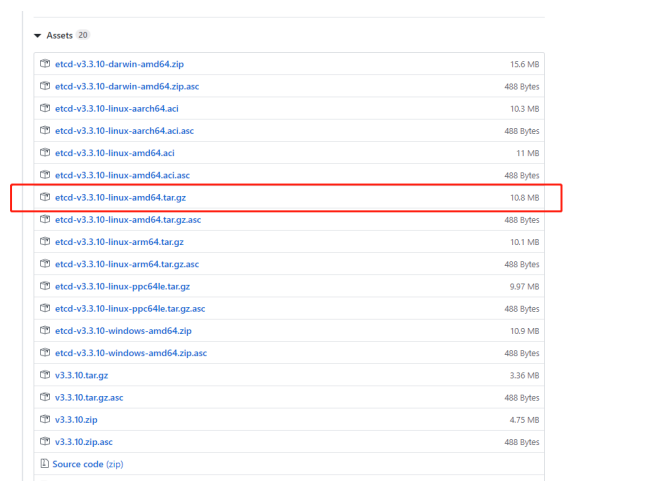
etcd binary package address: https://github.com/etcd-io/etcd/releases

2. Deploy etcd storage:
Step 1: Deploy master
//Prepare two script files first:
//The first script:
vim etcd-cert.sh
##Define a ca certificate:
cat > ca-config.json <<EOF
{
"signing": {
"default": {
"expiry": "87600h"
},
"profiles": {
"www": {
"expiry": "87600h",
"usages": [
"signing",
"key encipherment",
"server auth",
"client auth"
]
}
}
}
}
EOF
##Implement Certificate Signature
cat > ca-csr.json <<EOF
{
"CN": "etcd CA",
"key": {
"algo": "rsa",
"size": 2048
},
"names": [
{
"C": "CN",
"L": "Beijing",
"ST": "Beijing"
}
]
}
EOF
cfssl gencert -initca ca-csr.json | cfssljson -bare ca -
#-----------------------
##Specify communication validation between three etcd nodes
cat > server-csr.json <<EOF
{
"CN": "etcd",
"hosts": [
"192.168.109.131",
"192.168.109.132",
"192.168.109.138"
],
"key": {
"algo": "rsa",
"size": 2048
},
"names": [
{
"C": "CN",
"L": "BeiJing",
"ST": "BeiJing"
}
]
}
EOF
##Generate ETCD certificates server-key.pem and server.pem
cfssl gencert -ca=ca.pem -ca-key=ca-key.pem -config=ca-config.json -profile=www server-csr.json | cfssljson -bare server
//The second script:
vim etcd.sh
#!/bin/bash
# example: ./etcd.sh etcd01 192.168.1.10 etcd02=https://192.168.1.11:2380,etcd03=https://192.168.1.12:2380
ETCD_NAME=$1
ETCD_IP=$2
ETCD_CLUSTER=$3
WORK_DIR=/opt/etcd
cat <<EOF >$WORK_DIR/cfg/etcd
#[Member]
ETCD_NAME="${ETCD_NAME}"
ETCD_DATA_DIR="/var/lib/etcd/default.etcd"
ETCD_LISTEN_PEER_URLS="https://${ETCD_IP}:2380"
ETCD_LISTEN_CLIENT_URLS="https://${ETCD_IP}:2379"
#[Clustering]
ETCD_INITIAL_ADVERTISE_PEER_URLS="https://${ETCD_IP}:2380"
ETCD_ADVERTISE_CLIENT_URLS="https://${ETCD_IP}:2379"
ETCD_INITIAL_CLUSTER="etcd01=https://${ETCD_IP}:2380,${ETCD_CLUSTER}"
ETCD_INITIAL_CLUSTER_TOKEN="etcd-cluster"
ETCD_INITIAL_CLUSTER_STATE="new"
EOF
cat <<EOF >/usr/lib/systemd/system/etcd.service
[Unit]
Description=Etcd Server
After=network.target
After=network-online.target
Wants=network-online.target
[Service]
Type=notify
EnvironmentFile=${WORK_DIR}/cfg/etcd
ExecStart=${WORK_DIR}/bin/etcd \
--name=\${ETCD_NAME} \
--data-dir=\${ETCD_DATA_DIR} \
--listen-peer-urls=\${ETCD_LISTEN_PEER_URLS} \
--listen-client-urls=\${ETCD_LISTEN_CLIENT_URLS},http://127.0.0.1:2379 \
--advertise-client-urls=\${ETCD_ADVERTISE_CLIENT_URLS} \
--initial-advertise-peer-urls=\${ETCD_INITIAL_ADVERTISE_PEER_URLS} \
--initial-cluster=\${ETCD_INITIAL_CLUSTER} \
--initial-cluster-token=\${ETCD_INITIAL_CLUSTER_TOKEN} \
--initial-cluster-state=new \
--cert-file=${WORK_DIR}/ssl/server.pem \
--key-file=${WORK_DIR}/ssl/server-key.pem \
--peer-cert-file=${WORK_DIR}/ssl/server.pem \
--peer-key-file=${WORK_DIR}/ssl/server-key.pem \
--trusted-ca-file=${WORK_DIR}/ssl/ca.pem \
--peer-trusted-ca-file=${WORK_DIR}/ssl/ca.pem
Restart=on-failure
LimitNOFILE=65536
[Install]
WantedBy=multi-user.target
EOF
systemctl daemon-reload
systemctl enable etcd
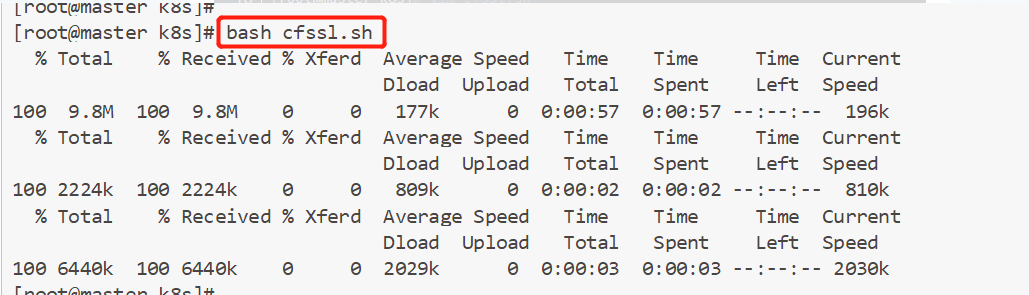
systemctl restart etcd[root@master ~]# mkdir k8s [root@master ~]# cd k8s/ [root@master k8s]# ls etcd-cert.sh etcd.sh [root@master k8s]# mkdir etcd-cert [root@master k8s]# mv etcd-cert.sh etcd-cert [root@master k8s]# ls etcd-cert etcd.sh [root@master k8s]# vim cfssl.sh curl -L https://pkg.cfssl.org/R1.2/cfssl_linux-amd64 -o /usr/local/bin/cfssl curl -L https://pkg.cfssl.org/R1.2/cfssljson_linux-amd64 -o /usr/local/bin/cfssljson curl -L https://pkg.cfssl.org/R1.2/cfssl-certinfo_linux-amd64 -o /usr/local/bin/cfssl-certinfo chmod +x /usr/local/bin/cfssl /usr/local/bin/cfssljson /usr/local/bin/cfssl-certinfo //Download the official cfssl package: [root@master k8s]# bash cfssl.sh [root@master k8s]# ls /usr/local/bin/ cfssl cfssl-certinfo cfssljson //cfssl: Generate certificate tool; cfssl-certinfo: View certificate information; cfssljson: By incoming json File Generation Certificate
[root@localhost etcd-cert]# cd /usr/local/bin/
[root@localhost bin]# ls
cfssl  cfssl-certinfo  cfssljson
//cfssl: is the certificate generation tool;
  cfssljson: By incoming json File generation certificate;
  cfssl-certinfo: Is to view the certificate information.

[root@localhost bin]#chmod 777 cfssl cfssl-certinfo cfssljson //Add permissions
//Next, define the generation of a ca certificate:
[root@localhost bin]# cd /root/k8s/etcd-cert/
cat > ca-config.json <<EOF
{
  "signing": {
    "default": {
      "expiry": "87600h"
    },
    "profiles": {
      "www": {
         "expiry": "87600h",
         "usages": [
            "signing",
            "key encipherment",
            "server auth",
            "client auth"
        ]
      }
    }
  }
}
EOF
//The next step is to implement certificate signatures:
cat > ca-csr.json <<EOF
{
    "CN": "etcd CA",
    "key": {
        "algo": "rsa",
        "size": 2048
    },
    "names": [
        {
            "C": "CN",
            "L": "Beijing",
            "ST": "Beijing"
        }
    ]
}
EOF
//Generate certificates, generate ca-key.pem, ca.pem
[root@localhost etcd-cert]# cfssl gencert -initca ca-csr.json | cfssljson -bare ca -
2020/02/07 11:29:31 [INFO] generating a new CA key and certificate from CSR
2020/02/07 11:29:31 [INFO] generate received request
2020/02/07 11:29:31 [INFO] received CSR
2020/02/07 11:29:31 [INFO] generating key: rsa-2048
2020/02/07 11:29:32 [INFO] encoded CSR
2020/02/07 11:29:32 [INFO] signed certificate with serial number 50595628178286351983894910684673691034530190819
[root@localhost etcd-cert]# ls
ca-config.json  ca.csr  ca-csr.json  ca-key.pem  ca.pem  etcd-cert.sh
//Specify communication validation between the three etcd nodes:
cat > server-csr.json <<EOF
{
    "CN": "etcd",
    "hosts": [
    "192.168.109.131",
    "192.168.109.132",
    "192.168.109.138"
    ],
    "key": {
        "algo": "rsa",
        "size": 2048
    },
    "names": [
        {
            "C": "CN",
            "L": "BeiJing",
            "ST": "BeiJing"
        }
    ]
}
EOF
[root@localhost etcd-cert]# ls
ca-config.json  ca.csr  ca-csr.json  ca-key.pem  ca.pem  etcd-cert.sh  server-csr.json
//Generate ETCD certificate generation server-key.pem * server.pem:
[root@localhost etcd-cert]# cfssl gencert -ca=ca.pem -ca-key=ca-key.pem -config=ca-config.json -profile=www server-csr.json | cfssljson -bare server
[root@localhost etcd-cert]# ls
ca-config.json  ca-csr.json  ca.pem        server.csr       server-key.pem
ca.csr          ca-key.pem   etcd-cert.sh  server-csr.json  server.pem
Step 2: Place the downloaded package in the / root/k8s/etcd-cert directory

[root@master etcd-cert]# mv *.tar.gz ../
[root@master k8s]# ls
cfssl.sh  etcd-cert  etcd.sh  etcd-v3.3.10-linux-amd64.tar.gz  flannel-v0.10.0-linux-amd64.tar.gz  kubernetes-server-linux-amd64.tar.gz
[root@master k8s]#Tar zvxf etcd-v3.3.10-linux-amd64.tar.gz //decompression
[root@master k8s]# ls etcd-v3.3.10-linux-amd64
Documentation  etcd  etcdctl  README-etcdctl.md  README.md  READMEv2-etcdctl.md
//Configuration files, command files, certificates:
[root@master k8s]# mkdir /opt/etcd/{cfg,bin,ssl} -p
[root@master k8s]# mv etcd-v3.3.10-linux-amd64/etcd etcd-v3.3.10-linux-amd64/etcdctl /opt/etcd/bin/
//Certificate copy:
[root@master k8s]# cp etcd-cert/*.pem /opt/etcd/ssl/
//Enter the stuck state and wait for other nodes to join:
[root@master k8s]# bash etcd.sh etcd01 192.168.109.138 etcd02=https://192.168.109.131:2380,etcd03=https://192.168.109.132:2380
//At this point, we can open another terminal and find that the etcd process has started:
[root@master ~]# ps -ef | grep etcd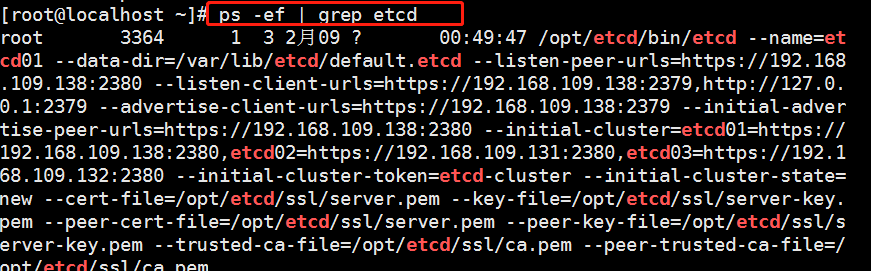
//Copy the certificate to another node (for efficiency, no configuration required)
[root@master k8s]# scp -r /opt/etcd/ root@192.168.109.131:/opt/
[root@master k8s]# scp -r /opt/etcd/ root@192.168.109.132:/opt/
//Start script copy other nodes:
[root@master k8s]# scp /usr/lib/systemd/system/etcd.service root@192.168.109.131:/usr/lib/systemd/system/
[root@master k8s]# scp /usr/lib/systemd/system/etcd.service root@192.168.109.132:/usr/lib/systemd/system/
Step 3: Deploy the node
1,modify node01:
[root@node01 ~]# vim /opt/etcd/cfg/etcd
#[Member]
ETCD_NAME="etcd02"
ETCD_DATA_DIR="/var/lib/etcd/default.etcd"
ETCD_LISTEN_PEER_URLS="https://192.168.109.131:2380"
ETCD_LISTEN_CLIENT_URLS="https://192.168.109.131:2379"
#[Clustering]
ETCD_INITIAL_ADVERTISE_PEER_URLS="https://192.168.109.131:2380"
ETCD_ADVERTISE_CLIENT_URLS="https://192.168.109.131:2379"
ETCD_INITIAL_CLUSTER="etcd01=https://192.168.109.138:2380,etcd02=https://192.168.109.131:2380,etcd03=https://192.168.109.138:2380"
ETCD_INITIAL_CLUSTER_TOKEN="etcd-cluster"
ETCD_INITIAL_CLUSTER_STATE="new"
//Start:
[root@node01 ~]# systemctl start etcd.service
[root@node01 ~]# systemctl status etcd.service
2,modify node02:
[root@node02 ~]# vim /opt/etcd/cfg/etcd
#[Member]
ETCD_NAME="etcd03"
ETCD_DATA_DIR="/var/lib/etcd/default.etcd"
ETCD_LISTEN_PEER_URLS="https://192.168.109.132:2380"
ETCD_LISTEN_CLIENT_URLS="https://192.168.109.132:2379"
#[Clustering]
ETCD_INITIAL_ADVERTISE_PEER_URLS="https://192.168.109.132:2380"
ETCD_ADVERTISE_CLIENT_URLS="https://192.168.109.132:2379"
ETCD_INITIAL_CLUSTER="etcd01=https://192.168.109.138:2380,etcd02=https://192.168.109.131:2380,etcd03=https://192.168.109.132:2380"
ETCD_INITIAL_CLUSTER_TOKEN="etcd-cluster"
ETCD_INITIAL_CLUSTER_STATE="new"
//Start:
[root@node02 ~]# systemctl start etcd.service
[root@node02 ~]# systemctl status etcd.service
Step 4: Detection
On master:
[root@master etcd-cert]# /opt/etcd/bin/etcdctl --ca-file=ca.pem --cert-file=server.pem --key-file=server-key.pem --endpoints="https://192.168.220.131:2379,https://192.168.220.140:2379,https://192.168.220.136:2379" cluster-health
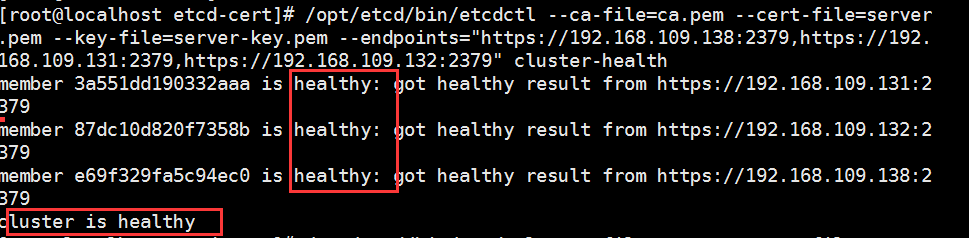
Cluster health!
2. Deploy flannel network:
All node s need to deploy and install the docker engine first
1. Flannel introduces: It is one kind of Overlay network and encapsulates source packets in another network package for routing and communication. At present, UDP, VXLAN, AWX VPC and GCE routing are supported for data forwarding.
Overlay Network: Overlay network, a virtual network technology mode that overlays the underlying network in which hosts are connected through virtual links.
VXLAN: Encapsulates the source data package into UDP, encapsulates it using the IP/MAC of the underlying network as the outer header, then transmits it over Ethernet, unencapsulates it at the end of the tunnel, and sends the data to the destination address.
2. flannel network configuration:
1. Write the allocated subnet segment to the ETCD for flannel to use:
[root@localhost etcd-cert]# /opt/etcd/bin/etcdctl --ca-file=ca.pem --cert-file=server.pem --key-file=server-key.pem --endpoints="https://192.168.220.131:2379,https://192.168.220.140:2379,https://192.168.220.136:2379" set /coreos.com/network/config '{ "Network": "172.17.0.0/16", "Backend": {"Type": "vxlan"}}'2. View the written information:
[root@localhost etcd-cert]# /opt/etcd/bin/etcdctl --ca-file=ca.pem --cert-file=server.pem --key-file=server-key.pem --endpoints="https://192.168.220.131:2379,https://192.168.220.140:2379,https://192.168.220.136:2379" get /coreos.com/network/config
3. Copy the package to all node nodes (just deploy it on the node):
[root@localhost k8s]# scp flannel-v0.10.0-linux-amd64.tar.gz root@192.168.109.131:/root
[root@localhost k8s]# scp flannel-v0.10.0-linux-amd64.tar.gz root@192.168.109.132:/root
4. All node s decompress the package:
tar zvxf flannel-v0.10.0-linux-amd64.tar.gz
5. On the node, first create the k8s working directory:
[root@localhost ~]# mkdir /opt/kubernetes/{cfg,bin,ssl} -p
[root@localhost ~]# mv mk-docker-opts.sh flanneld /opt/kubernetes/bin/
//Create a flannel script:
[root@localhost ~]# vim flannel.sh
#!/bin/bash
ETCD_ENDPOINTS=${1:-"http://127.0.0.1:2379"}
cat <<EOF >/opt/kubernetes/cfg/flanneld
FLANNEL_OPTIONS="--etcd-endpoints=${ETCD_ENDPOINTS} \
-etcd-cafile=/opt/etcd/ssl/ca.pem \
-etcd-certfile=/opt/etcd/ssl/server.pem \
-etcd-keyfile=/opt/etcd/ssl/server-key.pem"
EOF
cat <<EOF >/usr/lib/systemd/system/flanneld.service
[Unit]
Description=Flanneld overlay address etcd agent
After=network-online.target network.target
Before=docker.service
[Service]
Type=notify
EnvironmentFile=/opt/kubernetes/cfg/flanneld
ExecStart=/opt/kubernetes/bin/flanneld --ip-masq \$FLANNEL_OPTIONS
ExecStartPost=/opt/kubernetes/bin/mk-docker-opts.sh -k DOCKER_NETWORK_OPTIONS -d /run/flannel/subnet.env
Restart=on-failure
[Install]
WantedBy=multi-user.target
EOF
systemctl daemon-reload
systemctl enable flanneld
systemctl restart flanneld
6. Turn on flannel network function:
[root@localhost ~]# bash flannel.sh https://192.168.109.138:2379,https://192.168.109.131:2379,https://192.168.109.132:2379
7. Configure docker connection flannel:
[root@localhost ~]# vim /usr/lib/systemd/system/docker.service
//Add and insert the following code:
EnvironmentFile=/run/flannel/subnet.env
$DOCKER_NETWORK_OPTIONS
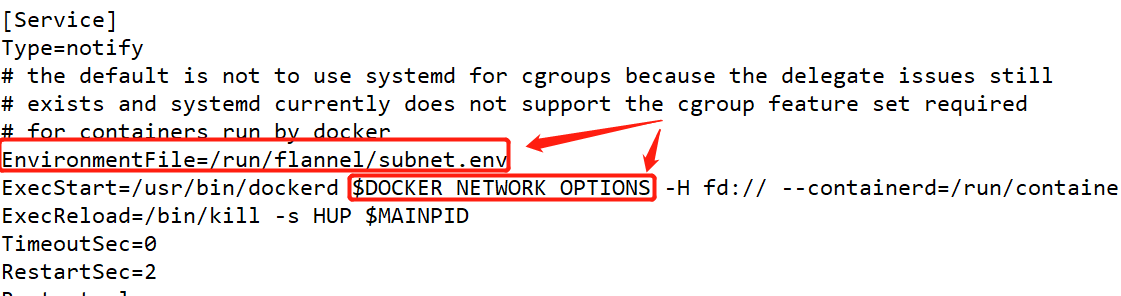
[root@localhost ~]# cat /run/flannel/subnet.env
DOCKER_OPT_BIP="--bip=172.17.93.1/24"
DOCKER_OPT_IPMASQ="--ip-masq=false"
DOCKER_OPT_MTU="--mtu=1450"
//Description: bip specifies the subnet at startup
DOCKER_NETWORK_OPTIONS=" --bip=172.17.93.1/24 --ip-masq=false --mtu=1450"
//Restart docker
[root@localhost ~]# systemctl daemon-reload
[root@localhost ~]# systemctl restart docker
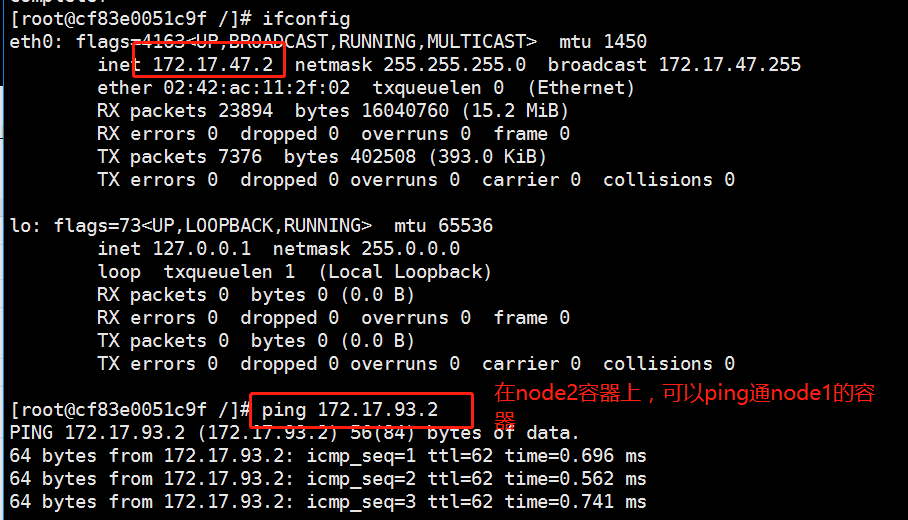
You can view the flannel network with the ifconfig command:
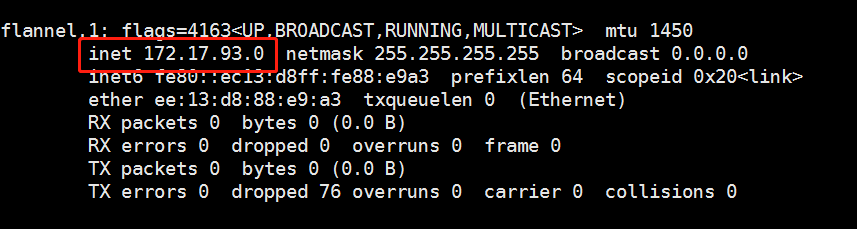
Next, the test ping pass docker0 network card proves that flannel plays a routing role:
[root@localhost ~]# docker run -it centos:7 /bin/bash
[root@bad98ca4fe31 /]# yum install -y net-tools
[root@bad98ca4fe31 /]# ifconfig
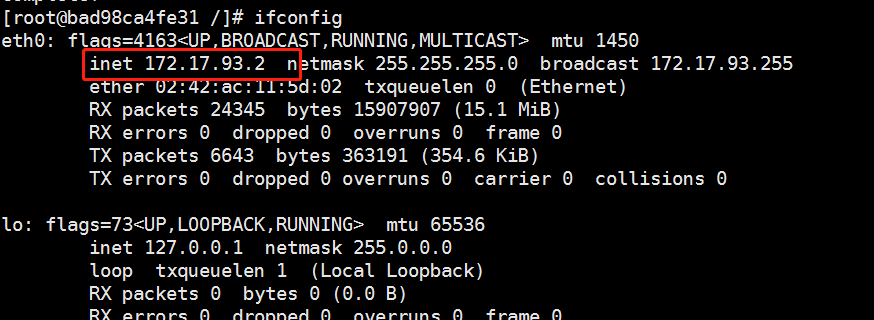
Do the same on the other node to test if ping passes through the centos:7 container in both nodes
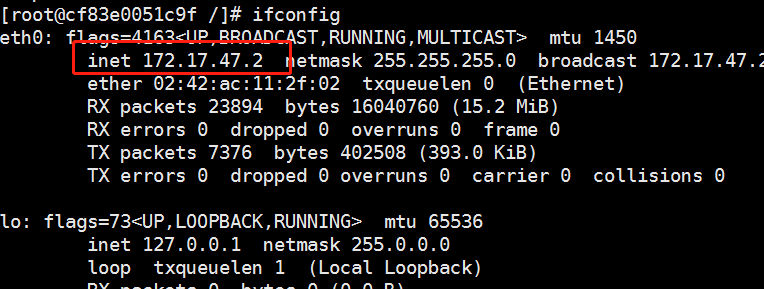
From the following figure, we can see that the container on node01 is a container that can ping through node02, representing the flannel network.