I. Introduction to Kubernetes
With the rapid development of Docker as an advanced container engine, container technology has been applied in Google
For many years, Borg system has run and managed thousands of container applications.
Kubernetes project originates from Borg, which can be said to be the essence of Borg design thought, and has absorbed the experience and lessons of Borg system.
Kubernetes abstracts computing resources at a higher level by carefully combining containers,
Deliver the final application service to the user.
Kubernetes benefits:
Hide resource management and error handling. Users only need to pay attention to application development.
The service is highly available and reliable.
The load can be run in a cluster of thousands of machines.
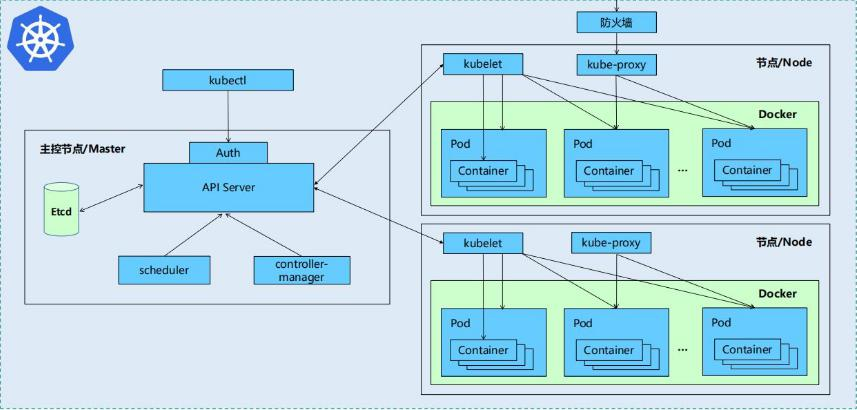
Kubernetes cluster includes node agent kubelet and Master components (APIs, scheduler, etc.),
Everything is based on a distributed storage system.

Kubernetes is mainly composed of the following core components:
etcd: saves the state of the entire cluster
apiserver: provides a unique entry for resource operations, and provides authentication, authorization, access control, API registration and discovery
Other mechanisms
controller manager: responsible for maintaining the status of the cluster, such as fault detection, automatic expansion, rolling update, etc
scheduler: it is responsible for resource scheduling and scheduling Pod to corresponding machines according to predetermined scheduling policies
kubelet: responsible for maintaining the life cycle of the container and managing Volume(CVI) and network (CNI)
Container runtime: responsible for image management and real operation (CRI) of Pod and container
Kube proxy: it is responsible for providing Service discovery and load balancing within the cluster for services
In addition to the core components, there are some recommended add ons:
Kube DNS: responsible for providing DNS services for the whole cluster
Ingress Controller: provides an Internet portal for services
Heapster: provides resource monitoring
Dashboard: provide GUI
Federation: provides clusters across availability zones
Fluent d-elastic search: provides cluster log collection, storage and query
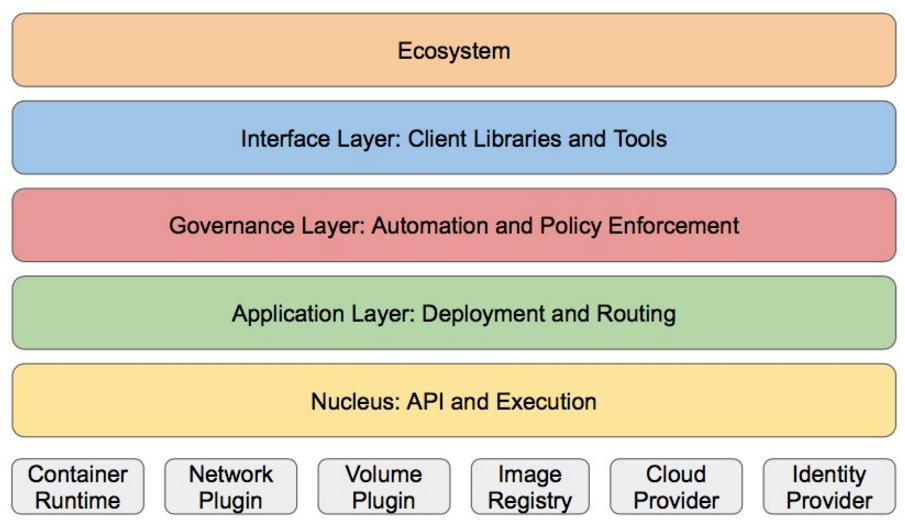
Kubernetes design concept and function is actually a layered architecture similar to Linux

Core layer: the core function of Kubernetes, which provides API s to build high-level applications externally and plug-ins internally
Application execution environment
Application layer: Deployment (stateless application, stateful application, batch task, cluster application, etc.) and routing (service)
Service discovery, DNS resolution, etc.)
Management: system measurement (such as infrastructure, container and network measurement), automation (such as automatic expansion, dynamic
Status Provision, etc.) and policy management (RBAC, Quota, PSP, NetworkPolicy, etc.)
Interface layer: kubectl command line tool, CLIENT SDK and cluster Federation
Ecosystem: a huge container cluster management and scheduling ecosystem above the interface layer, which can be divided into two modules
Domain:
Kubernetes external: logging, monitoring, configuration management, CI, CD, Workflow, FaaS
OTS applications, ChatOps, etc
Kubernetes internal: CRI, CNI, CVI, image warehouse, Cloud Provider, cluster itself
Configuration and management of
II. Kubernetes deployment
Turn off the selinux and iptables firewalls on the node
Virtual machines need internet access
[root@foundation7 ~]# firewall-cmd --list-all
trusted (active)
  target: ACCEPT
  icmp-block-inversion: no
  interfaces: br0 enp0s25 wlp3s0
  sources:
  services:
  ports:
  protocols:
  masquerade: no
  forward-ports:
  source-ports:
  icmp-blocks:
  rich rules:

[root@foundation7 ~]# firewall-cmd --permanent --add-masquerade
Warning: ALREADY_ENABLED: masquerade
success
[root@foundation7 ~]# firewall-cmd --reload
success
[root@foundation7 ~]# firewall-cmd --list-all
trusted (active)
  target: ACCEPT
  icmp-block-inversion: no
  interfaces: br0 enp0s25 wlp3s0
  sources:
  services:
  ports:
  protocols:
  masquerade: yes
  forward-ports:
  source-ports:
  icmp-blocks:
  rich rules:
Four virtual machines are required
Set the same part on server1, 2, 3 and 4
docker setting startup and self startup
[root@server1 ~]# systemctl enable --now docker
Edit the daemon. On server1 The JSON file is then passed to other virtual machines, and the docker service is restarted
[root@server3 ~]# cat /etc/docker/daemon.json
{
 "registry-mirrors": ["https://reg.westos.org"],
 "exec-opts": ["native.cgroupdriver=systemd"]
}
[root@server1 ~]# scp /etc/docker/daemon.json server2:/etc/docker/daemon.json
daemon.json                                                                        100%   99   121.8KB/s   00:00
[root@server1 ~]# scp /etc/docker/daemon.json server3:/etc/docker/daemon.json
daemon.json                                                                        100%   99   106.2KB/s   00:00
[root@server1 ~]# scp /etc/docker/daemon.json server4:/etc/docker/daemon.json
root@server4's password:
daemon.json                                                                        100%   99   120.3KB/s   00:00
[root@server1 ~]# systemctl daemon-reload
[root@server1 ~]# systemctl restart docker
Disable swap partition:
swapoff -a
Comment out the swap definition in the / etc/fstab file
[root@server1 ~]# swapoff -a
[root@server1 ~]# vim /etc/fstab

Edit the software download repository on four virtual machines
[root@server1 ~]# vim /etc/yum.repos.d/k8s.repo
[root@server1 ~]# cat /etc/yum.repos.d/k8s.repo
[kubernetes]
name=Kubernetes
baseurl=https://mirrors.aliyun.com/kubernetes/yum/repos/kubernetes-el7-x86_64/
enabled=1
gpgcheck=0
[root@server1 ~]# scp /etc/yum.repos.d/k8s.repo server2:/etc/yum.repos.d/
k8s.repo                                                                           100%  130   196.1KB/s   00:00
[root@server1 ~]# scp /etc/yum.repos.d/k8s.repo server3:/etc/yum.repos.d/
k8s.repo                                                                           100%  130   171.1KB/s   00:00
[root@server1 ~]# scp /etc/yum.repos.d/k8s.repo server4:/etc/yum.repos.d/
root@server4's password:
k8s.repo                                                                           100%  130   152.8KB/s   00:00
Download the software on the four virtual machines and set the software to start automatically
[root@server1 ~]# yum install -y kubelet kubeadm kubectl

systemctl enable --now kubelet
View default configuration information
[root@server1 ~]# kubeadm config print init-defaults
apiVersion: kubeadm.k8s.io/v1beta2
bootstrapTokens:
- groups:
  - system:bootstrappers:kubeadm:default-node-token
  token: abcdef.0123456789abcdef
  ttl: 24h0m0s
  usages:
  - signing
  - authentication
kind: InitConfiguration
localAPIEndpoint:
  advertiseAddress: 1.2.3.4
  bindPort: 6443
nodeRegistration:
  criSocket: /var/run/dockershim.sock
  name: node
  taints: null
---
apiServer:
  timeoutForControlPlane: 4m0s
apiVersion: kubeadm.k8s.io/v1beta2
certificatesDir: /etc/kubernetes/pki
clusterName: kubernetes
controllerManager: {}
dns:
  type: CoreDNS
etcd:
  local:
    dataDir: /var/lib/etcd
imageRepository: k8s.gcr.io
kind: ClusterConfiguration
kubernetesVersion: 1.21.0
networking:
  dnsDomain: cluster.local
  serviceSubnet: 10.96.0.0/12
scheduler: {}
List the required mirrors
[root@server1 ~]# kubeadm config images list --image-repository registry.aliyuncs.com/google_containers
registry.aliyuncs.com/google_containers/kube-apiserver:v1.21.3
registry.aliyuncs.com/google_containers/kube-controller-manager:v1.21.3
registry.aliyuncs.com/google_containers/kube-scheduler:v1.21.3
registry.aliyuncs.com/google_containers/kube-proxy:v1.21.3
registry.aliyuncs.com/google_containers/pause:3.4.1
registry.aliyuncs.com/google_containers/etcd:3.4.13-0
registry.aliyuncs.com/google_containers/coredns:v1.8.0
Pull image
[root@server1 ~]# kubeadm config images pull --image-repository registry.aliyuncs.com/google_containers
[config/images] Pulled registry.aliyuncs.com/google_containers/kube-apiserver:v1.21.3
[config/images] Pulled registry.aliyuncs.com/google_containers/kube-controller-manager:v1.21.3
[config/images] Pulled registry.aliyuncs.com/google_containers/kube-scheduler:v1.21.3
[config/images] Pulled registry.aliyuncs.com/google_containers/kube-proxy:v1.21.3
[config/images] Pulled registry.aliyuncs.com/google_containers/pause:3.4.1
[config/images] Pulled registry.aliyuncs.com/google_containers/etcd:3.4.13-0
failed to pull image "registry.aliyuncs.com/google_containers/coredns:v1.8.0": output: Error response from daemon: manifest for registry.aliyuncs.com/google_containers/coredns:v1.8.0 not found: manifest unknown: manifest unknown
, error: exit status 1
To see the stack trace of this error execute with --v=5 or higher
Label the pulled image
[root@server1 packages]# docker images | grep ^registry.aliyuncs.com |awk '{print $1":"$2}'|awk -F/ '{system("docker tag "$0" reg.westos.org/k8s/"$3"")}'
Upload image
[root@server1 ~]# docker images | grep ^registry.aliyuncs.com |awk '{print $1":"$2}'|awk -F/ '{system("docker tag "$0" reg.westos.org/k8s/"$3"")}'
[root@server1 ~]# docker images |grep ^reg.westos.org/k8s|awk '{system("docker push "$1":"$2"")}'
The push refers to repository [reg.westos.org/k8s/kube-apiserver]
79365e8cbfcb: Layer already exists
3d63edbd1075: Layer already exists
16679402dc20: Layer already exists
v1.21.3: digest: sha256:910cfdf034262c7b68ecb17c0885f39bdaaad07d87c9a5b6320819d8500b7ee5 size: 949
The push refers to repository [reg.westos.org/k8s/kube-scheduler]
9408d6c3cfbd: Layer already exists
3d63edbd1075: Layer already exists
16679402dc20: Layer already exists
v1.21.3: digest: sha256:b61779ea1bd936c137b25b3a7baa5551fbbd84fed8568d15c7c85ab1139521c0 size: 949
The push refers to repository [reg.westos.org/k8s/kube-proxy]
8fe09c1d10f0: Layer already exists
48b90c7688a2: Layer already exists
v1.21.3: digest: sha256:af5c9bacb913b5751d2d94e11dfd4e183e97b1a4afce282be95ce177f4a0100b size: 740
The push refers to repository [reg.westos.org/k8s/kube-controller-manager]
46675cd6b26d: Layer already exists
3d63edbd1075: Layer already exists
16679402dc20: Layer already exists
v1.21.3: digest: sha256:020336b75c4893f1849758800d6f98bb2718faf3e5c812f91ce9fc4dfb69543b size: 949
The push refers to repository [reg.westos.org/k8s/pause]
915e8870f7d1: Layer already exists
3.4.1: digest: sha256:9ec1e780f5c0196af7b28f135ffc0533eddcb0a54a0ba8b32943303ce76fe70d size: 526
The push refers to repository [reg.westos.org/k8s/coredns]
69ae2fbf419f: Pushed
225df95e717c: Pushed
v1.8.0: digest: sha256:10ecc12177735e5a6fd6fa0127202776128d860ed7ab0341780ddaeb1f6dfe61 size: 739
The push refers to repository [reg.westos.org/k8s/etcd]
bb63b9467928: Layer already exists
bfa5849f3d09: Layer already exists
1a4e46412eb0: Layer already exists
d61c79b29299: Layer already exists
d72a74c56330: Layer already exists
3.4.13-0: digest: sha256:bd4d2c9a19be8a492bc79df53eee199fd04b415e9993eb69f7718052602a147a size: 1372

Initialize cluster
[root@server1 ~]# kubeadm init --pod-network-cidr=10.244.0.0/16 --image-repository reg.westos.org/k8s
[init] Using Kubernetes version: v1.21.3
[preflight] Running pre-flight checks
[preflight] Pulling images required for setting up a Kubernetes cluster
[preflight] This might take a minute or two, depending on the speed of your internet connection
[preflight] You can also perform this action in beforehand using 'kubeadm config images pull'
[certs] Using certificateDir folder "/etc/kubernetes/pki"
[certs] Generating "ca" certificate and key
[certs] Generating "apiserver" certificate and key
[certs] apiserver serving cert is signed for DNS names [kubernetes kubernetes.default kubernetes.default.svc kubernetes.default.svc.cluster.local server1] and IPs [10.96.0.1 172.25.7.1]
[certs] Generating "apiserver-kubelet-client" certificate and key
[certs] Generating "front-proxy-ca" certificate and key
[certs] Generating "front-proxy-client" certificate and key
[certs] Generating "etcd/ca" certificate and key
[certs] Generating "etcd/server" certificate and key
[certs] etcd/server serving cert is signed for DNS names [localhost server1] and IPs [172.25.7.1 127.0.0.1 ::1]
[certs] Generating "etcd/peer" certificate and key
[certs] etcd/peer serving cert is signed for DNS names [localhost server1] and IPs [172.25.7.1 127.0.0.1 ::1]
[certs] Generating "etcd/healthcheck-client" certificate and key
[certs] Generating "apiserver-etcd-client" certificate and key
[certs] Generating "sa" key and public key
[kubeconfig] Using kubeconfig folder "/etc/kubernetes"
[kubeconfig] Writing "admin.conf" kubeconfig file
[kubeconfig] Writing "kubelet.conf" kubeconfig file
[kubeconfig] Writing "controller-manager.conf" kubeconfig file
[kubeconfig] Writing "scheduler.conf" kubeconfig file
[kubelet-start] Writing kubelet environment file with flags to file "/var/lib/kubelet/kubeadm-flags.env"
[kubelet-start] Writing kubelet configuration to file "/var/lib/kubelet/config.yaml"
[kubelet-start] Starting the kubelet
[control-plane] Using manifest folder "/etc/kubernetes/manifests"
[control-plane] Creating static Pod manifest for "kube-apiserver"
[control-plane] Creating static Pod manifest for "kube-controller-manager"
[control-plane] Creating static Pod manifest for "kube-scheduler"
[etcd] Creating static Pod manifest for local etcd in "/etc/kubernetes/manifests"
[wait-control-plane] Waiting for the kubelet to boot up the control plane as static Pods from directory "/etc/kubernetes/manifests". This can take up to 4m0s
[apiclient] All control plane components are healthy after 19.003026 seconds
[upload-config] Storing the configuration used in ConfigMap "kubeadm-config" in the "kube-system" Namespace
[kubelet] Creating a ConfigMap "kubelet-config-1.21" in namespace kube-system with the configuration for the kubelets in the cluster
[upload-certs] Skipping phase. Please see --upload-certs
[mark-control-plane] Marking the node server1 as control-plane by adding the labels: [node-role.kubernetes.io/master(deprecated) node-role.kubernetes.io/control-plane node.kubernetes.io/exclude-from-external-load-balancers]
[mark-control-plane] Marking the node server1 as control-plane by adding the taints [node-role.kubernetes.io/master:NoSchedule]
[bootstrap-token] Using token: p8n9r4.9cusb995n7bnohgy
[bootstrap-token] Configuring bootstrap tokens, cluster-info ConfigMap, RBAC Roles
[bootstrap-token] configured RBAC rules to allow Node Bootstrap tokens to get nodes
[bootstrap-token] configured RBAC rules to allow Node Bootstrap tokens to post CSRs in order for nodes to get long term certificate credentials
[bootstrap-token] configured RBAC rules to allow the csrapprover controller automatically approve CSRs from a Node Bootstrap Token
[bootstrap-token] configured RBAC rules to allow certificate rotation for all node client certificates in the cluster
[bootstrap-token] Creating the "cluster-info" ConfigMap in the "kube-public" namespace
[kubelet-finalize] Updating "/etc/kubernetes/kubelet.conf" to point to a rotatable kubelet client certificate and key
[addons] Applied essential addon: CoreDNS
[addons] Applied essential addon: kube-proxy

Your Kubernetes control-plane has initialized successfully!

To start using your cluster, you need to run the following as a regular user:

  mkdir -p $HOME/.kube
  sudo cp -i /etc/kubernetes/admin.conf $HOME/.kube/config
  sudo chown $(id -u):$(id -g) $HOME/.kube/config

Alternatively, if you are the root user, you can run:

  export KUBECONFIG=/etc/kubernetes/admin.conf

You should now deploy a pod network to the cluster.
Run "kubectl apply -f [podnetwork].yaml" with one of the options listed at:
  https://kubernetes.io/docs/concepts/cluster-administration/addons/

Then you can join any number of worker nodes by running the following on each as root:

kubeadm join 172.25.7.1:6443 --token p8n9r4.9cusb995n7bnohgy \
	--discovery-token-ca-cert-hash sha256:237abdcd84f8ad748c8a2e1555da9af8c5153c1145def48b662c42b998bd87bf
Node expansion
Configure kubectl
[root@server1 ~]# useradd kubeadm
[root@server1 ~]# vim /etc/sudoers

[root@server1 ~]# mkdir -p $HOME/.kube
[root@server1 ~]# sudo cp -i /etc/kubernetes/admin.conf $HOME/.kube/config
[root@server1 ~]# sudo chown $(id -u):$(id -g) $HOME/.kube/config
Configure kubectl command replenishment function
[root@server1 ~]# echo "source <(kubectl completion bash)" >> ~/.bashrc