Kubernetes configuration management
ConfigMap
The variable configuration of applications is implemented through a ConfigMap resource object in Kubernetes. Many applications often need to read some configuration information from configuration files, command-line parameters or environment variables. These configuration information will certainly not be written directly to applications. For example, an application connects to a redis service, The next time we want to replace one, we have to modify the code and remake an image, which is certainly not desirable. ConfigMap provides us with the ability to inject configuration information into the container, which can be used to save not only a single attribute, but also the entire configuration file. For example, we can configure the access address of a redis service, It can also be used to save the entire redis configuration file.
establish
The ConfigMap resource object uses key value pairs in the form of key value to configure data. These data can be used in the Pod, as shown in the resource list below:
apiVersion: v1
kind: ConfigMap
metadata:
  name: configMap
data: # <map[string]string>
  xxx
Detailed resource list:
kind: ConfigMap
apiVersion: v1
metadata:
  name: cm-demo
  namespace: default
data:
  data.1: hello
  data.2: world
  config: |
    property.1=value-1
    property.2=value-2
    property.3=value-3
The configuration data is configured under the data attribute. The first two are used to save a single attribute, and the latter one is used to save a configuration file.
Of course, we can also use kubectl create - f XX Yaml to create the above ConfigMap object, but if we don't know how to create ConfigMap, we can use kubectl create configmap -h to view the help information about creating ConfigMap:
Examples:
# Create a new configmap named my-config based on folder bar
kubectl create configmap my-config --from-file=path/to/bar

# Create a new configmap named my-config with specified keys instead of file basenames on disk
kubectl create configmap my-config --from-file=key1=/path/to/bar/file1.txt --from-file=key2=/path/to/bar/file2.txt

# Create a new configmap named my-config with key1=config1 and key2=config2
kubectl create configmap my-config --from-literal=key1=config1 --from-literal=key2=config2
You can see that a ConfigMap object can be created from a given directory. For example, we have a directory of testcm, which contains some configuration files and the connection information of redis and mysql, as follows:
$ ls testcm/
mysql.conf  redis.conf

$ cat testcm/mysql.conf
host=127.0.0.1
port=3306

$ cat testcm/redis.conf
host=127.0.0.1
port=6379
Then we can use the from file keyword to create a ConfigMap containing the following configuration files in this directory:
$ kubectl create configmap cm-demo1 --from-file=testcm/
configmap/cm-demo1 created
The from file parameter specifies that all files under the directory will be used to create a key value pair in ConfigMap. The name of the key is the file name and the value is the content of the file. After creation, you can also use the following command to view the ConfigMap list:
$ kubectl get config
NAME       DATA   AGE
cm-demo1   2      10m
You can see that a cm-demo1 ConfigMap object has been created. Then you can use the describe command to view the details:
$ kubectl describe configmap cm-demo1
Name:         cm-demo1
Namespace:    default
Labels:       <none>
Annotations:  <none>

Data
====
mysql.conf:
----
host=127.0.0.1
port=3306

redis.conf:
----
host=127.0.0.1
port=6379

Events:  <none>
You can see that the two keys are the file names under the testcm directory, and the corresponding value value is the file content. It is worth noting that if the configuration information in the file is large, the corresponding value may not be displayed when describing. To view the complete key value, you can use the following command:
$ kubectl get cm cm-demo1 -o yaml
apiVersion: v1
data:
  mysql.conf: |
    host=127.0.0.1
    port=3306
  redis.conf: |
    host=127.0.0.1
    port=6379
kind: ConfigMap
metadata:
  creationTimestamp: "2022-01-02T02:58:51Z"
  managedFields:
  - apiVersion: v1
    fieldsType: FieldsV1
    fieldsV1:
      f:data:
        .: {}
        f:mysql.conf: {}
        f:redis.conf: {}
    manager: kubectl
    operation: Update
    time: "2022-01-02T02:58:51Z"
  name: cm-demo1
  namespace: default
  resourceVersion: "4885"
  selfLink: /api/v1/namespaces/default/configmaps/cm-demo1
  uid: 1d4353cc-2bbb-44a0-9b25-b4ac4ca2cafe
In addition to creating through the file directory, we can also use the specified file to create ConfigMap. Similarly, taking the above configuration file as an example, we create a separate ConfigMap object for redis configuration:
$ kubectl create configmap cm-demo2 --from-file=testcm/mysql.conf
configmap/cm-demo2 created
You can see an associated mysql The ConfigMap object of the conf file configuration information is created successfully. In addition, it is worth noting that the parameter -- from file can be used multiple times. For example, we use it twice to specify redis Conf and mysql The conf file has the same effect as directly specifying the entire directory.
In addition, through the help document, we can see that we can also directly use the string to create, and pass the configuration information through the -- from literal parameter. Similarly, this parameter can be used multiple times. The format is as follows:
$ kubectl create configmap cm-demo3 --from-literal=db.host=localhost --from-literal=db.port=6379
configmap/cm-demo3 created

$ kubectl get cm cm-demo3 -o yaml
apiVersion: v1
data:
  db.host: localhost
  db.port: "6379"
kind: ConfigMap
metadata:
  creationTimestamp: "2022-01-02T03:19:39Z"
  managedFields:
  - apiVersion: v1
    fieldsType: FieldsV1
    fieldsV1:
      f:data:
        .: {}
        f:db.host: {}
        f:db.port: {}
    manager: kubectl
    operation: Update
    time: "2022-01-02T03:19:39Z"
  name: cm-demo3
  namespace: default
  resourceVersion: "7882"
  selfLink: /api/v1/namespaces/default/configmaps/cm-demo3
  uid: ac114686-f7cd-4da9-86a9-1c6fff3ad8ee
use
ConfigMap is created successfully. How should we use it in Pod? ConfigMap these configuration data can be used in the Pod in the following ways:
- Set the value of the environment variable
- Setting command line parameters in a container
- Mount the configuration file in the data volume
First, use ConfigMap to fill in our environment variables, as shown in the Pod resource object:
apiVersion: v1
kind: Pod
metadata:
  name: testcm1-pod
spec:
  containers:
    - name: testcm1
      image: busybox
      command: ["/bin/sh", "-c", "env"]
      env:
        - name: DB_HOST
          valueFrom:
            configMapKeyRef:
              name: cm-demo3
              key: db.host
        - name: DB_PORT
          valueFrom:
            configMapKeyRef:
              name: cm-demo3
              key: db.port
      envFrom:
        - configMapRef:
            name: cm-demo1
To view the Pod output log:
$ kubectl logs testcm1-pod
......
DB_PORT=6379
mysql.conf=host=127.0.0.1
port=3306
redis.conf=host=127.0.0.1
port=6379
DB_HOST=localhost
......
The findings are consistent with our expectations, DB_HOST and DB_PORT has been output normally. The other environment variables are because we directly inject cm-demo1 into it.
In addition, we can also use ConfigMap to set command line parameters:
apiVersion: v1
kind: Pod
metadata:
  name: testcm2-pod
spec:
  containers:
    - name: testcm1
      image: busybox:1.30
      command: ["/bin/sh", "-c", "echo $(DB_HOST) $(DB_PORT)"]
      env:
        - name: DB_HOST
          valueFrom:
            configMapKeyRef:
              name: cm-demo3
              key: db.host
        - name: DB_PORT
          valueFrom:
            configMapKeyRef:
              name: cm-demo3
              key: db.port
Similarly, let's look at the output of Pod:
$ kubectl logs testcm2-pod
localhost 6379
In addition, you can also use ConfigMap in the data volume, as shown in the following resource object:
apiVersion: v1
kind: Pod
metadata:
  name: testcm3-pod
spec:
  volumes:
    - name: config-volume
      configMap:
        name: cm-demo2
  containers:
    - name: testcm3
      image: busybox:1.30
      command: ["/bin/sh", "-c", "cat /etc/config/mysql.conf"]
      volumeMounts:
        - name: config-volume
          mountPath: /etc/config
Run this Pod to view the log:
$ kubectl logs testcm3-pod
host=127.0.0.1
port=3306
Of course, we can also control the path in the data volume to which the ConfigMap value is mapped, as shown in Pod below:
apiVersion: v1
kind: Pod
metadata:
  name: testcm4-pod
spec:
  volumes:
    - name: config-volume
      configMap:
        name: cm-demo1
        items:
          - key: redis.conf
            path: path/redis.conf   # Define the mount path in the container
  containers:
    - name: testcm3
      image: busybox:1.30
      command: ["/bin/sh", "-c", "cat /etc/config/path/redis.conf"]
      volumeMounts:
        - name: config-volume
          mountPath: /etc/config
Run this Pod to view the output log:
$ kubectl logs testcm4-pod
host=127.0.0.1
port=6379
In addition, it should be noted that when ConfigMap is attached to the Pod in the form of data volume, the ConfigMap will be updated (or the ConfigMap will be deleted and reconstructed), and the configuration information attached in the Pod will be hot updated. At this time, you can add some scripts to monitor the changes of the configuration file, and then reload the corresponding services to realize the hot update of the application.
Next, we create a ConfigMap, mount it into the Pod in the form of data volume, and dynamically update the configuration information.
apiVersion: v1
kind: ConfigMap
metadata:
  name: cm1
data:
  info:
    username:admin
    password:123456
Mount the above ConfigMap into the Pod:
apiVersion: v1
kind: Pod
metadata:
  name: cm-pod
spec:
  containers:
    - name: nginx
      image: nginx:1.17.1
      volumeMounts:
        - name: config
          mountPath: /configMap/config
  volumes:
    - name: config
      configMap:
        name: cm1
Enter the container to view the configuration:
$ kubectl exec -it cm-pod /bin/bash
kubectl exec [POD] [COMMAND] is DEPRECATED and will be removed in a future version. Use kubectl kubectl exec [POD] -- [COMMAND] instead.

root@cm-pod:~# cat /configMap/config/info
username:admin password:123456
Next, we dynamically modify ConfigMap:
$ kubectl edit cm cm1
# Here, I changed the original password:123456 to admin
After modification, enter the container again to view the configuration:
$ kubectl exec -it cm-pod /bin/bash
kubectl exec [POD] [COMMAND] is DEPRECATED and will be removed in a future version. Use kubectl kubectl exec [POD] -- [COMMAND] instead.
root@cm-pod:/# cat /configMap/config/info
username:admin password:admin
In addition, ConfigMap can only be used for pods created through Kubernetes API, and cannot be used for pods created in other ways (such as static pods); ConfigMap file size is limited to 1MB (ETCD requirements).
Secret
Generally, ConfigMap is used to store some non secure configuration information. If some security related data is involved, it is very inappropriate to use ConfigMap, because ConfigMap is stored in plaintext. At this time, we need to use another resource object very similar to ConfigMap: Secret, which is used to store sensitive information, such as password OAuth token and ssh key, etc. putting these information in Secret is more secure and flexible than in the definition of Pod or Docker image.
Secret mainly uses the following three types:
- Opaque: Secret in Base64 encoding format, which is used to store passwords, keys, etc; However, the original data can also be decoded by base64 – decode, and all encryption is very weak.
- kubernetes.io/dockerconfigjson: used to store the authentication information of the private docker registry.
- Kubernetes. IO / service account token: used to create a corresponding Secret object by default when created by ServiceAccount. If the Pod uses ServiceAccount, the corresponding Secret will be automatically mounted to the Pod directory / run / secrets / Kubernetes IO / ServiceAccount.
Opaque Secret
The data of Opaque type is a map type. It is required that value must be in base64 encoding format. For example, let's create a Secret object with user name admin and password admin321. First, we need to encode the user name and password in base64:
$ echo -n "admin" | base64
YWRtaW4=
$ echo -n "admin123" | base64
YWRtaW4xMjM=
Then we use the above encoded data to write a YAML file:
apiVersion: v1
kind: Secret
metadata:
  name: s1
type:
  Opaque
data:
  username: YWRtaW4=
  password: YWRtaW4xMjM=
After creation, use the kubectl get secret command to view:
$ kubectl get secret
NAME                  TYPE                                  DATA   AGE
default-token-lqrpd   kubernetes.io/service-account-token   3      171m
s1                    Opaque                                2      8s
Where default token lqrpd is the Secret created by default when creating a cluster, which is referenced by serviceaccount / default.
We can use the describe command to view s1 details:
kubectl describe secret s1
Name:         s1
Namespace:    default
Labels:       <none>
Annotations:
Type:         Opaque

Data
====
password:  8 bytes
username:  5 bytes
We find that the Data of Data is not directly displayed, so we can output it to yaml file to view:
$ kubectl get secret s1 -o yaml
apiVersion: v1
data:
  password: YWRtaW4xMjM=
  username: YWRtaW4=
kind: Secret
metadata:
  annotations:
    kubectl.kubernetes.io/last-applied-configuration: |
      {"apiVersion":"v1","data":{"password":"YWRtaW4xMjM=","username":"YWRtaW4="},"kind":"Secret","metadata":{"annotations":{},"name":"s1","namespace":"default"},"type":"Opaque"}
  creationTimestamp: "2022-01-02T05:20:21Z"
  ...... Omit some contents
  name: s1
  namespace: default
  resourceVersion: "25976"
  selfLink: /api/v1/namespaces/default/secrets/s1
  uid: 1ca8d5b8-27c5-4044-8c02-e5ac8331584b
type: Opaque
After the Secret object is created, it can be used in two ways: in the form of environment variable and in the form of Volume mount
environment variable
The environment variable is similar to the configMapKeyRef in ConfigMap above. Use the secertKeyRef in Secret:
apiVersion: v1
kind: Pod
metadata:
  name: s1-pod
spec:
  containers:
    - name: secret1
      image: busybox:1.30
      command: ["/bin/sh", "-c", "env"]
      env:
        - name: USERNAME
          valueFrom:
            secretKeyRef:
              name: s1
              key: username
        - name: PASSWORD
          valueFrom:
            secretKeyRef:
              name: s1
              key: password
Also view the Pod output log:
$ kubectl logs s1-pod
......
USERNAME=admin
PASSWORD=admin123
......
Volume mount
Also use a Pod to verify the Volume mount:
apiVersion: v1
kind: Pod
metadata:
  name: s1-pod1
spec:
  containers:
    - name: secret1
      image: busybox:1.30
      command: ["/bin/sh", "-c", "ls /etc/secrets"]
      volumeMounts:
        - name: secrets
          mountPath: /etc/secrets
  volumes:
    - name: secrets
      secret:
        secretName: s1
To view the output log of the Pod:
$ kubectl logs s1-pod1
password
username
You can see that Secret mounts two keys into two corresponding files. Of course, if you want to mount to the specified file, you can also use the method in the previous section: add items under secretName to specify key and path.
apiVersion: v1
kind: Pod
metadata:
  name: s1-pod2
spec:
  volumes:
    - name: secrets
      secret:
        secretName: s1
        items:
          - key: password
            path: secrets/password
  containers:
    - name: s1
      image: busybox:1.30
      command: ["/bin/sh", "-c", "cat /etc/config/secrets/password"]
      volumeMounts:
        - name: secrets
          mountPath: /etc/config
Also view the output log of the pod:
$ kubectl logs s1-pod2
admin123
kubernetes.io/dockerconfigjson
In addition to the above Opaque type, you can also create a Secret authenticated by the user docker registry, which can be created directly by using the kubectl create command:
$ kubectl create secret docker-registry myregistry \
	--docker-server=DOCKER_SERVER \
	--docker-username=DOCKER_USER\
 	--docker-password=DOCKER_PASSWORD\
 	--docker-email=DOCKER_EMAIL
We can create the authentication information of the image warehouse by specifying the file, which mainly needs the corresponding KEY and TYPE.
First, we log in to docker:
$ docker login
Login with your Docker ID to push and pull images from Docker Hub. If you don't have a Docker ID, head over to https://hub.docker.com to create one.
Username: huiyichanmian
Password:
WARNING! Your password will be stored unencrypted in /root/.docker/config.json.
Configure a credential helper to remove this warning. See
https://docs.docker.com/engine/reference/commandline/login/#credentials-store

Login Succeeded
After successful login, docker will store the login information in ` ` ~ / docker/config.json ` in this file.
Next, we create the image warehouse authentication information:
$ kubectl create secret generic myregistry \
	--from-file=.dockerconfigjson=/root/.docker/config.json \
	--type=kubernetes.io/dockerconfigjson
To view the Secret list:
$ kubectl get secrets
NAME                  TYPE                                  DATA   AGE
default-token-lqrpd   kubernetes.io/service-account-token   3      6h9m
myregistry            kubernetes.io/dockerconfigjson        1      22s
myregistry1           kubernetes.io/dockerconfigjson        1      42s
The TYPE corresponding to myregistry is kubernetes IO / dockerconfigugjson, you can also use the describe command to view the details:
$ kubectl describe secret myregistry
Name:         myregistry
Namespace:    default
Labels:       <none>
Annotations:  <none>

Type:  kubernetes.io/dockerconfigjson

Data
====
.dockerconfigjson:  152 bytes
The Data in the Data area is not directly displayed. We use - o yaml to output:
$ kubectl get secret myregistry -o yaml
apiVersion: v1
data:
  .dockerconfigjson: ewoJImF1dGhzIjogewoJCSJodHRwczovL2luZGV4LmRvY2tlci5pby92MS8iOiB7CgkJCSJhdXRoIjogImFIVnBlV2xqYUdGdWJXbGhianBqYUhKcGMzUnBZVzQ0TWpVPSIKCQl9Cgl9LAoJIkh0dHBIZWFkZXJzIjogewoJCSJVc2VyLUFnZW50IjogIkRvY2tlci1DbGllbnQvMTguMDYuMy1jZSAobGludXgpIgoJfQp9
kind: Secret
metadata:
  creationTimestamp: "2022-01-02T08:38:01Z"
  .....
  uid: 37b13407-b5d2-4513-a8cf-6dee65acc2bf
type: kubernetes.io/dockerconfigjson
Let's put the above data base64 decoding of dockerconfigjson data:
$ echo eyJhdXRocyI6eyJET0NLRVJfU0VSVkVSIjp7InVzZXJuYW1lIjoiRE9DS0VSX1VTRVIiLCJwYXNzd29yZCI6IkRPQ0tFUl9QQVNTV09SRCIsImVtYWlsIjoiRE9DS0VSX0VNQUlMIiwiYXV0aCI6IlJFOURTMFZTWDFWVFJWSTZSRTlEUzBWU1gxQkJVMU5YVDFKRSJ9fX0= | base64 -d
{"auths":{"DOCKER_SERVER":{"username":"DOCKER_USER","password":"DOCKER_PASSWORD","email":"DOCKER_EMAIL","auth":"RE9DS0VSX1VTRVI6RE9DS0VSX1BBU1NXT1JE"}}}
If we need to pull the Docker image from the private warehouse, we need to use the Secret of myregistry above:
apiVersion: v1
kind: Pod
metadata:
  name: foo
spec:
  containers:
  - name: foo
    image: 192.168.1.100:5000/test:v1
  imagePullSecrets:
  - name: myregistry
-
ImagePullSecrets
ImagePullSecrets is different from Secrets because Secrets can be mounted in Pod, but ImagePullSecrets can only be accessed by Kubelet.
We need to pull the private warehouse image 192.168.1.100:5000/test:v1, so we need to create the above Secret for the private warehouse, and then specify imagePullSecrets in Pod.
kubernetes.io/service-account-token
Kubernetes. IO / service account token is used to be referenced by ServiceAccount. When ServiceAccout is created, Kubernetes will create the corresponding Secret by default. If a Pod uses a ServiceAccount, the corresponding Secret will be automatically mounted to / var / run / secrets / Kubernetes. Com of the Pod IO / ServiceAccount / directory. Let's create a Pod at will as follows:
$ kubectl run secret-pod --image nginx:1.17.1
View the details of this pod:
......
spec:
  containers:
  - image: nginx:1.17.1
    imagePullPolicy: IfNotPresent
    name: secret-pod
   ......
    volumeMounts:
    - mountPath: /var/run/secrets/kubernetes.io/serviceaccount
      name: default-token-lqrpd
      readOnly: true
......
  serviceAccount: default
  serviceAccountName: default
  volumes:
  - name: default-token-lqrpd
    secret:
      defaultMode: 420
      secretName: default-token-lqrpd
You can see that by default, the Secret object corresponding to the ServiceAccount named default (automatically created) is mounted to the container's / var / run / secrets / kubernetes In the directory of IO / ServiceAccount.
Similarly, the size of Secret file is limited to 1MB (ETCD requirements); Although Secret adopts Base64 coding, we can easily decode and obtain the original information, so we still need to carefully consider the very important data.
ServiceAccount
ServiceAccount is mainly used to solve the identity authentication problem of Pod in the cluster. The authorization information used for authentication is actually the use of kubernetes IO / service account token.
introduce
ServiceAccount is namespace level. When each namespace is created, a ServiceAccount object named default will be automatically created:
$ kubectl create namespace dev
namespace/dev created

$ kubectl get serviceaccount -n dev
NAME      SECRETS   AGE
default   1         22s

$  kubectl get secret -n dev
NAME                  TYPE                                  DATA   AGE
default-token-qxvm4   kubernetes.io/service-account-token   3      70s
This ServiceAccount will be automatically associated to a Secret object:
$ kubectl get sa default -n dev -o yaml
apiVersion: v1
kind: ServiceAccount
metadata:
  creationTimestamp: "2022-01-02T09:21:03Z"
  name: default
  namespace: dev
  resourceVersion: "61354"
  selfLink: /api/v1/namespaces/dev/serviceaccounts/default
  uid: 0cfe3ea8-0255-434a-84ec-82f9c9e60fee
secrets:
- name: default-token-qxvm4
This Secret object is automatically created by the ServiceAccount controller. We can view the associated Secret object information:
# kubectl get secret default-token-qxvm4 -n dev -o yaml
apiVersion: v1
data:
  ca.crt: LS0...
  namespace: ZGV2
  token: ZXlKaGJ...
kind: Secret
metadata:
  annotations:
    kubernetes.io/service-account.name: default
    kubernetes.io/service-account.uid: 0cfe3ea8-0255-434a-84ec-82f9c9e60fee
  creationTimestamp: "2022-01-02T09:21:03Z"
  ......
  name: default-token-qxvm4
  namespace: dev
  resourceVersion: "61353"
  selfLink: /api/v1/namespaces/dev/secrets/default-token-qxvm4
  uid: 0277b6f3-5e22-405d-a4fa-e64b7bbd4bc5
type: kubernetes.io/service-account-token
In the data area, we can see three messages:
- ca.crt: used to verify the certificate information of the server
- Namespace: represents the currently managed namespace
- Token: token used for Pod authentication
By default, the Pod under the current namespace will use the ServiceAccount of default by default, and the corresponding Secret will be automatically attached to / var / run / secrets / kubernetes IO / ServiceAccount / directory, so that we can get the information used for identity authentication in the Pod.
Implementation principle
In fact, this automatic mounting process is implemented through the admission controller when the Pod is created.
-
Admisson Controller
Admission Controller is a means used by Kubernetes API Server to intercept requests. Permission can verify and modify the requested resource object. When the Pod is created, the permission controller will mount the corresponding Secret to the fixed directory / var / run / secrets / kubernetes in the container according to the specified ServiceAccount (default) io/ServiceAccount/.
When we access the cluster in the Pod, we can use the token file mounted inside the Pod to authenticate the identity of the Pod by default, and ca.crt is used to verify the server. A typical way to access Kubernetes cluster in Pod is shown in the following figure:
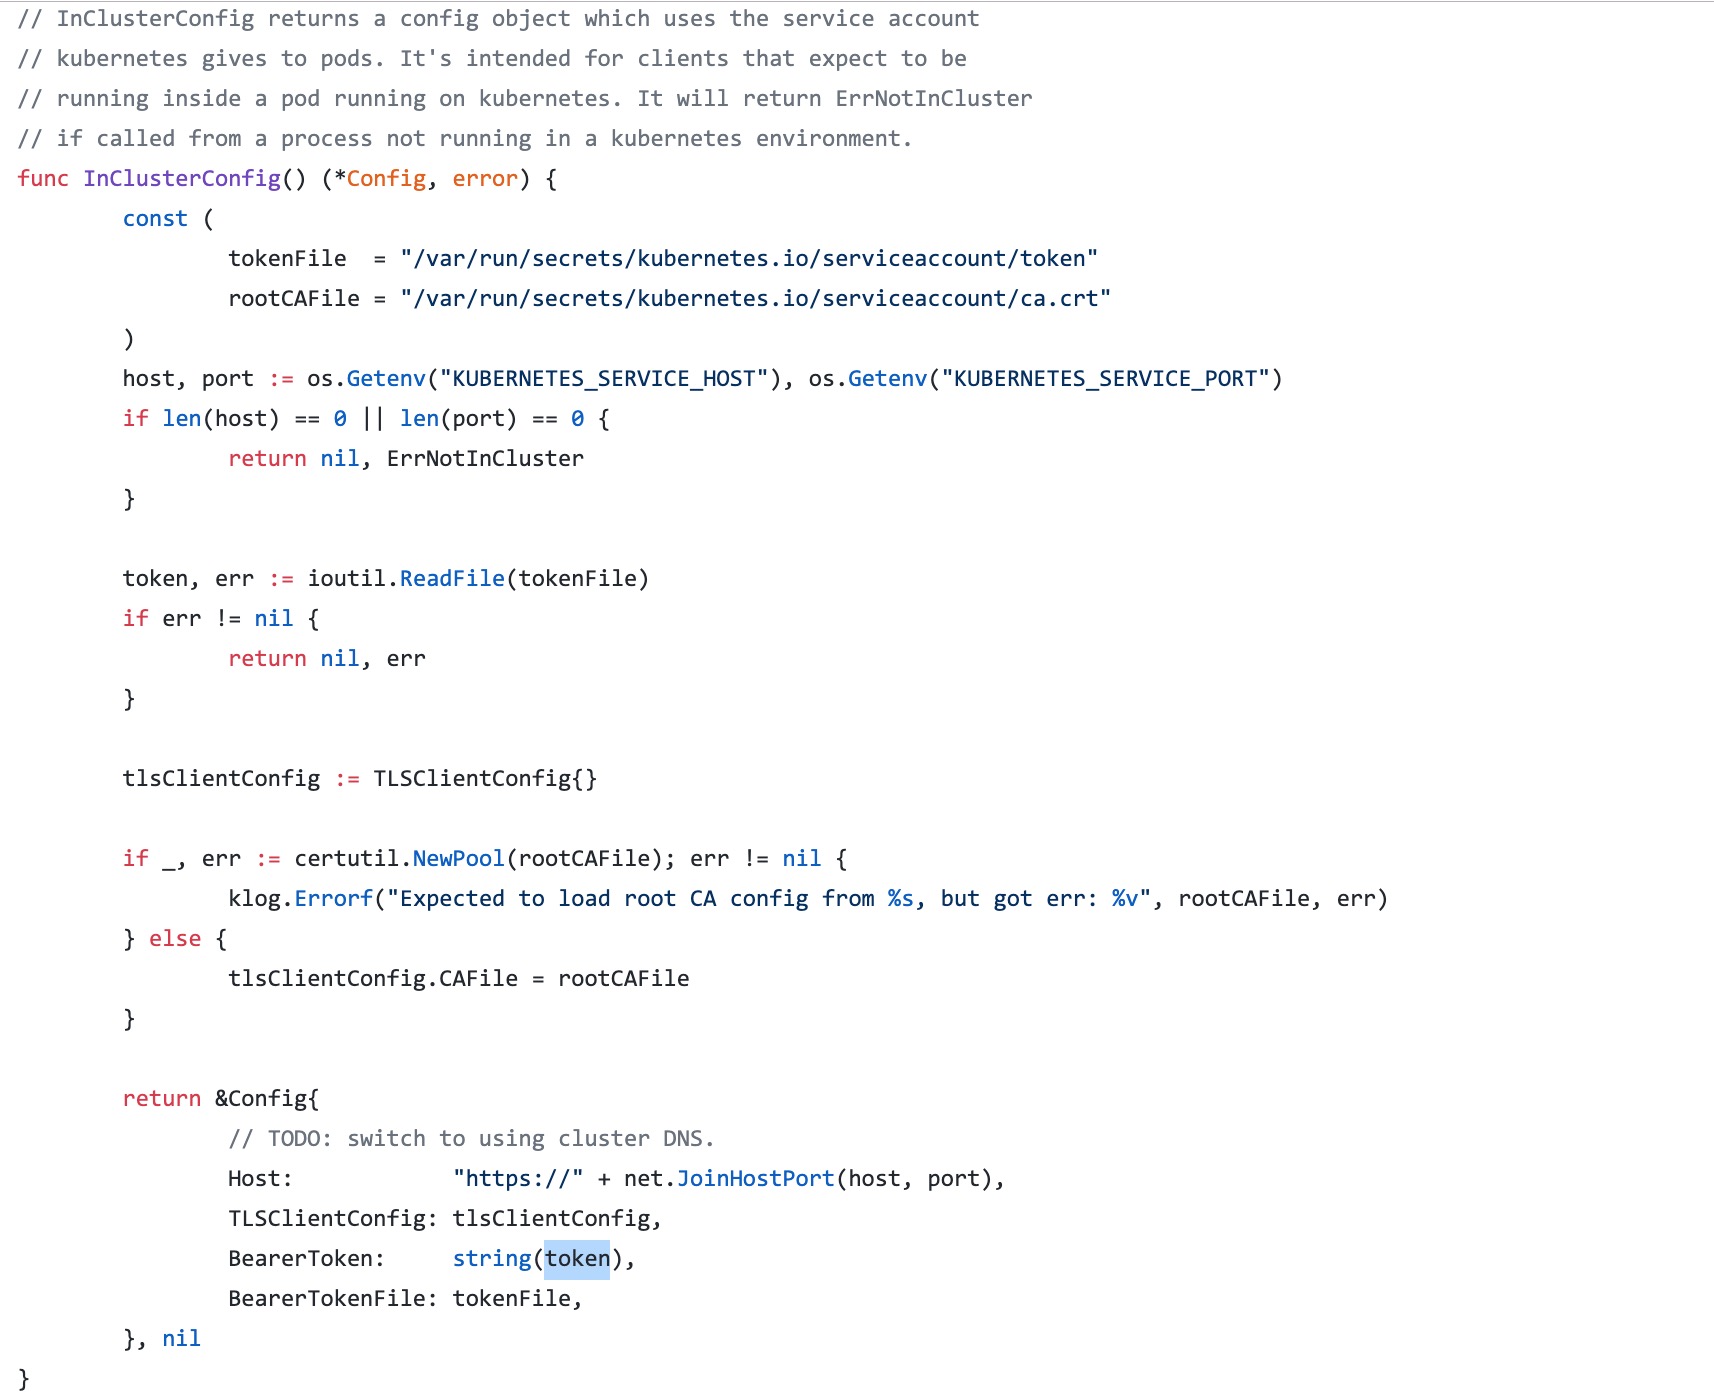
In the code, we specify that the Secret behind the ServiceAccount is attached to two files in the Pod: token and ca.crt, and then obtain the access address of APIServer through the environment variable (we mentioned earlier that the Service information will be injected into the pod through the environment variable), and then verify whether the server is trusted through ca.cart, Finally, the server will authenticate the pod according to the token file provided by us.
After the Pod identity is authenticated legally, the specific access rights of resources need to be declared through the following RBAC.