Kubernetes, abbreviated as K8s, is an abbreviation of 8 characters instead of "ubernet". Kubernetes is an open source application for managing containerized applications on multiple hosts in the cloud platform. Kubernetes aims to make the deployment of containerized applications simple and efficient. Kubernetes provides a mechanism for application deployment, planning, updating and maintenance.
1, Machine preparation
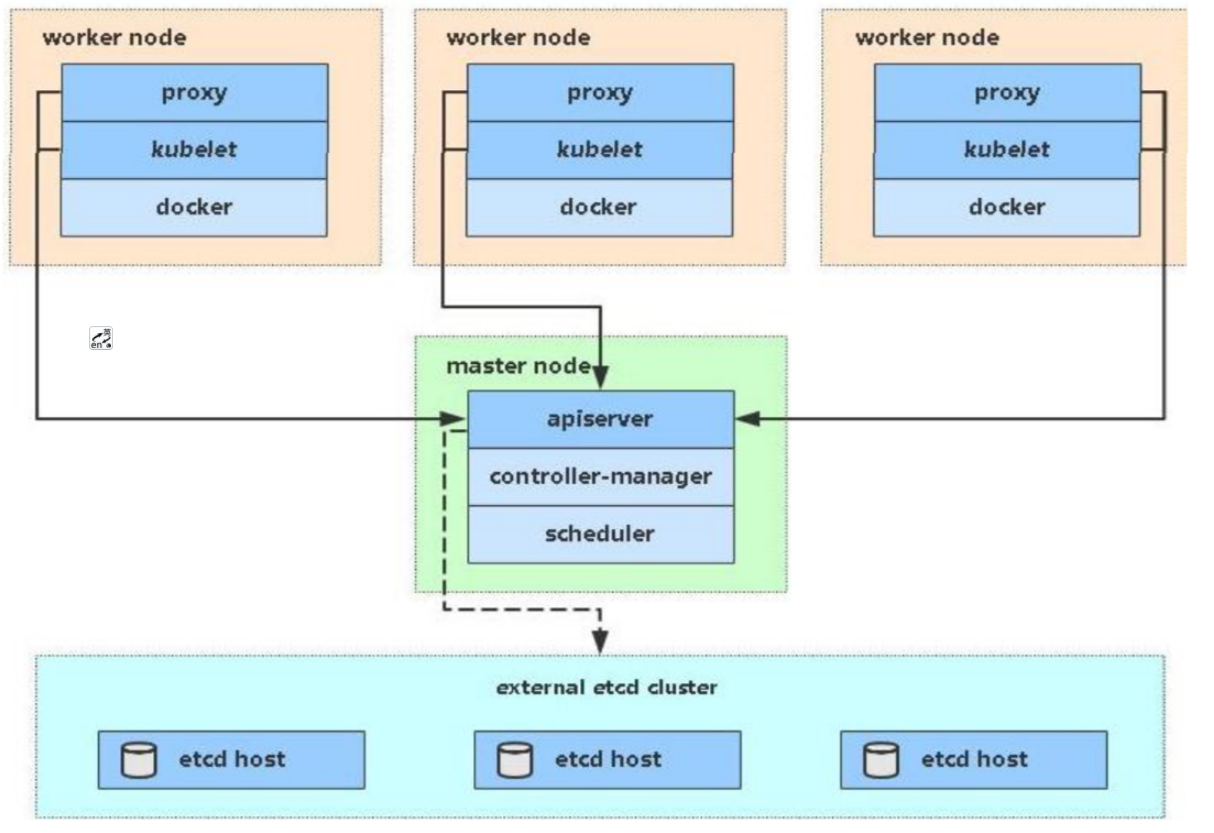
The node diagram is as follows:
target
- kubernetes version: 1.23.0
- Services can be deployed
Three hosts need to be prepared. I use three virtual machines. The configuration is as follows:
| IP | role | to configure |
|---|---|---|
| 192.168.67.101 | k8s-master | 2-core CPU, 2G memory |
| 192.168.67.102 | k8s-node1 | 1G memory |
| 192.168.67.103 | k8s-node2 | 1G memory |
2, Environmental preparation
- Modify host name
# Option 1:
hostnamectl set-hostname <hostname>
# for example
hostnamectl set-hostname k8s-master
hostnamectl set-hostname k8s-node1
hostnamectl set-hostname k8s-node2
All machines below can be operated in batches
- Turn off the firewall
# Temporarily turn off the firewall
systemctl stop firewalld
# Turn off startup and self startup
systemctl disable firewalld
- Close selinux
sed -i 's/enforcing/disabled/' /etc/selinux/config # permanent
setenforce 0 # temporary
- Close swap
swapoff -a # temporary
sed -ri 's/.*swap.*/#&/' /etc/fstab #So it's permanently closed
- Add hosts
cat >> /etc/hosts << EOF
192.168.67.101 k8smaster
192.168.67.102 k8snode1
192.168.67.103 k8snode2
EOF
- The chain that delivers bridged IPv4 traffic to iptables:
cat > /etc/sysctl.d/k8s.conf << EOF
net.bridge.bridge-nf-call-ip6tables = 1
net.bridge.bridge-nf-call-iptables = 1
EOF
- Change to alicloud image source
#Back up the original image source
cp /etc/yum.repos.d/CentOS-Base.repo /etc/yum.repos.d/CentOS-Base.repo.backup
#download
wget -O /etc/yum.repos.d/CentOS-Base.repo http://mirrors.aliyun.com/repo/Centos-7.repo
# Rebuild cache
yum makecache
# View warehouse
yum repolist
# Install prerequisite software (optional)
yum -y install lrzsz
yum -y install vim
yum install -y wget
- time synchronization
yum install ntpdate -y
ntpdate time.windows.com
# Above is the windows server, below is the Chinese server
ntpdate  cn.ntp.org.cn
3, Install docker / kubedm / kubelet on all nodes
By default, the CRI (container runtime) of Kubernetes is Docker, so Docker is installed first.
Batch operation of all machines
- Install Docker
wget https://mirrors.aliyun.com/docker-ce/linux/centos/docker-ce.repo -O
/etc/yum.repos.d/docker-ce.repo
yum -y install docker-ce-18.06.1.ce-3.el7
- Add alicloud YUM software source. Note that the cgroup of docker container needs to be modified. kubelet recommends systemd
mkdir -p /etc/docker
tee /etc/docker/daemon.json <<-'EOF'
{
  "registry-mirrors": ["https://u4dk6b2s.mirror.aliyuncs.com"],
   "exec-opts": ["native.cgroupdriver=systemd"]
}
EOF
systemctl daemon-reload && systemctl restart docker
systemctl enable docker
- Add yum source for K8S
cat > /etc/yum.repos.d/kubernetes.repo << EOF
[kubernetes]
name=Kubernetes
baseurl=https://mirrors.aliyun.com/kubernetes/yum/repos/kubernetes-el7-x86_64
enabled=1
gpgcheck=0
repo_gpgcheck=0
gpgkey=https://mirrors.aliyun.com/kubernetes/yum/doc/yum-key.gpg
https://mirrors.aliyun.com/kubernetes/yum/doc/rpm-package-key.gpg
EOF
- Install kubedm, kubelet and kubectl
yum install -y kubelet-1.23.0 kubeadm-1.23.0 kubectl-1.23.0
# Set startup and self startup
systemctl enable kubelet
#View version
kubelet --version
4, Deploy Master node
Execute at 192.168.67.101 (Master). Note: apiserver advertisement address needs to be the IP address of the master, and the version number is 1.23.0. Other fields need not be controlled
kubeadm init \
--apiserver-advertise-address=192.168.67.101 \
--image-repository registry.aliyuncs.com/google_containers \
--kubernetes-version v1.23.0 \
--service-cidr=10.96.0.0/12 \
--pod-network-cidr=10.244.0.0/16
After installation, prompt to execute the following statement
mkdir -p $HOME/.kube
sudo cp -i /etc/kubernetes/admin.conf $HOME/.kube/config
sudo chown $(id -u):$(id -g) $HOME/.kube/config
After installation, the following command outputs need to be executed at k8s-node1 node and k8s-node2 node respectively
kubeadm join 192.168.67.101:6443 --token qb4uwe.imwr6pkqy19vnjs1 \
	--discovery-token-ca-cert-hash sha256:caf1193372e07c2df962843cb8a87a62be7c3ee8cc2aa1fe5fbbc03bee8130c5
If the time is too long, the key may expire, or it may not be brushed to the log. You can use the following command to obtain the key
kubeadm token create --print-join-command
Get node on master
[root@k8smaster ~]# kubectl get nodes
NAME        STATUS     ROLES                  AGE   VERSION
k8smaster   NotReady   control-plane,master   34m   v1.23.0
k8snode1    NotReady   <none>                 25s   v1.23.0
k8snode2    NotReady   <none>                 13s   v1.23.0
5, Install Pod network plug-in
Execute the following statement on the master node to download the network plug-in
# You cannot access github. You can use this
kubectl apply -f https://rs.amoqi.cn/kube-flannel.yml
# github can access and use this
kubectl apply -f https://raw.githubusercontent.com/coreos/flannel/master/Documentation/kube-flannel.yml
You can use the following statement to monitor the operation of the image
kubectl get pods -w
You can view the status of the node, which may need to wait for some time
[root@k8smaster ~]# kubectl get nodes
NAME        STATUS   ROLES                  AGE   VERSION
k8smaster   Ready    control-plane,master   55m   v1.23.0
k8snode1    Ready    <none>                 21m   v1.23.0
k8snode2    Ready    <none>                 21m   v1.23.0
6, Service test
Create a pod in the Kubernetes cluster and verify whether it works normally:
# Create nginx container
kubectl create deployment nginx --image=nginx
# Expose nginx port
kubectl expose deployment nginx --port=80 --type=NodePort
# View pod s and services
[root@k8smaster ~]# kubectl get pod,svc
NAME                         READY   STATUS    RESTARTS   AGE
pod/nginx-85b98978db-lq8tn   1/1     Running   0          66s

NAME                 TYPE        CLUSTER-IP      EXTERNAL-IP   PORT(S)        AGE
service/kubernetes   ClusterIP   10.96.0.1       <none>        443/TCP        68m
service/nginx        NodePort    10.111.144.73   <none>        80:32076/TCP   5s
It can be accessed according to the IP address of the master node or node node + the port 32076 just obtained
7, Conclusion
The codeword is not easy. I hope you can give me more support. A program ape with four years of working experience is currently engaged in the logistics industry and has its own small broken website amoqi cn. Welcome to the official account [I am Liu Qiqi], to exchange JAVA knowledge, including, but not limited to, SpringBoot+ micro service, and free distribution of tools, interview materials and professional books in Kiki JAVA learning process.