Kubernetes learning materials
K8S overview and related features
summary
- K8s is a container cluster management system released by Google in 2014
- Container application deployment using k8s
- Use k8s to facilitate application expansion
- k8s target implementation makes deploying container applications more concise and efficient
characteristic
- Automatic packing
Based on the resource configuration of the application running environment by the container, the application container is required to be deployed automatically
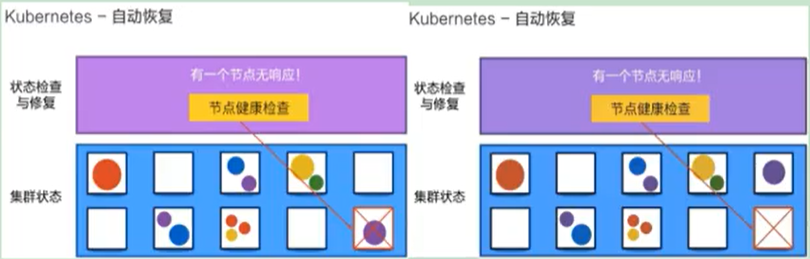
- Self healing (self healing)
When the container fails, the container will be restarted
When the deployed Node has problems, the container will be redeployed and rescheduled
When the container fails to pass the monitoring inspection, the container will be closed until the container is in normal operation
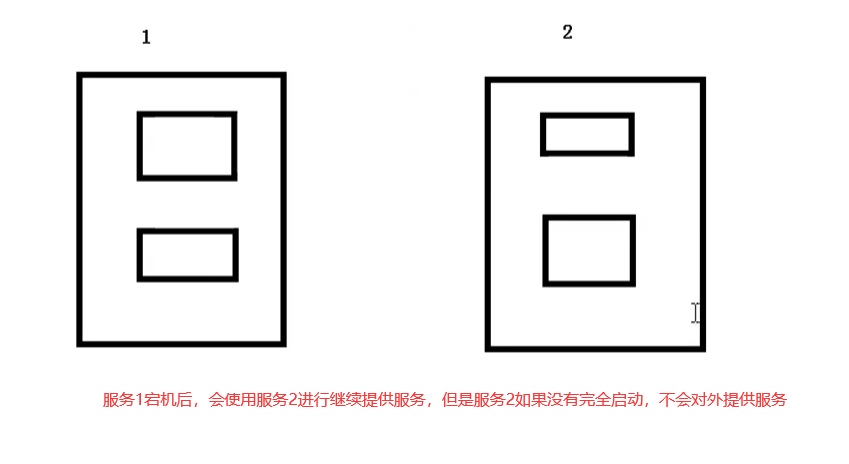
If an application on a server does not respond, Kubernetes will automatically create one elsewhere
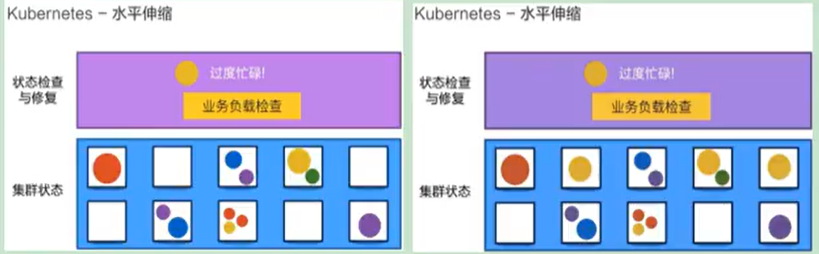
- Horizontal expansion
Through simple commands, user UI interface or resource usage based on CPU, the application container can be expanded or trimmed
When we have a large number of requests coming, we can increase the number of copies to achieve the effect of horizontal expansion
When the Yellow application is too busy, it will expand an application
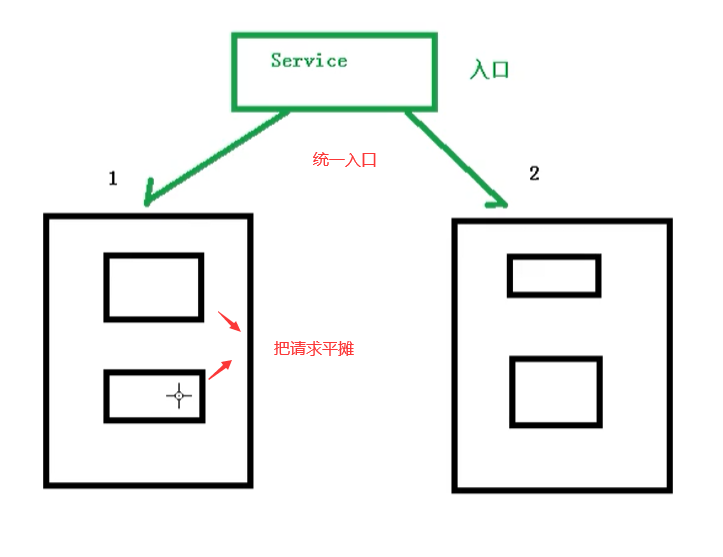
- Service discovery
Users can realize service discovery and load balancing based on Kubernetes' own ability without using additional service discovery mechanism
Provide a unified entrance for node scheduling and load balancing, which is equivalent to the gateway in microservice?
- Rolling update
According to the change of application, the application running in the application container can be updated at one time or in batch
When adding an application, it is not necessary to add it and use it immediately, but to judge whether the added application can be used normally
- Version fallback
According to the application deployment, the historical version of the application running in the application container can be returned immediately
Similar to rollback in Git
- Key and configuration management
Without rebuilding the image, you can deploy and update the key and application configuration, similar to hot deployment.
- Storage orchestration
Automatic storage system mounting and application, especially for stateful applications, is very important to realize data persistence
The storage system can come from local directory, network storage (NFS, Gluster, Ceph, etc.) and public cloud storage services
- Batch processing
Provide one-time tasks and scheduled tasks; Scenarios for batch data processing and analysis
K8S core concept
- Pod: the smallest unit level of K8s management, which is the basis of all business types
- Controller: controller, stateful, stateless, one task, scheduled task, daemon
- Service and progress: define a set of access rules for pods and expose ports to the public
- RBAC: security mechanism, permission model
- Helm: Download mechanism
- Persistent storage
K8S cluster architecture components
Complete architecture diagram
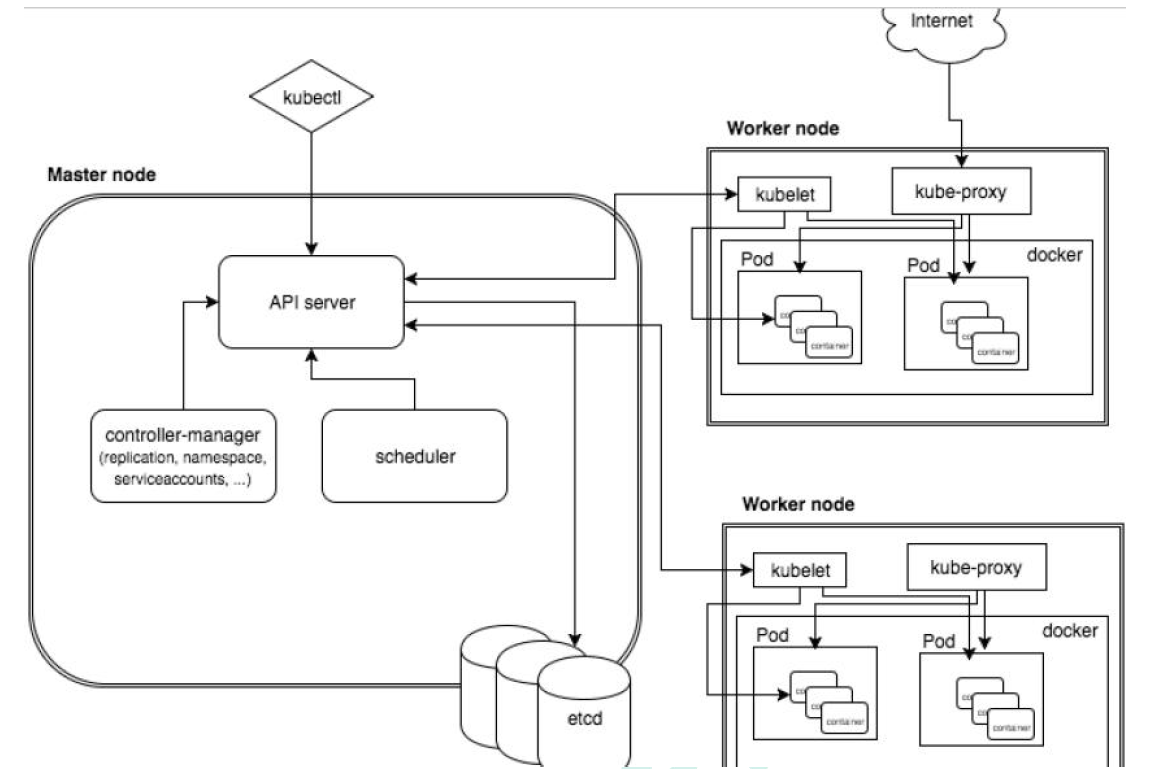

Architecture details
K8S architecture mainly consists of two parts: Master and node
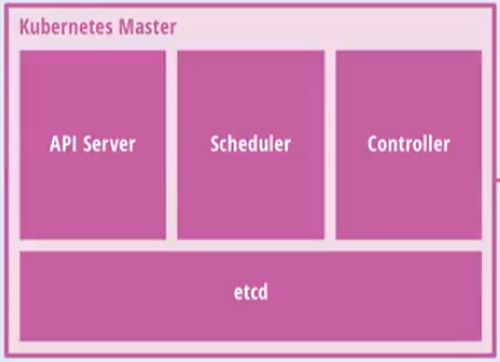
master node architecture diagram
Node architecture diagram

k8s cluster control node is used to dispatch and manage the cluster and accept the cluster operation requests from users outside the cluster;
-
Master: master node
- API Server: a unified portal for clusters, which operates in a restful style and is handed over to etcd storage at the same time
- Provide authentication, authorization, access control, API registration and discovery mechanisms
- scheduler: node scheduling. Select node node to apply deployment
- Controller Manager: handles the regular background tasks in the cluster. One resource corresponds to one controller
- etcd: storage system, which is used to save relevant data in the cluster
- API Server: a unified portal for clusters, which operates in a restful style and is handed over to etcd storage at the same time
-
Work node: work node
- Kubelet: the master sends a node representative to manage the local container
- An agent running on each node in a cluster, which ensures that the container runs in the Pod
- Responsible for maintaining the life cycle of containers, as well as Volume(CSI) and network (CNI) management
- Kube proxy: provides network proxy, load balancing and other operations
- Kubelet: the master sends a node representative to manage the local container
-
Container Runtime
- The container running environment is the software responsible for running the container
- Kubernetes supports multiple container running environments: Docker, containerd, cri-o, rktlet, and any software that implements Kubernetes CRI (container running environment interface).
-
Fluent D: it is a daemon that helps to improve cluster level logs
Kubenetes cluster management tool Kubectl
summary
kubectl is the command-line tool of Kubernetes cluster. kubectl can manage the cluster itself and install and deploy container applications on the cluster
Command format
The command format is as follows
kubectl [command] [type] [name] [flags]
parameter
- command: Specifies the operations to be performed on the resource, such as create, get, describe, and delete
- Type: Specifies the resource type. The resource type is case sensitive. Developers can use singular, plural and abbreviated forms
For example:
kubectl get pod pod1
kubectl get pods pod1
kubectl get po pod1
- Name: Specifies the name of the resource. The name is also case sensitive. If the name is omitted, all resources will be displayed, such as
kubectl get pods
- flags: specify optional parameters. For example, you can specify the address and port of Kubernetes API server with - s or - server parameters
Common commands
kubectl help for more information
Help information can be obtained through the help command
# Command to get kubectl
kubectl --help

# Get the introduction and use of a command
kubectl get --help
Basic command
Common basic commands
| command | introduce |
|---|---|
| create | Create resources by file name or standard input |
| expose | Expose a resource as a new Service |
| run | Running a specific image in a cluster |
| set | Set specific functions on the object |
| get | Displays one or more resources |
| explain | Document references |
| edit | Edit an asset using the default editor |
| delete | Delete resources by file name, standard input, resource name or label |
Deployment command
| command | introduce |
|---|---|
| rollout | Manage publishing of resources |
| rolling-update | Rolling updates for a given replication controller |
| scale | Expand or shrink the number of pods, Deployment, ReplicaSet, RC or Job |
| autoscale | Create an automatic selection of capacity expansion or reduction and set the number of pods |
Cluster management command
| command | introduce |
|---|---|
| certificate | Modify certificate resource |
| cluster-info | Display cluster information |
| top | Display resources (CPU/M) |
| cordon | Marked node is not schedulable |
| uncordon | Marked nodes can be scheduled |
| drain | Expel applications on nodes and prepare for offline maintenance |
| taint | Modify node taint tag |
Fault and commissioning commands
| command | introduce |
|---|---|
| describe | Displays the details of a specific resource or resource group |
| logs | Print a container log in a Pod. If the Pod has only one container, the container name is optional |
| attach | Attached to a running container |
| exec | Execute command to container |
| port-forward | Forward one or more |
| proxy | Run a proxy to Kubernetes API Server |
| cp | Copy files or directories into containers |
| auth | Check authorization |
Other commands
| command | introduce |
|---|---|
| apply | Apply configuration to resources by file name or standard input |
| patch | Use the patch to modify and update the fields of resources |
| replace | Replace a resource with a file name or standard input |
| convert | Converting profiles between different API versions |
| label | Update labels on resources |
| annotate | Update comments on resources |
| completion | It is used to realize automatic completion of kubectl tool |
| api-versions | Print supported API versions |
| config | Modify kubeconfig file (used to access API, such as configuring authentication information) |
| help | All command help |
| plugin | Run a command line plug-in |
| version | Print client and service version information |
Currently used commands
# Create an nginx image
kubectl create deployment nginx --image=nginx

# External exposure port
kubectl expose deployment nginx --port=80 --type=NodePort

# View resources
kubectl get pod, svc
Kubernetes cluster YAML file
summary
The resource management and resource object arrangement and deployment in k8s cluster can be solved by declaration style (YAML) file, that is, the operation of resource objects can be edited into YAML format file. We call this kind of file resource list file, and a large number of resource objects can be arranged and deployed by directly using resource list file through kubectl command. Generally, when we develop, we deploy clusters by configuring YAML files.
YAML file: it is a resource list file, which is used for resource arrangement
YAML file introduction
YAML overview
YAML: still a markup language. To emphasize that the language is data centric rather than markup language focused.
YAML is a highly readable format used to express data sequences.
YAML basic syntax
- Use spaces as indents
- The number of indented spaces is not important, as long as the elements of the same level are aligned to the left
- The Tab key is not allowed when indenting in the lower version, and only spaces are allowed
- Using # identification annotation, from this character to the end of the line, will be ignored by the interpreter
- Use - indicates the beginning of a new yaml file
Data structures supported by YAML
object
A collection of key value pairs, also known as mapping / hashes / dictionary
# Object type: a set of key value pairs of an object, represented by a colon structure
name: Tom
age: 18

# yaml also allows another way to write all key value pairs as an inline object
hash: {name: Tom, age: 18}
array
# Array type: a group of lines beginning with a conjunction line to form an array
People
- Tom
- Jack

# Arrays can also use inline representation
People: [Tom, Jack]
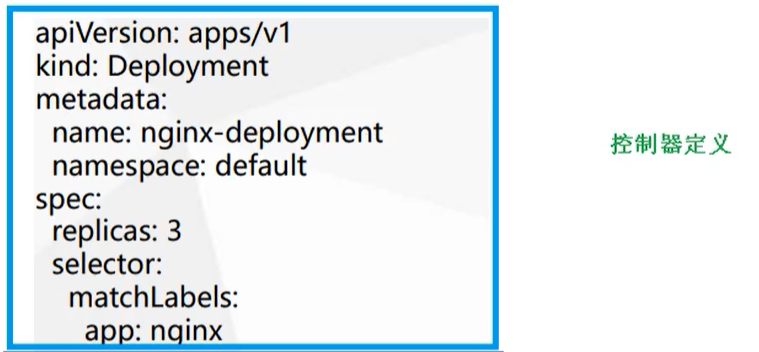
YAML file components
It is mainly divided into two parts. One is the definition of the controller and the controlled object
Definition of controller
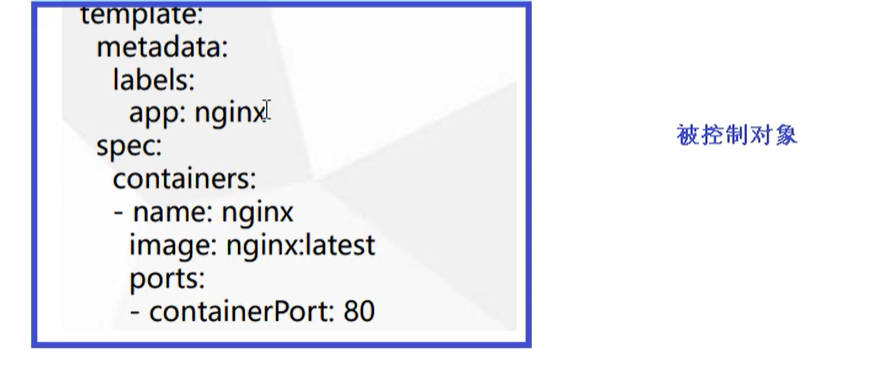
Controlled object
Contains some images, versions, ports, etc
Attribute description
There are many attribute names in the controller definition of a YAML file
| Attribute name | introduce |
|---|---|
| apiVersion | API version |
| kind | Resource type |
| metadata | Resource metadata |
| spec | Resource specification |
| replicas | Number of copies |
| selector | tag chooser |
| template | Pod template |
| metadata | Pod metadata |
| spec | Pod specification |
| containers | Container configuration |
How to write YAML file quickly
Generally speaking, we seldom write YAML files by ourselves, because there are many contents involved, and we usually create them with the help of tools
Using the kubectl create command
This method is generally used when resources are not deployed. We can directly create a YAML configuration file
# Trying to run does not actually create an image
kubectl create deployment web --image=nginx -o yaml --dry-run
Or we can output to a file
kubectl create deployment web --image=nginx -o yaml --dry-run > hello.yaml
Then we can modify it directly in the file
Export yaml file using kubectl get command
You can first view a currently deployed image
kubectl get deploy

Then we export the configuration of nginx
kubectl get deploy nginx -o=yaml --export > nginx.yaml
Then an nginx Yaml configuration file

yaml format pod definition file complete content
apiVersion: v1       #Required, version number, e.g. v1
kind: Pod       #Required, Pod
metadata:       #Required, metadata
  name: string       #Required, Pod name
  namespace: string    #Required, the namespace to which the Pod belongs
  labels:      #Custom label
    - name: string     #Custom tag name
  annotations:       #Custom comment list
    - name: string
spec:         #Required, detailed definition of container in Pod
  containers:      #Required, container list in Pod
  - name: string     #Required, container name
    image: string    #Required, the image name of the container
    imagePullPolicy: [Always | Never | IfNotPresent] #Alawys means to download the image, IfnotPresent means to use the local image first, otherwise download the image, and Nerver means to use only the local image
    command: [string]    #The list of startup commands of the container. If not specified, the startup commands used during packaging shall be used
    args: [string]     #Start command parameter list of container
    workingDir: string     #Working directory of the container
    volumeMounts:    #Configuration of storage volumes mounted inside the container
    - name: string     #Refer to the name of the shared storage volume defined by pod, and use the volume name defined in volumes []
      mountPath: string    #The absolute path of the storage volume mount in the container should be less than 512 characters
      readOnly: boolean    #Is it in read-only mode
    ports:       #List of port library numbers to be exposed
    - name: string     #Port number name
      containerPort: int   #The port number that the container needs to listen on
      hostPort: int    #The port number that the host of the Container needs to listen to. It is the same as the Container by default
      protocol: string     #Port protocol, support TCP and UDP, default TCP
    env:       #List of environment variables to be set before container operation
    - name: string     #Environment variable name
      value: string    #Value of environment variable
    resources:       #Setting of resource limits and requests
      limits:      #Setting of resource limits
        cpu: string    #Cpu limit, in the number of core s, will be used for the docker run -- Cpu shares parameter
        memory: string     #Memory limit. The unit can be Mib/Gib. It will be used for docker run --memory parameter
      requests:      #Settings for resource requests
        cpu: string    #Cpu request, initial available quantity of container startup
        memory: string     #The memory is clear, and the initial available quantity of container startup
    livenessProbe:     #For the setting of health check of containers in the Pod, when there is no response to detection for several times, the container will be restarted automatically. The check methods include exec, httpGet and tcpSocket. For a container, only one of them needs to be set
      exec:      #Set the inspection mode in Pod container to exec mode
        command: [string]  #Command or script required for exec mode
      httpGet:       #Set the health check method of containers in Pod to HttpGet, and specify Path and port
        path: string
        port: number
        host: string
        scheme: string
        HttpHeaders:
        - name: string
          value: string
      tcpSocket:     #Set the health check mode of containers in the Pod to tcpSocket mode
         port: number
       initialDelaySeconds: 0  #The time of the first detection after the container is started, in seconds
       timeoutSeconds: 0   #Timeout for container health check probe waiting for response, unit: seconds, default: 1 second
       periodSeconds: 0    #Set the periodic detection time for container monitoring and inspection, in seconds, once every 10 seconds by default
       successThreshold: 0
       failureThreshold: 0
       securityContext:
         privileged:false
    restartPolicy: [Always | Never | OnFailure]#For the restart strategy of Pod, Always indicates that once the operation is terminated in any way, kubelet will restart, OnFailure indicates that only the Pod exits with a non-0 exit code, and Nerver indicates that the Pod will not be restarted
    nodeSelector: obeject  #Setting NodeSelector means scheduling the Pod to the node containing the label and specifying it in the format of key: value
    imagePullSecrets:    #The secret name used when pulling the image, which is specified in the format of key: secret key
    - name: string
    hostNetwork:false      #Whether to use the host network mode. The default is false. If it is set to true, it means to use the host network
    volumes:       #Define a list of shared storage volumes on this pod
    - name: string     #Shared storage volume name (there are many types of volumes)
      emptyDir: {}     #The storage volume of type emtyDir is a temporary directory with the same life cycle as Pod. Null value
      hostPath: string     #The storage volume of type hostPath represents the directory of the host where the Pod is mounted
        path: string     #The directory of the host where the Pod is located will be used for the directory of mount in the same period
      secret:      #For the storage volume of type secret, mount the cluster and the defined secret object into the container
        scretname: string
        items:
        - key: string
          path: string
      configMap:     #The storage volume of type configMap mounts predefined configMap objects into the container
        name: string
        items:
        - key: string
Example of example file
apiVersion: extensions/v1beta1   #Interface version
kind: Deployment                 #Interface type
metadata:
  name: ptengine-demo               #Deployment name
  namespace: ptengine-prd           #namespace name
  labels:
    app: ptengine-demo              #label
spec:
  replicas: 3
   strategy:
    rollingUpdate:  ##Since replicas is 3, the number of pod s in the whole upgrade is between 2-4
      maxSurge: 1       #When rolling upgrade, one pod will be started first
      maxUnavailable: 1 #Maximum number of Unavailable pod s allowed during rolling upgrade
  template:
    metadata:
      labels:
        app: ptengine-demo  #Template name is required
    sepc: #Define a container template that can contain multiple containers
      containers:
        - name: ptengine-demo                                                           #Image name
          image: reg.pt1.com/ptengine-prd/ptengine-demo:0.0.1-SNAPSHOT #Mirror Address
          CMD: [ "/bin/sh","-c","cat /etc/config/path/to/special-key" ]    #Start CMD
          args:                                                                #startup parameter
            - '-storage.local.retention=$(STORAGE_RETENTION)'
            - '-web.external-url=$(EXTERNAL_URL)'

          imagePullPolicy: IfNotPresent  #If not, pull
          livenessProbe:       #Indicates whether the container is in live state. If the LivenessProbe fails, the LivenessProbe will notify kubelet that the corresponding container is unhealthy. Then kubelet will kill the container and carry out further operations according to the RestarPolicy. By default, the initialization value of LivenessProbe is Success before the first detection. If the container does not provide LivenessProbe, it is also considered Success;
            httpGet:
              path: /health #If there is no heartbeat detection interface, it is/
              port: 8080
              scheme: HTTP
            initialDelaySeconds: 60 ##How long is the delay after startup to start operation detection
            timeoutSeconds: 5
            successThreshold: 1
            failureThreshold: 5
            readinessProbe:
          readinessProbe:
            httpGet:
              path: /health #If there is no health detection interface, it is/
              port: 8080
              scheme: HTTP
            initialDelaySeconds: 30 ##How long is the delay after startup to start operation detection
            timeoutSeconds: 5
            successThreshold: 1
            failureThreshold: 5
          resources:              ##CPU memory limit
            requests:
              cpu: 2
              memory: 2048Mi
            limits:
              cpu: 2
              memory: 2048Mi
          env:                    ##Pass pod = custom Linux OS environment variable directly through environment variable
            - name: LOCAL_KEY     #Local Key
              value: value
            - name: CONFIG_MAP_KEY  #The local policy can use the configuration Key of configMap,
              valueFrom:
                configMapKeyRef:
                  name: special-config   #Found in special config
                  key: special.type      #Find the key whose name is data in special config
          ports:
            - name: http
              containerPort: 8080 #Expose port to service
          volumeMounts:     #Mount the disk defined in volumes
          - name: log-cache
            mount: /tmp/log
          - name: sdb       #In common usage, the volume is destroyed with the container and a directory is mounted
            mountPath: /data/media
          - name: nfs-client-root    #Directly mount the hard disk, such as attaching the following nfs directory to / mnt/nfs
            mountPath: /mnt/nfs
          - name: example-volume-config  #The first advanced usage is to mount the log script and backup script of ConfigMap to a relative path path/to / If a file with the same name exists, it will be overwritten directly.
            mountPath: /etc/config
          - name: rbd-pvc                #Advanced usage 2: Mount PVC (presentvolumeclaim)

#Use volume to mount ConfigMap directly as a file or directory. Each key value pair will generate a file. Key is the file name and value is the content,
  volumes:  # Define the disk to mount to the above volumeMounts
  - name: log-cache
    emptyDir: {}
  - name: sdb  #Mount the directory on the host
    hostPath:
      path: /any/path/it/will/be/replaced
  - name: example-volume-config  # It is used for ConfigMap file content to the specified path
    configMap:
      name: example-volume-config  #Name in ConfigMap
      items:
      - key: log-script           #Key in ConfigMap
        path: path/to/log-script  #Specify a relative path path / to / log script in the directory
      - key: backup-script        #Key in ConfigMap
        path: path/to/backup-script  #Specify a relative path path / to / backup script in the directory
  - name: nfs-client-root         #NFS storage type for mounting
    nfs:
      server: 10.42.0.55          #NFS server address
      path: /opt/public           #showmount -e take a look at the path
  - name: rbd-pvc                 #Mount PVC disk
    persistentVolumeClaim:
      claimName: rbd-pvc1         #Mount the requested pvc disk
kubernetes resource list
Assets: objects
Core resources
-
workload: Pod,ReplicaSet,Deployment,StatefulSet,
DaemonSet,Job,Cronjob
-
Service discovery and balance: service, progress
-
Configuration and storage: Volume, CSI
- configMap,Secret
- DownwardAPI
-
Cluster level resources:
- Namespace,Node,Role,ClusterRole,RoleBinding,ClusterRoleBinding
-
Metadata resources: HPA, PodTemplate, LimitRange
Configuration list of most resources:
- apiVersion: group/version
- kind: resource category
- Metadata: metadata
- Name: the name is unique
- namespace
- Labels: labels
- Annotations: annotations
- spec: desired state, disire state
- status: current state. This field is maintained by kubernetes cluster. Users cannot change or delete it at will
query yaml
kubectl explain kind
Create pod with yaml file
kubectl create -f nginx.yaml
Delete pod with yaml file
kubectl delete -f nginx.yaml
Kubernetes core resource Pod
Pod overview
Pod is the smallest unit that can be created and managed in the K8S system. It is the smallest resource object model created or deployed by users in the resource object model. It is also a resource object for running container applications on K8S. Other resource objects are used to support or expand the functions of pod objects. For example, controller objects are used to control pod objects, The Service or progress resource object is used to expose the pod reference object, and the PersistentVolume resource object is used to provide storage for the pod. K8S does not directly process the container, but the pod, which is composed of one or more containers.
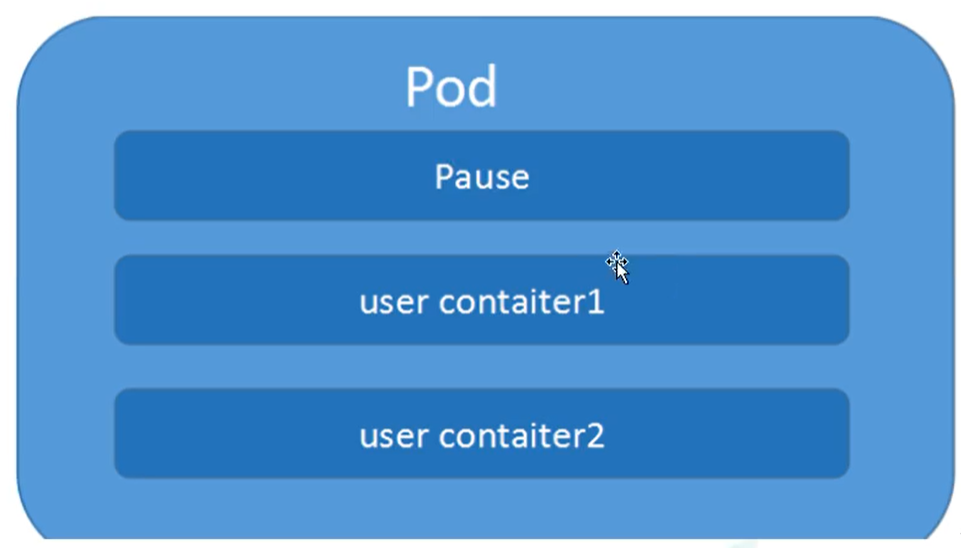
Pod is the most important concept of Kubernetes. Each pod has a special Pause container called "root container". The image corresponding to Pause container belongs to a part of Kubernetes platform. In addition to Pause container, each pod also contains one or more closely related user business containers.
Basic concepts of Pod
- Minimum deployed unit
- Pod consists of one or more containers [a set of containers]
- Containers in a pod are shared network namespaces
- Pod is short
- Each Pod contains one or more closely related user business containers
The meaning of Pod existence
- Dockers are used to create containers. One docker corresponds to one container, and one container runs an application process
- Pod is a multi process design, which uses multiple applications, that is, there are multiple containers in a pod, and one application runs in a container
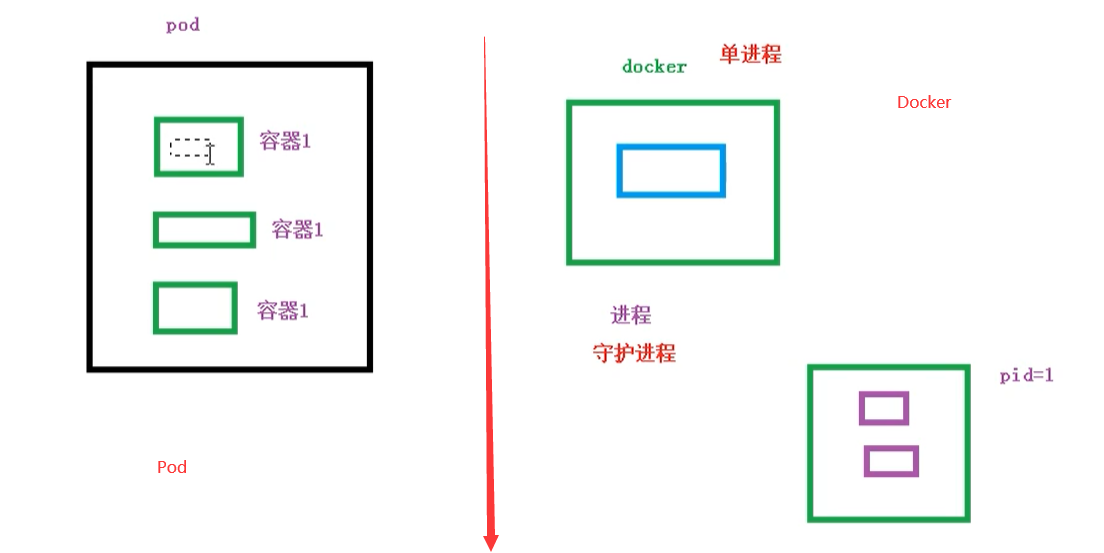
- Pod exists for intimacy applications
- Interaction between two applications
- Call between networks [through 127.0.0.1 or socket]
- Frequent calls are required between two applications
Pod is the smallest unit for running and deploying applications or services in K8S cluster. It can support multiple containers. The design concept of pod is to support multiple containers to share network address and file system in one pod. Services can be combined in a simple and efficient way of inter process communication and file sharing. At the same time, pod's support for multiple containers is the most basic design concept in K8S. In the production environment, different teams usually develop and build their own container images, which are combined into a micro service to provide services.
Pod is the basis of all business types in K8S cluster. Pod can be regarded as a small robot running on K8S cluster. Different types of businesses need different types of small robots to execute. At present, the business of K8S can be divided into the following types:
- Long term servo type: long running
- Batch type: batch
- Node background support type: node daemon
- stateful application
The corresponding small robot controllers of the above types are Deployment, Job, daemon set and stateful set (controllers will be introduced later)
Pod implementation mechanism
-
Shared network
Containers are isolated from each other, usually through namespace and group. How can the containers in Pod realize communication?
- First of all, the precondition must be met, that is, the containers are all in the same namespace
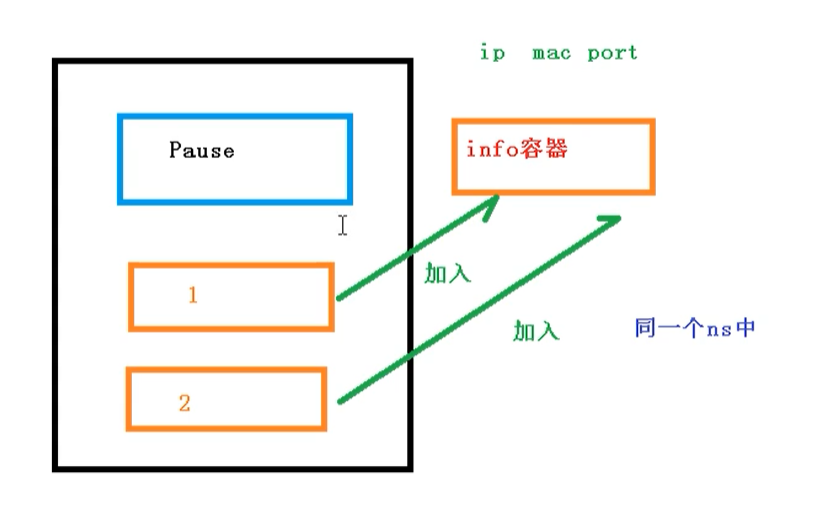
About the implementation principle of pod, we will first create a root container in Pod: pause container, and then we will create a business container [nginx, redis, etc.), and when we create a business container, we will add it to the info container
In the info container, the ip address, mac address, port and other information will be separated, and then the network sharing will be realized
- Through the Pause container, add other business containers to the Pause container, so that all business containers can be shared in the same namespace
The complete steps are as follows
- Through the Pause container, add other business containers to the Pause container, so that all business containers can be shared in the same namespace
-
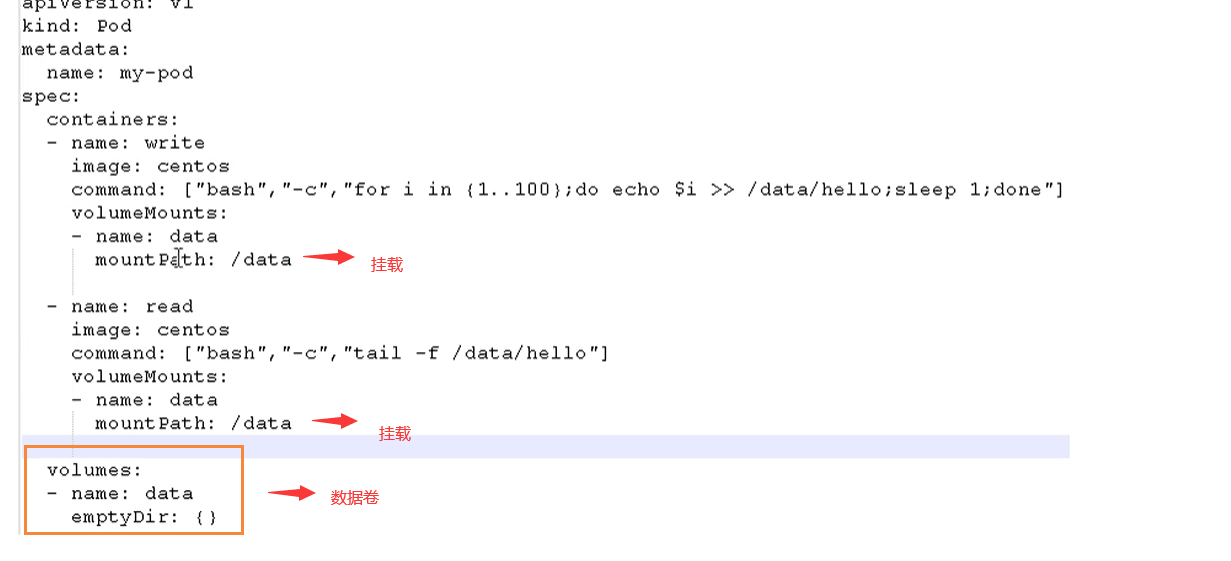
Shared storage
Pod persistent data is stored in a specific place
Use Volumn data volume for shared storage. The case is as follows
Pod image pull strategy
For example, the pull policy is imagePullPolicy
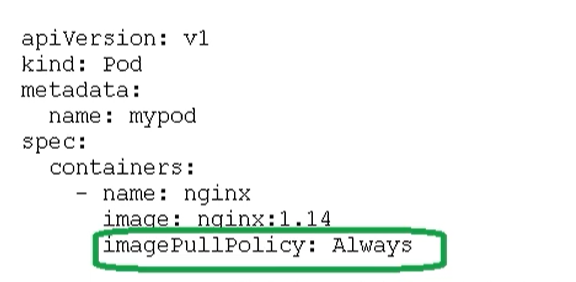
Pull strategies are mainly divided into the following types
- IfNotPresent: the default value. The image cannot be pulled until it does not exist on the host
- Always: every time you create a Pod, you will pull the image again
- Never: Pod will never take the initiative to pull this image
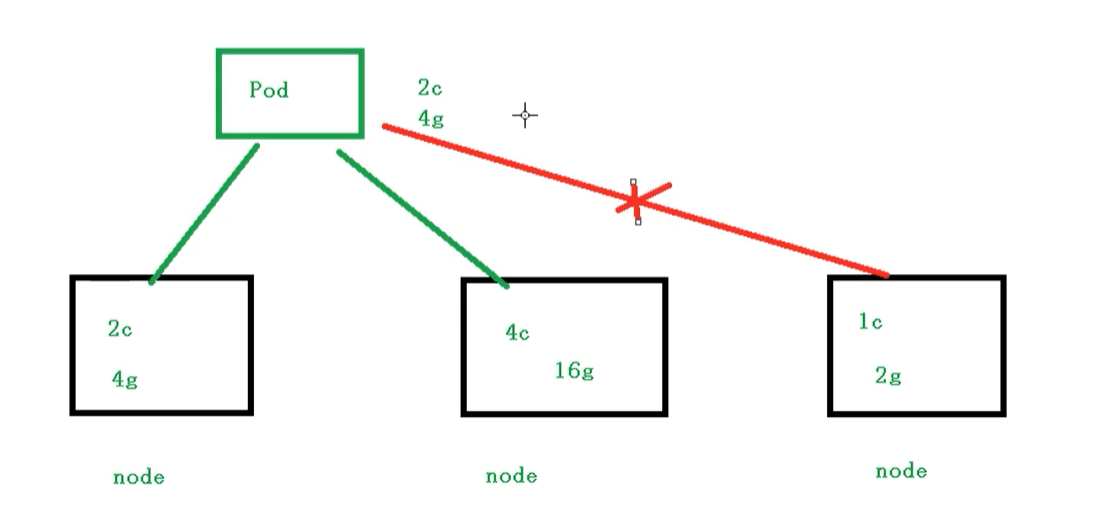
Pod resource limit
That is, we can limit the resources of the Pod when scheduling. For example, we restrict the resources used by the Pod scheduling to 2C4G, so when scheduling the corresponding node nodes, only the corresponding resources will be occupied, and the nodes that do not meet the resources will not be scheduled
Examples
We limit resources in the following places
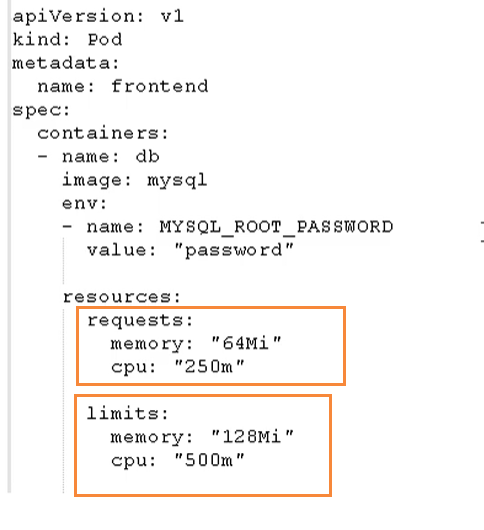
There are two parts here
- request: indicates the resources required for scheduling
- limits: indicates the maximum resources occupied
Pod restart mechanism
Because the Pod contains many containers, if a container has a problem, the Pod restart mechanism will be triggered
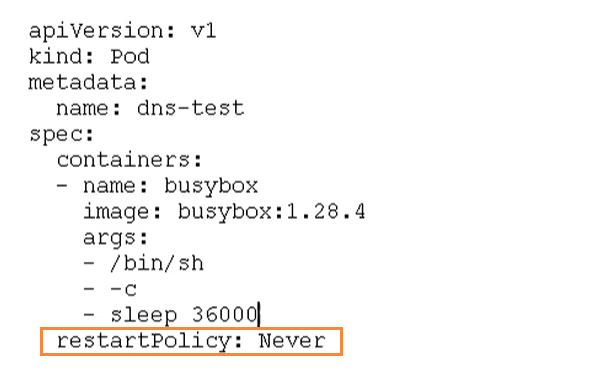
Restart strategies are mainly divided into the following three types
- Always: always restart the container after the container terminates and exits. The default policy is [nginx, etc., which needs to provide services continuously]
- OnFailure: restart the container only when the container exits abnormally (the exit status code is not 0).
- Never: never restart the container [batch task] when the container terminates and exits
Pod health check
Through the container check, we used the following command to check
kubectl get pod
However, sometimes, the program may overflow Java heap memory, and the program is still running, but it cannot provide external services. At this time, it is not possible to judge whether the service is available through container inspection
At this time, application level inspection can be used
# Survival check. If the check fails, the container will be killed and operated according to the restart policy of Pod
livenessProbe

# Readiness check. If the check fails, Kubernetes will remove Pod from Service endpoints
readinessProbe
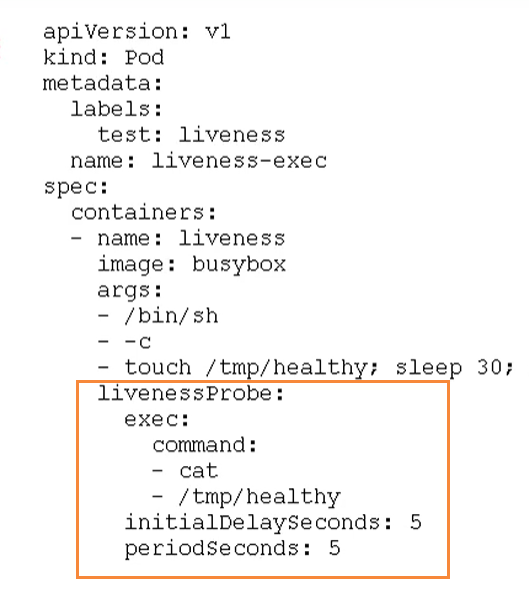
Probe supports the following three inspection methods
- http Get: send HTTP request and return 200 - 400 range status code as success
- exec: execute the Shell command and return the status code of 0 as success
- tcpSocket: the TCP Socket initiated is successfully established
Pod scheduling strategy
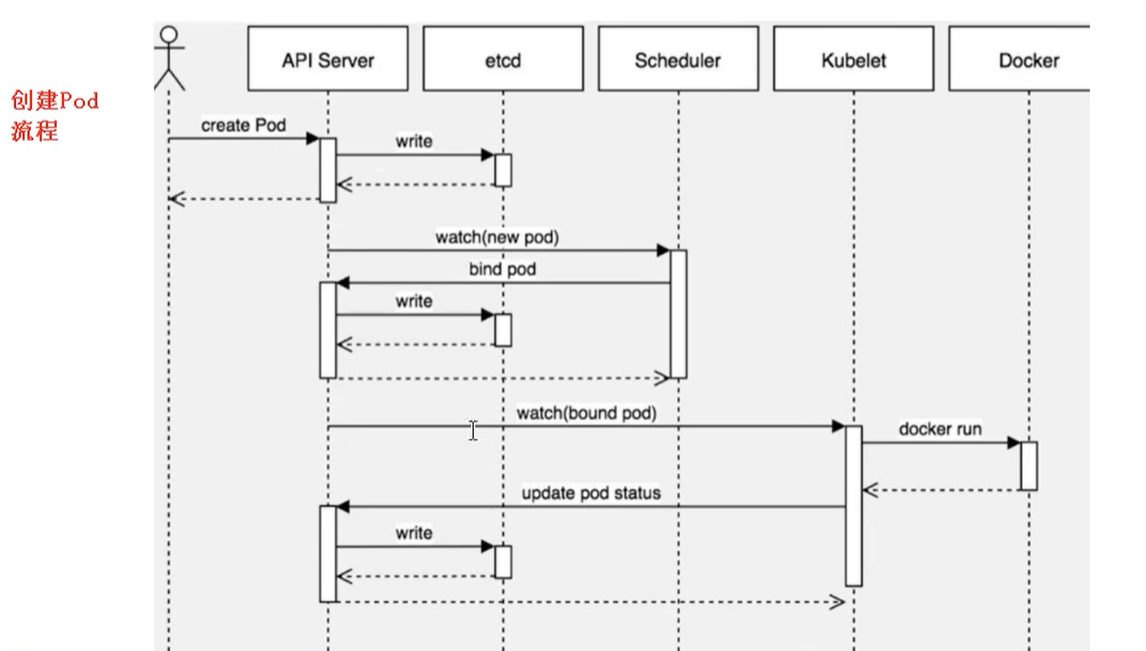
Create Pod process
- First create a pod, then link API Server and etcd [store the created information in etcd]
- Then create a Scheduler to monitor whether the API Server has a new pod. If so, it will schedule the pod on a node through the scheduling algorithm
- At the node node, the etcd will be read through kubelet -- apiserver to get the pod allocated on the current node node, and then the container will be created through docker
Attributes that affect Pod scheduling
Pod resource constraints will have an impact on POD scheduling
Find enough node nodes for scheduling according to the request
Node selector labels affect Pod scheduling
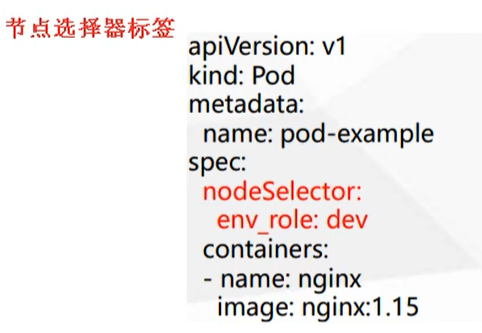
As for the node selector, there are actually two environments, and the resource allocation between the environments is different
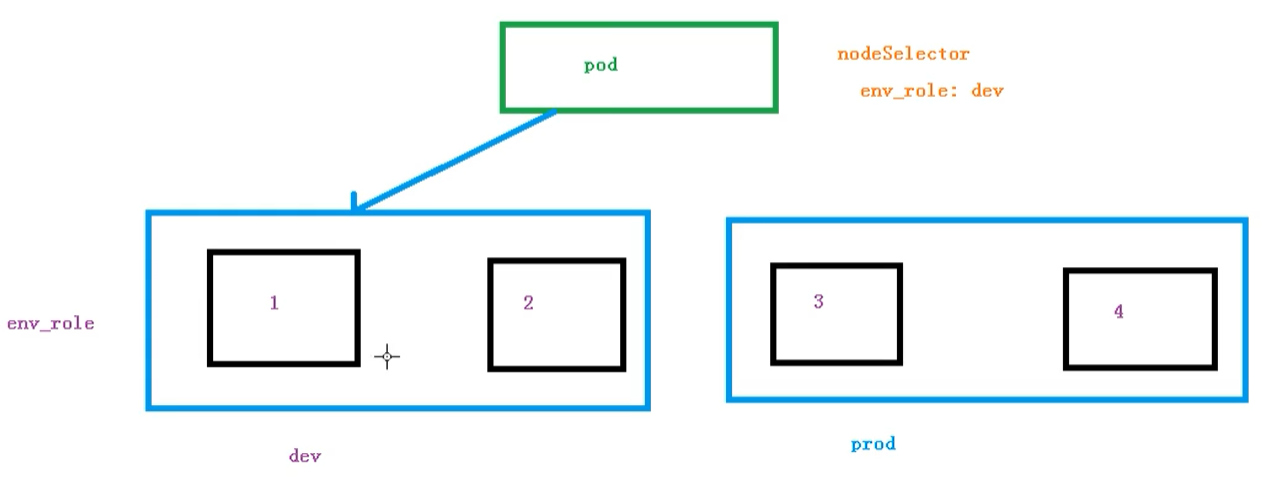
We can add labels to our nodes through the following commands, and then the node selector will schedule
kubectl label node node1 env_role=prod
Node affinity
Node affinity is basically the same as the previous nodeSelector. It determines which nodes the Pod is scheduled to according to the label constraints on the nodes
- Hard affinity: constraints must be met
- Soft affinity: try to meet, not guaranteed
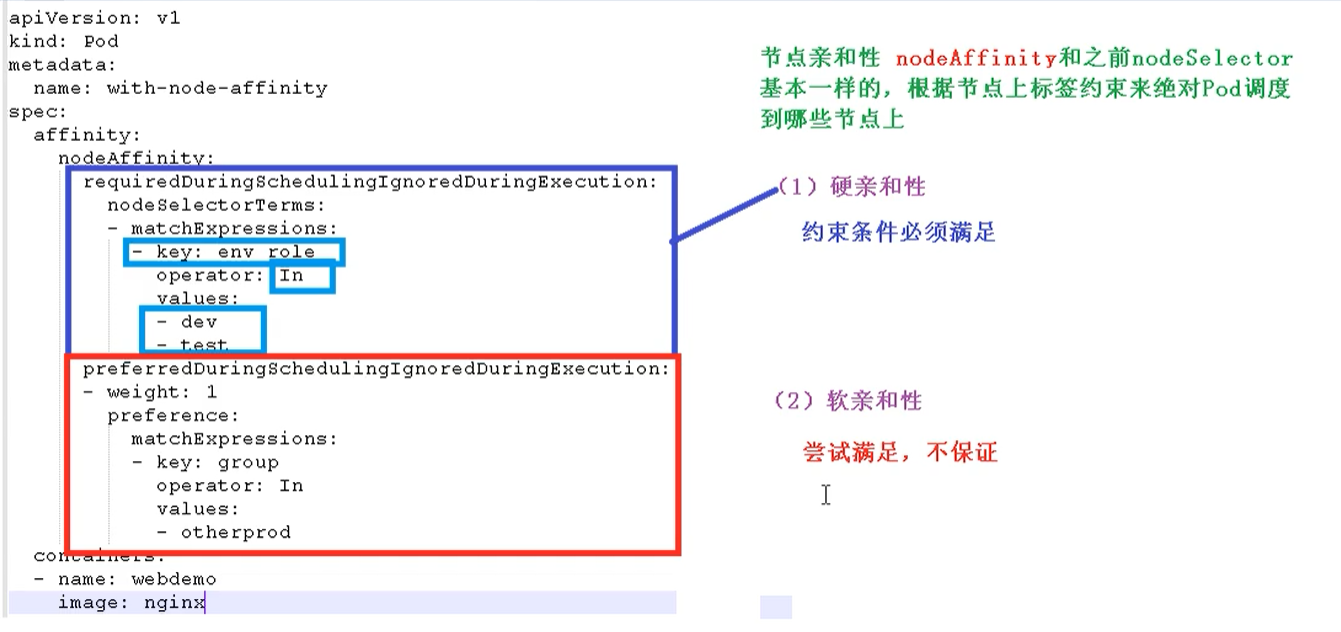
Support common operators: in, NotIn, Exists, GT (greater than), LT (less than), DoesNotExists
Anti affinity: just opposite to affinity, such as NotIn, DoesNotExists, etc
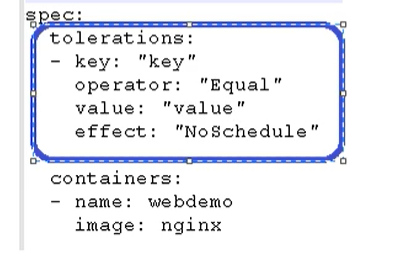
Stain and stain tolerance
nodeSelector and NodeAffinity are attributes of Pod that Prod schedules to some nodes and are implemented during scheduling.
Taint stain: nodes do not perform normal allocation scheduling, but are node attributes
scene
- Private node [restricted ip]
- Node for configuring specific hardware [solid state drive]
- Expulsion based on Taint [not on node1, not on node2]
View stain condition
kubectl describe node k8smaster | grep Taint

There are three stain values
- NoSchedule: must not be scheduled
- PreferNoSchedule: try not to be scheduled [there is also a chance of being scheduled]
- NoExecute: it will not be scheduled, and it will also expel the existing Pod of the Node
Add stain to node
kubectl taint node [node] key=value:Three values of stain
give an example:
kubectl taint node k8snode1 env_role=yes:NoSchedule
Remove stains
kubectl taint node k8snode1 env_role:NoSchedule-

demonstration
Now let's create multiple pods and check the final allocation to nodes
First, we create an nginx pod
kubectl create deployment web --image=nginx
Then use the command to view
kubectl get pods -o wide

We can clearly see that this Pod has been assigned to the k8snode1 node
Now let's copy five copies of pod and check the situation of pod
kubectl scale deployment web --replicas=5
We can find that because the master node is tainted, the nodes are assigned to node1 and node2 nodes

We can use the following command to delete all the pod s we just created
kubectl delete deployment web
Now that we have a better demonstration of the usage of stains, let's stain the node1 node
kubectl taint node k8snode1 env_role=yes:NoSchedule
Then we check whether the stain is successfully added
kubectl describe node k8snode1 | grep Taint

Then we are creating a pod
# Create nginx pod
kubectl create deployment web --image=nginx
# Copy five times
kubectl scale deployment web --replicas=5
Then we're checking
kubectl get pods -o wide
We can see that all pod s are now assigned to k8snode2, because we just set a stain on node1 node

Finally, we can delete the stain just added
kubectl taint node k8snode1 env_role:NoSchedule-
Stain tolerance
Stain tolerance means that a node may or may not be scheduled
Detailed explanation of resource list yaml configuration
metadata
-
Name: name
-
Namespace: namespace
-
Labels: labels for classification
- app: application name, indicating the application (both keys and values can be customized)
- tier: hierarchy (keys and values can be customized)
Label selector:
	Equivalence relationship:=,==,Logical operation
	Set relationship: in,notin
-
Annotations: unlike label, annotations cannot be used to select object resources, but only to provide "metadata" for objects
Display label
kubectl get pods --show-labels : Show all labels
kubectl get pods -l app : Filter Tags
Many resources support inline fields to define the label selectors they use:
matchLabels: give key values directly
matchExpressions: defines the tag selector to be used based on the given expression, {KEY: "KEY", OPERATOR: '' OPERATOR ', values: [val1, val2,...]}
operator:
In, NotIn: the value of the values field must be a non empty list;
Exists, NotExists: the value of the values field must be an empty list;
spec
-
containers: container definition
- Name: name customization
- Liveness probe: survivability detection
- Readiness probe: Readiness probe
- Image: image name
- imagePullPolicy: image acquisition policy - always, never, ifnopresent
- Lifecycle: lifecycle hook
- Ports: define exposed ports
- Name: port name (not required)
- containerPort: port number (customizable)
- command:
- args:
- restartPolicy: restart policy (Always, OnFailue, Never, Default to Always)
-
nodeSelector: node selector, which can affect the scheduling algorithm
-
nodeName: indicates running directly on the specified node
Pod life cycle
- Pending pending status
- Running status
- Failed
- Successfully run
- Unknown unknown status
Important behaviors in Pod life cycle
- Initialize container
- Container detection
- livenes
- readness
K8S survival & readiness detection
Probe type
- ExecAction
- TCPSocketAction
- HTTPGetAction
livenessProbe:
-
exec
apiVersion: v1 kind: Pod metadata: name: liveness-exec-pod spec: containers: - name: liveness-exec-container image: busybox:latest imagePullPolicy: IfNotPresent command: ["/bin/sh","-c","touch /tmp/healthy; sleep 20; rm -rf /tmp/healthy; sleep 3600"] livenessProbe: exec: command: ["test","-e","/tmp/healthy"] initialDelaySeconds: 2 periodSeconds: 3 -
httpGet
apiVersion: v1
kind: Pod
metadata:
  name: liveness-httpd-pod
spec:
  containers:
  - name: liveness-httpd-container
    image: nginx:latest
    imagePullPolicy: IfNotPresent
    ports:
    - name: http
      containerPort: 80
    livenessProbe:
      httpGet:
        port: http
        path: /index.html
      initialDelaySeconds: 2
      periodSeconds: 3
readinessProbe:
-
httpGet
apiVersion: v1
kind: Pod
metadata:
  name: readiness-httpd-pod
spec:
  containers:
  - name: readiness-httpd-container
    image: nginx:latest
    imagePullPolicy: IfNotPresent
    ports:
    - name: http
      containerPort: 80
    livenessProbe:
      httpGet:
        port: http
        path: /index.html
      initialDelaySeconds: 2
      periodSeconds: 3
    readinessProbe:
      httpGet:
        port: http
        path: /index.html
      initialDelaySeconds: 2
      periodSeconds: 3
lifecycle hook
-
postStart: operation after container startup
apiVersion: v1 kind: Pod metadata: name: poststart-busybox spec: containers: - name: busybox-httpd image: busybox:latest imagePullPolicy: IfNotPresent lifecycle: postStart: exec: command: ["/bin/sh/","-c","echo 'home page' >> /tmp/index.html"] command: ["/bin/httpd"] args: ["-f","-h /tmp"] -
preStop: operation before container termination
Kubernetes core resource controller manager
content
- What is Controller
- Relationship between Pod and Controller
- Deployment controller application scenario
- yaml file field description
- Deployment controller deployment application
- Upgrade rollback (you can directly modify the yaml file and then execute the file)
- Elastic scaling (you can modify the yaml file directly and then execute the file)
What is Controller
The Controller is the object that manages and runs containers on the cluster. The Controller actually exists and the Pod is the object of the virtual machine
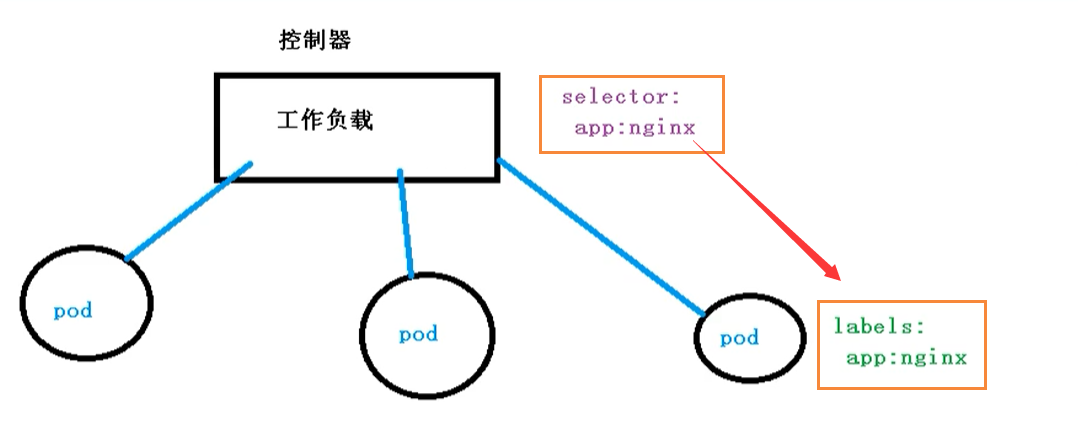
Relationship between Pod and Controller
Pod realizes application operation and maintenance through Controller, such as elastic expansion, rolling upgrade, etc
The relationship between Pod and Controller is established through the label label. At the same time, Controller is also called Controller workload
Deployment controller
- The Deployment controller can deploy stateless applications
- Manage Pod and ReplicaSet
- Deployment, rolling upgrade and other functions
- Application scenario: web services, micro services
Deployment refers to a user's update operation on the K8S cluster. Deployment is an API object wider than RS (replicaset) application model. It can create a new service, update a new service, or upgrade a service by rolling. Rolling upgrade of a service is actually a composite operation of creating a new RS, gradually increasing the number of copies in the new rs to the ideal state and reducing the number of copies in the old rs to 0.
Such a composite operation is not easy to describe with an RS, so it is described with a more general Deployment. All businesses will be managed in the long-term direction of 8ks Deployment.
Deployment deployment application
We have also used Deployment to deploy applications before, as shown in the following code
kubectrl create deployment web --image=nginx
However, the above code is not well reused, because we need to re-enter the code every time, so we configure it through YAML
However, we can try to use the above code to create an image [just try, not create]
kubectl create deployment web --image=nginx --dry-run -o yaml > nginx.yaml
Then output a yaml configuration file nginx YML, the configuration file is as follows
apiVersion: apps/v1
kind: Deployment
metadata:
creationTimestamp: null
labels:
app: web
name: web
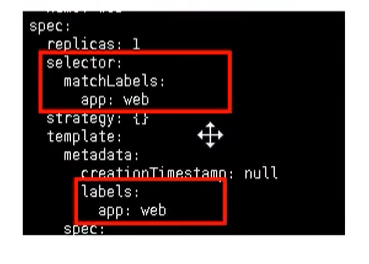
spec:
replicas: 1
selector:
matchLabels:
app: web
strategy: {}
template:
metadata:
creationTimestamp: null
labels:
app: web
spec:
containers:
- image: nginx
name: nginx
resources: {}
status: {}
The selector and label we see are the bridge between our Pod and Controller
Create Pod using YAML
Through the code just, we have generated the YAML file. Now we can use the configuration file to quickly create the Pod image
kubectl apply -f nginx.yaml
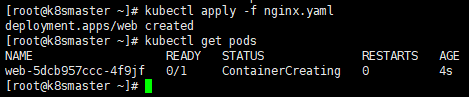
However, because it is created in this way, we can only access it inside the cluster, so we also need to expose the port
kubectl expose deployment web --port=80 --type=NodePort --target-port=80 --name=web1
There are several parameters for the above command
- – port: it's our internal port number
- – target port: refers to the port number exposed for external access
- – Name: name
- – type: type
Similarly, we can export the corresponding configuration file
kubectl expose deployment web --port=80 --type=NodePort --target-port=80 --name=web1 -o yaml > web1.yaml
Get web1 Yaml is shown below
apiVersion: v1
kind: Service
metadata:
  creationTimestamp: "2020-11-16T02:26:53Z"
  labels:
    app: web
  managedFields:
  - apiVersion: v1
    fieldsType: FieldsV1
    fieldsV1:
      f:metadata:
        f:labels:
          .: {}
          f:app: {}
      f:spec:
        f:externalTrafficPolicy: {}
        f:ports:
          .: {}
          k:{"port":80,"protocol":"TCP"}:
            .: {}
            f:port: {}
            f:protocol: {}
            f:targetPort: {}
        f:selector:
          .: {}
          f:app: {}
        f:sessionAffinity: {}
        f:type: {}
    manager: kubectl
    operation: Update
    time: "2020-11-16T02:26:53Z"
  name: web2
  namespace: default
  resourceVersion: "113693"
  selfLink: /api/v1/namespaces/default/services/web2
  uid: d570437d-a6b4-4456-8dfb-950f09534516
spec:
  clusterIP: 10.104.174.145
  externalTrafficPolicy: Cluster
  ports:
  - nodePort: 32639
    port: 80
    protocol: TCP
    targetPort: 80
  selector:
    app: web
  sessionAffinity: None
  type: NodePort
status:
  loadBalancer: {}
Then we can view the exposed services through the following command
kubectl get pods,svc
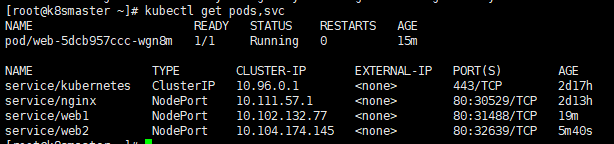
Then we can visit the corresponding url and see nginx http://192.168.177.130:32639/
Upgrade rollback and elastic scaling
- Upgrade: if you upgrade from version 1.14 to 1.15, this is called application upgrade [upgrade can ensure uninterrupted service]
- Rollback: from version 1.15 to 1.14, which is called application rollback
- Elastic scaling: we change the number of pods according to different business scenarios to provide external services, which is elastic scaling
Apply upgrade and rollback
First, we create a 1.14 version of Pod
apiVersion: apps/v1
kind: Deployment
metadata:
  creationTimestamp: null
  labels:
    app: web
  name: web
spec:
  replicas: 1
  selector:
    matchLabels:
      app: web
  strategy: {}
  template:
    metadata:
      creationTimestamp: null
      labels:
        app: web
    spec:
      containers:
      - image: nginx:1.14
        name: nginx
        resources: {}
status: {}
We first specify the version as 1.14, and then start creating our Pod
kubectl apply -f nginx.yaml
At the same time, using the docker images command, we can see that we have successfully pulled an image of version 1.14

We can upgrade nginx from 1.14 to 1.15 by using the following command
kubectl set image deployment web nginx=nginx:1.15
After we execute the command, we can see the upgrade process
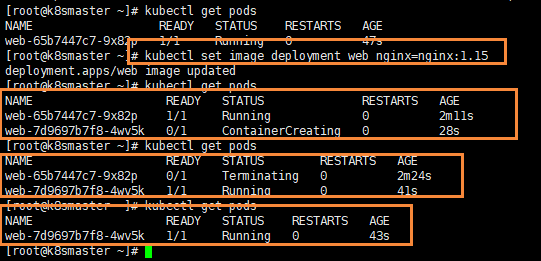
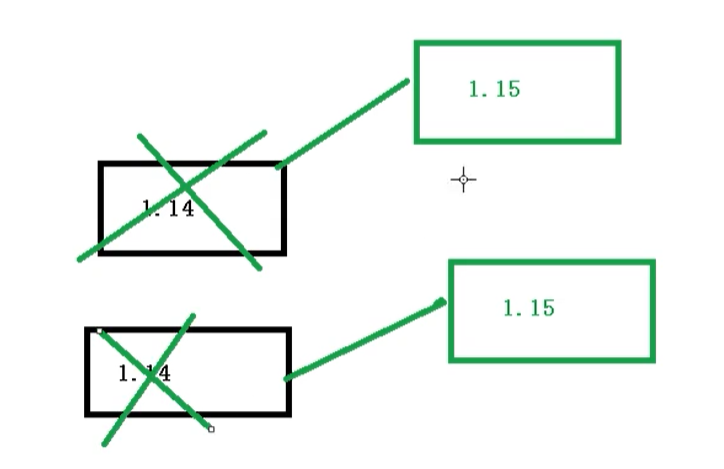
- First, nginx version 1.14 Pod is running, and then version 1.15 Pod is created
- Then, when version 1.15 is created, version 1.14 will be suspended
- Finally, remove the Pod of version 1.14 and complete our upgrade
When we download version 1.15, the container will be in ContainerCreating state. After downloading, we will replace version 1.14 with version 1.15. The advantage of this is that the upgrade can ensure uninterrupted service
We go to our node2 node and check our docker images;
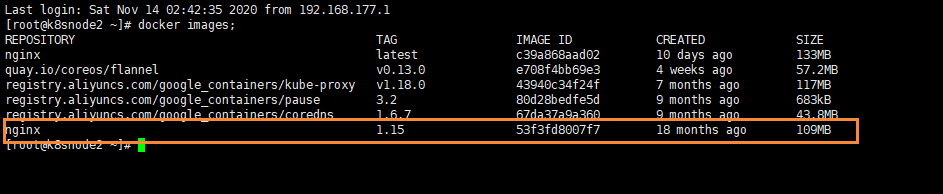
We can see that we have successfully pulled nginx version 1.15
View upgrade status
Next, you can view the upgrade status
kubectl rollout status deployment web

View historical versions
We can also view historical versions
kubectl rollout history deployment web
Apply rollback
We can use the following command to complete the rollback operation, that is, rollback to the previous version
kubectl rollout undo deployment web
Then we can check the status
kubectl rollout status deployment web

At the same time, we can roll back to the specified version
kubectl rollout undo deployment web --to-revision=2
Elastic expansion
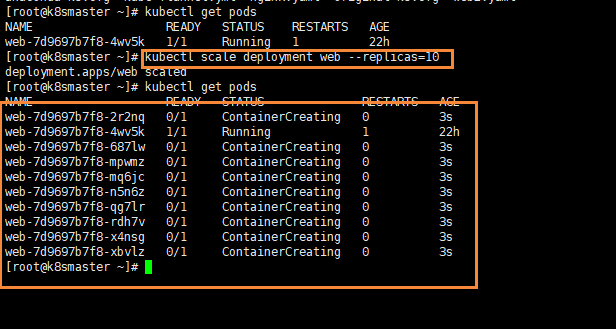
Elastic scaling, that is, we create multiple copies by command
kubectl scale deployment web --replicas=10
As you can see clearly, we have created 10 copies at once
Controller type
ReplicaSet (replica controller, Deployment recommended)
Create a specified number of Pod copies on behalf of the user, ensure that the number of Pod copies maintains the quantity state expected by the user, and support the mechanism of rolling update;
apiVersion: apps/v1
kind: ReplicaSet
metadata:
    name: myapp
    namespace: default
spec:
    replicas: 3
    selector:
        matchLabels:
            app: myapp
            release: canary
    template:
        metadata:
          name: myapp-pod
          labels:
             app: myapp
             release: canary
             environment: dev
        spec:
          containers:
          - name: myapp-container
            image: nginx
            ports:
            - name: http
              containerPort: 80
Deployment (the best choice for managing stateless applications, which can only be used for stateless applications)
Based on ReplicaSet, it supports rolling update, rollback... And can control the update rhythm and update logic
apiVersion: apps/v1
kind: Deployment
metadata:
    name: myapp-deploy
    namespace: default
spec:
    replicas: 2
    selector:
        matchLabels:
            app: myapp
            release: canary
    template:
        metadata:
          name: myapp-deploy
          labels:
             app: myapp
             release: canary
             environment: dev
        spec:
          containers:
          - name: myapp-container
            image: nginx
            ports:
            - name: http
              containerPort: 80
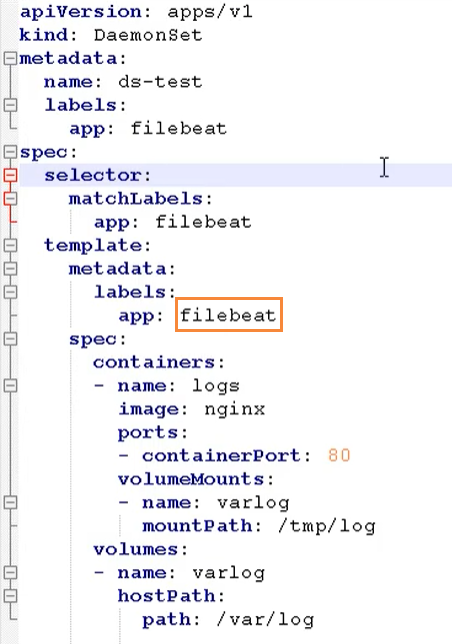
DeamonSet (generally, the service is stateless and the daemon class)
It is used to ensure that each qualified node of K8S cluster only runs a specific Pod copy. It is usually used to realize some system level background tasks
apiVersion: apps/v1
kind: DaemonSet
metadata:
    name: myapp-ds
    namespace: default
spec:
    selector:
        matchLabels:
            app: filebeat
            release: stable
    template:
        metadata:
          name: myapp-ds
          labels:
             app: filebeat
             release: stable
             environment: dev
        spec:
          containers:
          - name: filebeat
            image: filebeat
            env:
            - name: REDIS_HOST
              value: redis.default.svc.cluster.local
            - name: REDIS_LOG_LEVEL
              value: info
            ports:
            - name: http
              containerPort: 80
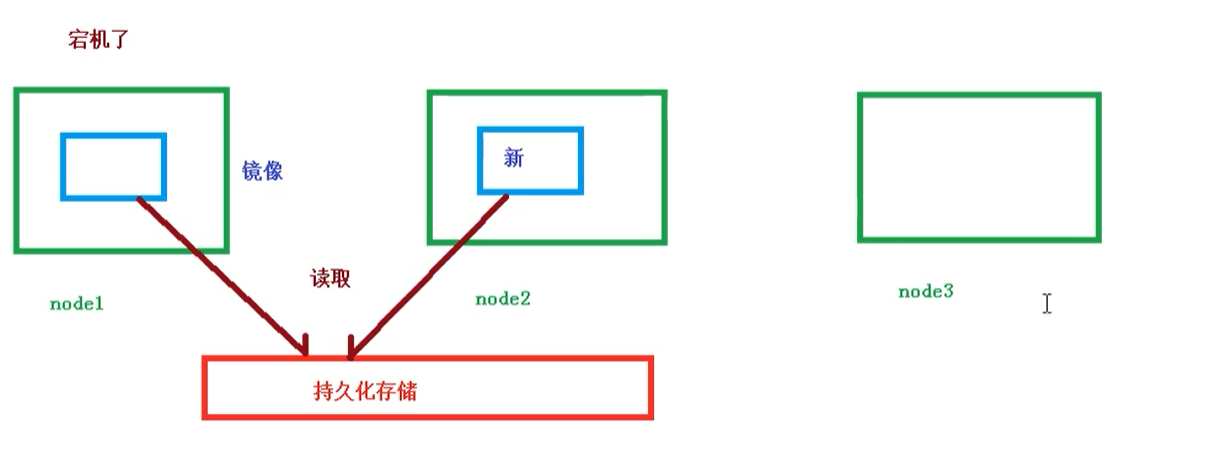
Statefulset
Stateful set is mainly used to deploy stateful applications
For pods in stateful set, each Pod mounts its own independent storage. If a Pod fails, start a Pod with the same name from other nodes. Mount the storage of the original Pod and continue to provide services in its state.
Stateless application
We used to use deployment and deployed stateless applications. What are stateless applications?
- Think Pod is the same
- No sequence requirements
- Regardless of which node the application runs on
- It can scale and expand at will
Stateful application
The above factors need to be taken into account
- Make each Pod independent
- Make each Pod independent and keep the starting order and uniqueness of the Pod
- Unique network identifier, persistent storage
- Orderly, such as master-slave in mysql
Businesses suitable for stateful set include database services MySQL and PostgreSQL, clustered management services Zookeeper, etcd and other stateful services
Another typical application scenario of StatefulSet is as a more stable and reliable mechanism for simulating virtual machines than ordinary containers. The traditional virtual machine is a kind of stateful pet, and the operation and maintenance personnel need to maintain it constantly. When the container began to be popular, we used the container to simulate the use of the virtual machine, and all States are saved in the container, which has been proved to be very unsafe and unreliable.
Using StatefulSet, Pod can still provide high availability by drifting to different nodes, and storage can also provide high reliability through plug-in storage. What StatefulSet does is associate the determined Pod with the determined storage to ensure the continuity of state.
Deploying stateful applications
Headless service, ClusterIp: none
Here you need to use stateful set to deploy stateful applications
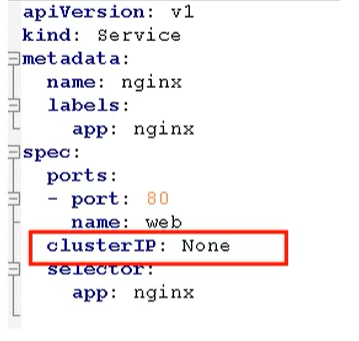
apiVersion: v1
kind: Service
metadata:
name: nginx
namespace: default
labels:
app: nginx
spec:
selector:
app: nginx
release: canary
clusterIP: None
ports:
- port: 80
---
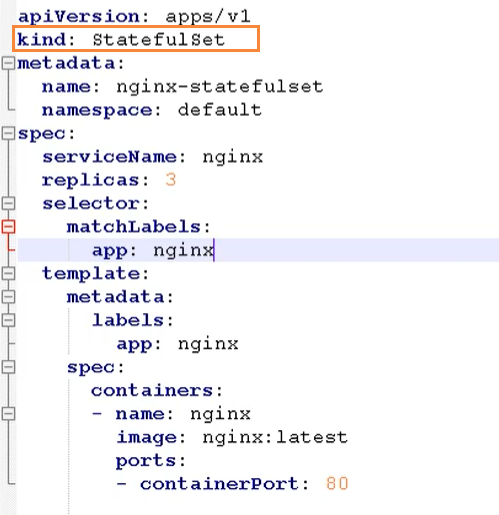
apiVersion: apps/v1
kind: StatefulSet
metadata:
name: nginx-statefulset
namespace: default
spec:
serviceName: nginx
replicas: 3
selector:
matchLabels:
app: nginx
template:
metadata:
labels:
app: nginx
spec:
containers:
- name: nginx
image: nginx
ports:
- containerPort: 80
Then, by looking at the pods, can you find that each pod has a unique name

Then we check the service and find that it is a headless service

There are state conventions here. They are certainly not simply agreed by name, but more complex operations
- deployment: it has identity and unique identification
- Statefullset: generate the domain name according to the host name + certain rules
Each pod has a unique host name and a unique domain name
- Format: host name service name Namespace svc.cluster.local
- Example: nginx-statefullset-0 default. svc. cluster. local
DaemonSet
DaemonSet is a background supporting service, which is mainly used to deploy daemons
The core of long-term servo and batch processing is business applications. Some nodes may run multiple pods of the same business, and some nodes do not run such pods; The core focus of the background support service is on the nodes (physical machines or virtual machines) in the K8S cluster. It is necessary to ensure that there is one such Pod running on each node. The nodes may be all cluster nodes or some specific nodes selected through nodeSelector. Typical background support services include storage, logging and monitoring. Services supporting K8S cluster operation on each node.
The daemon runs the same pod on each of our nodes, and the newly added nodes also run in the same pod
- Example: install data collection tools on each node
Here is a FileBeat image, which is mainly used for log collection
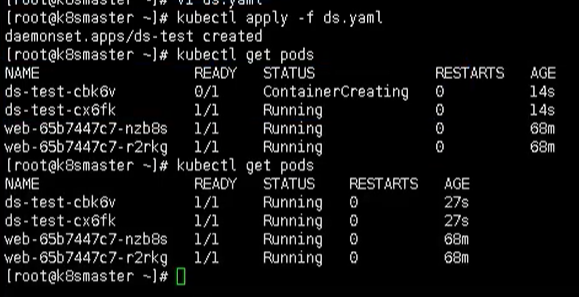
Enter a Pod, enter
kubectl exec -it ds-test-cbk6v bash
After passing this command, we can see the log information collected internally

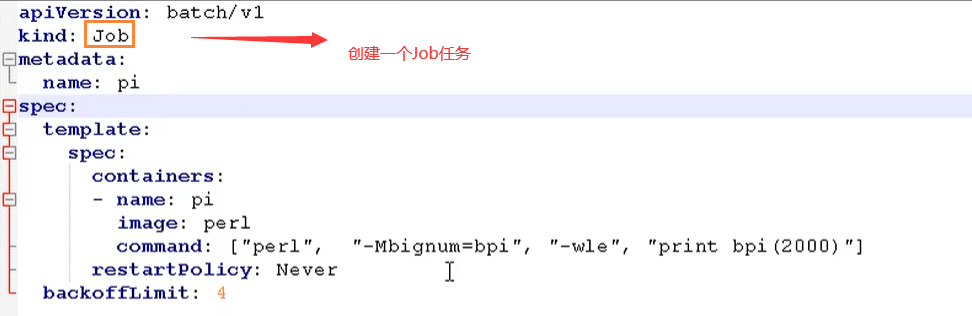
Job and CronJob
One time and scheduled tasks
- One time task: it ends after one-time execution
- Scheduled task: periodic execution
Job is an API object used to control batch tasks in K8S. The main difference between batch service and long-term servo service is that batch service runs from beginning to end, while long-term servo service runs forever without users stopping. The Pod managed by job will exit automatically after successfully completing the task according to the user's settings. The marks of successful completion vary according to different spec.completions strategies: a single Pod task is marked to be completed if one Pod is successful; A certain number of successful line tasks ensure that all N tasks are successful; Work queue tasks are marked as successful according to the global success determined by the application.
Job
Job is also a one-time task
Use the following command to see the existing jobs
kubectl get jobs

After the calculation is completed, you can find that the task has been completed through the command view
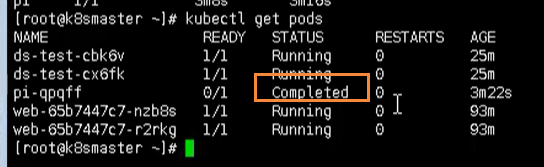
We can view the results of one-time tasks by viewing the log
kubectl logs pi-qpqff

CronJob
Scheduled task, cronjob Yaml is shown below
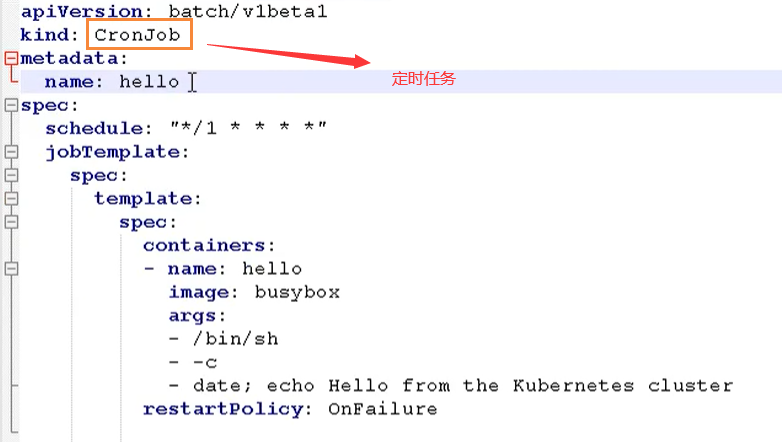
The commands here are configured for each period of time through the cron expression and the schedule field
Then the following command is output for each period of time
First, we use the above configuration file to create a scheduled task
kubectl apply -f cronjob.yaml
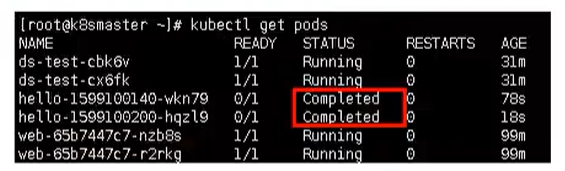
After the creation is completed, we can view the scheduled tasks through the following command
kubectl get cronjobs

We can check through the log
kubectl logs hello-1599100140-wkn79

Then every time it is executed, one more pod will appear
Delete svc and statefullset
Use the following command to delete the svc and statefullset we added
kubectl delete svc web

kubectl delete statefulset --all
Replication Controller
Replication Controller, RC for short, is the Replication Controller in K8S. RC is the earliest API object in K8S cluster to ensure high availability of Pod. Monitor the running Pod to ensure that the specified number of Pod copies are running in the cluster. The specified number can be multiple or 1; If it is less than the specified number, RC will start a new Pod copy; More than the specified number, RC will kill the redundant Pod copies.
Even when the specified number is 1, running Pod through RC is more wise than running Pod directly, because RC can also give full play to its highly available ability to ensure that there is always a Pod running. RC is an early technical concept in K8S. It is only applicable to long-term servo business types, such as controlling Pod to provide highly available Web services.
Replica Set
Replica Set checks RS, that is, Replica Set. RS is a new generation of RC, which provides the same high availability. The difference is that RS comes from behind and can support more kinds of matching modes. Replica Set objects are generally not used alone, but as ideal state parameters of Deployment
Kubernetes core technology Service
summary
We learned earlier that Deployment only guarantees the number of micro service pods supporting services, but does not solve the problem of how to access these services. A Pod is just an instance of running services. It may stop on one node at any time and start a new Pod with a new IP on another node. Therefore, it cannot provide services with a determined IP and port number.
Service discovery and load balancing capabilities are needed to provide services stably. The work of service discovery is to find the corresponding back-end service instance for the services accessed by the client. In the K8S cluster, the service that the client needs to access is the service object. Each service corresponds to a valid virtual IP in the cluster, and a service is accessed through the virtual IP in the cluster.
In k8s cluster, the load balancing of microservices is realized by Kube proxy. Kube proxy is the load balancer within k8s cluster. It is a distributed proxy server with one on each node of k8s; This design reflects its scalability advantages. The more nodes that need to access the service, the more Kube proxies that provide load balancing capability, and the more high availability nodes. In contrast, we usually use reverse proxy for load balancing on the server, and we need to further solve the problem of high availability of reverse proxy.
The meaning of Service existence
[find lost connection prevention service]
Because each creation of a Pod corresponds to an IP address, which is short-lived and will change with the update of the Pod. Suppose that when there are multiple pods on our front-end page and multiple pods on the back-end, when they access each other, they need to get the IP address of the Pod through the registration center, and then access the corresponding Pod
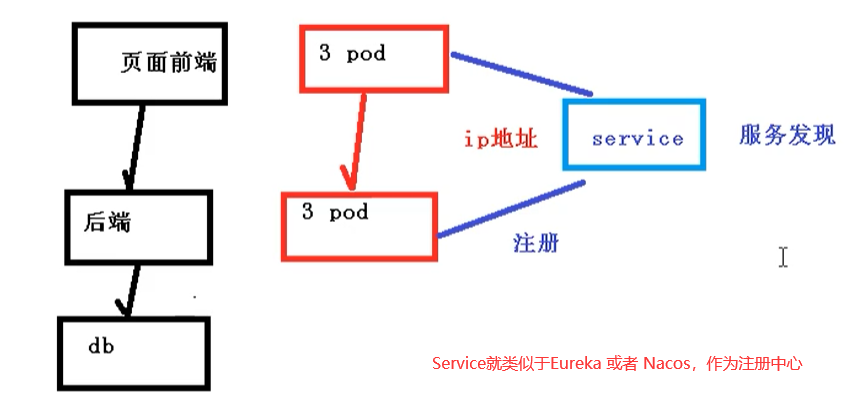
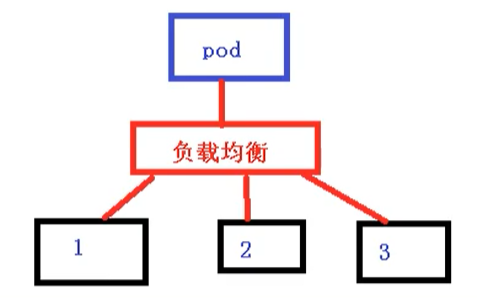
Define Pod access policy [load balancing]
The Pod at the front end of the page accesses the Pod at the back end, and the middle will pass through the Service layer, where Service can also perform load balancing. There are many implementation strategies for load balancing, such as:
- random
- polling
- Response ratio
Relationship between Pod and Service
Here, Pod and Service are still associated according to label and selector [same as Controller]
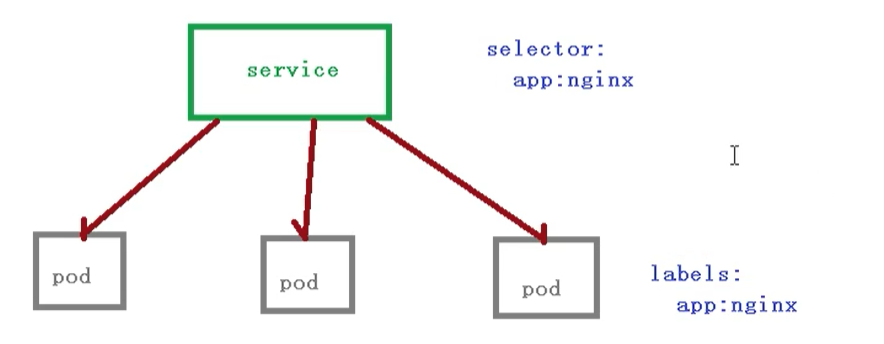
When accessing a service, we also need to have an ip address. This ip is definitely not the ip address of the pod, but the virtual IP vip
Service common types
There are three common types of Service
- ClusterIp: cluster internal access
- NodePort: used by external access applications
- LoadBalancer: used for external access applications, public cloud
give an example
We can export a file containing the configuration information of the service
kubectl expose deployment web --port=80 --target-port=80 --dry-run -o yaml > service.yaml
service.yaml is shown below
apiVersion: v1
kind: Service
metadata:
  creationTimestamp: null
  labels:
    app: web
  name: web
spec:
  ports:
  - port: 80
    protocol: TCP
    targetPort: 80
  selector:
    app: web
status:
  loadBalancer: {}
If we don't set it, the first method is ClusterIp by default, that is, it can only be used inside the cluster. We can add a type field to set our service type
apiVersion: v1
kind: Service
metadata:
  creationTimestamp: null
  labels:
    app: web
  name: web
spec:
  ports:
  - port: 80
    protocol: TCP
    targetPort: 80
  selector:
    app: web
  type: NodePort
status:
  loadBalancer: {}
After modifying the command, we use to create a pod
kubectl apply -f service.yaml
Then you can see that it has been successfully modified to NodePort type. The last remaining method is LoadBalanced: public cloud is used for external access applications
Nodes are generally deployed on the intranet, while the extranet is generally inaccessible. How do you access them?
- Find a machine that can be accessed through the Internet and install nginx and reverse proxy
- Manually add accessible nodes to nginx
If we use LoadBalancer, there will be a load balancing controller, which has functions similar to nginx, so we don't need to add it to nginx
Service working mode:
-
userspace
-
iptables
-
ipvs
Service Type:
-
ExternalName
-
ClusterIP
apiVersion: v1 kind: Service metadata: name: redis namespace: default spec: selector: app: redis role: logstor clusterIP: 10.97.97.97 type: ClusterIP ports: - port: 6379 targetPort: 6379 -
NodePort
apiVersion: v1 kind: Service metadata: name: nginx namespace: default spec: selector: app: nginx release: canary clusterIP: 10.99.99.99 type: NodePort ports: - port: 80 targetPort: 80 nodePort: 30080 -
LoadBalance
-
No ClusterIP: Headless Service
apiVersion: v1
kind: Service
metadata:
    name: Nginx
    namespace: default
spec:
  selector:
    app: nginx
    release: canary
  clusterIP: None
  type: NodePort
  ports:
  - port: 80
    targetPort: 80
    nodePort: 30080
resource record
SVC_NAME.NS_NAME.DOMAIN.LTD.
DOMAIN.LTD : svc.cluster.local.
For example: redis default. svc. cluster. local.
Kubernetes configuration management secret, ConfigMap
Secret
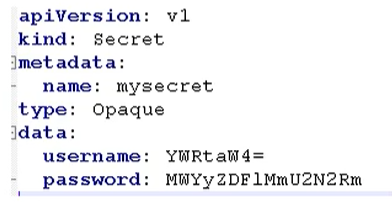
The main function of Secret is to encrypt the data and store it in etcd, so that the Pod container can access it by attaching Volume
Scenario: encrypt user name and password
The common scenario is to encrypt a string with base64 encoding
echo -n 'admin' | base64

Mount to Pod in variable form
- Create a yaml file that encrypts data yaml
Then create a pod using the following command
[the external link picture transfer fails. The source station may have anti-theft chain mechanism. It is recommended to save the picture and upload it directly (img-jGHYy1Gc-1620547540333)(C:\Users\h7104\Desktop \ new folder \ Kubenetes learning material record \ picture \ capture. PNG)]
kubectl create -f secret.yaml
View through get command
kubectl get pods
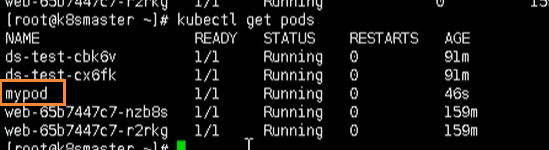
Then we enter our container through the following command
kubectl exec -it mypod bash
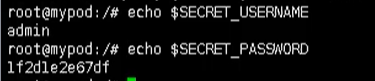
Then we can output our value, which is loaded into our container in the form of variables
# Output user
echo $SECRET_USERNAME
# Output password
echo $SECRET_PASSWORD
Finally, if we want to delete this Pod, we can use this command
kubectl delete -f secret-val.yaml
Data volume mount
First, we create a secret-val.yaml file
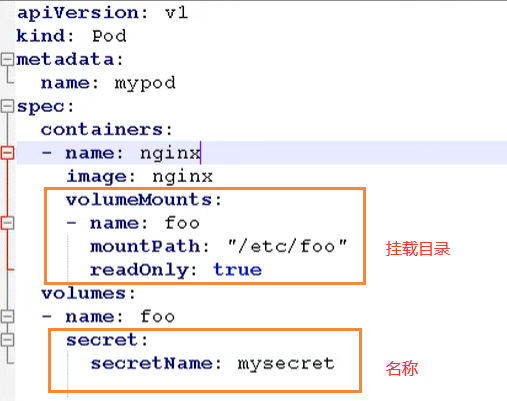
Then create our Pod
# Create container based on configuration
kubectl apply -f secret-val.yaml
# Enter container
kubectl exec -it mypod bash
# see
ls /etc/foo

ConfigMap
The function of ConfigMap is to store unencrypted data into etcd and mount Pod to container as variable or data Volume
Application scenario: configuration file
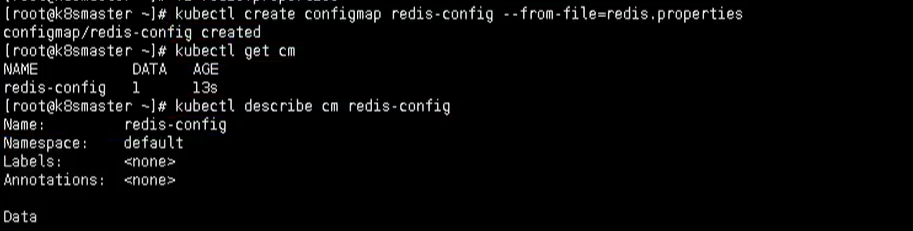
create profile
First, we need to create a configuration file redis properties
redis.port=127.0.0.1
redis.port=6379
redis.password=123456
Create ConfigMap
We use the command to create a configmap
kubectl create configmap redis-config --from-file=redis.properties
Then view the details
kubectl describe cm redis-config
Volume is mounted as a data volume
First we need to create a cm yaml
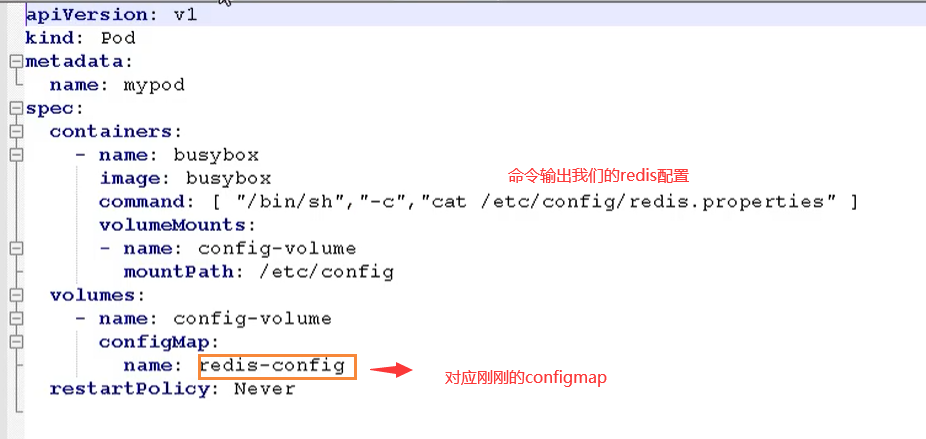
Then use this yaml to create our pod
# establish
kubectl apply -f cm.yaml
# see
kubectl get pods
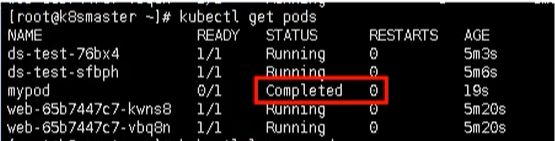
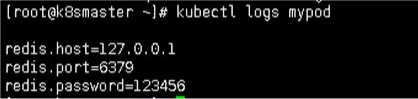
Finally, we can view the result output through the command
kubectl logs mypod
Mount Pod as a variable
First, we also have a myconfig Yaml file, declare variable information, and then create it with configmap
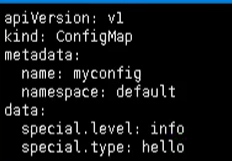
Then we can create our profile
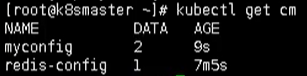
# Create pod
kubectl apply -f myconfig.yaml
# obtain
kubectl get cm
Then, after we create the pod, we need to create a config-var.yaml to use our configuration information
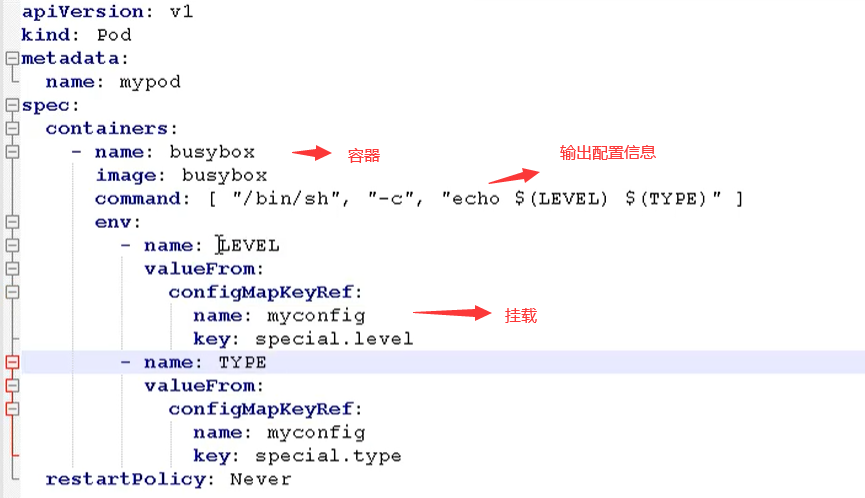
Finally, let's look at the output
kubectl logs mypod

Kubernetes cluster security mechanism
summary
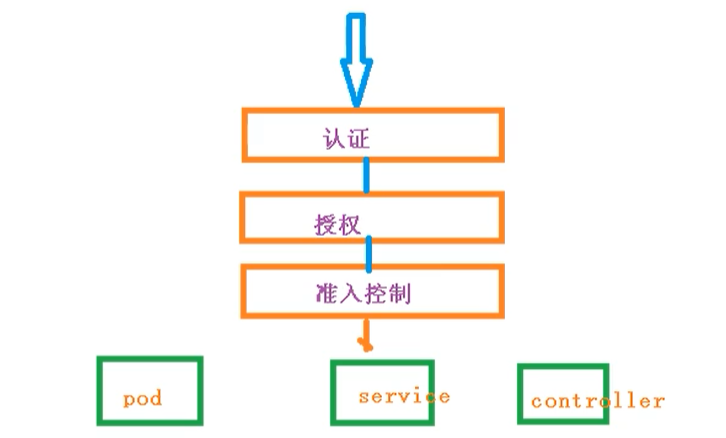
When accessing the K8S cluster, we need to go through three steps to complete the specific operation
- authentication
- [authentication]
- admission control
During the visit, you need to go through apiserver for unified coordination, such as the doorman
- During the access process, you need a certificate, token, or user name and password
- If you need serviceAccount to access pod
authentication
Port 8080 is not exposed externally, but can only be accessed internally. Port 6443 is used externally
Common methods of client authentication
- https certificate authentication, based on ca certificate
- http token authentication, which identifies users through tokens
- http basic authentication, user name + password authentication
authentication
Authentication based on RBAC
Role based access control
admission control
It is the list of admission controllers. If the list has requested content, it will pass, and if not, it will be rejected
Introduction to RBAC
Role based access control: set the access content for a role, and then the user will have the access permission of the role after assigning the role
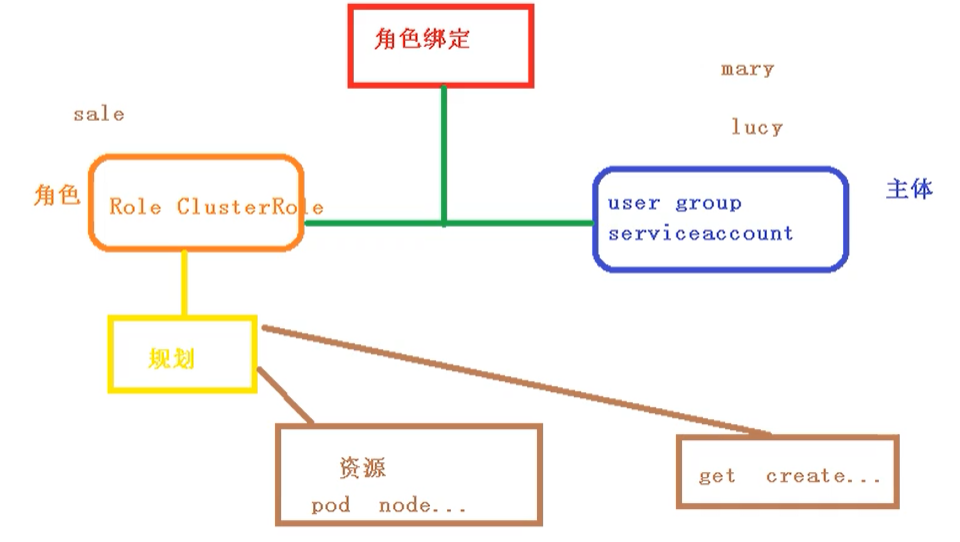
There are several default roles in k8s
- role: specific namespace access
- ClusterRole: access rights for all namespaces
Role binding
- roleBinding: the role is bound to the principal
- ClusterRoleBinding: the cluster role is bound to the principal
subject
- User: user
- Group: user group
- serviceAccount: service account
RBAC realizes authentication
- Create namespace
Create namespace
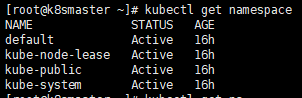
We can first look at the existing namespace
kubectl get namespace
Then we create our own namespace roledemo
kubectl create ns roledemo
Create Pod from namespace
Why create a namespace? Because if you do not create a namespace, it is under default by default
kubectl run nginx --image=nginx -n=roletest
Create role
We passed RBAC role Yaml to create
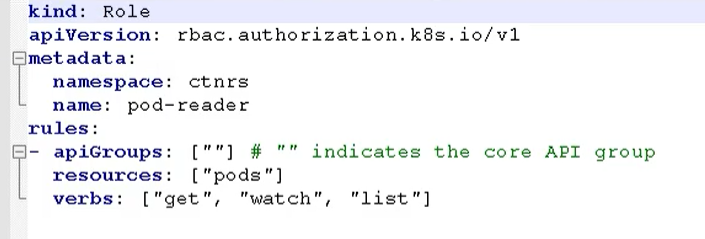
tip: this role only has get and list permissions for pod
Then create our role through yaml
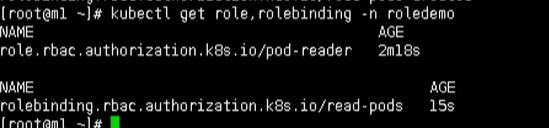
#### establish
kubectl apply -f rbac-role.yaml
#### see
kubectl get role -n roledemo

Create role binding
We still use role rolebinding Yaml way to create our role binding
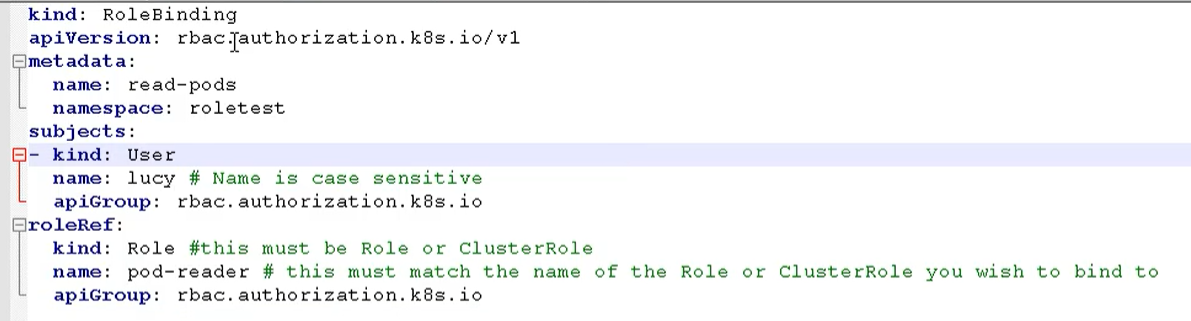
Then create our role binding
#### Create role binding
kubectl apply -f rbac-rolebinding.yaml
#### View role bindings
kubectl get role, rolebinding -n roledemo
Use certificate to identify
We first have to have an RBAC user SH certificate script

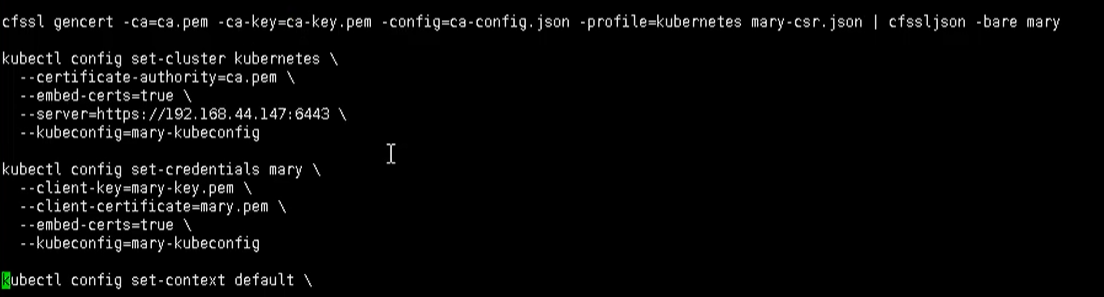
Many certificate files are contained here. They need to be copied in the TSL directory
Execute our script with the following command
./rbac-user.sh
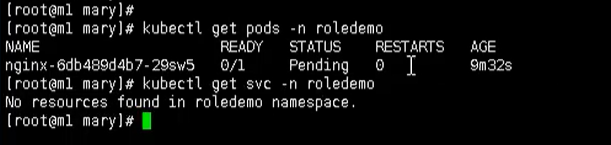
Finally, we test
#### Use the get command to view the pod [with permission]
kubectl get pods -n roledemo
#### Use the get command to view svc [no permission]
kubectl get svc -n roledmeo
Kubernetes core technology Ingress
preface
Originally, we need to expose the port number to the public, and we can access it through ip + port number
It was originally implemented using NodePort in Service
- Ports are started on each node
- When accessing, you can access through any node through ip + port number
However, NodePort still has some defects
- Because ports cannot be repeated, each port can only be used once, and one port corresponds to one application
- In actual access, domain names are used, and jump to different port services according to different domain names
Relationship between progress and Pod
pod and inress are associated through service, while inress, as a unified entry, is associated with a group of pods by service
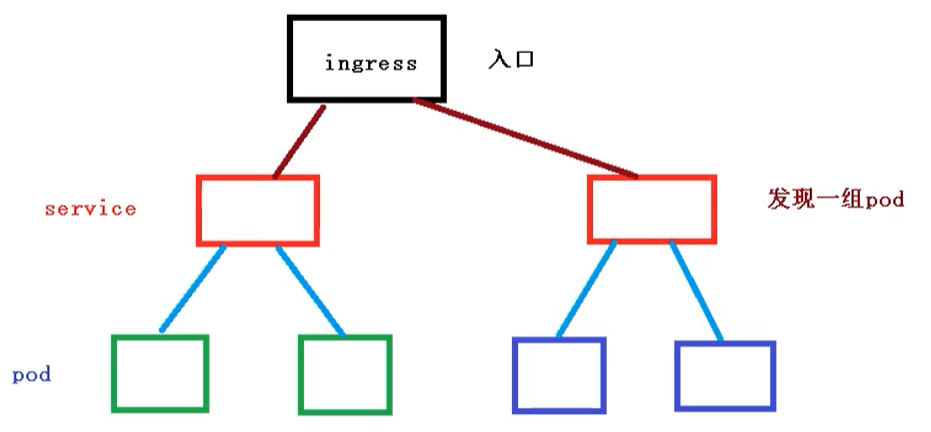
- First of all, service is related to our pod
- Then, using ingress as the entry, you need to go to the service first, and then find a group of pod s
- After discovering the pod, you can perform load balancing and other operations
Progress workflow
In the actual visit, we need to maintain many domain names, a.com and b.com
Then, different domain names correspond to different services, and then the service manages different pod s

It should be noted that ingress is not a built-in component and needs to be installed separately
Using Ingress
The steps are as follows
- Deploy ingress Controller [need to download official]
- Create and configure rules for which namespace
Create Nginx Pod
Create an nginx application and expose the port
# Create pod
kubectl create deployment web --image=nginx
# see
kubectl get pods
External exposure port
kubectl expose deployment web --port=80 --target-port=80 --type=NodePort
Deploy ingress controller
Now let's deploy our ingress through yaml. The configuration file is as follows
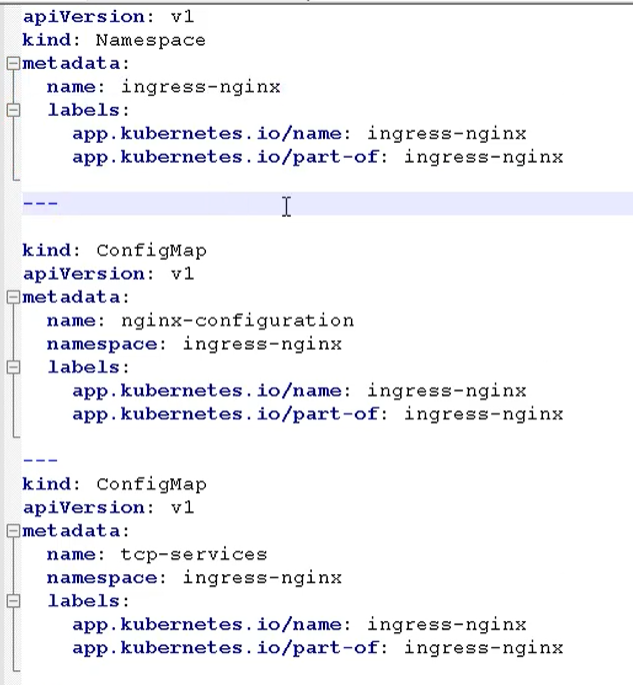
apiVersion: v1
kind: Namespace
metadata:
  name: ingress-nginx
  labels:
    app.kubernetes.io/name: ingress-nginx
    app.kubernetes.io/part-of: ingress-nginx

---

kind: ConfigMap
apiVersion: v1
metadata:
  name: nginx-configuration
  namespace: ingress-nginx
  labels:
    app.kubernetes.io/name: ingress-nginx
    app.kubernetes.io/part-of: ingress-nginx

---
kind: ConfigMap
apiVersion: v1
metadata:
  name: tcp-services
  namespace: ingress-nginx
  labels:
    app.kubernetes.io/name: ingress-nginx
    app.kubernetes.io/part-of: ingress-nginx

---
kind: ConfigMap
apiVersion: v1
metadata:
  name: udp-services
  namespace: ingress-nginx
  labels:
    app.kubernetes.io/name: ingress-nginx
    app.kubernetes.io/part-of: ingress-nginx

---
apiVersion: v1
kind: ServiceAccount
metadata:
  name: nginx-ingress-serviceaccount
  namespace: ingress-nginx
  labels:
    app.kubernetes.io/name: ingress-nginx
    app.kubernetes.io/part-of: ingress-nginx

---
apiVersion: rbac.authorization.k8s.io/v1beta1
kind: ClusterRole
metadata:
  name: nginx-ingress-clusterrole
  labels:
    app.kubernetes.io/name: ingress-nginx
    app.kubernetes.io/part-of: ingress-nginx
rules:
  - apiGroups:
      - ""
    resources:
      - configmaps
      - endpoints
      - nodes
      - pods
      - secrets
    verbs:
      - list
      - watch
  - apiGroups:
      - ""
    resources:
      - nodes
    verbs:
      - get
  - apiGroups:
      - ""
    resources:
      - services
    verbs:
      - get
      - list
      - watch
  - apiGroups:
      - ""
    resources:
      - events
    verbs:
      - create
      - patch
  - apiGroups:
      - "extensions"
      - "networking.k8s.io"
    resources:
      - ingresses
    verbs:
      - get
      - list
      - watch
  - apiGroups:
      - "extensions"
      - "networking.k8s.io"
    resources:
      - ingresses/status
    verbs:
      - update

---
apiVersion: rbac.authorization.k8s.io/v1beta1
kind: Role
metadata:
  name: nginx-ingress-role
  namespace: ingress-nginx
  labels:
    app.kubernetes.io/name: ingress-nginx
    app.kubernetes.io/part-of: ingress-nginx
rules:
  - apiGroups:
      - ""
    resources:
      - configmaps
      - pods
      - secrets
      - namespaces
    verbs:
      - get
  - apiGroups:
      - ""
    resources:
      - configmaps
    resourceNames:
      # Defaults to "<election-id>-<ingress-class>"
      # Here: "<ingress-controller-leader>-<nginx>"
      # This has to be adapted if you change either parameter
      # when launching the nginx-ingress-controller.
      - "ingress-controller-leader-nginx"
    verbs:
      - get
      - update
  - apiGroups:
      - ""
    resources:
      - configmaps
    verbs:
      - create
  - apiGroups:
      - ""
    resources:
      - endpoints
    verbs:
      - get

---
apiVersion: rbac.authorization.k8s.io/v1beta1
kind: RoleBinding
metadata:
  name: nginx-ingress-role-nisa-binding
  namespace: ingress-nginx
  labels:
    app.kubernetes.io/name: ingress-nginx
    app.kubernetes.io/part-of: ingress-nginx
roleRef:
  apiGroup: rbac.authorization.k8s.io
  kind: Role
  name: nginx-ingress-role
subjects:
  - kind: ServiceAccount
    name: nginx-ingress-serviceaccount
    namespace: ingress-nginx

---
apiVersion: rbac.authorization.k8s.io/v1beta1
kind: ClusterRoleBinding
metadata:
  name: nginx-ingress-clusterrole-nisa-binding
  labels:
    app.kubernetes.io/name: ingress-nginx
    app.kubernetes.io/part-of: ingress-nginx
roleRef:
  apiGroup: rbac.authorization.k8s.io
  kind: ClusterRole
  name: nginx-ingress-clusterrole
subjects:
  - kind: ServiceAccount
    name: nginx-ingress-serviceaccount
    namespace: ingress-nginx

---

apiVersion: apps/v1
kind: Deployment
metadata:
  name: nginx-ingress-controller
  namespace: ingress-nginx
  labels:
    app.kubernetes.io/name: ingress-nginx
    app.kubernetes.io/part-of: ingress-nginx
spec:
  replicas: 1
  selector:
    matchLabels:
      app.kubernetes.io/name: ingress-nginx
      app.kubernetes.io/part-of: ingress-nginx
  template:
    metadata:
      labels:
        app.kubernetes.io/name: ingress-nginx
        app.kubernetes.io/part-of: ingress-nginx
      annotations:
        prometheus.io/port: "10254"
        prometheus.io/scrape: "true"
    spec:
      hostNetwork: true
      # wait up to five minutes for the drain of connections
      terminationGracePeriodSeconds: 300
      serviceAccountName: nginx-ingress-serviceaccount
      nodeSelector:
        kubernetes.io/os: linux
      containers:
        - name: nginx-ingress-controller
          image: lizhenliang/nginx-ingress-controller:0.30.0
          args:
            - /nginx-ingress-controller
            - --configmap=$(POD_NAMESPACE)/nginx-configuration
            - --tcp-services-configmap=$(POD_NAMESPACE)/tcp-services
            - --udp-services-configmap=$(POD_NAMESPACE)/udp-services
            - --publish-service=$(POD_NAMESPACE)/ingress-nginx
            - --annotations-prefix=nginx.ingress.kubernetes.io
          securityContext:
            allowPrivilegeEscalation: true
            capabilities:
              drop:
                - ALL
              add:
                - NET_BIND_SERVICE
            # www-data -> 101
            runAsUser: 101
          env:
            - name: POD_NAME
              valueFrom:
                fieldRef:
                  fieldPath: metadata.name
            - name: POD_NAMESPACE
              valueFrom:
                fieldRef:
                  fieldPath: metadata.namespace
          ports:
            - name: http
              containerPort: 80
              protocol: TCP
            - name: https
              containerPort: 443
              protocol: TCP
          livenessProbe:
            failureThreshold: 3
            httpGet:
              path: /healthz
              port: 10254
              scheme: HTTP
            initialDelaySeconds: 10
            periodSeconds: 10
            successThreshold: 1
            timeoutSeconds: 10
          readinessProbe:
            failureThreshold: 3
            httpGet:
              path: /healthz
              port: 10254
              scheme: HTTP
            periodSeconds: 10
            successThreshold: 1
            timeoutSeconds: 10
          lifecycle:
            preStop:
              exec:
                command:
                  - /wait-shutdown

---

apiVersion: v1
kind: LimitRange
metadata:
  name: ingress-nginx
  namespace: ingress-nginx
  labels:
    app.kubernetes.io/name: ingress-nginx
    app.kubernetes.io/part-of: ingress-nginx
spec:
  limits:
  - min:
      memory: 90Mi
      cpu: 100m
    type: Container
In this file, it should be noted that hostNetwork: true is changed to true for later access
kubectl apply -f ingress-con.yaml
In this way, we can actually access it from the outside. We need to add a layer outside here
kubectl apply -f ingress-con.yaml
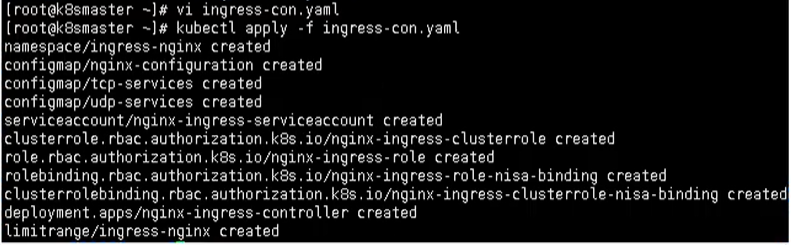
Finally, use the following command to check whether ingress is successfully deployed
kubectl get pods -n ingress-nginx

Creating an ingress rule file
Create the inress rule file, inress-h.yaml
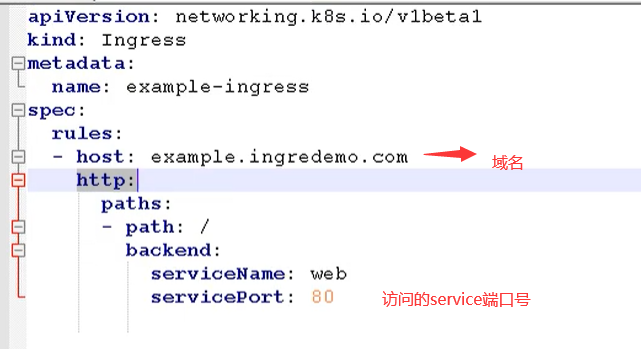
Add domain name access rule
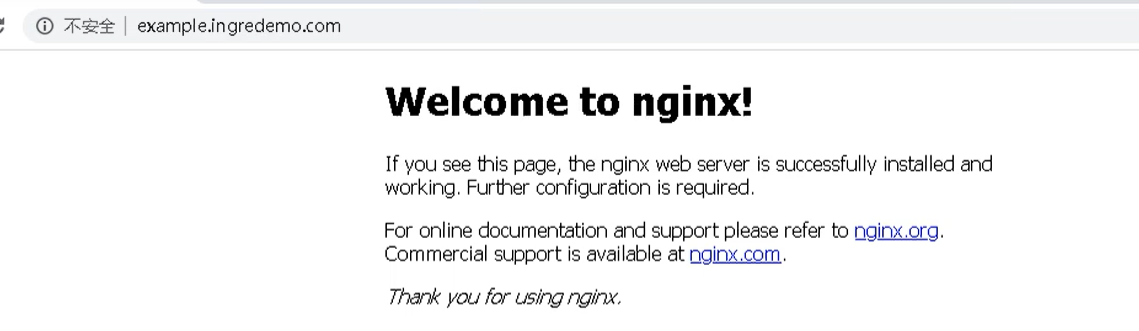
Add domain name access rules in the hosts file of windows [because we don't have domain name resolution, we can only do this]

Finally, you can access it through the domain name
Core technology of Kubernetes Helm
Helm is a package management tool [similar to npm]
Why introduce Helm
First of all, the original project was deployed and released based on yaml files. At present, most of the projects are micro service or modular, and will be deployed into many components. Each component may correspond to a deployment Yaml, a service Yaml, an progress Yaml may also have various dependencies. If a project has five components, it is likely to have 15 different yaml files. These yamls are stored separately. If the project is restored one day, it is difficult to know the deployment order and dependencies, and all these include
- Centralized storage based on yaml configuration
- Project based packaging
- Dependencies between components
But what are the problems with deploying in this way?
- It is more appropriate to deploy a single application and a few service applications before use
- However, if a microservice project is deployed, there may be dozens of services, and each service has a set of yaml files. A large number of yaml files need to be maintained, so version management is particularly inconvenient
Helm was introduced to solve this problem
- Using Helm, you can manage these YAML files as a whole
- Realize efficient reuse of YAML files
- Using helm application level version management
Helm introduction
Helm is a package management tool of kubernetes, just like the package manager under Linux, such as yum/apt, which can easily deploy the previously packaged yaml file to kubernetes.
Helm has three important concepts
- helm: a command-line client tool, which is mainly used for the creation, packaging, publishing and management of Kubernetes application chart (equivalent to yum)
- Chart: application description, a series of collections used to describe k8s resource related files (yaml is packaged as a collection of yaml)
- Release: the deployment entity based on chart. After a chart is run by Helm, the corresponding release will be generated, and the real operation resource object will be created in K8S. That is, application level version management
- Repository: a repository for publishing and storing charts
Helm components and architecture
Helm adopts client / server architecture and is composed of the following components
- Helm CLI is a helm client that can be executed locally
- Tiller is a server-side component that runs on the Kubernetes cluster and manages Kubernetes applications
- Repository is a Chart repository. Helm client accesses Chart index files and compressed packages in the repository through HTTP protocol
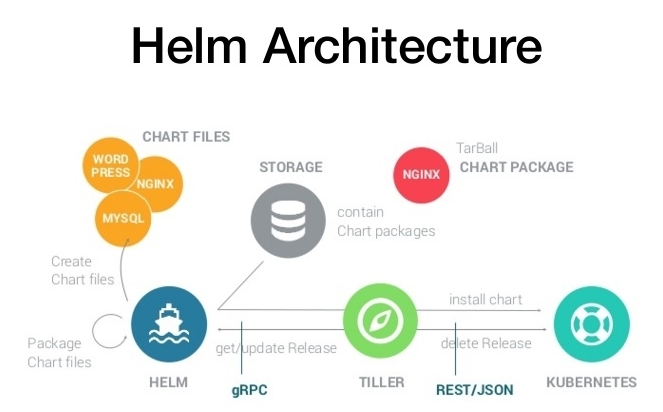
Helm v3 change
On November 13, 2019, Helm team released the first stable version of Helm v3
The main changes of this version are as follows
- Architecture change
- The most obvious change is the deletion of Tiller
- Delete Tiller in V3 version
- Release can be reused in different namespaces
Before V3
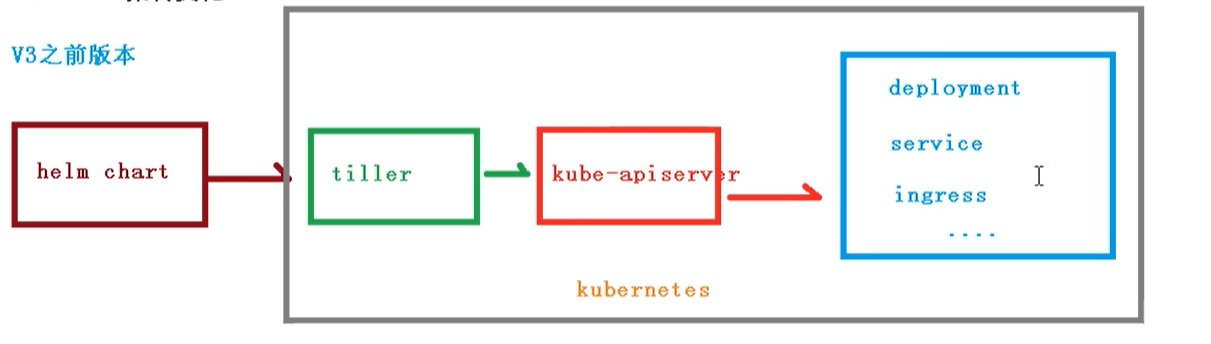
V3 version
[the external link picture transfer fails. The source station may have an anti-theft chain mechanism. It is recommended to save the picture and upload it directly (img-l0yGr72u-1620547540351)(C:\Users\h7104\Desktop \ new folder \ Kubenetes learning material record \ picture \ wechat picture _20210505155614.png)]
helm configuration
First we need to go Download from official website
- The first step, Download helm Install the compressed file and upload it to the linux system
- Step 2: unzip the helm compressed file and copy the unzipped helm directory to the usr/bin directory
- Using the command: helm
We all know that Yum needs to configure the yum source, so helm needs to configure the helm source
helm warehouse
Add warehouse
helm repo add Warehouse name and address
for example
# Configure Microsoft source
helm repo add stable http://mirror.azure.cn/kubernetes/charts
# Configure Ali source
helm repo add aliyun https://kubernetes.oss-cn-hangzhou.aliyuncs.com/charts
# Configure google source
helm repo add google https://kubernetes-charts.storage.googleapis.com/

# to update
helm repo update
Then you can view the warehouse address we added
# View all
helm repo list
# View a
helm search repo stable
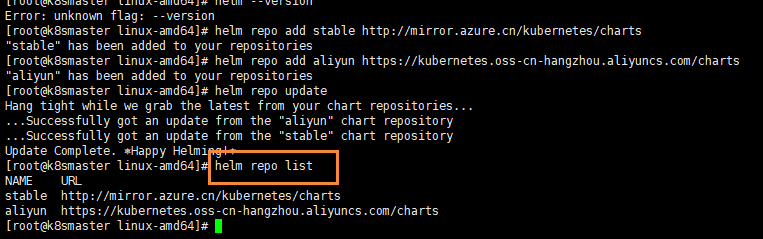
Or you can delete the source we added
helm repo remove stable
Helm basic command
- chart install
- chart upgrade
- chart rollback
Rapid deployment of applications using helm
Search for apps using commands
First, we use the command to search for the application we need to install
# Search weave warehouse
helm search repo weave

Select the installation according to the search content
After the search is complete, use the command to install
helm install ui aliyun/weave-scope
You can download yaml file through the following command [if]
kubectl apply -f weave-scope.yaml
After installation, you can view it through the following command
helm list

At the same time, you can view and update specific information through the following commands
helm status ui
However, by checking the svc status, we found that no objects exposed ports

Therefore, we need to modify the yaml file of the service and add NodePort
kubectl edit svc ui-weave-scope
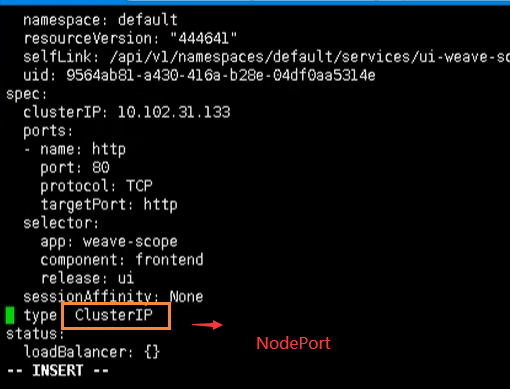
In this way, the port can be exposed

Then we can access it through ip + 32185
If you create Chart yourself
Use the command to create Chart yourself
helm create mychart
After the creation, we can see that a mychart directory has been created under the current folder

Directory format
- templates: write yaml files and store them in this directory
- values.yaml: Global yaml files are stored
- chart.yaml: current chart attribute configuration information
Create two files in the templates folder
We create the following two
- deployment.yaml
- service.yaml
We can create yaml file with the following command
# Export deployment yaml
kubectl create deployment web1 --image=nginx --dry-run -o yaml > deployment.yaml
# Export service Yaml [you may need to create a deployment, otherwise an error will be reported]
kubectl expose deployment web1 --port=80 --target-port=80 --type=NodePort --dry-run -o yaml > service.yaml
Install mychart
Execute command creation
helm install web1 mychart
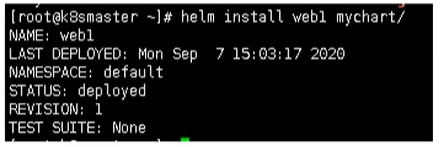
Application upgrade
When we modify something in mychart, we can upgrade it
helm upgrade web1 mychart
chart template usage
By passing parameters, the template is dynamically rendered, and yaml content is dynamically generated from the incoming parameters

When we just created mychart, we saw that there were values Yaml file, which is some global variables, and then the value of the variable can be obtained in templates. Next, we can use this to complete the dynamic template
- In values Yaml defines variables and values
- Specific yaml file to obtain the value of the defined variable
- There are several differences in the big questions in yaml file
- image
- tag
- label
- port
- replicas
Define variables and values
In values Yaml defines variables and values
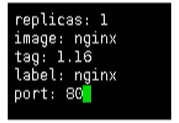
Get variables and values
We use the global variable {. Values. Variable name}} in the form of expression
For example: {. Release.Name}}

Install application
After we modify the above information, we can try to create an application
helm install --dry-run web2 mychart
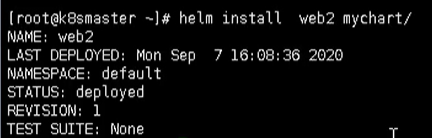
Kubernetes persistent storage
preface
We mentioned the data volume before: emptydir, which is local storage. When the pod is restarted, the data does not exist. It needs to be stored persistently
There are two ways to store data: Data restart and data persistence
- nfs: network storage [stored by one server]
step
Operation on persistent server
- Find a new server nfs server and install nfs
- Set mount path
Installing nfs using the command
yum install -y nfs-utils
First, create a directory for storing data
mkdir -p /data/nfx
Set mount path
# Open file
vim /etc/exports
# Add the following
/data/nfs *(rw,no_root_squash)
After execution, we will deploy our persistence server
Operation on Node
Then you need to install nfs on the node node of k8s cluster. Here, you need to install nfs on node1 and node2 nodes
yum install -y nfs-utils
After execution, it will automatically mount it for us
Start nfs server
Now let's go back to the nfs server and start our nfs service
systemctl start nfs
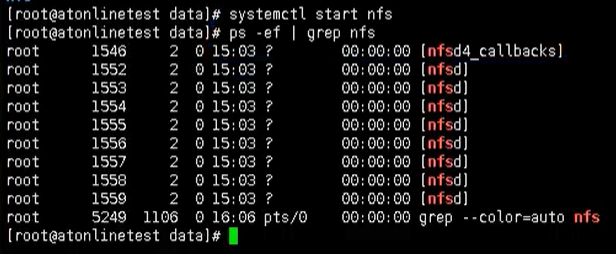
K8s cluster deployment application
Finally, we deploy the application on k8s cluster and use nfs persistent storage
# Create a pv file
mkdir pv
# get into
cd pv
Then create a yaml file NFS nginx yaml
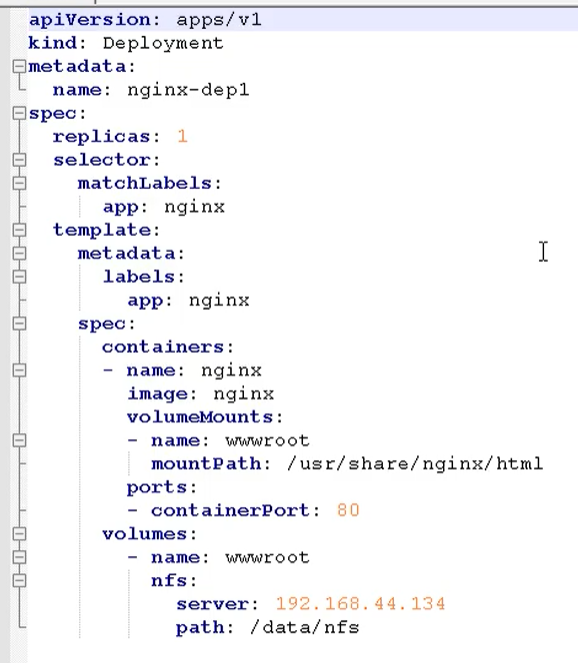
In this way, it is mounted to the / data/nfs directory under our nfs data node just now
Finally, it becomes: / usr / share / nginx / HTML - > 192.168.44.134/data/nfs. The content is corresponding
We use this yaml file to create a pod
kubectl apply -f nfs-nginx.yaml
After the creation, we can also view the log
kubectl describe pod nginx-dep1

It can be seen that our pod has been successfully created, and the following figure is also in Running status
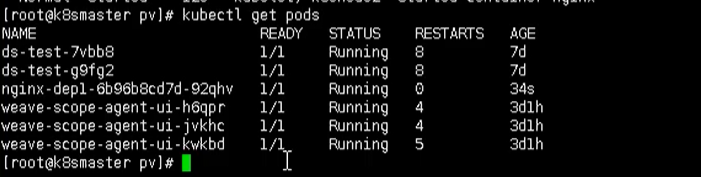
Now we can test it. For example, add data to the nfs service node and check whether the data exists in the pod
# Enter the pod to view
kubectl exec -it nginx-dep1 bash

PV and PVC
For the above methods, we all know that our ip and port are directly placed on our container, which may be inconvenient to manage
We need to use the concept of ip meta address and pv management information here
PV: persistent storage, which abstracts the stored resources and provides places that can be called externally [producer]
PVC: used for calling, no need to care about internal implementation details [consumer]
PV and PVC make K8s cluster have the ability of logical abstraction of storage. So that the configuration of the actual background storage technology can be ignored in the logic of configuring Pod, and the configuration work is handed over to the configurator of PV, that is, the manager of the cluster. The relationship between stored PV and PVC is very similar to the relationship between calculated Node and Pod; PV and Node are resource providers, which change according to the change of cluster infrastructure, and are configured by K8s Cluster Administrator; PVC and Pod are resource users, which change according to the needs of business services, and are configured by the user of K8s cluster, that is, the service administrator.
Process implementation
- PVC bound PV
- Define PVC
- Define PV [data volume definition, specifying ip, path, capacity and matching mode of data storage server]
give an example
Create a PVC yaml
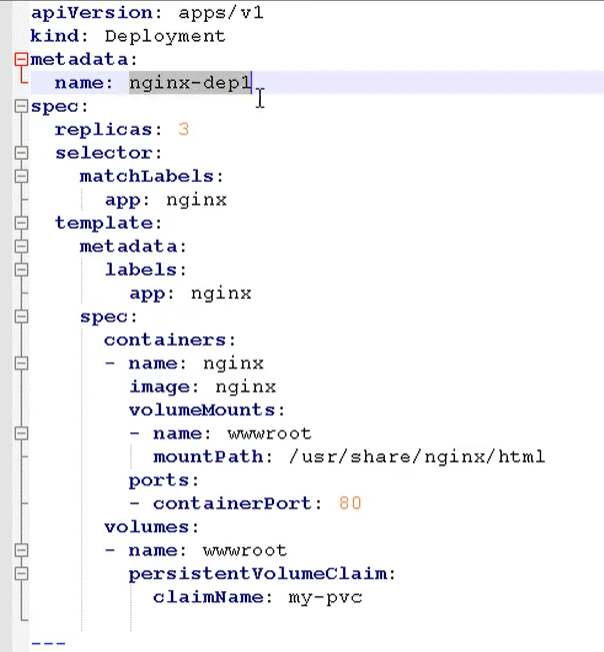
The first part is to define a deployment and make a deployment
- Number of copies: 3
- Mount path
- Call: through pvc mode
Then define pvc
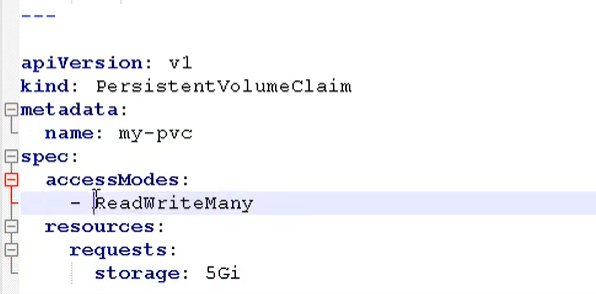
Then create a PV yaml
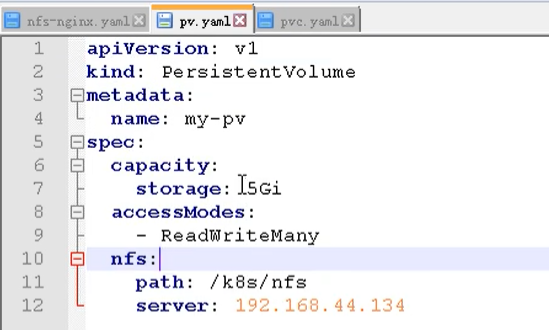
Then you can create a pod
kubectl apply -f pv.yaml
Then we can view the binding relationship between our pv and pvc through the following command
kubectl get pv, pvc

So far, we have completed the binding operation of our pv and pvc. Through the previous way, we can enter the pod to view the content
kubect exec -it nginx-dep1 bash
Then look at / usr / share / nginx html

You can also see the content just now. In fact, this operation is the same as our nfs before, but there is an additional layer of pvc binding pv operation
Kubernetes cluster resource monitoring
summary
Monitoring indicators
A good system mainly monitors the following contents
- Cluster monitoring
- Node resource utilization
- Number of nodes
- Run Pods
- Pod monitoring
- Container index
- Application [how much CPU and memory does the program occupy]
Monitoring platform
Use prometheus + Grafana to build a monitoring platform
- prometheus [regularly search the status of the monitored service]
- GPl
- Monitoring, alarm and database
- Periodically grab the status of monitored components with HTTP protocol
- No complex integration process is required, and http interface can be used for access
- Grafana
- Open source data analysis and visualization tools
- Support multiple data sources
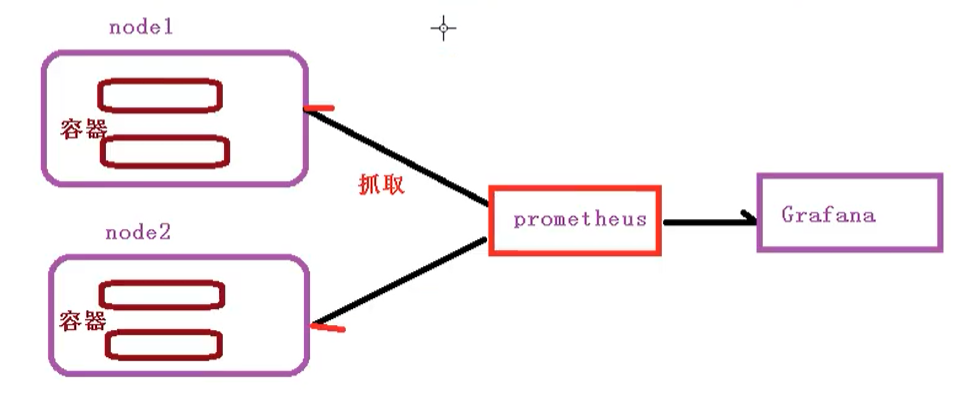
Deploy prometheus
First, you need to deploy a daemon

---
apiVersion: apps/v1
kind: DaemonSet
metadata:
  name: node-exporter
  namespace: kube-system
  labels:
    k8s-app: node-exporter
spec:
  selector:
    matchLabels:
      k8s-app: node-exporter
  template:
    metadata:
      labels:
        k8s-app: node-exporter
    spec:
      containers:
      - image: prom/node-exporter
        name: node-exporter
        ports:
        - containerPort: 9100
          protocol: TCP
          name: http
---
apiVersion: v1
kind: Service
metadata:
  labels:
    k8s-app: node-exporter
  name: node-exporter
  namespace: kube-system
spec:
  ports:
  - name: http
    port: 9100
    nodePort: 31672
    protocol: TCP
  type: NodePort
  selector:
    k8s-app: node-exporter
Then execute the following command
kubectl create -f node-exporter.yaml
After execution, an error will be reported

This is because the versions are inconsistent, because the official version is released, and this is a test version
So let's find the first line and change it to the following
# Before modification
apiVersion: extensions/v1beta1
# Modified [ after the official version is released, the test version cannot be used ]
apiVersion: apps/v1
Effect after creation

Then deploy prometheus through yaml
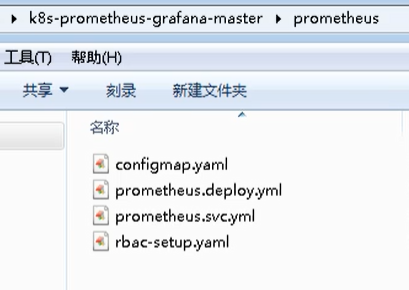
- Configmap: define a configmap: store some configuration files [no encryption]
- prometheus.deploy.yaml: deploy a deployment [including port number and resource limit]
- prometheus.svc.yaml: exposed port
- rbac-setup.yaml: assign permissions to some roles
Now let's go to the directory and first deploy RBAC setup yaml
kubectl create -f rbac-setup.yaml
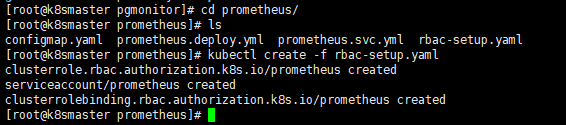
Then deploy them separately
# Deploy configmap
kubectl create -f configmap.yaml
# deployment
kubectl create -f prometheus.deploy.yml
# Deploy svc
kubectl create -f prometheus.svc.yml
After the deployment is completed, we use the following command to view
kubectl get pods -n kube-system
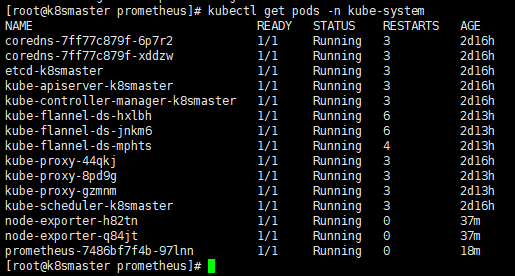
After the deployment, you can see the pod of prometheus, and then you can see the corresponding port through the following command
kubectl get svc -n kube-system

Through this, we can see that the exposed port of prometheus is 30003, and the corresponding graphical interface can be accessed by visiting the page
http://192.168.177.130:30003
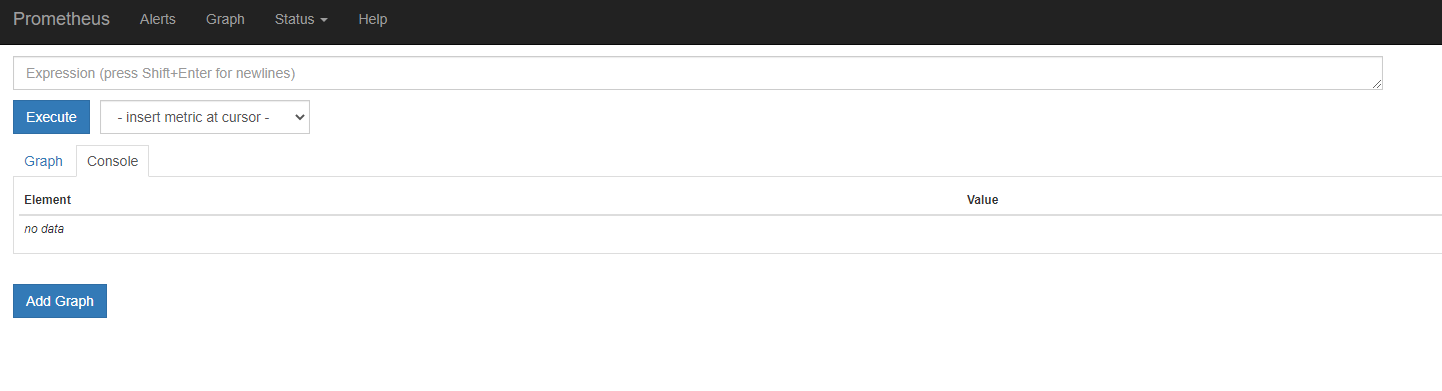
After we deploy prometheus, we need to deploy grafana
kubectl create -f grafana-deploy.yaml
Then, after execution, the following problems are found
error: unable to recognize "grafana-deploy.yaml": no matches for kind "Deployment" in version "extensions/v1beta1"
We need to amend the following
# modify
apiVersion: apps/v1

# Add selector
spec:
  replicas: 1
  selector:
    matchLabels:
      app: grafana
      component: core
After the modification, we continue to execute the above code
# Create deployment
kubectl create -f grafana-deploy.yaml
# Create svc
kubectl create -f grafana-svc.yaml
# Creating ing
kubectl create -f grafana-ing.yaml
We can see that our grafana is
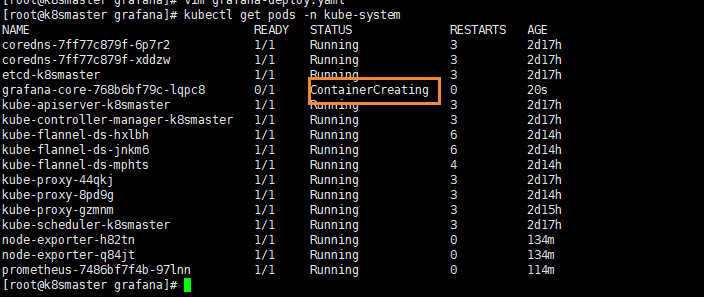
Configure data source
Next, we need to start opening Grafana, then configure the data source and import the data display template
kubectl get svc -n kube-system

We can access our grafana graphical page via ip + 30431
Then enter the account and password: admin admin
After entering, we need to configure the data source of prometheus

And the corresponding IP [here IP is our ClusterIP]

Set the template for displaying data
Select Dashboard and import our template
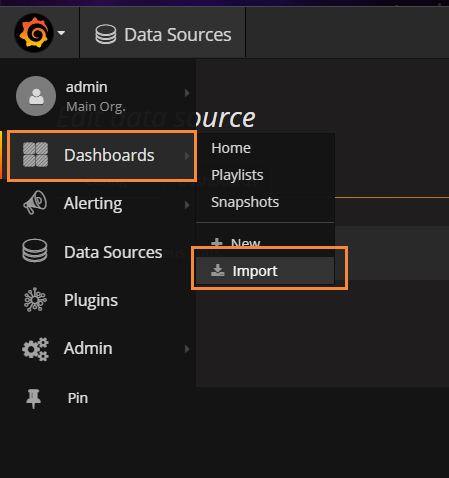
Then enter template 315
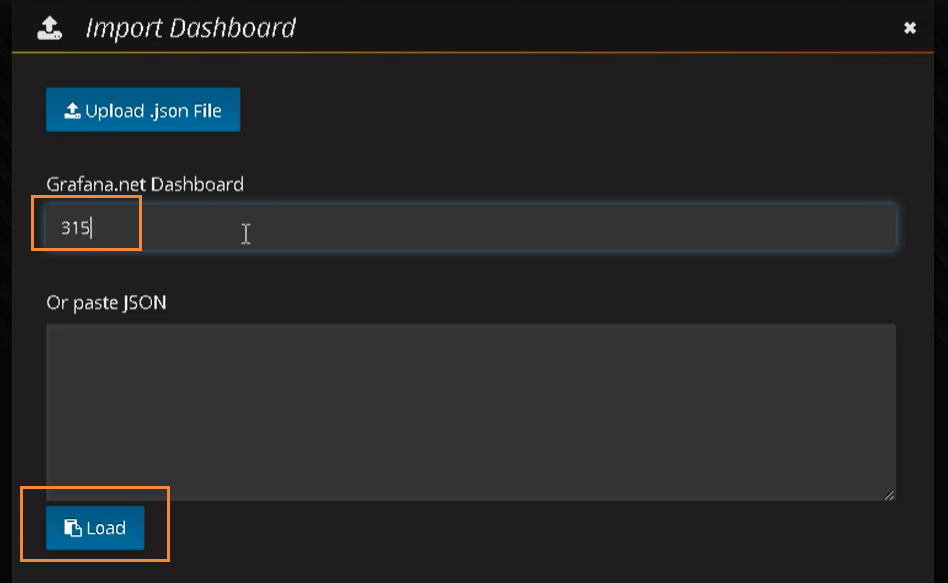
Then select the prometheus data source mydb and import it
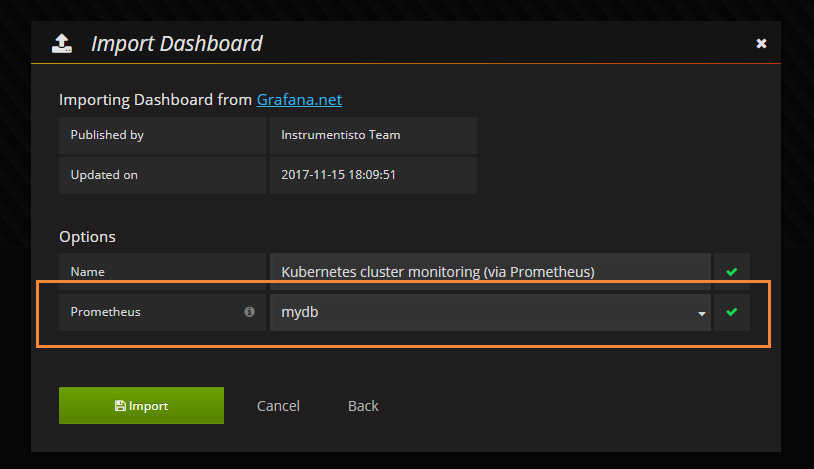
The effect after import is as follows: