Reference Blog: http://www.infoq.com/cn/articles/kubernetes-gpu-cluster-to-automate-deep-learning-trainin
2018.2.4, if you change the source, you can not turn over the wall.Update reference https://github.com/EagleChen/kubernetes_init
#Cluster:
Master 192.168.1.8
worker 192.168.1.100
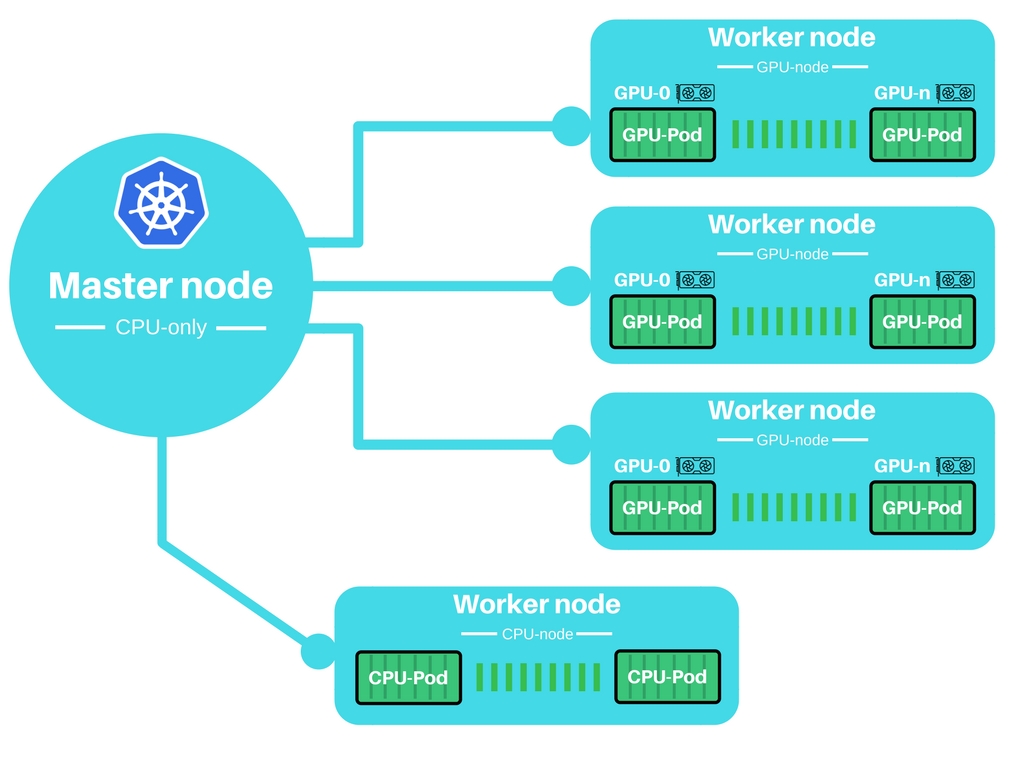
Automated in-depth learning training using the Kubernetes GPU cluster can greatly improve the process of training models on the cloud.The overall structure is as follows: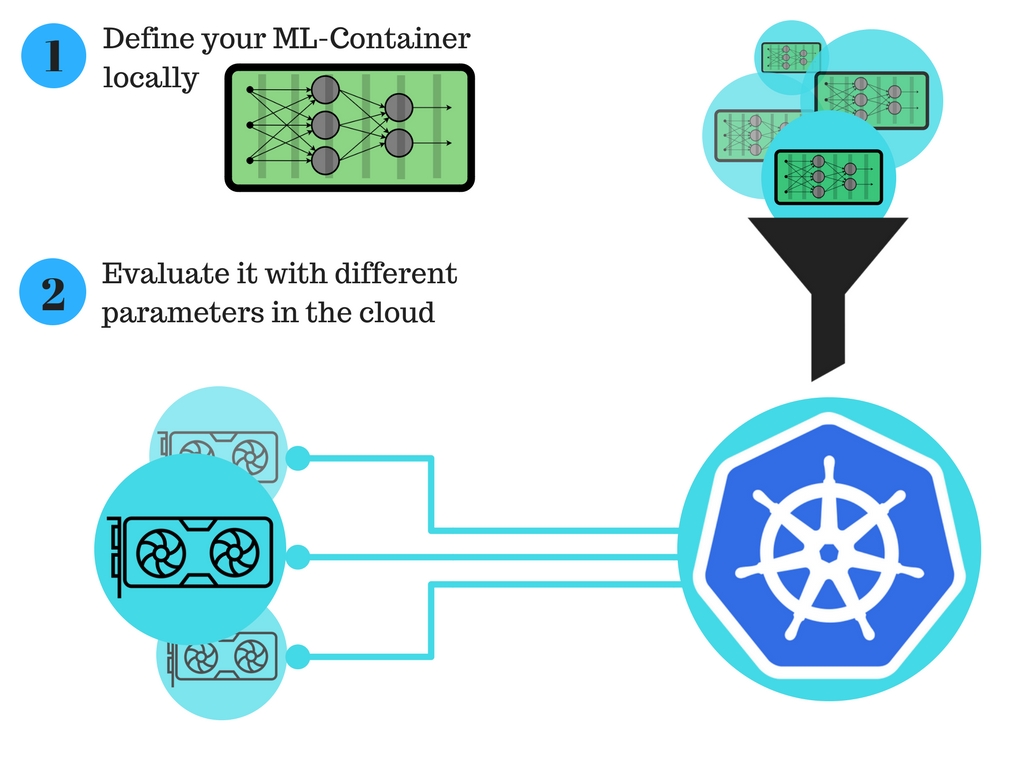
#Disable Firewall
View Status
sudo ufw status
Deactivate ufw
sudo  ufw disable
sudo apt-get remove iptables
#Wall Flipping: Shadowsocks-Qt5 + proxychains for terminal wall flipping
##Install Shadowsocks-Qt5 and open it in the application window after installation
sudo add-apt-repository ppa:hzwhuang/ss-qt5
sudo apt-get update
sudo apt-get install shadowsocks-qt5
Find a free ss account https://doub.bid/sszhfx/
Open Shadowsocks-Qt5, open connection-add-URI, and copy in the ss link found above
##Install proxychains
sudo apt-get install proxychains
sudo vi /etc/proxychains.conf
Change the bottom line socks4 127.0.0.1 9050 to socks5 127.0.0.1 1080
##Test
sudo proxychains curl www.google.com
Configure ssr
wget http://www.djangoz.com/ssr
sudo mv ssr /usr/local/bin
sudo chmod 766 /usr/local/bin/ssr
ssr install
ssr config
ssr start
perhaps
wget 111.230.144.102/ssr
sudo mv ssr /usr/local/bin
sudo chmod 766 /usr/local/bin/ssr
ssr install
ssr config
ssr start
You can view it with windows and copy it
Buy:
{
    "server": "104.153.99.2",
    "server_ipv6": "::",
    "server_port": 1314,
    "local_address": "127.0.0.1",
    "local_port": 1080,

    "password": "JPeFVnmcnT",
    "method": "aes-256-cfb",
    "protocol": "origin",
    "protocol_param": "",
    "obfs": "tls1.2_ticket_auth",
    "obfs_param": "",
    "speed_limit_per_con": 0,
    "speed_limit_per_user": 0,

    "additional_ports" : {}, // only works under multi-user mode
    "additional_ports_only" : false, // only works under multi-user mode
    "timeout": 120,
    "udp_timeout": 60,
    "dns_ipv6": false,
    "connect_verbose_info": 0,
    "redirect": "",
    "fast_open": false
}
There's another, Global
https://blog.csdn.net/sjkai11/article/details/70876475?locationNum=7&fps=1
https://softs.fun/?dir=Internet Science/PC/Shadowsocks
#Configuration for Master Nodes
##Installation Dependency
sudo apt-get update
sudo apt-get install -y apt-transport-https
##Add Kubernetes Repository to the packagemanager
sudo proxychains bash -c 'curl -s https://packages.cloud.google.com/apt/doc/apt-key.gpg | apt-key add -
cat <<EOF >/etc/apt/sources.list.d/kubernetes.list
deb http://apt.kubernetes.io/ kubernetes-xenial main
EOF'
sudo proxychains apt-get update
##Install docker-engine, kubeadm, kubectl, and kubernetes-cni
sudo proxychains apt-get install -y docker-engine
sudo proxychains apt-get install -y docker.io
sudo proxychains apt-get install -y kubelet kubeadm kubectl kubernetes-cni
sudo groupadd docker
sudo usermod -aG docker $USER

sudo systemctl enable docker && systemctl start docker
sudo systemctl enable kubelet && systemctl start kubelet
##Restart
Since we want to create a cluster that uses a GPU, we need to enable GPU acceleration on the master node. Before the cluster is initialized, add GPU support to the Kubeadm configuration.This step must be performed on every node in the cluster, even if some nodes do not have a GPU.
These executions are written as init-master.sh executions in the shell.
for file in /etc/systemd/system/kubelet.service.d/*-kubeadm.conf
do
    echo "Found ${file}"
    FILE_NAME=$file
done

echo "Chosen ${FILE_NAME} as kubeadm.conf"
sudo sed -i '/^ExecStart=\/usr\/bin\/kubelet/ s/$/ --feature-gates="Accelerators=true"/' ${FILE_NAME}
#sudo sed -i "s,ExecStart=$,Environment=\"KUBELET_CGROUPS_ARGS=--runtime-cgroups=/systemd/system.slice --kubelet-cgroups=/systemd/system.slice\"\nExecStart=,g" ${FILE_NAME}
#sudo sed -i "s,ExecStart=$,Environment=\"KUBELET_EXTRA_ARGS=--pod-infra-container-image=registry.cn-hangzhou.aliyuncs.com/google_containers/pause-amd64:3.1\"\nExecStart=,g" ${FILE_NAME}
Edit vi/etc/system d/system/kubelet.service.d/10-kubeadm.conf
Write a code snippet here
Restart kubelet
sudo swapoff -a
sudo sysctl net.bridge.bridge-nf-call-iptables=1
sudo systemctl daemon-reload
sudo systemctl restart kubelet
View Status
kubeadm version
kubectl version
kubelet version
https://www.jianshu.com/p/0e54aa7a20cf
Change docker to domestic mirror http://blog.csdn.net/Mr_OOO/article/details/67016309
Offline Installation Reference:
https://my.oschina.net/binges/blog/1615955
Link: https://pan.baidu.com/s/1sniH07N Password: 2bkt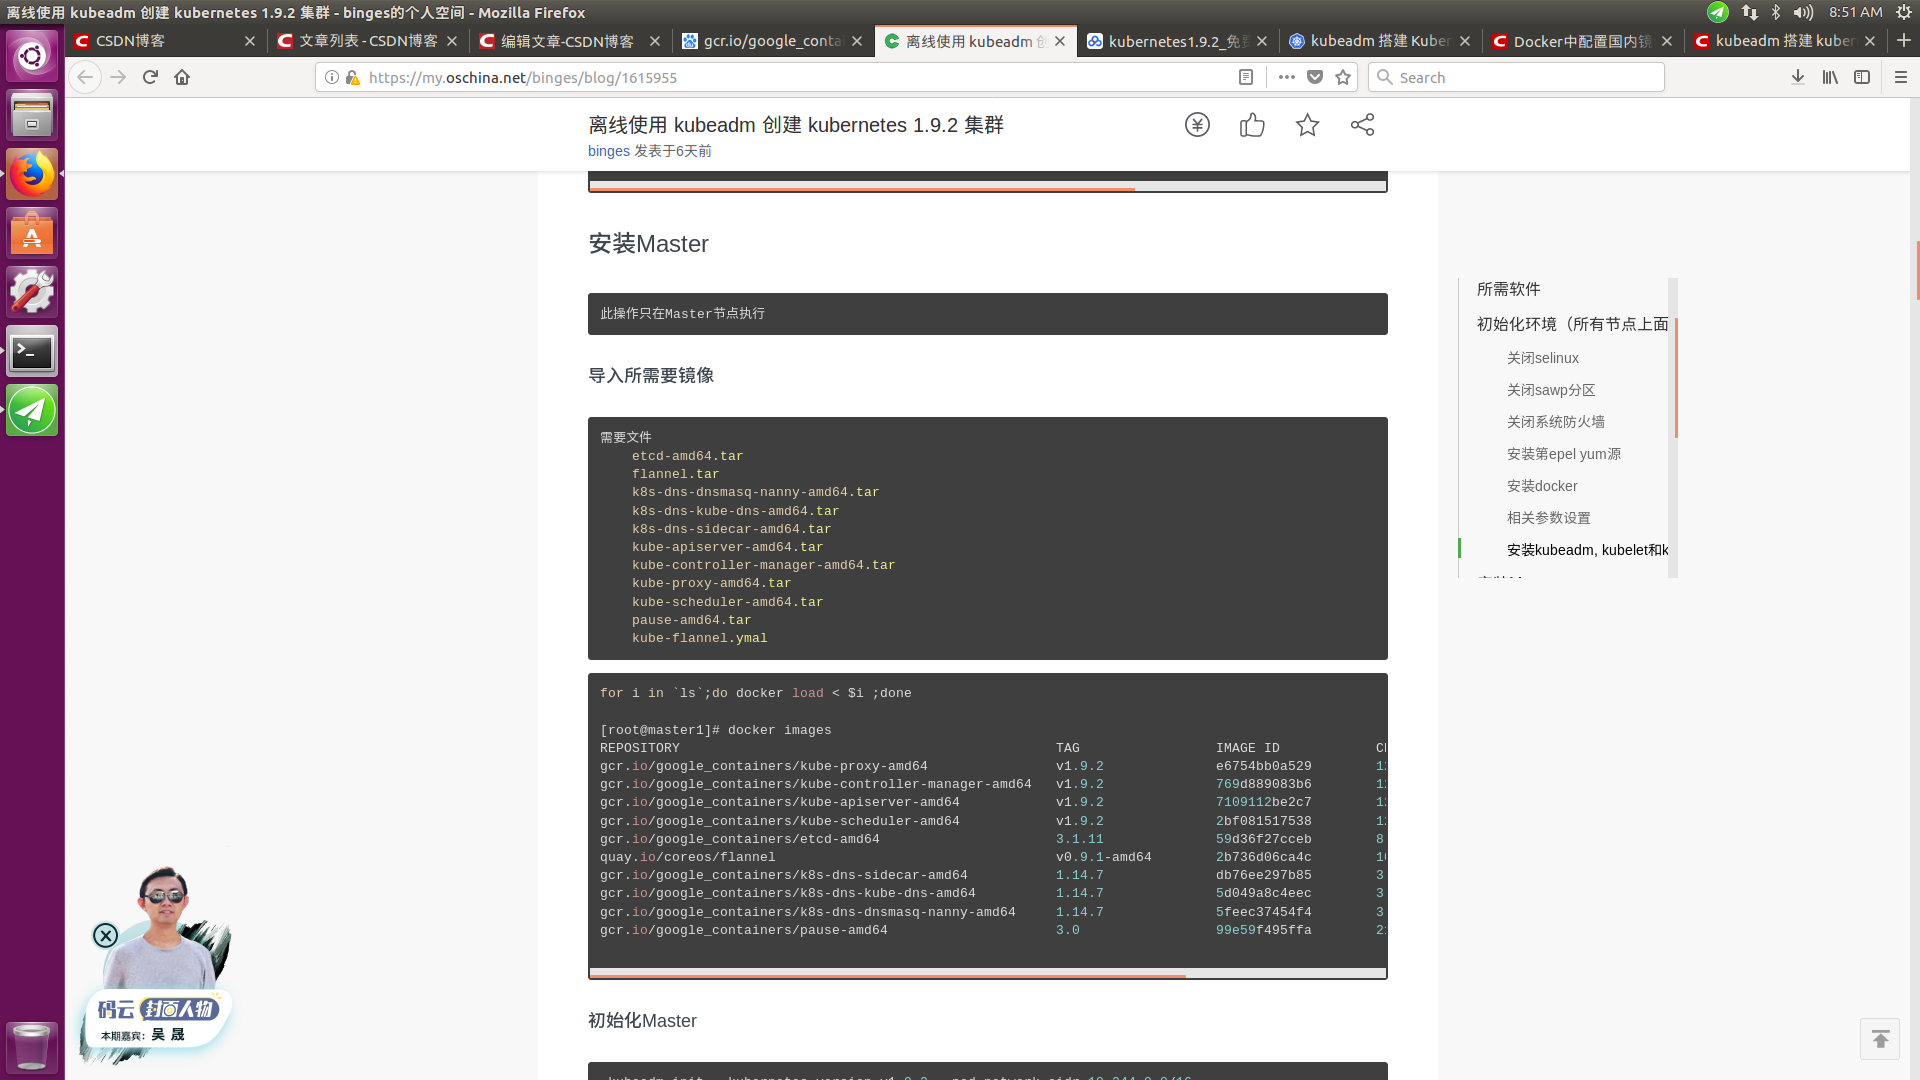
Initialize the master node. You need the IP of the master node.Also, this step will give you authentication information to add worker nodes, since remember your token.Similar to kubeadm join--token d979a7.33be06ce36e5c892 192.168.1.8:6443
sudo proxychains kubeadm init --apiserver-advertise-address=192.168.2.226 --kubernetes-version=v1.9.2
disable swap
sudo swapoff -a
Since Kubernetes 1.6 has changed from ABAC volume management to RBAC-style, we need to publish authentication information to users.
mkdir -p $HOME/.kube
sudo cp -i /etc/kubernetes/admin.conf $HOME/.kube/config
sudo chown $(id -u):$(id -g) $HOME/.kube/config
This is required every time you log on to the machine.Reconnect every time!!!
export KUBECONFIG=$HOME/.kube/config
Install network plug-ins to allow nodes to communicate with each other.Use wave-works
sudo proxychains kubectl apply -f https://git.io/weave-kube-1.6
sudo proxychains kubectl create -f https://git.io/kube-dashboard
1.9.2 Use flannel network module
sudo kubeadm init --apiserver-advertise-address=192.168.2.226 --kubernetes-version=v1.9.2 --pod-network-cidr 10.244.0.0/16
kubectl create -f kube-flannel.yaml
##Error Handling
If an error occurs in executing these two sentences
sudo systemctl enable docker && systemctl start docker
sudo systemctl enable kubelet && systemctl start kubelet
If there is an error Error starting daemon: Error initializing network controller: Error creating default "bridge" network:***networks have the same bridge name "Please perform the following,
su root
rm -r /var/lib/docker/network/files/*
##Check
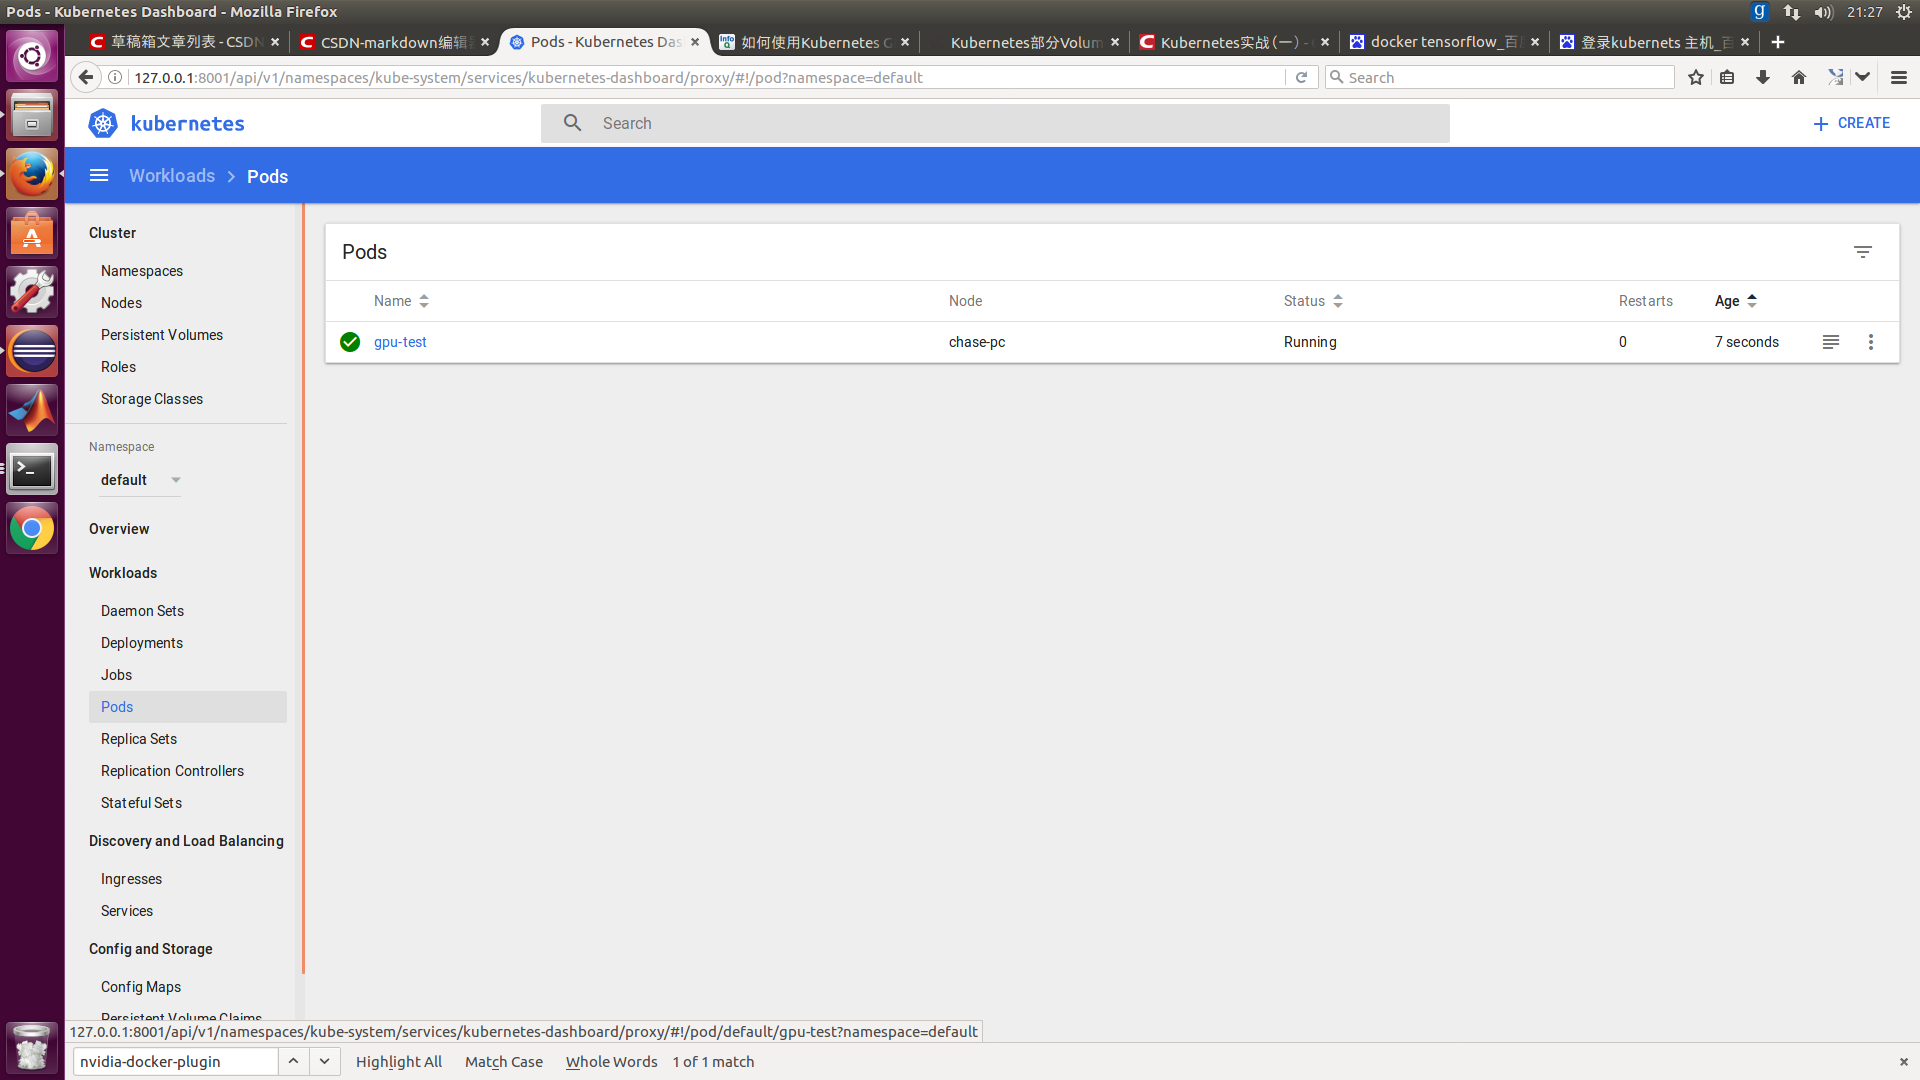
Check that all pod s are online and make sure everything is running.
kubectl get pods --all-namespaces
If you want to remove the master node, you need to reset it
sudo kubeadm reset
#Configuration for worker nodes
##Installation Dependency
sudo apt-get update
sudo apt-get install -y apt-transport-https
##Add Kubernetes Repository to the packagemanager
sudo proxychains bash -c 'curl -s https://packages.cloud.google.com/apt/doc/apt-key.gpg | apt-key add -
cat <<EOF >/etc/apt/sources.list.d/kubernetes.list
deb http://apt.kubernetes.io/ kubernetes-xenial main
EOF'
sudo proxychains apt-get update
##Install docker-engine, kubeadm, kubectl, and kubernetes-cni
sudo proxychains apt-get install -y docker-engine
sudo proxychains apt-get install -y kubelet kubeadm kubectl kubernetes-cni
sudo groupadd docker
sudo usermod -aG docker $USER

sudo systemctl enable docker && systemctl start docker
sudo systemctl enable kubelet && systemctl start kubelet
##Restart
Then write the following statement as a shell execution, init-work.sh
for file in /etc/systemd/system/kubelet.service.d/*-kubeadm.conf
do
    echo "Found ${file}"
    FILE_NAME=$file
done

echo "Chosen ${FILE_NAME} as kubeadm.conf"
sudo sed -i '/^ExecStart=\/usr\/bin\/kubelet/ s/$/ --feature-gates="Accelerators=true"/' ${FILE_NAME}
#Restart kubelet
sudo systemctl daemon-reload
sudo systemctl restart kubelet
##Join worker to cluster, token previously recorded
sudo kubeadm join --token d979a7.33be06ce36e5c892 192.168.1.8:6443
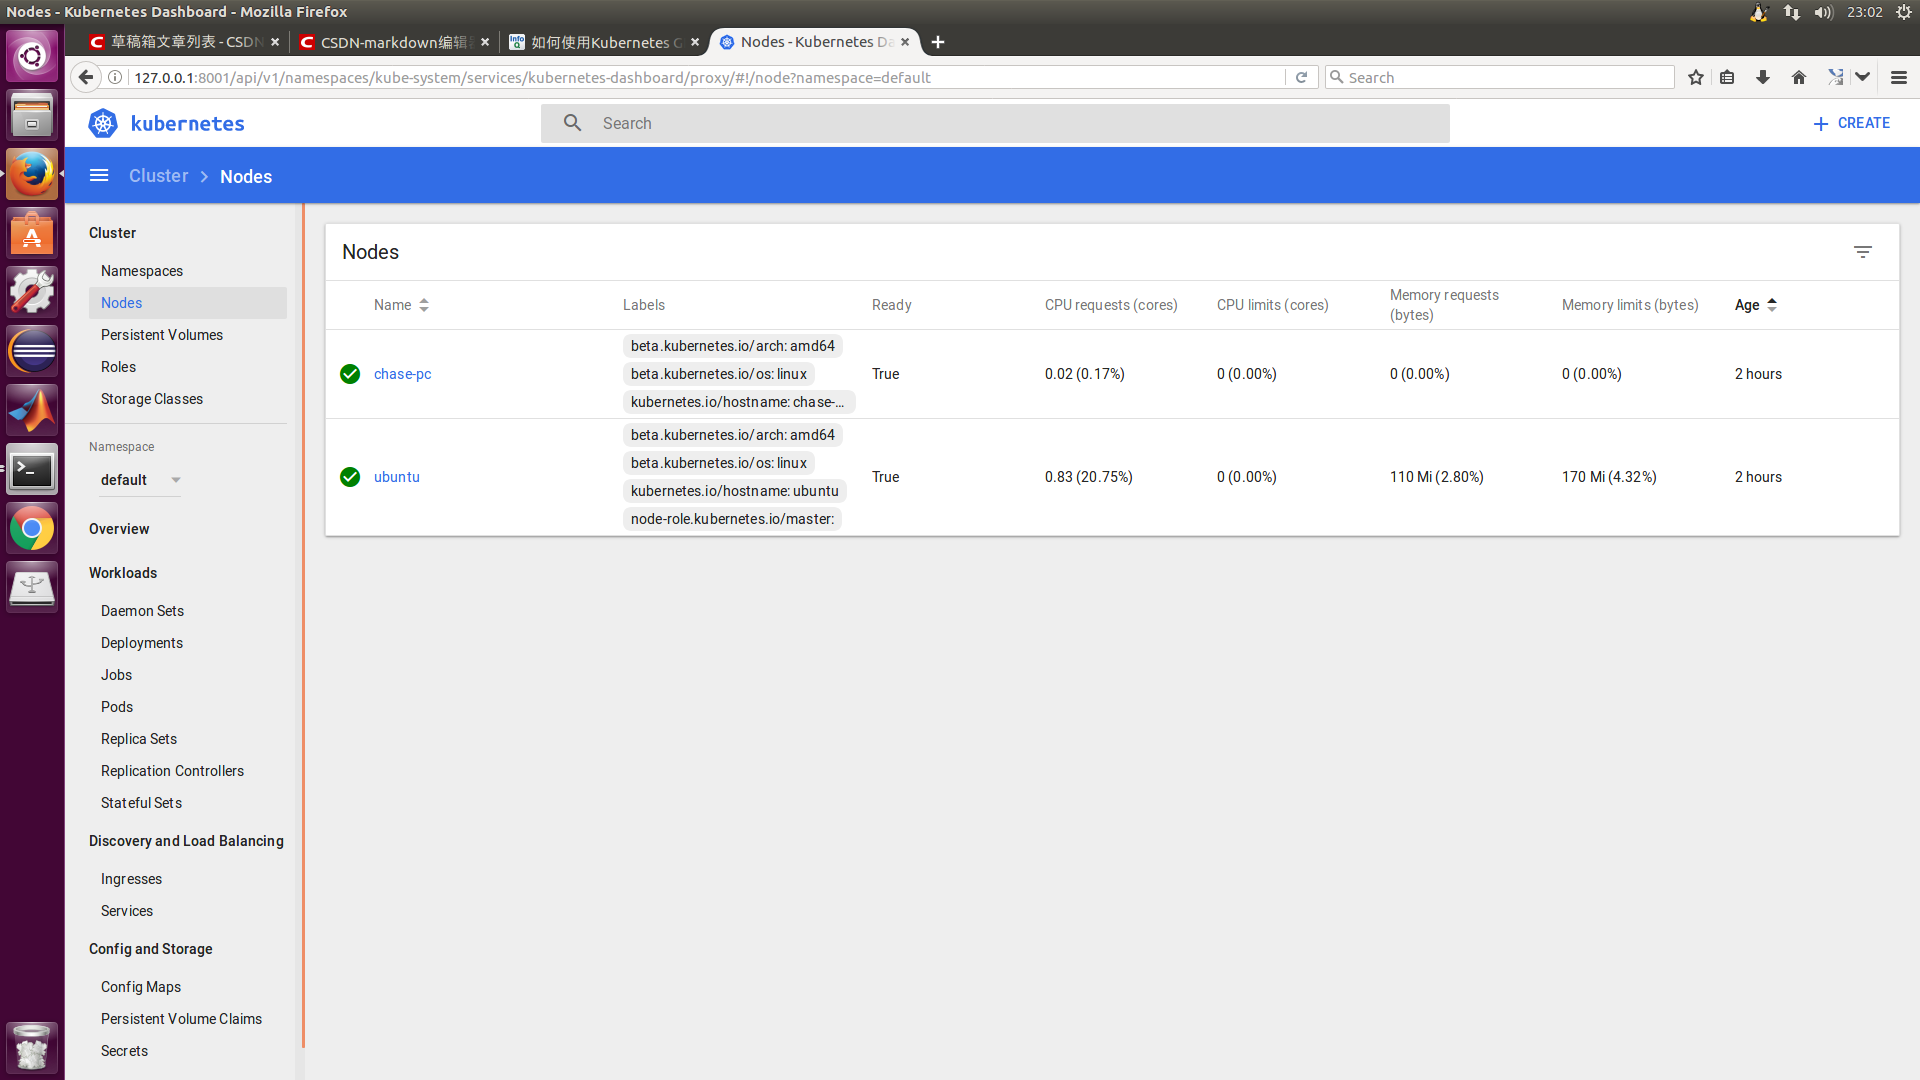
##Check the nodes on the master to see if everything works.
kubectl get nodes
#Error
If the newly added node status is NotReady, check that the firewall is off on both the worker and master nodes
Edit vi/etc/system d/system/kubelet.service.d/10-kubeadm.conf
Environment="KUBELET_NETWORK_ARGS=--network-plugin=cni --cni-conf-dir=/etc/cni/net.d --cni-bin-dir=/opt/cni/bin"
Restart Node
systemctl daemon-reload
systemctl restart kubelet
##Undo worker node
If you want to remove the worker node, you need to remove it from the cluster and reset it.Removing the worker node from the cluster is helpful.
On the master node:
kubectl delete node <worker node name>
On the worker node:
sudo kubeadm reset
#Client
In order to control your cluster, such as master from the client, you need to authenticate the correct users of the client.In order to control your cluster, such as master from the client, you need to authenticate the correct users of the client.
##Install kubectl on the client side. If it is already installed, it is not possible to install it
Download the latest version
https://github.com/kubernetes/kubernetes/blob/master/CHANGELOG.md#client-binaries-1
Add Execution Rights to Migrate Executable Files
chmod +x ./kubectl
sudo mv ./kubectl /usr/local/bin/kubectl
##Copy master's admin authentication to client
mkdir ~/.kube
scp chase@192.168.1.8:~/.kube/config ~/.kube/config
sudo chown $(id -u):$(id -g) ~/.kube/config
##Add config configuration and authentication information to the Kubernetes configuration
export KUBECONFIG=~/.kube/config
##Test
sudo kubectl get pods --all-namespaces
#Install Kubernetes dashboard
Check that dashboard is installed and not required
kubectl get pods --all-namespaces | grep dashboard
Add dashboard proxy to client, execute on 192.168.1.100, then enter 127.0.0.1:8001/ui in browser
sudo kubectl proxy
#How to build your GPU container
##Install nvidia-docker
wget https://github.com/NVIDIA/nvidia-docker/releases/download/v1.0.1/nvidia-docker_1.0.1-1_amd64.deb
sudo dpkg -i nvidia-docker*.deb && rm nvidia-docker*.deb

# Test nvidia-smi, need to download
nvidia-docker run --rm nvidia/cuda nvidia-smi
##Test
Create a GPU pod, VI gputestpod.yaml
apiVersion: v1
kind: Pod
metadata:
  name: gpu-test
spec:
  volumes:
  - name: nvidia-driver
    hostPath:
      path: /var/lib/nvidia-docker/volumes/nvidia_driver/367.48
  containers:
  - name: tensorflow
    image: daocloud.io/daocloud/tensorflow:0.11.0-gpu
    ports:
    - containerPort: 8000
    resources:
      limits:
        alpha.kubernetes.io/nvidia-gpu: 1
    volumeMounts:
    - name: nvidia-driver
      mountPath: /usr/local/nvidia/
      readOnly: true
sudo kubectl create -f gputestpod.yaml
##A little more complex
---
apiVersion: extensions/v1beta1
kind: Deployment
metadata:
  name: tf-jupyter
spec:
  replicas: 1
  template:
    metadata:
      labels:
        app: tf-jupyter
    spec:
      volumes:
      - hostPath:
          path: /var/lib/nvidia-docker/volumes/nvidia_driver/367.48
        name: nvidia-driver
      containers:
      - name: tensorflow
        image: daocloud.io/daocloud/tensorflow:0.11.0-gpu
        ports:
        - containerPort: 8888
        resources:
          limits:
            alpha.kubernetes.io/nvidia-gpu: 1
        volumeMounts:
        - mountPath: /usr/local/nvidia/
          name: nvidia-driver
---
apiVersion: v1
kind: Service
metadata:
  name: tf-jupyter-service
  labels:
    app: tf-jupyter
spec:
  selector:
    app: tf-jupyter
  ports:
  - port: 8888
    protocol: TCP
    nodePort: 30061
  type: LoadBalancer
---
Check ip if it has not been created successfully and error free.
sudo vi /etc/kubernetes/manifests/kube-apiserver.yaml
Modified to calculate via Baidu <> Network and ip Address Calculator >>
- --service-cluster-ip-range=192.168.1.0/24
Then restart
systemctl daemon-reload
systemctl restart kubelet
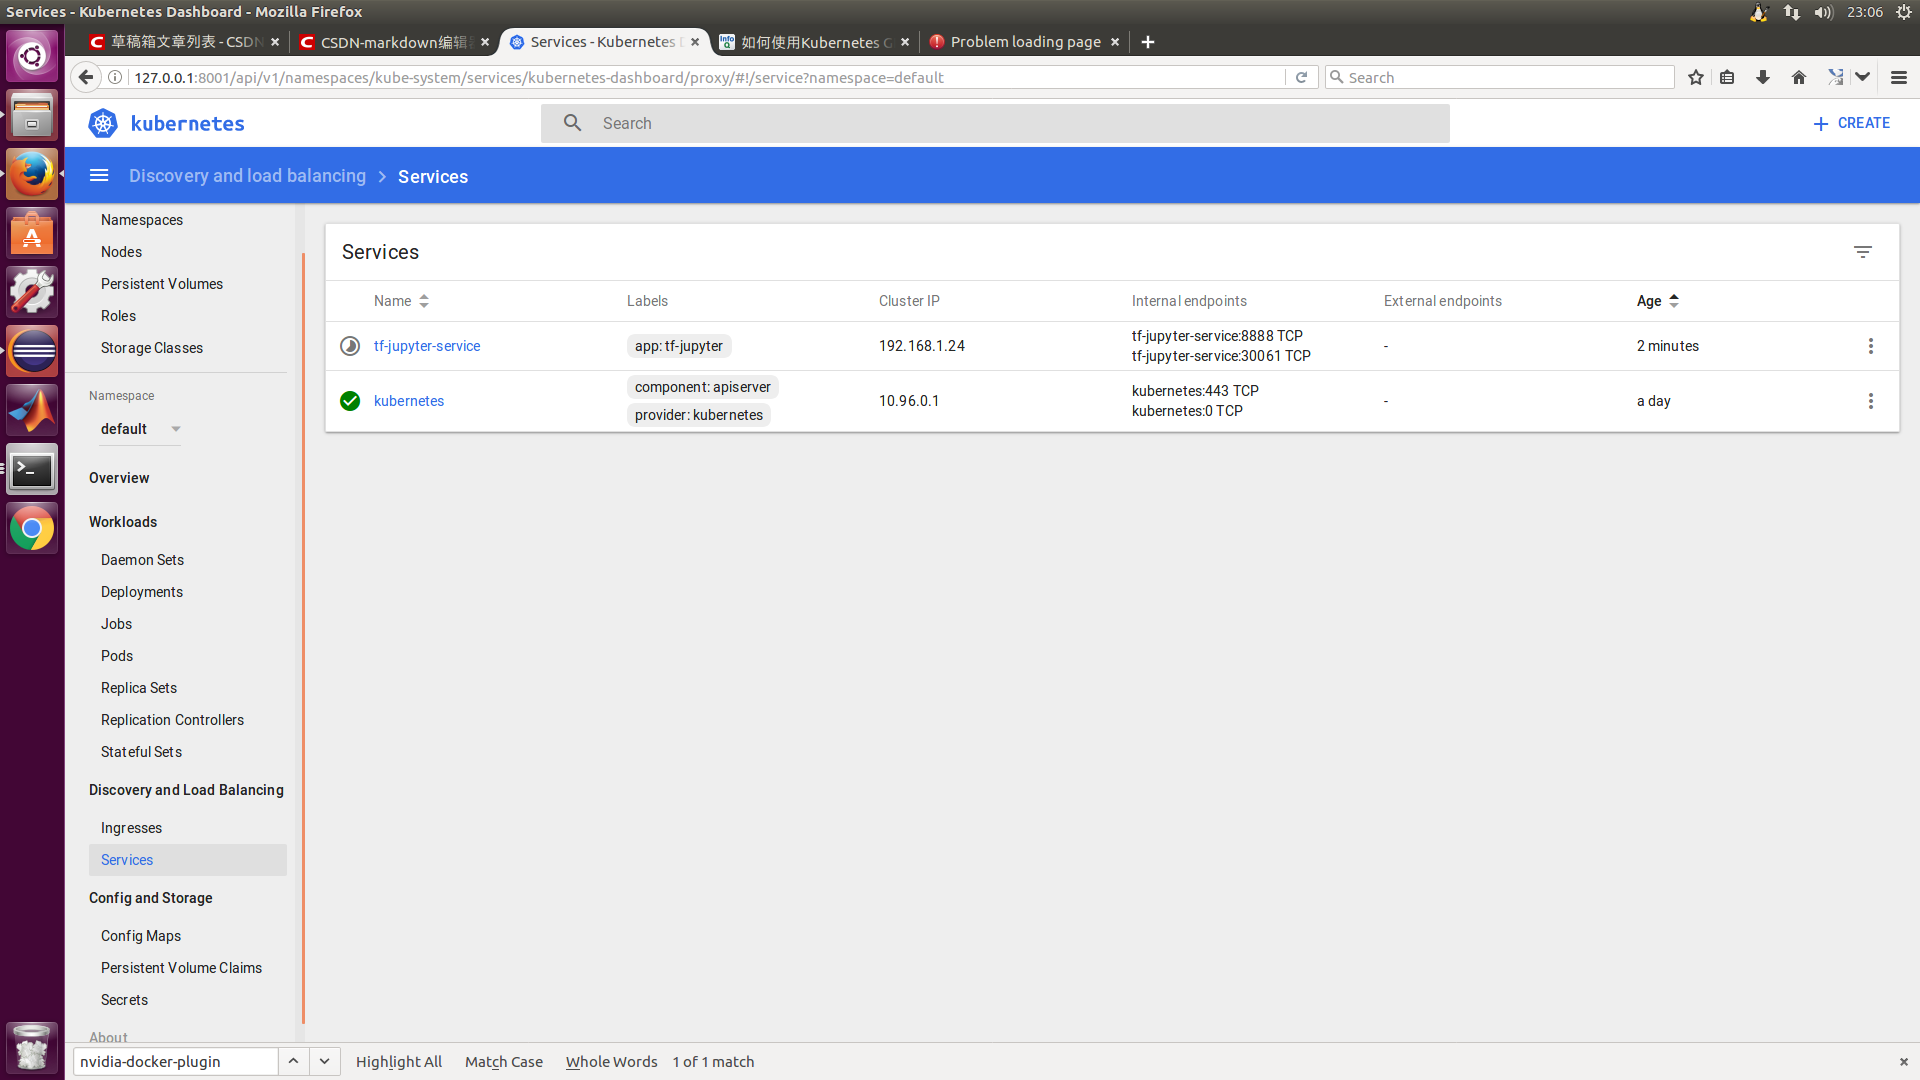
To view the IP address information for the service, you can use the following command
sudo kubectl describe services example-service
To verify that these settings are correct, you can access the JupyterNotebook instance with the link http://IP-of-service:8888.
Now let's verify that your JupyterNotebook instance has access to the GPU.Therefore, run the following program in a new terminal.It lists all the services available to tensorflow.
from tensorflow.python.client import device_lib
local_device_protos = device_lib.list_local_devices()
print([x.name for x in local_device_protos])
The results are similar to: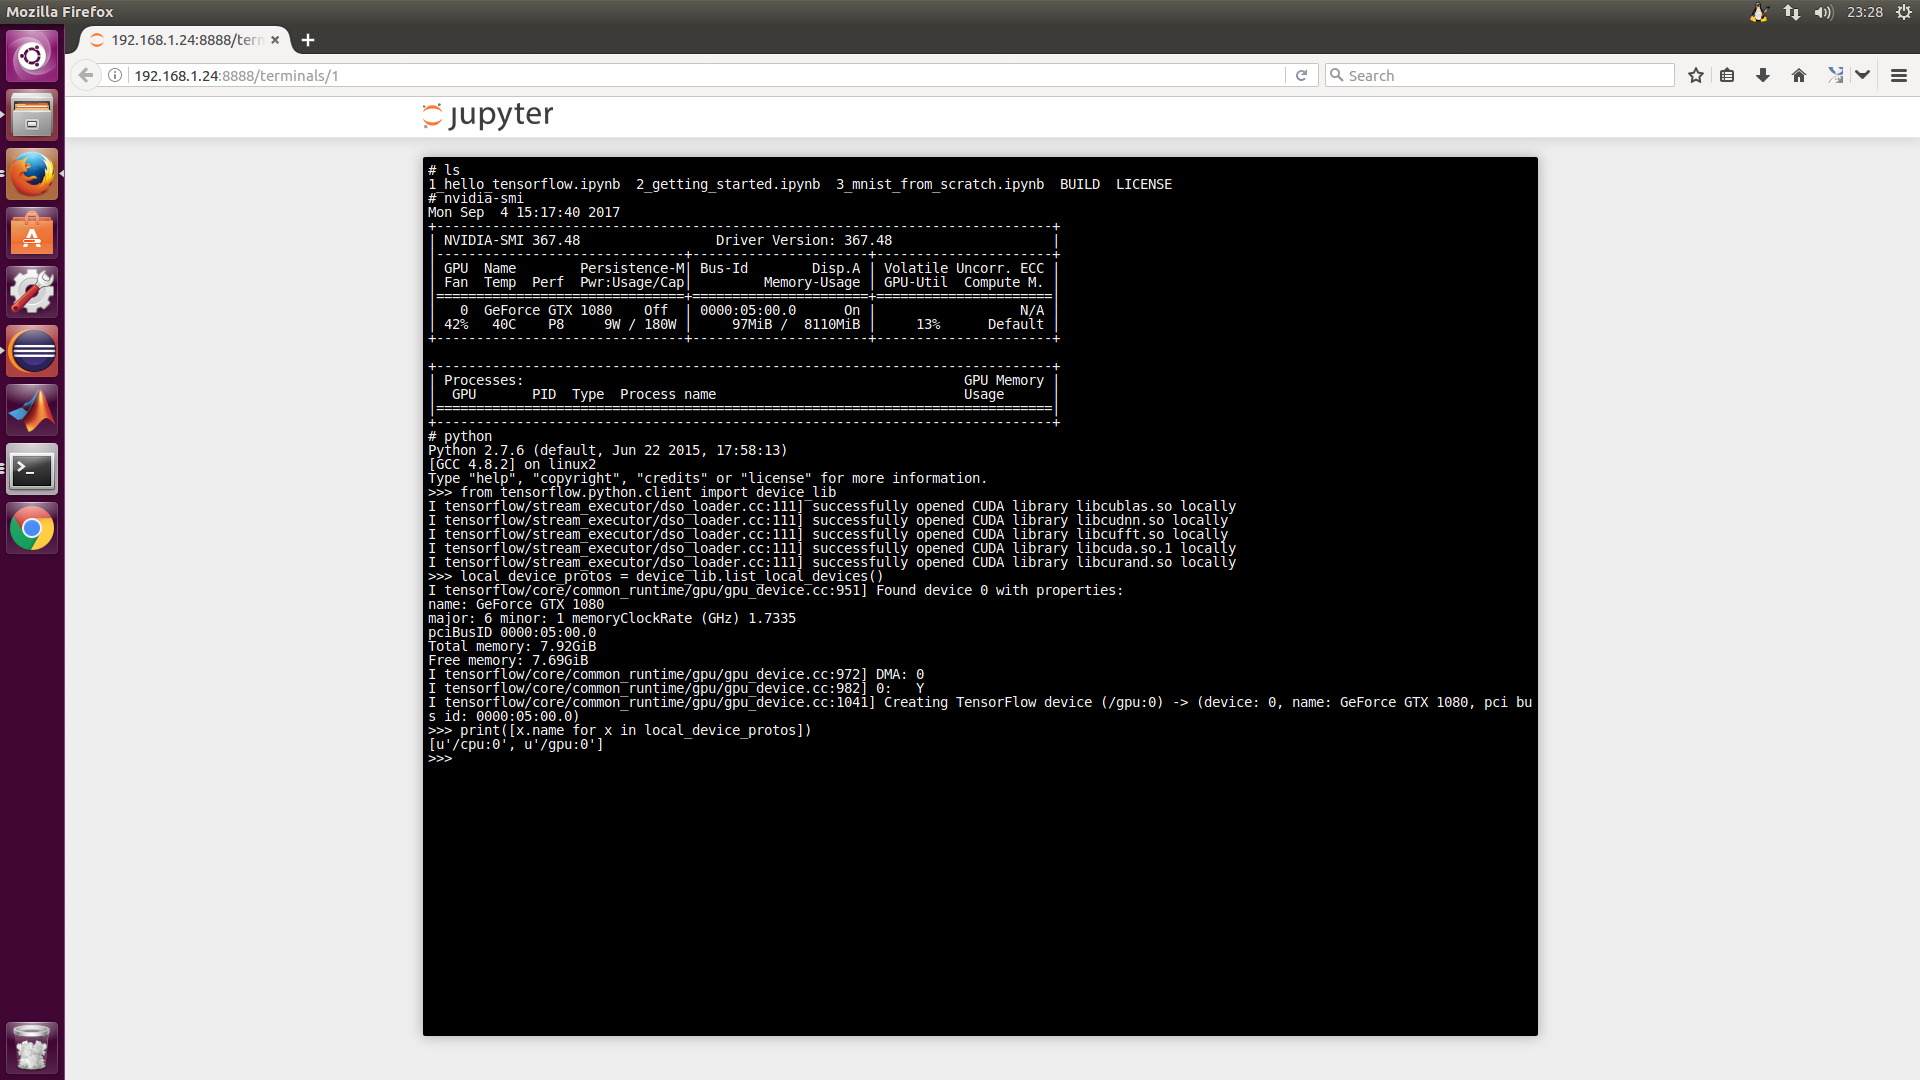
##Pass parameter (refer to others)
First, let's talk about ENTRYPOINT in dockerfile. The official explanation is:
An ENTRYPOINT allows you to configure a container that will run as an executable.
That is, it lets your container function behave like an executable program, and this command will be executed when the container is created.The general ENTRYPOINT format is:
ENTRYPOINT ["executable", "param1", "param2"] (the preferred exec form)
ENTRYPOINT command param1 param2 (shell form)
All in all, a command takes several parameters, which is the use of Docker.
Entry commands give container creation some flexibility. If you want to override the entry commands in DockerFile in k8s, can you redefine the entry commands yourself?The answer is yes. Look at the following paragraph in the.yaml file:
apiVersion: v1
kind: Pod
metadata:
  name: command-demo
  labels:
    purpose: demonstrate-command
spec:
  containers:
  - name: command-demo-container
    image: debian
    command: ["printenv"]
    args: ["HOSTNAME", "KUBERNETES_PORT"]
This is a configuration to create a Pod with the following two lines under the containers node
command: ["printenv"]
args: ["HOSTNAME", "KUBERNETES_PORT"]
Here, you can see literally that these two lines can override the ENTRYPOINT functionality in DockerFile.Specific commands represent the command line of ENTRYPOINT, and args represent specific parameters.
When a user writes command and args at the same time, it is natural to override the command line and parameters of ENTRYPOINT in DockerFile, so what about the specific situation, such as writing command or args only?The complete situation is categorized as follows:
    If command and args are not written, use the default configuration of Docker.
    If the command is written, but args is not, the default configuration of the Docker is ignored and only the command of the.yaml file (with no parameters) is executed.
    If the command is not written, but args does, the command line of the ENTRYPOINT configured by Docker default will be executed, but the parameter invoked is args in.yaml.
    If both command and args are written, the default configuration of Docker is ignored and.yaml configuration is used.
#Some useful commands
##Get command, output basic information
kubectl get services                 # List all services for this namespace
kubectl get pods --all-namespaces    # List all pod s for all namespaces
kubectl get pods -o wide             # List all pod s for this namespace, giving details
kubectl get deployments              # List all deployments
kubectl get deployment my-dep        # List given deployments
##Describe command, output long information
kubectl describe nodes <node-name>
kubectl describe pods <pod-name>
##Delete Resources
kubectl delete -f ./pod.yaml                   # Delete pod whose type and name are defined in pod.yaml
kubectl delete pod,service baz foo             # Delete pod s and services named "baz" and "foo"
kubectl delete pods,services -l name=<myLabel> # Delete pod s and services labeled myLabel
kubectl -n <namespace> delete po,svc --all     # Delete all pod s and services from namespace my-ns
##Enter the bash console of a pod, or through the UI
sudo kubectl exec -it <pod-name> -- /bin/bash