Install kubernetes
Preparation before installation
1, Install docker
2, Close swap partition
There are two ways, temporary shutdown and permanent shutdown
Temporarily Closed
sudo swapoff -a
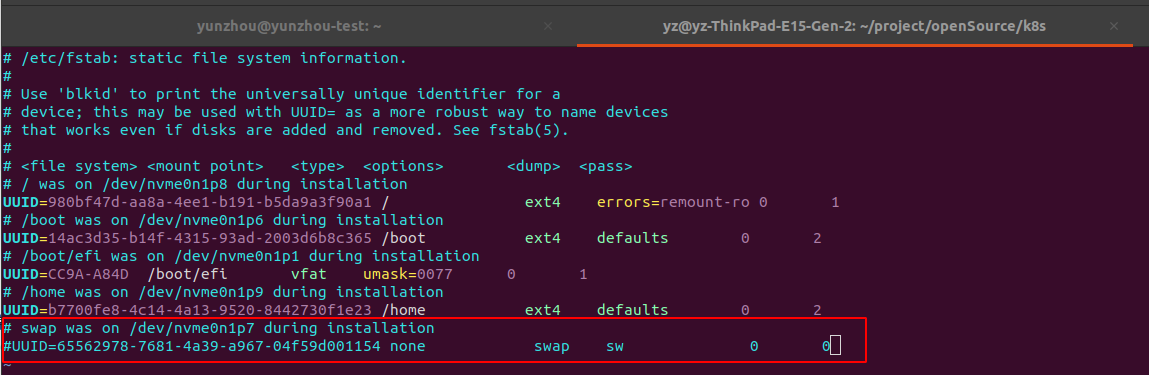
Permanent shutdown
Edit / etc/fstab and # comment the swap line
sudo vim /etc/fstab
3, Check hostname
# The output of hostname here will be the node name of the machine in the Kubernetes cluster
# You cannot use localhost as the name of a node
cat /etc/hosts


## Get hostname
hostname

# Modify hostname
hostnamectl set-hostname your-new-host-name

# Modify the host resolution and set 127.0.0.1 to its own hostname, which cannot be localhost
vim /etc/hostname
Installation tools
Install kubedm, kubelet and kubectl (domestic version)
- Update the apt package index and install the packages required to use the Kubernetes apt repository
sudo apt-get update
sudo apt-get install -y apt-transport-https ca-certificates curl
2. Add Kubernetes apt warehouse
Add apt key and source
# Add key
curl -s https://mirrors.aliyun.com/kubernetes/apt/doc/apt-key.gpg | sudo apt-key add -

# Add k8s the Ali source to the source list
# If you are prompted that you do not have permission, go to / etc / apt / sources list. D / directory, create a new kubernetes List file, input the deb statement into the file and save it
echo "deb https://mirrors.aliyun.com/kubernetes/apt/ kubernetes-xenial main" >>/etc/apt/sources.list.d/kubernetes.list
- install
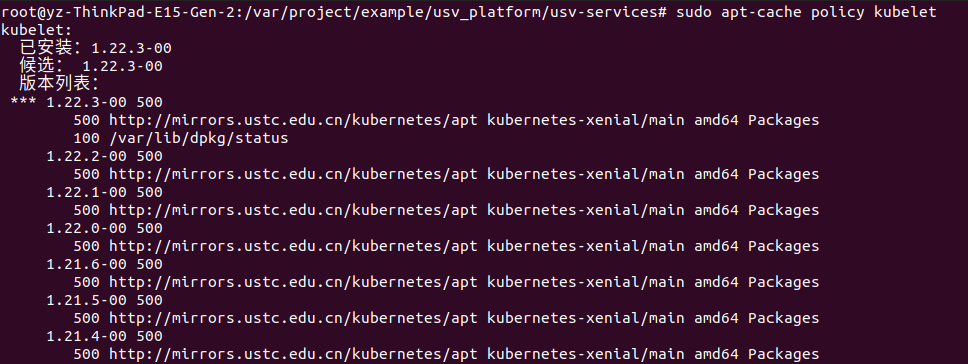
sudo apt-get update

## If no version is specified, install the latest version
sudo apt-get install -y kubelet kubeadm kubectl

## Install the specified version
sudo apt-get install -y kubelet=1.22.3-00 kubeadm=1.22.3-00 kubectl=1.22.3-00
If not specified, the latest version is installed by default. See sudo apt cache policy kubelet for more available versions
Install kubemeters
After installing kubectl, kubedm and kubelet tools, you can set k8s clusters through kubedm and execute the following commands:
sudo kubeadm init --image-repository registry.aliyuncs.com/google_containers \
--kubernetes-version v1.22.3 \
--pod-network-cidr=10.244.0.0/16
The optional parameters of init command are:
| parameter | describe | value |
|---|---|---|
| --image-repository | Specify the warehouse of the image. Alibaba cloud can be used in China. | registry.aliyuncs.com/google_containers |
| --kubernetes-version | It needs to be consistent with the kubectl and kubedm versions installed locally | v1.22.3 |
| --pod-network-cidr | Specify the network segment used by the pod | 10.244.0.0/16 |
| --cert-dir | Specify the path to the certificate | |
| --dry-run | Output the operation to be performed without any change | |
| --feature-gates | Specify function configuration key value pairs to control whether various functions are enabled | |
| -h, --help | Output help information for init command | |
| --apiserver-advertise-address | Specify the API Server address | |
| --apiserver-cert-extra-sans | Specifies the server certificate for the API Server | |
| --ignore-preflight-errors | Ignore the check item error list, such as "IsPrivilegedUser,Swap". If it is filled in as "all", all check item errors will be ignored | |
| --kubernetes-version | Specify Kubernetes version | |
| --node-name | Specify node name | |
| --pod-network-cidr | Specify the pod network IP address segment | 10.244.0.0/16 |
| --service-cidr | Specify the IP address field of the service | |
| --service-dns-domain | Specify the domain name of the Service. The default is "cluster.local" | |
| --skip-token-print | Do not print Token | |
| --token | Specify token | |
| --token-ttl | Specify the valid time of the token. If it is set to "0", it will never expire |
After startup, it will wait for a moment. The following words mean that the installation is successful.
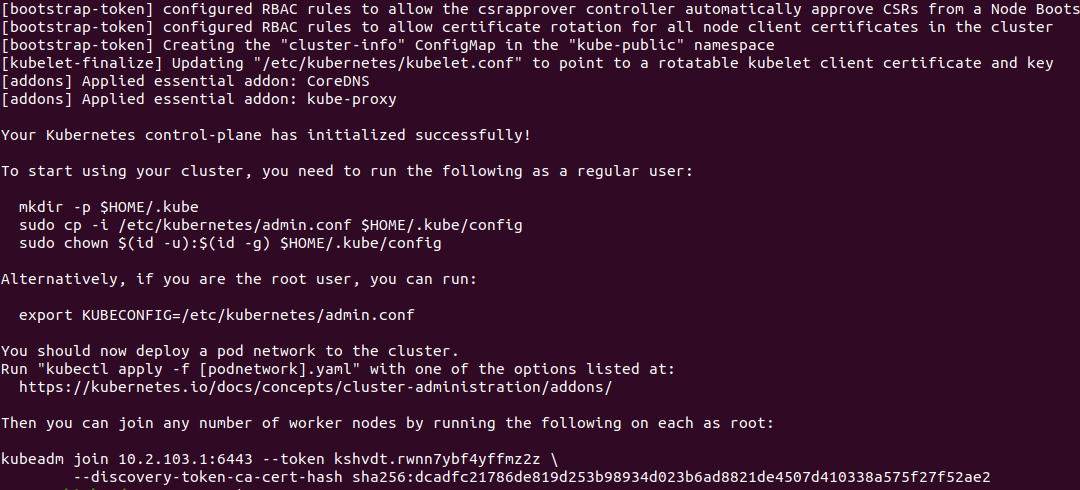
After the above words appear, you need to move the kubectl file to the HOME directory so that you can use the kubectl command
Execute the following command
mkdir -p $HOME/.kube
sudo cp -i /etc/kubernetes/admin.conf $HOME/.kube/config
sudo chown $(id -u):$(id -g) $HOME/.kube/config
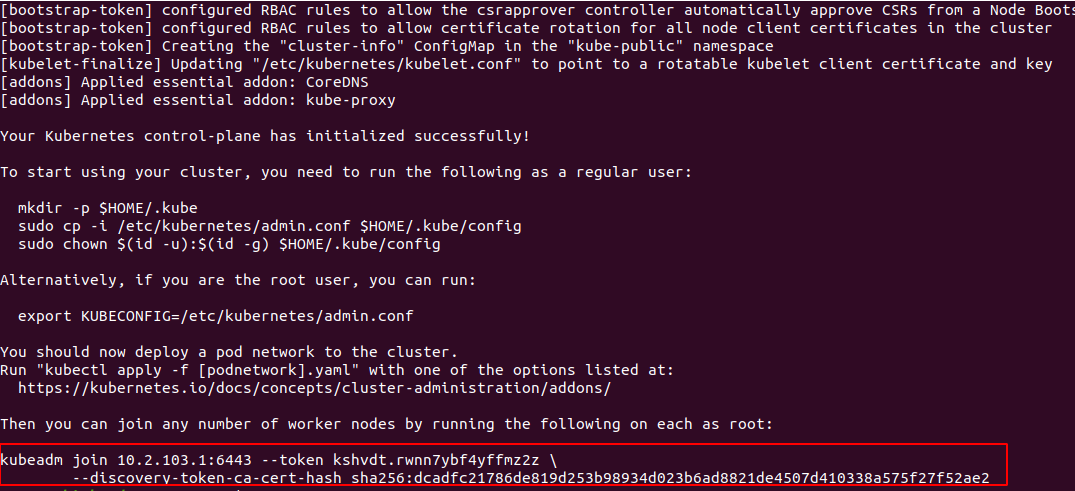
After successful execution, copy the command in the following figure, which is used to join the work node to the cluster;
Get the status of each component and node of kubernetes cluster
# Get master node name and worker node status
kubectl get nodes

# Get all pod status
kubectl get pods --all-namespaces
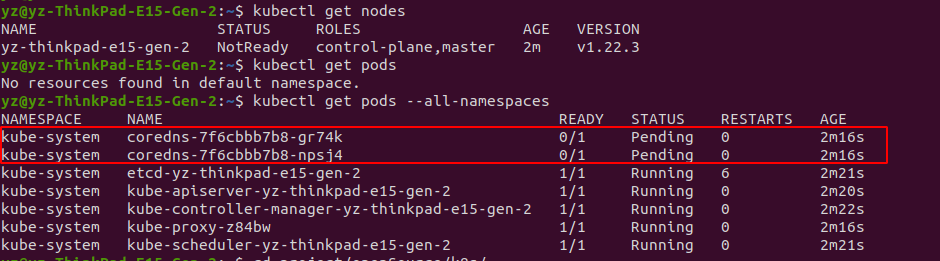
As can be seen from the above figure, when the pod status is obtained, the status of the coredns node is not Running but Pending. This is because the cluster has not yet installed a network plug-in. K8S does not accurately define a network plug-in, but defines an interface. The network plug-in K8S that implements the interface can run;
Install network plug-in
K8S does not accurately define a network plug-in, but defines an interface. The network plug-in K8S that implements the interface can run; K8S network plug-in interface is provided by major manufacturers realization , flannel is used here.
Network plug-in you can download a plug-in configuration file from the Internet and then apply it, or you can directly reference the plug-in on the Internet;
The first method is suitable for scenes with poor network, and the second method is suitable for scenes with good network.
Download File
## Get flannel configuration file
wget https://raw.githubusercontent.com/coreos/flannel/master/Documentation/kube-flannel.yml

## Apply this profile
kubectl apply -f kube-flannel.yml
Directly apply profiles on the network
This method does not need to download files locally, but needs a good network
kubectl apply -f https://raw.githubusercontent.com/coreos/flannel/master/Documentation/kube-flannel.yml
After these two methods are run, you can obtain the status of each component through the command kubectl get pods -- all namespaces. It is found that the coredns component is still in Pending status. This is because when you re apply the network plug-in, the plug-in is also downloading the image in the warehouse for application. Here you can use the following command to verify:
kubectl describe pods kube-flannel-ds-amd64-vcmx9 -n kube-system
kube-flannel-ds-amd64-vcmx9 in the command needs to configure its own network plug-in name, which can be obtained through kubectl get pods -- all namespaces.
After using the command, you can get the detailed information of this component. You don't need to look at the front of the detailed information. You can see the Evnets tag at the bottom. The step will be stuck in the pulling of the image "quay.io/coreos/flannel:v0.15.1", so wait until the pulling of the image is successful.

If you can't wait, you can make a choice; Copy the image name, then go to alicloud to download the same image, and then change it to the same image name as in the event. If you redeploy the network plug-in at this time and find that there is this image locally, you will not pull the image from the network, but directly apply the local image;
docker pull registry.cn-shenzhen.aliyuncs.com/myownmirrors/quay.io_coreos_flannel:v0.15.1
docker tag registry.cn-shenzhen.aliyuncs.com/myownmirrors/quay.io_coreos_flannel:v0.15.1 quay.io/coreos/flannel:v0.12.0-amd64
docker rmi registry.cn-shenzhen.aliyuncs.com/myownmirrors/quay.io_coreos_flannel:v0.15.1
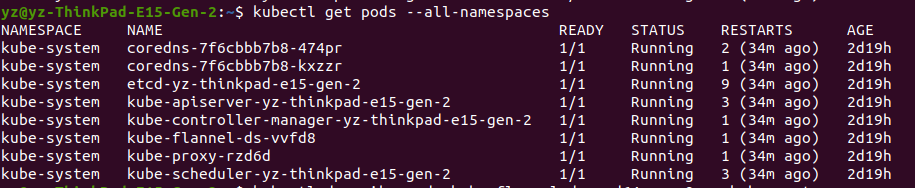
After performing the above steps, you can find that the network plug-in is successfully deployed and the coredns component is in Running status
Work nodes join the cluster
For the work node, please also install kubectl, kubedm and kubelet, and then use the kubedm join command copied above to make the node join the cluster as a work node
kubeadm join 10.1.3.203:6443 --token mk59c0.2jwnb5d7194iry3c \
	--discovery-token-ca-cert-hash sha256:685e1097f492bdbf90aa215810dab32a0311388e423a81fde287656fa947934c
After joining, execute kubectl get nodes to see that the work node has joined the cluster

Install Kuborad visualization
The kuborad visualization interface is used here, Reference documents
Use command
kubectl apply -f https://addons.kuboard.cn/kuboard/kuboard-v3.yaml
Visit Kuboard
- Open link in browser http://your-node-ip-address:30080
- Enter the initial user name and password and log in
- User name: admin
- Password: Kuboard123
Installation k8s step pit - kublet has been restarted
kubelet is always restarted because when docker runs as a container of kubernetes, the cgroup attribute of docker needs to be consistent with kubernetes;
This attribute is located in / etc / docker / daemon Add settings to the JSON file
# Modify the file
vim /etc/docker/daemon.json

# Append content at the end of the file
{
	"exec-opts": ["native.cgroupdriver=systemd"]
}

# Restart kubelet service
systemctl daemon-reload
systemctl restart docker
Reference articles
7, K8S getting started: installing Flannel network plug-in
Installing Kubernetes clusters using kubedm
Kubedm deploys the Kubernetes network plug-ins flannel, Calico and weave and sets the cluster role