Learning Video: Kubernetes (K8S) 3 hours fast start + practice, no waste pure dry goods
Reference documents: https://k8s.easydoc.net/
Content description:
- What is kubernetes, when does it need to be, and its architecture.
- Install the kubernetes cluster in three different ways. Includes minikube, cloud platform and bare machine (3 servers).
- demo project demonstrates how to deploy projects to a cluster and expose service ports to the outside world.
- How to deploy stateful applications like databases and how to persist data.
- Use of configuration and password files in the cluster.
- How to use the Helm App Store to quickly install third-party applications.
- How to use Ingress to provide services to the outside world.
Goal: Complete the course, have a comprehensive understanding of kubernates, and can easily handle various cluster deployments.
Introduction to Kubenetes
Official Documents (Chinese): Kubernetes
What is Kubernetes (K8S)
K8S is an open source tool for cluster deployment and management of containerized applications, developed by Google.
The name Kubernetes comes from Greek and means "pilot" or "pilot".
K8S is an abbreviation because there are eight characters between k and s.
Google opened the Kubernetes project in 2014
Main features:
- High availability, no downtime, automatic disaster recovery.
- Grayscale update does not affect the normal operation of the business.
- One-click rollback to the historical version.
- Convenient scaling extensions (application scaling, machine addition and subtraction) to provide load balancing.
- Perfect ecology.
Different deployment scenarios
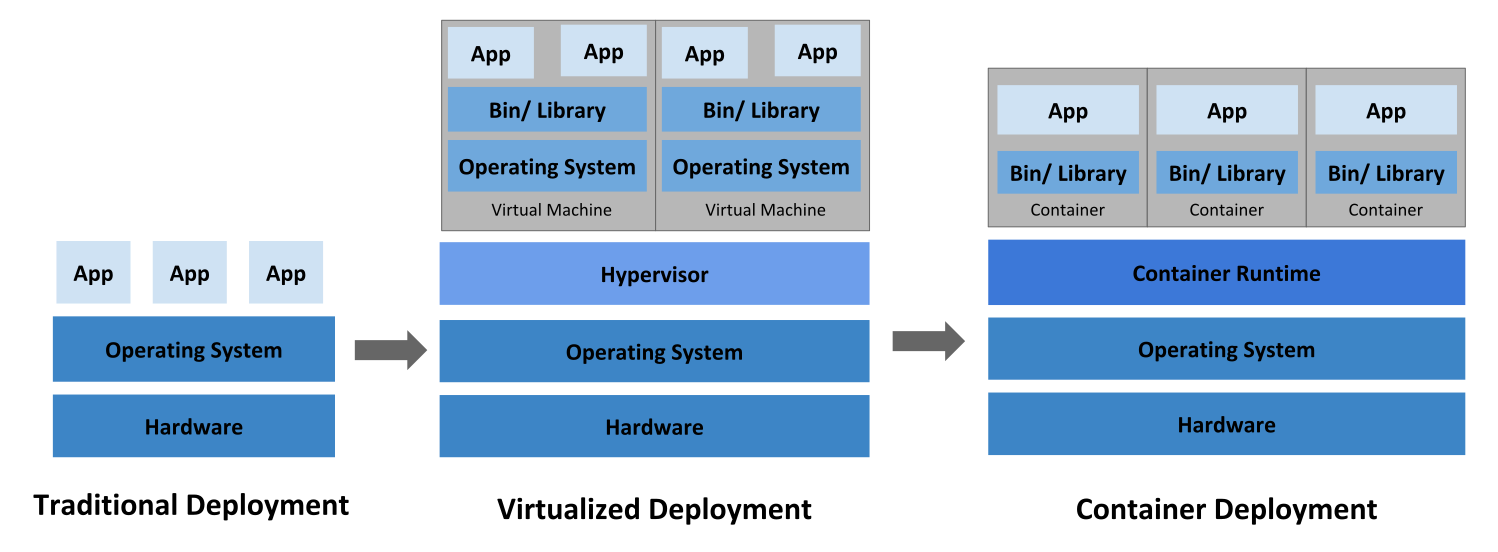
Traditional deployment
Applications are deployed directly on physical machines, machine resource allocation is not well controlled. When a Bug occurs, it is possible that most of the machine's resources are occupied by an application, resulting in other applications not functioning properly and application isolation cannot be achieved.
Virtual Machine Deployment
Run multiple virtual machines on a single physical machine, each of which is a completely separate system with high performance penalties.
Container Deployment
All containers share host systems, lightweight virtual machines, low performance consumption, resource isolation, and on-demand CPU and memory allocation.
When K8S is needed
When the application only needs to run on one machine, direct docker + docker-compose is enough for ease of use.
When the application needs to run on 3 or 4 machines, it is still possible to configure the operating environment + load balancer separately for each machine.
As the number of application visits increases and the number of machines increases gradually to more than a dozen, hundreds, thousands... Every time you add machines, software updates, version rollbacks, it becomes very troublesome and painful. Life is wasted on repetitive work with no technical content. At this point, Kubernetes can help you manage clusters of millions of machines.
Kubernates can provide centralized management of cluster machines and applications, plus machines, version upgrades, version rollbacks, all in one command.
It also has many features: non-stop grayscale updates to ensure high availability, high performance, high scalability...
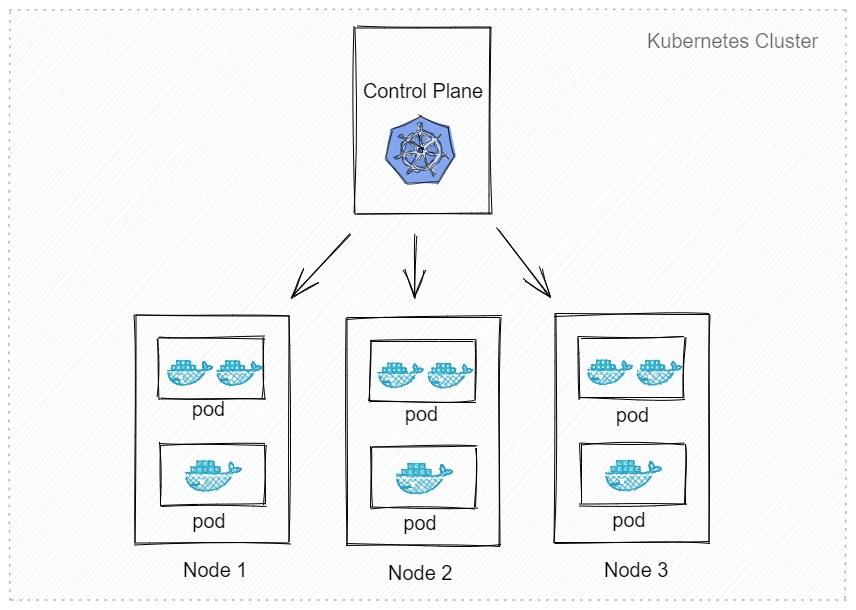
K8S Cluster Architecture

Master: master node, control platform, do not need high performance, do not run tasks.
Usually one is OK, but you can also open multiple primary nodes to improve cluster availability.
worker: a work node, which can be a virtual machine or a physical computer, where tasks run and machine performance needs to be better.
Usually there are many machines to expand the cluster. Each work node is managed by the primary node.
Pod: The smallest unit of K8S scheduling and management.
A Pod can contain one or more containers, each with its own virtual IP.
A working node can have more than one pod, and the primary node considers to which node the load automatically dispatches the pod to run.
Kubernetes components:
- kube-apiserver: API server, which exposes the Kubernetes API
- etcd: Key value database, which can be used as a background database to hold all the cluster data for Kubernetes
- kube-scheduler: Dispatch Pod to which node to run
- kube-controller: cluster controller
- cloud-controller: interacting with cloud service providers

To learn more about the K8S component details, what are the main and working nodes'programs and what are their functions, you can see Official website details
Install K8S Cluster
Installation method:
- minikube
It's just a K8S cluster emulator, a cluster with only one node for testing purposes, master and worker together. - Using cloud platform Kubernetes
Visual setup allows you to create a cluster in a few simple steps.
Advantages: simple installation, complete ecology, load balancer, storage, etc. are well matched, simple operation will be completed. - Bare Metal Installation
At least two machines (one for the primary node and one for the working node) are required, and the Kubernetes components need to be installed on their own, which can be a bit cumbersome to configure.
Cloud vendors can rent servers on time at a low cost and destroy when used up.
Disadvantages: cumbersome configuration, lack of ecological support, such as load balancers, cloud storage.
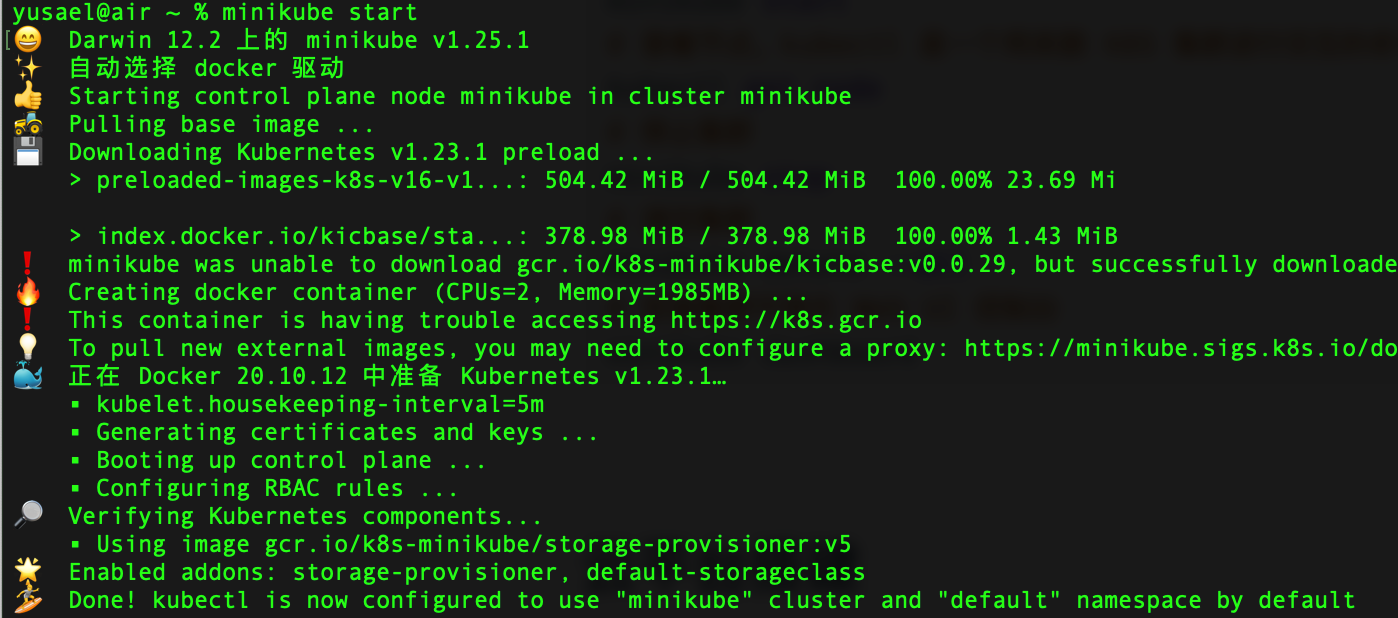
minikube
Note: Docker needs to be installed in advance
Installation is simple and supports a variety of platforms, referring to the official documentation: Installation Method
# Start Cluster
minikube start
# View nodes. kubectl is a command line tool for interacting with K8S clusters
kubectl get node
# Stop Clustering
minikube stop
# Empty Cluster
minikube delete --all
# Install Cluster Visualization Web UI Console
minikube dashboard
Cloud Platform Building
1,Tencent Kubernetes Engine (TKE)
- Quick Start Cluster Creation
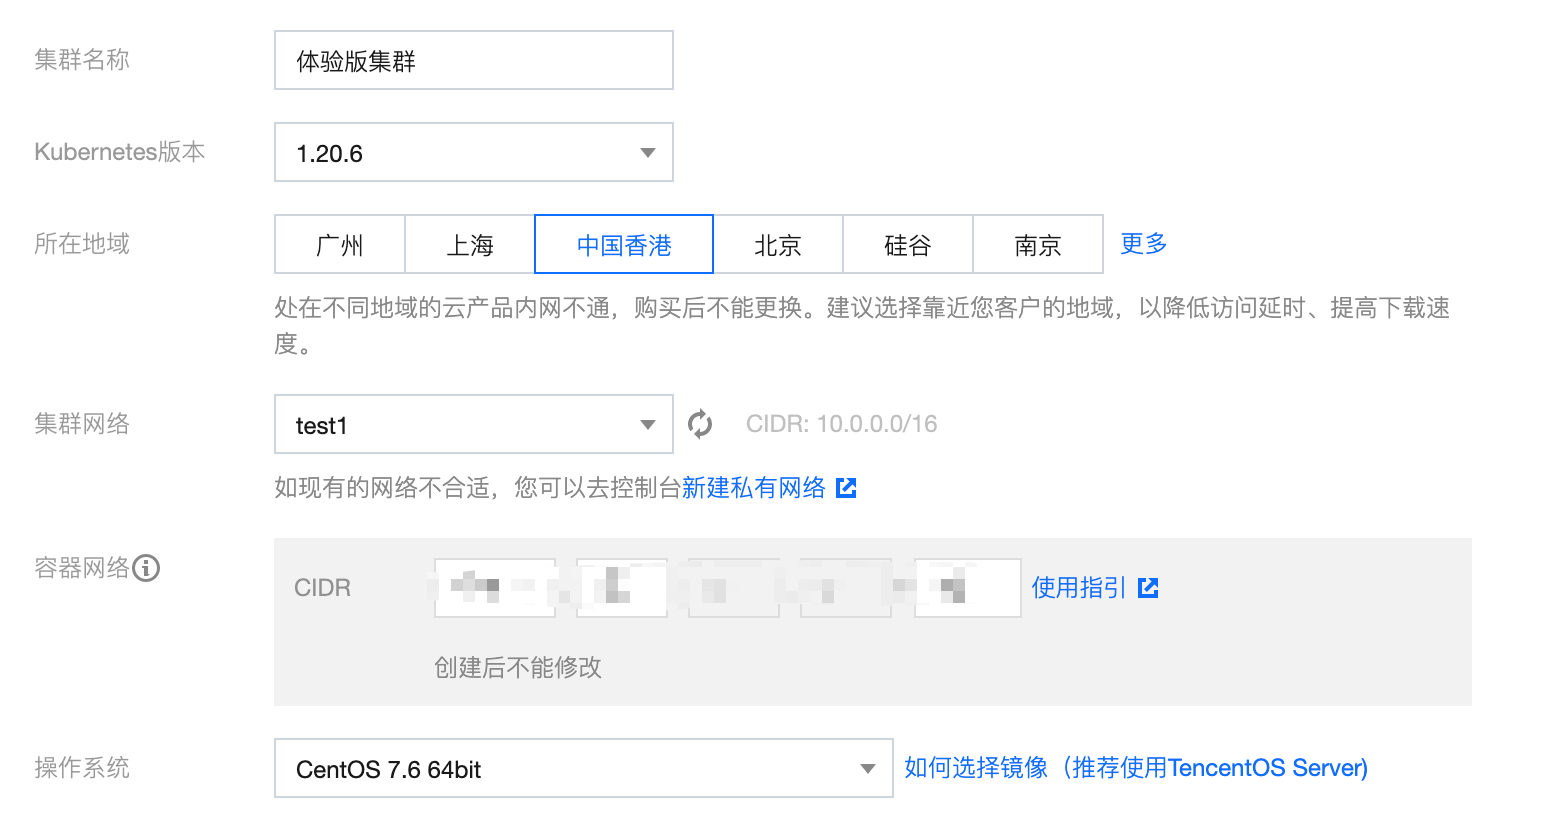
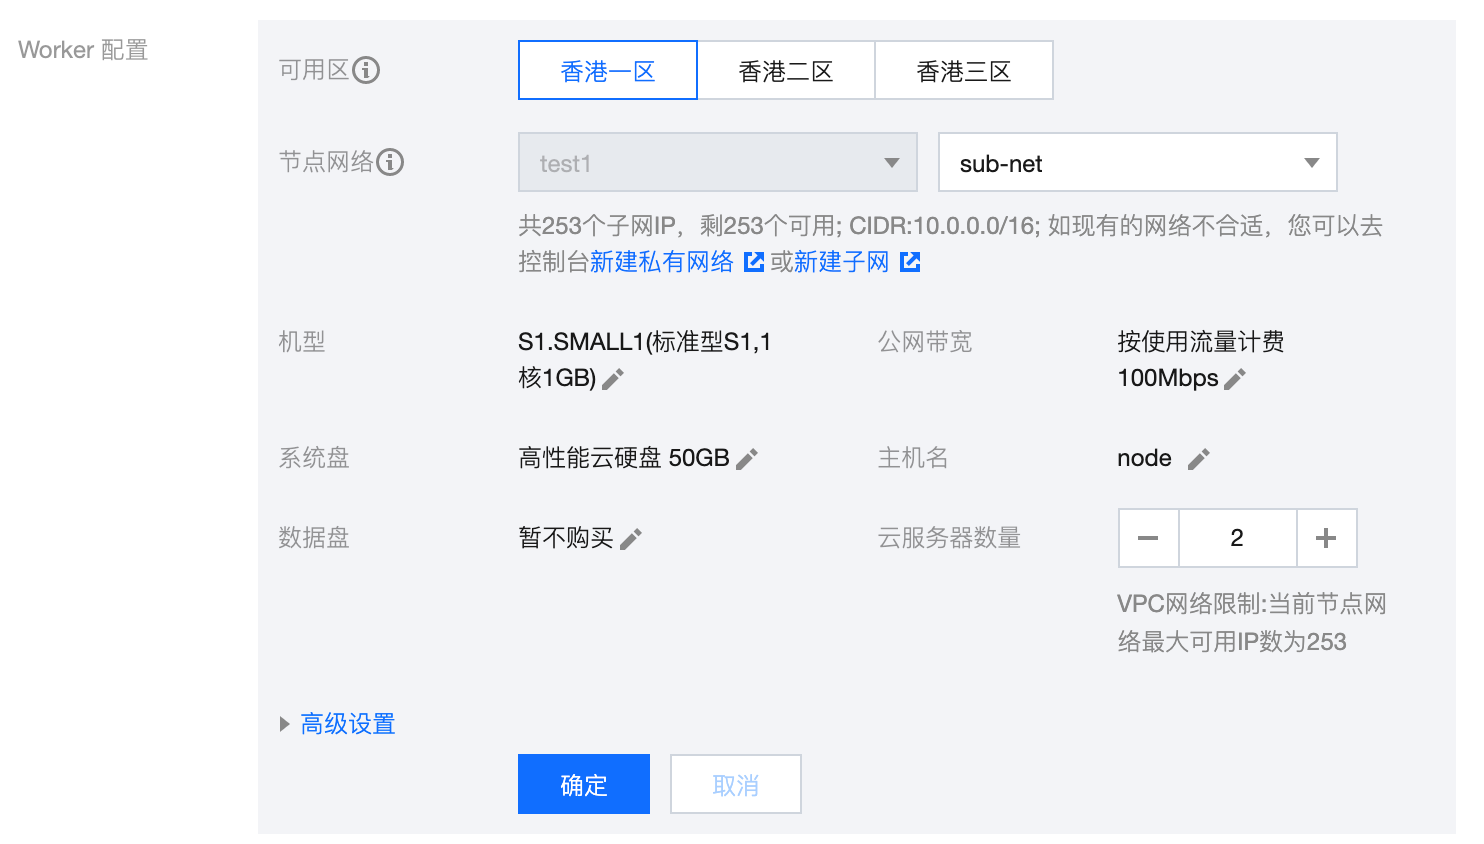
The operation steps are similar to Tencent Cloud.
Bare Metal
The primary node requires components:
- docker (or other container runtime)
- kubectl Cluster Command Line Interaction Tool
- kubeadm cluster initialization tool
Work node requires components: File
- docker (or other container runtime)
- kubelet manages Pod s and containers to ensure their healthy and stable operation.
- kube-proxy Network Agent, responsible for network related work
Purchase Server
Tencent Cloud, Cloud Server, and 3 new servers to achieve bare-metal building.
- Select model
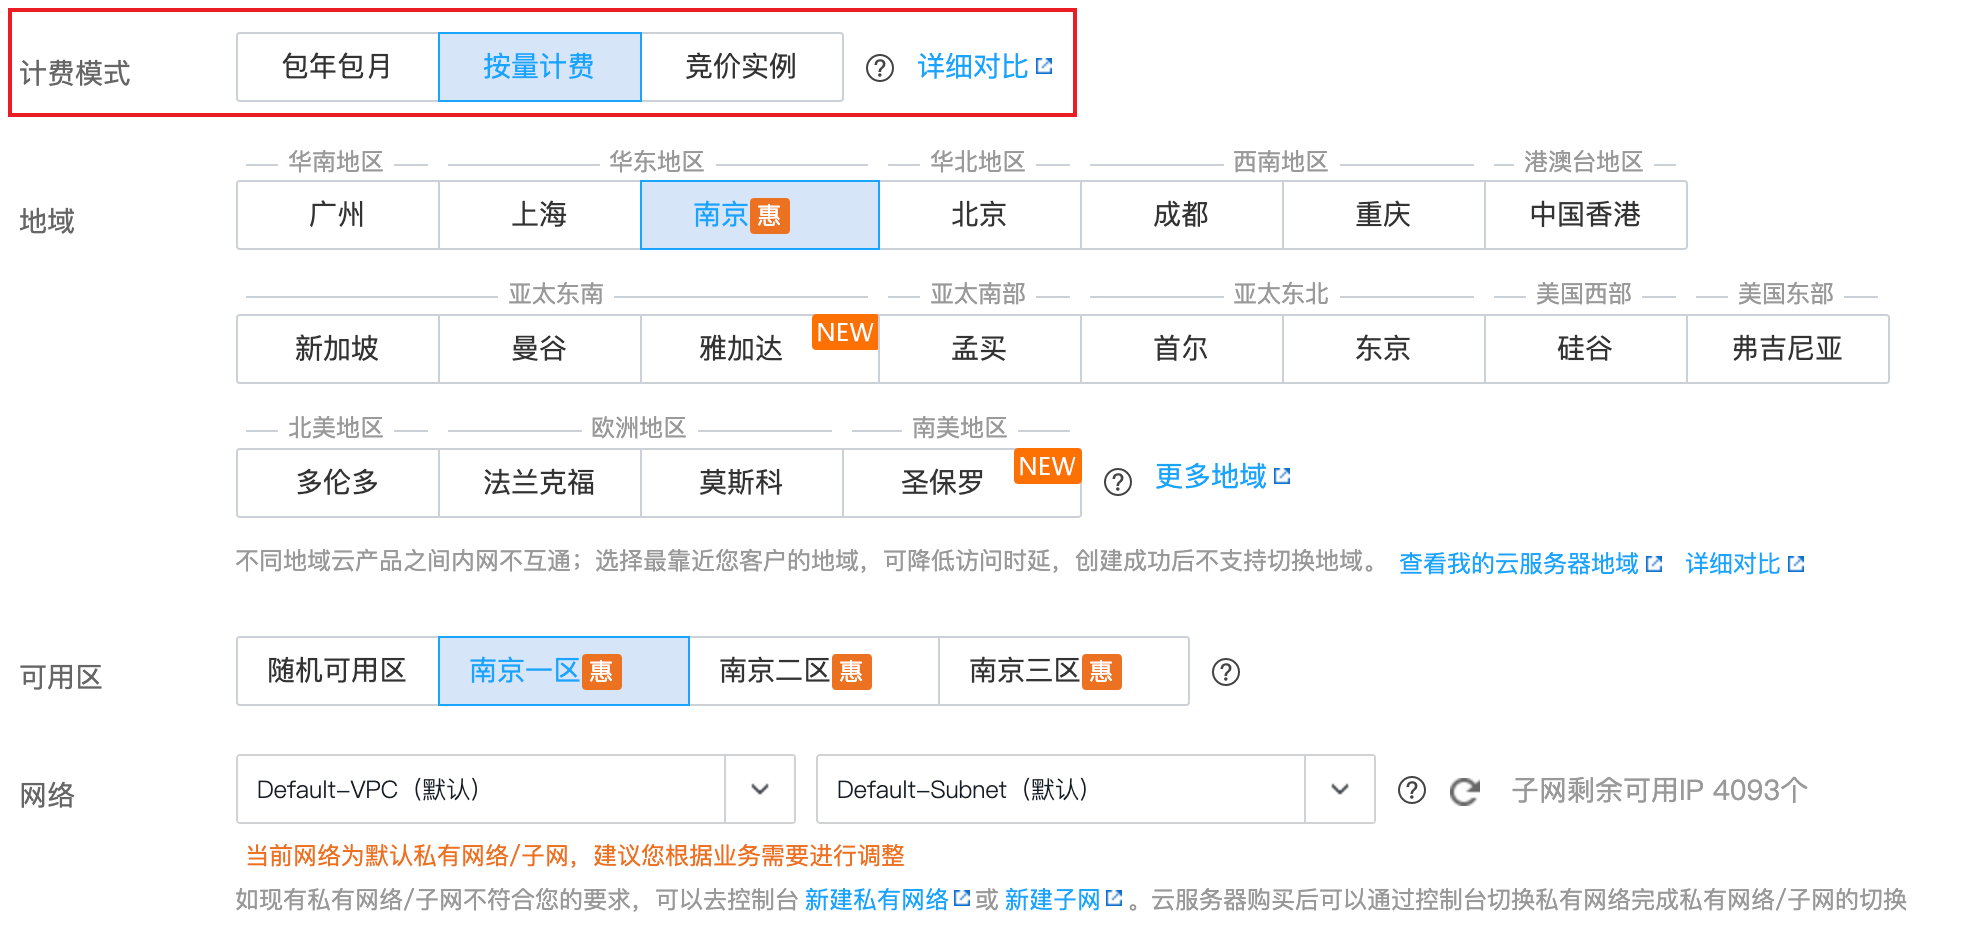
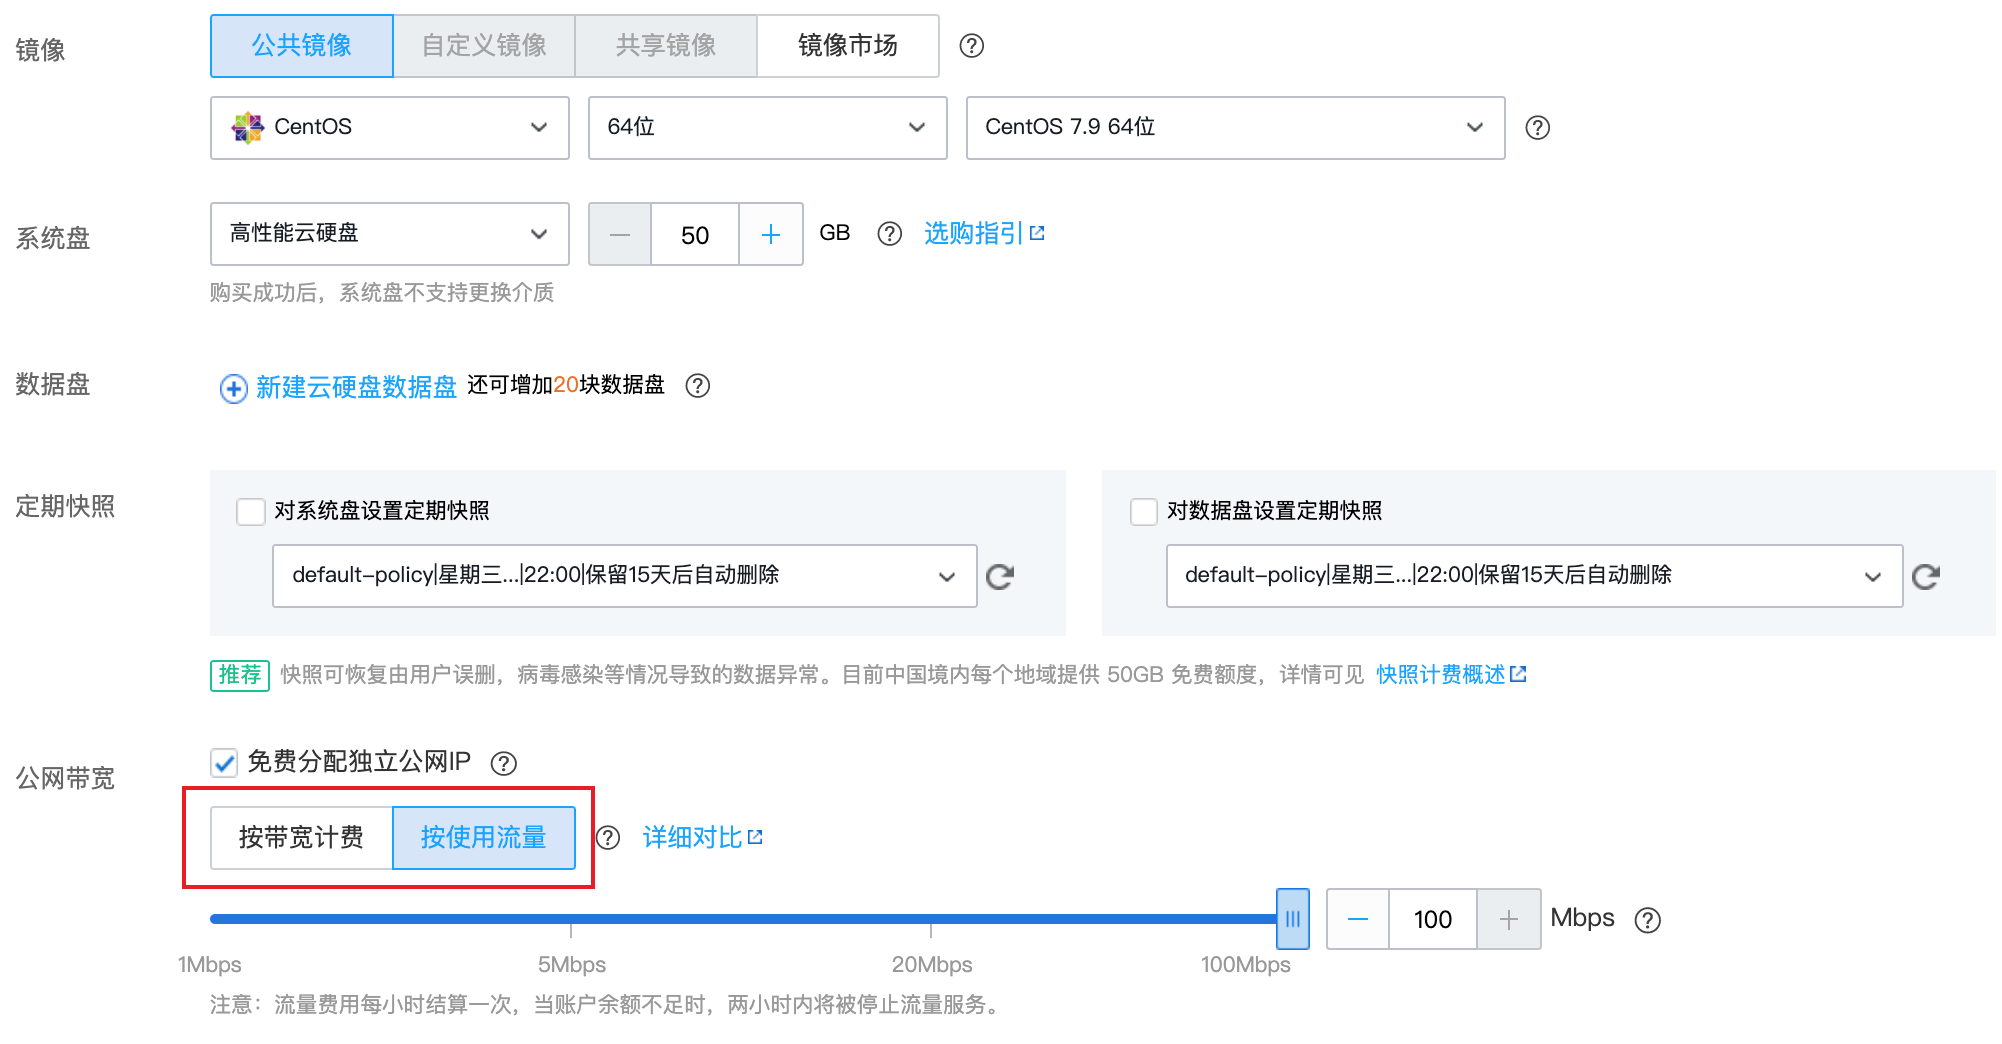

- Setup Host
- Confirm Configuration
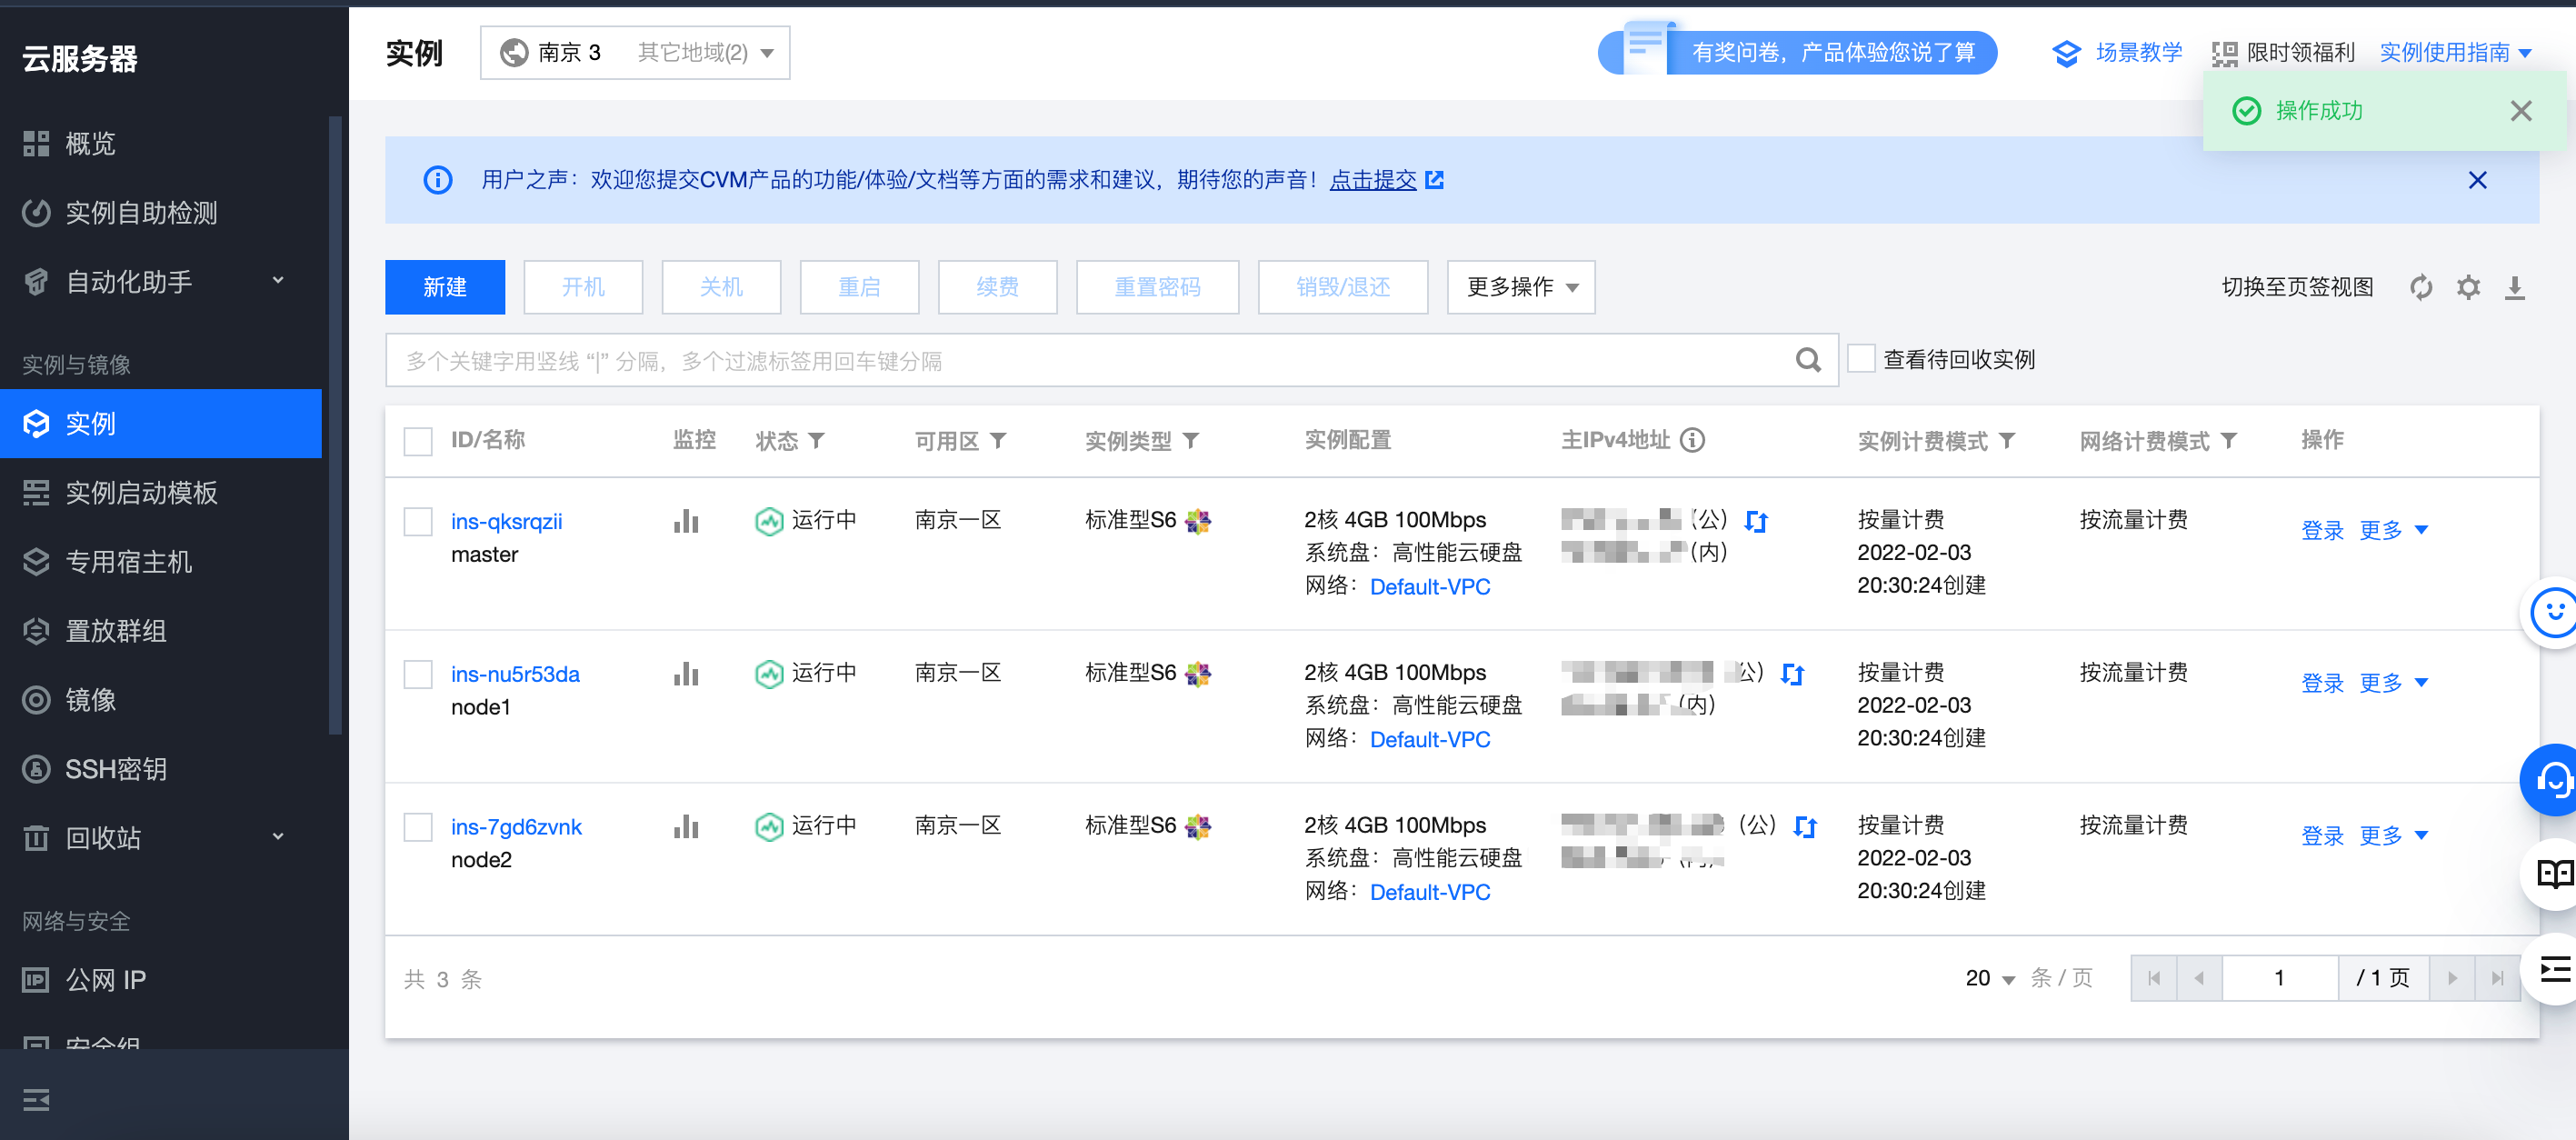
Three new instances were successfully created.
Start building
You can try it This project Quickly build K8S bare machine cluster with scripts
Of course, for a better understanding, you should build it manually first
Each node has a corresponding host name set:
hostnamectl set-hostname master
hostnamectl set-hostname node1
hostnamectl set-hostname node2
Modify hosts (duplicate Tencent Intranet ip) (all nodes)
vim /etc/hosts

10.206.0.14 master
10.206.0.3 node1
10.206.0.5 node2

# You can ping each other once the modification is complete
# ping node1
# All nodes shut down SELinux
setenforce 0
sed -i --follow-symlinks 's/SELINUX=enforcing/SELINUX=disabled/g' /etc/sysconfig/selinux
Make sure the firewall is off (all nodes)
systemctl stop firewalld
systemctl disable firewalld
Add installation source (all nodes)
# Add k8s installation source
cat <<EOF > kubernetes.repo
[kubernetes]
name=Kubernetes
baseurl=https://mirrors.aliyun.com/kubernetes/yum/repos/kubernetes-el7-x86_64
enabled=1
gpgcheck=1
repo_gpgcheck=1
gpgkey=https://mirrors.aliyun.com/kubernetes/yum/doc/yum-key.gpg https://mirrors.aliyun.com/kubernetes/yum/doc/rpm-package-key.gpg
EOF
mv kubernetes.repo /etc/yum.repos.d/

# Add Docker Installation Source
yum-config-manager --add-repo http://mirrors.aliyun.com/docker-ce/linux/centos/docker-ce.repo
Install required components (all nodes)
yum install -y kubelet kubeadm kubectl docker-ce
Start kubelet, docker, and set boot start (all nodes)
systemctl enable kubelet
systemctl start kubelet
systemctl enable docker
systemctl start docker
Modify docker configuration (all nodes)
# kubernetes officially recommends docker and others to use systemd as cgroupdriver, otherwise kubelet will not start
cat <<EOF > daemon.json
{
  "exec-opts": ["native.cgroupdriver=systemd"],
  "registry-mirrors": ["https://ud6340vz.mirror.aliyuncs.com"]
}
EOF
mv daemon.json /etc/docker/

# Restart takes effect
systemctl daemon-reload
systemctl restart docker
use kubeadm Initialize the cluster (run only at the primary node)
Note the code that comes out of the first line below, and so on, to be run on the working node (note that line breaks are removed)
kubeadm join xxxx:6443 --token xxx --discovery-token-ca-cert-hash xxx
# Initialize Cluster Console Control plane
# Failed can be reset with kubeadm reset
kubeadm init --image-repository=registry.aliyuncs.com/google_containers
##### Record the code that was run at this time, etc. to be run on the working node
##### kubeadm join xxxx:6443 --token xxx --discovery-token-ca-cert-hash xxx

# Remember to save kubeadm join xxx
# Forgot to retrieve: kubeadm token create --print-join-command

# Copy the authorization file so that kubectl has access to the cluster
mkdir -p $HOME/.kube
cp -i /etc/kubernetes/admin.conf $HOME/.kube/config
chown $(id -u):$(id -g) $HOME/.kube/config

# Create ~/ on other machines. The kube/config file can also access the cluster via kubectl
Interested in knowing exactly what kubeadm init did, you can View Documents
Join the working node into the cluster (run only at the working node) and run with the code that you run on it:
kubeadm join xxxx:6443 --token xxx --discovery-token-ca-cert-hash xxx
Install the network plug-in, otherwise the node is in the NotReady state (running only on the primary node)
kubectl apply -f https://raw.githubusercontent.com/coreos/flannel/master/Documentation/kube-flannel.yml
View nodes, to view in the primary node (other nodes can also view with kubectl installed)
kubectl get nodes
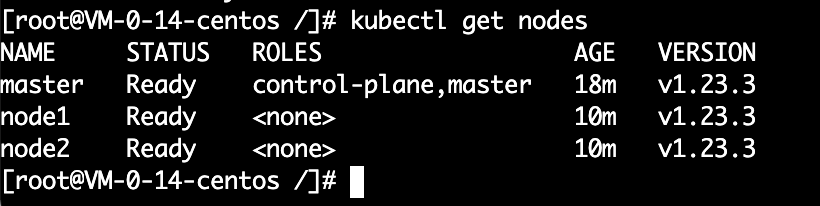
Build successful! Wooooooooo!
Deployment applies to clusters
Deploy application YAML files
According to Mirror
From the command line, run a pod from the mirror:
kubectl run testapp --image=ccr.ccs.tencentyun.com/k8s-tutorial/test-k8s:v1
Use the following instructions to view running pods:kubectl get pod, parameter -o wide to show more information

Pod
According to. The yaml file starts with a pod: (note type: Pod)
kubectl apply -f ./pod.yaml
# pod.yaml
apiVersion: v1
kind: Pod
metadata:
  name: test-pod
spec:
  # Define containers, which can be multiple
  containers:
    - name: test-k8s # Container name
      image: ccr.ccs.tencentyun.com/k8s-tutorial/test-k8s:v1 # image

Deployment
According to. yaml file runs multiple pod s: (note type: Deployment)
kubectl apply -f ./deployment.yaml
# deployment.yaml
apiVersion: apps/v1
kind: Deployment
metadata:
  # Deployment Name
  name: test-k8s
spec:
  replicas: 2
  # Used to find associated pods, all tags match
  selector:
    matchLabels:
      app: test-k8s
  # Define Pod-related data
  template:
  	# The following is actually the previous pod. Contents in yaml
    metadata:
      labels:
        app: test-k8s
    spec:
      # Define containers, which can be multiple
      containers:
      - name: test-k8s # Container name, followed by a string of random strings when the container is generated
        image: ccr.ccs.tencentyun.com/k8s-tutorial/test-k8s:v1 # image

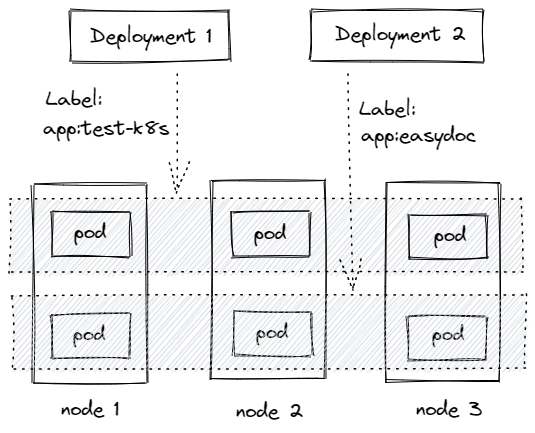
Deployment associates Pods through label:
Deployment Application Demo
Deploy a nodejs web application with source address: Github
# Deploying applications
kubectl apply -f app.yaml
# View deployment
kubectl get deployment
# View pod
kubectl get pod -o wide
# View pod details
kubectl describe pod pod-name
# View log
kubectl logs pod-name
# Enter the Pod container terminal, -c container-name specifies which container to enter.
kubectl exec -it pod-name -- bash # exit after Entry
# Scaled Extended Copy
kubectl scale deployment test-k8s --replicas=5
# Map intra-cluster ports to nodes
kubectl port-forward pod-name 8090:8080
# View History
kubectl rollout history deployment test-k8s
# Return to previous version
kubectl rollout undo deployment test-k8s
# Return to the specified version
kubectl rollout undo deployment test-k8s --to-revision=2
# Delete Deployment
kubectl delete deployment test-k8s
Pod Error Resolution
If you run kubectl describe pod/pod-name and find the following error in Events:
networkPlugin cni failed to set up pod "test-k8s-68bb74d654-mc6b9_default" network: open /run/flannel/subnet.env: no such file or directory
Create a file/run/flannel/subnet at each node. Env can be solved by writing the following:
FLANNEL_NETWORK=10.244.0.0/16
FLANNEL_SUBNET=10.244.0.1/24
FLANNEL_MTU=1450
FLANNEL_IPMASQ=true
More Commands
# View All
kubectl get all
# Redeployment
kubectl rollout restart deployment test-k8s
# Command modifies the mirror, --record indicates that the command is recorded in the operation history
kubectl set image deployment test-k8s test-k8s=ccr.ccs.tencentyun.com/k8s-tutorial/test-k8s:v2-with-error --record
# Suspend running. Modifications to deployment will not take effect immediately after the suspension, and settings will not be applied until they are restored
kubectl rollout pause deployment test-k8s
# recovery
kubectl rollout resume deployment test-k8s
# output to a file
kubectl get deployment test-k8s -o yaml >> app2.yaml
# Delete all resources
kubectl delete all --all
More government gateways at Deployment Introduction
Specify a Pod to run on a node: nodeselector
Limit total CPU, memory: File
apiVersion: v1
kind: Pod
metadata:
  name: nginx
  labels:
    env: test
spec:
  containers:
  - name: nginx
    image: nginx
    imagePullPolicy: IfNotPresent
  nodeSelector:
    disktype: ssd
Workload classification
Reference documents: https://kubernetes.io/zh/docs/concepts/workloads/
- Deployment
Suitable for stateless applications, all Pod s are equivalent and replaceable. - StatefulSet
Stateful application, suitable for database type. - DaemonSet
Run a Pod on each node, which can be used for node monitoring, node log collection, and so on. - Job & CronJob
Job is used to express a one-time task, while CronJob runs repeatedly according to its time plan.
Existing problems
- Only one Pod can be accessed at a time, and no load balancing automatically forwards to a different Pod.
- Access also requires port forwarding.
- The IP changed and the name changed after the Pod crash.