kubernetes(k8s) environment construction and deployment
preface
The word kubernetes comes from Greek, which means navigator and container arrangement technology at the production environment level, which can realize automatic deployment, expansion and management of containers. Kubernetes, also known as K8S, in which 8 represents the middle 8 characters, is an open-source container orchestration engine technology of Google in 2014, which is used to automate the deployment, planning, expansion and management of container applications. It groups the composed application containers into logical units for management and discovery, and is used to manage container applications on multiple hosts in the cloud platform, Kubernetes aims to make the deployment of containerized applications simple and efficient. Many details do not require the operation and maintenance personnel to carry out complex manual configuration and processing.
Official website: https://kubernetes.io/
code: https://github.com/kubernets/kubernets
Kubernetes is developed in Go language, which is an open source programming voice released by Google in 2009.
1, Overall architecture of Kubernetes
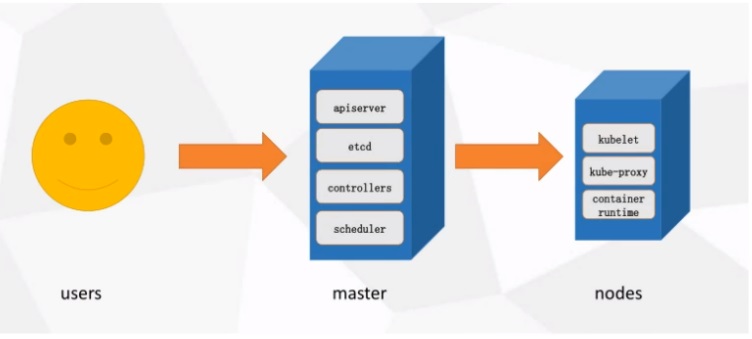
Master
k8s cluster control node is used to dispatch and manage the cluster and accept the cluster operation requests from users outside the cluster.
The Master Node consists of API Server, Scheduler, ClusterState Store(ETCD database) and Controller ManagerServer;
Nodes
Cluster work node, running user business application container;
Nodes node, also known as WorkerNode, includes kubelet, kube proxy and Pod(Container Runtime);
2, Kubernetes environment construction method
(1)minkube can run Kubernets tools locally, and minikube can run a single node Kubernets cluster on a personal computer, so that you can try Kubernets or daily development work (not used much)
https://kubernetes.io/docs/tutorials/hello-minikube/
(2)kind
Tools like Kind and minikub allow you to run Kubernetes on your local computer. This tool needs to install and configure Docker
https://kind.sigs.k8s.io/
(3) kubeadm
Kubedm is a K8S deployment tool that provides kubedm init and kubedm join commands to quickly deploy a Kubernetes cluster.
Official address: https://kubernetes.io/docs/reference/setup-tools/kubeadm/kubeadm/
https://kubernetes.io/docs/setup/production-environment/tools/kubeadm/install-kubeadm
(4) Download the binary package of the distribution from github, manually deploy and install each component to form a Kubernetes cluster. The steps are cumbersome, but it can make you have a clearer understanding of each component.
(5) Install each component of Kubernetes through Yum to form a Kubernetes cluster. However, the k8s version in the yum source is relatively old, so this method is rarely used.
(6) Third party tools
Some big gods encapsulate some tools and use these tools for k8s the installation
(7) Spend money to buy
Purchase a public cloud platform k8s like Alibaba cloud directly and decide with one click.
3, Kubedm deploys Kubernetes
3.1 environmental requirements
kubeadm is a tool launched by the official community for rapid deployment of kubernetes clusters. This tool can complete the deployment of a kubernetes cluster through two instructions
1. Create a Master node
kubeadm init
2. Join the Node to the Master cluster:
Kubedm join < IP and port of master node >
Deployment environment requirements
One or more machines, operating system centos7 x-86_ x64
Hardware configuration: memory 2G or 2G+,CPU2 core or CPU2 core+
The machines in the cluster can communicate with each other
Each machine in the cluster can access the external network and needs to pull the image
Disable swap partition
If the environment is not satisfied, an error will be reported
3.2 relevant strategies of configuration environment
Turn off firewall
# systemctl stop firewalld.service
# systemctl disable firewalld.service
Close selinux
# sed -i 's/enforceing/disabled/' /etc/selinux/config#permanent
# setenforce 0 #temporary
Turn off swap(k8s disable virtual memory to improve performance)
# swapoff -a  #temporary
# sed -ri 's/.*swap.*/#&/' /etc/fstab #permanent
Add hosts in master
cat >> /etc/hosts << EOF
192.168.10.30  k8s-master
192.168.10.31  k8s-node1
EOF
Set bridge parameters
cat >> /etc/sysctl.d/k8s.conf << EOF
net.bridge.bridge-nf-call-ip6tables = 1
net.bridge.bridge-nf-call-iptables = 1
EOF
sysctl --system
time synchronization
yum -y install ntpdate
Since the operating system is installed in English by default, the time synchronization is New York time in the United States, so it needs to be modified.
mv /etc/localtime /etc/localtime.bak
ln -s /usr/share/zoneinfo/Asia/Shanghai /etc/localtime
ntpdate ntp1.aliyun.com
4, Kubernetes specific operation steps
Install docker / kubedm / kubelet on all server nodes
The default container running environment of Kubernetes is Docker, so you need to install Docker first
4.1 installing Docker
Update docker's yum source
wget https://mirrors.aliyun.com/docker-ce/linux/centos/docker-ce.repo -O /etc/yum.repos.d/docker-ce.repo
yum -y install docker-ce-20.10.12
systemctl start docker
vim /etc/docker/daemon.json
{
"registry-mirrors":["https://registry.docker-cn.com"]
}
systemctl enable docker
4.2 build kubedm, kubelet and kubectl
Add k8s Alibaba cloud cloud source
cat > /etc/yum.repos.d/kubernetes.repo << EOF
[kubernetes]
name=Kubernetes
baseurl=https://mirrors.aliyun.com/kubernetes/yum/repos/kubernetes-el7-x86_64
enabled=1
gpgcheck=0
repo_gpgcheck=0
gpgkey=https://mirrors.aliyun.com/kubernetes/yum/doc/yum-key.gpg
https://mirrors.aliyun.com/kurbernetes/yum/doc/rpm-package-key.gpg
EOF
Start installation
yum -y install kubelet-1.19.4 kubeadm-1.19.4 kubectl-1.19.4
systemctl enable kubelet
Check to see if it is installed
yum list installed | grep kubelet
yum list installed | grep kubeadm
yum list installed | grep kubectl
Tool introduction
kubelet: runs on all nodes of the cluster and is responsible for starting the pod and container
kubeadm: a tool for initializing cluster
kubectl:kubectl is a kubenetes command-line tool. Through kubectl, you can deploy and manage applications, view various resources, create, delete and update components.
4.3Master node
kubeadm init --apiserver-advertise-address=192.168.10.30 --image-repository registry.aliyuncs.com/google_containers --kubernetes-version v1.19.4 --service-cidr=10.96.0.0/12 --pod-network-cidr=10.244.0.0/16
Execute the following command
mkdir -p $HOME/.kube
sudo cp -i /etc/kubernetes/admin.conf $HOME/.kube/config
sudo chown $(id -u):$(id -g) $HOME/.kube/config
4.4 add the node node to the Kubernetes master and execute on the node
Add a new node to the cluster. The command executed is kubedm join, the last output of kubedm init
kubeadm join 192.168.10.30:6443 --token vf8ckd.k76hannwrja98fze \
    --discovery-token-ca-cert-hash sha256:ab6d6e80d199d4628ddd6daa186901f21c06cb691a7e7ffcde6e0ea890077f66
4.5 deploying network plug-ins
wget https://raw.githubbusercontent.com/coreos/flannel/master/Documentation/kube-flannel.yml
kubectl apply -f kube-flannel.yml
[root@k8s-master ~]# kubectl apply -f kube-flannel.yml
podsecuritypolicy.policy/psp.flannel.unprivileged created
clusterrole.rbac.authorization.k8s.io/flannel created
clusterrolebinding.rbac.authorization.k8s.io/flannel created
serviceaccount/flannel created
configmap/kube-flannel-cfg created
daemonset.apps/kube-flannel-ds created
kubectl get nodes
[root@k8s-master ~]# kubectl get nodes
NAME         STATUS   ROLES    AGE   VERSION
k8s-master   Ready    master   50m   v1.19.4
k8s-node1    Ready    <none>   29m   v1.19.4
Because the label of the node node is, we need to mark the label manually
[root@k8s-master ~]# kubectl label node k8s-node1 node-role.kubernetes.io/worker=worker
node/k8s-node1 labeled
[root@k8s-master ~]# kubectl get nodes
NAME         STATUS   ROLES    AGE   VERSION
k8s-master   Ready    master   58m   v1.19.4
k8s-node1    Ready    worker   36m   v1.19.4
So far, the k8s environment has been built.