kubernetes persistent storage PV and PVC
1. Introduction of PV and PVC
Volume provides a very good data persistence scheme, but there are still deficiencies in manageability.
Take the previous example of AWS EBS. To use Volume, Pod must know the following information in advance:
The current Volume is from AWS EBS.
The EBS Volume has been created in advance and the exact volume ID is known.
The Pod is usually maintained by the application developer, while the Volume is usually maintained by the storage system administrator. Developers need to get the above information:
Or ask the administrator.
Or you're the administrator.
This brings a management problem: the responsibilities of application developers and system administrators are coupled. If the system scale is small or for the development environment, it is acceptable. However, when the cluster size becomes larger, especially for the generation environment, considering efficiency and security, this has become a problem that must be solved.
The solutions given by Kubernetes are PersistentVolume and PersistentVolumeClaim.
A persistent Volume (PV) is a piece of storage space in an external storage system that is created and maintained by an administrator. Like Volume, PV is persistent and its life cycle is independent of Pod.
Persistent volume claim (PVC) is a claim for PV. PVC is usually created and maintained by ordinary users. When storage resources need to be allocated to the Pod, the user can create a PVC to indicate the capacity and access mode (such as read-only) of the storage resources. Kubernetes will find and provide qualified PV.
With PersistentVolumeClaim, users only need to tell Kubernetes what storage resources they need, without caring about the underlying details such as where the real space is allocated and how to access it. The underlying information of these storage providers is handled by the administrator. Only the administrator should care about the details of creating a PersistentVolume.
2. Persistent storage through NFS
2.1 configuring nfs
Install nfs on all nodes
[root@k8s-master]# yum install -y nfs-common nfs-utils
Create a shared directory on the master node
[root@k8s-master]# mkdir /nfsdata
Authorized shared directory
[root@k8s-master]# chmod 666 /nfsdata
Edit exports file
[root@k8s-master]# vim /etc/exports
/nfsdata *(rw,no_root_squash,no_all_squash,sync)
Configuration effective
Start rpc and nfs (note the order)
[root@k8s-master]# systemctl start rpcbind
[root@k8s-master]# systemctl start nfs
# Make configuration effective
[root@k8s-master]# exportfs -r
#Check whether the configuration is effective
[root@k8s-master]# exportfs
/nfsdata      	<world>
As a preparatory work, we have built an NFS server on the k8s master node. The directory is / nfsdata:
2.2 create PV
Next, create a PV mypv1 configuration file nfs-pv1 YML as follows:
[root@k8s-master ~]# vim nfs-pv1.yml
apiVersion: v1
kind: PersistentVolume
metadata:
  name: mypv1
spec:
  capacity:
    storage: 1Gi
  accessModes:
    - ReadWriteOnce
  persistentVolumeReclaimPolicy: Recycle
  storageClassName: nfs
  nfs:
    path: /nfsdata
    server: 192.168.119.163  #Specify the address of the machine where the nfs directory is located
-
Capacity specifies that the capacity of PV is 1G.
-
accessModes specifies that the access mode is ReadWriteOnce. The supported access modes are:
ReadWriteOnce – PV can mount to a single node in read-write mode.
ReadOnlyMany – PV can mount to multiple nodes in read only mode.
ReadWriteMany – PV can mount to multiple nodes in read-write mode. -
persistentVolumeReclaimPolicy specifies that when the recycling policy of PV is Recycle, the supported policies are:
Retain – the administrator needs to recycle manually.
Recycle – clear the data in PV. The effect is equivalent to executing rm -rf /thevolume / *.
Delete – delete the corresponding storage resources on the Storage Provider, such as AWS EBS, GCE PD, Azure Disk, OpenStack Cinder Volume, etc. -
storageClassName specifies that the class of PV is nfs. It is equivalent to setting a classification for PV. PVC can specify class to apply for PV of corresponding class.
-
Specify the directory corresponding to PV on NFS server.
Create mypv1:
[root@k8s-master ~]# kubectl apply -f nfs-pv1.yml

STATUS is Available, indicating that mypv1 is ready and can be applied by PVC.
2.3 creating PVC
Next, create the PVC mypvc1 configuration file nfs-pvc1 YML as follows:
[root@k8s-master ~]# vim nfs-pvc1.yml
apiVersion: v1
kind: PersistentVolumeClaim
metadata:
  name: mypvc1
spec:
  accessModes:
    - ReadWriteOnce
  resources:
    requests:
      storage: 1Gi
  storageClassName: nfs
PVC is very simple. You only need to specify the capacity, access mode and class of PV.
Execute the command to create mypvc1:
[root@k8s-master ~]# kubectl apply -f nfs-pvc1.yml

From the output of kubectl get pvc and kubectl get pv, you can see that mypvc1 has Bound to mypv1 and the application is successful.
2.4 creating a pod
pv and pvc have been created above. You can directly use this pvc in pod
[root@k8s-master ~]# vim pod1.yml
apiVersion: v1
kind: Pod
metadata:
  name: mypod1
spec:
  containers:
    - name: mypod1
      image: busybox
      args:
      - /bin/sh
      - -c
      - sleep 30000
      volumeMounts:
      - mountPath: "/mydata"
        name: mydata
  volumes:
    - name: mydata
      persistentVolumeClaim:
        claimName: mypvc1
Similar to the format of using a normal Volume, specify the Volume requested using mypvc1 through persistentVolumeClaim in volumes.
Create mypod1 with the command:
[root@k8s-master ~]# kubectl apply -f pod1.yml

2.5 verification
[root@k8s-master ~]# docker exec -it mypod1 /bin/sh
/ # ls mydata/
/ # echo "do you think I look like someone who can" > mydata / Hello txt
/ # ls mydata/
hello.txt
/ # exit
[root@k8s-master ~]# ls /nfsdata/    #It can also be viewed in the shared directory of nfs, indicating that the volume sharing is successful
hello.txt
[root@k8s-master ~]# cat /nfsdata/hello.txt
hello
 Visible, in Pod Files created in /mydata/hello.txt It has indeed been saved to NFS Server directory /nfsdata Yes.
If no longer needed PV,Available delete PVC recovery PV.

Here, you can try to delete the file on either side, and the file will disappear at both ends;

3. Recovery of PV
When pv is no longer needed, it can be recycled by deleting pvc. Before deleting pvc, the status of pv is Bound

Delete pod
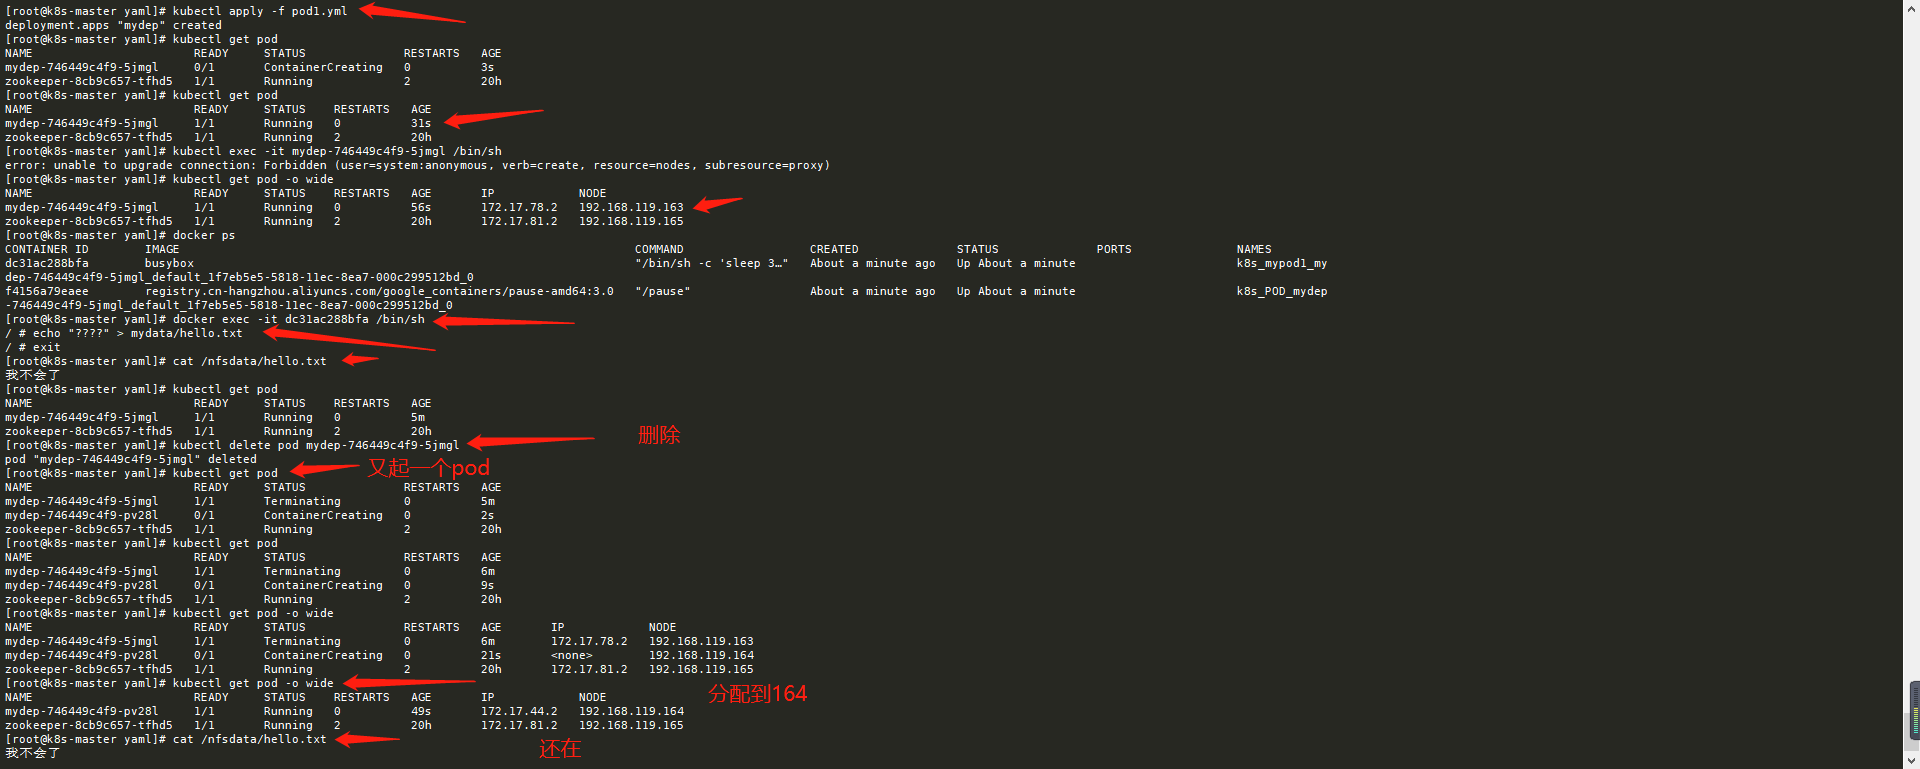
[root@k8s-master yaml]# kubectl delete pod mypod1
Delete pvc
[root@k8s-master yaml]# kubectl delete pvc mypvc1
Check the status of pv again
[root@k8s-master yaml]# kubectl get pv
After deleting PVC, the status of pv becomes Available. At this time, it can be applied for by new PVC after unbinding.
/The files in the nfsdata file were deleted

Because the recycling policy of PV is set to Recycle, the data will be cleared,
But this may not be the result we want. If we want to Retain data, we can set the policy to Retain
[root@k8s-master yaml]# vim nfs-pv1.yml
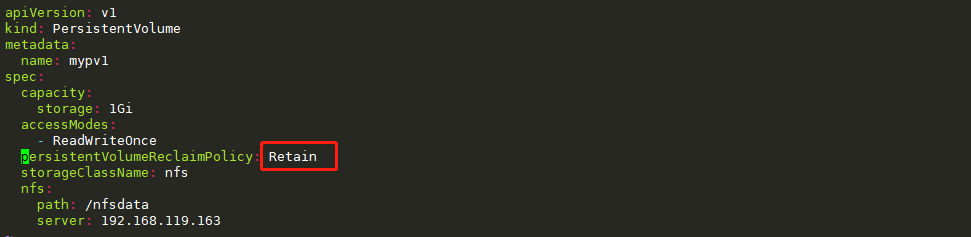
[root@k8s-master yaml]# kubectl apply -f nfs-pv1.yml

The recycling policy has been changed to Retain. Verify its effect through the following steps:
# Recreate mypvc1
[root@k8s-master yaml]# kubectl apply -f nfs-pvc1.yml
# Recreate the pod and reference mypvc1
[root@k8s-master yaml]# kubectl apply -f pod1.yml
# Enter the pod and create a file
[root@k8s-master yaml]# kubectl get pod -o wide
NAME                       READY     STATUS    RESTARTS   AGE       IP            NODE
mypod1                     1/1       Running   0          1m        172.17.44.2   192.168.119.164
# Come to 164
[root@k8s-node01]# docker exec -it mypod1 /bin/sh
/ # echo 'do you think I can' > mydata / Hello txt
/ # ls mydata/
hello.txt
/ # exit

# Verify in nfs directory
[root@k8s-master yaml]# ls /nfsdata/
hello.txt
[root@k8s-master yaml]# cat /nfsdata/hello.txt
Do you think I will

# Delete pod
[root@k8s-master yaml]# kubectl delete -f pod1.yml
pod "mypod1" deleted
[root@k8s-master yaml]# ls /nfsdata/
hello.txt
# Delete pvc (mypvc1)
[root@k8s-master yaml]# kubectl delete pvc mypvc1
persistentvolumeclaim "mypvc1" deleted
[root@k8s-master yaml]# ls /nfsdata/
hello.txt
[root@k8s-master yaml]# cat /nfsdata/hello.txt
Do you think I will

# Found that the data is still retained


Although the data in mypv1 is retained, its PV status will always be Released and cannot be applied by other PVC. In order to reuse storage resources, you can delete and recreate mypv1. The delete operation only deletes the PV object, and the data in the storage space will not be deleted.
[root@k8s-master yaml]# ls /nfsdata/
hello.txt
[root@k8s-master yaml]# kubectl delete pv mypv1
persistentvolume "mypv1" deleted
[root@k8s-master yaml]# ls /nfsdata/
hello.txt
[root@k8s-master yaml]# kubectl apply -f nfs-pv1.yml
persistentvolume/mypv1 created
[root@k8s-master yaml]# kubectl get pod
No resources found in default namespace.
[root@k8s-master yaml]# kubectl get pv

The newly created mypv1 is Available and can be applied by PVC.
PV also supports the recycle policy of Delete, which will Delete the storage space corresponding to PV on the Storage Provider. NFS PV does not support Delete. Providers that support Delete include AWS EBS, GCE PD, Azure Disk, OpenStack Cinder Volume, etc.
4. Static supply of PV / PVC
All nodes Download nfs
yum install -y nfs-common nfs-utils

master Node as nfs Server
[root@k8s-master]# cat /etc/exports
/data/opv *(rw,no_root_squash,no_all_squash,sync)
[root@k8s-master]# chmod 777 -R /data/opv
# Make configuration effective
[root@k8s-master]# exportfs -r
#Check whether the configuration is effective
[root@k8s-master]# exportfs

master Node operation
#1. Definition pv
[root@k8s-master yaml]# vim pv-pod.yaml
apiVersion: v1
kind: PersistentVolume
metadata:
  name: my-pv
spec:
  capacity:
    storage: 5Gi
  accessModes:
    - ReadWriteMany
  nfs:
    path: /data/opv  #Directory shared by nfs server
    server: 192.168.119.163   #Address of nfs server
[root@k8s-master yaml]# kubectl apply -f pv-pod.yaml

#2. Define pvc and deployment
[root@k8s-master yaml]# vim pvc-pod.yaml
apiVersion: apps/v1
kind: Deployment
metadata:
  name: nginx-deployment
spec:
  replicas: 2
  selector:
    matchLabels:
      app: nginx
  template:
    metadata:
      labels:
        app: nginx
    spec:
      containers:
      - name: nginx
        image: nginx
        #The name of the enabled data volume is wwwroot, and it is mounted in the html directory of nginx
        volumeMounts:
        - name: wwwroot
          mountPath: /usr/share/nginx/html
        ports:
        - containerPort: 80
    #Define the name of the data volume as wwwroot and the type as pvc
      volumes:
      - name: wwwroot
        persistentVolumeClaim:
          claimName: my-pvc


---
# Define the data source of pvc and match pv according to the capacity
apiVersion: v1
kind: PersistentVolumeClaim
metadata:
  #Corresponding to the above name
  name: my-pvc
spec:
  accessModes:
    - ReadWriteMany
  resources:
    requests:
      storage: 5G
[root@k8s-master yaml]# kubectl apply -f pvc-pod.yaml

#3. Expose the port
[root@k8s-master yaml]# vim pv-service.yaml
apiVersion: v1
kind: Service
metadata:
  name: pv-svc
spec:
  type: NodePort
  ports:
    - port: 8080
      nodePort: 30001
      targetPort: 80
  selector:   #selector
    app: nginx

# 4. Start
[root@k8s-master yaml]# kubectl apply -f pv-service.yaml
#5.nfs server operation
[root@k8s-master yaml]# echo hello >> /data/opv/index.html
#6. Visit and see the effect


5. Dynamic supply of PV
In the previous example, we created PV in advance, then applied for PV through PVC and used it in Pod. This method is called Static Provision.
The corresponding is dynamic provision, that is, if there is no PV that meets the PVC conditions, it will dynamically create PV. Compared with static supply, dynamic supply has obvious advantages: there is no need to create PV in advance, which reduces the workload of administrators and has high efficiency.
Dynamic provisioning is implemented through StorageClass, which defines how to create PV. The following are two examples.
StorageClass standard
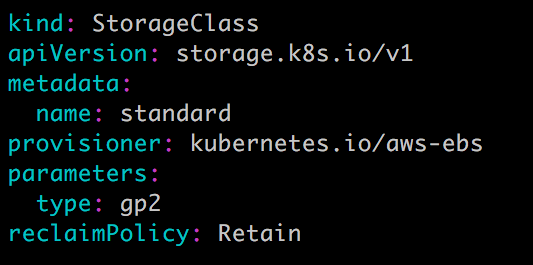
StorageClass slow:

Both storageclasses will dynamically create AWS EBS. The difference is that standard creates gp2 EBS, while slow creates io1 EBs. For parameters supported by different types of EBS, please refer to AWS official documents.
StorageClass supports two reclaimpolicies: Delete and Retain. The default is Delete.
As before, when applying for PV, PVC only needs to specify StorageClass, capacity and access mode, such as:

In addition to AWS EBS, Kubernetes supports a variety of other providers that dynamically supply PV. For a complete list, please refer to https://kubernetes.io/docs/concepts/storage/storage-classes/#provisioner
6. Persistent storage of PV and PVC in applications
[root@k8s-master yaml]# kubectl delete -f pod1.yml
[root@k8s-master yaml]# vim pod1.yml
apiVersion: apps/v1
kind: Deployment
metadata:
  name: mydep
spec:
  selector:
    matchLabels:
      app: busy
  replicas: 1
  template:
    metadata:
      labels:
        app: busy
    spec:
      containers:
        - name: mypod1
          image: busybox
          args:
          - /bin/sh
          - -c
          - sleep 30000
          volumeMounts:
          - mountPath: "/mydata"
            name: mydata
      volumes:
        - name: mydata
          persistentVolumeClaim:
            claimName: mypvc1

[root@k8s-master pv]# kubectl apply -f pod1.yml
[root@k8s-master yaml]# kubectl get pod -o wide
[root@k8s-master yaml]# docker exec -it dc31ac288bfa /bin/sh
/ # echo "I won't" > mydata / Hello txt
/ # exit
Check which node the pod is running on and turn off the node. If another node is found, it will take over, and the data still exists
7. Practical project of persistent storage of PV and PVC in mysql
The following shows how to provide persistent storage for MySQL database. The steps are as follows:
- Create PV and PVC.
- Deploy MySQL.
- Add data to MySQL.
- Simulate node downtime, and Kubernetes will automatically migrate MySQL to other nodes.
- Verify data consistency.
First create PV and PVC with the following configuration:
mysql-pv.yml
# Create persistent directory
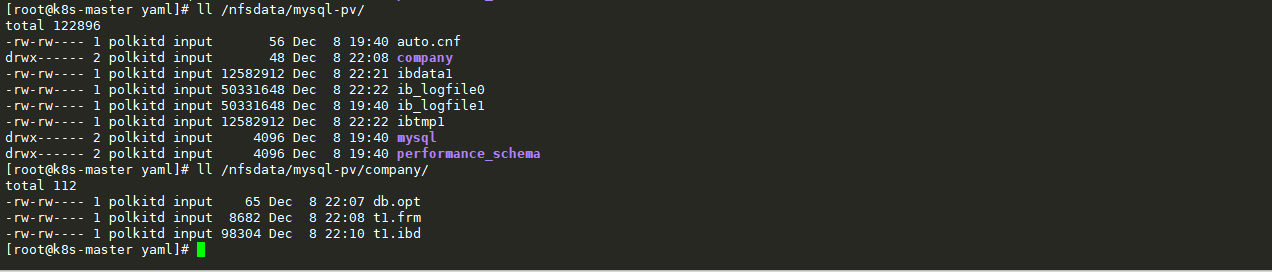
[root@k8s-master yaml]# mkdir /nfsdata/mysql-pv
[root@k8s-master yaml]# vim mysql-pv.yml
apiVersion: v1
kind: PersistentVolume
metadata:
name: mysql-pv
spec:
capacity:
storage: 1Gi
accessModes:
- ReadWriteOnce
persistentVolumeReclaimPolicy: Retain
storageClassName: nfs
nfs:
path: /nfsdata/mysql-pv
server: 192.168.119.163
[root@k8s-master yaml]# kubectl apply -f mysql-pv.yml
mysql-pvc.yml
[root@k8s-master yaml]# vim mysql-pvc.yml
apiVersion: v1
kind: PersistentVolumeClaim
metadata:
  name: mysql-pvc
spec:
  accessModes:
    - ReadWriteOnce
  resources:
    requests:
      storage: 1Gi
  storageClassName: nfs

[root@k8s-master yaml]# kubectl apply -f mysql-pvc.yml

Next, deploy MySQL. The configuration file is as follows:
[root@k8s-master yaml]# vim mysqlpod.yml
apiVersion: v1
kind: Service
metadata:
  name: mysql
spec:
  ports:
  - port: 3306
  selector:
    app: mysql
---
apiVersion: apps/v1
kind: Deployment
metadata:
  name: mysql
spec:
  selector:
    matchLabels:
      app: mysql
  template:
    metadata:
      labels:
        app: mysql
    spec:
      containers:
      - image: mysql:5.7.5 #The image here must be selected correctly to ensure that it can be pulled, and variables can be used
        name: mysql
        env:
        - name: MYSQL_ROOT_PASSWORD
          value: password
        ports:
        - containerPort: 3306
          name: mysql
        volumeMounts:
        - name: mysql-persistent-storage
          mountPath: /var/lib/mysql
      volumes:
      - name: mysql-persistent-storage
        persistentVolumeClaim:
          claimName: mysql-pvc

[root@k8s-master yaml]# kubectl apply -f mysqlpod.yml
PVC MySQL PVC bound PV MySQL PV will be mount ed to the MySQL data directory var/lib/mysql.
MySQL is deployed to 163

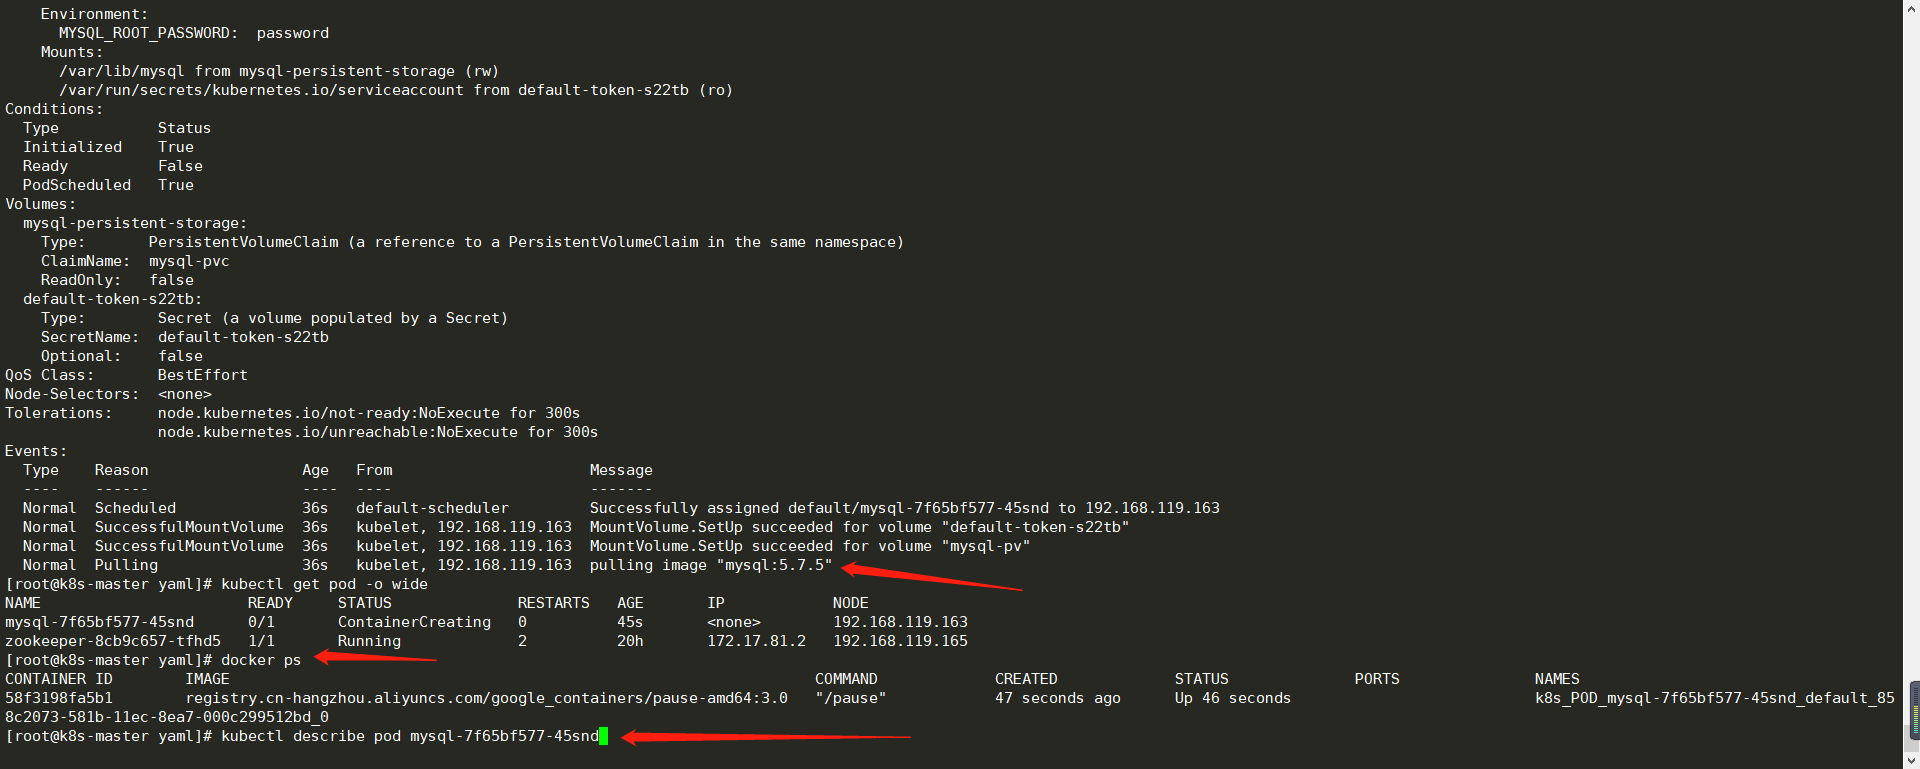
Because it is assigned to the primary node, it cannot be shut down, so delete it and let it reassign the node

Wait for the image to be pulled and start the pod
1. Switch to mysql database.

2. Create the database company and table t1.
[root@k8s-node01 ~]# docker exec -it e0effdbcddb4 bash
root@mysql-7f65bf577-b2ssv:/# mysql -uroot -p
Enter password:
Welcome to the MySQL monitor.  Commands end with ; or \g.
Your MySQL connection id is 1
Server version: 5.7.5-m15 MySQL Community Server (GPL)

Copyright (c) 2000, 2014, Oracle and/or its affiliates. All rights reserved.

Oracle is a registered trademark of Oracle Corporation and/or its
affiliates. Other names may be trademarks of their respective
owners.

Type 'help;' or '\h' for help. Type '\c' to clear the current input statement.

mysql> create database company;
create database  company;
Query OK, 1 row affected (0.03 sec)

mysql> show databases;
+--------------------+
| Database           |
+--------------------+
| information_schema |
| company            |
| mysql              |
| performance_schema |
+--------------------+
4 rows in set (0.02 sec)
mysql> use company;
Database changed
mysql> create table t1(Sno char(9) primary key,Sname char(20) not null,Ssex char(2),Sage smallint,Sdept char(20));
Query OK, 0 rows affected (0.07 sec)
3. Insert data.
Add table data
mysql> insert into t1(Sno,Sname,Ssex,Sage,Sdept)values('202112081','Li Si','male','20','CS');
Query OK, 1 row affected (0.02 sec)

mysql> insert into t1(Sno,Sname,Ssex,Sage,Sdept)values('202112082','Zhang San','female','19','CS');
Query OK, 1 row affected (0.01 sec)

mysql> insert into t1(Sno,Sname,Ssex,Sage,Sdept)values('202112083','Wang Wu','female','18','MA');
Query OK, 1 row affected (0.00 sec)

mysql> insert into t1(Sno,Sname,Ssex,Sage,Sdept)values('202112085','Pockmarks','male','19','IS');
Query OK, 1 row affected (0.01 sec)
4. Confirm that the data has been written.
mysql> show tables;
+-------------------+
| Tables_in_company |
+-------------------+
| t1                |
+-------------------+
1 row in set (0.01 sec)

mysql> select * from t1;
+-----------+-------+------+------+-------+
| Sno       | Sname | Ssex | Sage | Sdept |
+-----------+-------+------+------+-------+
| 202112081 |       |      |   20 | CS    |
| 202112082 |       |      |   19 | CS    |
| 202112083 |       |      |   18 | MA    |
| 202112085 |       |      |   19 | IS    |
+-----------+-------+------+------+-------+
4 rows in set (0.00 sec)
You can see that the data has been written. Due to coding problems, Chinese characters are not recognized. Is there a problem? no problem!
If you have problems, modify the code yourself.
Close k8s-node01 to simulate node downtime.
# Shutdown node01
[root@k8s-node01 ~]# poweroff
# The master needs to wait for some time to view mysql
[root@k8s-master yaml]# kubectl get pod -o wide
NAME                       READY     STATUS    RESTARTS   AGE       IP            NODE
mysql-7f65bf577-b2ssv      1/1       Unknown   0          2h        172.17.44.2   192.168.119.164
mysql-7f65bf577-hkvld      1/1       Running   0          9s        172.17.78.2   192.168.119.163

# Verify data consistency:
# Because node1 node has been down, the master node takes over the task, and the pod transfer needs to wait for a period of time, about five minutes

[root@k8s-master yaml]# docker exec -it 7f001e01d786 bash
root@mysql-7f65bf577-hkvld:/# mysql -uroot -p
Enter password:
Welcome to the MySQL monitor.  Commands end with ; or \g.
Your MySQL connection id is 1
Server version: 5.7.5-m15 MySQL Community Server (GPL)

Copyright (c) 2000, 2014, Oracle and/or its affiliates. All rights reserved.

Oracle is a registered trademark of Oracle Corporation and/or its
affiliates. Other names may be trademarks of their respective
owners.

Type 'help;' or '\h' for help. Type '\c' to clear the current input statement.

mysql> show databases;
+--------------------+
| Database           |
+--------------------+
| information_schema |
| company            |
| mysql              |
| performance_schema |
+--------------------+
4 rows in set (0.01 sec)

mysql> use company;
Reading table information for completion of table and column names
You can turn off this feature to get a quicker startup with -A

Database changed
mysql> show tables;
+-------------------+
| Tables_in_company |
+-------------------+
| t1                |
+-------------------+
1 row in set (0.00 sec)

mysql> select * from t1;
+-----------+-------+------+------+-------+
| Sno       | Sname | Ssex | Sage | Sdept |
+-----------+-------+------+------+-------+
| 202112081 |       |      |   20 | CS    |
| 202112082 |       |      |   19 | CS    |
| 202112083 |       |      |   18 | MA    |
| 202112085 |       |      |   19 | IS    |
+-----------+-------+------+------+-------+
4 rows in set (0.00 sec)
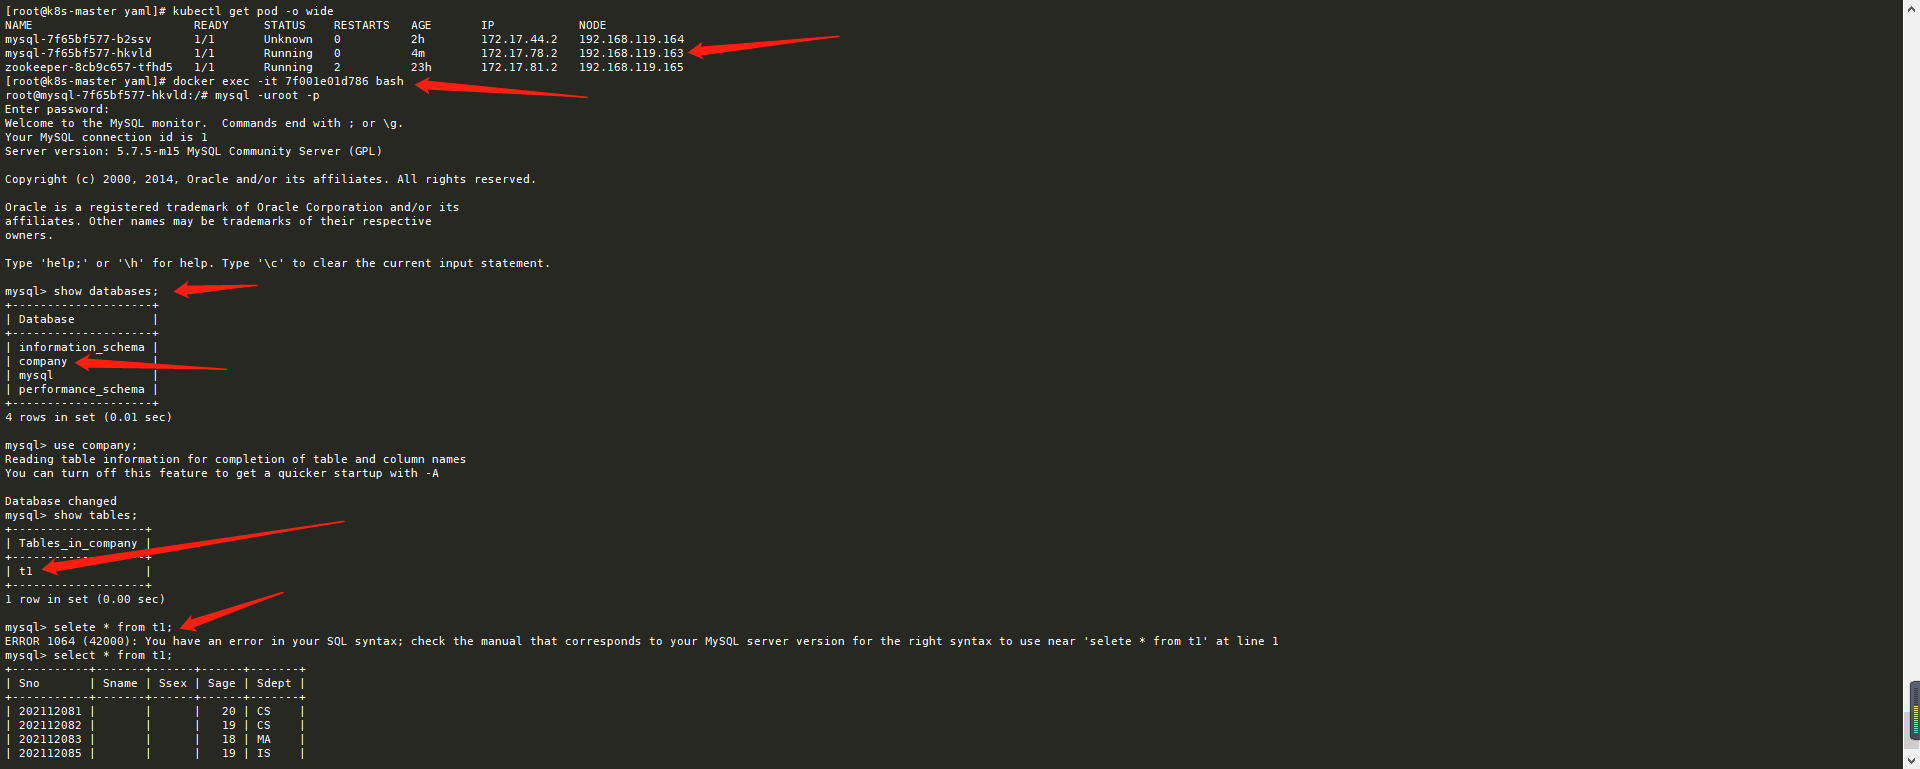
After entering the new pod, the data still exists and the persistence is successful. It's safe.
The MySQL service is restored and the data is intact.