preface
This is the sixth chapter of Kubernetes. We must build up the environment. It seems that we can't solve the problem. We must fight in practice.
Kubernetes series:
Pod scheduling
In Kubernetes, we rarely create a Pod directly. In most cases, we will complete the creation, scheduling and life cycle management of a group of pods through Replication Controller, Deployment, daemon, Job and other controllers. This is because a single Pod cannot meet the concept of high availability and high concurrency proposed by us. In addition, there are some line color requirements in the real production environment:
-
Affinity between different pods. For example, the master-slave MySQL database cannot be allocated to the same node, or two pods must be scheduled to the same node to realize local network, file sharing, etc;
-
For stateful clusters, such as Zookeeper, Kafka and other stateful clusters, each node looks similar, but each node must specify the master node, and there are strict sequence requirements for node startup. In addition, the data in the cluster also needs persistent storage, and how to recover according to the planned information when each working node hangs up;
-
Only one Pod is created for scheduling on each Node. For example, for monitoring Node nodes, only one Node can be deployed for host Node logs and performance collection nodes;
-
For batch scheduling tasks and scheduled scheduling tasks, Pod is required to be destroyed when the call is completed;
Deployment or Replication Controller
The main functions of Deployment and Replication Controller are to automatically deploy multiple replicas of a container application and control the number of replicas. The number of specified replicas is always controlled within the cluster.
-
Delete existing resource information;
#Delete pod
kubectl delete -f nginx-deployment.yaml
-
Edit the nginx-deployment.yaml file;
#Edit nginx-deployment.yaml
apiVersion: apps/v1
kind: Deployment
#Create a Deployment resource object named nginx Deployment
metadata:
  name: nginx-deployment
spec:
  selector:
    #Find pod by tag
    matchLabels:
      app: nginx
  #Number of copies
  replicas: 3
  template:
    #pod labeling
    metadata:
      labels:
        app: nginx
    spec:
      containers:
      - name: nginx
        image: nginx:latest
        resources:
          limits:
            memory: "128Mi"
            cpu: "128m"
        ports:
        - containerPort: 80
-
Create a Deployment object;
kubectl apply -f nginx-deployment.yaml
-
View the created resource object information;
#Get deployment object information
kubectl get deployment
#Get pod information
kubectl get pod
#Get rs information
kubectl get rs
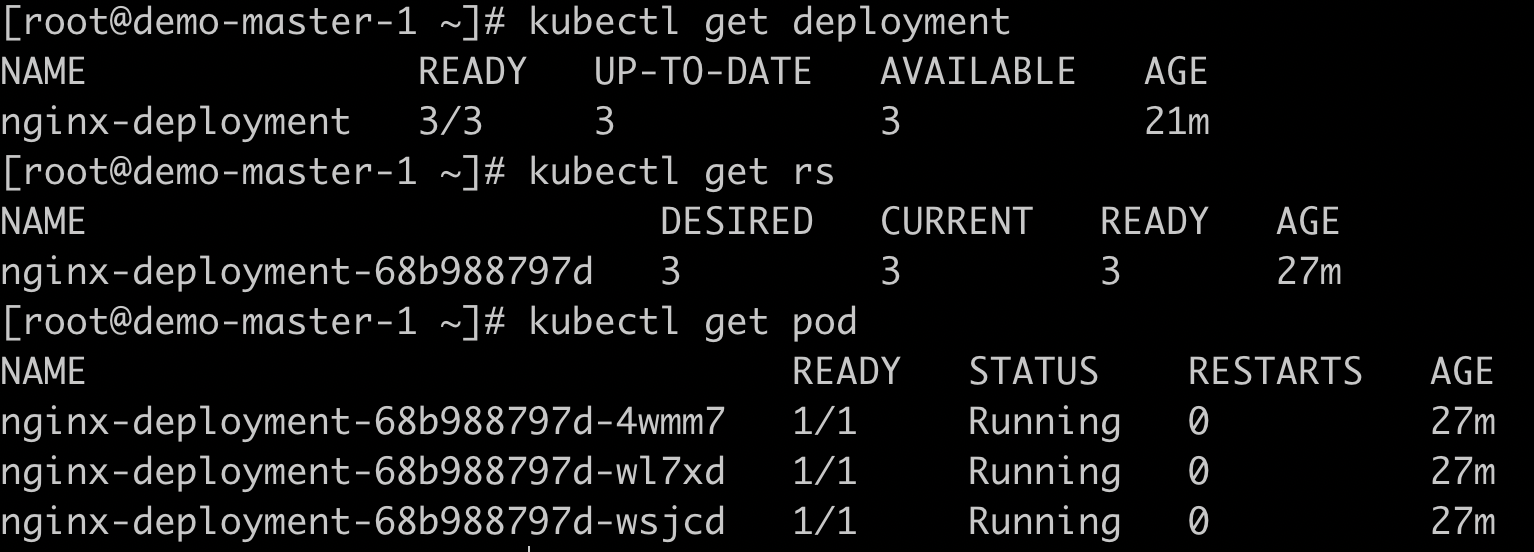
image.png
Note: when defining Deployment resources, matchlabels and template.labels must appear in pairs and have the same name;
Affinity scheduling
NodeSelector
In Kubernetes, Pod scheduling is completed by Kube scheduler, and finally the Pod is scheduled to the best Node. This process is completed automatically. We can't predict that Pod will be allocated to that Node. In actual situations, we may need to schedule Pod to the specified Node, At this time, we can complete the Node directed scheduling by matching the label of the Node with the NodeSelector attribute of the Pod.
-
Delete the existing Pod. Here I bought a temporary ECS from Alibaba cloud to complete the experiment. At present, we are in the state of one master and two slaves. Here I encounter such a problem. You can Reference solution
#Delete pod
kubectl delete -f nginx-deployment.yaml
#View node
kubectl get nodes
-
Label nodes;
#View node details
kubectl get nodes
#Label nodes
kubectl label nodes demo-work-1 zone=hangzhou
#View node labels
kubectl get node --show-labels

image.png
-
Edit the nginx-deployment.yaml file;
apiVersion: apps/v1
kind: Deployment
metadata:
  name: nginx-deployment
spec:
  selector:
    matchLabels:
      app: nginx
  replicas: 3
  template:
    metadata:
      labels:
        app: nginx
    spec:
      containers:
      - name: nginx
        image: nginx:latest
        resources:
          limits:
            memory: "128Mi"
            cpu: "128m"
        ports:
        - containerPort: 80
      #node selector
      nodeSelector:
        zone: hangzhou
-
Create a Deployment object;
kubectl apply -f nginx-deployment.yaml
-
Check the distribution of Pod nodes. Here, we will find that Pod nodes are scheduled to demo-work-1 nodes;
#View more node information of pod
kubectl get pods -o wide
Note: when we specify the NodeSelector condition of the Pod, if there is no Node with the same label in the cluster, the Pod cannot be scheduled successfully, and the running Pod is also included.
NodeSelector completes the directional scheduling of nodes by labeling. This affinity scheduling mechanism greatly improves the Pod scheduling capability of Kubernetes and helps Kubernetes better meet our requirements. However, the NodeSelector scheduling method is still too simple. Therefore, Kubernetes also provides two dimensions of affinity scheduling functions: NodeAffinity and PodAffinity.
NodeAffinity
NodeAffinity is translated as Node affinity scheduling to replace NodeSelector. NodeAffinity currently has two expressions of affinity:
-
requiredDuringSchedulingIgnoredDuringExecution: indicates that the pod must be deployed to nodes that meet the conditions. If there is no node that meets the conditions, it will keep trying again;
-
preferredDuringSchedulingIgnoredDuringExecution: it means that the nodes that meet the conditions are preferentially deployed. If there are no nodes that meet the conditions, these conditions will be ignored. According to the normal logic, the rules of multiple priority levels can also set weights;
Ignored duringexecution means that the node where the Pod is located changes during operation and does not comply with the affinity rules of the Pod node. The system will not affect the Pod that has been running on the node.
-
Delete the existing Pod, label the new Node with zone=shanghai, and view the Node list;
#Delete pod
kubectl delete -f nginx-deployment.yaml
#Label Shanghai
kubectl label nodes demo-work-2 zone=shanghai
#Look at the Node tag
kubectl get node --show-labels

image.png
-
The Node has been labeled in the last actual battle, so here we directly edit the nginx-deployment.yaml file;
apiVersion: apps/v1
kind: Deployment
metadata:
  name: nginx-deployment
spec:
  selector:
    matchLabels:
      app: nginx
  replicas: 10
  template:
    metadata:
      labels:
        app: nginx
    spec:
      containers:
      - name: nginx
        image: nginx:latest
        resources:
          limits:
            memory: "128Mi"
            cpu: "128m"
        ports:
        - containerPort: 80
      affinity:
        nodeAffinity:
          #Give priority to matching nodes in hangzhou   Second, match shanghai
          preferredDuringSchedulingIgnoredDuringExecution:
            - weight: 80
              preference:
                matchExpressions:
                - key: zone
                  operator: In
                  values:
                    - hangzhou
            - weight: 20
              preference:
                matchExpressions:
                - key: zone
                  operator: In
                  values:
                    - shanghai
-
Create a Deployment object;
kubectl apply -f nginx-deployment.yaml
-
View the distribution of Pod nodes;
#View more node information of pod
kubectl get pods -o wide
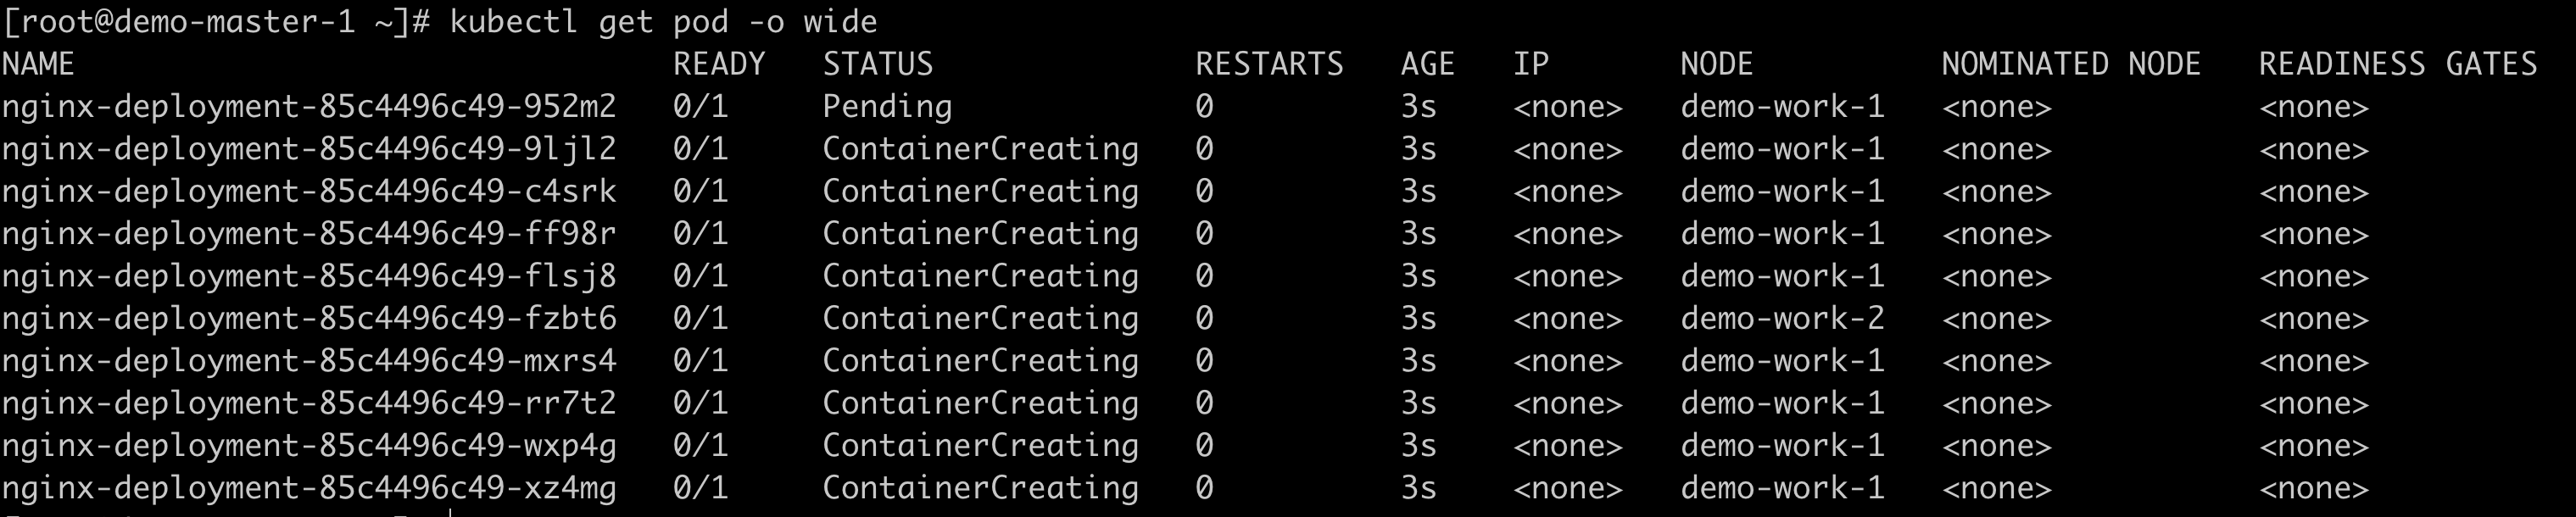
image.png
In the configuration, we can see that operators can be used. The operator types are as follows:
-
In: indicates that all information should be in the list of value;
-
NotIn: the value of the tag is not in a list;
-
Exists: a label exists;
-
DoesNotExist: a tag does not exist;
-
Gt: the value of the tag is greater than a certain value;
-
Lt: the value of the tag is less than a certain value;
Note:
-
If nodeSelector and nodeAffinity are set at the same time, two conditions must be met at the same time before Pod can run on the final node:
-
If multiple nodeSelectorTerms are specified at the same time, the matching can be successful as long as one of them is satisfied;
-
If nodeSelectorTerms has multiple matchExpressions, all matchExpressions must be met before running Pod;
PodAffinity And PodAntiAffinity
There is a class of pods in the production environment. They depend on each other. They are required to be deployed to the same Node as much as possible. For example, the front-end and back-end of the application are deployed together to reduce access latency, or some pods are required to stay away from each other in order to avoid competition between pods. This is the affinity or mutual exclusion between pods. Pod affinity also has two rules: required during scheduling ignored during execution and preferred during scheduling ignored during execution.
-
Delete Pod;
#Delete pod
kubectl delete -f nginx-deployment.yaml
-
Edit the nginx-deployment.yaml file, change the Pod name to backend, and adjust the number of nodes to 3;
apiVersion: apps/v1
kind: Deployment
metadata:
  name: nginx-deployment
spec:
  selector:
    matchLabels:
      app: backend
  replicas: 3
  template:
    metadata:
      labels:
        app: backend
    spec:
      containers:
      - name: nginx
        image: nginx:latest
        resources:
          limits:
            memory: "128Mi"
            cpu: "128m"
        ports:
        - containerPort: 80
      affinity:
        nodeAffinity:
          #Give priority to matching nodes in hangzhou   Second, match shanghai
          preferredDuringSchedulingIgnoredDuringExecution:
            - weight: 80
              preference:
                matchExpressions:
                - key: zone
                  operator: In
                  values:
                    - hangzhou
            - weight: 20
              preference:
                matchExpressions:
                - key: zone
                  operator: In
                  values:
                    - shanghai
-
Create a new file, podAffinity-deployment.yaml, and select a Pod labeled zone and app=backend;
apiVersion: apps/v1
kind: Deployment
metadata:
  name: podaffinitydemo
spec:
  selector:
    matchLabels:
      app: frontend
  replicas: 3
  template:
    metadata:
      labels:
        app: frontend
    spec:
      containers:
      - name: nginx
        image: nginx:latest
        resources:
          limits:
            memory: "128Mi"
            cpu: "128m"
        ports:
        - containerPort: 80
      affinity:
        #Affinity
        podAffinity:
          requiredDuringSchedulingIgnoredDuringExecution:
            #Select the label key as zone
            - topologyKey: zone
              labelSelector:
                #Must match to zone=hangzhou   app=backend
                matchExpressions:
                - key: app
                  operator: In
                  values:
                    - backend
-
Create Deployment resources;
kubectl apply -f nginx-deployment.yaml
kubectl apply -f podAffinity-deployment.yaml
-
View the distribution of Pod nodes;
#View more node information of pod
kubectl get pods -o wide

image.png
PodAntiAffinity is anti affinity. It can appear in the configuration file together with PodAffinity. Similar to node affinity, operators can also be used in Pod affinity. Compared with node affinity, there is a required value topologyKey. The following precautions are taken for the use of topologyKey:
-
topologyKey must appear for the anti affinity of Pod and affinity of Pod of requiredDuringSchedulingIgnoredDuringExecution;
-
For the Pod anti affinity of requiredDuringSchedulingIgnoredDuringExecution, a LimitPodHardAntiAffinityTopology admission controller is introduced to limit that the topologyKey can only be kubernetes.io/hostname. If you want to use a custom topology domain, you can modify the admission controller or disable it directly;
-
For the Pod anti affinity of preferredDuringSchedulingIgnoredDuringExecution, an empty topologyKey represents all topological domains. All topology domains can only be a combination of kubernetes.io/hostname, failure-domain.beta.kubernetes.io/zone and failure-domain.beta.kubernetes.io/region;
-
In addition to the above, topologyKey can be any legal tag key;
In addition to labelSelector and topologyKey, you can also specify a namespace, and labelSelector can match it. If omitted or empty, it defaults to the namespace of the Pod affinity / anti affinity definition.
Taints and Tolerations
Affinity can help the pod to schedule to the specified node, but in a complex production environment, when a node has a problem, we don't want another pod to be scheduled to the node. The problem here is not that the node is dead, but that the disk is full, CPU and memory are insufficient. At this time, we can mark the node Taint, Pod will not be scheduled to this node. There is another special case. Sometimes we still need to schedule the pod to the node marked Taint. At this time, we set the tolerance attribute for the pod to meet the Taint node.
-
Mark the node Taint;
#Stain demo-work-1   The key name is   notRam, the key value is   true, the effect is NoSchedule
kubectl taint nodes demo-work-1 notRam=true:NoSchedule
#Stain demo-work-2   The key name is   haha, the key value is   true, the effect is NoSchedule
kubectl taint nodes demo-work-2 haha=true:NoSchedule
#Remove stains
kubectl taint nodes demo-work-1 notRam=true:NoSchedule-
-
Edit tolerance-pod.yaml and set the tolerance attribute to ensure that the node is scheduled to the corresponding stain;
apiVersion: v1
kind: Pod
metadata:
  name: nginx
  labels:
    env: test
spec:
  containers:
  - name: nginx
    image: nginx:latest
    imagePullPolicy: IfNotPresent
  #Set tolerance
  tolerations:
  - key: "notRam"
    operator: "Equal"
    value: "true"
    effect: "NoSchedule"
-
Create Pod resources;
kubectl apply -f toleration-pod.yaml
-
View the distribution of Pod nodes;
#View more node information of pod
kubectl get pods -o wide

image.png
There are two values for operator:
-
When the operator is Exists, it is not necessary to set the value of value;
-
When the operator is Equal, their value s must be Equal;
scheduling strategy
The system allows the same Node to set multiple Taint tags and Pod to set multiple tolerance attributes. Kubernetes processes multiple taints and tolerations like a filter: first list all taints and ignore the matching taints in the Pod. The remaining taints have the following three situations:
-
If effect=NoSchedule exists in the remaining taints, the scheduler will not assign the Pod to this node;
-
If there is no NoSchedule in the remaining taints, but there is a stain of PreferNoSchedule, the scheduler will try not to assign the Pod to the node;
-
If NoExecute exists in the remaining taints, if a Pod runs on this node, it will be expelled; If it is not running on the node, it will not be scheduled to the node;
Expulsion strategy
For Taint with NoExecute set, there will be expulsion policy for running Pod:
-
Pod s without acceleration will be expelled immediately;
-
Configure the Pod of the tolerance. If the tolerance seconds is not set, one runs on the node;
-
If you configure the acceleration Pod and set the acceleration seconds, you will be expelled after the specified time. Note that in case of Node failure, the system will gradually add taints to the Node according to the speed limit mode to avoid a large number of pods being expelled under specific circumstances;
Automatically added acceleration
Kubernetes will silently add the following two types of tolerance to Pod:
-
The key is node.kubernetes.io/not-ready, and tollationseconds = 300;
-
The key is node.kubernetes.io/unreachable, and the tollationseconds = 300;
The automatically added tolerance means that when one of the problems is detected, the Pod can continue to run on the current node for 5 minutes by default, rather than being expelled immediately, so as to avoid fluctuations in the system.
Add Taint by criteria
Since version 1.6, Kubernetes has introduced two new Taint related features, tainnodesbycondition and TaintBasedEvictions, to improve the Pod scheduling and expulsion problem. The process after transformation is as follows:
-
Constantly check the status of all nodes and set corresponding conditions;
-
Continuously set the corresponding Taint according to the Node Condition;
-
Continuously drive out the Pod on the Taint Node;
Among them, checking the status of the Node and setting the taint of the Node is the feature of TaintNodesByCondition. Taint will be automatically added to the Node when the following conditions are met:
-
node.kubernetes.io/unreachable: the node is unreachable, and the corresponding NodeCondition Ready is Unknown;
-
node.kubernetes.io/not-ready: the node is not ready, and the corresponding NodeCondition Ready is False;
-
node.kubernetes.io/disk-pressure: node disk is full;
-
node.kubernetes.io/network-unavailable: node network is unavailable;
-
Node.kubernetes.io/unscheduled (version 1.10 or higher): the node cannot be scheduled;
Kubernetes will be enabled by default from 1.13. TaintNodesByCondition will only set NoSchedule and add taint for nodes; TaintBasedEvictions will only add NoExecute to the node to add Taint. After the feature is turned on, the scheduler will add NoExecute Taint to the corresponding Node when there is resource pressure. If no corresponding Toleration is set, Pod will be expelled immediately, so as to ensure that Node will not crash.
Priority scheduling
When the cluster resources are insufficient, when we need to create a Pod, the Pod will be in the Pending state. Even if the Pod is a particularly important Pod, we need to wait for the scheduler to Release other resources before the call can succeed. In view of this situation, Kubernetes introduced the Pod with priority scheduling in 1.8. When resources are insufficient and a Pod with higher priority needs to be scheduled, Kubernetes will try to Release some resources with lower priority to meet the scheduling of resources with higher priority. It will be officially released in version 1.14.
-
Define PriorityClass and name it prioritydemo.yaml;
apiVersion: scheduling.k8s.io/v1
kind: PriorityClass
metadata:
  name: high-priority
value: 1000000
globalDefault: false
description: "For priority calls"
-
Define any Pod and use priority scheduling;
apiVersion: v1
kind: Pod
metadata:
  name: nginx
  labels:
    env: test
spec:
  containers:
  - name: nginx
    image: nginx:latest
    imagePullPolicy: IfNotPresent
  priorityClassName: high-priority
-
Create resources;
#Create priority scheduling resources
kubectl apply -f prioritydemo.yaml
#Create pod
kubectl apply -f priority-pod.yaml
PriorityClass
PriorityClass is a nameless object that defines the mapping from the priority class name to the priority integer value. The higher the value, the higher the priority. The name of the PriorityClass object must be a valid DNS subdomain name and it cannot be prefixed with system -.
Note on using PriorityClass:
-
If you upgrade an existing cluster that has not yet used priority scheduling, the priority of the existing Pod in the cluster is equivalent to 0;
-
Adding a PriorityClass with globalDefault set to true will not change the priority of the existing Pod. The value of this PriorityClass is only used for the Pod created after adding PriorityClass;
-
If you delete a PriorityClass object, the existing Pod with the deleted PriorityClass name will remain unchanged, but you can no longer create a Pod with the deleted PriorityClass name;
Note that the use of priority preemptive scheduling strategy will cause some pods to never be scheduled. Priority scheduling not only increases the complexity of the system, but also brings many unstable factors. It is recommended to give priority to capacity expansion when resources are tight.
DeamonSet
DeamonSet ensures that a copy of the Pod is running on the Node. When nodes join the cluster, a Pod will also be added for them. When a Node is removed from the cluster, the Pod will also be recycled. Deleting a DaemonSet will delete all pods it creates. DeamonSet scheduling strategy is similar to RC. In addition to the built-in algorithm to ensure scheduling on nodes, NodeSelector and NodeAffinity can also be defined on Pod to schedule nodes that meet specified conditions.
-
Delete Pod;
kubectl delete -f priority-pod.yaml
-
Create a new fluentd-deamonset.yaml file and mount the / var/log and / var/lib/docker/containers directories of the physical machine;
apiVersion: apps/v1
kind: DaemonSet
metadata:
  name: fluentd-elasticsearch
spec:
  selector:
    matchLabels:
      name: fluentd-elasticsearch
  template:
    metadata:
      labels:
        name: fluentd-elasticsearch
    spec:
      containers:
      - name: fluentd-elasticsearch
        image: fluentd:latest
        resources:
          limits:
            memory: 200Mi
          requests:
            cpu: 100m
            memory: 200Mi
        volumeMounts:
        - name: varlog
          mountPath: /var/log
        - name: varlibdockercontainers
          mountPath: /var/lib/docker/containers
          readOnly: true
      terminationGracePeriodSeconds: 30
      volumes:
      - name: varlog
        hostPath:
          path: /var/log
      - name: varlibdockercontainers
        hostPath:
          path: /var/lib/docker/containers
-
Create DeamonSet resources;
kubectl apply -f fluentd-deamonset.yaml
-
View the distribution of Pod nodes;
#View more node information of pod
kubectl get pods -o wide

image.png
DaemonSet scene
-
Run the cluster daemon on each node;
-
Run the log collection daemon on each node;
-
Running monitoring daemon on each node;
Taints and Tolerations
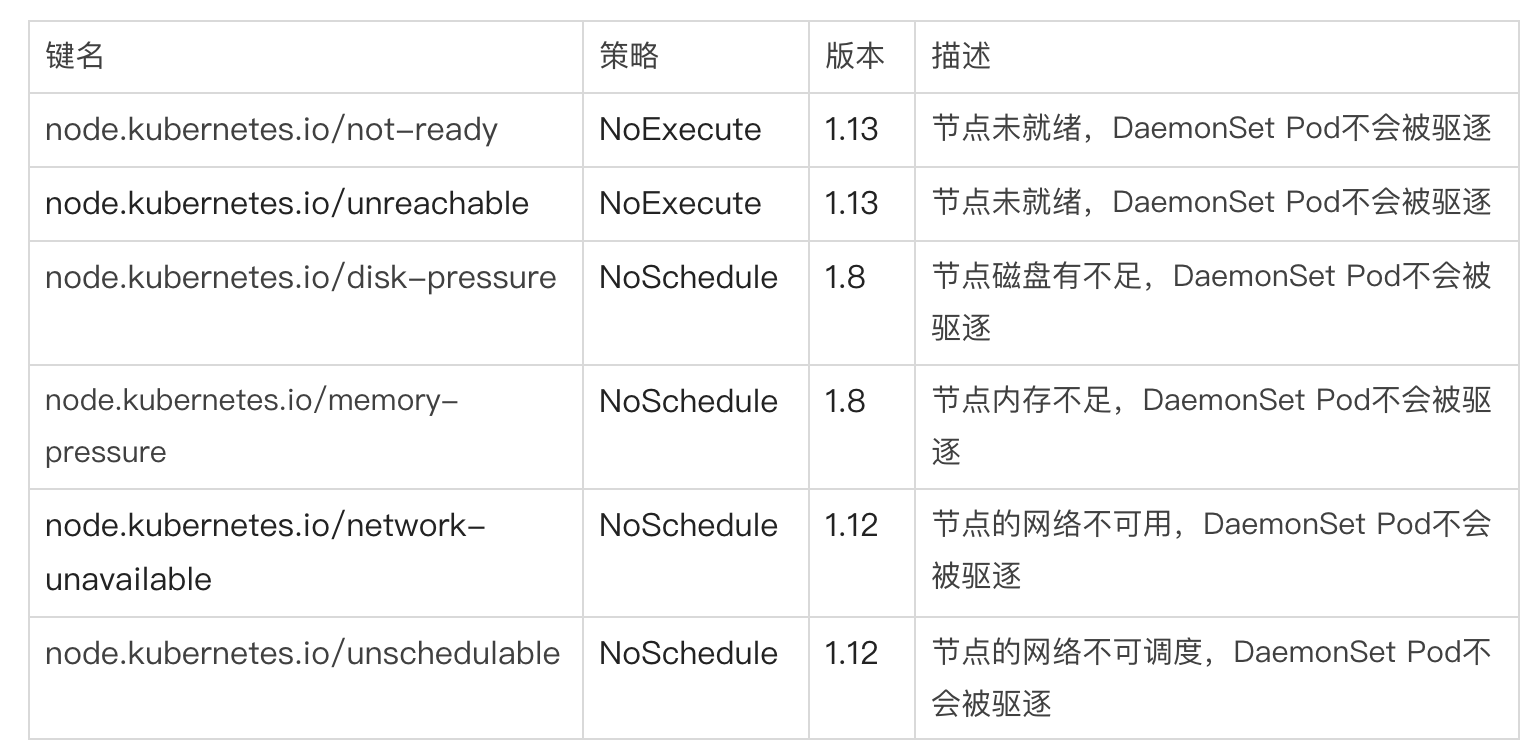
image.png
Batch scheduling
We often encounter such scenarios. There is a large amount of data to be calculated. At this time, we need batch tasks to process. Kubernetes can define and start batch tasks through jobs. Batch tasks usually process a work item in parallel with multiple computing nodes. After processing, the whole batch task ends, According to different implementation methods, it can be divided into the following situations:
-
Job Template Expansion mode: a job object corresponds to a work item to be processed, and several work items correspond to several jobs. It is usually suitable for scenarios with a small number of work items and a large amount of data processed by each work item;
-
Queue with Pod Per Work Item mode: a task queue is used to store work items, and a Job object is used as a consumer to consume these work items. In this mode, each Pod corresponds to a work item. When a work item is processed, the Pod ends;
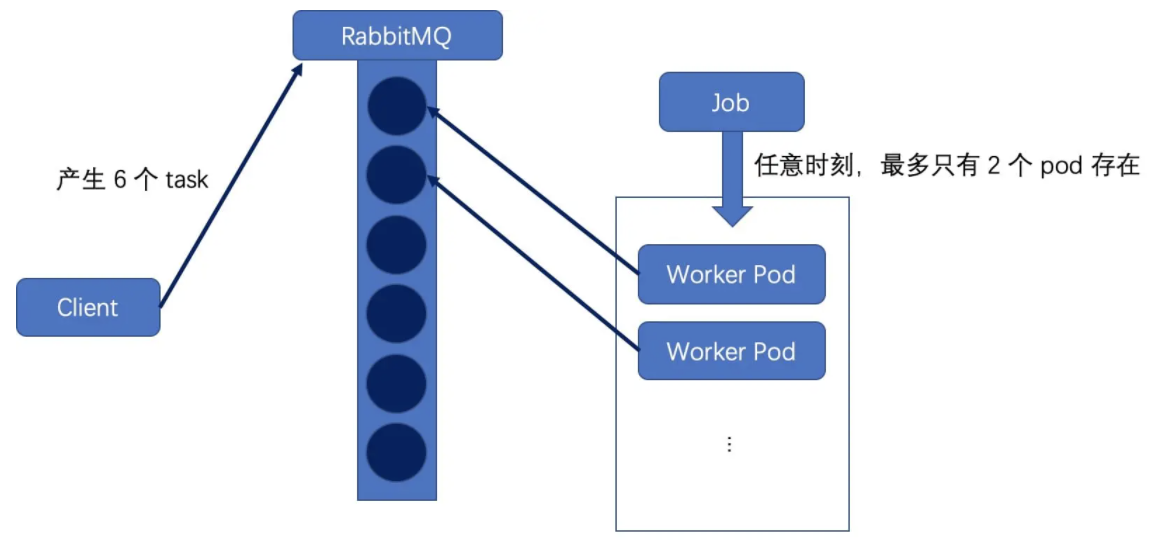
image.png
-
Queue with Variable Pod Count mode: similarly, a task queue is used to store task items, and a Job object is used as a consumer to consume these task items. Each Pod continuously goes to the queue to pull task items. After completion, it continues to go to the queue to remove task items. The Pod does not exit until there are no tasks in the queue. In this case, as long as one Pod exits successfully, it means that the whole Job ends;
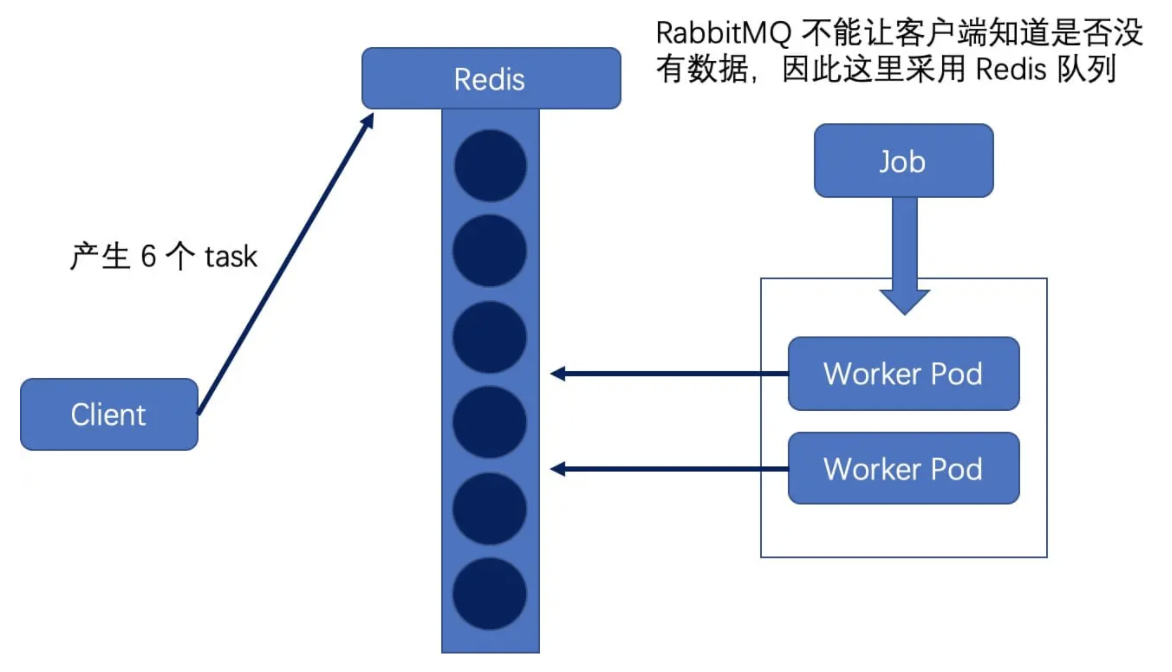
image.png
-
Create a new busybox-job.yaml file;
apiVersion: batch/v1
kind: Job
metadata:
  name: jobdemo
  labels:
    jobgroup: jobexample
spec:
  template:
    metadata:
      name: jobexample
      labels:
        jobgroup: jobexample
    spec:
      containers:
      - name: c
        image: busybox
        command: ["sh", "-c", "echo job demo && sleep 5"]
      restartPolicy: Never
-
Create Job resources;
kubectl apply -f busybox-job.yaml
-
View Job resources;
kubectl get jobs -l jobgroup=jobexample
-
Check the output content;
kubectl logs -f -l jobgroup=jobexample

image.png
Timing scheduling
There is also a periodic task in our daily requirements. Kubernetes can create periodic tasks through CronJobs, such as performing database backup regularly. In addition, it can also use the independent tasks used by CronJobs to perform at a specified time, such as executing a Job when the cluster is idle.
-
Create the file hello-cronjob.yaml to print Hello Word every minute;
apiVersion: batch/v1
kind: CronJob
metadata:
  name: hello
spec:
  schedule: "*/1 * * * *"
  jobTemplate:
    spec:
      template:
        spec:
          containers:
          - name: hello
            image: busybox
            imagePullPolicy: IfNotPresent
            command:
            - /bin/sh
            - -c
            - date; echo Hello Word
          restartPolicy: OnFailure
-
Create CronJob resources;
kubectl apply -f hello-cronjob.yaml
-
View CronJob resources;
kubectl get cronJob hello
-
Check the output content, and we will find that a Pod is scheduled every 1 minute;
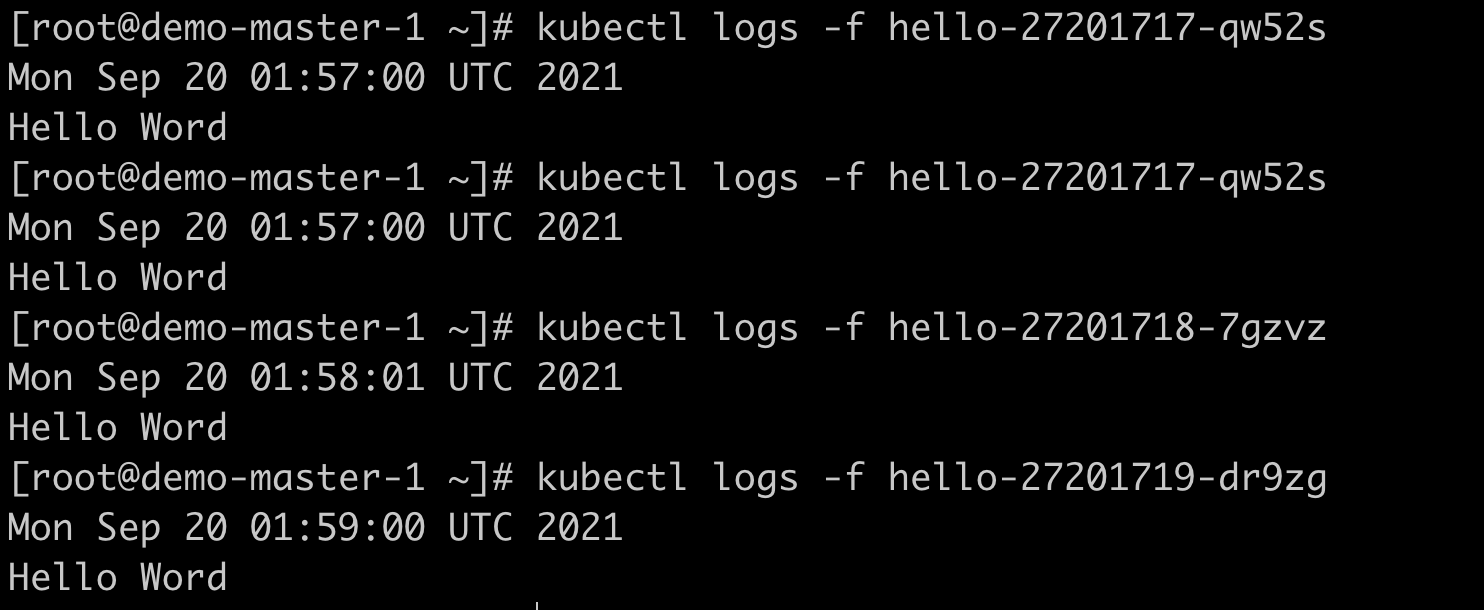
image.png
end
Welcome to pay attention and praise!