dispatch
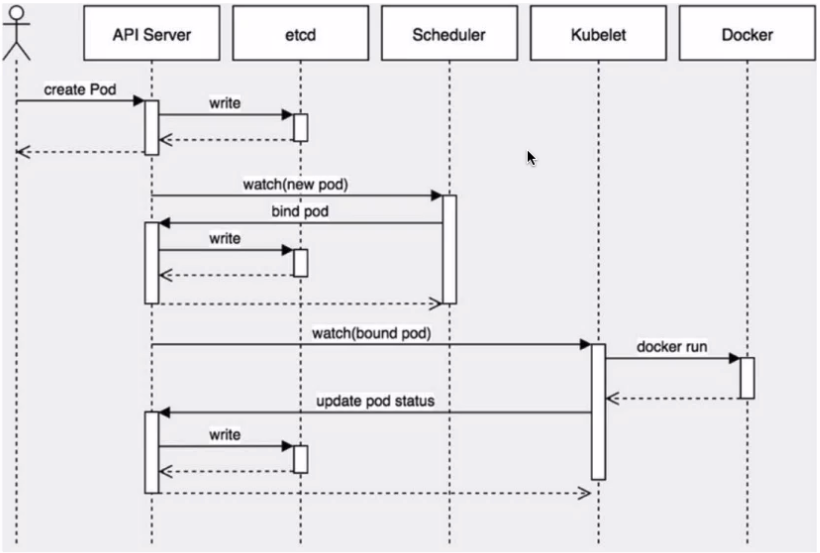
Create a pod workflow
kubernetes realizes the decoupling of interaction between components based on the controller architecture of list watch mechanism.
Other components monitor their own resources. When these resources change, Kube apiserver will notify these components. This process is similar to publish and subscribe.
Main attributes affecting scheduling in pod
apiVersion: apps/v1
kind: Deployment
metadata:
  name: web
  namespace: default
spec:
...
    containers:
    - image: lizhenliang/java-demo
      name: java-demo
      imagePullPolicy: Always
      livenessProbe:
        initialDelaySeconds: 30
        periodSeconds: 20
        tcpSocket:
          port: 8080
    respurces: {}       ## Resource scheduling basis
restartPolicy: Always
schedulerName: default-scheduler    ## The following are the scheduling policies
nodeName: ""
nodeSelector: {}
affinity: {}
tolerations: []

Impact of resource constraints on pod scheduling
Container resource limit:
- resources.limits.cpu
- resources.limits.memory
The minimum resource requirement used by the container is used as the basis for resource allocation during container scheduling:
- resources.requests.cpu
- resources.requests.memory
CPU unit: you can write either m or floating-point number, for example, 0.5=500m, 1=1000m
apiVersion: v1
kind: Pod
metadata:
  name: web
spec:
  containers:
  - name: web
    image: nginx
    resources:
      requests:
        memory: "64Mi"
        cpu: "250m"
      limits:
        memory: "128Mi"
        cpu: "500m"
K8s will find nodes with sufficient resources according to the value of Request to schedule this Pod
nodeSelector&nodeAffinity
nodeSelector: used to schedule the Pod to the Node matching the Label. If there is no matching Label, the scheduling will fail.
effect:
- Constrain the Pod to run on a specific node
- Exactly match node labels
Application scenario:
- Private Node: manage nodes in groups according to business lines
- Equipped with special hardware: some nodes are equipped with SSD hard disk and GPU
Example: make sure that the pod is assigned to a node with a specific SSD hard disk
Step 1: add labels to nodes
format: kubectl label nodes <node-name> <label-key> =<label-value>
for example: kubectl label nodes k8s-node1 disktype=ssd
 verification: kubectl get nodes --show-labels
Step 2: add nodeSelector field to Pod configuration
Finally, verify that:
kubectl get pods -o wide
apiVersion: v1
kind: Pod
metadata:
  name: pod-example
spec:
  nodeSelector:
    disktype: "ssd"
  containers:
  - name: nginx
    image: nginx:1.19
nodeAffinity: node affinity, which has the same function as nodeSelector, but is more flexible and meets more conditions, such as:
- Matching has more logical combinations, not just the exact equality of strings
- Scheduling is divided into soft strategy and hard strategy, not hard requirements
- Required: must meet
- Preferred: try to meet, but not guarantee
Operators: ln, Notln, Exists, DoesNotExist, Gt, Lt
apiversion: v1
kind: Pod
metadata:
  name: with-node-affinity
spec:
  affinity:
    nodeAffinity:
      requiredDuringSchedulinglgnoredDuringExecution:
        nodeSelectorTerms:
        - matchExpressions:
          - key: gpu
            operator: In
            values:
            - nvidia-tesla
      preferredDuringSchedulinglgnoredDuringExecution:
      - weight: 1
        preference:
          matchExpressions:
          - key: group
          operator: In
          values:
          - ai
  containers:
  - name: web
    image: nginx
Taint & tolerances
Taints: avoid point scheduling to specific nodes
Accelerations: allows the Pod to be scheduled to the Node that holds the Taints
Application scenario:
- Private Node: nodes are grouped and managed according to the business line. It is hoped that this Node will not be scheduled by default. Allocation is allowed only when stain tolerance is configured
- Equipped with special hardware: some nodes are equipped with SSD, hard disk and GPU. It is hoped that the Node will not be scheduled by default. The allocation is allowed only when stain tolerance is configured
- Taint based expulsion
Step 1: add a stain to the node
format: kubectl taint node [node] key=value:[effect]
for example: kubectl taint node k8s-node1 gpu=yes:NoSchedule
 verification: kubectl describe node k8s-node1 lgrep Taint
Where [effect] can be taken as:
- NoSchedule: must not be scheduled
- PreferNoSchedule: try not to schedule. Tolerance must be configured
- NoExecute: not only will it not be scheduled, it will also expel the existing Pod on the Node
Step 2: add the stain tolerance field to the Pod configuration
Remove stains:
kubectl taint node [node] key:[effect]-
apiversion: v1
kind: Pod
metadata:
  name: pod-taints
spec:
  containers:
  - name: pod-taints
    image: busybox:latest
  tolerations:
  - key: "gpu"
    operator: "Equal"
    value: "yes"
    effect:"NoSchedule"
nodeName
nodeName: Specifies the Node name. It is used to schedule the Pod to the specified Node. The Node name passes through the scheduler
apiVersion: v1
kind: Pod
metadata:
  name: pod-example
  labels:
    app: nginx
spec:
  nodeName: k8s-node2
  containers:
  - name: nginx
    image: nginx:1.15
Resource scheduling
The scheduling strategies in Kubernetes are mainly divided into global scheduling and runtime scheduling. The global scheduling policy is configured when the scheduler starts, The runtime scheduling strategy mainly includes node selector, Node Affinity, pod affinity and anti affinity. The features of Node Affinity, podAffinity / anti affinity and Taints and tolerances to be introduced later are in Beta in kuberntes 1.6.
Set node label
Label is one of the core concepts of Kubernetes. It is attached to various objects in the form of key/value, such as Pod, Service, Deployment, Node, etc. to identify these objects and manage the association relationship, such as the association between Node and Pod.
Get all nodes in the current cluster:
[root@master ~]# kubectl  get nodes
NAME                 STATUS   ROLES                  AGE    VERSION
master.example.com   Ready    control-plane,master   2d2h   v1.23.1
node1.example.com    Ready    <none>                 2d2h   v1.23.1
node2.example.com    Ready    <none>                 2d2h   v1.23.1
View node default label:
[root@master ~]# kubectl get node node1.example.com --show-labels
NAME                STATUS   ROLES    AGE    VERSION   LABELS
node1.example.com   Ready    <none>   2d2h   v1.23.1   beta.kubernetes.io/arch=amd64,beta.kubernetes.io/os=linux,kubernetes.io/arch=amd64,kubernetes.io/hostname=node1.example.com,kubernetes.io/os=linux
Set label for the specified node:
[root@master ~]# kubectl  label node node1.example.com disktype=ssd
node/node1.example.com labeled
Confirm whether the node label is set successfully:
[root@master ~]# kubectl get node node1.example.com --show-labels
NAME                STATUS   ROLES    AGE    VERSION   LABELS
node1.example.com   Ready    <none>   2d2h   v1.23.1   beta.kubernetes.io/arch=amd64,beta.kubernetes.io/os=linux,disktype=ssd,kubernetes.io/arch=amd64,kubernetes.io/hostname=node1.example.com,kubernetes.io/os=linux

[root@master ~]# kubectl get nodes -l disktype=ssd
NAME                STATUS   ROLES    AGE    VERSION
node1.example.com   Ready    <none>   2d2h   v1.23.1
Select node (nodeSelector)
Nodeselector is currently the simplest pop runtime scheduling restriction, which is currently in kubernetes1 Versions 7. X and below are available. Pod.spec.nodeSelector selects nodes through the label-selector mechanism of kubernetes. The scheduler schedules the policy to match label, and then schedules pod to the target node, which is a mandatory constraint. The nodeAffinity to be mentioned later has all the functions of nodeselector, so kubernetes will abolish nodeselector in the future.
nodeSelector example:
Set label
[root@master ~]# kubectl  label node node1.example.com disktype=ssd
node/node1.example.com labeled
View nodes that meet the requirements of non master nodes and whose disktype type is ssd:
[root@master ~]# kubectl get nodes -l 'role!=master, disktype=ssd'
NAME                STATUS   ROLES    AGE    VERSION
node1.example.com   Ready    <none>   2d2h   v1.23.1
pod.yaml file content:
[root@master ~]# vi pod.yml
---
apiVersion: v1
kind: Pod
metadata:
  name: nginx
  labels:
    app: nginx
spec:
  containers:
  - name: nginx
    image: nginx
    imagePullPolicy: IfNotPresent
  nodeSelector:
    disktype: ssd
To create a pod:
[root@master ~]# kubectl apply -f pod.yml
pod/nginx created
Check that pod nginx is scheduled to run on the expected node:
[root@master ~]# kubectl get pod nginx -o  wide
NAME    READY   STATUS    RESTARTS   AGE     IP            NODE                NOMINATED NODE   READINESS GATES
nginx   1/1     Running   0          9m35s   10.244.1.31   node1.example.com   <none>           <none>
Note: if it is not the default namespace, you need to specify a specific namespace, for example:
kubectl -n kube-system get pods -o wide
Built in label example
yaml file content:
[root@master ~]# vi pod.yml
---
apiVersion: v1
kind: Pod
metadata:
  name: nginx
  labels:
    app: nginx
spec:
  containers:
  - name: nginx
    image: nginx
    imagePullPolicy: IfNotPresent
  nodeSelector:
    kubernetes.io/hostname: node1.example.com
Create a pod and check that the results meet expectations. The pod is scheduled at the preset node node1 example. com
[root@master ~]# kubectl apply -f pod.yml
pod/nginx unchanged
[root@master ~]# kubectl get pod nginx -o wide
NAME    READY   STATUS    RESTARTS   AGE   IP            NODE                NOMINATED NODE   READINESS GATES
nginx   1/1     Running   0          63s   10.244.1.32   node1.example.com   <none>           <none>
Affinity and anti affinity
The nodeSelector mentioned earlier only enforces the restriction of pod scheduling to the specified node in a very simple way, that is, label. Affinity and anti affinity are more flexible in assigning pods to the expected nodes. Compared with nodeSelector, affinity and anti affinity have the following advantages:
- The expressive grammar is more diversified and is no longer limited to mandatory constraints and matching.
- The scheduling rule is no longer a hard constraint, but a soft limit or preference.
- Specify which pod s can be deployed in the same / different topology.
Affinity is mainly divided into three types: node affinity and inter pod affinity / anti affinity, which will be described in detail below.
Node affinity
Node affinity is introduced as an alpha in Kubernetes 1.2, which covers the nodeSelector function. It is mainly divided into two types: required duringschedulingignored duringexecution and preferredduringschedulingignored duringexecution. The former can be regarded as a kind of mandatory restriction. If the label of a node changes and it does not meet the scheduling requirements of the pod, the pod scheduling will fail. The latter can be understood as soft limit or preference. Similarly, if the label of the node changes, resulting in it no longer meeting the scheduling requirements of the pod, the pod will still schedule and run.
Node affinity example
Set node label:
[root@master ~]# kubectl label nodes node1.example.com  cpu=high
node/node1.example.com labeled

[root@master ~]# kubectl  label node node1.example.com disktype=ssd
node/node1.example.com labeled


[root@master ~]# kubectl label nodes node2.example.com  cpu=low
node/node2.example.com labeled
It is expected to deploy pod to a machine with ssd type hard disk (disktype=ssd) and high CPU configuration (cpu=high).
To view nodes that meet the criteria:
[root@master ~]# kubectl get nodes -l 'cpu=high, disktype=ssd'
NAME                STATUS   ROLES    AGE    VERSION
node1.example.com   Ready    <none>   2d3h   v1.23.1
pod.yaml file contents are as follows:
apiVersion: v1
kind: Pod
metadata:
  name: nginx
  labels:
    app: nginx
spec:
  affinity:
    nodeAffinity:
      requiredDuringSchedulingIgnoredDuringExecution:
        nodeSelectorTerms:
        - matchExpressions:
          - key: disktype
            operator: In
            values:
            - ssd
      preferredDuringSchedulingIgnoredDuringExecution:
      - weight: 1
        preference:
          matchExpressions:
          - key: cpu
            operator: In
            values:
            - high
  containers:
  - name: nginx
    image: nginx
    imagePullPolicy: IfNotPresent
The inspection results are in line with expectations. pod nginx is successfully deployed to the machine with ssd type hard disk and high CPU configuration.
[root@master ~]# kubectl  get pod nginx -o wide
NAME    READY   STATUS    RESTARTS   AGE   IP            NODE                NOMINATED NODE   READINESS GATES
nginx   1/1     Running   0          27s   10.244.1.33   node1.example.com
Taints and tolerances
For Node affinity, both hard and preference methods are used to schedule pods to the expected nodes, while taints is just the opposite. If a node is marked as taints, unless the point is also identified as a stain tolerant node, the taints node will not be scheduled Pod. Taints and tolerances are currently in beta,
Taints node application scenarios, for example, users want to reserve the Kubernetes Master node for Kubernetes system components, or reserve a group of special resources for some pods. The pod will no longer be scheduled to the taint marked node.
Examples of taint tag nodes are as follows:
[root@master ~]# kubectl taint node node1.example.com cpu=high:NoSchedule
node/node1.example.com tainted


[root@master ~]# kubectl apply -f pod.yml
pod/nginx created
[root@master ~]# kubectl  get pods
NAME    READY   STATUS    RESTARTS   AGE
nginx   0/1     Pending   0          6s
If you still want a pod to be dispatched to the taint node, you must make a tolerance definition in the Spec to dispatch to the node, for example:
[root@master ~]# vim pod.yml
---
apiVersion: v1
kind: Pod
metadata:
  name: nginx
  labels:
    app: nginx
spec:
  affinity:
    nodeAffinity:
      requiredDuringSchedulingIgnoredDuringExecution:
        nodeSelectorTerms:
        - matchExpressions:
          - key: disktype
            operator: In
            values:
            - ssd
      preferredDuringSchedulingIgnoredDuringExecution:
      - weight: 1
        preference:
          matchExpressions:
          - key: cpu
            operator: In
            values:
            - high
  containers:
  - name: nginx
    image: nginx
    imagePullPolicy: IfNotPresent
  tolerations:
  - key: "cpu"
    operator: "Equal"
    value: "high"
    effect: "NoSchedule"


[root@master ~]# kubectl apply -f pod.yml
pod/nginx configured
[root@master ~]# kubectl  get pods
NAME    READY   STATUS    RESTARTS   AGE
nginx   1/1     Running   0          3m48s
effect has three options, which can be set according to actual needs:
- NoSchedule: pod will not be scheduled to nodes marked tails.
- PreferNoSchedule: the "preference" or "soft" version of NoSchedule.
- NoExecute: this option means that once Taint takes effect, if the running Pod in this node does not have a corresponding tolerance setting, it will be evicted directly.