1 k8s workload controller
What is the workload controller?
-
Workload Controllers is an abstract concept of K8s, which is used for higher-level objects, deployment and management of Pod.
-
Workloads are applications running on kubernetes.
-
Whether your load is a single component or multiple components working together, you can run it in a set of Pods in Kubernetes. In Kuberneres, pod represents a set of containers running on the cluster.
-
Kubernetes Pods has a defined life cycle. For example, when a Pod runs in your cluster and a fatal error occurs on the node where the Pod runs, all Pods on that node will fail. Kubernetes regards such failures as the final state: even if the node returns to normal operation later, you need to create a new Pod to restore the application.
-
However, in order to make life a little easier for users, you don't need to manage each Pod directly. Instead, you can use load resources to manage a set of Pods for you. These resource configuration controllers ensure that the number of Pods of the appropriate type and running state is correct and consistent with the state you specify.
Common workload controllers:
- Deployment
- StatefulSet
- DaemonSet
- Job
- CronJob
Function of controller:
- Manage Pod objects
- Associate with Pod using tag
- The controller realizes the operation and maintenance of Pod, such as rolling update, scaling, replica management, maintaining Pod status, etc

2 Deployment
-
A Deployment provides declarative update capabilities for Pods and ReplicaSets.
-
You are responsible for describing the target state in the Deployment, and the Deployment controller changes the actual state to the desired state at a controlled rate. You can define a Deployment to create a new ReplicaSet, or delete an existing Deployment and adopt its resources through the new Deployment.
-
Deployment is very suitable for managing stateless applications on your cluster. All pod s in deployment are equivalent to each other and are replaced when necessary.
Functions of Deployment:
Based on ReplicaSet, it can provide declarative updates for Pod and ReplicaSet resources. It has the following features:
- Event and status view: you can view the detailed progress and status of the Deployment object upgrade
- Rollback: when a problem is found after the upgrade operation is completed, the application can be returned to the specified historical version
- Version record: save every operation of the Deployment object
- Pause and start: each upgrade can be paused and started at any time
- Multiple automatic update schemes: Recreate update, RollingUpdate rolling update
Application scenario:
- website
- Microservices
- APi

The update strategy of Deployment is described as follows:
RollingUpdate strategy: the number of pods of old controllers is decreasing, while the number of pods of new controllers is increasing. The following two attributes:
- maxSurge: the maximum number of total pods existing during upgrade can exceed the expected value, which can be a value or percentage.
- Maxunavailable: the number of normally available pods (old and new versions) during upgrade cannot be less than the expected number at most, which can be a value or percentage.
Create Deployment
[root@master mainfest]# vim deploy.yaml
apiVersion: apps/v1
kind: Deployment
metadata:
  name: deploy
  labels:
    app: nginx
spec:
  replicas: 3
  selector:
    matchLabels:
      app: nginx
  template:
    metadata:
      labels:
        app: nginx
    spec:
      containers:
      - name: nginx
        image: nginx:latest
        ports:
        - containerPort: 80

[root@master mainfest]# kubectl apply -f deploy.yaml
deployment.apps/deploy created
[root@master mainfest]# kubectl get pod
NAME                     READY   STATUS    RESTARTS   AGE
deploy-6799fc88d8-qmw4h   1/1     Running   0          46s
deploy-6799fc88d8-xn6mk   1/1     Running   0          46s
deploy-6799fc88d8-2dmrq   1/1     Running   0          46s
In this example:
A deployment named deploy (indicated by the. metadata.name field) was created
This deployment creates three (indicated by the replicas field) copies of the pod
The selector field defines how Deployment finds Pods to manage. Here, you can select the tag (app: nginx) defined in the Pod template. However, more complex selection rules are also possible, as long as the Pod template itself meets the given rules.
The template field contains the following subfields:
Pod is labeled app: nginx using the labels field.
The Pod template specification (i.e. the. template.spec field) instructs Pods to run an nginx container that runs the nginx Docker Hub image of version 1.14.2.
Create a container and name it nginx using the name field.
3 ReplicaSet
The purpose of ReplicaSet is to maintain a stable set of Pod replicas that are running at any time. Therefore, it is usually used to ensure the availability of a given number of identical pods.
How ReplicaSet works
-
RepicaSet is defined by a set of fields, including a selection operator that identifies the set of available pods, a value used to indicate the number of copies that should be maintained, a Pod template used to specify that a new Pod should be created to meet the conditions for the number of copies, and so on. Each ReplicaSet uses the provided Pod template when it creates a new Pod as needed.
-
ReplicaSet via metadata. On Pod The ownerReferences field is connected to the affiliated Pod, which gives the master resource of the current object. The Pod obtained by the ReplicaSet contains the identification information of the master ReplicaSet in its ownerReferences field. It is through this connection that ReplicaSet knows the state of the Pod set it maintains and plans its operation behavior accordingly.
-
The ReplicaSet uses its selection operator to identify the Pod set to obtain. If a Pod does not have an OwnerReference or its OwnerReference is not a controller, and it matches the selection operator of a ReplicaSet, the Pod is immediately obtained by the ReplicaSet.

Differences among ReplicationController, ReplicaSet and Deployment
-
ReplicaSet is a new generation of ReplicationController, and it is recommended to use it instead of - ReplicationController to replicate and manage Pod.
-
At the same time, when using Deployment, the actual Pod is created and managed by the Deployment's replicate, rather than directly created and managed by the Deployment.
-
Every time the Deployment publishes, an RS will be created as a record for rollback
When to use ReplicaSet
-
ReplicaSet ensures that a specified number of Pod replicas are running at any time. However, Deployment is a more advanced concept that manages the ReplicaSet and provides declarative updates and many other useful functions to the Pod. Therefore, we recommend using Deployment instead of directly using ReplicaSet, unless you need to customize the update business process or do not need to update at all.
-
This actually means that you may never need to manipulate the ReplicaSet object: instead, use Deployment and define your application in the spec section.
Example:
[root@master mainfest]# vim replicaset.yaml
apiVersion: apps/v1
kind: ReplicaSet
metadata:
  name: replicaset
  labels:
    app: httpd
    tier: frontend
spec:
  replicas: 3
  selector:
    matchLabels:
      tier: frontend
  template:
    metadata:
      labels:
        tier: frontend
    spec:
      containers:
      - name: httpd
        image: httpd:latest

[root@master mainfest]# kubectl apply -f replicaset.yaml
replicaset.apps/replicaset created
[root@master mainfest]# kubectl get rs
NAME               DESIRED   CURRENT   READY   AGE
deploy-585449566   3         3         3       94m
replicaset         3         3         2       49s
[root@master mainfest]# kubectl get pod
NAME                     READY   STATUS    RESTARTS   AGE
deploy-6799fc88d8-qmw4h   1/1    Running   0          46s
deploy-6799fc88d8-xn6mk   1/1    Running   0          46s
deploy-6799fc88d8-2dmrq   1/1    Running   0          46s
replicaset-de35r         1/1     Running   0          54s
replicaset-l4kx4         1/1     Running   0          54s
replicaset-f295r         1/1     Running   0          54s
4 DaemonSet
The DaemonSet controller ensures that each Node in the cluster only runs a specific Pod copy, implements system level background tasks, and also has a label selector. You can also specify nodes that partially meet the conditions to run a Pod copy, such as monitoring nodes with ssd storage.
It is often used to deploy some cluster log, monitoring or other system management applications. Typical applications include:
- Log collection, such as fluent D, logstash, etc.
- System monitoring, such as Prometheus Node Exporter, collected, New Relic agent, Ganglia gmond, etc.
- System programs, such as Kube proxy, Kube DNS, Glusterd, Ceph, etc.
A simple usage is to start a daemon set on all nodes for each type of daemon. A slightly more complex usage is to deploy multiple daemonsets for the same daemon; Each has different flags, and has different memory and CPU requirements for different hardware types.
Create DaemonSet
You can describe the DaemonSet in the YAML file. For example, the following daemon The YAML file describes a runtime
[root@master mainfest]# vim daemonset.yaml
apiVersion: apps/v1
kind: DaemonSet
metadata:
  name: fluentd-elasticsearch
  namespace: kube-system
  labels:
    k8s-app: fluentd-logging
spec:
  selector:
    matchLabels:
      name: fluentd-elasticsearch
  template:
    metadata:
      labels:
        name: fluentd-elasticsearch
    spec:
      tolerations:
      # this toleration is to have the daemonset runnable on master nodes
      # remove it if your masters can't run pods
      - key: node-role.kubernetes.io/master
        operator: Exists
        effect: NoSchedule
      containers:
      - name: fluentd-elasticsearch
        image: quay.io/fluentd_elasticsearch/fluentd:v2.5.2
        resources:
          limits:
            memory: 200Mi
          requests:
            cpu: 100m
            memory: 200Mi
        volumeMounts:
        - name: varlog
          mountPath: /var/log
        - name: varlibdockercontainers
          mountPath: /var/lib/docker/containers
          readOnly: true
      terminationGracePeriodSeconds: 30
      volumes:
      - name: varlog
        hostPath:
          path: /var/log
      - name: varlibdockercontainers
        hostPath:
          path: /var/lib/docker/containers

//Create view
[root@master mainfest]# kubectl create -f daemonset.yaml
daemonset.apps/fluentd-elasticsearch created
[root@master mainfest]# kubectl get pod -n kube-system
fluentd-elasticsearch-36bv8      1/1     Running   0          23s
fluentd-elasticsearch-b8d73      1/1     Running   0          23s
5 how is daemon pods scheduled
Scheduling via default scheduler
FEATURE STATE: Kubernetes v1.23 [stable]
The daemon set ensures that all eligible nodes run a copy of the Pod. Typically, the node running the Pod is selected by the Kubernetes scheduler. However, the DaemonSet Pods are created and scheduled by the DaemonSet controller. This brings the following problems:
- Inconsistency of Pod behavior: normal pods are in Pending state when waiting for scheduling after being created, and DaemonSet Pods will not be in Pending state after being created. This confuses users.
- Pod preemption is handled by the default scheduler. After preemption is enabled, the DaemonSet controller will make scheduling decisions without considering pod priority and preemption.
ScheduleDaemonSetPods allows you to schedule DaemonSets using the default scheduler instead of the DaemonSet controller by placing NodeAffinity conditions instead of Add the spec.nodeName condition to the DaemonSet Pods. The default scheduler then binds the Pod to the target host. If the node affinity configuration of the DaemonSet Pod already exists, it is replaced (the original node affinity configuration is considered before selecting the target host). The DaemonSet controller performs these operations only when creating or modifying the DaemonSet Pod and does not change the spec.template of the DaemonSet.
nodeAffinity:
  requiredDuringSchedulingIgnoredDuringExecution:
    nodeSelectorTerms:
    - matchFields:
      - key: metadata.name
        operator: In
        values:
        - target-host-name
- In addition, the system automatically adds node kubernetes. IO / unscheduled: NoSchedule tolerance to DaemonSet Pods. When scheduling the DaemonSet Pod, the default scheduler ignores the unscheduled node.
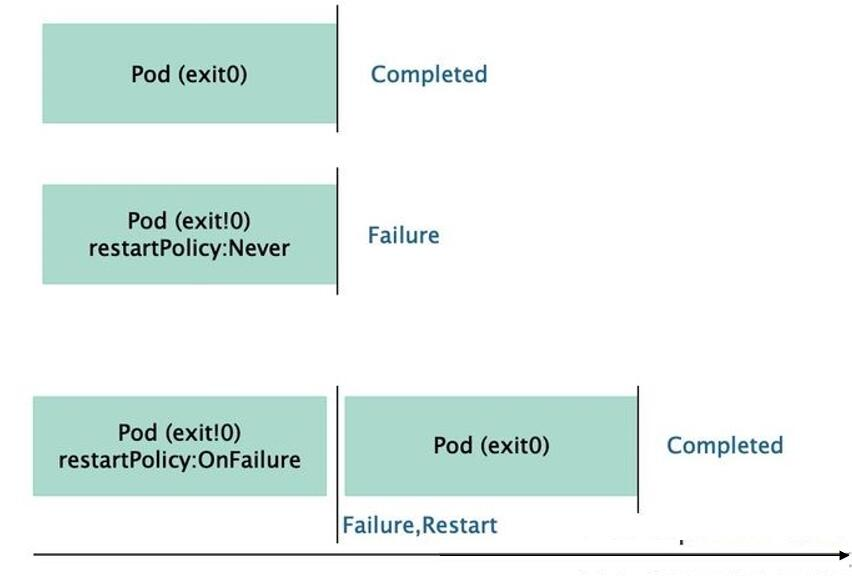
6 Jobs
The Job controller is used for the Pod object to run a one-time task. The process in the container will not restart it after normal operation, but put the Pod object in the "Completed" state. If the process in the container is terminated due to an error, you need to determine whether to restart according to the restart policy configuration, The unfinished Pod object will be scheduled after it is terminated unexpectedly due to the failure of its node. The state transition of the Pod object of the Job controller is shown in the following figure:
-
The Job will create one or more Pods and will continue to retry the execution of Pods until the specified number of Pods are successfully terminated. With the successful completion of Pods, the Job tracks the number of successfully completed Pods. When the number reaches the specified success threshold, the task (i.e. Job) ends. Deleting a Job will clear all the created Pods. Suspending a Job will delete all the active Pods of the Job until the Job is resumed again.
-
In a simple usage scenario, you will create a Job object to run a Pod in a reliable way until it is completed. When the first Pod fails or is deleted (for example, because the node hardware fails or restarts), the Job object will start a new Pod.
-
You can also use Job to run multiple pods in parallel.
[root@master mainfest]# vim jobs.yaml
apiVersion: batch/v1
kind: Job
metadata:
  name: pi
spec:
  template:
    spec:
      containers:
      - name: pi
        image: perl
        command: ["perl",  "-Mbignum=bpi", "-wle", "print bpi(2000)"]
      restartPolicy: Never
  backoffLimit: 4
[root@master mainfest]# kubectl apply -f jobs.yaml
job.batch/pi created

[root@master mainfest]# kubectl describe jobs/pi
Name:           pi
Namespace:      default
Selector:       controller-uid=73b759ad-23db-879b-927c-d73146fd359
Labels:         controller-uid=73b759ad-23db-879b-927c-d73146fd359
                job-name=pi
Annotations:    <none>
Parallelism:    1
Completions:    1
Start Time:     Fri, 24 Dec 2021 23:57:23 -0500
Pods Statuses:  1 Running / 0 Succeeded / 0 Failed
Pod Template:
  Labels:  controller-uid=73b759ad-23db-879b-927c-d73146fd359
           job-name=pi
  Containers:
   pi:
    Image:      perl
    Port:       <none>
    Host Port:  <none>
    Command:
      perl
      -Mbignum=bpi
      -wle
      print bpi(2000)
    Environment:  <none>
    Mounts:       <none>
  Volumes:        <none>
Events:
  Type    Reason            Age   From            Message
  ----    ------            ----  ----            -------
  Normal  SuccessfulCreate  48s   job-controller  Created pod: pi-rm6dx
7 CronJob
FEATURE STATE: Kubernetes v1.21 [stable]
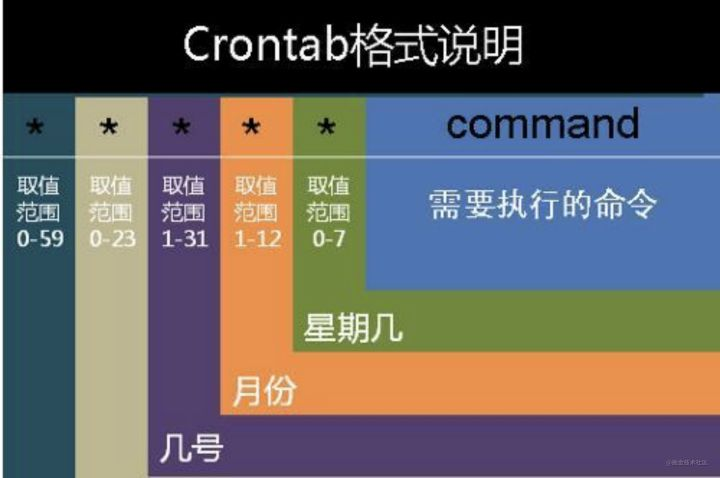
CronJob creates Jobs based on interval repeat scheduling.
A CronJob object is like a line in a crontab (cron table) file. It is written in Cron format and executes jobs periodically at a given scheduling time.
be careful:
-
All CronJob schedule s are based on Kube controller manager Time zone.
-
If your control plane runs Kube controller manager in a Pod or a bare container, the time zone set for the container will determine the time zone used by the controller of Cron Job.
-
When creating a manifest for CronJob resources, ensure that the name provided is a legal DNS subdomain name The name cannot exceed 52 characters. This is because the CronJob controller will automatically append 11 characters after the Job name provided, and there is a limit that the maximum length of the Job name cannot exceed 63 characters.
-
CronJob is used to perform periodic actions, such as backup, report generation, etc. Each of these tasks should be configured to repeat periodically (e.g. daily / weekly / monthly); you can define the time interval at which the task starts to execute.
The following CronJob sample list prints out the current time and greeting messages every minute:
[root@master mainfest]# vim cronjob.yaml
apiVersion: batch/v1beta1
kind: CronJob
metadata:
  name: haha
spec:
  schedule: "*/1 * * * *"
  jobTemplate:
    spec:
      template:
        spec:
          containers:
          - name: hello
            image: busybox
            imagePullPolicy: IfNotPresent
            command:
            - /bin/sh
            - -c
            - date; echo Hello from the Kubernetes cluster
          restartPolicy: OnFailure


//Run view
[root@master mainfest]# kubectl apply -f cronjob.yaml
cronjob.batch/hello created

[root@master mainfest]# kubectl get pods
NAME                     READY   STATUS      RESTARTS   AGE
haha-2736939037-qnvvx   0/1     Completed           0          3m
haha-3674348466-mcmxs   0/1     Completed           0          2m
haha-1890349842-6gqv4   0/1     Completed           0          60s
[root@master mainfest]# kubectl logs hello-1640349360-6gqv4
Fri Dec 24 23:59:27 UTC 2021
Hello from the Kubernetes cluster