We have learned that the Ingress resource object is only a routing request description configuration file, and the corresponding Ingress controller is needed to make it effective. There are many Ingress controllers. Here we first introduce the most used Ingress Nginx, which is an Ingress controller based on Nginx.
Operating principle
The ingress Nginx controller is mainly used to assemble an Nginx The configuration file of conf needs to reload Nginx to take effect when the configuration file changes. However, Nginx will not be reloaded only after the changes affecting the upstream configuration. A Lua Nginx module will be used inside the controller to realize this function.
We know that the Kubernetes controller uses the control loop mode to check whether the required state in the controller has been updated or needs to be changed. Therefore, Ingress Nginx needs to use different objects in the cluster to build the model, such as progress, Service, Endpoints, Secret, ConfigMap and other objects that can generate configuration files reflecting the cluster state, The controller needs to Watch the changes of these resource objects all the time, but there is no way to know whether the specific changes will affect the final generated Nginx Conf configuration file, so once the Watch detects any change, the controller must reconstruct a new model according to the state of the cluster and compare it with the current model. If the model is the same, you can avoid generating a new Nginx configuration and triggering reload. Otherwise, you need to check whether the difference of the model is only related to the endpoint. If so, Then you need to use HTTP POST request to send the new endpoint list to the Lua handler running in Nginx, and again avoid generating new Nginx configuration and triggering reload. If the difference between the run and the new model is not just the endpoint, a new Nginx configuration will be created based on the new model, One of the biggest benefits of building the model in this way is to avoid unnecessary reloading when the state does not change, which can save a lot of Nginx reloading.
Some scenarios that need to be reloaded are briefly described below:
- A new Ingress resource was created
- Add TLS to existing Ingress
- Add or remove path paths from Ingress
- Ingress, Service and Secret have been deleted
- Some missing reference objects of Ingress become available, such as Service or Secret
- A Secret has been updated
For scenarios with large cluster size, frequent reloading of Nginx will obviously cause a lot of performance consumption, so it is necessary to reduce reloading scenarios as much as possible.
install
Because the node of ingress nginx needs to be able to access the external network (not mandatory). In this way, the domain name can be resolved to these nodes for direct use. Therefore, it is necessary to bind ingress nginx to ports 80 and 443 of the node, so hostPort can be used for access. Of course, for online environments, in order to ensure high availability, it is generally necessary to run multiple · ingress nginx instances, and then an nginx/haproxy can be used as the incoming port Port to access the vip address of the edge node through keepalived.
!!! info "edge node" refers to the so-called edge node, that is, the node inside the cluster used to expose the service capability outside the cluster. Services outside the cluster call services inside the cluster through this node. The edge node is an Endpoint for communication between inside and outside the cluster.
Here, we use Helm Chart (which will be explained in detail later) to install:
# If you don't like using helm chart for installation, you can also use the following command for one click installation
# kubectl apply -f https://raw.githubusercontent.com/kubernetes/ingress-nginx/controller-v1.1.0/deploy/static/provider/cloud/deploy.yaml
➜ helm repo add ingress-nginx https://kubernetes.github.io/ingress-nginx
➜ helm repo update
➜ helm fetch ingress-nginx/ingress-nginx
➜ tar -xvf ingress-nginx-4.0.13.tgz && cd ingress-nginx
➜ tree .
.
├── CHANGELOG.md
├── Chart.yaml
├── OWNERS
├── README.md
├── ci
│   ├── controller-custom-ingressclass-flags.yaml
│   ├── daemonset-customconfig-values.yaml
│   ├── daemonset-customnodeport-values.yaml
│   ├── daemonset-headers-values.yaml
│   ├── daemonset-internal-lb-values.yaml
│   ├── daemonset-nodeport-values.yaml
│   ├── daemonset-podannotations-values.yaml
│   ├── daemonset-tcp-udp-configMapNamespace-values.yaml
│   ├── daemonset-tcp-udp-values.yaml
│   ├── daemonset-tcp-values.yaml
│   ├── deamonset-default-values.yaml
│   ├── deamonset-metrics-values.yaml
│   ├── deamonset-psp-values.yaml
│   ├── deamonset-webhook-and-psp-values.yaml
│   ├── deamonset-webhook-values.yaml
│   ├── deployment-autoscaling-behavior-values.yaml
│   ├── deployment-autoscaling-values.yaml
│   ├── deployment-customconfig-values.yaml
│   ├── deployment-customnodeport-values.yaml
│   ├── deployment-default-values.yaml
│   ├── deployment-headers-values.yaml
│   ├── deployment-internal-lb-values.yaml
│   ├── deployment-metrics-values.yaml
│   ├── deployment-nodeport-values.yaml
│   ├── deployment-podannotations-values.yaml
│   ├── deployment-psp-values.yaml
│   ├── deployment-tcp-udp-configMapNamespace-values.yaml
│   ├── deployment-tcp-udp-values.yaml
│   ├── deployment-tcp-values.yaml
│   ├── deployment-webhook-and-psp-values.yaml
│   ├── deployment-webhook-resources-values.yaml
│   └── deployment-webhook-values.yaml
├── templates
│   ├── NOTES.txt
│   ├── _helpers.tpl
│   ├── _params.tpl
│   ├── admission-webhooks
│   │   ├── job-patch
│   │   │   ├── clusterrole.yaml
│   │   │   ├── clusterrolebinding.yaml
│   │   │   ├── job-createSecret.yaml
│   │   │   ├── job-patchWebhook.yaml
│   │   │   ├── psp.yaml
│   │   │   ├── role.yaml
│   │   │   ├── rolebinding.yaml
│   │   │   └── serviceaccount.yaml
│   │   └── validating-webhook.yaml
│   ├── clusterrole.yaml
│   ├── clusterrolebinding.yaml
│   ├── controller-configmap-addheaders.yaml
│   ├── controller-configmap-proxyheaders.yaml
│   ├── controller-configmap-tcp.yaml
│   ├── controller-configmap-udp.yaml
│   ├── controller-configmap.yaml
│   ├── controller-daemonset.yaml
│   ├── controller-deployment.yaml
│   ├── controller-hpa.yaml
│   ├── controller-ingressclass.yaml
│   ├── controller-keda.yaml
│   ├── controller-poddisruptionbudget.yaml
│   ├── controller-prometheusrules.yaml
│   ├── controller-psp.yaml
│   ├── controller-role.yaml
│   ├── controller-rolebinding.yaml
│   ├── controller-service-internal.yaml
│   ├── controller-service-metrics.yaml
│   ├── controller-service-webhook.yaml
│   ├── controller-service.yaml
│   ├── controller-serviceaccount.yaml
│   ├── controller-servicemonitor.yaml
│   ├── default-backend-deployment.yaml
│   ├── default-backend-hpa.yaml
│   ├── default-backend-poddisruptionbudget.yaml
│   ├── default-backend-psp.yaml
│   ├── default-backend-role.yaml
│   ├── default-backend-rolebinding.yaml
│   ├── default-backend-service.yaml
│   ├── default-backend-serviceaccount.yaml
│   └── dh-param-secret.yaml
└── values.yaml

4 directories, 81 files
After downloading the Helm Chart package, unzip it to see the template files contained in it. The ci directory contains the Values configuration files installed under various scenarios, Values Yaml file contains all configurable default Values. We can override these default Values. Our test environment regards the master1 node as an edge node, so we directly fix Ingress nginx to the master1 node and adopt the hostNetwork mode (LB + daemon set hostNetwork mode can be used in the production environment), In order to avoid the error of creating resource objects such as Ingress, which will affect the controller reload, we also strongly recommend that you turn on the admission controller. Ingess nginx will provide an Admission Webhook for verifying resource objects, which can be turned on through the Values file. Then create a new Values file named ci / daemon set-prod.yaml to override the default Values of Ingress nginx.
The corresponding Values configuration file is as follows:
# ci/daemonset-prod.yaml
controller:
  name: controller
  image:
    repository: cnych/ingress-nginx
    tag: "v1.1.0"
    digest:

  dnsPolicy: ClusterFirstWithHostNet

  hostNetwork: true

  publishService:  # Set the hostNetwork mode to false, and report the ingress status data through the node IP address
    enabled: false

  # Do you need to process the Ingress object without the Ingress class annotation or the Ingress classname attribute
  # If it is set to true, a -- watch ingress without class annotation will be added to the controller startup parameters
  watchIngressWithoutClass: false

  kind: DaemonSet

  tolerations:   # By default, the cluster installed by kubedm has a stain on the master, which needs to be tolerated before deployment
  - key: "node-role.kubernetes.io/master"
    operator: "Equal"
    effect: "NoSchedule"

  nodeSelector:   # Fixed to master1 node
    kubernetes.io/hostname: master1

  service:  # The HostNetwork mode does not need to create a service
    enabled: false

  admissionWebhooks: # It is strongly recommended to open admission webhook
    enabled: true
    createSecretJob:
      resources:
        limits:
          cpu: 10m
          memory: 20Mi
        requests:
          cpu: 10m
          memory: 20Mi
    patchWebhookJob:
      resources:
        limits:
          cpu: 10m
          memory: 20Mi
        requests:
          cpu: 10m
          memory: 20Mi
    patch:
      enabled: true
      image:
        repository: cnych/ingress-nginx-webhook-certgen
        tag: v1.1.1
        digest:

defaultBackend:  # Configure default backend
  enabled: true
  name: defaultbackend
  image:
    repository: cnych/ingress-nginx-defaultbackend
    tag: "1.5"
Then use the following command to install ingress nginx and apply it to the namespace of ingress nginx:
➜ kubectl create ns ingress-nginx
➜ helm upgrade --install ingress-nginx . -f ./ci/daemonset-prod.yaml --namespace ingress-nginx
Release "ingress-nginx" does not exist. Installing it now.

NAME: ingress-nginx
LAST DEPLOYED: Thu Dec 16 16:47:20 2021
NAMESPACE: ingress-nginx
STATUS: deployed
REVISION: 1
TEST SUITE: None
NOTES:
The ingress-nginx controller has been installed.
It may take a few minutes for the LoadBalancer IP to be available.
You can watch the status by running 'kubectl --namespace ingress-nginx get services -o wide -w ingress-nginx-controller'

An example Ingress that makes use of the controller:
  apiVersion: networking.k8s.io/v1
  kind: Ingress
  metadata:
    name: example
    namespace: foo
  spec:
    ingressClassName: nginx
    rules:
      - host: www.example.com
        http:
          paths:
            - backend:
                service:
                  name: exampleService
                  port:
                    number: 80
              path: /
    # This section is only required if TLS is to be enabled for the Ingress
    tls:
      - hosts:
        - www.example.com
        secretName: example-tls

If TLS is enabled for the Ingress, a Secret containing the certificate and key must also be provided:

  apiVersion: v1
  kind: Secret
  metadata:
    name: example-tls
    namespace: foo
  data:
    tls.crt: <base64 encoded cert>
    tls.key: <base64 encoded key>
  type: kubernetes.io/tls
View the running status of the Pod after deployment:
➜ kubectl get svc -n ingress-nginx
NAME                                 TYPE        CLUSTER-IP      EXTERNAL-IP   PORT(S)   AGE
ingress-nginx-controller-admission   ClusterIP   10.96.15.99     <none>        443/TCP   11m
ingress-nginx-defaultbackend         ClusterIP   10.97.250.253   <none>        80/TCP    11m
➜ kubectl get pods -n ingress-nginx
NAME                                            READY   STATUS    RESTARTS   AGE
ingress-nginx-controller-5dfdd4659c-9g7c2       1/1     Running   0          11m
ingress-nginx-defaultbackend-84854cd6cb-xb7rv   1/1     Running   0          11m
➜ POD_NAME=$(kubectl get pods -l app.kubernetes.io/name=ingress-nginx -n ingress-nginx -o jsonpath='{.items[0].metadata.name}')
➜ kubectl exec -it $POD_NAME -n ingress-nginx -- /nginx-ingress-controller --version
kubectl logs -f ingress-nginx-controller-5dfdd4659c-9g7c2 -n ingress-nginxW1216 08:51:22.179213       7 client_config.go:615] Neither --kubeconfig nor --master was specified.  Using the inClusterConfig.  This might not work.
I1216 08:51:22.179525       7 main.go:223] "Creating API client" host="https://10.96.0.1:443"
-------------------------------------------------------------------------------
NGINX Ingress controller
  Release:       v1.1.0
  Build:         cacbee86b6ccc45bde8ffc184521bed3022e7dee
  Repository:    https://github.com/kubernetes/ingress-nginx
  nginx version: nginx/1.19.9

-------------------------------------------------------------------------------

I1216 08:51:22.198221       7 main.go:267] "Running in Kubernetes cluster" major="1" minor="22" git="v1.22.2" state="clean" commit="8b5a19147530eaac9476b0ab82980b4088bbc1b2" platform="linux/amd64"
I1216 08:51:22.200478       7 main.go:86] "Valid default backend" service="ingress-nginx/ingress-nginx-defaultbackend"
I1216 08:51:22.611100       7 main.go:104] "SSL fake certificate created" file="/etc/ingress-controller/ssl/default-fake-certificate.pem"
I1216 08:51:22.627386       7 ssl.go:531] "loading tls certificate" path="/usr/local/certificates/cert" key="/usr/local/certificates/key"
I1216 08:51:22.651187       7 nginx.go:255] "Starting NGINX Ingress controller"
When you see the above information to prove that the ingress nginx deployment is successful, here we install the latest version of the controller. After the installation is completed, an IngressClass object named nginx will be automatically created:
➜ kubectl get ingressclass
NAME    CONTROLLER             PARAMETERS   AGE
nginx   k8s.io/ingress-nginx   <none>       18m
➜ kubectl get ingressclass nginx -o yaml
apiVersion: networking.k8s.io/v1
kind: IngressClass
metadata:
  ......
  name: nginx
  resourceVersion: "1513966"
  uid: 70340e62-cab6-4a11-9982-2108f1db786b
spec:
  controller: k8s.io/ingress-nginx
However, we only provide a controller attribute here. If you need to configure some additional parameters, you can configure them in the installed values file.
First example
After successful installation, let's create an Ingress resource for an nginx application, as shown below:
# my-nginx.yaml
apiVersion: apps/v1
kind: Deployment
metadata:
  name: my-nginx
spec:
  selector:
    matchLabels:
      app: my-nginx
  template:
    metadata:
      labels:
        app: my-nginx
    spec:
      containers:
      - name: my-nginx
        image: nginx
        ports:
        - containerPort: 80
---
apiVersion: v1
kind: Service
metadata:
  name: my-nginx
  labels:
    app: my-nginx
spec:
  ports:
  - port: 80
    protocol: TCP
    name: http
  selector:
    app: my-nginx
---
apiVersion: networking.k8s.io/v1
kind: Ingress
metadata:
  name: my-nginx
  namespace: default
spec:
  ingressClassName: nginx  # IngressClass using nginx (associated ingress nginx controller)
  rules:
  - host: ngdemo.qikqiak.com  # Mapping domain names to my nginx services
    http:
      paths:
      - path: /
        pathType: Prefix
        backend:
          service:  # Send all requests to port 80 of my nginx service
            name: my-nginx
            port:
              number: 80
# However, it should be noted that most progress controllers are not forwarded directly to the Service
# Instead, the backend endpoint list is obtained through the Service and directly forwarded to the Pod, which can reduce network hops and improve performance
Directly create the above resource object:
➜ kubectl apply -f my-nginx.yaml
deployment.apps/my-nginx created
service/my-nginx created
ingress.networking.k8s.io/my-nginx created
➜ kubectl get ingress
NAME           CLASS    HOSTS                ADDRESS         PORTS   AGE
my-nginx       nginx    ngdemo.qikqiak.com   192.168.31.31   80      30m
In the above Ingress resource object, we use the configuration of Ingress classname: nginx to specify the controller of Ingress nginx that we install to process our Ingress resources. The configured matching path type is prefixed to match /, which will be from the domain name ngdemo qikqiak. All requests from. Com are forwarded to the backend Endpoints of my nginx service.
After the above resources are created successfully, we can then add the domain name ngdemo qikqiak. Com can be resolved to any of the edge nodes where ingress nginx is located. Of course, you can also add the corresponding mapping in the local / etc/hosts, and then you can access it through the domain name.
The following figure shows how the client connects to one of the pods through the progress controller. The client first connects to ngdemo qikqiak. Com performs DNS resolution to get the IP of the node where the Ingress controller is located, and then the client sends an HTTP request to the Ingress controller, then matches the domain name according to the description in the Ingress object, finds the corresponding Service object, obtains the associated Endpoints list, and forwards the client's request to one of the pods.
We also mentioned earlier that the core principle of the Ingress Nginx controller is to translate the resource object mappings of our Ingress into the Nginx configuration file Nginx Conf, we can verify this by viewing the configuration file in the controller:
➜ kubectl exec -it $POD_NAME -n ingress-nginx -- cat /etc/nginx/nginx.conf

......
upstream upstream_balancer {
        server 0.0.0.1; # placeholder
        balancer_by_lua_block {
                balancer.balance()
        }
        keepalive 320;
        keepalive_timeout  60s;
        keepalive_requests 10000;
}

......
## start server ngdemo.qikqiak.com
server {
        server_name ngdemo.qikqiak.com ;

        listen 80  ;
        listen [::]:80  ;
        listen 443  ssl http2 ;
        listen [::]:443  ssl http2 ;

        set $proxy_upstream_name "-";

        ssl_certificate_by_lua_block {
                certificate.call()
        }

        location / {

                set $namespace      "default";
                set $ingress_name   "my-nginx";
                set $service_name   "my-nginx";
                set $service_port   "80";
                set $location_path  "/";
                set $global_rate_limit_exceeding n;
                ......
                proxy_next_upstream_timeout             0;
                proxy_next_upstream_tries               3;

                proxy_pass http://upstream_balancer;

                proxy_redirect                          off;

        }

}
## end server ngdemo.qikqiak.com
......
We can go to nginx In the conf configuration file, we can see the relevant configuration information of the newly added progress resource object. However, it should be noted that an upstream configuration block will not be created for each backend. Now it is processed dynamically using the Lua program, so we do not directly see the relevant configuration data of Endpoints at the backend.
Nginx configuration
If we also want to make some custom configurations, there are several ways to implement them: using Configmap to set the global configuration in Nginx, setting the rules of specific progress through the Annotations of progress, and customizing the template. Next, we focus on using Annotations to customize the progress object.
Basic Auth
We can configure some Basic Auth authentication on the progress object, such as Basic Auth. We can generate a password file with htpasswd to verify authentication.
➜ htpasswd -c auth foo
New password:
Re-type new password:
Adding password for user foo
Then create a secret object according to the auth file above:
➜ kubectl create secret generic basic-auth --from-file=auth
secret/basic-auth created
➜ kubectl get secret basic-auth -o yaml
apiVersion: v1
data:
  auth: Zm9vOiRhcHIxJFUxYlFZTFVoJHdIZUZQQ1dyZTlGRFZONTQ0dXVQdC4K
kind: Secret
metadata:
  name: basic-auth
  namespace: default
type: Opaque
Then create an Ingress object with Basic Auth for the above my nginx application:
apiVersion: networking.k8s.io/v1
kind: Ingress
metadata:
  name: ingress-with-auth
  namespace: default
  annotations:
    nginx.ingress.kubernetes.io/auth-type: basic  # Certification Type
    nginx.ingress.kubernetes.io/auth-secret: basic-auth  # The name of the secret object that contains the user/password definition
    nginx.ingress.kubernetes.io/auth-realm: 'Authentication Required - foo'  # The message to be displayed with the appropriate context, explaining why authentication is required
spec:
  ingressClassName: nginx  # IngressClass using nginx (associated ingress nginx controller)
  rules:
  - host: bauth.qikqiak.com  # Mapping domain names to my nginx services
    http:
      paths:
      - path: /
        pathType: Prefix
        backend:
          service:  # Send all requests to port 80 of my nginx service
            name: my-nginx
            port:
              number: 80
Directly create the above resource object, and then directly open the configured domain name through the following command or in the browser:
➜ kubectl get ingress
NAME                CLASS    HOSTS                        ADDRESS         PORTS   AGE
ingress-with-auth   nginx    bauth.qikqiak.com            192.168.31.31   80      6m55s
➜ curl -v http://192.168.31.31 -H 'Host: bauth.qikqiak.com'
*   Trying 192.168.31.31...
* TCP_NODELAY set
* Connected to 192.168.31.31 (192.168.31.31) port 80 (#0)
> GET / HTTP/1.1
> Host: bauth.qikqiak.com
> User-Agent: curl/7.64.1
> Accept: */*
>
< HTTP/1.1 401 Unauthorized
< Date: Thu, 16 Dec 2021 10:49:03 GMT
< Content-Type: text/html
< Content-Length: 172
< Connection: keep-alive
< WWW-Authenticate: Basic realm="Authentication Required - foo"
<
<html>
<head><title>401 Authorization Required</title></head>
<body>
<center><h1>401 Authorization Required</h1></center>
<hr><center>nginx</center>
</body>
</html>
* Connection #0 to host 192.168.31.31 left intact
* Closing connection 0
We can see the 401 authentication failure error, and then bring our configured user name and password for authentication:
➜ curl -v http://192.168.31.31 -H 'Host: bauth.qikqiak.com' -u 'foo:foo'
*   Trying 192.168.31.31...
* TCP_NODELAY set
* Connected to 192.168.31.31 (192.168.31.31) port 80 (#0)
* Server auth using Basic with user 'foo'
> GET / HTTP/1.1
> Host: bauth.qikqiak.com
> Authorization: Basic Zm9vOmZvbw==
> User-Agent: curl/7.64.1
> Accept: */*
>
< HTTP/1.1 200 OK
< Date: Thu, 16 Dec 2021 10:49:38 GMT
< Content-Type: text/html
< Content-Length: 615
< Connection: keep-alive
< Last-Modified: Tue, 02 Nov 2021 14:49:22 GMT
< ETag: "61814ff2-267"
< Accept-Ranges: bytes
<
<!DOCTYPE html>
<html>
<head>
<title>Welcome to nginx!</title>
<style>
html { color-scheme: light dark; }
body { width: 35em; margin: 0 auto;
font-family: Tahoma, Verdana, Arial, sans-serif; }
</style>
</head>
<body>
<h1>Welcome to nginx!</h1>
<p>If you see this page, the nginx web server is successfully installed and
working. Further configuration is required.</p>

<p>For online documentation and support please refer to
<a href="http://nginx.org/">nginx.org</a>.<br/>
Commercial support is available at
<a href="http://nginx.com/">nginx.com</a>.</p>

<p><em>Thank you for using nginx.</em></p>
</body>
</html>
* Connection #0 to host 192.168.31.31 left intact
* Closing connection 0
You can see that the authentication has been successful. In addition to using the Auth information created by ourselves in the local cluster, you can also use external Basic Auth authentication information, such as https://httpbin.org For external Basic Auth authentication, create the progress resource object as follows:
apiVersion: networking.k8s.io/v1
kind: Ingress
metadata:
  annotations:
    # Configure external authentication service address
    nginx.ingress.kubernetes.io/auth-url: https://httpbin.org/basic-auth/user/passwd
  name: external-auth
  namespace: default
spec:
  ingressClassName: nginx
  rules:
  - host: external-bauth.qikqiak.com
    http:
      paths:
      - path: /
        pathType: Prefix
        backend:
          service:
            name: my-nginx
            port:
              number: 80
After the above resource object is created, perform a simple test:
➜ kubectl get ingress
NAME                CLASS    HOSTS                        ADDRESS         PORTS   AGE
external-auth       <none>   external-bauth.qikqiak.com                   80      72s
➜ curl -k http://192.168.31.31 -v -H 'Host: external-bauth.qikqiak.com'
*   Trying 192.168.31.31...
* TCP_NODELAY set
* Connected to 192.168.31.31 (192.168.31.31) port 80 (#0)
> GET / HTTP/1.1
> Host: external-bauth.qikqiak.com
> User-Agent: curl/7.64.1
> Accept: */*
>
< HTTP/1.1 401 Unauthorized
< Date: Thu, 16 Dec 2021 10:57:25 GMT
< Content-Type: text/html
< Content-Length: 172
< Connection: keep-alive
< WWW-Authenticate: Basic realm="Fake Realm"
<
<html>
<head><title>401 Authorization Required</title></head>
<body>
<center><h1>401 Authorization Required</h1></center>
<hr><center>nginx</center>
</body>
</html>
* Connection #0 to host 192.168.31.31 left intact
* Closing connection 0
Then test with the correct user name and password:
➜ curl -k http://192.168.31.31 -v -H 'Host: external-bauth.qikqiak.com' -u 'user:passwd'
*   Trying 192.168.31.31...
* TCP_NODELAY set
* Connected to 192.168.31.31 (192.168.31.31) port 80 (#0)
* Server auth using Basic with user 'user'
> GET / HTTP/1.1
> Host: external-bauth.qikqiak.com
> Authorization: Basic dXNlcjpwYXNzd2Q=
> User-Agent: curl/7.64.1
> Accept: */*
>
< HTTP/1.1 200 OK
< Date: Thu, 16 Dec 2021 10:58:31 GMT
< Content-Type: text/html
< Content-Length: 615
< Connection: keep-alive
< Last-Modified: Tue, 02 Nov 2021 14:49:22 GMT
< ETag: "61814ff2-267"
< Accept-Ranges: bytes
<
<!DOCTYPE html>
<html>
<head>
<title>Welcome to nginx!</title>
<style>
html { color-scheme: light dark; }
body { width: 35em; margin: 0 auto;
font-family: Tahoma, Verdana, Arial, sans-serif; }
</style>
</head>
<body>
<h1>Welcome to nginx!</h1>
<p>If you see this page, the nginx web server is successfully installed and
working. Further configuration is required.</p>

<p>For online documentation and support please refer to
<a href="http://nginx.org/">nginx.org</a>.<br/>
Commercial support is available at
<a href="http://nginx.com/">nginx.com</a>.</p>

<p><em>Thank you for using nginx.</em></p>
</body>
</html>
* Connection #0 to host 192.168.31.31 left intact
* Closing connection 0
If the user name or password is wrong, the status code of 401 will also appear:
➜ curl -k http://192.168.31.31 -v -H 'Host: external-bauth.qikqiak.com' -u 'user:passwd123'
*   Trying 192.168.31.31...
* TCP_NODELAY set
* Connected to 192.168.31.31 (192.168.31.31) port 80 (#0)
* Server auth using Basic with user 'user'
> GET / HTTP/1.1
> Host: external-bauth.qikqiak.com
> Authorization: Basic dXNlcjpwYXNzd2QxMjM=
> User-Agent: curl/7.64.1
> Accept: */*
>
< HTTP/1.1 401 Unauthorized
< Date: Thu, 16 Dec 2021 10:59:18 GMT
< Content-Type: text/html
< Content-Length: 172
< Connection: keep-alive
* Authentication problem. Ignoring this.
< WWW-Authenticate: Basic realm="Fake Realm"
<
<html>
<head><title>401 Authorization Required</title></head>
<body>
<center><h1>401 Authorization Required</h1></center>
<hr><center>nginx</center>
</body>
</html>
* Connection #0 to host 192.168.31.31 left intact
* Closing connection 0
Of course, in addition to the simple authentication method of Basic Auth, ingress nginx also supports some other advanced authentication. For example, we can use GitHub OAuth to authenticate Kubernetes Dashboard.
URL Rewrite
Many advanced uses of Ingress nginx can be configured through the annotation of the Ingress object, such as the common URL Rewrite function. We often use Ingress nginx as a gateway. For example, we prefix the accessed services with / app. In the configuration of nginx, we know that there is a proxy_ The pass instruction can realize:
location /app/ {
  proxy_pass http://127.0.0.1/remote/;
}
proxy_ The PATH / remote is added after pass. At this time, the / app matching the rule PATH will be replaced with / remote, which is equivalent to cutting off the / app in the PATH. Similarly, how to use ingress Nginx in Kubernetes? We can use the Rewrite target annotation to implement this requirement. For example, now we want to use Rewrite qikqiak. COM / gateway / to access the Nginx service, we need to Rewrite the accessed URL PATH and add a gateway prefix to the PATH. The corresponding instructions on the Rewrite operation are also given in the official document of inress Nginx:
As required, we need to match the prefix gateway in the path, and then specify the target through rewrite target. The progress object is as follows:
apiVersion: networking.k8s.io/v1
kind: Ingress
metadata:
  name: rewrite
  annotations:
    nginx.ingress.kubernetes.io/rewrite-target: /$2
spec:
  ingressClassName: nginx
  rules:
  - host: rewrite.qikqiak.com
    http:
      paths:
      - path: /gateway(/|$)(.*)
        pathType: Prefix
        backend:
          service:
            name: my-nginx
            port:
              number: 80
After the update, we can foresee that direct access to the domain name will not work, because we do not have a matching / path:
➜ curl rewrite.qikqiak.com
default backend - 404
However, we can access it with the prefix of gateway:
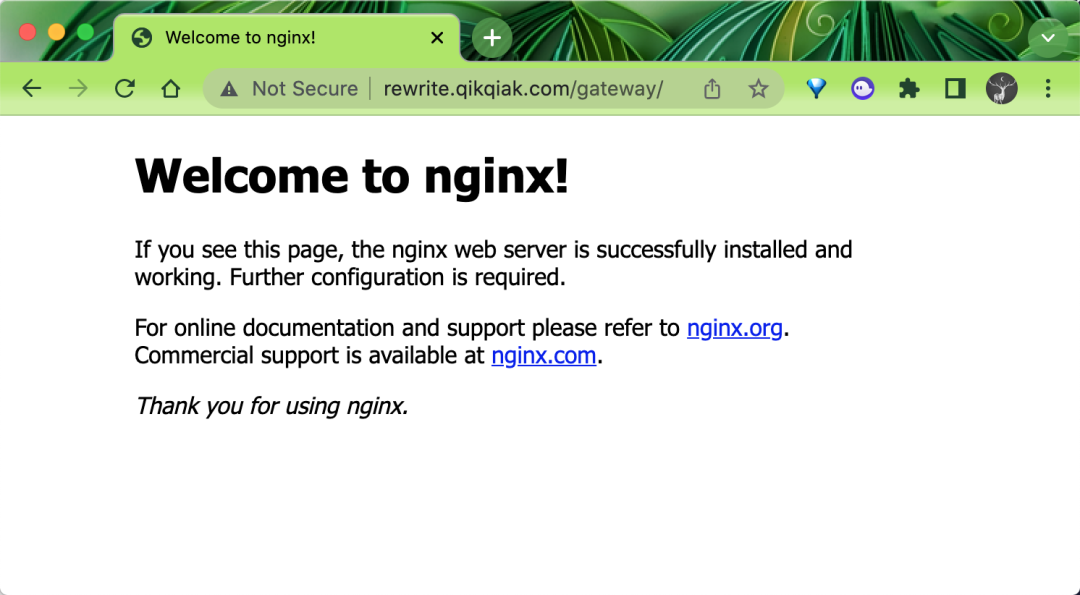
We can see that we can access it. This is because we set the matching path to the target path of rewrite target through the regular expression / gateway(/ | $) (. *) in the path, so we access rewite qikqiak. COM / gateway / is actually equivalent to accessing the / path of the back-end service.
To solve the problem of 404 when we access the main domain name, we can set an app root annotation for the application, so that when we access the main domain name, we will automatically jump to the app root directory specified by us, as shown below:
apiVersion: networking.k8s.io/v1
kind: Ingress
metadata:
  name: rewrite
  annotations:
    nginx.ingress.kubernetes.io/app-root: /gateway/
    nginx.ingress.kubernetes.io/rewrite-target: /$2
spec:
  ingressClassName: nginx
  rules:
  - host: rewrite.qikqiak.com
    http:
      paths:
      - path: /gateway(/|$)(.*)
        pathType: Prefix
        backend:
          service:
            name: my-nginx
            port:
              number: 80
At this time, we update the application and visit the main domain name rewrite qikqiak. Com will automatically jump to rewrite qikqiak. COM / gateway /. However, another problem is that our path path actually matches the path of / app. Maybe we want our application to add a / such slash at the end. Similarly, we can complete it through configuration snippet configuration, as shown in the following Ingress object:
apiVersion: networking.k8s.io/v1
kind: Ingress
metadata:
  name: rewrite
  annotations:
    nginx.ingress.kubernetes.io/app-root: /gateway/
    nginx.ingress.kubernetes.io/rewrite-target: /$2
    nginx.ingress.kubernetes.io/configuration-snippet: |
      rewrite ^(/gateway)$ $1/ redirect;
spec:
  ingressClassName: nginx
  rules:
  - host: rewrite.qikqiak.com
    http:
      paths:
      - path: /gateway(/|$)(.*)
        pathType: Prefix
        backend:
          service:
            name: my-nginx
            port:
              number: 80
After the update, our applications will all end with / such slash. This completes our requirements. If you are familiar with nginx configuration, you should be able to understand this configuration method soon.
Grayscale Publishing
In our daily work, we often need to update and upgrade the version of the service, so we often use different publishing operations such as rolling upgrade, blue-green publishing, gray publishing and so on. Ingress nginx supports gray publishing and testing in different scenarios through Annotations configuration, which can meet business scenarios such as Canary publishing, blue-green deployment and A/B testing.
The Annotations of ingress nginx supports the following four Canary rules:
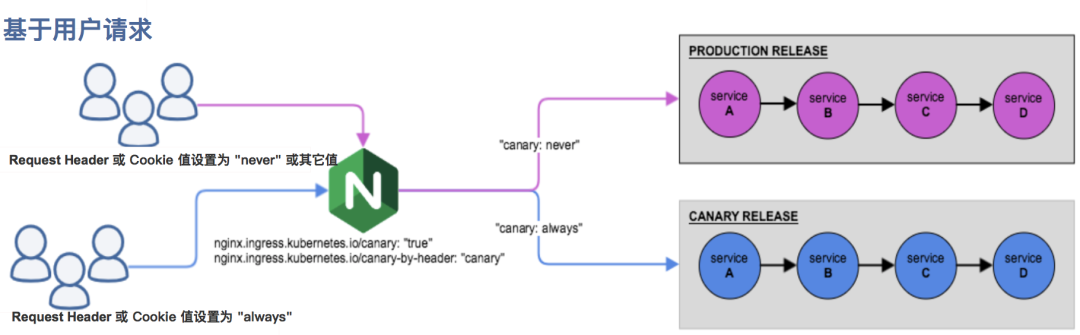
- nginx. ingress. kubernetes. IO / Canary by Header: traffic segmentation based on Request Header, suitable for gray publishing and A/B testing. When the Request Header is set to always, the request will be sent to the Canary version; When the Request Header is set to never, the request will not be sent to the Canary entry; For any other Header value, the Header is ignored and the request is compared with other Canary rules by priority.
- nginx. Ingress. kubernetes. IO / Canary by header value: the value of the Request Header to be matched, which is used to inform Ingress to route the request to the service specified in Canary Ingress. When the Request Header is set to this value, it will be routed to the Canary entry. This rule allows users to customize the value of the Request Header, which must be used together with the previous annotation (Canary by header).
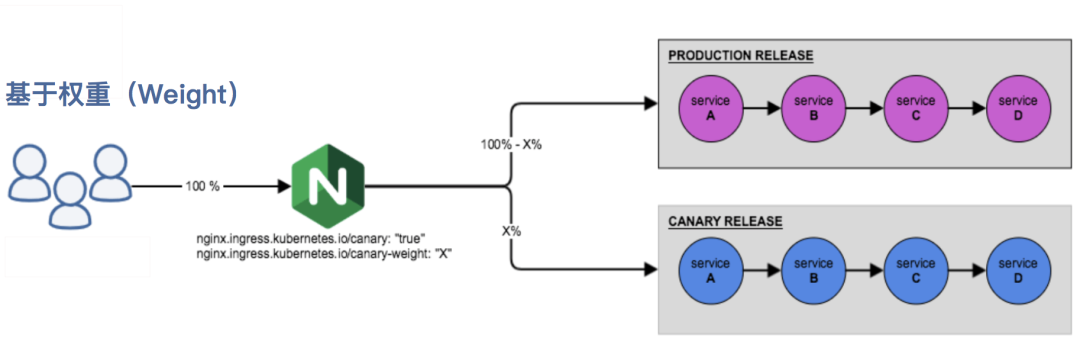
- nginx. ingress. kubernetes. IO / Canary weight: traffic segmentation based on service weight. It is applicable to blue-green deployment. The weight range is 0 - 100. Requests are routed to the services specified in Canary progress by percentage. A weight of 0 means that the Canary rule will not send any requests to the Canary entry service, and a weight of 100 means that all requests will be sent to the Canary entry.
- nginx. Ingress. kubernetes. IO / Canary by Cookie: Cookie based traffic segmentation, suitable for gray publishing and A/B testing. A cookie used to notify Ingress to route requests to the service specified in Canary Ingress. When the cookie value is set to always, it will be routed to the Canary entry; When the cookie value is set to never, the request will not be sent to the Canary entry; For any other value, the cookie is ignored and the request is compared with the priority of other Canary rules.
Note that Canary rules are sorted by priority: Canary by header - > Canary by Cookie - > Canary weight
In general, the above four annotation rules can be divided into the following two categories:
- Canary rule based on weight
- Canary rule based on user request
Next, we will illustrate the gray publishing function through an example application.
The first step Deploy Production application
First, create an application resource list for the production environment:
# production.yaml
apiVersion: apps/v1
kind: Deployment
metadata:
  name: production
  labels:
    app: production
spec:
  selector:
    matchLabels:
      app: production
  template:
    metadata:
      labels:
        app: production
    spec:
      containers:
      - name: production
        image: cnych/echoserver
        ports:
        - containerPort: 8080
        env:
          - name: NODE_NAME
            valueFrom:
              fieldRef:
                fieldPath: spec.nodeName
          - name: POD_NAME
            valueFrom:
              fieldRef:
                fieldPath: metadata.name
          - name: POD_NAMESPACE
            valueFrom:
              fieldRef:
                fieldPath: metadata.namespace
          - name: POD_IP
            valueFrom:
              fieldRef:
                fieldPath: status.podIP
---
apiVersion: v1
kind: Service
metadata:
  name: production
  labels:
    app: production
spec:
  ports:
  - port: 80
    targetPort: 8080
    name: http
  selector:
    app: production
Then create an Ingress resource object for access to the production environment:
# production-ingress.yaml
apiVersion: networking.k8s.io/v1
kind: Ingress
metadata:
  name: production
spec:
  ingressClassName: nginx
  rules:
  - host: echo.qikqiak.com
    http:
      paths:
      - path: /
        pathType: Prefix
        backend:
          service:
            name: production
            port:
              number: 80
Directly create the above resource objects:
➜ kubectl apply -f production.yaml
➜ kubectl apply -f production-ingress.yaml
➜ kubectl get pods -l app=production
NAME                         READY   STATUS    RESTARTS   AGE
production-856d5fb99-d6bds   1/1     Running   0          2m50s
➜ kubectl get ingress
NAME         CLASS    HOSTS                ADDRESS        PORTS   AGE
production   <none>   echo.qikqiak.com     10.151.30.11   80      90s
After the application is successfully deployed, the domain name echo qikqiak. COM is mapped to the IP of the master1 node (the node where ingress nginx is located), and the application can be accessed normally:
➜ curl http://echo.qikqiak.com

Hostname: production-856d5fb99-d6bds

Pod Information:
 node name: node1
 pod name: production-856d5fb99-d6bds
 pod namespace: default
 pod IP: 10.244.1.111

Server values:
 server_version=nginx: 1.13.3 - lua: 10008

Request Information:
 client_address=10.244.0.0
 method=GET
 real path=/
 query=
 request_version=1.1
 request_scheme=http
 request_uri=http://echo.qikqiak.com:8080/

Request Headers:
 accept=*/*
 host=echo.qikqiak.com
 user-agent=curl/7.64.1
 x-forwarded-for=171.223.99.184
 x-forwarded-host=echo.qikqiak.com
 x-forwarded-port=80
 x-forwarded-proto=http
 x-real-ip=171.223.99.184
 x-request-id=e680453640169a7ea21afba8eba9e116
 x-scheme=http

Request Body:
 -no body in request-
Step two To create a Canary version reference, the above Production version of Production Yaml file, and then create a Canary version of the application.
# canary.yaml
apiVersion: apps/v1
kind: Deployment
metadata:
  name: canary
  labels:
    app: canary
spec:
  selector:
    matchLabels:
      app: canary
  template:
    metadata:
      labels:
        app: canary
    spec:
      containers:
      - name: canary
        image: cnych/echoserver
        ports:
        - containerPort: 8080
        env:
          - name: NODE_NAME
            valueFrom:
              fieldRef:
                fieldPath: spec.nodeName
          - name: POD_NAME
            valueFrom:
              fieldRef:
                fieldPath: metadata.name
          - name: POD_NAMESPACE
            valueFrom:
              fieldRef:
                fieldPath: metadata.namespace
          - name: POD_IP
            valueFrom:
              fieldRef:
                fieldPath: status.podIP
---
apiVersion: v1
kind: Service
metadata:
  name: canary
  labels:
    app: canary
spec:
  ports:
  - port: 80
    targetPort: 8080
    name: http
  selector:
    app: canary
Next, you can perform traffic segmentation by configuring Annotation rules.
Step three Annotation rule configuration
1. Weight based: the typical application scenario of weight based traffic segmentation is Blue-Green deployment, which can be achieved by setting the weight to 0 or 100. For example, you can set the Green version as the main part and configure the entry of the Blue version as Canary. Initially, the weight is set to 0, so traffic is not proxied to the Blue version. Once the new version is tested and verified successfully, the weight of the Blue version can be set to 100, that is, all traffic turns from the Green version to Blue.
Create a weight based Canary version of the application routing Ingress object.
# canary-ingress.yaml
apiVersion: networking.k8s.io/v1
kind: Ingress
metadata:
  name: canary
  annotations:
    nginx.ingress.kubernetes.io/canary: "true"   # To enable the grayscale publishing mechanism, first enable Canary
    nginx.ingress.kubernetes.io/canary-weight: "30"  # Allocate 30% traffic to the current Canary version
spec:
  ingressClassName: nginx
  rules:
  - host: echo.qikqiak.com
    http:
      paths:
      - path: /
        pathType: Prefix
        backend:
          service:
            name: canary
            port:
              number: 80
Directly create the above resource object:
➜ kubectl apply -f canary.yaml
➜ kubectl apply -f canary-ingress.yaml
➜ kubectl get pods
NAME                         READY   STATUS    RESTARTS   AGE
canary-66cb497b7f-48zx4      1/1     Running   0          7m48s
production-856d5fb99-d6bds   1/1     Running   0          21m
......
➜ kubectl get svc
NAME                       TYPE        CLUSTER-IP       EXTERNAL-IP   PORT(S)                      AGE
canary                     ClusterIP   10.106.91.106    <none>        80/TCP                       8m23s
production                 ClusterIP   10.105.182.15    <none>        80/TCP                       22m
......
➜ kubectl get ingress
NAME         CLASS    HOSTS                ADDRESS        PORTS   AGE
canary       <none>   echo.qikqiak.com     10.151.30.11   80      108s
production   <none>   echo.qikqiak.com     10.151.30.11   80      22m
After the Canary version application is successfully created, we will continue to access the application in the command line terminal to observe the changes of Hostname:
➜ for i in $(seq 1 10); do curl -s echo.qikqiak.com | grep "Hostname"; done
Hostname: production-856d5fb99-d6bds
Hostname: canary-66cb497b7f-48zx4
Hostname: production-856d5fb99-d6bds
Hostname: production-856d5fb99-d6bds
Hostname: production-856d5fb99-d6bds
Hostname: production-856d5fb99-d6bds
Hostname: production-856d5fb99-d6bds
Hostname: canary-66cb497b7f-48zx4
Hostname: canary-66cb497b7f-48zx4
Hostname: production-856d5fb99-d6bds
Since we assigned about 30% of the traffic weight to the Canary version of the application, we visited the Canary version of the application three times out of 10 times, which is in line with our expectations.
2. Based on Request Header: a typical application scenario for traffic segmentation based on Request Header, i.e. gray release or A/B test scenario.
In the progress object of Canary version above, add an annotation configuration nginx Ingress. kubernetes. IO / Canary by header: Canary (the value here can be any value) enables the current progress to segment traffic based on the Request Header. Since the priority of Canary by header is greater than Canary weight, the original Canary weight rule will be ignored.
annotations:
  nginx.ingress.kubernetes.io/canary: "true"   # To enable the grayscale publishing mechanism, first enable Canary
  nginx.ingress.kubernetes.io/canary-by-header: canary  # Traffic segmentation based on header
  nginx.ingress.kubernetes.io/canary-weight: "30"  # Will be ignored because the Canary by header Canary version is configured
After updating the above progress resource object, we add different Header values to the request to access the application domain name again.
Note: when the Request Header is set to never or always, the request will not be sent to the Canary version. For any other Header value, the Header will be ignored, and the priority of the request will be compared with other Canary rules through priority.
➜ for i in $(seq 1 10); do curl -s -H "canary: never" echo.qikqiak.com | grep "Hostname"; done
Hostname: production-856d5fb99-d6bds
Hostname: production-856d5fb99-d6bds
Hostname: production-856d5fb99-d6bds
Hostname: production-856d5fb99-d6bds
Hostname: production-856d5fb99-d6bds
Hostname: production-856d5fb99-d6bds
Hostname: production-856d5fb99-d6bds
Hostname: production-856d5fb99-d6bds
Hostname: production-856d5fb99-d6bds
Hostname: production-856d5fb99-d6bds
Here, we set the canary: never Header value during the request, so the request was not sent to the Canary application. If it is set to other values:
➜ for i in $(seq 1 10); do curl -s -H "canary: other-value" echo.qikqiak.com | grep "Hostname"; done
Hostname: production-856d5fb99-d6bds
Hostname: production-856d5fb99-d6bds
Hostname: canary-66cb497b7f-48zx4
Hostname: production-856d5fb99-d6bds
Hostname: production-856d5fb99-d6bds
Hostname: production-856d5fb99-d6bds
Hostname: production-856d5fb99-d6bds
Hostname: canary-66cb497b7f-48zx4
Hostname: production-856d5fb99-d6bds
Hostname: canary-66cb497b7f-48zx4
Since the Header value we request to set is Canary: other value, ingress nginx will compare the priority of the request with other Canary rules by priority. Here, we will enter the Canary weight: "30" rule.
At this time, we can add a rule like nginx.ingress.kubernetes.io/canary-by-header-value: user value on the basis of the previous annotation (canary-by-header), so that the request can be routed to the service specified in Canary progress.
annotations:
  nginx.ingress.kubernetes.io/canary: "true"   # To enable the grayscale publishing mechanism, first enable Canary
  nginx.ingress.kubernetes.io/canary-by-header-value: user-value
  nginx.ingress.kubernetes.io/canary-by-header: canary  # Traffic segmentation based on header
  nginx.ingress.kubernetes.io/canary-weight: "30"  # Allocate 30% traffic to the current Canary version
Similarly, after updating the progress object, access the application again. When the Request Header meets Canary: user value, all requests will be routed to Canary version:
➜ for i in $(seq 1 10); do curl -s -H "canary: user-value" echo.qikqiak.com | grep "Hostname"; done
Hostname: canary-66cb497b7f-48zx4
Hostname: canary-66cb497b7f-48zx4
Hostname: canary-66cb497b7f-48zx4
Hostname: canary-66cb497b7f-48zx4
Hostname: canary-66cb497b7f-48zx4
Hostname: canary-66cb497b7f-48zx4
Hostname: canary-66cb497b7f-48zx4
Hostname: canary-66cb497b7f-48zx4
Hostname: canary-66cb497b7f-48zx4
Hostname: canary-66cb497b7f-48zx4
3. Cookie based: similar to the annotation usage rule based on Request Header. For example, in the A/B test scenario, users in Beijing need to access the Canary version. Then, when the annotation of the cookie is set to nginx ingress. kubernetes. IO / Canary by Cookie: "users_from_beijing". At this time, the background can check the login user's request. If the user's access source is from Beijing, set the cookie users_ from_ The value of Beijing is always, which ensures that users in Beijing only access the Canary version.
Similarly, we update the progress resource object of Canary version and use Cookie based traffic segmentation,
annotations:
  nginx.ingress.kubernetes.io/canary: "true"   # To enable the grayscale publishing mechanism, first enable Canary
  nginx.ingress.kubernetes.io/canary-by-cookie: "users_from_Beijing"  # cookie based
  nginx.ingress.kubernetes.io/canary-weight: "30"  # Will be ignored because Canary by cookie is configured
After updating the progress resource object above, we set a users in the request_ from_ The Cookie value of Beijing = always and access the domain name of the application again.
➜ for i in $(seq 1 10); do curl -s -b "users_from_Beijing=always" echo.qikqiak.com | grep "Hostname"; done
Hostname: canary-66cb497b7f-48zx4
Hostname: canary-66cb497b7f-48zx4
Hostname: canary-66cb497b7f-48zx4
Hostname: canary-66cb497b7f-48zx4
Hostname: canary-66cb497b7f-48zx4
Hostname: canary-66cb497b7f-48zx4
Hostname: canary-66cb497b7f-48zx4
Hostname: canary-66cb497b7f-48zx4
Hostname: canary-66cb497b7f-48zx4
Hostname: canary-66cb497b7f-48zx4
We can see that all applications are routed to the Canary version of the application. If we set the Cookie value to never, it will not be routed to the Canary application.
HTTPS
If we need to use HTTPS to access our application, we need to listen to port 443. Similarly, using HTTPS to access the application must require a certificate. Here, we use openssl to create a self signed certificate:
➜ openssl req -x509 -nodes -days 365 -newkey rsa:2048 -keyout tls.key -out tls.crt -subj "/CN=foo.bar.com"
Then reference the certificate file through the Secret object:
# Note that the certificate file name must be TLS CRT and TLS key
➜ kubectl create secret tls foo-tls --cert=tls.crt --key=tls.key
secret/who-tls created
At this time, we can create an HTTPS access application:
apiVersion: networking.k8s.io/v1
kind: Ingress
metadata:
  name: ingress-with-auth
  annotations:
    # Certification Type
    nginx.ingress.kubernetes.io/auth-type: basic
    # The name of the secret object that contains the user/password definition
    nginx.ingress.kubernetes.io/auth-secret: basic-auth
    # The message to be displayed with the appropriate context, explaining why authentication is required
    nginx.ingress.kubernetes.io/auth-realm: 'Authentication Required - foo'
spec:
  ingressClassName: nginx
  tls:  # Configure tls certificate
  - hosts:
    - foo.bar.com
    secretName: foo-tls
  rules:
  - host: foo.bar.com
    http:
      paths:
      - path: /
        pathType: Prefix
        backend:
          service:
            name: my-nginx
            port:
              number: 80
In addition to self signed certificates or purchasing CA certificates from formal institutions, we can also automatically generate legal certificates through some tools. Cert manager is an open-source project for cloud native certificate management, which can be used to provide HTTPS certificates in Kubernetes cluster and renew them automatically, and support the issuance of free certificates such as Let's Encrypt/HashiCorp/Vault. In Kubernetes, automatic HTTPS of external services can be realized through Kubernetes Ingress and Let's Encrypt.
TCP and UDP
Since there is no direct support for TCP or UDP services in the Ingress resource object, to provide support in Ingress nginx, you need to add -- TCP services ConfigMap and -- UDP services ConfigMap flags in the controller startup parameters to point to a ConfigMap, where the key is the external port to be used, Value value is a service exposed in the format < namespace / service name >: < service port >: [PROXY]: [PROXY]. The port can use port number or port name. The last two fields are optional and are used to configure PROXY.
For example, now we want to expose a MongoDB service through ingress nginx. First, create the following applications:
# mongo.yaml
apiVersion: apps/v1
kind: Deployment
metadata:
  name: mongo
  labels:
    app: mongo
spec:
  selector:
    matchLabels:
      app: mongo
  template:
    metadata:
      labels:
        app: mongo
    spec:
      volumes:
      - name: data
        emptyDir: {}
      containers:
      - name: mongo
        image: mongo:4.0
        ports:
        - containerPort: 27017
        volumeMounts:
        - name: data
          mountPath: /data/db
---
apiVersion: v1
kind: Service
metadata:
  name: mongo
spec:
  selector:
    app: mongo
  ports:
  - port: 27017
Directly create the above resource object:
➜ kubectl apply -f mongo.yaml
➜ kubectl get svc
NAME            TYPE        CLUSTER-IP       EXTERNAL-IP   PORT(S)     AGE
mongo           ClusterIP   10.98.117.228    <none>        27017/TCP   2m26s
➜ kubectl get pods -l app=mongo
NAME                     READY   STATUS    RESTARTS   AGE
mongo-84c587f547-gd7pv   1/1     Running   0          2m5s
Now, to expose the MongoDB service above through ingress nginx, we need to create a ConfigMap as follows:
apiVersion: v1
kind: ConfigMap
metadata:
  name: tcp-services
  namespace: ingress-nginx
data:
  "27017": default/mongo:27017
Then add -- TCP services configmap = $(pod_namespace) / ingress nginx TCP to the startup parameters of ingress nginx. Since Helm Chart is used for installation here, we only need to overwrite the Values value and reinstall. Modify the ci/daemonset-prod.yaml file:
# ci/daemonset-prod.yaml
# ......  Other parts are omitted, consistent with the previous ones

tcp:  # Configure tcp service
  27017: "default/mongo:27017"  # Use port 27017 to map mongo services
  # 9000: "default/test:8080"   # If you need to expose other TCP services, you can continue to add them
Update the current ingress nginx after configuration:
➜ helm upgrade --install ingress-nginx . -f ./ci/daemonset-prod.yaml --namespace ingress-nginx
After the redeployment, a ConfigMap object named ingress nginx TCP will be automatically generated, as shown below:
➜ kubectl get configmap -n ingress-nginx ingress-nginx-tcp -o yaml
apiVersion: v1
data:
  "27017": default/mongo:27017
kind: ConfigMap
metadata:
  ......
  name: ingress-nginx-tcp
  namespace: ingress-nginx
Add -- TCP services configmap = $(pod_namespace) / ingress nginx TCP to the startup parameters of ingress nginx:
➜ kubectl get pods -n ingress-nginx
NAME                                            READY   STATUS    RESTARTS        AGE
ingress-nginx-controller-gc582                  1/1     Running   0               5m17s
➜ kubectl get pod ingress-nginx-controller-gc582 -n ingress-nginx -o yaml
apiVersion: v1
kind: Pod
......
  containers:
  - args:
    - /nginx-ingress-controller
    - --default-backend-service=$(POD_NAMESPACE)/ingress-nginx-defaultbackend
    - --election-id=ingress-controller-leader
    - --controller-class=k8s.io/ingress-nginx
    - --configmap=$(POD_NAMESPACE)/ingress-nginx-controller
    - --tcp-services-configmap=$(POD_NAMESPACE)/ingress-nginx-tcp  # tcp configuration parameters
    - --validating-webhook=:8443
    - --validating-webhook-certificate=/usr/local/certificates/cert
    - --validating-webhook-key=/usr/local/certificates/key
......
    ports:
......
    - containerPort: 27017
      hostPort: 27017
      name: 27017-tcp
      protocol: TCP
......
Now we can access the Mongo service through the 27017 port exposed by ingress nginx:
➜ mongo --host 192.168.31.31 --port 27017
MongoDB shell version v4.0.3
connecting to: mongodb://192.168.31.31:27017/
Implicit session: session { "id" : UUID("10f462eb-32b8-443b-ad85-99820db1aaa0") }
MongoDB server version: 4.0.27
......

> show dbs
admin   0.000GB
config  0.000GB
local   0.000GB
>
Similarly, we can also check the final generated nginx Conf configuration file:
➜ kubectl exec -it ingress-nginx-controller-gc582 -n ingress-nginx -- cat /etc/nginx/nginx.conf
......
stream {
    ......
    # TCP services
    server {
            preread_by_lua_block {
                    ngx.var.proxy_upstream_name="tcp-default-mongo-27017";
            }
            listen                  27017;
            listen                  [::]:27017;
            proxy_timeout           600s;
            proxy_next_upstream     on;
            proxy_next_upstream_timeout 600s;
            proxy_next_upstream_tries   3;
            proxy_pass              upstream_balancer;
    }
    # UDP services
}
TCP related configurations are located under the stream configuration block. From nginx 1.9 Version 13 starts to provide UDP load balancing. Similarly, we can proxy UDP services in ingress nginx. For example, we can expose Kube DNS services. We also need to create a ConfigMap as follows:
apiVersion: v1
kind: ConfigMap
metadata:
  name: udp-services
  namespace: ingress-nginx
data:
  53: "kube-system/kube-dns:53"
Then you need to add a configuration -- UDP services configmap = $(pod_namespace) / UDP services in the ingress nginx parameter. Of course, we only need to modify the Values file value here, and modify the CI / daemon-prod.yaml file:
# ci/daemonset-prod.yaml
# ......  Other parts are omitted, consistent with the previous ones

tcp:  # Configure tcp service
  27017: "default/mongo:27017"  # Use port 27017 to map mongo services
  # 9000: "default/test:8080"   # If you need to expose other TCP services, you can continue to add them

udp:  # Configuring udp services
  53: "kube-system/kube-dns:53"
Then update it again.
Global configuration
In addition to customizing the specified progress through annotations, we can also configure the global configuration of Ingress nginx. In the controller startup parameter, a global ConfigMap object is specified through the flag -- ConfigMap. We can directly define some global configurations in this object:
containers:
  - args:
    - /nginx-ingress-controller
    - --configmap=$(POD_NAMESPACE)/ingress-nginx-controller
    ......
For example, the ConfigMap used for global configuration here is called ingress nginx controller:
➜ kubectl get configmap -n ingress-nginx
NAME                        DATA   AGE
ingress-nginx-controller    1      5d2h
For example, we can add some common configurations as follows:
➜ kubectl edit configmap ingress-nginx-controller -n ingress-nginx
apiVersion: v1
data:
  allow-snippet-annotations: "true"
  client-header-buffer-size: 32k  # Note not underline
  client-max-body-size: 5m
  use-gzip: "true"
  gzip-level: "7"
  large-client-header-buffers: 4 32k
  proxy-connect-timeout: 11s
  proxy-read-timeout: 12s
  keep-alive: "75"   # Enable keep alive to reuse connections and improve QPS
  keep-alive-requests: "100"
  upstream-keepalive-connections: "10000"
  upstream-keepalive-requests: "100"
  upstream-keepalive-timeout: "60"
  disable-ipv6: "true"
  disable-ipv6-dns: "true"
  max-worker-connections: "65535"
  max-worker-open-files: "10240"
kind: ConfigMap
......
After the modification, the Nginx configuration will take effect automatically. We can view Nginx Conf configuration file to verify:
➜ kubectl exec -it ingress-nginx-controller-gc582 -n ingress-nginx -- cat /etc/nginx/nginx.conf |grep large_client_header_buffers
        large_client_header_buffers     4 32k;
Since Helm Chart is installed here, we also need to perform global configuration through Values in order to ensure that the configuration remains after redeployment:
# ci/daemonset-prod.yaml
controller:
  config:
    allow-snippet-annotations: "true"
    client-header-buffer-size: 32k  # Note not underline
    client-max-body-size: 5m
    use-gzip: "true"
    gzip-level: "7"
    large-client-header-buffers: 4 32k
    proxy-connect-timeout: 11s
    proxy-read-timeout: 12s
    keep-alive: "75"   # Enable keep alive to reuse connections and improve QPS
    keep-alive-requests: "100"
    upstream-keepalive-connections: "10000"
    upstream-keepalive-requests: "100"
    upstream-keepalive-timeout: "60"
    disable-ipv6: "true"
    disable-ipv6-dns: "true"
    max-worker-connections: "65535"
    max-worker-open-files: "10240"

# Other omissions
In addition, we often need to optimize the performance of the nodes deployed by ingress Nginx and modify some kernel parameters to adapt to the use scenario of Nginx. Generally, we directly modify the kernel parameters on the nodes. In order to be able to manage uniformly, we can use initContainers for configuration:
initContainers:
- command:
  - /bin/sh
  - -c
  - |
    mount -o remount rw /proc/sys
    sysctl -w net.core.somaxconn=65535  # The specific configuration depends on the specific situation
    sysctl -w net.ipv4.tcp_tw_reuse=1
    sysctl -w net.ipv4.ip_local_port_range="1024 65535"
    sysctl -w fs.file-max=1048576
    sysctl -w fs.inotify.max_user_instances=16384
    sysctl -w fs.inotify.max_user_watches=524288
    sysctl -w fs.inotify.max_queued_events=16384
image: busybox
imagePullPolicy: IfNotPresent
name: init-sysctl
securityContext:
  capabilities:
    add:
    - SYS_ADMIN
    drop:
    - ALL
......
Since we use the ingress nginx installed by Helm Chart here, we only need to configure the Values value. The template provides support for initContainers. The configuration is as follows:
controller:
  # Others are omitted. Configure initContainers
  extraInitContainers:
  - name: init-sysctl
    image: busybox
    securityContext:
      capabilities:
        add:
        - SYS_ADMIN
        drop:
        - ALL
    command:
    - /bin/sh
    - -c
    - |
      mount -o remount rw /proc/sys
      sysctl -w net.core.somaxconn=65535  # Upper limit of backlog for socket listening
      sysctl -w net.ipv4.tcp_tw_reuse=1  # Enable reuse, allowing TIME-WAIT sockets to be reused for new TCP connections
      sysctl -w net.ipv4.ip_local_port_range="1024 65535"
      sysctl -w fs.file-max=1048576
      sysctl -w fs.inotify.max_user_instances=16384
      sysctl -w fs.inotify.max_user_watches=524288
      sysctl -w fs.inotify.max_queued_events=16384
Similarly, you can redeploy:
➜ helm upgrade --install ingress-nginx . -f ./ci/daemonset-prod.yaml --namespace ingress-nginx
After deployment, the node kernel parameters can be modified through initContainers. It is recommended to optimize the node kernel parameters in the production environment.