1, Pod life cycle
- Like independent application containers, Pod is also considered to be a relatively temporary (rather than long-term) entity. The Pod is created, given a unique ID (UID), scheduled to the node, and runs on the node until it is terminated (according to the restart Policy) or deleted.
- If a node dies, the Pod scheduled to the node is also scheduled to be deleted after the end of a given timeout period.
- Pod itself does not have self-healing ability. If the pod is scheduled to a node and the node fails later, or the scheduling operation itself fails, the pod will be deleted; Similarly, the pod cannot survive when the node resource is exhausted or during node maintenance. Kubernetes uses a high-level abstraction called controller to manage these relatively disposable pod instances.
- Any given Pod (defined by UID) will never be "rescheduled" to different nodes; Instead, this Pod can be replaced by a new, almost identical Pod. If necessary, the name of the new Pod can remain unchanged, but its UID will be different.
- If something claims that its lifetime is the same as that of a Pod, such as a storage volume, this means that the object also exists during the existence of this Pod (the UID is also the same). If the Pod is deleted for any reason, even when an identical alternative Pod is created, the related object (such as the volume here) will be deleted and rebuilt. Like independent application containers, Pod is also considered to be a relatively temporary (rather than long-term) entity. The Pod is created, given a unique ID (UID), scheduled to the node, and runs on the node until it is terminated (according to the restart Policy) or deleted.
- If a node dies, the Pod scheduled to the node is also scheduled to be deleted after the end of a given timeout period.
- Pod itself does not have self-healing ability. If the pod is scheduled to a node and the node fails later, or the scheduling operation itself fails, the pod will be deleted; Similarly, the pod cannot survive when the node resource is exhausted or during node maintenance. Kubernetes uses a high-level abstraction called controller to manage these relatively disposable pod instances.
- Any given Pod (defined by UID) will never be "rescheduled" to different nodes; Instead, this Pod can be replaced by a new, almost identical Pod. If necessary, the name of the new Pod can remain unchanged, but its UID will be different.
- If something claims that its lifetime is the same as that of a Pod, such as a storage volume, this means that the object also exists during the existence of this Pod (the UID is also the same). If the Pod is deleted for any reason, even when an identical alternative Pod is created, the related object (such as the volume here) will be deleted and rebuilt.
- Generally, the period from the creation to the end of a pod object becomes the life cycle of a pod. It mainly includes the following processes:
pod creation process
Run the init container process (more or less, optional)
Run the main container procedure
pod termination process
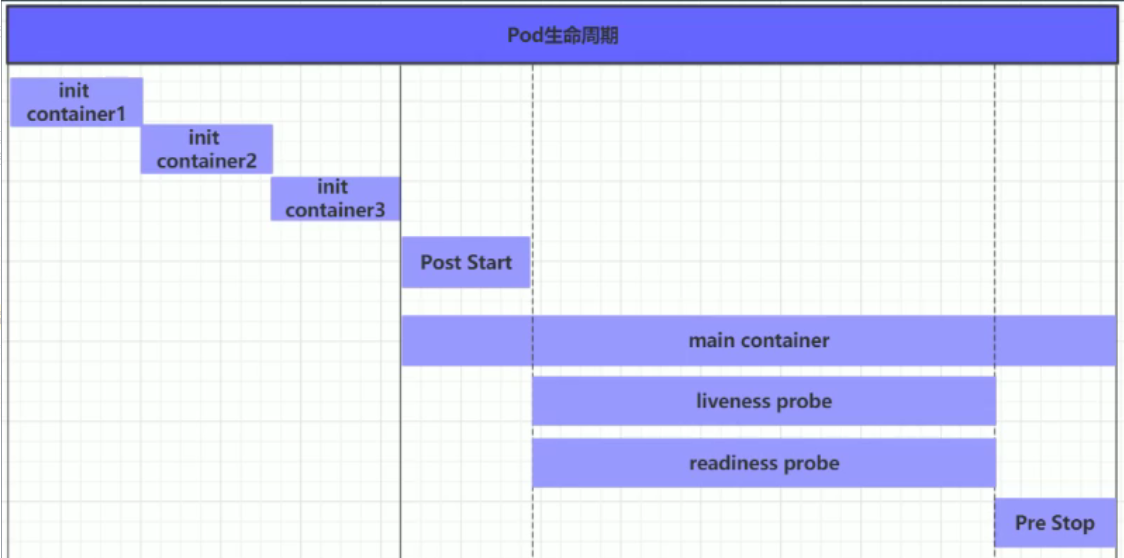
- The Pod can contain multiple containers, and the Pod can also have one or more init containers started before the application container. The init container is not different from the ordinary container. The main reason is that init runs first. The main container will not be started until init runs successfully. Therefore, the init container does not support Readiness. If the init container of the Pod fails to start, Kubernetes will continue to restart the Pod until the init container succeeds.
- Advantages of Init container:
1. If you want to use some tools but don't want to put them in the main container, put these tools in the initial image init. After running, the initial image ends, and then use the main container
2. The Init container can safely run these tools to reduce risk
3. The creator and deployer of the application image can work independently
2, init initialization
Note service1 and service2 and simulate initialization failure
vim init.yaml
///
apiVersion: v1
kind: Pod
metadata:
  name: myapp-pod
  labels:
    app: myapp
spec:
  containers:
  - name: myapp-container
    image: busyboxplus
    command: ['sh', '-c', 'echo The app is running! && sleep 3600']
  initContainers:
  - name: init-myservice
    image: busyboxplus
    command: ['sh', '-c', "until nslookup myservice.default.svc.cluster.local; do echo waiting for myservice; sleep 2; done"]
  - name: init-mydb
    image: busyboxplus
    command: ['sh', '-c', "until nslookup mydb.default.svc.cluster.local; do echo waiting for mydb; sleep 2; done"]

#---
#apiVersion: v1
#kind: Service
#metadata:
#  name: myservice
#spec:
#  ports:
#  - protocol: TCP
#    port: 80
#    targetPort: 9376
#---
#apiVersion: v1
#kind: Service
#metadata:
#  name: mydb
#spec:
#  ports:
#  - protocol: TCP
#    port: 80
#    targetPort: 9377
\\\
kubectl apply -f init.yaml
kubectl get pod
You can see that if the initialization cannot be completed, the main container cannot run

Modify init. Again Yaml file, add the service to be satisfied by init
vim init.yaml
///
apiVersion: v1
kind: Pod
metadata:
  name: myapp-pod
  labels:
    app: myapp
spec:
  containers:
  - name: myapp-container
    image: busyboxplus
    command: ['sh', '-c', 'echo The app is running! && sleep 3600']
  initContainers:
  - name: init-myservice
    image: busyboxplus
    command: ['sh', '-c', "until nslookup myservice.default.svc.cluster.local; do echo waiting for myservice; sleep 2; done"]
  - name: init-mydb
    image: busyboxplus
    command: ['sh', '-c', "until nslookup mydb.default.svc.cluster.local; do echo waiting for mydb; sleep 2; done"]
---
apiVersion: v1
kind: Service
metadata:
  name: myservice
spec:
  ports:
  - protocol: TCP
    port: 80
    targetPort: 9376
---
apiVersion: v1
kind: Service
metadata:
  name: mydb
spec:
  ports:
  - protocol: TCP
    port: 80
    targetPort: 9377
///
kubectl apply -f init.yaml
kubectl get pod

3, Probe
1. Survival probe
-
Indicates whether the container is running
-
If there is no probe, k8s cannot know whether the application is still alive. As long as the process is running, k8s considers the container healthy.
Note: when the survival and ready probes exist at the same time, but only the survival probe passes, the container will run, but it can only run internally and cannot be accessed externally. Only when both probes run successfully can they be accessed externally. -
http get
Perform an http get request on the container's ip address (specified port and path)
If the detector receives a response and the response code is 2xx, 3xx, the detection is considered successful. If the server does not respond or returns an error response, the probe fails and the container will restart. -
tcp socket
The probe establishes a tcp connection with the specified port of the container. If the connection is established, the probe succeeds, otherwise the probe fails and the container restarts. -
exec
Execute any command in the container and check the command exit status code. If the status code is 0, the detection is successful, otherwise the detection fails and the container restarts.
Edit POD2 Yaml, add survival probe
vim pod2.yaml
\\\
apiVersion: v1
kind: Pod
metadata:
  name: pod-example
  labels:
    app: myapp
spec:
  #hostNetwork: true
  #nodeName: server4
  #imagePullSecrets:
  containers:
  - name: myapp
    image: myapp:v1
    imagePullPolicy: IfNotPresent
    resources:
      requests:
        cpu: "100m"
        memory: "50Mi"
      limits:
        cpu: "200m"
        memory: "100Mi"
    livenessProbe:
      tcpSocket:
        port: 80
      initialDelaySeconds: 1
      periodSeconds: 3
      timeoutSeconds: 1
///
kubectl apply -f pod2.yaml
Because port 80 is under normal conditions, the container can start normally:

2. Readiessprobe
Indicates whether the container is ready for a service request (ready)
After the probe is ready, the svc will not be exposed
Edit pod Yaml file, add ready probe
vim pod2.yaml
\\\
Add after:
    readinessProbe:
      httpGet:
        path: /test.html
        port: 80
      initialDelaySeconds: 1
      periodSeconds: 3
      timeoutSeconds: 1
\\\
kubectl delete -f pod2.yaml
kubectl apply -f pod2.yaml
Because test The HTML file does not exist, so the container cannot be ready.

Enter pod example and add test HTML file, you can be ready

Test and access the added release information:

4, Controller of k8s cluster
- The autonomous Pod will not be created after the Pod exits. If a controller is added to the Pod managed by the controller, the number of copies of the Pod must always be maintained in the life cycle of the controller. If a copy is deleted, the controller will automatically supplement a copy
1. ReplicaSet (rs) controller
- ReplicaSet ensures that a specified number of Pod replicas are running at any time. Although ReplicaSets can be used independently, today it is mainly used by Deployments as a mechanism to coordinate Pod creation, deletion and update.
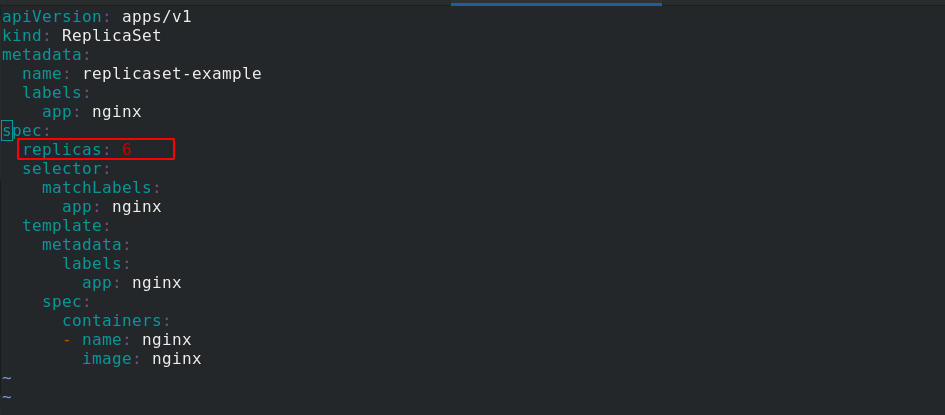
vim rs.yaml
///
apiVersion: apps/v1
kind: ReplicaSet
metadata:
  name: replicaset-example
spec:
  replicas: 3
  selector:
    matchLabels:
      app: nginx
  template:
    metadata:
      labels:
        app: nginx
    spec:
      containers:
      - name: nginx
        image: nginx
\\\
kubectl apply -f rs.yaml
Pull up the pod and you can see that there are 6 copies:
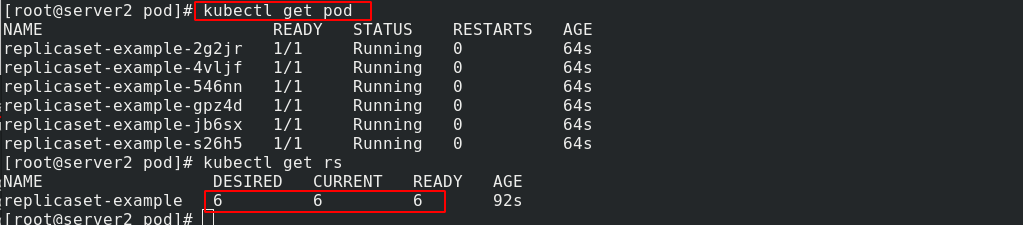
You can change the number of copies here:
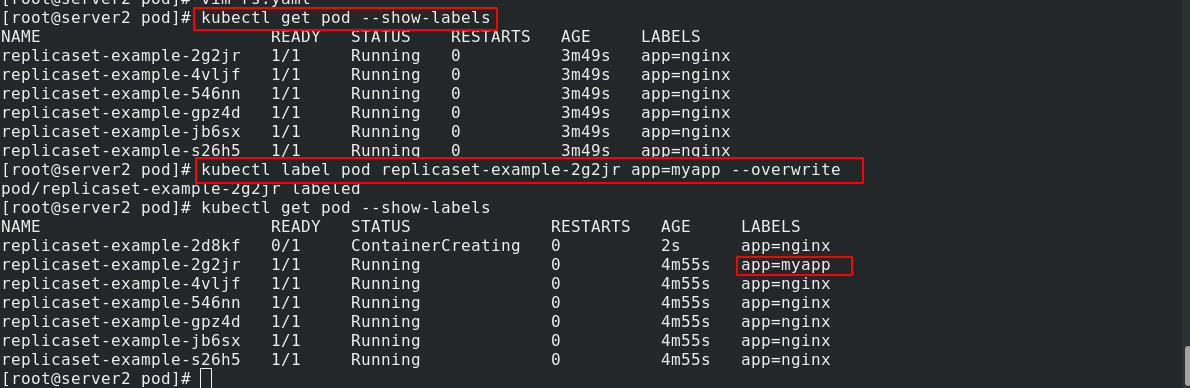
View change labels:
kubectl get pod --show-labels #View the label of pod
kubectl label pod replicaset-example-2g2jr app=myapp --overwrite #Override the label of replicaset-example-9b9gz this pod as app=myapp
2. Deployment controller
- Deployment provides a declarative definition method for Pod and ReplicaSet
- deployment can be updated. The principle is to cooperate with RS. one version is one RS, and five versions are five rs. each RS manages its own number of copies
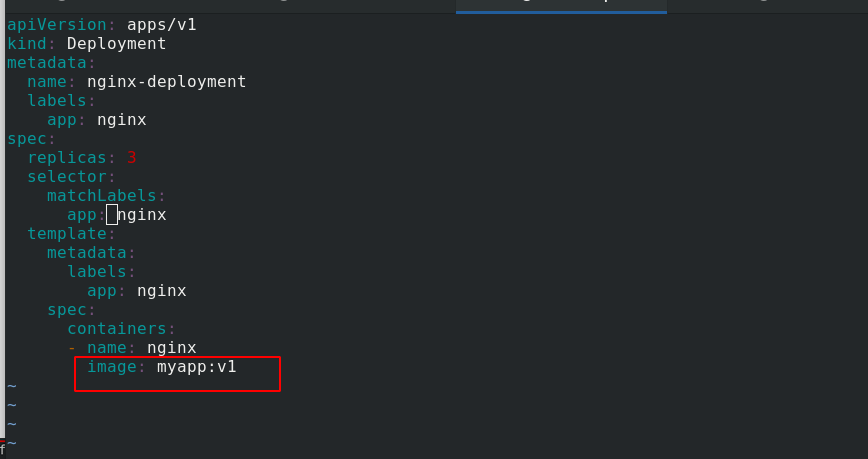
vim deployment.yaml
\\\
apiVersion: apps/v1
kind: Deployment
metadata:
  name: nginx-deployment
  labels:
    app: nginx
spec:
  replicas: 3
  selector:
    matchLabels:
      app: nginx
  template:
    metadata:
      labels:
        app: nginx
    spec:
      containers:
      - name: nginx
        image: myapp:v1
///
kubectl apply -f deployment.yaml
You can see nginx:
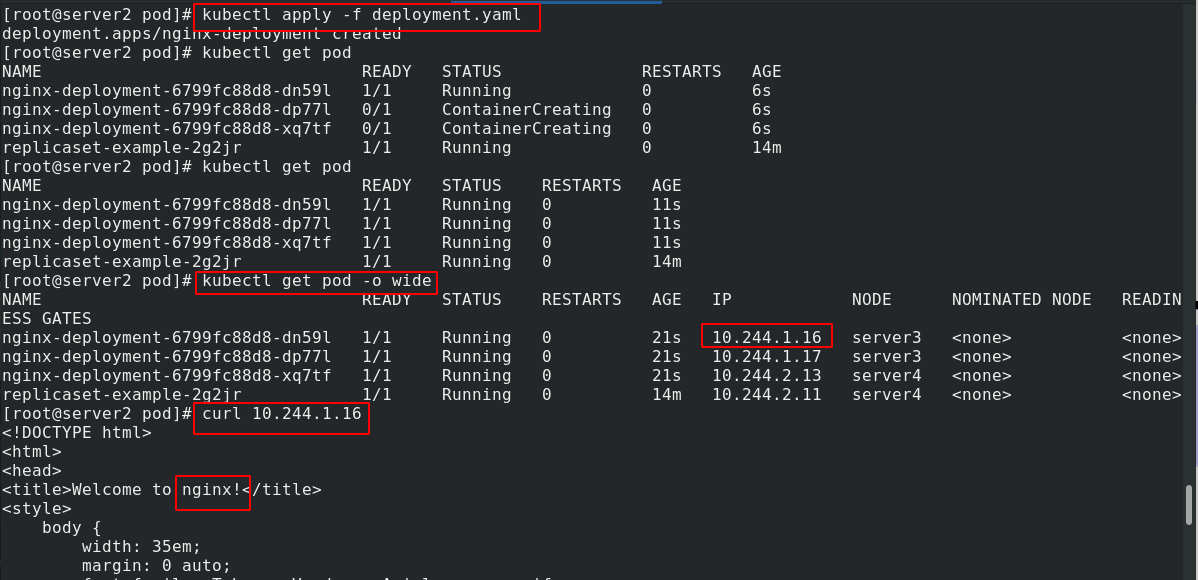
The image becomes myapp:
See, update to mypp:

3. DaemonSet controller
- The daemon set ensures that a copy of the Pod is running on all (or some) nodes. When nodes join the cluster, a Pod will also be added for them. When a node is removed from the cluster, these pods will also be recycled. Deleting a DaemonSet will delete all pods it creates. A typical usage is to run monitoring DaemonSet on each node, such as zabbix agent. Ensure that each node is done once
- The daemon set ensures that a Pod copy is running on all (or some) nodes. When new nodes join the cluster, a Pod will also be added for them. When the node is removed from the cluster, these pods will also be recycled. Deleting the DaemonSet will delete all the pods it creates
- Some typical uses of using DaemonSet:
Run the cluster storage daemon, such as Glusterd, Ceph, and so on on each node
Run the log collection daemon on each node, such as fluent D and Logstash
Run the monitoring daemon on each node, such as Prometheus Node Exporter, Collectd, Datadog agent, New Relic agent, or Ganglia gmond
vim daemonset.yaml
\\\
apiVersion: apps/v1
kind: DaemonSet
metadata:
  name: daemonset-example
  labels:
    k8s-app: zabbix-agent
spec:
  selector:
    matchLabels:
      name: zabbix-agent
  template:
    metadata:
      labels:
        name: zabbix-agent
    spec:
      containers:
      - name: zabbix-agent
        image: zabbix/zabbix-agent
///
4. StatefulSet controller
StatefulSet is an API object used to manage workload of stateful applications. Applications with unequal relationships between instances and instances dependent on external data are called "stateful applications".
It is mainly used for long-term and continuous monitoring of status and clusters requiring unique network identifier.
5. Job controller
Execute a batch task. If the task is executed only once, it will end if the execution is successful. For example, you can calculate the pi value.
vim job.yaml
\\\
apiVersion: batch/v1
kind: Job
metadata:
  name: pi
spec:
  template:
    spec:
      containers:
      - name: pi
        image: perl
        command: ["perl",  "-Mbignum=bpi", "-wle", "print bpi(2000)"]
      restartPolicy: Never
  backoffLimit: 4
///
kubectl get pod
6. CronJob controller
vim cronjob.yaml
\\\
apiVersion: batch/v1beta1
kind: CronJob
metadata:
  name: cronjob-example
spec:
  schedule: "* * * * *"
  jobTemplate:
    spec:
      template:
        spec:
          containers:
          - name: cronjob
            image: busyboxplus
            args:
            - /bin/sh
            - -c
            - date; echo Hello from k8s cluster
          restartPolicy: OnFailure
///
7. HPA controller
The full name is Horizontal Pod Autoscaler, which automatically adjusts the number of pods in the service according to the resource utilization to realize the horizontal dynamic stretching of Pod