Lane recognition is essential in automatic driving, and there are more than one implementation method.
Basic concept of Lane
"Driveway" is explained in Wikipedia or Baidu Encyclopedia. However, as we say every day, it is used to refer to "motorway". Therefore, the terms "lane recognition" and "automatic driving" are also for motor vehicles.
★ the "automatic driving" of bicycle is also worth exploring. In fact, there are already, for example: https://www.designboom.com/technology/self-driving-bicycle-huawei-engineers-operate-unmanned-06-14-2021/ ”
Problem description
Like the real-time lane recognition demonstrated in the previous video, it can be realized in a variety of ways. For example, a learning based approach can be used, that is, to train a deep learning model.
This paper does not use this method. This paper will introduce a simpler method: lane recognition with OpenCV.
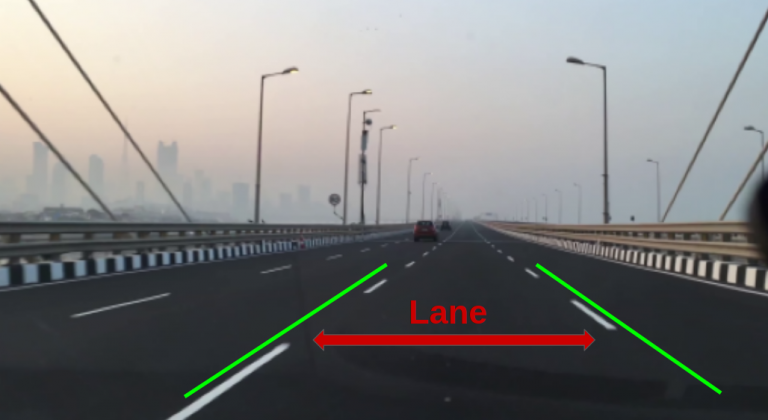
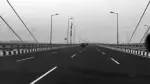
As shown in the figure above, the important task of lane recognition is to identify the lane separation lines on both sides of the lane, which is the key to the problem.
So, how to identify the lane separation of these lanes?
When driving out from the perspective of motor vehicles, there are many other objects in the scene, such as vehicles, roadside obstacles, street lights, etc. Through the previous videos and life attempts, it is easy to know that every frame in the scene is changing. This is the driving situation in real life - a little complicated.
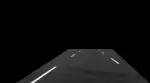
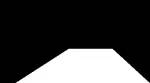
Therefore, to solve the problem of lane recognition, we must first find a way to ignore the objects that should not be seen in the scene - only the lane separation line. That is, as shown in the figure below, there are no other objects except the lane separation line. With the driving of motor vehicles, Lane separation lines are only presented in this scene.
In the following content, we will demonstrate how to select the specified area from the video, and introduce the necessary image preprocessing techniques.
Image mask
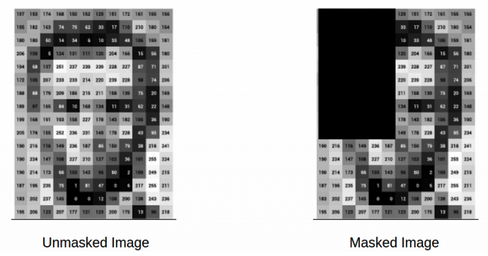
Image mask: use the selected image, figure or object to block the image to be processed (local or all) to control the area or process of image processing. In image processing, there are many requirements for image mask.
The essence of image mask is Numpy array, as shown in the figure below. Changing the pixel value of the selected area in the figure, for example, to 0, realizes the masking effect shown in the figure.
This is a very simple and effective way to remove unwanted objects.
Basic ideas
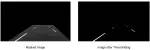
The first is to convert the picture to "black and white", that is, set a conversion threshold, so that you can get the effect on the right in the figure below.
The next problem to be solved is how to make the machine "see" the lane separation line. Hough Transformation is usually used, which is a feature extraction technology. For its mathematical principle, please refer to: http://math.itdiffer.com Relevant contents in.
Lane recognition with OpenCV
Let's start writing the code to realize lane recognition. The code of this article is released to AiStudio, and the relevant videos can also be downloaded in this project.
★ address of the project: https://aistudio.baidu.com/aistudio/projectdetail/3215224?contributionType=1 . ”
First introduce the following modules and libraries. If they are not installed locally, please install them yourself.
import os
import re
import cv2
import numpy as np
from tqdm import tqdm_notebook
import matplotlib.pyplot as plt
Then read in the video. This video file has been put into this project and can be downloaded by yourself.
prepare
Load the video file and extract several frames from the video as pictures for subsequent applications.
# Convert video frames into pictures at the specified frame rate
image_path = 'frames'

def get_frame(video, image_path, frame_rate=0.5):
    vidcap = cv2.VideoCapture(video)
    sec = 0
    count = 1
    image_lst = []
    while 1:
        vidcap.set(cv2.CAP_PROP_POS_MSEC, sec*1000)
        has_frames, image = vidcap.read()
        if has_frames:
            image_name = f"imge{count}.jpg"
            cv2.imwrite(f"{image_path}/{image_name}", image)
            image_lst.append(image_name)
        else:
            break
        count += 1
        sec += frame_rate
        sec = round(sec, 2)
    return image_lst

images = get_frame("road.mp4", 'frames', frame_rate=5)   # Here, a frame is taken every 5 seconds. In real business, it takes a long time.
len(images) # A total of 167 pictures were obtained
Pay special attention to the frame set above_ Rate = 5 is obviously rough, which is set for demonstration.
One of the pictures is shown below.
image_path = 'frames/'

# Show one of the pictures
idx = 2    # Specify an index
image_example = image_path + os.listdir("frames")[idx]
img = cv2.imread(image_example)
# display picture
plt.figure(figsize=(10,10))
plt.imshow(img, cmap= "gray")
plt.show()
Create mask
Obviously, the region we are interested in is a polygonal range, and other regions should be masked. Therefore, first specify the coordinates of the polygon, and then create a mask from it.
# Create 0 array
stencil = np.zeros_like(img[:,:,0])

# Determines the coordinates of the polygon
polygon = np.array([[80,370], [300,250], [450,250], [580,370]])

# Fill polygon with 1
cv2.fillConvexPoly(stencil, polygon, 1)

# Show polygon effect
plt.figure(figsize=(10,10))
plt.imshow(stencil, cmap= "gray")
plt.show()
Use the polygon as a mask on one of the pictures.
mask_img = cv2.bitwise_and(img[:,:,0],
                      img[:,:,0],
                      mask=stencil)

# Display effect
plt.figure(figsize=(10,10))
plt.imshow(mask_img, cmap= "gray")
plt.show()
Image preprocessing
In order to identify the lane in each frame of video, all pictures must be preprocessed, mainly in the two aspects mentioned above: threshold and Hough transform
- threshold
ret, thresh = cv2.threshold(img, 130, 145, cv2.THRESH_BINARY)

# plot image
plt.figure(figsize=(10,10))
plt.imshow(thresh, cmap= "gray")
plt.show()
- Hough transform
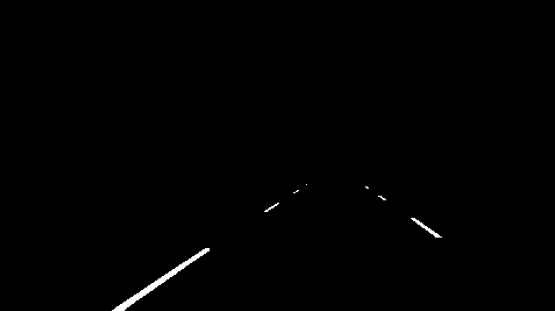
lines = cv2.HoughLinesP(thresh, 1, np.pi/180, 30, maxLineGap=200)

# Copy frame picture
dmy = img[:,:,0].copy()

# Draw the Hough line
for line in lines:
    x1, y1, x2, y2 = line[0]
    cv2.line(dmy, (x1, y1), (x2, y2), (255, 0, 0), 3)

# Drawing display
plt.figure(figsize=(10,10))
plt.imshow(dmy, cmap= "gray")
plt.show()
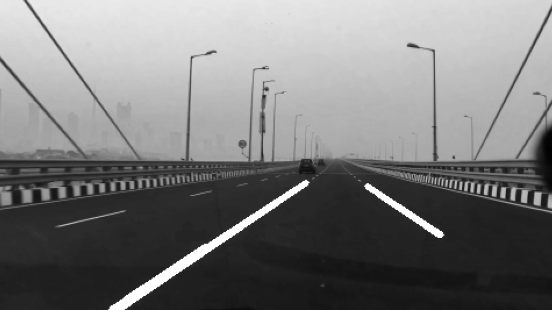
Now, use the above operation for each frame.
cnt = 0

for image in images:
    print(image)
    img = cv2.imread(f'frames/{image}')
    # Frame mask
    masked = cv2.bitwise_and(img[:,:,0], img[:,:,0], mask=stencil)

    # threshold
    ret, thresh = cv2.threshold(masked, 130, 145, cv2.THRESH_BINARY)

    # Hough transform
    lines = cv2.HoughLinesP(thresh, 1, np.pi/180, 30, maxLineGap=200)
    dmy = img[:,:,0].copy()

   # Recognized line
    try:
        for line in lines:
            x1, y1, x2, y2 = line[0]
            cv2.line(dmy, (x1, y1), (x2, y2), (255, 0, 0), 3)

        cv2.imwrite('detected/'+str(cnt)+'.png',dmy)

    except TypeError:
        cv2.imwrite('detected/'+str(cnt)+'.png',img)

    cnt+= 1
For video
# enter path
pathIn= 'detected/'

# Output video
pathOut = 'roads_v2.mp4'

# Sets the number of frames per second
fps = 30.0

from os.path import isfile, join

# read file
files = [f for f in os.listdir(pathIn) if isfile(join(pathIn, f))]
files.sort(key=lambda f: int(re.sub('\D', '', f)))
Save all detected Lane frames to the list.
frame_list = []

for i in range(len(files)):
    filename=pathIn + files[i]
    #reading each files
    img = cv2.imread(filename)
    height, width, layers = img.shape
    size = (width,height)

    #inserting the frames into an image array
    frame_list.append(img)
Finally, all frames are merged into video.
# write the video
out = cv2.VideoWriter(pathOut,cv2.VideoWriter_fourcc(*'DIVX'),
                      fps, size)

for i in range(len(frame_list)):
    # writing to a image array
    out.write(frame_list[i])

out.release()