LCD driver under Linux
In linux driver development, it is essential to use lcd for human-computer interaction. Therefore, how can we initialize lcd in the kernel?
1. LCD screen IO configuration
Open dts device tree file, create lcd child nodes in iomuxc
pinctrl_lcdif_dat: lcdifdatgrp {

fsl,pins = <
	 MX6UL_PAD_LCD_DATA00__LCDIF_DATA00 0x79
	 MX6UL_PAD_LCD_DATA01__LCDIF_DATA01 0x79
	 MX6UL_PAD_LCD_DATA02__LCDIF_DATA02 0x79
	 MX6UL_PAD_LCD_DATA03__LCDIF_DATA03 0x79
	 MX6UL_PAD_LCD_DATA04__LCDIF_DATA04 0x79
	 MX6UL_PAD_LCD_DATA05__LCDIF_DATA05 0x79
	 MX6UL_PAD_LCD_DATA06__LCDIF_DATA06 0x79
	 MX6UL_PAD_LCD_DATA07__LCDIF_DATA07 0x79
	 MX6UL_PAD_LCD_DATA08__LCDIF_DATA08 0x79
	 MX6UL_PAD_LCD_DATA09__LCDIF_DATA09 0x79
	 MX6UL_PAD_LCD_DATA10__LCDIF_DATA10 0x79
	 MX6UL_PAD_LCD_DATA11__LCDIF_DATA11 0x79
	 MX6UL_PAD_LCD_DATA12__LCDIF_DATA12 0x79
	 MX6UL_PAD_LCD_DATA13__LCDIF_DATA13 0x79
	 MX6UL_PAD_LCD_DATA14__LCDIF_DATA14 0x79
	 MX6UL_PAD_LCD_DATA15__LCDIF_DATA15 0x79
	 MX6UL_PAD_LCD_DATA16__LCDIF_DATA16 0x79
	 MX6UL_PAD_LCD_DATA17__LCDIF_DATA17 0x79
	 MX6UL_PAD_LCD_DATA18__LCDIF_DATA18 0x79
	 MX6UL_PAD_LCD_DATA19__LCDIF_DATA19 0x79
	 MX6UL_PAD_LCD_DATA20__LCDIF_DATA20 0x79
	 MX6UL_PAD_LCD_DATA21__LCDIF_DATA21 0x79
	 MX6UL_PAD_LCD_DATA22__LCDIF_DATA22 0x79
	 MX6UL_PAD_LCD_DATA23__LCDIF_DATA23 0x79
	>;
 };
pinctrl_lcdif_ctrl: lcdifctrlgrp {

fsl,pins = <
	 MX6UL_PAD_LCD_CLK__LCDIF_CLK 0x79
	 MX6UL_PAD_LCD_ENABLE__LCDIF_ENABLE 0x79
	 MX6UL_PAD_LCD_HSYNC__LCDIF_HSYNC 0x79
	 MX6UL_PAD_LCD_VSYNC__LCDIF_VSYNC 0x79

>;
 pinctrl_pwm1: pwm1grp {
	fsl,pins = <
		MX6UL_PAD_GPIO1_IO08__PWM1_OUT   0x110b0
	>;
 };
Child node pinctrl_lcdif_dat, configuration item for 24 data lines of RGB LCD.
Child node pinctrl_ lcdif_ CTRL, four control line configuration items of RGB LCD, including CLK, ENABLE, VSYNC and HSYNC.
Child node pinctrl_pwm1,LCD backlight PWM pin configuration item. This pin should be set according to the actual situation. The backlight IO of LCD should be the same as that of semiconductor manufacturer
Consistent with the development board.
2. LCD screen parameter node information modification
Go on, on Create parameter information node in dts device tree
&lcdif {
	pinctrl-names = "default";
	pinctrl-0 = <&pinctrl_lcdif_dat
		     &pinctrl_lcdif_ctrl>;
	display = <&display0>;
	status = "okay";

	display0: display {
		bits-per-pixel = <32>;
		bus-width = <24>;

		display-timings {
			native-mode = <&timing0>;
			timing0: timing0 {
			clock-frequency = <31000000>;
			hactive = <800>;
			vactive = <480>;
			hfront-porch = <40>;
			hback-porch = <88>;
			hsync-len = <48>;
			vback-porch = <32>;
			vfront-porch = <13>;
			vsync-len = <3>;

			hsync-active = <0>;
			vsync-active = <0>;
			de-active = <1>;
			pixelclk-active = <0>;
			};
		};
	};
};
3. LCD screen backlight node information
LCD backlight requires IO pin multiplexing to PWM, so to set IO pin configuration, PWM1 node should also be set
pinctrl_pwm1: pwm1grp {
	fsl,pins = <
		MX6UL_PAD_GPIO1_IO08__PWM1_OUT 0x110b0
	>;
 };
 &pwm1 {
	pinctrl-names = "default";
	pinctrl-0 = <&pinctrl_pwm1>;
	status = "okay";
};
There are also systems that set the brightness level of backlight, but generally manufacturers will write the corresponding lcd node file.
4. Set LCD as terminal console
We transplant the serial port to debug the terminal of the development board. After we use the lcd, we can use the lcd as the terminal display, and then cooperate with the keyboard perfectly. So how can we make the lcd input and display for the terminal?
1) Set bootargs in uboot
bootargs=console=tty1 console=ttymxc0,115200 root=/dev/nfs rw nfsroot=192.168.1.186:/home/gg/linux/nfs/rootfs ip=192.168.1.55:192.168.1.186:192.168.1.1:255.255.255.0::eth0:off
Here we set the console twice. For the first time, set the console=tty1, that is, set the LCD screen as the console. For the second time, set the console = ttymxc0115200, that is, set the serial port as the console. It is equivalent to opening two consoles, one is LCD and the other is serial port. When you restart the development board, you will find that both LCD and serial port will display Linux startup log information. However, at this time, we can't use LCD as the terminal for interaction, because our setting has not been completed.
2) Modify / etc/inittab file
Open the / etc/inittab file in the root file system of the development board and add the following line:
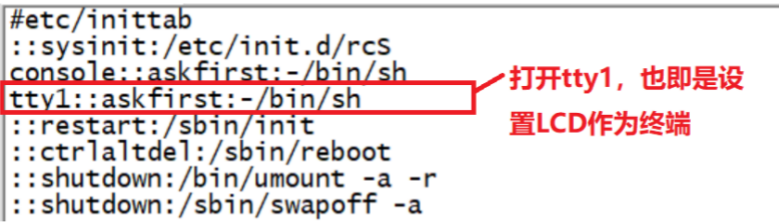
Save, exit and restart. So far, we have two sets of terminals, one based on serial port and the other is the LCD screen of our development board
3) LCD backlight adjustment
Enter the following directory:
/sys/devices/platform/backlight/backlight/backlight
Then adjust the brightness through the command echo 7 > brightness. The brightness range is 0-7, which can be modified by yourself.
5. Run test
We can output "hello world!" to the LCD screen through the following command line
echo hello world > /dev/tty1
