In e-commerce, payment and other fields, there are often such scenarios. If the user gives up payment after placing an order, the order will be closed after the specified time period. Careful, you must find that there is such logic as Yibao and Yidong, and the time is very accurate, and the error is within 1s; How did they achieve it?
The general practice is as follows
- Scheduled task close order
- rocketmq delay queue
- rabbitmq dead letter queue
- Time wheel algorithm
- redis expired listening
1, Scheduled task close order (low est)
In general, the least recommended method is the customs clearance method, which is the scheduled task method. The reason can be explained by looking at the following figure
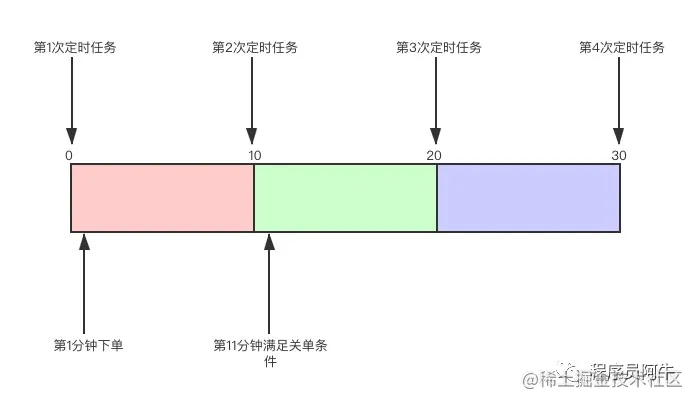
We assume that the customs clearance time is 10 minutes after the order is placed, and the scheduled task interval is also 10 minutes; From the above figure, we can see that if an order is placed in the first minute, it can only be scanned to perform customs clearance in the 20th minute, so the error can reach 10 minutes, which is unacceptable in many scenarios. In addition, it is necessary to scan the main order number frequently, resulting in the consumption of network IO and disk IO and a certain impact on real-time transactions, so PASS
2, rocketmq delay queue mode
After sending the message to the message server, the delayed message producer does not want to be consumed immediately, but waits for a specified time before it can be consumed by consumers. This kind of message is usually called delayed message. In the open source version of RocketMQ, delay messages are supported, but delay messages with arbitrary time accuracy are not supported. Only specific levels of delay messages are supported. The message delay levels are 1s, 5S, 10s, 30s, 1M, 2m, 3M, 4m, 6m, 7m, 8m, 9m, 10m, 20m, 30m, 1H, 2h, a total of 18 levels.
Send delay message (producer)
/**
     * Push delay message
     * @param topic
     * @param body
     * @param producerGroup
     * @return boolean
     */
    public boolean sendMessage(String topic, String body, String producerGroup)
    {
        try
        {
            Message recordMsg = new Message(topic, body.getBytes());
            producer.setProducerGroup(producerGroup);

            //Set the message delay level. I set 14 here, which corresponds to a delay of 10 minutes
            // "1s 5s 10s 30s 1m 2m 3m 4m 5m 6m 7m 8m 9m 10m 20m 30m 1h 2h"
            recordMsg.setDelayTimeLevel(14);
            // Send messages to a Broker
            SendResult sendResult = producer.send(recordMsg);
            // Whether the message was successfully delivered is returned through sendResult
            log.info("Send delay message result:======sendResult: {}", sendResult);
            DateFormat format =new SimpleDateFormat("yyyy-MM-dd HH:mm:ss");
            log.info("Sent on:{}", format.format(new Date()));

            return true;
        }
        catch (Exception e)
        {
            e.printStackTrace();
            log.error("Delayed message queue push message exception:{},Push content:{}", e.getMessage(), body);
        }
        return false;
    }
Consumption delay message (consumer)
/**
     * Receive delay message
     *
     * @param topic
     * @param consumerGroup
     * @param messageHandler
     */
    public void messageListener(String topic, String consumerGroup, MessageListenerConcurrently messageHandler)
{
        ThreadPoolUtil.execute(() ->
        {
            try
            {
                DefaultMQPushConsumer consumer = new DefaultMQPushConsumer();
                consumer.setConsumerGroup(consumerGroup);
                consumer.setVipChannelEnabled(false);
                consumer.setNamesrvAddr(address);
                //Set the policy for consumers to pull messages, * means to consume all messages under the topic. You can also specify tag for message filtering
                consumer.subscribe(topic, "*");
                //The consumer starts message listening. Once the message sent by the producer is monitored, it prints the message, which is similar to the handler delivery in rabbitmq
                consumer.registerMessageListener(messageHandler);
                consumer.start();
                log.info("Start delay message queue listening succeeded:" + topic);
            }
            catch (MQClientException e)
            {
                log.error("Failed to start delayed message queue listening:{}", e.getErrorMessage());
                System.exit(1);
            }
        });
    }
Implement the listening class to handle the specific logic
/**
 * Delayed message listening
 *
 */
@Component
public class CourseOrderTimeoutListener implements ApplicationListener<ApplicationReadyEvent>
{

    @Resource
    private MQUtil mqUtil;

    @Resource
    private CourseOrderTimeoutHandler courseOrderTimeoutHandler;

    @Override
    public void onApplicationEvent(ApplicationReadyEvent applicationReadyEvent)
{
        // Order timeout listening
        mqUtil.messageListener(EnumTopic.ORDER_TIMEOUT, EnumGroup.ORDER_TIMEOUT_GROUP, courseOrderTimeoutHandler);
    }
}
/**
* Implement listening
*/
@Slf4j
@Component
public class CourseOrderTimeoutHandler implements MessageListenerConcurrently
{
@Override
public ConsumeConcurrentlyStatus consumeMessage(List<MessageExt> list, ConsumeConcurrentlyContext consumeConcurrentlyContext) {
for (MessageExt msg : list)
{
// Get message body
String body = new String(msg.getBody());
JSONObject userJson = JSONObject.parseObject(body);
TCourseBuy courseBuyDetails = JSON.toJavaObject(userJson, TCourseBuy.class);
// Processing specific business logic,,,,,
DateFormat format =new SimpleDateFormat("yyyy-MM-dd HH:mm:ss");
log.info("Consumption time:{}", format.format(new Date()));
return ConsumeConcurrentlyStatus.CONSUME_SUCCESS;
}
}This method is much better than scheduled tasks, but it has a fatal disadvantage that there are only 18 delay levels (the commercial version supports custom time). What should we do if we want to set the closing order time to 15 minutes? Obviously not flexible enough.
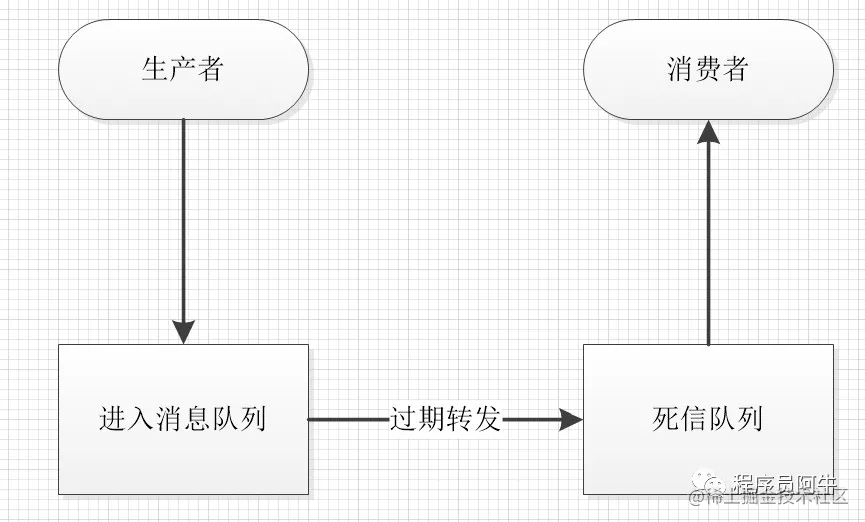
3, rabbitmq dead letter queue
Rabbitmq itself has no delay queue and can only be implemented through the characteristics of rabbitmq queue. If you want rabbitmq to implement delay queue, you need to use rabbitmq's dead letter switch (Exchange) and message lifetime TTL (Time To Live)
A message from the dead letter switch will enter the dead letter switch if the following conditions are met. Remember that this is a switch rather than a queue. A switch can correspond to many queues.
A message is rejected by the Consumer, and the request in the parameter of the reject method is false. In other words, it will not be put in the queue again and used by other consumers. The TTL of the above message has arrived and the message has expired.
The queue length limit is full. The messages in the front row will be discarded or thrown on the dead letter route. Dead letter switch is an ordinary switch. It is called dead letter switch because we throw in expired messages. It does not mean that dead letter switch is a specific switch
Message TTL (message lifetime) the TTL of a message is the lifetime of the message. RabbitMQ can set TTL for queues and messages respectively. Setting the queue is the retention time of the queue without consumers. You can also set each individual message separately. After this time, we think the news is dead, which is called dead letter. If the queue is set and the message is set, the value will be smaller. Therefore, if a message is routed to different queues, the time of death of the message may be different (different queue settings). The TTL of a single message is discussed here, because it is the key to realize the delay task.
byte[] messageBodyBytes = "Hello, world!".getBytes();
AMQP.BasicProperties properties = new AMQP.BasicProperties();
properties.setExpiration("60000");
channel.basicPublish("my-exchange", "queue-key", properties, messageBodyBytes);
You can set the time by setting the expiration field of the message or the x-message-ttl attribute. Both have the same effect. Only the expiration field is a string parameter, so write an int type string: when the above message is thrown into the queue, after 60 seconds, if it is not consumed, it will die. Will not be consumed by consumers. Behind this message, there is no "dead" message on the top, which is consumed by consumers. Dead letter will not be deleted or released in the queue. It will be counted into the number of messages in the queue
Processing flow chart
Create switches and Queues
Create dead letter switch
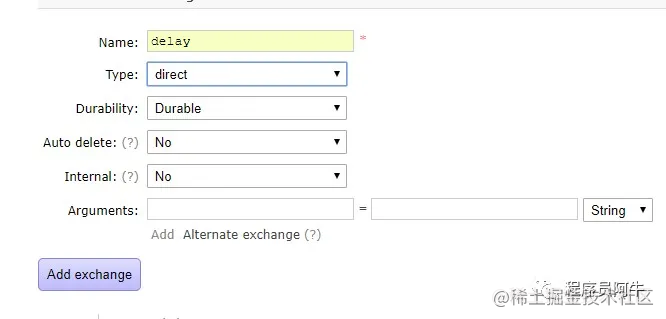
As shown in the figure, it is to create an ordinary switch. Here, in order to facilitate differentiation, the name of the switch is delay
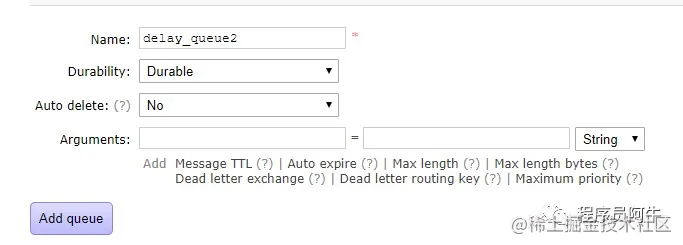
Create an automatic expiration message queue. The main function of this queue is to make messages expire regularly. For example, if we need to close orders in 2 hours, we need to put messages into this queue and set the message expiration time to 2 hours
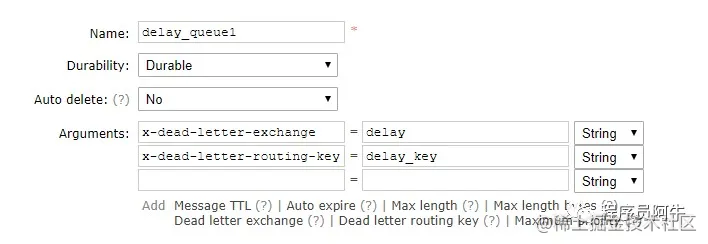
Create a named delay_ For the queue with automatic expiration of queue1, of course, the parameters above the picture will not make the message expire automatically, because we have not set the x-message TTL parameter. If the messages in the whole queue are the same, it can be set. For flexibility, it is not set here. The other two parameters x-dead-letter-exchange represent the switch into which the message will enter after the message expires, Delay is configured here, that is, the dead letter switch. x-dead-letter-routing-key is the routing key that enters the dead letter switch after the configuration message expires. It is the same as the routing key that sends the message. The messages are put into different queues according to this key
Create a message processing queue. This queue is the queue that really processes messages. All messages entering this queue will be processed
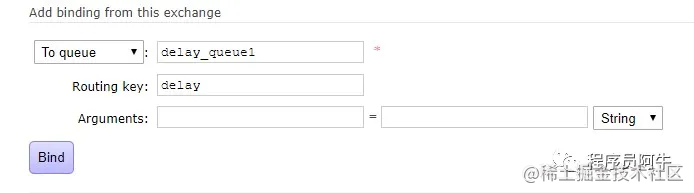
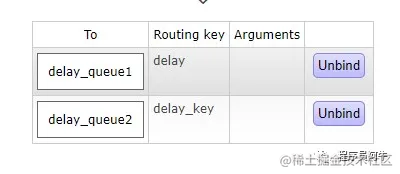
The name of the message queue is delay_ The Queue2 message queue is bound to the switch. Enter the switch details page and bind the two queues created (delayqueue1 and delayqueue2) to the switch
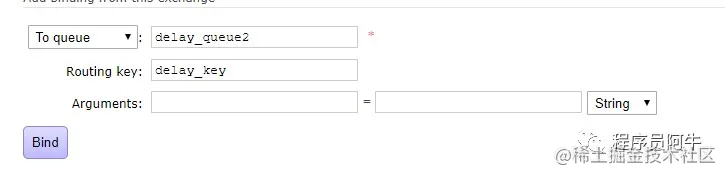
The key of delayqueue2 should be set as the x-dead-letter-routing-key parameter to create an automatically expired queue, so that messages can be automatically put into delay when they expire_ Queue2 the bound management page in the queue is as follows:
Of course, this binding can also be implemented by code, just for intuitive performance, so the management platform used in this paper is to operate and send messages
String msg = "hello word";
MessageProperties messageProperties = newMessageProperties();
messageProperties.setExpiration("6000");
messageProperties.setCorrelationId(UUID.randomUUID().toString().getBytes());
Message message = newMessage(msg.getBytes(), messageProperties);
rabbitTemplate.convertAndSend("delay", "delay",message);
Set the message to expire after 6 seconds. Note: you must not set delay because you want the message to expire automatically_ The listening of queue1 cannot allow the messages in this queue to be received, otherwise once the messages are consumed, there will be no expiration
Receive message receive message configure delay_ Just listen to Queue2
package wang.raye.rabbitmq.demo1;
import org.springframework.amqp.core.AcknowledgeMode;
import org.springframework.amqp.core.Binding;
import org.springframework.amqp.core.BindingBuilder;
import org.springframework.amqp.core.DirectExchange;
import org.springframework.amqp.core.Message;
import org.springframework.amqp.core.Queue;
import org.springframework.amqp.rabbit.connection.CachingConnectionFactory;
import org.springframework.amqp.rabbit.connection.ConnectionFactory;
import org.springframework.amqp.rabbit.core.ChannelAwareMessageListener;
import org.springframework.amqp.rabbit.listener.SimpleMessageListenerContainer;
import org.springframework.beans.factory.annotation.Autowired;
import org.springframework.context.annotation.Bean;
import org.springframework.context.annotation.Configuration;
@Configuration
publicclassDelayQueue{
    /** The name of the message switch*/
    publicstaticfinalString EXCHANGE = "delay";
    /** Queue key1*/
    publicstaticfinalString ROUTINGKEY1 = "delay";
    /** Queue key2*/
    publicstaticfinalString ROUTINGKEY2 = "delay_key";
    /**
     * Configure link information
     * @return
     */
    @Bean
    publicConnectionFactory connectionFactory() {
        CachingConnectionFactory connectionFactory = newCachingConnectionFactory("120.76.237.8",5672);
        connectionFactory.setUsername("kberp");
        connectionFactory.setPassword("kberp");
        connectionFactory.setVirtualHost("/");
        connectionFactory.setPublisherConfirms(true); // Must be set
        return connectionFactory;
    }
    /**
     * Configure message switch
     * Configuration for consumers
        FanoutExchange: Distribute messages to all binding queues without the concept of routingkey
        HeadersExchange : Match by adding the attribute key value
        DirectExchange:Distribute to the specified queue according to routingkey
        TopicExchange:Multi keyword matching
     */
    @Bean
    publicDirectExchange defaultExchange() {
        returnnewDirectExchange(EXCHANGE, true, false);
    }
    /**
     * Configure message queuing 2
     * Configuration for consumers
     * @return
     */
    @Bean
    publicQueue queue() {
       returnnewQueue("delay_queue2", true); //Queue persistence
    }
    /**
     * Bind message queue 2 to the switch
     * Configuration for consumers
     * @return
     */
    @Bean
    @Autowired
    publicBinding binding() {
        returnBindingBuilder.bind(queue()).to(defaultExchange()).with(DelayQueue.ROUTINGKEY2);
    }
    /**
     * Accept message listening. This listening will accept messages from message queue 1
     * Configuration for consumers
     * @return
     */
    @Bean
    @Autowired
    publicSimpleMessageListenerContainer messageContainer2(ConnectionFactory connectionFactory) {
        SimpleMessageListenerContainer container = newSimpleMessageListenerContainer(connectionFactory());
        container.setQueues(queue());
        container.setExposeListenerChannel(true);
        container.setMaxConcurrentConsumers(1);
        container.setConcurrentConsumers(1);
        container.setAcknowledgeMode(AcknowledgeMode.MANUAL); //Set confirmation mode manual confirmation
        container.setMessageListener(newChannelAwareMessageListener() {
            publicvoid onMessage(Message message, com.rabbitmq.client.Channel channel) throwsException{
                byte[] body = message.getBody();
                System.out.println("delay_queue2 Received message : "+ newString(body));
                channel.basicAck(message.getMessageProperties().getDeliveryTag(), false); //Confirmation message successfully consumed
            }
        });
        return container;
    }
}
In this way, you can customize the time of entering the dead letter queue; Isn't it perfect, but the situation of some small partners is that the message middleware is rocketmq, and the company can't use the commercial version. What should we do? Then go to the next section
4, Time wheel algorithm
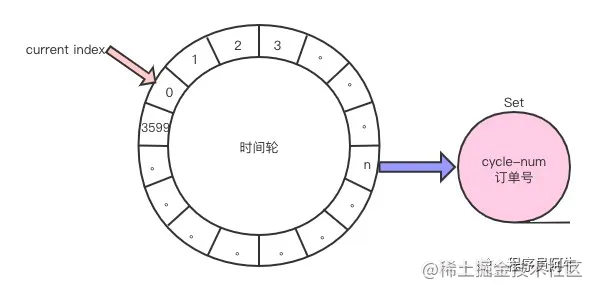
(1) Create a ring queue. For example, you can create a ring queue containing 3600 slot s (essentially an array)
(2) Task Set. Each slot on the ring is a Set. At the same time, start a timer. This timer moves one grid in the above ring queue every 1s, and there is a Current Index pointer to identify the slot being detected.
There are two important attributes in the Task structure: (1) cycle num: when the Slot is scanned in the Current Index, execute the Task (2) the order number and the order number to close (or other information, such as a Task based on an order number)
Suppose the Current Index points to grid 0. For example, after 3610 seconds, an order needs to be closed. Just: (1) calculate which slot the order should be placed in. When we calculate, it now points to grid 10 after 13610 seconds, so the Task should be placed in the Set of the 10th slot. (2) calculate the cycle num of the Task, because the ring queue is grid 3600 (move one grid per second, exactly 1 hour). This Task is executed after 3610 seconds, so it should be executed after 3610 / 3600 = 1, so cycle num = 1
The Current Index keeps moving and moves to a new slot every second. For each Task in this slot, see whether the cycle num is 0: (1) if it is not 0, it indicates that it needs to move a few more rounds and reduce the cycle num by 1 (2) if it is 0, it indicates that the customs clearance Task is about to be executed. Take out the order number and execute the customs clearance (you can use a separate thread to execute the Task) , and delete the order information from the Set. (1) no need to poll all orders, high efficiency. (2) one order, the Task is executed only once. (3) good timeliness, accurate to seconds (controlling the movement frequency of timer can control the accuracy)
5, redis expired listening
1. Modify the value of notify keyspace events in redis.windows.conf configuration file. By default, the value of notify keyspace events is "" and modified to notify keyspace events ex, so that the expiration event is enabled
2. Create a configuration class RedisListenerConfig (configure the RedisMessageListenerContainer Bean)
package com.zjt.shop.config;
import org.springframework.beans.factory.annotation.Autowired;
import org.springframework.context.annotation.Bean;
import org.springframework.context.annotation.Configuration;
import org.springframework.data.redis.connection.RedisConnectionFactory;
import org.springframework.data.redis.core.RedisTemplate;
import org.springframework.data.redis.listener.RedisMessageListenerContainer;
import org.springframework.data.redis.serializer.GenericJackson2JsonRedisSerializer;
import org.springframework.data.redis.serializer.StringRedisSerializer;


@Configuration
public class RedisListenerConfig {

    @Autowired
    private RedisTemplate redisTemplate;

    /**
     * @return
     */
    @Bean
    public RedisTemplate redisTemplateInit() {

        // key serialization
        redisTemplate.setKeySerializer(new StringRedisSerializer());

        //val instantiation
        redisTemplate.setValueSerializer(new GenericJackson2JsonRedisSerializer());

        return redisTemplate;
    }

    @Bean
    RedisMessageListenerContainer container(RedisConnectionFactory connectionFactory) {
        RedisMessageListenerContainer container = new RedisMessageListenerContainer();
        container.setConnectionFactory(connectionFactory);
        return container;
    }

}
3. Inherit KeyExpirationEventMessageListener and create a listening class for redis expiration events
package com.zjt.shop.common.util;
import com.baomidou.mybatisplus.core.conditions.query.QueryWrapper;
import com.baomidou.mybatisplus.core.conditions.update.UpdateWrapper;
import com.zjt.shop.modules.order.service.OrderInfoService;
import com.zjt.shop.modules.product.entity.OrderInfoEntity;
import com.zjt.shop.modules.product.mapper.OrderInfoMapper;
import lombok.extern.slf4j.Slf4j;
import org.springframework.beans.factory.annotation.Autowired;
import org.springframework.data.redis.connection.Message;
import org.springframework.data.redis.listener.KeyExpirationEventMessageListener;
import org.springframework.data.redis.listener.RedisMessageListenerContainer;
import org.springframework.stereotype.Component;


@Slf4j
@Component
public class RedisKeyExpirationListener extends KeyExpirationEventMessageListener {

    public RedisKeyExpirationListener(RedisMessageListenerContainer listenerContainer) {
        super(listenerContainer);
    }

    @Autowired
    private OrderInfoMapper orderInfoMapper;

    /**
     * Perform data processing for redis data failure events
     * @param message
     * @param pattern
     */
    @Override
    public void onMessage(Message message, byte[] pattern) {
      try {
          String key = message.toString();
          //Filter the keys representing order invalidation from the invalid keys
          if (key != null && key.startsWith("order_")) {
              //Intercept the order number and query the order. If it is in unpaid status, it is - cancel the order
              String orderNo = key.substring(6);
              QueryWrapper<OrderInfoEntity> queryWrapper = new QueryWrapper<>();
              queryWrapper.eq("order_no",orderNo);
              OrderInfoEntity orderInfo = orderInfoMapper.selectOne(queryWrapper);
              if (orderInfo != null) {
                  if (orderInfo.getOrderState() == 0) {   //To be paid
                      orderInfo.setOrderState(4);         //Cancelled
                      orderInfoMapper.updateById(orderInfo);
                      log.info("Order No[" + orderNo + "]Overdue payment-Automatically modified to cancelled status");
                  }
              }
          }
      } catch (Exception e) {
          e.printStackTrace();
          log.error("[Modify payment order expiration status [exception]:" + e.getMessage());
      }
    }
}
4: Through the test, the redis client saves an order with an effective time of 3s:

result:

Conclusion: these methods are just some personal thoughts about customs closing. There may be some omissions in some places. Please note directly in official account. If you have a better way of closing, you can communicate at any time.
This article is transferred from https://juejin.cn/post/6987233263660040206 , in case of infringement, please contact to delete.