preface
The last article introduced how to Create CANoe project , you need to read this article before you can understand the whole project, including key information such as nodes, messages and signals.
The focus of this paper is to analyze how the CAPL language of each node in the project is written. The main purpose is to understand the implementation of the whole project and share the specific theoretical knowledge of CAPL language later.
CAPL is the abbreviation of communication application programming language. CAPL is similar to the syntax of C language. CAPL syntax is C language, and there are some C + + features, such as this pointer, events, etc. I think it has some interoperability with the JavaScript language I learned before.
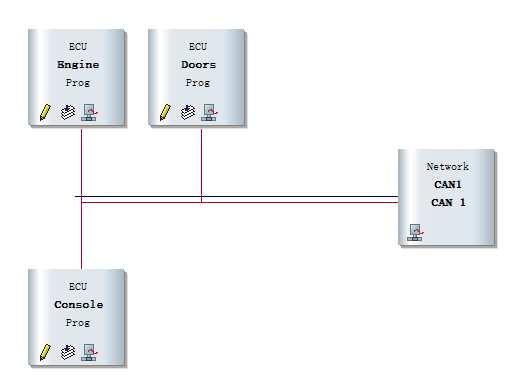
As shown in the figure, we will introduce the CAPL programs of the three nodes respectively.
Engine.can
First, let's take a look at the Engine node Engine Can code.
/*@!Encoding:936*/
includes
{
}
variables
{
//The following three messages are defined for transmission
message EngineStatus EngineStat; //Define a message variable EngineStat whose message name is EngineStatus in DBC
message LockingRq LkCtrlRq;
message WindowRq WindowCtrl;
//The following timer is for simulating the cyclic message transmission
msTimer msTimer_EngineStatus; //Define an ms timer msTimer_EngineStatus
}
on start
{
  setTimerCyclic(msTimer_EngineStatus,100);
}
on timer msTimer_EngineStatus{       //Response timer event msTimer_EngineStatus, send the message to the bus
  EngineStat.Velocity = @sysvar::testNS::Velocity; //Gets the value of the variable input in the panel
  EngineStat.IgnitionStatus = @sysvar::testNS::IgnitionStart;
  output(EngineStat);  //Send message to bus
}
Program structure
First, from a macro point of view, the structure of this CAPL program includes header files, global variables and event functions, and there is no user-defined function.
The includes {} header file contains descriptions of other files and dll files, variables {} is the declaration and definition of global variables, and on start {} and on timer {} are various events used in the project.
Global variable
- Message message variable
CAPL provides message classes corresponding to various networks. Taking CAN message as an example, this paper defines the format of message variable: message + message ID/message name + variable
Use the message keyword to declare a message variable, followed by the message ID or the message name after the CANoe project is imported into DBC, and then the message variable name to be used in the CAPL program.
message EngineStatus EngineStat;
As above, define a message variable enginstat with message name as EngineStatus in DBC. In addition, define message LockingRq and message WindowRq.
2. msTimer timer variable
CAPL provides two timer variables: timer: timer based on seconds (s) and msTimer: timer based on milliseconds (ms).
msTimer msTimer_EngineStatus;
As above, an ms timer mstimer is defined_ EngineStatus.
Event function
CAPL is a process oriented and event driven C-like language.
The difference between event driven execution and sequential execution is as follows:
Sequential execution: in the sequential execution process, subroutines or procedure functions are executed sentence by sentence according to the code writing order.
Event driven: the CAPL program is event driven. The corresponding event handling function will be run only when the specified event occurs during the operation of the project.
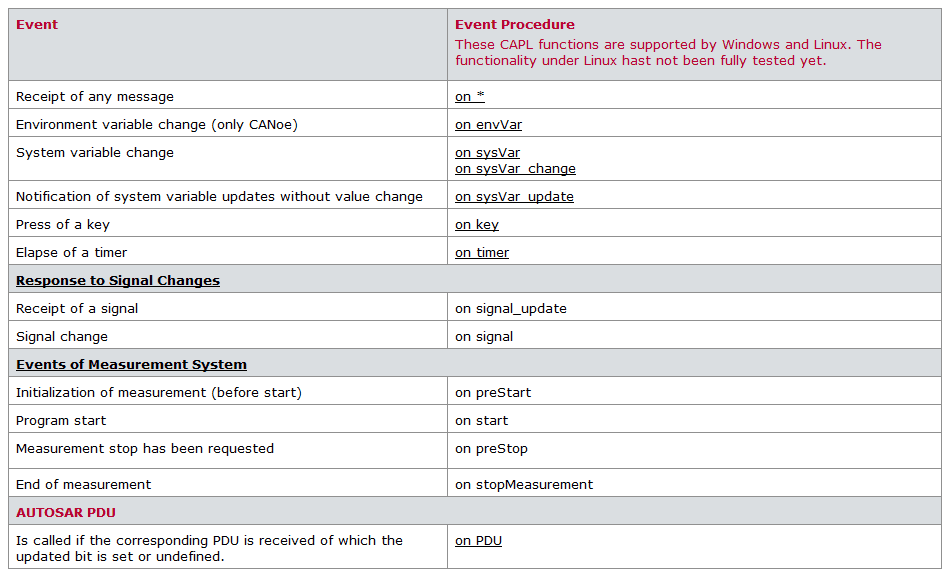
Event start keyword on
If an event is added after on and the project runtime condition is triggered, the statement in the function body will be executed.
Keyword this
In system variable, environment variable or CAN message event, the data content it refers to CAN be accessed with this keyword.
on start
{
setTimerCyclic(msTimer_EngineStatus,100);
}As above, the on start {} function is called at the beginning of the project, and setTimerCyclic(msTimer_EngineStatus,100) sets the timer mstimer_ Enginestatus is a 100 ms cycle timer;
on timer msTimer_EngineStatus{ //Response timer event msTimer_EngineStatus, send the message to the bus
EngineStat.Velocity = @sysvar::testNS::Velocity; //Gets the value of the variable input in the panel
EngineStat.IgnitionStatus = @sysvar::testNS::IgnitionStart;
output(EngineStat); //Send message to bus
}As described above, a response timer event is defined, in which EngineStat Velocity = @sysvar::testNS::Velocity; Indicates that after the system variable velocity in the panel changes, it is assigned to the velocity signal of the EngineStat message. The last output() function sends the message to the bus.
Whole engine The code of can realizes the cyclic execution of msTimer_EngineStatus event in a cycle (100ms) and sends the EngineStatus message to the bus every 100ms. If the two signals of the message in the panel change, it will be updated in real time.
Doors.can
includes
{

}

variables
{
  byte WindowState = 0;
  byte IgnitionState;

  message LockingState LockingStat;
  message WindowState WindowStat;
}


on message EngineStatus
{
  //Storing Ignition State
  if(this.IgnitionStatus) IgnitionState = 1; //Ignition is on
  else IgnitionState = 0; // Ignition is off

  //Locking based on velocity
  if(IgnitionState == 1 && this.Velocity > 15 && LockingStat.LockState == 0){
    LockingStat.LockState = 1;
    output(LockingStat);
  }
}

on message WindowRq{
   if(IgnitionState){
     if(this.WindowRequest == 1) //Roll up window
      if(WindowState > 0) WindowState--;
     if(this.WindowRequest == 2) //Roll down window
      if(WindowState<15) WindowState++;
   }
  WindowStat.WindowPosition = WindowState;
  output(WindowStat);
}

on message LockingRq{
    if(this.LockRequest)  LockingStat.LockState = 0;
    else LockingStat.LockState = 1;
    output(LockingStat);
}
data structure
variables
{
  byte WindowState = 0;
  byte IgnitionState;

  message LockingState LockingStat;
  message WindowState WindowStat;
}
As above, two message variables LockingStat and WindowStat are defined, as well as the variables WindowState and IgnitionState with one byte declared in byte.
Event function
CAN message events
Define the message event through "on message", which will be called when the specified message is received.
on message EngineStatus
{
  //Storing Ignition State
  if(this.IgnitionStatus) IgnitionState = 1; //Ignition is on
  else IgnitionState = 0; // Ignition is off

  //Locking based on velocity
  if(IgnitionState == 1 && this.Velocity > 15 && LockingStat.LockState == 0){
    LockingStat.LockState = 1;
    output(LockingStat);
  }
}
As above, after receiving the message EngineStatus, execute the contents in the function brackets. When the signal IgnitionStatus in the message is 1, the IgnitionState variable is assigned as 1, indicating that the vehicle has been started; otherwise, the variable is assigned as 0.
The second if statement indicates that when the car has started, IgnitionState == 1, and the vehicle speed is greater than 15this Velocity > 15, the vehicle is unlocked lockingstat Lockstate. When these three conditions are met at the same time, lockingstat Set lockstate to 1 to lock the car. Then, the LockingState message is sent to the bus.
The contents of the other two message events are the same. I won't repeat them here.
console.can
/*@!Encoding:936*/
includes
{

}

variables
{
  message LockingRq LkCtrlRq;
  message WindowRq WinRq;
}

on sysvar_update testNS::LockRq{
  if(@sysvar::testNS::LockRq) LkCtrlRq.LockRequest = 1; //request unlock doors
  else LkCtrlRq.LockRequest = 0; //request Lock Doors
  output(LkCtrlRq); //Outputs message onto the bus
}

on sysvar_update testNS::WindowRequest{
  WinRq.WindowRequest = @sysvar::testNS::WindowRequest;
  output(WinRq); //Outputs message onto the bus
}

on message WindowState{
  @sysvar::testNS::WindowState = this.WindowPosition;
}
Event function
on message WindowState{
  @sysvar::testNS::WindowState = this.WindowPosition;
}
As above, after receiving the message WindowState, assign the value of the signal WindowPosition to the system variable WindowState, that is, the change of the value can be seen on the panel.
Read or set the value of the system variable. Use '@' or sysGetVariable. The system variable should be preceded by its domain space through the domain operator "::.
on sysvar_update testNS::WindowRequest{
  WinRq.WindowRequest = @sysvar::testNS::WindowRequest;
  output(WinRq); //Outputs message onto the bus
}
As above, after operating the system variable WindowRequest on the panel panel, the contents in the function brackets will be executed, the value of the system variable will be assigned to the WindowRequest signal of the message, and then the message will be sent to the bus.
On sysvar and on sysvar_ The difference between update
on sysvar: triggered only when the value changes
on sysvar_update: as long as the system variable is operated, it will be triggered if the value does not change