brief introduction
After the previous study, we have basically mastered the commonly used api and painting skills. Now, through the implementation of a small game, we can deeply understand how the canvas is used in the project.
Basic introduction to the game
The user has a spaceship, which can move left and right with the arrow keys and fire with the spacebar. The enemy spacecraft at the top of the screen moves back and forth, firing missiles at random. Then, according to the collision between the missile and the spaceship, we can judge when the user's spaceship or the person's spaceship was killed.
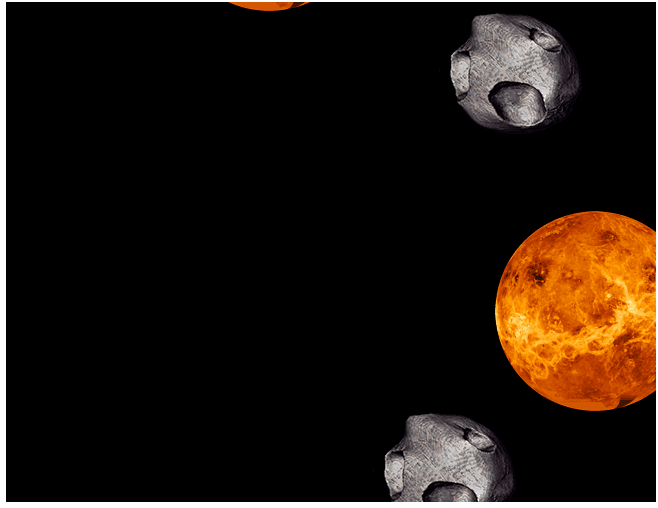
Draw game background
For the sake of the game, the experience effect increases. We first draw the game background and move the picture object on the background from bottom to top as time changes.
First add compatibility animation function to improve the efficiency of animation.
<!DOCTYPE html>
<html lang="en">
  <head>
    <meta charset="UTF-8" />
    <meta http-equiv="X-UA-Compatible" content="IE=edge" />
    <meta name="viewport" content="width=device-width, initial-scale=1.0" />
    <title>Document</title>
  </head>
  <style type="text/css">
    .canvasDiv {
      margin: 0 auto;
      width: 500px;
    }
  </style>
  <body>
    <div class="canvasDiv">
      <canvas width="650" height="500" id="canvas"></canvas>
    </div>
    <script type="text/javascript">
      // Compatibility processing
      window.requestAnimFrame = (function () {
        return (
          window.requestAnimationFrame ||
          window.webkitRequestAnimationFrame ||
          window.mozRequestAnimationFrame ||
          window.oRequestAnimationFrame ||
          window.msRequestAnimationFrame ||
          function (callback, element) {
            window.setTimeout(callback, 1000 / 60)
          }
        )
      })()
    </script>
  </body>
</html>
Initialize canvas and game resources
      /** @type {HTMLCanvasElement} */
      var canvas = document.getElementById('canvas')
      var c = canvas.getContext('2d')

      // ===========Resource loading============
      // Sprite map - own spaceship, game background object
      var sprite_image = new Image()
      sprite_image.src = './sprite.png'

      // ===========Game status============
      var game = {
        state: 'start' // start: playing: starting won: victory over: Death
      }
It should be noted here that the loading of picture resources is asynchronous. When operating pictures alone, they can be loaded in the onload event.
Initialize the background image according to the game state.
      // ===========Background animation============
      // Background image object
      var backImgs = []
      // Number of background images loaded
      function updatebackground() {
        if (game.state === 'start') {
          // Start status reset background picture
          backImgs = []
          for (var i = 0; i < 4; i++) {
            // Image sprite location
            var imagePos =
              i % 2
                ? { x: 270, y: 0, imgX: 150, imgY: 150, canX: 150, canY: 150 }
                : {
                    x: 0,
                    y: 0,
                    imgX: 200,
                    imgY: 200,
                    canX: 200,
                    canY: 200
                  }
            backImgs.push({
              x: Math.round(Math.random() * 500), // x-axis position
              y: 200 * i, // y-axis position
              speed: 1, // Moving speed
              // The location of the sprite in the picture
              imagePos: imagePos
            })
          }

          game.state = 'playing'
        }

        // Position movement
        for (var key in backImgs) {
          var backImg = backImgs[key]
          if (backImg.y + 200 === 0) {
            // Go to the top and return to the bottom
            backImg.y = 650
            backImg.x = Math.round(Math.random() * 500) // x-axis position
          }
          backImg.y = backImg.y - backImg.speed
        }
      }

      function drawBackground(c) {
        c.fillStyle = 'black'
        c.fillRect(0, 0, canvas.width, canvas.height)

        for (var key in backImgs) {
          var backImg = backImgs[key]
          var imPos = backImg.imagePos
          // Draw graphics
          c.drawImage(sprite_image, imPos.x, imPos.y, imPos.imgX, imPos.imgY, backImg.x, backImg.y, imPos.canX, imPos.canY)
        }
      }
- Initialization data and drawing image are separated, which can better maintain the state data of image objects.
- Initialize the picture object by judging the state of the game. Because the canvas is 650px high, 4 picture objects are loaded manually. After data initialization, modify the game state to keep the picture object from being initialized again.
- Use drawImage() to obtain the corresponding sprite in the snow flake map according to the drawing data set in the picture object.
- Each frame will enter the updatebackground() function, modify the y-axis data corresponding to the object, and the picture object will move upward in the canvas.
- Judge the position of the object in the canvas in the function. When it exceeds the canvas, reset the object data to the bottom and move it again.
Draw enemy
In the game, the enemy moves left and right repeatedly at the top of the canvas and sends out bullets in a random time.
Load enemy resources
      // ===========Resource loading============
      ...
      // Sprite map enemy ship
      var hunter1_image = new Image()
      hunter1_image.src = './Hunter.png'

      // Bomb enemy bullets
      var bomb_image = new Image()
      bomb_image.src = './bomb.png'
Create functions to modify enemy objects
 // ===========Enemy============
 // enemy
      var enemies = []
      // Enemy bullet
      var enemyBullets = []

      var num = 10 // Number of enemies
      // Modify enemy object
      function updateEnemies() {
        if (game.state === 'start') {
          // Initialize the enemy every time you restart
          enemies = [] // Clear the enemy
          enemyBullets = [] // Empty the bullet
          for (var i = 0; i < num; i++) {
            enemies.push({
              x: 50 + i * 50, // x-axis position
              y: 10,
              width: 40,
              height: 40,
              state: 'alive', // Alive: alive: hit: hit dead: Die
              counter: 0, // metering
              phase: Math.floor(Math.random() * 100) // Time to add bullets
            })
          }
          game.state = 'playing'
        }

        // Add bullets
        for (var i = 0; i < num; i++) {
          var enemy = enemies[i]
          if (!enemy) continue

          if (enemy && enemy.state == 'alive') {
            // The survival state continues
            enemy.counter++
            // The enemy shifted left and right
            enemy.x += Math.sin((enemy.counter * Math.PI * 2) / 100) * 2
            // Add bullet time
            if ((enemy.counter + enemy.phase) % 200 == 0) {
              enemyBullets.push({
                x: enemy.x,
                y: enemy.y + enemy.height,
                width: 20,
                height: 20,
                counter: 0
              })
            }
          }

          // Hit state
          if (enemy && enemy.state == 'hit') {
            enemy.counter++

            // Change to death status after a period of time
            if (enemy.counter >= 20) {
              enemy.state = 'dead'
              enemy.counter = 0
            }
          }
        }

        // Clear the dead enemy
        enemies = enemies.filter(function (e) {
          if (e && e.state != 'dead') {
            return true
          }
          return false
        })

        // Modify bullet position
        if (enemyBullets.length) {
          for (var i in enemyBullets) {
            var bullet = enemyBullets[i]
            bullet.y += 1.2
            bullet.counter++
          }

          // Beyond screen delete bullet
          enemyBullets = enemyBullets.filter(function (bullet) {
            return bullet.y < 600
          })
        }
      }
- Calculate and generate 10 enemy objects according to the canvas width and the left and right moving distance of the enemy.
- As before, according to the game status State determines whether to initialize the enemy object and modify the game state after creation. Pay special attention to this. After the initialization in the background object, the code to modify the game state needs to be commented / / game State = 'playing', because the initialization data will be affected after the game state is modified, and the function call position cannot be modified.
- After the enemy object is initialized, the updateenmies() function will be executed according to each frame through math Sin () to calculate the y-axis displacement so that it can move left and right.
- At the same time of modifying the position, according to the number of function executions, enemy Counter and random number to judge when the enemy bullet is generated.
- Judge the enemy's status (the status will be modified after hitting). After being hit, enter the hit state, no bullet is generated, and enter the death state after the countdown. Clear the object entering the death state.
- Cycle the bullet object to modify the position, and clear the bullet object when it exceeds the canvas.
Draw enemies and bullets
// Draw enemy
      function drawEnemies(cxt) {
        // Enemy drawing
        for (var key in enemies) {
          var enemy = enemies[key]

          if (enemy.state === 'alive') {
            // survival
            // c.fillStyle = 'green'
            cxt.drawImage(hunter1_image, 25, 50, 22, 22, enemy.x, enemy.y, enemy.width, enemy.height)
          }

          if (enemy.state === 'hit') {
            // Hit -- change to black
            cxt.fillStyle = 'black'
            cxt.fillRect(enemy.x, enemy.y, enemy.width, enemy.height)
          }

          if (enemy.state === 'dead') {
            // Death -- not drawing
          }
        }

        // Bullets -- drawing
        for (var i in enemyBullets) {
          var bullet = enemyBullets[i]
          // Switch sprite map position to realize animation
          var xoff = (bullet.counter % 9) * 12 + 2
          var yoff = 1
          cxt.drawImage(bomb_image, xoff, yoff, 9, 10, bullet.x, bullet.y, bullet.width, bullet.height)
        }
      }
- Enter different drawing states according to the enemy state
- The bullet animation is loaded through sprite chart, and through bullet The counter function is used to calculate the number of execution times. After the interval of how many frames, it enters the next sprite in the sprite diagram to realize the gap animation.
Add to the cycle
      // ===========Initialize============
      function mainLoop() {
        // Empty canvas
        cxt.clearRect(0, 0, 650, 500)
        // Modify image Sprite
        updatebackground()
        // Modify enemy bullet object
        updateEnemies()

        // Draw background image
        drawBackground(cxt)
        // Draw - enemy - enemy bullets
        drawEnemies(cxt)
        window.requestAnimFrame(mainLoop)
      }
      window.requestAnimFrame(mainLoop)
Draw user
In the game, the user can control the movement of the aircraft through the left and right direction keys, and launch bullets through the space bar.
load resources
      // User bullet
      var bullets_image = new Image()
      bullets_image.src = './bullets.png'
Initializing user objects and keyboard events
// User object
var II = {
  x: 300,
  y: 400,
  width: 50,
  height: 50,
  state: 'alive' // Alive: alive: hit: hit dead: Die
}
// User's bullet
var IIBullets = []

// Keyboard monitor
var keyboard = []

// Initial user
function updatePlayer() {
  // Death is not drawing
  if (II.state == 'dead') return

  // Left key
  if (keyboard[37]) {
    II.x -= 10
    if (II.x < 0) II.x = 0
  }
  // Right click
  if (keyboard[39]) {
    II.x += 10
    var right = canvas.width - II.width
    if (II.x > right) II.x = right
  }

  // Space
  if (keyboard[32]) {
    if (!keyboard.fired) {
      // Add bullets
      IIBullets.push({
        x: II.x + 17.5,
        y: II.y - 7,
        width: 15,
        height: 15,
        counter: 0
      })
      keyboard.fired = true
    }
  } else {
    keyboard.fired = false
  }

  // The hit state waits for 40 frames and is changed to the death state
  if (II.state == 'hit') {
    II.counter++
    if (II.counter >= 40) {
      II.counter = 0
      II.state = 'dead'
      game.state = 'over'
    }
  }

  // Modify bullet position
  if (IIBullets) {
    for (i in IIBullets) {
      var bullet = IIBullets[i]
      bullet.y -= 8
      bullet.counter++
    }
    // Beyond screen delete bullet
    IIBullets = IIBullets.filter(function (bullet) {
      return bullet.y > 0
    })
  }
- Define the user object. Each time you execute updatePlayer(), first judge whether the value corresponding to the keyboard in the keyboard monitoring object keyboard is in the press and hold state (the value in the keyboard is modified in the keyboard monitoring event) to modify and add bullets to the user object.
- Hit state, increase the waiting time, and add death animation when drawing.
- Modify bullet position, clear beyond canvas
Add keyboard event
// ===========Keyboard events============
 function doSetup() {
   // Press
   attachEvent(document, 'keydown', function (e) {
     keyboard[e.keyCode] = true
     console.log(keyboard)
   })
   // release
   attachEvent(document, 'keyup', function (e) {
     keyboard[e.keyCode] = false
     console.log(keyboard)
   })
 }
 function attachEvent(node, name, func) {
   if (node.addEventListener) {
     node.addEventListener(name, func, false)
   } else if (node.attachEvent) {
     node.attachEvent(name, func)
   }
 }
 // Execute on entry
 doSetup()
- Monitor whether the keyboard is pressed. For example, press to modify the corresponding value in the keyboard value object as true, and release to modify the value as false. Used for the updatePlayer() function to control the modification of the aircraft object.
Draw user aircraft
// Draw yourself
function drawII(cxt) {
  if (II.state === 'alive') {
    cxt.drawImage(sprite_image, 201, 0, 70, 80, II.x, II.y, II.width, II.height)
  }

  if (II.state === 'hit') {
    c.fillStyle = 'black'
    c.fillRect(II.x, II.y, II.width, II.height)
    // drawExplosion(cxt)
  }

  if (II.state === 'dead') {
    return
  }

  // Draw bullets
  for (i in IIBullets) {
    var bullet = IIBullets[i]
    var count = Math.floor(bullet.counter / 4)
    var xoff = (count % 4) * 24
    cxt.drawImage(
      bullets_image,
      xoff + 10,
      0 + 7.5,
      8,
      13,
      bullet.x,
      bullet.y,
      bullet.width,
      bullet.height //dst
    )
  }
}
- Draw different images according to the state of the aircraft.
Add collision detection and death animation
// ===========Collision detection============
function checkCollisions() {
  // He was hit
  for (var key in IIBullets) {
    var bullet = IIBullets[key];
    for (var j in enemies) {
      var enemy = enemies[j];
      if (collided(bullet, enemy)) {
        bullet.state = "hit";
        enemy.state = "hit";
        enemy.counter = 0;
      }
    }
  }

  if (II.state == "hit" || II.state == "dead") return;

  // The enemy was hit
  for (var i in enemyBullets) {
    var bullet = enemyBullets[i];
    if (collided(bullet, II)) {
      bullet.state = "hit";
      II.state = "hit";
      II.counter = 0;
    }
  }
}

/**
 * Judgment of two objects in canvas
 * a: Graph line to judge
 * b: Judged graph line
 */
function collided(a, b) {
  // Check for horizontal collisions
  // The rightmost side of object b is larger than the leftmost side of object a
  // The leftmost side of object b is smaller than the rightmost side of object a
  if (b.x + b.width > a.x && b.x < a.x + a.width) {
    // Check for vertical collisions
    if (b.y + b.height >= a.y && b.y < a.y + a.height) {
      return true;
    }
  }
  // a in b
  if (b.x <= a.x && b.x + b.width >= a.x + a.width) {
    if (b.y <= a.y && b.y + b.height >= a.y + a.height) {
      return true;
    }
  }
  // b within a
  if (a.x <= b.x && a.x + a.width >= b.x + b.width) {
    if (a.y <= b.y && a.y + a.height >= b.y + b.height) {
      return true;
    }
  }
  return false;
}
- Judge whether the aircraft and the enemy are not hit by each other's bullets. After hitting, modify the status to hit and modify the counter to 0.
Add death animation
// modify
if (II.state === 'hit') {
   // c.fillStyle = 'black'
   // c.fillRect(II.x, II.y, II.width, II.height)
   drawExplosion(cxt)
 }


// ===========Death animation===========
var particles = []
function drawExplosion(cxt) {
  // After being hit, the count starts from 0
  if (II.counter == 0) {
    // Generate particles
    particles = []
    for (var i = 0; i < 50; i++) {
      particles.push({
        x: II.x + II.width / 2,
        y: II.y + II.height / 2,
        xv: (Math.random() - 0.5) * 2.0 * 5.0, // x velocity
        yv: (Math.random() - 0.5) * 2.0 * 5.0, // y velocity
        age: 0 // v \ \ \ existence time
      })
    }
  }

  if (II.counter > 0) {
    for (var i = 0; i < particles.length; i++) {
      var p = particles[i]
      p.x += p.xv
      p.y += p.yv
      var v = 255 - p.age * 3
      cxt.fillStyle = 'rgb(' + v + ',' + v + ',' + v + ')'
      cxt.fillRect(p.x, p.y, 3, 3)
      p.age++
    }
  }
}
- After the plane enters the hit state, it starts to draw the death animation. Particle explosion is that we update the list of Particle objects at each frame. First calculate the middle position of the aircraft explosion, and then expand to the random direction at random speed.
Join game status
      // ===========Game status============
      var overlay = {}
      function updateGame() {
        if (game.state == 'playing' && enemies.length == 0) {
          // In game
          game.state = 'won' // victory
          overlay.title = 'Destroy all the enemy'
          overlay.subtitle = 'Press the spacebar to start again'
          overlay.counter = 0
        }
        if (game.state == 'over' && keyboard[32]) {
          // game over
          game.state = 'start' // start
          II.state = 'alive'
          overlay.counter = -1
        } else if (game.state == 'over') {
          overlay.title = 'game over'
          overlay.subtitle = 'Press the spacebar to start again'
        }

        if (game.state == 'won' && keyboard[32]) {
          // Game victory
          game.state = 'start' // start
          II.state = 'alive'
          overlay.counter = -1
        } else if (game.state == 'won') {
          overlay.title = 'Game victory'
          overlay.subtitle = 'Press the spacebar to start again'
        }

        if (overlay.counter >= 0) {
          overlay.counter++
        }
      }

      // Draw tips for different states of the game
      function drawOverlay(cxt) {
        if (game.state == 'over' || game.state == 'won') {
          cxt.fillStyle = 'white'
          cxt.font = 'Bold 40pt Arial'
          cxt.fillText(overlay.title, 225, 200)
          cxt.font = '14pt Arial'
          cxt.fillText(overlay.subtitle, 250, 250)
        }
      }
	  ...
      // ===========Initialize============
      function mainLoop() {
        // Empty canvas
        cxt.clearRect(0, 0, 650, 500)
        // Modify image Sprite
        updatebackground()
        // Modify enemy bullet object
        updateEnemies()
        // Modify user object bullet object
        updatePlayer()

        // Collision detection
        checkCollisions()

        // Game status
        updateGame()

        // Draw background image
        drawBackground(cxt)
        // Draw - enemy - enemy bullets
        drawEnemies(cxt)
        // Draw -- user -- user bullet
        drawII(cxt)
        // Game tips
        drawOverlay(cxt)
        window.requestAnimFrame(mainLoop)
      }
- Add prompts according to different states.
