catalogue
Authorized account and password
Set user assigned operation permissions
Message model supported by RabbitMQ
1. RabbitMQ introduction case - Simple mode
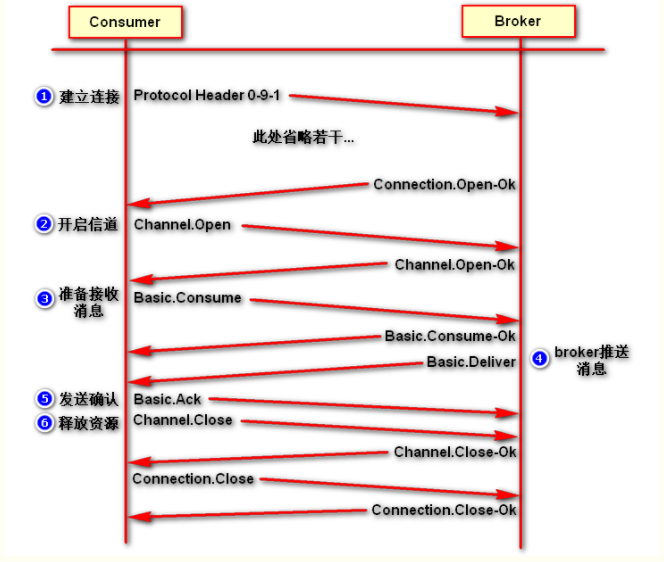
03 AMQP consumer circulation process
3. The core components of rabbitmq
02 what does the overall architecture of rabbitmq look like?
03 operation process of rabbitmq
4. RabbitMQ entry case - fanout mode
01 publish subscribe mode of rabbitmq
5. RabbitMQ entry case - Direct mode
6. RabbitMQ introduction case - Topic mode
Complete case (create switch, create queue, and bind switch to queue)
7. RabbitMQ entry case - Work mode
01 Work mode polling mode (round robin)
02 Work mode fair distribution mode
01 decoupling, peak shaving, asynchronous
02 high cohesion, low coupling
4. Cluster (docker cluster rabbitmq)
1. Create three rabbitmq containers first
2. The container node joins the cluster
What is rabbitMQ
RabbitMQ is an open source implementation of AMQP (Advanced Message Queue protocol) developed by erlang, which can realize asynchronous message processing
RabbitMQ is a message broker: it accepts and forwards messages.
You can think of it as a post office: when you put the mail you want to publish in the mailbox, you can make sure that the postman will finally send the mail to your recipient. In this metaphor, rabbit MQ is a post office box, a post office and a postman.
The main difference between RabbitMQ and the post office is that it does not process paper, but accepts, stores and forwards binary data blocks
Advantages: asynchronous message processing
Business decoupling (order placing operation: deduct inventory, generate order, send red envelope and send SMS). The main process of order placing operation: deduct inventory, generate order, and then complete notification through MQ message queue, send red envelope and send SMS
Peak shifting flow control (MQ message queue mechanism is implemented when the number of notifications, messages and orders is large, and the traffic will be less in off-season)
Flexible Routing
Route messages through Exchange before they enter the queue. For typical routing functions, RabbitMQ has provided some built-in Exchange to implement. For more complex routing functions, multiple exchanges can be bound together, and their own Exchange can be realized through plug-in mechanism.
RabbitMQ website port number: 15672
The port implemented in the program is: 5672
Install RabbitMQ with docker. If you haven't used docker, you can see this article https://blog.csdn.net/qq_44716544/article/details/119870837
1. Pull the RabbitMQ image
docker pull rabbitmq:management
2. Run RabbitMQ image
docker run -itd --name rabbit01 --hostname myrabbit -e RABBITMQ_DEFAULT_USER=chenjinxian -e RABBITMQ_DEFAULT_PASS=chenjinxian -p 15672:15672 -p 5672:5672 -p 25672:25672 rabbitmq:management
Note: RABBITMQ_DEFAULT_USER=chenjinxian -e RABBITMQ_DEFAULT_PASS=chenjinxian
Rabbitmq is set here_ DEFAULT_ User) login account and (rabbitmq)_ DEFAULT_ Pass) password, which can be modified according to itself
Here you can see that the container has been opened successfully, and then it can be used

3. Open via browser
If you are using a local virtual machine, you can access it directly by using the ipv4 address displayed by the virtual machine plus the end slogan;
If you use ECs, you need to open port 15672 in the security group of the corresponding server (Alibaba cloud, Tencent cloud, etc.) and port 15672 in the firewall
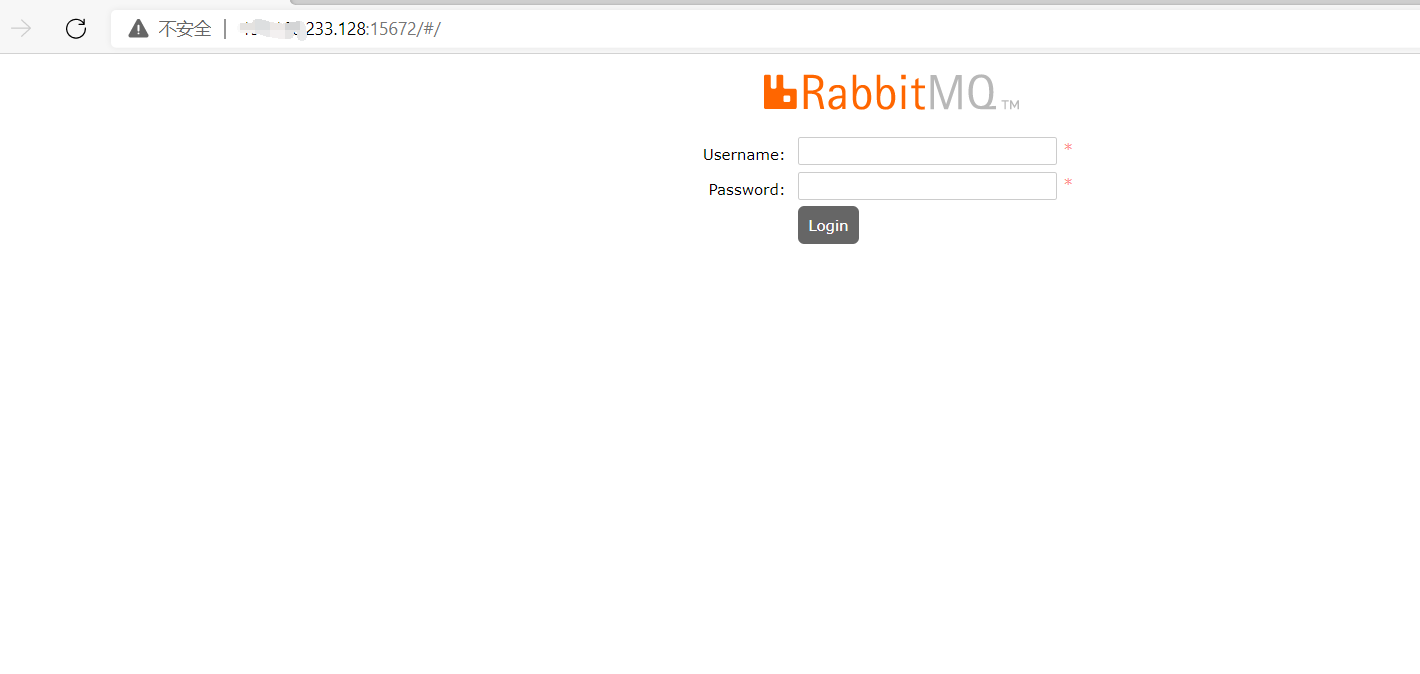
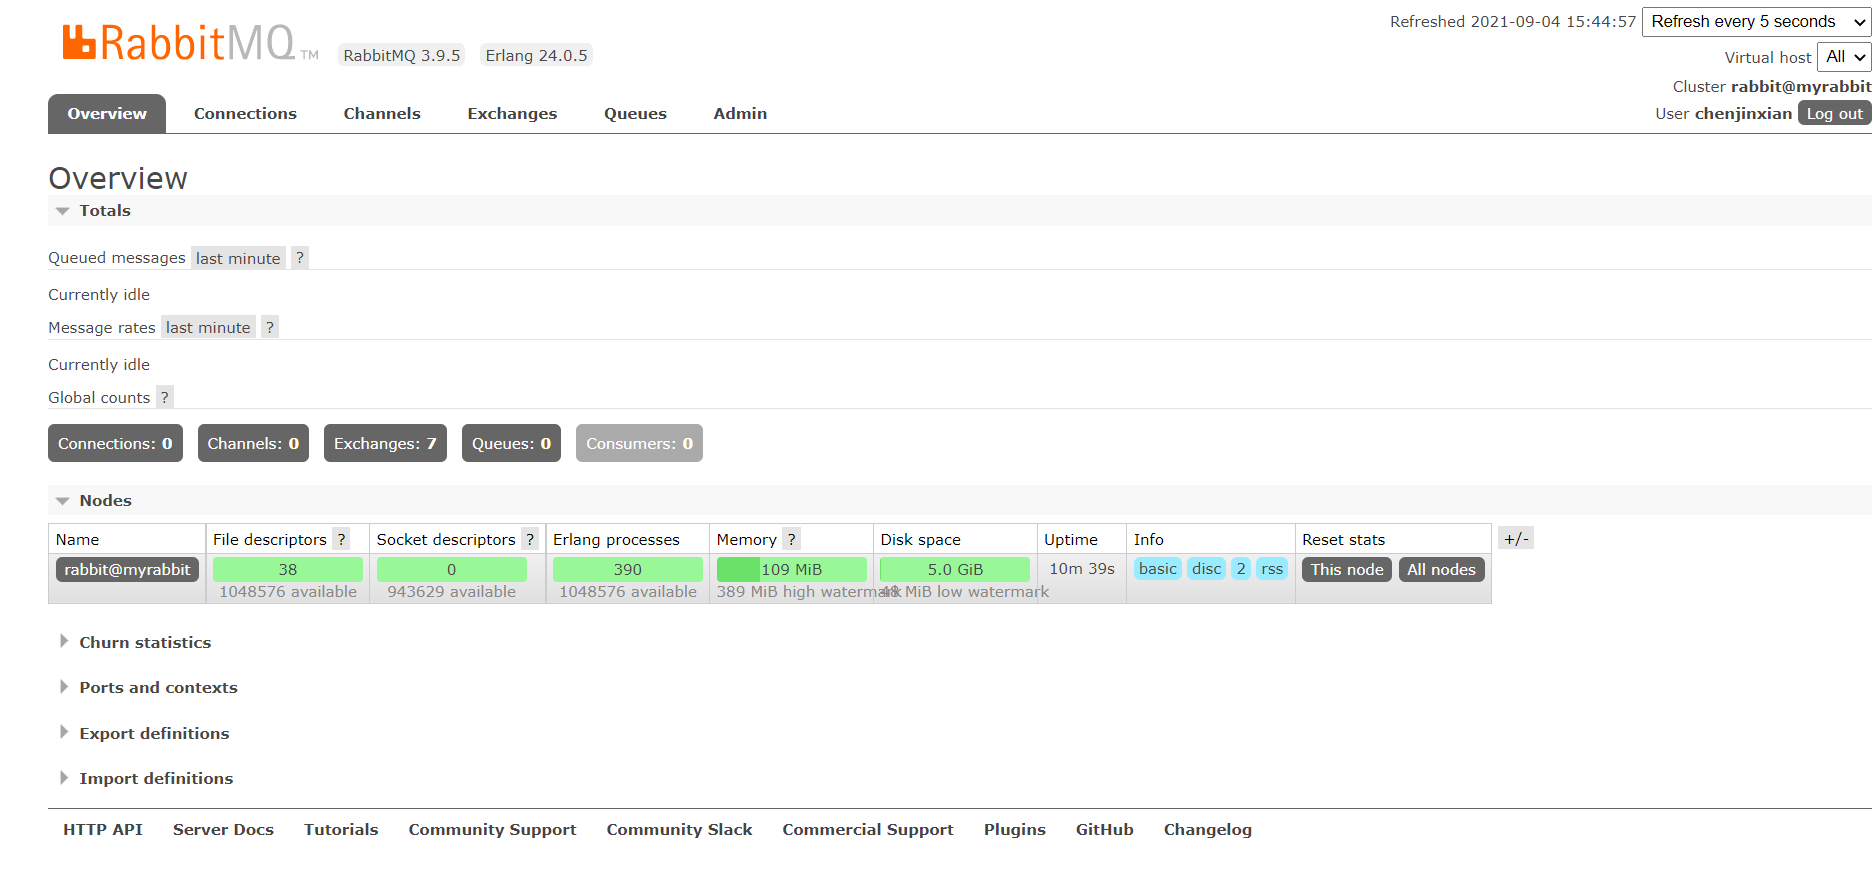
If the display is as shown in the figure above, you can start to use it
Then enter the rabbitmq container through the command
docker exec -it rabbit01 /bin/bash
Authorized account and password
rabbitmqctl add_user admin admin
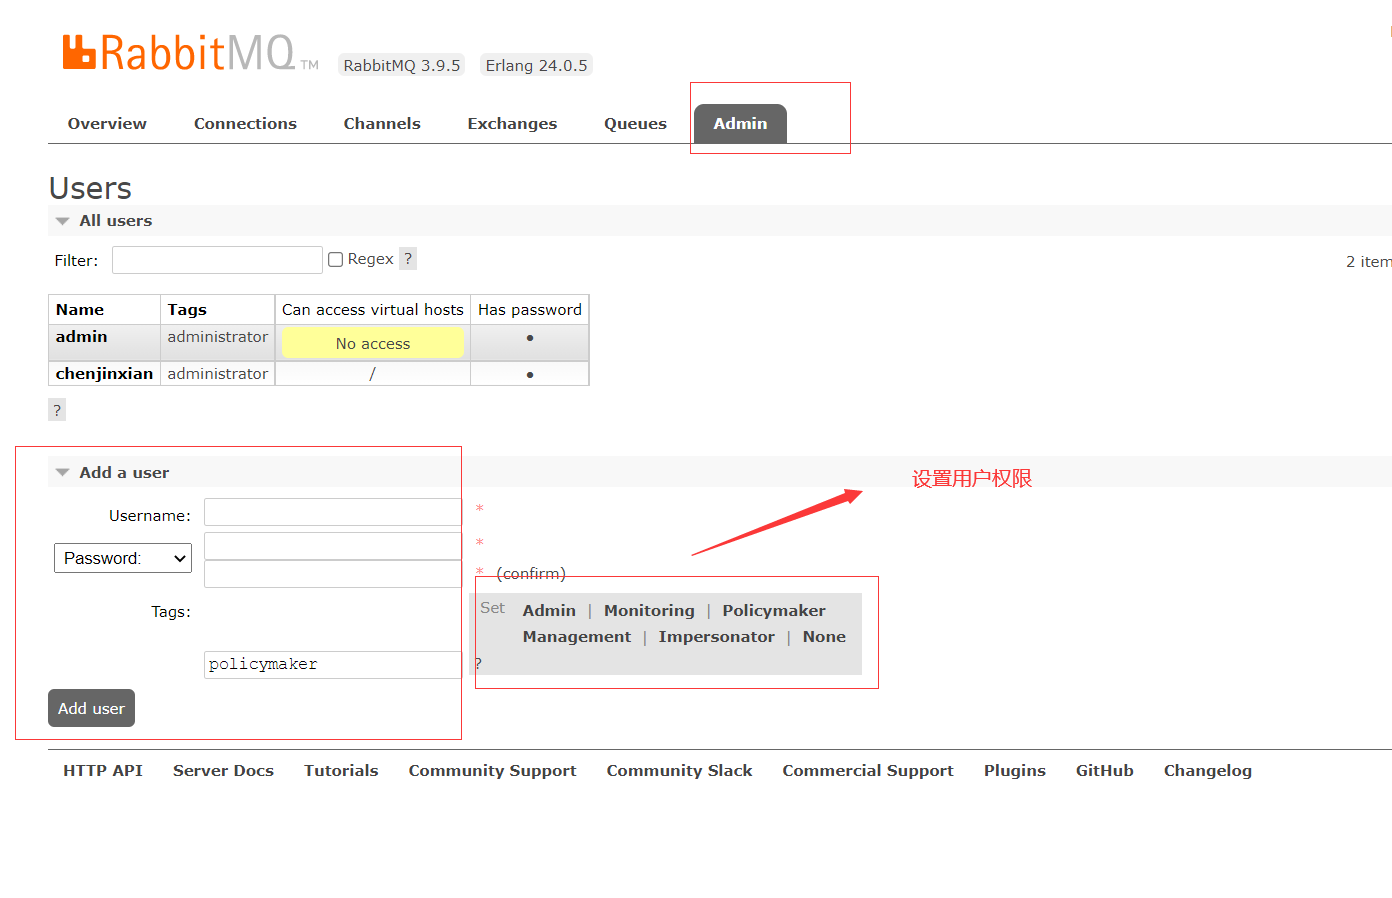
Set user assigned operation permissions
rabbitmqctl set_user_tags admin administrator
User level:
-
administrator: you can log in to the console, view all information, and manage rabbitmq
-
monitoring: the monitor logs in to the console to view all information
-
policymaker: the policy maker logs in to the console and specifies the policy
-
Management common administrator login console
Add resource permissions for users
rabbitmqctl set_permissions -p / admin ".*"".*"".*"
You can also add users in the interface
Message model supported by RabbitMQ
1. Simple mode
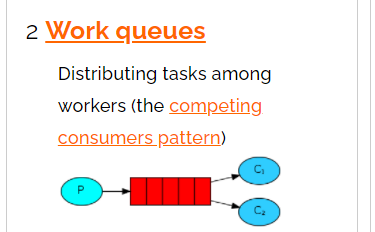
2. Work ing mode
3. Publish subscribe mode

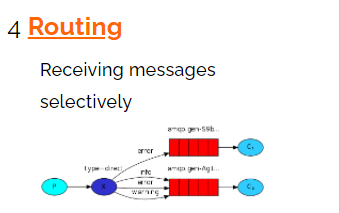
4. Routing mode
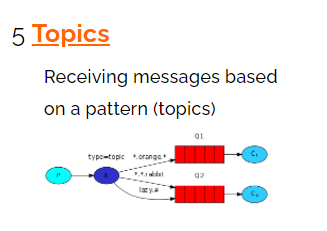
5. Topic mode
6. Parameter mode
7. Publisher confirmation mode
1. Introduction case
1. RabbitMQ introduction case - Simple mode
-
jdk1.8
-
Build a maven project
-
Define producer
-
Define consumer
-
Observe the process of the message in the rabbitmq server service
01 build a maven project
02 import dependency
 <dependencies>
        <!--Import rabbitmq Dependence of-->
        <dependency>
            <groupId>com.rabbitmq</groupId>
            <artifactId>amqp-client</artifactId>
            <version>5.13.0</version>
        </dependency>

    </dependencies>
3. Coding
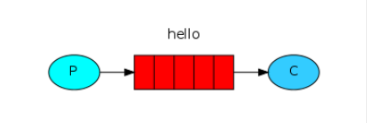
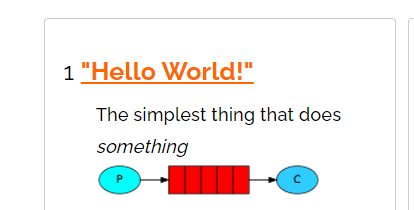
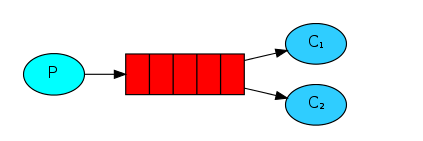
In the model above, there are the following concepts:
-
The producer is the program that sends the message
-
Consumer: the receiver of the message will always wait for the message to arrive.
-
Message queue: the red part in the figure. Similar to a mailbox, messages can be cached; The producer delivers the message to it, and the consumer takes the message out of it.
producer
package com.chen.rabbitmq.simple;
import com.rabbitmq.client.Channel;
import com.rabbitmq.client.Connection;
import com.rabbitmq.client.ConnectionFactory;
import com.rabbitmq.client.MessageProperties;
/**
* @description: Simple mode
*/
public class Producer {
public static void main(String[] args) {
// All middleware technologies are based on tcp/ip protocol to build a new protocol specification, but rabbitmq follows amqp
// ip port
// 1: Create connection project
ConnectionFactory connectionFactory = new ConnectionFactory();
connectionFactory.setHost("128.197.157.151");
connectionFactory.setPort(5672);
connectionFactory.setUsername("chenjinxian");//rabbitmq login account
connectionFactory.setPassword("chenjinxian");//rabbitmq login password
connectionFactory.setVirtualHost("/");
//springboot ---rabbitmq
Connection connection = null;
Channel channel = null;
try {
// 2: Why is the Connection Rabbitmq created based on channel rather than link? Long connection - channel
connection = connectionFactory.newConnection("Generator");
// 3: Get Channel through connection
channel = connection.createChannel();
// 4: Create switches, declare queues, bind relationships, route key s, send messages, and receive messages through communication
String queueName = "queue1";
/*
* @params1 The name of the queue
* @params2 Whether to persist durable=false. Whether to save the so-called persistent messages. If false is not persistent, true is persistent? Will non persistence be saved? The disk will be saved, but the service will be lost after restarting.
* @params3 Exclusivity, is it exclusive independence
* @params4 Whether to delete automatically. Whether to delete the queue automatically after the last consumer message is completed
* @params5 Carry auxiliary parameters
*/
channel.queueDeclare(queueName, true, false, false, null);
// 5: Prepare message content
String message = "Hello chenjinxian!!!";
// 6: Send message to queue
// @params1: switch @ params2 queue, routing key @params message status control @ params4 message subject
// Interview question: can there be queues without switches? Impossible. Although no switch is specified, there must be a default switch.
channel.basicPublish("", queueName, null, message.getBytes());
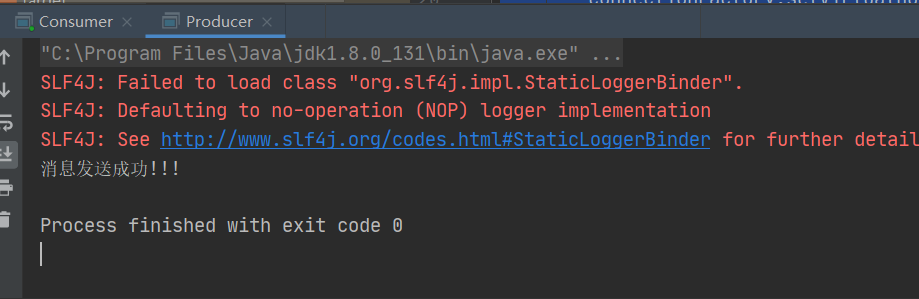
System.out.println("Message sent successfully!!!");
} catch (Exception ex) {
ex.printStackTrace();
} finally {
// 7: Close channel
if (channel != null && channel.isOpen()) {
try {
channel.close();
} catch (Exception ex) {
ex.printStackTrace();
}
}
// 8: Close connection
if (connection != null && connection.isOpen()) {
try {
connection.close();
} catch (Exception ex) {
ex.printStackTrace();
}
}
}
}
}
consumer
package com.chen.rabbitmq.simple;

import com.rabbitmq.client.*;
import java.io.IOException;

public class Consumer {


    public static void main(String[] args) {

        // All middleware technologies are based on tcp/ip protocol to build a new protocol specification, but rabbitmq follows amqp
        // ip port

        // 1: Create connection project
        ConnectionFactory connectionFactory = new ConnectionFactory();
        connectionFactory.setHost("128.197.157.151");//Server IP
        connectionFactory.setPort(5672);
        connectionFactory.setUsername("chenjinxian");
        connectionFactory.setPassword("chenjinxian");
        connectionFactory.setVirtualHost("/");

        Connection connection = null;
        Channel channel = null;
        try {
            // 2: Create Connection
            connection = connectionFactory.newConnection("consumer");
            // 3: Get Channel through connection
            channel = connection.createChannel();
            // 4: Create switches, declare queues, bind relationships, route key s, send messages, and receive messages through communication


            // true = ack. The normal logic is no problem. The dead loop rabbit retransmission strategy
            // false = nack message, which may cause exceptions and failures when consuming messages
            final  Channel channel2 = channel;
            channel2.basicConsume("queue1", false, new DeliverCallback() {
                public void handle(String consumerTag, Delivery message) throws IOException {
                    try {
                        System.out.println("The message is" + new String(message.getBody(), "UTF-8"));
                        channel2.basicAck(message.getEnvelope().getDeliveryTag(),false);
                    }catch (Exception ex){
                        ex.printStackTrace();
                        // Three confirmations -- reject + sixin
                    }

                }
            }, new CancelCallback() {
                public void handle(String consumerTag) throws IOException {
                    System.out.println("Acceptance failed...");
                }
            });

            System.out.println("Start receiving messages");
            System.in.read();

        } catch (Exception ex) {
            ex.printStackTrace();
        } finally {
            // 7: Close channel
            if (channel != null && channel.isOpen()) {
                try {
                    channel.close();
                } catch (Exception ex) {
                    ex.printStackTrace();
                }
            }
            // 8: Close connection

            if (connection != null && connection.isOpen()) {
                try {
                    connection.close();
                } catch (Exception ex) {
                    ex.printStackTrace();
                }
            }
        }


    }
}

2. What is AMQP
01 what is AMQP
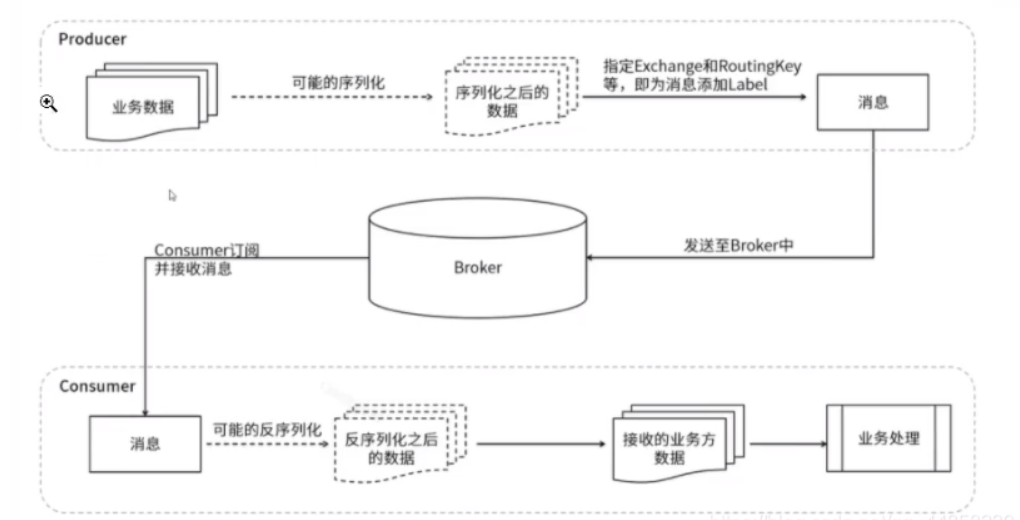
Full name of AMQP: Advanced Message Queuing Protocol. It is a development standard of application layer protocol and is designed for message oriented middleware
02 AMQP producer flow process
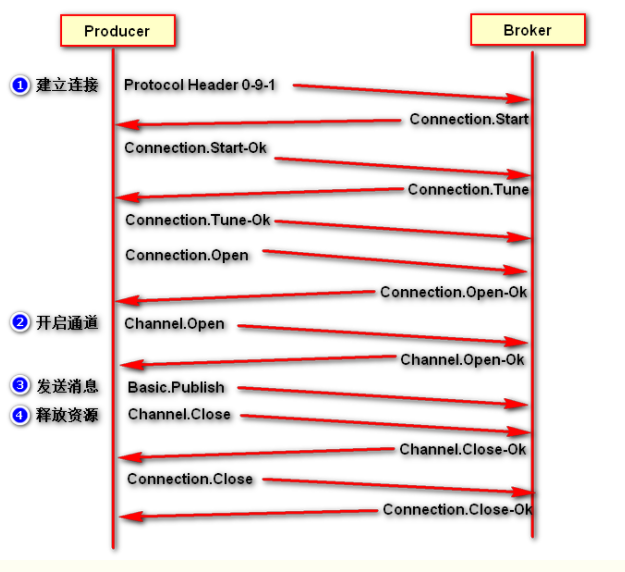
03 AMQP consumer circulation process
3. The core components of rabbitmq
01 RabbitMQ core components
Core concepts: core concepts:
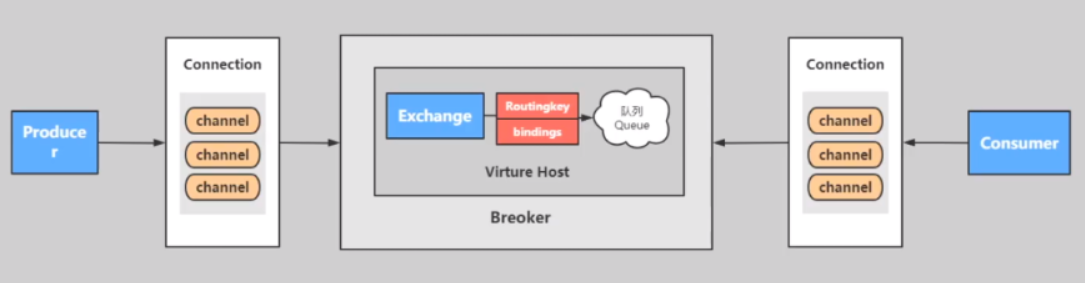
Server: also known as Broker, it accepts client connections and implements AMQP entity services. Install rabbitmq serverconnection: connection, network connection between application and Broker, TCP / IP / three handshakes and four handshakes server: also known as Broker, which accepts client connections and implements AMQP entity services. Install rabbitmq serverconnection: connection, network connection between application and Broker, TCP / IP / three handshakes and four waves
Channel: network channel. Almost all operations are carried out in the channel. The channel is a channel for incoming reading and writing. The client can establish a pair of channels. Each channel represents a session task. Channel: network channel. Almost all operations are performed in the channel. The channel is a channel for incoming reading and writing. The client can establish a pair of channels. Each channel represents a session task channel.
Message: Message: the data transmitted between the service and the application. It is composed of properties and body. Properties can modify the message, such as message priority, delay and other advanced features. Body is the content of the message body. Message: Message: the data transmitted between the service and the application. It is composed of properties and body. Properties can modify the message, such as message priority, delay and other advanced features. Body is the content of the message body.
The Virtual Host virtual address is used for logical isolation and message routing at the top layer. A Virtual Host can have several exits and queues. The same Virtual Host cannot have virtual addresses of Exchange virtual hosts with the same name for logical isolation. A Virtual Host can have several exits and queues for message routing at the top layer, The same Virtual Host cannot have Exchange with the same name
Exchange: a switch that accepts messages and sends messages to a bound Queue according to the routing key. (== Does not have the ability to store messages = =) bindings: a virtual connection between exchange and Queue. Multiple routing keys can be protected in binding. Exchange: a switch that accepts messages and sends messages to the bound Queue according to the routing keys. (= does not have the ability to store messages = =) binding: a virtual connection between exchange and Queue. Multiple routing keys can be protected in binding.
Routing key: a routing rule that the virtual machine can use to determine how to route a special consumer. Bttos: / bloq.csdn.net/qg_ 4485823 (queue: queue: also known as Message Queue, Message Queue, save messages and forward them to the consumer“ gwa "routing key: it is a routing rule that the virtual machine can use to determine how to route a characteristic message (queue: queue: also known as Message Queue, Message Queue, save messages and forward them to consumers
02 what does the overall architecture of rabbitmq look like?
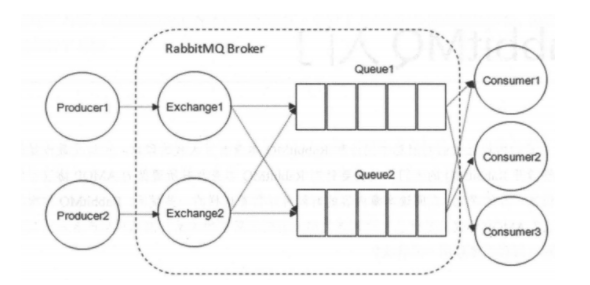
03 operation process of rabbitmq
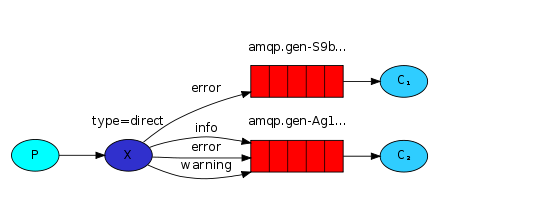
4. RabbitMQ entry case - fanout mode
01 publish subscribe mode of rabbitmq

Implementation of publish subscribe mode
-
Type: fanout
-
Features: Fanout - publish and subscribe mode is a broadcast mechanism. It is a mode without routing key
(note that the queue has been bound to the switch in the visual interface)

producer
package com.chen.rabbitmq.fanout;
import com.rabbitmq.client.Channel;
import com.rabbitmq.client.Connection;
import com.rabbitmq.client.ConnectionFactory;
/**
Implementation of publish subscribe mode
Type: fanout
Features: Fanout - publish and subscribe mode is a broadcast mechanism. It is a mode without routing key
*/
public class Producer {
public static void main(String[] args) {
// 1: Create connection factory
ConnectionFactory connectionFactory = new ConnectionFactory();
// 2: Set connection properties
connectionFactory.setHost("128.156.157.161");
connectionFactory.setPort(5672);
connectionFactory.setVirtualHost("/");
connectionFactory.setUsername("chenjinxian");
connectionFactory.setPassword("chenjinxian");
Connection connection = null;
Channel channel = null;
try {
// 3: Get connection from connection factory
connection = connectionFactory.newConnection("producer");
// 4: Get channel from connection
channel = connection.createChannel();
// 5: Prepare to send the contents of the message
String message = "hello xuexi!!!";
// 6: Prepare switch
String exchangeName = "fanout_change";
// 8: Specifies the type of switch
String type = "fanout";
// 7: Send a message to the middleware rabbitmq server
// @params1: switch exchange
// @params2: queue name / routingkey
// @params3: property configuration
// @params4: send message content
// #.course.* queue3
// *.order.# queue2 ta
// com.order.course.xxx collecion
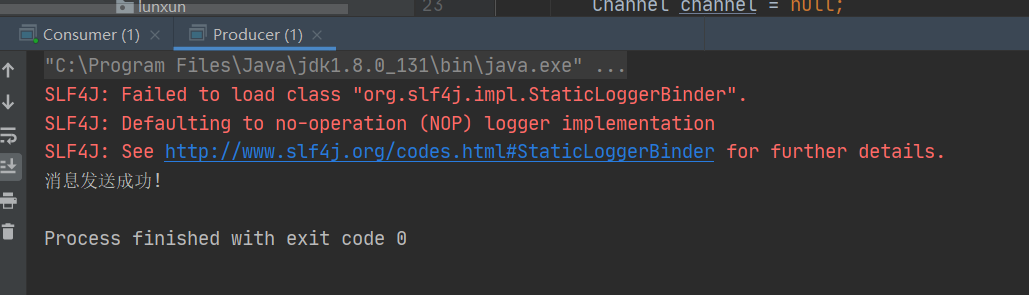
channel.basicPublish(exchangeName,"", null, message.getBytes());
System.out.println("Message sent successfully!");
} catch (Exception ex) {
ex.printStackTrace();
System.out.println("Exception in sending message...");
} finally {
// 7: Release connection close channel
if (channel != null && channel.isOpen()) {
try {
channel.close();
} catch (Exception ex) {
ex.printStackTrace();
}
}
if (connection != null) {
try {
connection.close();
} catch (Exception ex) {
ex.printStackTrace();
}
}
}
}
}consumer
package com.chen.rabbitmq.fanout;
import com.rabbitmq.client.*;
import java.io.IOException;
/**
Implementation of publish subscribe mode
Type: fanout
Features: Fanout - publish and subscribe mode is a broadcast mechanism. It is a mode without routing key
*/
public class Consumer {
private static Runnable runnable = new Runnable() {
public void run() {
// 1: Create connection factory
ConnectionFactory connectionFactory = new ConnectionFactory();
// 2: Set connection properties
connectionFactory.setHost("128.156.157.151");
connectionFactory.setPort(5672);
connectionFactory.setVirtualHost("/");
connectionFactory.setUsername("chenjinxian");
connectionFactory.setPassword("chenjinxian");
//Gets the name of the queue
final String queueName = Thread.currentThread().getName();
Connection connection = null;
Channel channel = null;
try {
// 3: Get connection from connection factory
connection = connectionFactory.newConnection("producer");
// 4: Get channel from connection
channel = connection.createChannel();
// 5: Declare that the queue stores messages
/*
* If the queue does not exist, it is created
* Rabbitmq It is not allowed to create two identical queue names, otherwise an error will be reported.
*
* @params1: queue The name of the queue
* @params2: durable Is the queue persistent
* @params3: exclusive Exclusive, that is, private. If true, the current queue will be locked, other channels cannot be accessed, and the connection will be closed automatically
* @params4: autoDelete Whether to delete the message automatically, and whether to delete the message automatically after the last consumer disconnects.
* @params5: arguments You can set additional parameters of the queue, the validity period of the queue, the maximum length of messages, the message life cycle of the queue, and so on.
* */
// Here, if the queue has been created once, it does not need to be defined
//channel.queueDeclare("queue1", false, false, false, null);
// 6: Defines a callback that accepts messages
Channel finalChannel = channel;
finalChannel.basicConsume(queueName, true, new DeliverCallback() {
@Override
public void handle(String s, Delivery delivery) throws IOException {
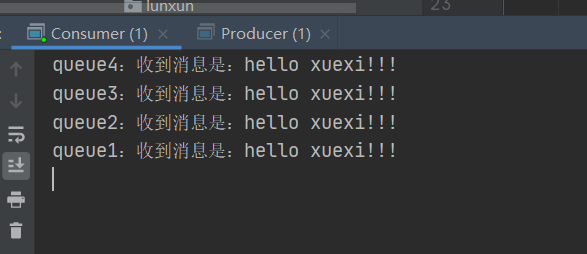
System.out.println(queueName + ": The message received is:" + new String(delivery.getBody(), "UTF-8"));
}
}, new CancelCallback() {
@Override
public void handle(String s) throws IOException {
}
});
System.out.println(queueName + ": Start receiving messages");
System.in.read();
} catch (Exception ex) {
ex.printStackTrace();
System.out.println("Exception in sending message...");
} finally {
// 7: Release connection close channel
if (channel != null && channel.isOpen()) {
try {
channel.close();
} catch (Exception ex) {
ex.printStackTrace();
}
}
if (connection != null && connection.isOpen()) {
try {
connection.close();
} catch (Exception ex) {
ex.printStackTrace();
}
}
}
}
};
public static void main(String[] args) {
// Start three threads to execute
new Thread(runnable, "queue1").start();
new Thread(runnable, "queue2").start();
new Thread(runnable, "queue3").start();
new Thread(runnable, "queue4").start();
//new Thread(runnable, "queue5").start();
}
}
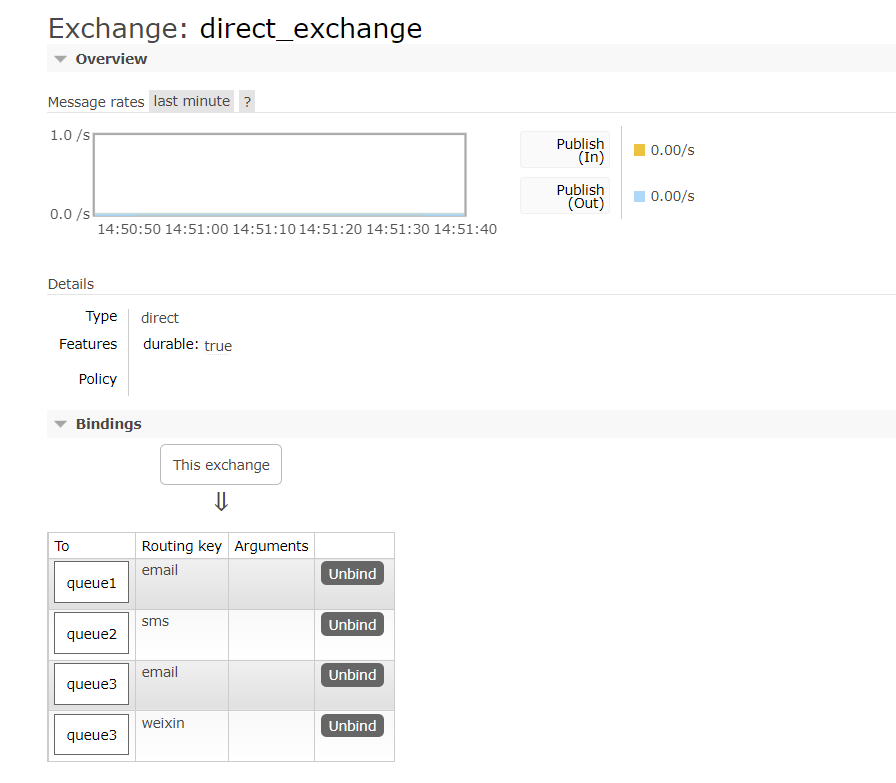
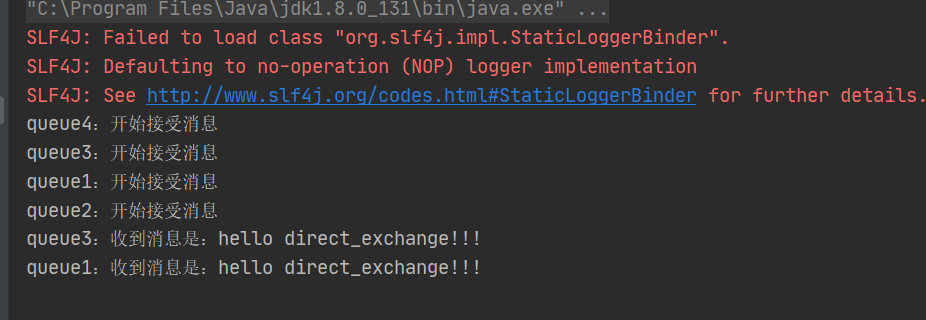
5. RabbitMQ entry case - Direct mode
( Note that the queue has been bound to the switch in the visual interface)
producer
package com.chen.rabbitmq.routing;

import com.rabbitmq.client.Channel;
import com.rabbitmq.client.Connection;
import com.rabbitmq.client.ConnectionFactory;

/**
 Direct pattern
 */
public class Producer {
    public static void main(String[] args) {
        // 1: Create connection factory
        ConnectionFactory connectionFactory = new ConnectionFactory();
        // 2: Set connection properties
        connectionFactory.setHost("128.176.157.151");
        connectionFactory.setPort(5672);
        connectionFactory.setVirtualHost("/");
        connectionFactory.setUsername("chenjinxian");
        connectionFactory.setPassword("chenjinxian");
        Connection connection = null;
        Channel channel = null;
        try {
            // 3: Get connection from connection factory
            connection = connectionFactory.newConnection("producer");
            // 4: Get channel from connection
            channel = connection.createChannel();

            // 5: Prepare to send the contents of the message
            String message = "hello direct_exchange!!!";

            // 6: Prepare switch
            String exchangeName = "direct_exchange";
            // 7: Define routing key
            String routeKey = "email";
            // 8: Specifies the type of switch
            String type = "direct";
            // 7: Send a message to the middleware rabbitmq server
            // @params1: switch exchange
            // @params2: queue name / routingkey
            // @params3: property configuration
            // @params4: send message content
            //  #.course.* queue3
            // *.order.# queue2 ta
            // com.order.course.xxx collecion
            channel.basicPublish(exchangeName, routeKey, null, message.getBytes());
            System.out.println("Message sent successfully!");
        } catch (Exception ex) {
            ex.printStackTrace();
            System.out.println("Exception in sending message...");
        } finally {
            // 7: Release connection close channel
            if (channel != null && channel.isOpen()) {
                try {
                    channel.close();
                } catch (Exception ex) {
                    ex.printStackTrace();
                }
            }
            if (connection != null) {
                try {
                    connection.close();
                } catch (Exception ex) {
                    ex.printStackTrace();
                }
            }
        }
    }
}
consumer
package com.chen.rabbitmq.routing;

import com.rabbitmq.client.*;

import java.io.IOException;

/**
 Direct pattern
 */
public class Consumer {

    private static Runnable runnable = new Runnable() {
        public void run() {
            // 1: Create connection factory
            ConnectionFactory connectionFactory = new ConnectionFactory();
            // 2: Set connection properties
            connectionFactory.setHost("123.156.147.151");
            connectionFactory.setPort(5672);
            connectionFactory.setVirtualHost("/");
            connectionFactory.setUsername("chenjinxian");
            connectionFactory.setPassword("chenjinxian");
            //Gets the name of the queue
            final String queueName = Thread.currentThread().getName();
            Connection connection = null;
            Channel channel = null;
            try {
                // 3: Get connection from connection factory
                connection = connectionFactory.newConnection("producer");
                // 4: Get channel from connection
                channel = connection.createChannel();
                // 5: Declare that the queue stores messages
                /*
                 *  If the queue does not exist, it is created
                 *  Rabbitmq It is not allowed to create two identical queue names, otherwise an error will be reported.
                 *
                 *  @params1:  queue The name of the queue
                 *  @params2:  durable Is the queue persistent
                 *  @params3:  exclusive Exclusive, that is, private. If true, the current queue will be locked, other channels cannot be accessed, and the connection will be closed automatically
                 *  @params4:  autoDelete Whether to delete the message automatically, and whether to delete the message automatically after the last consumer disconnects.
                 *  @params5:  arguments You can set additional parameters of the queue, the validity period of the queue, the maximum length of messages, the message life cycle of the queue, and so on.
                 * */
                // Here, if the queue has been created once, it does not need to be defined
                //channel.queueDeclare("queue1", false, false, false, null);
                // 6: Defines a callback that accepts messages
                Channel finalChannel = channel;
                finalChannel.basicConsume(queueName, true, new DeliverCallback() {
                    @Override
                    public void handle(String s, Delivery delivery) throws IOException {
                        System.out.println(queueName + ": The message received is:" + new String(delivery.getBody(), "UTF-8"));
                    }
                }, new CancelCallback() {
                    @Override
                    public void handle(String s) throws IOException {
                    }
                });
                System.out.println(queueName + ": Start receiving messages");
                System.in.read();
            } catch (Exception ex) {
                ex.printStackTrace();
                System.out.println("Exception in sending message...");
            } finally {
                // 7: Release connection close channel
                if (channel != null && channel.isOpen()) {
                    try {
                        channel.close();
                    } catch (Exception ex) {
                        ex.printStackTrace();
                    }
                }
                if (connection != null && connection.isOpen()) {
                    try {
                        connection.close();
                    } catch (Exception ex) {
                        ex.printStackTrace();
                    }
                }
            }
        }
    };


    public static void main(String[] args) {
        // Start three threads to execute
        new Thread(runnable, "queue1").start();
        new Thread(runnable, "queue2").start();
        new Thread(runnable, "queue3").start();
        new Thread(runnable, "queue4").start();
      //  new Thread(runnable, "queue5").start();
    }
}
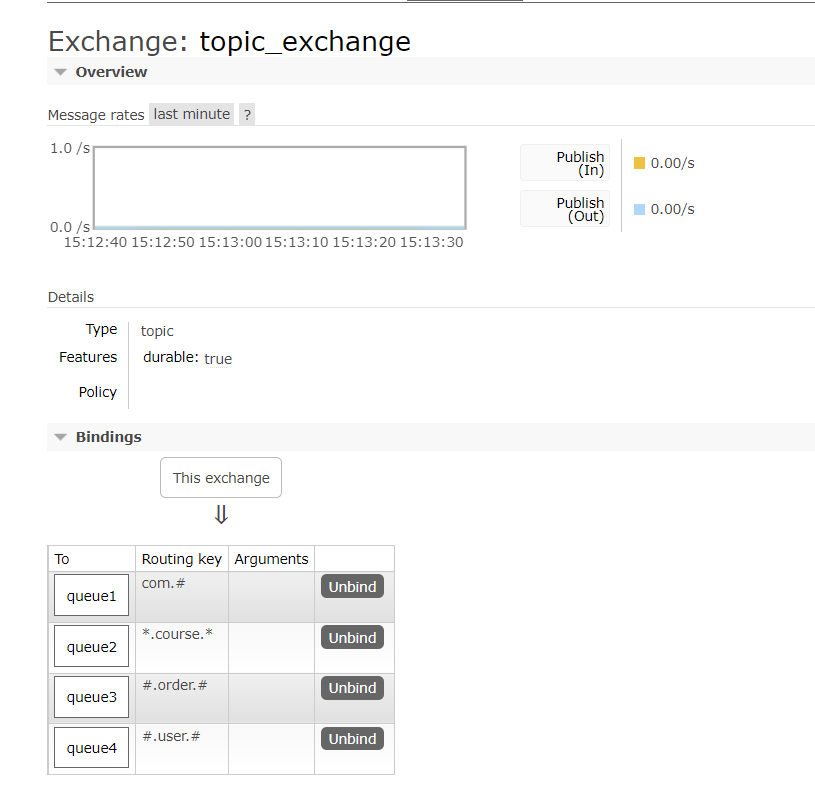
6. RabbitMQ introduction case - Topic mode
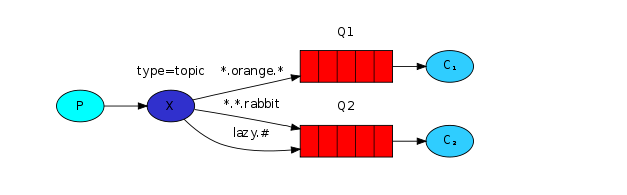
( Note that the queue has been bound to the switch in the visual interface)
producer
package com.chen.rabbitmq.topics;

import com.rabbitmq.client.Channel;
import com.rabbitmq.client.Connection;
import com.rabbitmq.client.ConnectionFactory;

/**
 Topic pattern
 */
public class Producer {
    public static void main(String[] args) {
        // 1: Create connection factory
        ConnectionFactory connectionFactory = new ConnectionFactory();
        // 2: Set connection properties
        connectionFactory.setHost("125.156.157.151");
        connectionFactory.setPort(5672);
        connectionFactory.setVirtualHost("/");
        connectionFactory.setUsername("chenjinxian");
        connectionFactory.setPassword("chenjinxian");
        Connection connection = null;
        Channel channel = null;
        try {
            // 3: Get connection from connection factory
            connection = connectionFactory.newConnection("producer");
            // 4: Get channel from connection
            channel = connection.createChannel();

            // 5: Prepare to send the contents of the message
            String message = "hello topic_exchange!!!";

            // 6: Prepare switch
            String exchangeName = "topic_exchange";
            // 7: Define routing key
            String routeKey = "com.order.user";
            // 8: Specifies the type of switch
            String type = "topic";
            // 7: Send a message to the middleware rabbitmq server
            // @params1: switch exchange
            // @params2: queue name / routingkey
            // @params3: property configuration
            // @params4: send message content
            //  #.course.* queue3
            // *.order.# queue2 ta
            // com.order.course.xxx collecion
            channel.basicPublish(exchangeName, routeKey, null, message.getBytes());
            System.out.println("Message sent successfully!");
        } catch (Exception ex) {
            ex.printStackTrace();
            System.out.println("Exception in sending message...");
        } finally {
            // 7: Release connection close channel
            if (channel != null && channel.isOpen()) {
                try {
                    channel.close();
                } catch (Exception ex) {
                    ex.printStackTrace();
                }
            }
            if (connection != null) {
                try {
                    connection.close();
                } catch (Exception ex) {
                    ex.printStackTrace();
                }
            }
        }
    }
}
Consumer unchanged
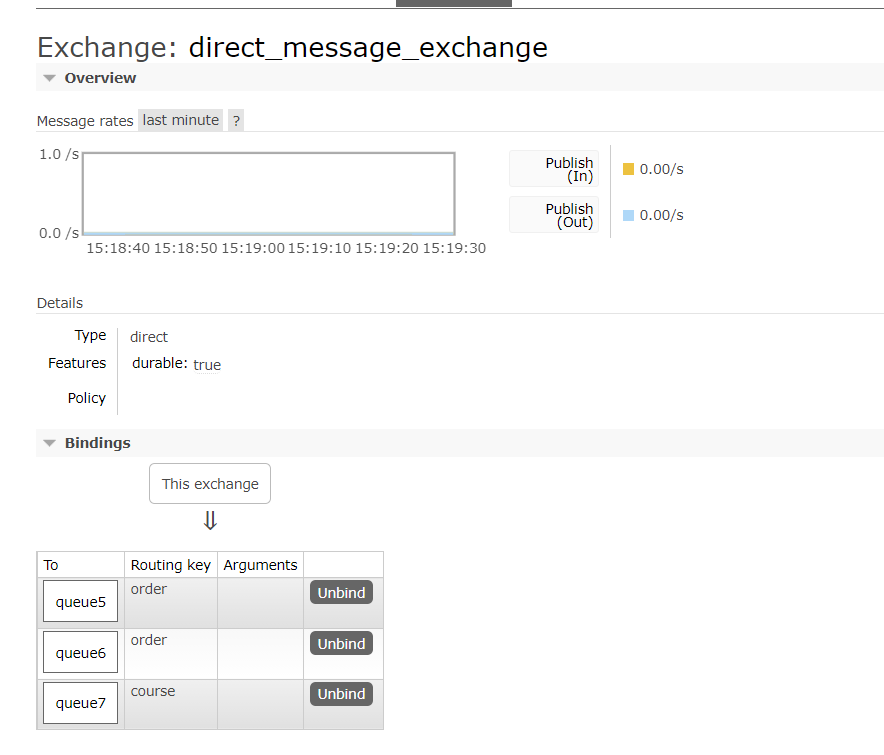
Complete case (create switch, create queue, and bind switch to queue)
package com.chen.rabbitmq.all;

import com.rabbitmq.client.Channel;
import com.rabbitmq.client.Connection;
import com.rabbitmq.client.ConnectionFactory;

/**
Complete case
 */
public class Producer {
    public static void main(String[] args) {
        // 1: Create connection factory
        ConnectionFactory connectionFactory = new ConnectionFactory();
        // 2: Set connection properties
        connectionFactory.setHost("151.156.157.151");
        connectionFactory.setPort(5672);
        connectionFactory.setVirtualHost("/");
        connectionFactory.setUsername("chenjinxian");
        connectionFactory.setPassword("chenjinxian");
        Connection connection = null;
        Channel channel = null;
        try {
            // 3: Get connection from connection factory
            connection = connectionFactory.newConnection("producer");
            // 4: Get channel from connection
            channel = connection.createChannel();
            // 6: Prepare to send the contents of the message
            String message = " Hello, Xiaobai";
            // Switch
            String  exchangeName = "direct_message_exchange";
            // Type of switch: direct/topic/fanout/headers
            String exchangeType = "direct";

            // If you use the interface to bind the relationship between queueu and exchange first, you don't need to write these declaration codes, which can make the code more concise, but it can't be read
            // If we declare it in code, we need to learn
            // 7: The so-called persistence of the switch means whether the switch will be lost with the server restart. If true means no loss, false restart will be lost
            channel.exchangeDeclare(exchangeName,exchangeType,true);

            // 8: Declaration queue
            channel.queueDeclare("queue5",true,false,false,null);
            channel.queueDeclare("queue6",true,false,false,null);
            channel.queueDeclare("queue7",true,false,false,null);

            // 9: Relationship between binding queue and switch
            channel.queueBind("queue5",exchangeName,"order");
            channel.queueBind("queue6",exchangeName,"order");
            channel.queueBind("queue7",exchangeName,"course");

            channel.basicPublish(exchangeName, "course", null, message.getBytes());
            System.out.println("Message sent successfully!");
        } catch (Exception ex) {
            ex.printStackTrace();
            System.out.println("Exception in sending message...");
        } finally {
            // 7: Release connection close channel
            if (channel != null && channel.isOpen()) {
                try {
                    channel.close();
                } catch (Exception ex) {
                    ex.printStackTrace();
                }
            }
            if (connection != null) {
                try {
                    connection.close();
                } catch (Exception ex) {
                    ex.printStackTrace();
                }
            }
        }
    }
}
Generate queues and switches after execution

7. RabbitMQ entry case - Work mode
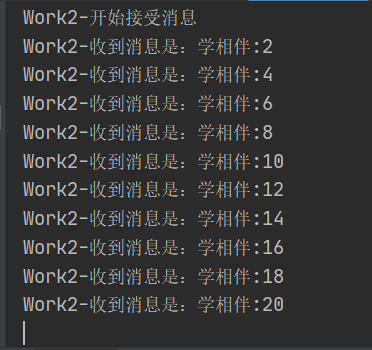
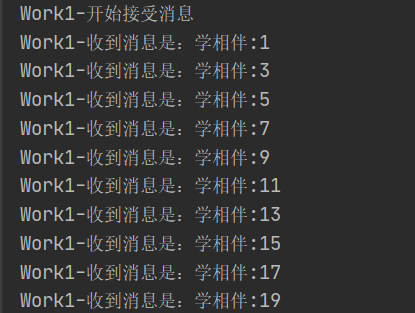
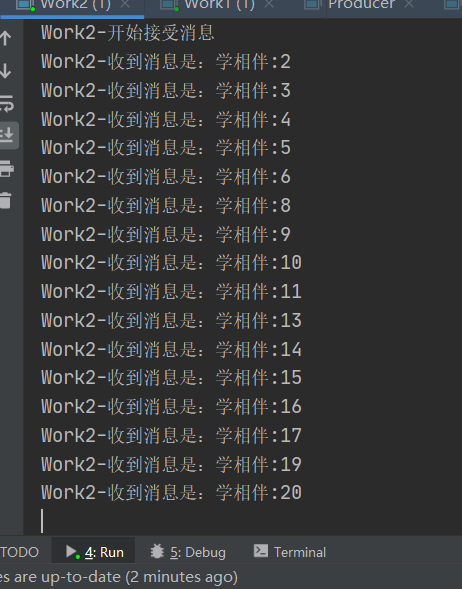
01 Work mode polling mode (round robin)
When there are multiple consumers, which consumer will consume our news, and how can we balance the amount of consumer consumption information?
There are two main modes:
-
Distribution in polling mode: one for each consumer, distributed equally
-
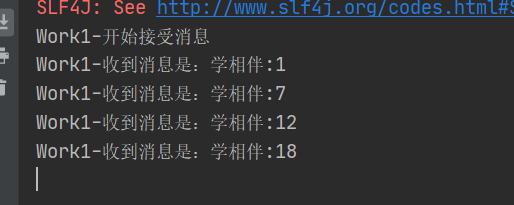
Fair distribution: fair distribution is carried out according to the consumption capacity of consumers, with more fast processing and less slow processing; distribution according to work
01 polling mode
producer
package com.chen.rabbitmq.work.lunxun;
import com.rabbitmq.client.Channel;
import com.rabbitmq.client.Connection;
import com.rabbitmq.client.ConnectionFactory;
/**
 Polling mode
 */
public class Producer {
    public static void main(String[] args) {
        // 1: Create connection factory
        ConnectionFactory connectionFactory = new ConnectionFactory();
        // 2: Set connection properties
        connectionFactory.setHost("123.156.147.151");
        connectionFactory.setPort(5672);
        connectionFactory.setVirtualHost("/");
        connectionFactory.setUsername("chenjinxian");
        connectionFactory.setPassword("chenjinxian");
        Connection connection = null;
        Channel channel = null;
        try {
            // 3: Get connection from connection factory
            connection = connectionFactory.newConnection("producer");
            // 4: Get channel from connection
            channel = connection.createChannel();
            // 6: Prepare to send the contents of the message
            //===============================end topic mode==================================
            for (int i = 1; i <= 20; i++) {
                //Content of the message
                String msg = "Learning companion:" + i;
                // 7: Send a message to the middleware rabbitmq server
                // @params1: switch exchange
                // @params2: queue name / routingkey
                // @params3: property configuration
                // @params4: send message content
                channel.basicPublish("", "queue1", null, msg.getBytes());
            }
            System.out.println("Message sent successfully!");
        } catch (Exception ex) {
            ex.printStackTrace();
            System.out.println("Exception in sending message...");
        } finally {
            // 7: Release connection close channel
            if (channel != null && channel.isOpen()) {
                try {
                    channel.close();
                } catch (Exception ex) {
                    ex.printStackTrace();
                }
            }
            if (connection != null) {
                try {
                    connection.close();
                } catch (Exception ex) {
                    ex.printStackTrace();
                }
            }
        }
    }
}
consumer
package com.chen.rabbitmq.work.lunxun;
import com.rabbitmq.client.*;
import java.io.IOException;
/**
 Polling mode
 */
public class Work1 {
    public static void main(String[] args) {
        // 1: Create connection factory
        ConnectionFactory connectionFactory = new ConnectionFactory();
        // 2: Set connection properties
        connectionFactory.setHost("123.156.147.155");
        connectionFactory.setPort(5672);
        connectionFactory.setVirtualHost("/");
        connectionFactory.setUsername("chenjinxian");
        connectionFactory.setPassword("chenjinxian");
        Connection connection = null;
        Channel channel = null;
        try {
            // 3: Get connection from connection factory
            connection = connectionFactory.newConnection("consumer-Work1");
            // 4: Get channel from connection
            channel = connection.createChannel();
            // 5: Declare that the queue stores messages
            /*
             *  If the queue does not exist, it is created
             *  Rabbitmq It is not allowed to create two identical queue names, otherwise an error will be reported.
             *
             *  @params1:  queue The name of the queue
             *  @params2:  durable Is the queue persistent
             *  @params3:  exclusive Exclusive, that is, private. If true, the current queue will be locked, other channels cannot be accessed, and the connection will be closed automatically
             *  @params4:  autoDelete Whether to delete the message automatically, and whether to delete the message automatically after the last consumer disconnects.
             *  @params5:  arguments You can set additional parameters of the queue, the validity period of the queue, the maximum length of messages, the message life cycle of the queue, and so on.
             * */
            // Here, if the queue has been created once, it does not need to be defined
//            channel.queueDeclare("queue1", false, false, false, null);
            // At the same time, the server will only push one message to the consumer
            // 6: Defines a callback that accepts messages
            Channel finalChannel = channel;
            //finalChannel.basicQos(1);

            finalChannel.basicConsume("queue1", true, new DeliverCallback() {
                @Override
                public void handle(String s, Delivery delivery) throws IOException {
                    try{
                        System.out.println("Work1-The message received is:" + new String(delivery.getBody(), "UTF-8"));
                        Thread.sleep(200);
                    }catch(Exception ex){
                        ex.printStackTrace();
                    }
                }
            }, new CancelCallback() {
                @Override
                public void handle(String s) throws IOException {
                }
            });
            System.out.println("Work1-Start receiving messages");
            System.in.read();
        } catch (Exception ex) {
            ex.printStackTrace();
            System.out.println("Exception in sending message...");
        } finally {
            // 7: Release connection close channel
            if (channel != null && channel.isOpen()) {
                try {
                    channel.close();
                } catch (Exception ex) {
                    ex.printStackTrace();
                }
            }
            if (connection != null && connection.isOpen()) {
                try {
                    connection.close();
                } catch (Exception ex) {
                    ex.printStackTrace();
                }
            }
        }
    }
}
package com.chen.rabbitmq.work.lunxun;
import com.rabbitmq.client.*;
import java.io.IOException;
/**
Polling mode
*/
public class Work2 {
public static void main(String[] args) {
// 1: Create connection factory
ConnectionFactory connectionFactory = new ConnectionFactory();
// 2: Set connection properties
connectionFactory.setHost("123.195.157.151");
connectionFactory.setPort(5672);
connectionFactory.setVirtualHost("/");
connectionFactory.setUsername("chenjinxian");
connectionFactory.setPassword("chenjinxian");
Connection connection = null;
Channel channel = null;
try {
// 3: Get connection from connection factory
connection = connectionFactory.newConnection("consumer-Work2");
// 4: Get channel from connection
channel = connection.createChannel();
// 5: Declare that the queue stores messages
/*
* If the queue does not exist, it is created
* Rabbitmq It is not allowed to create two identical queue names, otherwise an error will be reported.
*
* @params1: queue The name of the queue
* @params2: durable Is the queue persistent
* @params3: exclusive Exclusive, that is, private. If true, the current queue will be locked, other channels cannot be accessed, and the connection will be closed automatically
* @params4: autoDelete Whether to delete the message automatically, and whether to delete the message automatically after the last consumer disconnects.
* @params5: arguments You can set additional parameters of the queue, the validity period of the queue, the maximum length of messages, the message life cycle of the queue, and so on.
* */
// Here, if the queue has been created once, it does not need to be defined
//channel.queueDeclare("queue1", false, true, false, null);
// At the same time, the server will only push one message to the consumer
//channel.basicQos(1);
// 6: Defines a callback that accepts messages
Channel finalChannel = channel;
//finalChannel.basicQos(1);
finalChannel.basicConsume("queue1", true, new DeliverCallback() {
@Override
public void handle(String s, Delivery delivery) throws IOException {
try{
System.out.println("Work2-The message received is:" + new String(delivery.getBody(), "UTF-8"));
Thread.sleep(100);
}catch(Exception ex){
ex.printStackTrace();
}
}
}, new CancelCallback() {
@Override
public void handle(String s) throws IOException {
}
});
System.out.println("Work2-Start receiving messages");
System.in.read();
} catch (Exception ex) {
ex.printStackTrace();
System.out.println("Exception in sending message...");
} finally {
// 7: Release connection close channel
if (channel != null && channel.isOpen()) {
try {
channel.close();
} catch (Exception ex) {
ex.printStackTrace();
}
}
if (connection != null && connection.isOpen()) {
try {
connection.close();
} catch (Exception ex) {
ex.printStackTrace();
}
}
}
}
}
02 Work mode fair distribution mode
producer
package com.chen.rabbitmq.work.fair;
import com.rabbitmq.client.Channel;
import com.rabbitmq.client.Connection;
import com.rabbitmq.client.ConnectionFactory;

/**
 Fair distribution model
 */
public class Producer {
    public static void main(String[] args) {
        // 1: Create connection factory
        ConnectionFactory connectionFactory = new ConnectionFactory();
        // 2: Set connection properties
        connectionFactory.setHost("125.156.157.151");
        connectionFactory.setPort(5672);
        connectionFactory.setVirtualHost("/");
        connectionFactory.setUsername("chenjinxian");
        connectionFactory.setPassword("chenjinxian");
        Connection connection = null;
        Channel channel = null;
        try {
            // 3: Get connection from connection factory
            connection = connectionFactory.newConnection("producer");
            // 4: Get channel from connection
            channel = connection.createChannel();
            // 6: Prepare to send the contents of the message
            //===============================end topic mode==================================
            for (int i = 1; i <= 20; i++) {
                //Content of the message
                String msg = "Learning companion:" + i;
                // 7: Send a message to the middleware rabbitmq server
                // @params1: switch exchange
                // @params2: queue name / routingkey
                // @params3: property configuration
                // @params4: send message content
                channel.basicPublish("", "queue1", null, msg.getBytes());
            }
            System.out.println("Message sent successfully!");
        } catch (Exception ex) {
            ex.printStackTrace();
            System.out.println("Exception in sending message...");
        } finally {
            // 7: Release connection close channel
            if (channel != null && channel.isOpen()) {
                try {
                    channel.close();
                } catch (Exception ex) {
                    ex.printStackTrace();
                }
            }
            if (connection != null) {
                try {
                    connection.close();
                } catch (Exception ex) {
                    ex.printStackTrace();
                }
            }
        }
    }
}
consumer
package com.chen.rabbitmq.work.fair;

import com.rabbitmq.client.*;

import java.io.IOException;

/**
 Fair distribution model
 */
public class Work1 {
    public static void main(String[] args) {
        // 1: Create connection factory
        ConnectionFactory connectionFactory = new ConnectionFactory();
        // 2: Set connection properties
        connectionFactory.setHost("123.156.146.151");
        connectionFactory.setPort(5672);
        connectionFactory.setVirtualHost("/");
        connectionFactory.setUsername("chenjinxian");
        connectionFactory.setPassword("chenjinxian");
        Connection connection = null;
        Channel channel = null;
        try {
            // 3: Get connection from connection factory
            connection = connectionFactory.newConnection("consumer-Work1");
            // 4: Get channel from connection
            channel = connection.createChannel();
            // 5: Declare that the queue stores messages
            /*
             *  If the queue does not exist, it is created
             *  Rabbitmq It is not allowed to create two identical queue names, otherwise an error will be reported.
             *
             *  @params1:  queue The name of the queue
             *  @params2:  durable Is the queue persistent
             *  @params3:  exclusive Exclusive, that is, private. If true, the current queue will be locked, other channels cannot be accessed, and the connection will be closed automatically
             *  @params4:  autoDelete Whether to delete the message automatically, and whether to delete the message automatically after the last consumer disconnects.
             *  @params5:  arguments You can set additional parameters of the queue, the validity period of the queue, the maximum length of messages, the message life cycle of the queue, and so on.
             * */
            // Here, if the queue has been created once, it does not need to be defined
//            channel.queueDeclare("queue1", false, false, false, null);
            // At the same time, the server will only push one message to the consumer
            // 6: Defines a callback that accepts messages
            final Channel finalChannel = channel;

            finalChannel.basicQos(1);
            finalChannel.basicConsume("queue1", false, new DeliverCallback() {
                @Override
                public void handle(String s, Delivery delivery) throws IOException {
                    try{
                        System.out.println("Work1-The message received is:" + new String(delivery.getBody(), "UTF-8"));
                        Thread.sleep(1000);
                        // Change to manual response
                        finalChannel.basicAck(delivery.getEnvelope().getDeliveryTag(),false);
                    }catch(Exception ex){
                        ex.printStackTrace();
                    }
                }
            }, new CancelCallback() {
                @Override
                public void handle(String s) throws IOException {
                }
            });
            System.out.println("Work1-Start receiving messages");
            System.in.read();
        } catch (Exception ex) {
            ex.printStackTrace();
            System.out.println("Exception in sending message...");
        } finally {
            // 7: Release connection close channel
            if (channel != null && channel.isOpen()) {
                try {
                    channel.close();
                } catch (Exception ex) {
                    ex.printStackTrace();
                }
            }
            if (connection != null && connection.isOpen()) {
                try {
                    connection.close();
                } catch (Exception ex) {
                    ex.printStackTrace();
                }
            }
        }
    }
}
package com.chen.rabbitmq.work.fair;
import com.rabbitmq.client.*;
import java.io.IOException;
/**
Fair distribution model
*/
public class Work2 {
public static void main(String[] args) {
// 1: Create connection factory
ConnectionFactory connectionFactory = new ConnectionFactory();
// 2: Set connection properties
connectionFactory.setHost("121.156.157.131");
connectionFactory.setPort(5672);
connectionFactory.setVirtualHost("/");
connectionFactory.setUsername("chenjinxian");
connectionFactory.setPassword("chenjinxian");
Connection connection = null;
Channel channel = null;
try {
// 3: Get connection from connection factory
connection = connectionFactory.newConnection("consumer-Work2");
// 4: Get channel from connection
channel = connection.createChannel();
// 5: Declare that the queue stores messages
/*
* If the queue does not exist, it is created
* Rabbitmq It is not allowed to create two identical queue names, otherwise an error will be reported.
*
* @params1: queue The name of the queue
* @params2: durable Is the queue persistent
* @params3: exclusive Exclusive, that is, private. If true, the current queue will be locked, other channels cannot be accessed, and the connection will be closed automatically
* @params4: autoDelete Whether to delete the message automatically, and whether to delete the message automatically after the last consumer disconnects.
* @params5: arguments You can set additional parameters of the queue, the validity period of the queue, the maximum length of messages, the message life cycle of the queue, and so on.
* */
// Here, if the queue has been created once, it does not need to be defined
//channel.queueDeclare("queue1", false, true, false, null);
// At the same time, the server will only push one message to the consumer
//channel.basicQos(1);
// 6: Defines a callback that accepts messages
final Channel finalChannel = channel;
finalChannel.basicQos(1);
finalChannel.basicConsume("queue1", false, new DeliverCallback() {
@Override
public void handle(String s, Delivery delivery) throws IOException {
try{
System.out.println("Work2-The message received is:" + new String(delivery.getBody(), "UTF-8"));
Thread.sleep(200);
// Be sure to use our manual answer
finalChannel.basicAck(delivery.getEnvelope().getDeliveryTag(),false);
}catch(Exception ex){
ex.printStackTrace();
}
}
}, new CancelCallback() {
@Override
public void handle(String s) throws IOException {
}
});
System.out.println("Work2-Start receiving messages");
System.in.read();
} catch (Exception ex) {
ex.printStackTrace();
System.out.println("Exception in sending message...");
} finally {
// 7: Release connection close channel
if (channel != null && channel.isOpen()) {
try {
channel.close();
} catch (Exception ex) {
ex.printStackTrace();
}
}
if (connection != null && connection.isOpen()) {
try {
connection.close();
} catch (Exception ex) {
ex.printStackTrace();
}
}
}
}
}
8. RabbitMQ usage scenario
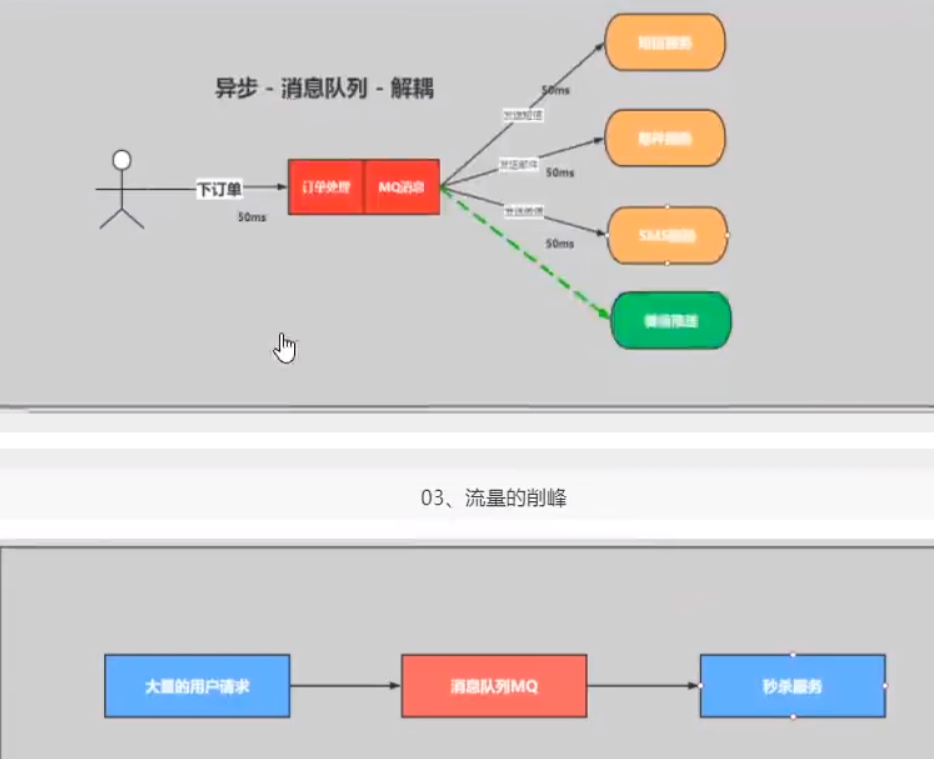
01 decoupling, peak shaving, asynchronous
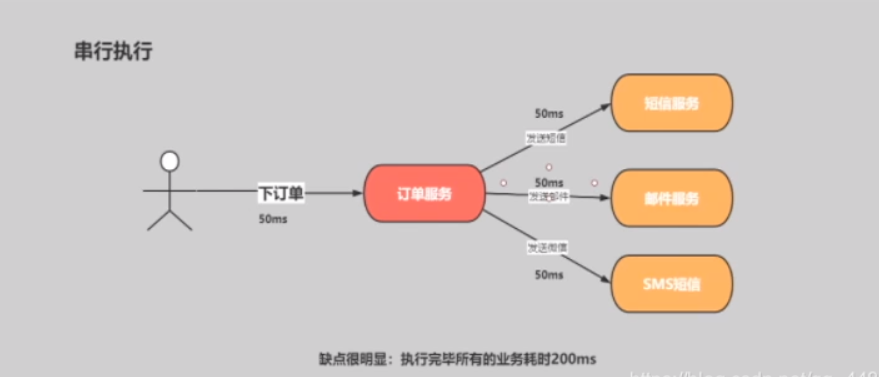
Synchronous asynchronous problem (serial)
Serial mode: after successfully writing the order information into the database, send the registration email and then send the registration SMS. After the above three tasks are completed, return to the client
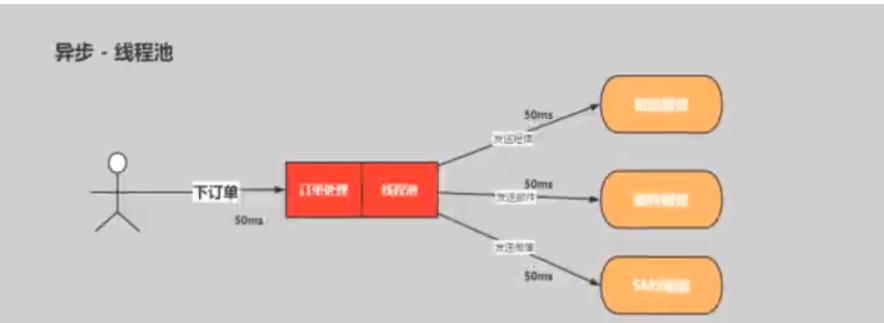
Parallel asynchronous thread pool
Parallel mode: after the order information is successfully written into the database, send the registration email and send the registration SMS at the same time. After the above three tasks are completed, return to the client. The difference from serial is that the parallel method can improve the processing time
Existing problems
-
High coupling
-
You need to write your own thread pool. The maintenance cost is too high
-
Messages may be lost. You need to make message compensation yourself
-
How to ensure the reliability of the message? Write it yourself
-
If the server cannot be hosted, you need to write high availability
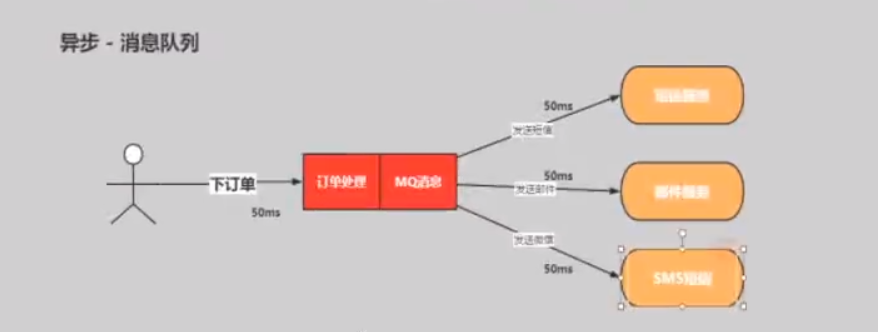
Asynchronous message queuing
Benefits:
-
Fully decoupled, bridging with MQ
-
There is an independent thread pool and running model
-
If a message occurs, it may be lost. MQ has persistence function
-
How to ensure the reliability of messages, dead letter queue and message transfer, etc
-
If the server cannot be hosted, you need to write high availability, and the HA image model is high availability
According to the above agreement, the user's response time is equivalent to the time when the order information is written to the database, that is, 50 milliseconds. Register e-mail, send SMS, write to the message queue and return directly. Therefore, the speed of writing to the message queue is very fast and can be basically ignored. Therefore, the user's response time may be 50 milliseconds. Therefore, after the architecture is changed, the throughput of the system is increased to 20QPS per second. It is three times higher than serial and two times higher than parallel
02 high cohesion, low coupling
Benefits:
-
Fully decoupled, bridging with MQ
-
There is an independent thread pool and running model
-
If a message occurs, it may be lost. MQ has persistence function
-
How to ensure the reliability of messages, dead letter queue and message transfer, etc
-
If the server cannot be hosted, you need to write high availability, and the HA image model is high availability
According to the above agreement, the user's response time is equivalent to the time when the order information is written to the database, that is, 50 milliseconds. Register e-mail, send SMS, write to the message queue and return directly. Therefore, the speed of writing to the message queue is very fast and can be basically ignored. Therefore, the user's response time may be 50 milliseconds. Therefore, after the architecture is changed, the throughput of the system is increased to 20QPS per second. It is three times higher than serial and two times higher than parallel
4, Springboot case
1. Fanout mode
producer
Import dependency
  <!--rabbitmq starter rely on-->
        <dependency>
            <groupId>org.springframework.boot</groupId>
            <artifactId>spring-boot-starter-amqp</artifactId>
        </dependency>
application.yml
# Service port
server:
  port: 8080
# Configure rabbitmq service
spring:
	rabbitmq:
		username: admin
		password: admin
		virtual-host: /
		host: 127.0.0.1
		port: 5672
directory structure
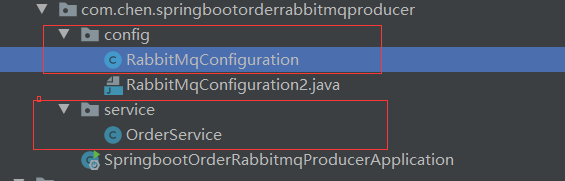
Create configuration class RabbitMqConfiguration.java
package com.chen.springbootorderrabbitmqproducer.config;
import org.springframework.amqp.core.Binding;
import org.springframework.amqp.core.BindingBuilder;
import org.springframework.amqp.core.FanoutExchange;
import org.springframework.amqp.core.Queue;
import org.springframework.context.annotation.Bean;
import org.springframework.context.annotation.Configuration;

/**

 */
@Configuration
public class RabbitMqConfiguration {


    // 1: Claim switch
    @Bean
    public FanoutExchange fanoutExchange() {
        return new FanoutExchange("fanout_order_ex", true, false);
    }


    // 2: Declaration queue duanxin.fanout.queue
    @Bean
    public Queue duanxinqueue() {
        return new Queue("duanxin.fanout.queue", true);
    }


    // 2: Declaration queue duanxin.fanout.queue
    @Bean
    public Queue smsqueue() {
        return new Queue("sms.fanout.queue", true);
    }


    // 2: Declaration queue duanxin.fanout.queue
    @Bean
    public Queue emailqueue() {
        return new Queue("email.fanout.queue", true);
    }


    // 3: Determine binding relationship
    @Bean
    public Binding bindduanxin(){
        return BindingBuilder.bind(duanxinqueue()).to(fanoutExchange());
    }

    // 3: Determine binding relationship
    @Bean
    public Binding bindsms(){
        return BindingBuilder.bind(smsqueue()).to(fanoutExchange());
    }

    // 3: Determine binding relationship
    @Bean
    public Binding bindemail(){
        return BindingBuilder.bind(emailqueue()).to(fanoutExchange());
    }
}
Write the implementation class OrderService.java
package com.chen.springbootorderrabbitmqproducer.service;

import org.springframework.amqp.AmqpException;
import org.springframework.amqp.core.Message;
import org.springframework.amqp.core.MessagePostProcessor;
import org.springframework.amqp.rabbit.core.RabbitTemplate;
import org.springframework.beans.factory.annotation.Autowired;
import org.springframework.stereotype.Service;

import java.util.UUID;

/**

 */
@Service
public class OrderService {

    @Autowired
    private RabbitTemplate rabbitTemplate;

    // Switch
    private String exchangeName = "fanout_order_ex";
    // Routing key
    private String routingKey = "";


    /**
     * @Author xuke
     * @Description Simulate the business of placing orders for goods purchased by users
     * @Date 22:26 2021/3/5
     * @Param [userId, productId, num]
     * @return void
    **/
    public void makeOrder(String userId,String productId,int num){
        // 1: Query whether the inventory is sufficient according to the commodity id
        // 2: Save order
        String orderId = UUID.randomUUID().toString();
        System.out.println("Order saved successfully: id Yes:" + orderId);
        // 3: Send message
        rabbitTemplate.convertAndSend(exchangeName,routingKey,orderId);
    }

}
Writing test classes
package com.chen.springbootorderrabbitmqproducer.rabbitmq.springbootorderrabbitmqproducer;


import com.chen.springbootorderrabbitmqproducer.service.OrderService;
import org.junit.jupiter.api.Test;
import org.springframework.beans.factory.annotation.Autowired;
import org.springframework.boot.test.context.SpringBootTest;

@SpringBootTest
class SpringbootOrderRabbitmqProducerApplicationTests {


    @Autowired
    private OrderService orderService;


    @Test
    public void contextLoads() {
        orderService.makeOrder("100","100",10);
    }


    @Test
    public void testDirect() {
        orderService.makeOrderDirect("100","100",10);
    }

    @Test
    public void testDirectTTl() {
        orderService.makeOrderDirectTtl("100","100",10);
    }


//    @Test
//    public void testTopic() {
//        orderService.makeOrderTopic("100","100",10);
//    }

}
consumer
application.yml
# Service port
server:
  port: 8080
# Configure rabbitmq service
spring:
	rabbitmq:
		username: admin
		password: admin
		virtual-host: /
		host: 127.0.0.1
		port: 5672
Accept message
package com.chen.direct;

import org.springframework.amqp.rabbit.annotation.RabbitHandler;
import org.springframework.amqp.rabbit.annotation.RabbitListener;
import org.springframework.stereotype.Service;

/**

 */
@Service
@RabbitListener(queues ={"duanxin.direct.queue"})
public class DirectDuanxinConsumber {


    // The message that tells your receiving server has no return value
    @RabbitHandler
    public void reviceMessage(String message){
        System.out.println("duanxin--direct--->Order message received, order id yes: " + message);
    }
}
package com.chen.direct;

import org.springframework.amqp.rabbit.annotation.RabbitHandler;
import org.springframework.amqp.rabbit.annotation.RabbitListener;
import org.springframework.stereotype.Service;

/**

 */
@Service
@RabbitListener(queues ={"email.direct.queue"})
public class DirectEmailConsumber {


    @RabbitHandler
    public void reviceMessage(String message){
        System.out.println("email---direct-->Order message received, order id yes: " + message);
    }
}
package com.chen.direct;

import org.springframework.amqp.rabbit.annotation.RabbitHandler;
import org.springframework.amqp.rabbit.annotation.RabbitListener;
import org.springframework.stereotype.Service;

/**

 */
@Service
@RabbitListener(queues ={"sms.direct.queue"})
public class DirectSmsConsumber {


    @RabbitHandler
    public void reviceMessage(String message){
        System.out.println("sms--direct--->Order message received, order id yes: " + message);
    }
}
2. Direct mode
producer
Configuration class
package com.chen.springbootorderrabbitmqproducer.config;

import org.springframework.amqp.core.*;
import org.springframework.context.annotation.Bean;
import org.springframework.context.annotation.Configuration;

import java.util.HashMap;
import java.util.Map;

/**

 */
@Configuration
public class RabbitMqConfiguration2 {


    // 1: Claim switch
    @Bean
    public DirectExchange directExchange() {
        return new DirectExchange("direct_order_ex", true, false);
    }


    // 2: Declaration queue duanxin.direct.queue
    @Bean
    public Queue duanxinqueue() {
        return new Queue("duanxin.direct.queue", true);
    }


    // 2: Declaration queue duanxin.direct.queue
    @Bean
    public Queue smsqueue() {
        return new Queue("sms.direct.queue", true);
    }


    // 2: Declaration queue duanxin.direct.queue
    @Bean
    public Queue emailqueue() {
        return new Queue("email.direct.queue", true);
    }


    // 3: Determine binding relationship
    @Bean
    public Binding bindduanxin(){
        return BindingBuilder.bind(duanxinqueue()).to(directExchange()).with("msg");
    }

    // 3: Determine binding relationship
    @Bean
    public Binding bindsms(){
        return BindingBuilder.bind(smsqueue()).to(directExchange()).with("sms");
    }

    // 3: Determine binding relationship
    @Bean
    public Binding bindemail(){
        return BindingBuilder.bind(emailqueue()).to(directExchange()).with("email");
    }
}
Implementation class:
package com.chen.springbootorderrabbitmqproducer.service;

import org.springframework.amqp.AmqpException;
import org.springframework.amqp.core.Message;
import org.springframework.amqp.core.MessagePostProcessor;
import org.springframework.amqp.rabbit.core.RabbitTemplate;
import org.springframework.beans.factory.annotation.Autowired;
import org.springframework.stereotype.Service;

import java.util.UUID;

/**

 */
@Service
public class OrderService {

    @Autowired
    private RabbitTemplate rabbitTemplate;

    // Switch
    private String exchangeName = "fanout_order_ex";
    // Routing key
    private String routingKey = "";


    /**
     * @Description Simulate the business of placing orders for goods purchased by users
     * @Param [userId, productId, num]
     * @return void
     **/
    public void makeOrderDirect(String userId,String productId,int num){
        // 1: Query whether the inventory is sufficient according to the commodity id
        // 2: Save order
        String orderId = UUID.randomUUID().toString();
        System.out.println("Order saved successfully: id Yes:" + orderId);
        // 3: Send message
        rabbitTemplate.convertAndSend("direct_order_ex","email",orderId);
        rabbitTemplate.convertAndSend("direct_order_ex","sms",orderId);
    }


}
Test:
package com.chen.springbootorderrabbitmqproducer.rabbitmq.springbootorderrabbitmqproducer;


import com.chen.springbootorderrabbitmqproducer.service.OrderService;
import org.junit.jupiter.api.Test;
import org.springframework.beans.factory.annotation.Autowired;
import org.springframework.boot.test.context.SpringBootTest;

@SpringBootTest
class SpringbootOrderRabbitmqProducerApplicationTests {

    @Autowired
    private OrderService orderService;


    @Test
    public void testDirect() {
        orderService.makeOrderDirect("100","100",10);
    }


}
consumer
package com.chen.direct;

import org.springframework.amqp.rabbit.annotation.RabbitHandler;
import org.springframework.amqp.rabbit.annotation.RabbitListener;
import org.springframework.stereotype.Service;

/**
 * @description:
 */
@Service
@RabbitListener(queues ={"duanxin.direct.queue"})
public class DirectDuanxinConsumber {


    // The message that tells your receiving server has no return value
    @RabbitHandler
    public void reviceMessage(String message){
        System.out.println("duanxin--direct--->Order message received, order id yes: " + message);
    }
}
package com.chen.direct;

import org.springframework.amqp.rabbit.annotation.RabbitHandler;
import org.springframework.amqp.rabbit.annotation.RabbitListener;
import org.springframework.stereotype.Service;

/**

 */
@Service
@RabbitListener(queues ={"email.direct.queue"})
public class DirectEmailConsumber {


    @RabbitHandler
    public void reviceMessage(String message){
        System.out.println("email---direct-->Order message received, order id yes: " + message);
    }
}
package com.chen.direct;

import org.springframework.amqp.rabbit.annotation.RabbitHandler;
import org.springframework.amqp.rabbit.annotation.RabbitListener;
import org.springframework.stereotype.Service;

/**

@Service
@RabbitListener(queues ={"sms.direct.queue"})
public class DirectSmsConsumber {


    @RabbitHandler
    public void reviceMessage(String message){
        System.out.println("sms--direct--->Order message received, order id yes: " + message);
    }
}
3. Topic mode
producer
public class OrderService{
    @Autowired
    private RabbitTemplate rabbitTemplate;
    //Simulated user orders
    public void makeOrder(String userid,String productid,int num){

  public void makeOrderTopic(String userId,String productId,int num){
        // 1: Query whether the inventory is sufficient according to the commodity id
        // 2: Save order
        String orderId = UUID.randomUUID().toString();
        System.out.println("Order saved successfully: id Yes:" + orderId);
        // 3: Send message

        //com.#  duanxin
        //#.email.* email
        //#.sms.# sms
        // Set message confirmation mechanism
        rabbitTemplate.convertAndSend("topic_order_ex","com.email.sms.xxx",orderId);
    }
}
@Test
public void testTopic() {
orderService.makeOrderTopic("100","100",10);
}
Consumer (using notes)
FanoutSmsConsumer.java
@Component
@RabbitListener(bindings = @QueueBinding(
	value = @Queue(value = "sms.topic.queue",durable = "true",antoDelete = "false"),
    exchange = @Exchange(value = "topic_order_exchange",type = "ExchangeTypes.TOPIC")
    key = "#.sms.#"
))
public class TopicSmsConsumer{
    @RabbitHandler
    public void reviceMessage(String message){
        sout("sms The order information received is:"+message);
    }
}
FanoutDuanxinConsumer.java
@Component
@RabbitListener(bindings = @QueueBinding(
	value = @Queue(value = "duanxin.topic.queue",durable = "true",antoDelete = "false"),
    exchange = @Exchange(value = "topic_order_exchange",type = "ExchangeTypes.TOPIC")
    key = "#.duanxin.#"
))
public classTopicDuanxinConsumer{
    @RabbitHandler
    public void reviceMessage(String message){
        sout("duanxin The order information received is:"+message);
    }
}
FanoutEmailConsumer.java
@Component
@RabbitListener(bindings = @QueueBinding(
	value = @Queue(value = "email.topic.queue",durable = "true",antoDelete = "false"),
    exchange = @Exchange(value = "topic_order_exchange",type = "ExchangeTypes.TOPIC")
    key = "#.email.#"
))
public class TopicEmailConsumer{
    @RabbitHandler
    public void reviceMessage(String message){
        sout("email The order information received is:"+message);
    }
}
5, RabbitMQ advanced
1. Expiration time TTL
summary
The expiration time TTL indicates that the expected time can be set for the message and can be received by the consumer within this time; After that, the message will be deleted automatically. RabbitMQ can set TTL for messages and queues. At present, there are two methods to set TTL
-
The first method is to set the queue property so that all messages in the queue have the same expiration time
-
The second method is to set the message separately, and the TTL of each message can be different
If the above two methods are used at the same time, the expiration time of the message shall be subject to the value with the smaller TTL. Once the lifetime of the message in the queue exceeds the set TTL value, it is called dead message. It is delivered to the dead letter queue, and the consumer will no longer receive the message
Set queue TTL
RabbitMqConfiguration.java
@Configuration
public class TTLRabbitMQConfiguration{
    //1. Declare and register the switch in direct mode
    @Bean
    public DirectExchange ttldirectExchange(){
        return new DirectExchange("ttl_direct_exchange",true,false);}
    //2. Expiration time of the queue
    @Bean
    public Queue directttlQueue(){
        //Set expiration time
        Map<String,Object> args = new HashMap<>();
        args.put("x-message-ttl",5000);//This must be of type int
        return new Queue("ttl.direct.queue",true,false,false,args);}

    @Bean
    public Binding ttlBingding(){
        return BindingBuilder.bin(directttlQueue()).to(ttldirectExchange()).with("ttl");
    }
}
Set message TTL
public class OrderService{
    @Autowired
    private RabbitTemplate rabbitTemplate;
    //Simulated user orders
    public void makeOrder(String userid,String productid,int num){
        //1. Query whether the inventory is sufficient according to the commodity id
        //2. Save order
        String orderId = UUID.randomUUID().toString();
        sout("Order production succeeded:"+orderId);
        //3. Complete message distribution through MQ
        //Parameter 1: switch parameter 2: routing key/queue queue name parameter 3: message content
        String exchangeName = "ttl_order_exchange";
        String routingKey = "ttlmessage";
        //Set expiration time for messages
        MessagePostProcessor messagePostProcessor = new MessagePostProcessor(){
            public Message postProcessMessage(Message message){
                //Here is the string
                message.getMessageProperties().setExpiration("5000");
                message.getMessageProperties().setContentEncoding("UTF-8");
                return message;
            }
        }
        rabbitTemplate.convertAndSend(exchangeName,routingKey,orderId,messagePostProcessor);
    }
}
RabbitMqConfiguration.java
@Configuration
public class TTLRabbitMQConfiguration{
//1. Declare and register the switch in direct mode
@Bean
public DirectExchange ttldirectExchange(){
return new DirectExchange("ttl_direct_exchange",true,false);}
//2. Expiration time of the queue
@Bean
public Queue directttlQueue(){
//Set expiration time
Map<String,Object> args = new HashMap<>();
args.put("x-message-ttl",5000);//This must be of type int
return new Queue("ttl.direct.queue",true,false,false,args);}
@Bean
public Queue directttlMessageQueue(){
return new Queue("ttlMessage.direct.queue",true,false,false,args);}
@Bean
public Binding ttlBingding(){
return BindingBuilder.bin(directttlMessageQueue()).to(ttldirectExchange()).with("ttlmessage");
}
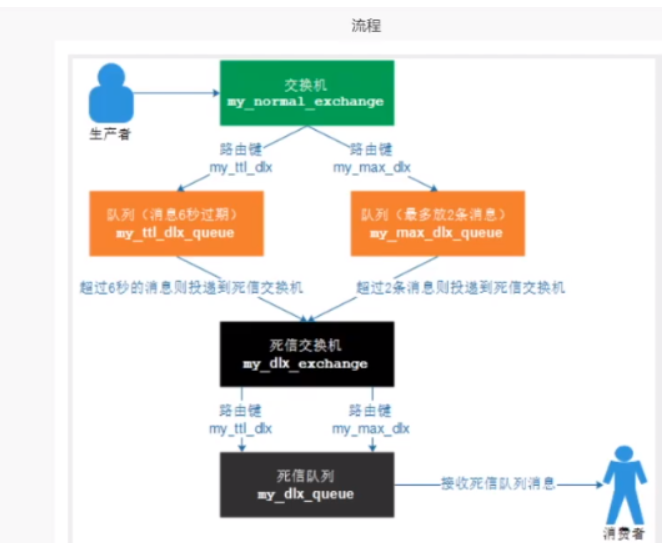
}2. Dead letter queue
summary
DLX, fully known as dead letter exchange, can be called dead letter switch or dead letter mailbox. When a message becomes dead letter in another queue, it can be re sent to another switch, which is DLX. The queue bound to DLX is called dead letter queue. The message may become dead letter due to the following reasons:
-
Message rejected
-
Message expiration
-
The queue has reached its maximum length
DLX is also a normal switch. It is no different from a general switch. It can be specified on any queue. In fact, it is to set the properties of a queue. When there is dead letter in this queue, Rabbitmq will automatically republish the message to the set DLX, and then route it to another queue, that is, dead letter queue.
To use dead letter queue, you only need to set the queue parameter x-dead-letter-exchange to specify the switch when defining the queue
code
DeadRabbitMqConfiguration.java
@Configuration
public class DeadRabbitMqConfiguration{
    //1. Declare and register the switch in direct mode
    @Bean
    public DirectExchange deadDirect(){
        return new DirectExchange("dead_direct_exchange",true,false);}
    //2. Expiration time of the queue
    @Bean
    public Queue deadQueue(){
        return new Queue("dead.direct.queue",true);}
    @Bean
    public Binding deadbinds(){
        return BindingBuilder.bind(deadDirect()).to(deadQueue()).with("dead");
    }
}
RabbitMqConfiguration.java
@Configuration
public class TTLRabbitMQConfiguration{
    //1. Declare and register the switch in direct mode
    @Bean
    public DirectExchange ttldirectExchange(){
        return new DirectExchange("ttl_direct_exchange",true,false);}
    //2. Expiration time of the queue
    @Bean
    public Queue directttlQueue(){
        //Set expiration time
        Map<String,Object> args = new HashMap<>();
        //args.put("x-max-length",5);
        args.put("x-message-ttl",5000);//This must be of type int
        args.put("x-dead-letter-exchange","dead_direct_exchange");
        args.put("x-dead-letter-routing-key","dead");//fanout does not need to be configured
        return new Queue("ttl.direct.queue",true,false,false,args);}


    @Bean
    public Binding ttlBingding(){
        return BindingBuilder.bin(directttlQueue()).to(ttldirectExchange()).with("ttlmessage");
    }
}
3. Memory disk monitoring
01 RabbitMQ memory warning
02 memory control of rabbitmq
Refer to the help documentation: http://www.rabbbitmq.com/configure.html
When a warning occurs, it can be modified and adjusted through configuration
Command mode
rabbitmqctl set_vm_memory_high_watermark <fraction>
rabbitmqctl set_vm_memory_high_watermark absolute 50MB
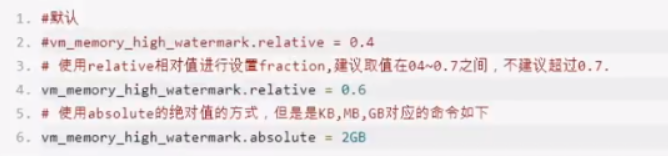
fraction/value is the memory threshold. The default is 0.4/2GB, which means that when the memory of RabbitMQ exceeds 40%, a warning will be generated and the connections of all producers will be blocked. The threshold value modified by this command will be invalid after the Broker is restarted. The threshold value set by modifying the configuration file will not disappear with the restart, but it will not take effect until the Broker is restarted like the configuration file is modified
Configuration file mode: rabbitmq.conf
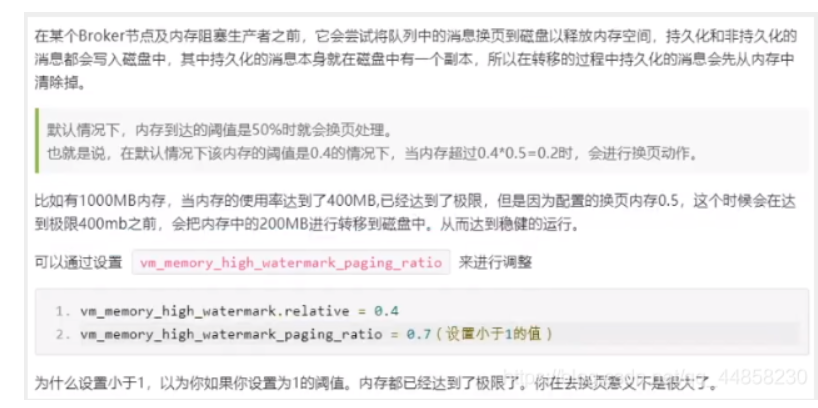
03 RabbitMQ memory page feed
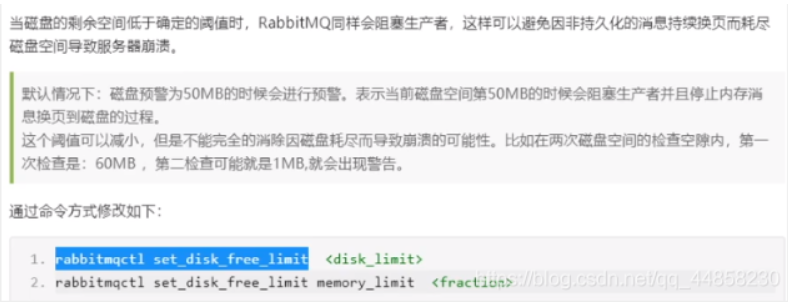
04 disk alert for rabbitmq
4. Cluster (docker cluster rabbitmq)
1. Create three rabbitmq containers first
docker run -itd --name rabbit01 --hostname myrabbit01 -v /home/software/rabbitmqcluster/rabbitmq01:/var/lib/rabbitmq -e RABBITMQ_DEFAULT_USER=chenjinxian -e RABBITMQ_DEFAULT_PASS=chenjinxian  -e RABBITMQ_ERLANG_COOKIE='rabbitmqCookie' -p 15672:15672 -p  5672:5672 -p 25672:25672 rabbitmq:management

docker run -itd --name rabbit02 --hostname myrabbit02 -v /home/software/rabbitmqcluster/rabbitmq01:/var/lib/rabbitmq -e RABBITMQ_DEFAULT_USER=chenjinxian -e RABBITMQ_DEFAULT_PASS=chenjinxian  -e RABBITMQ_ERLANG_COOKIE='rabbitmqCookie' --link rabbit01:myrabbit01 -p 15673:15672 -p  5673:5672 -p 25673:25672 rabbitmq:management

docker run -itd --name rabbit03 --hostname myrabbit03 -v /home/software/rabbitmqcluster/rabbitmq01:/var/lib/rabbitmq -e RABBITMQ_DEFAULT_USER=chenjinxian -e RABBITMQ_DEFAULT_PASS=chenjinxian  -e RABBITMQ_ERLANG_COOKIE='rabbitmqCookie' --link rabbit01:myrabbit01  --link rabbit02:myrabbit02 -p 15674:15672 -p  5674:5672 -p 25674:25672 rabbitmq:management
After the container is successfully started, readers can access it
Access through the browser: IP (own IP address): 15672;ip:15673;ip:15674
2. The container node joins the cluster
Execute the following command to enter the first rabbitmq node container:
docker exec -it rabbit01 /bin/bash
After entering the container, operate rabbitmq and execute the following commands:
rabbitmqctl stop_app
rabbitmqctl reset
rabbitmqctl start_app
exit
Execute the following command to enter the second rabbitmq node container:
docker exec -it rabbit02 /bin/bash
Enter the second rabbitmq node container and execute the following command:
rabbitmqctl stop_app
rabbitmqctl reset
rabbitmqctl join_cluster --ram rabbit@myrabbit01
rabbitmqctl start_app
exit
, enter the third rabbitmq node container and execute the following command:
docker exec -it rabbit03 /bin/bash
rabbitmqctl stop_app
rabbitmqctl reset
rabbitmqctl join_cluster --ram rabbit@myrabbit01
rabbitmqctl start_app
exit
Finally, you can see the node information
