Apache source code installation
For Apache source code installation, please see the following blog, which is well written:
https://blog.csdn.net/weixin_42313749/article/details/115418935
Apache server summary:
1. The folder of the installed Apache server is: / etc/httpd
2. The default root path folder of the web page is: / var/www/html
3. The total configuration file is in: / etc/httpd/conf/httpd.conf
4. The sub module configuration file is: / etc/httpd/conf.d
The naming of sub modules has no effect, as long as they are placed in the specified directory (conf.d folder) and the standard suffix (. CONF); However, in order to avoid future maintenance, the file name is generally named after the website name. For example, the configuration file of www.myweb.com website is myweb.conf
Because there will be a statement to introduce sub modules in the general configuration file, as follows:
IncludeOptional conf.d/*.conf
Therefore, when configuring different websites, we only need to configure our own sub modules.
The sub module content template is as follows:
<VirtualHost   192.168.133.x:80>	#IP address and port
   ServerName  www.myweb.com		# This is the name of the website. It's for you to see. It doesn't affect the configuration
   DocumentRoot  /var/www/html/myweb		#The root directory where the web page is stored
   DirectoryIndex index.html				#If the visited web page does not exist, the structure (which files are there) in the folder will be displayed
   <Directory  "/var/www/html/myweb">	#Set access permissions, corresponding to the web page root directory
       Options Indexes FollowSymLinks
       AllowOverride None
       Require   all  granted		#Set permissions that everyone can access
   </Directory>
</VirtualHost>
In fact, sub modules can also be called virtual hosts, that is, one apache server corresponds to one host. Now different websites can be configured in one to many form; In this way, you can configure n multiple websites on one network card. Pay attention to the problem of port number conflict; Of course, you can also use different virtual network cards;
Contact of Linux server, apache server, virtual host and network card:
What we usually call a Linux server is actually composed of one or more Linux hosts, and then various services can be installed on Linux, including apache services, which are used to request and respond to static web pages, and the network card is an interface to connect the external network. The Linux host allows the creation of multiple virtual network cards, Even if there is only one physical network card, you can use one physical network card to divide multiple virtual network cards in Linux system; Network card and virtual network card are no different, but they are called differently. Don't care. What's the use of virtual network card? As mentioned above, the IP interface is provided. Network requests need to go through the "window" of the network card. Then, there will be different ports on a network card, such as port 8080. The total number of ports on each network card is 65536. The ports between the network card and the network card do not interfere with each other. Just like two WiFi, the names can be the same, But it won't interfere with each other.
There are various services in the Linux server. apache service is only one of them. The following apache services correspond to each virtual host, and the virtual host corresponds to each website. Specific process: IP request. The network card passes the IP to various services. The apache service receives the request to check whether there is a corresponding virtual host. If there is, it will respond. If not, it will return to page 404.
Note: if http protocol is used for web page access, the default port is 80. If port 80 is also used for sub module configuration, the port need not be added when using domain name (www.myweb. Com), otherwise the port number needs to be added; If port 8080 is used, the domain name is www.myweb.com:8080
The default port of https is 443, which is the same as above.
Configure network card
1. Copy a network card first: copy ens33 to ens33:0
The network card configuration file is in: / etc / sysconfig / network scripts / ifcfg-ens33
Command:
cp -r /etc/sysconfig/network-scripts/ifcfg-ens33 /etc/sysconfig/network-scripts/ifcfg-ens33:0
The network card contents are as follows:
TYPE=Ethernet
PROXY_METHOD=none
BROWSER_ONLY=no
#BOOTPROTO=dhcp	#Use dynamic IP
DEFROUTE=yes
IPV4_FAILURE_FATAL=no
IPV6INIT=yes
IPV6_AUTOCONF=yes
IPV6_DEFROUTE=yes
IPV6_FAILURE_FATAL=no
IPV6_ADDR_GEN_MODE=stable-privacy
NAME=ens33
UUID=a1798e3d-ba9c-4762-8831-ef21bc508fca
DEVICE=ens33
ONBOOT=yes
BOOTPROTO=static		#Use static IP
IPADDR=192.168.122.07
NETMASK=255.255.255.0
GATEWAY=192.168.122.2
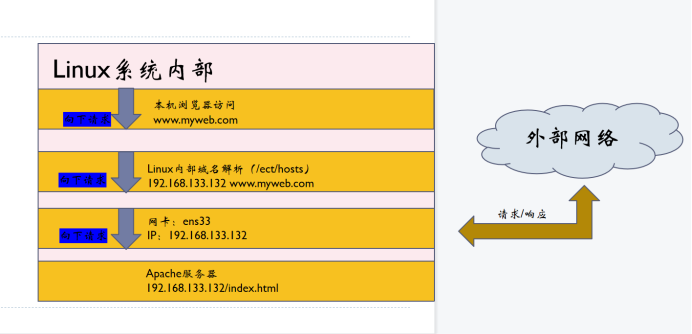
Domain name resolution file inside Linux: / etc/hosts
For example: 192.168.133.132 www.myweb.com
This folder deals with domain name resolution. First, find out whether there is a corresponding IP address through the domain name entered in the browser. If so, directly access the IP. If not, enter the DNS domain name resolution of the network and transfer to the correct IP address or 404.
The web page request process is shown in the figure below

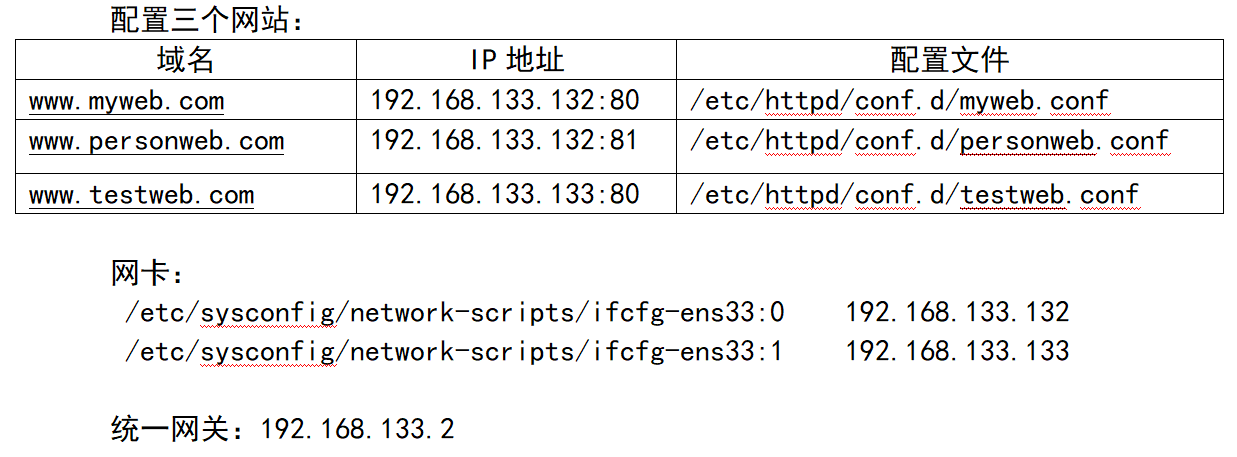
Example: configure the following websites
Two websites are on the same network card (IP) and different ports. As follows:

If the configuration file does not take effect, use the command directly:
ifconfig ens33:0 192.168.133.132 netmask 255.255.255.0
ifconfig ens33:1 192.168.133.133 netmask 255.255.255.0
Note: root permission
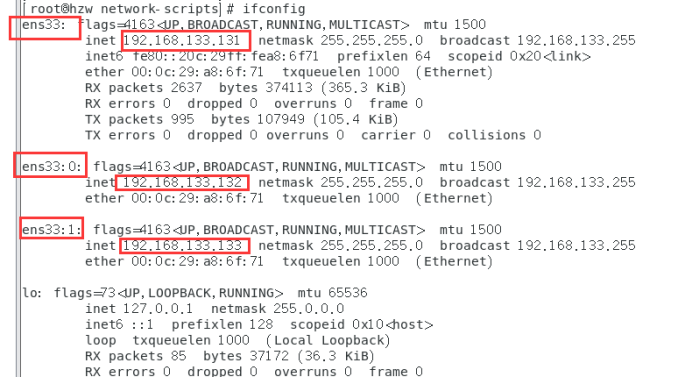
After configuration, view the network card configuration information as follows:

Prepare the files of the web page and put them in the html folder, as shown in the following figure;

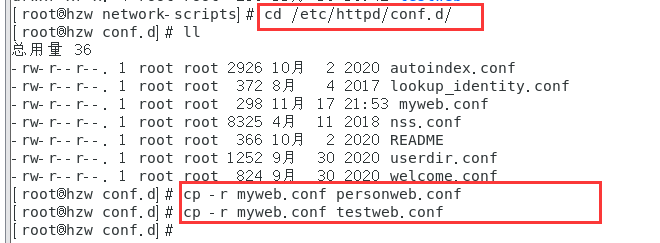
There is an index.html file in each folder. Next, configure the virtual host (apache sub module). I originally configured myweb.conf, so now I can copy two;

myweb.conf, as follows:
<VirtualHost   192.168.133.132:80>
   ServerName  www.myweb.com
   DocumentRoot  /var/www/html/myweb
   DirectoryIndex index.html
   <Directory  "/var/www/html/myweb">
       Options Indexes FollowSymLinks
       AllowOverride None
       Require   all  granted
   </Directory>
</VirtualHost>
personweb.conf, as follows:
<VirtualHost   192.168.133.132:81>
   ServerName  www.personweb.com
   DocumentRoot  /var/www/html/personweb
   DirectoryIndex index.html
   <Directory  "/var/www/html/personweb">
       Options Indexes FollowSymLinks
       AllowOverride None
       Require   all  granted
   </Directory>
</VirtualHost>
testweb.conf, as follows:
<VirtualHost   192.168.133.133:80>
   ServerName  www.testweb.com
   DocumentRoot  /var/www/html/testweb
   DirectoryIndex index.html
   <Directory  "/var/www/html/testweb">
       Options Indexes FollowSymLinks
       AllowOverride None
       Require   all  granted
   </Directory>
</VirtualHost>
Check Apache configuration syntax:
httpd -t
Restart Apache service:
systemctl restart httpd.service
You can access / var/www/html/personweb/index.html by accessing the IP 192.168.133.132:81 with a Linux browser
If there is a problem (unable to connect to 192.168.133.132:81), there should be no open listening port. Port 80 is developed by default; Add an 81 port in the general configuration / etc/httpd/conf/httpd.conf file, as follows:
Command:
vim /etc/httpd/conf/httpd.conf

Then restart the Apache service:
systemctl restart httpd.service
Visit 192.168.133.132:81 again, as follows:

What if I want to access web pages through domain names? can I?
A: of course. You can configure the ip address resolution file of the host and open the / etc/hosts file
vim /etc/hosts
The configuration is as follows:

However, with this configuration, when visiting www.myweb.com and www.personweb.com, it will be forwarded to the address with ip 192.168.133.132. Since the default is port 80, only the contents of the web page www.myweb.com will be displayed, because port 80 configured above is the website; Therefore, if you want to visit www.personweb.com, you should add a port, such as www.personweb.com:81
Visit www.personweb.com: 81 as follows;

Visit www.testweb.com as follows;

be accomplished!
Split line