Overview of MVC
In the early development of Java Web, the operations of display layer, control layer and data layer were all handled by higher JSP or JavaBean, which was called Model1:

-
malpractice
- There is a strong coupling between JSP and Java Bean, and Java and HTML code are also coupled together
- Requires that developers not only master Java back-end design capabilities, but also have a high level of front-end design and development capabilities
- Front-end and back-end depend on each other. Front-end needs to wait for the back-end to complete, and back-end also depends on the front-end to complete for effective testing.
- Code is difficult to reuse
Because of all the drawbacks of Model1, this approach was soon replaced by Servlet + JSP + Java Bean, and the earlier MVC model (Model2) looked like the following:

First the user's request arrives at the Servlet, then the corresponding Java Bean is called upon the request, and all the display results are handed over to JSP to complete. This mode is called MVC mode, where
- M Represents Model
Model is data, dao, bean, service, etc.
- V Represents View
Web page, JSP, to show data in a model
-
C stands for Controller
The purpose of the controller is to display different data (models) on different views, ==Servlet s play the same role==.
Spring MVC Architecture
To address the programming of database transactions that have not been handled well in the persistence layer while catering to the strong rise of NoSQL, SpringMVC offers the following solutions:
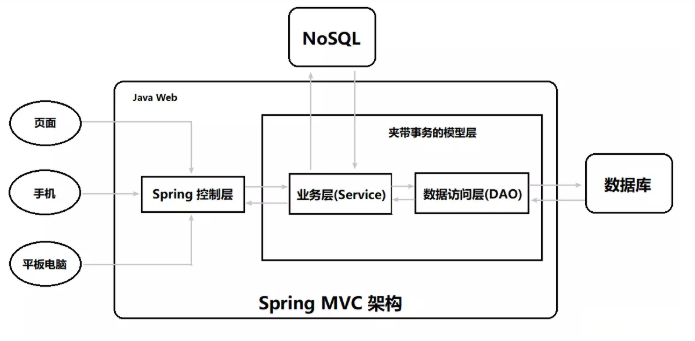
The traditional model layer is split into a business layer (Service) and a data access layer (Dao, Data Access Object).In the Service layer, you can manipulate the data access layer through Spring's declarative transactions, and in the Business layer, you can access NoSQL, which can satisfy the use of NoSQL and greatly improve the performance of Internet systems.
- Characteristic
- Loose-structured to use almost any type of view in Spring MVC
- Decrease coupling, separate modules
- Seamless integration with Spring
Spring MVC Practice Operations
Step1: Create a new Spring MVC project in IDEA
As shown in the diagram, to create a SpringMVC project, IDEA automatically downloads the necessary jar packages for us and creates some default directories and files for us:


It's a good idea to set the path of the project. If there is no folder under the path, it will be created for us automatically


Step2: Modify the web.xml file
Change the value of the <url-pattern>element to /, indicating that all requests will be intercepted and handled by the background controller of Spring MVC, after which:
<servlet-mapping>
    <servlet-name>dispatcher</servlet-name>
    <url-pattern>/</url-pattern>
</servlet-mapping>
Step3: Edit dispatcher-servlet.xml
The dispatcher at the beginning of this file name corresponds to the dispatcher configured by the <servlet-name>element in the web.xml above. This is the mapping configuration file for Spring MVC (x xxx-servlet.xml), which we edited as follows:
<?xml version="1.0" encoding="UTF-8"?>
<beans xmlns="http://www.springframework.org/schema/beans"
       xmlns:xsi="http://www.w3.org/2001/XMLSchema-instance"
       xsi:schemaLocation="http://www.springframework.org/schema/beans http://www.springframework.org/schema/beans/spring-beans.xsd">
    <bean id="simpleUrlHandlerMapping"
          class="org.springframework.web.servlet.handler.SimpleUrlHandlerMapping">
        <property name="mappings">
            <props>
                <!-- /hello Request for path handed over to id by helloController Controller handling-->
                <prop key="/hello">helloController</prop>
            </props>
        </property>
    </bean>
    <bean id="helloController" class="controller.HelloController"></bean>
</beans>
Step4: Write HelloController.java
Create the HelloController class under Package and implement the org.springframework.web.servlet.mvc.Controller interface:
package controller;


import org.springframework.web.servlet.ModelAndView;
import org.springframework.web.servlet.mvc.Controller;

public class HelloController implements Controller {

    @Override
    public ModelAndView handleRequest(javax.servlet.http.HttpServletRequest httpServletRequest, javax.servlet.http.HttpServletResponse httpServletResponse) throws Exception {
        return null;
    }
}
- A problem occurred: The javax.servlet package could not be found
- Solution: Copy the servlet-api.jar package from the local Tomcat server's directory [lib] folder to the project [lib] folder, add dependencies (I did not find the local jar package, download the jar package from the Internet, paste it into the lib, and add)
package controller;

import org.springframework.web.servlet.ModelAndView;
import org.springframework.web.servlet.mvc.Controller;

public class HelloController implements Controller {

    @Override
    public ModelAndView handleRequest(javax.servlet.http.HttpServletRequest httpServletRequest, javax.servlet.http.HttpServletResponse httpServletResponse) throws Exception {
        ModelAndView mav = new ModelAndView("index.jsp");
        mav.addObject("message", "Hello Spring MVC");
        return mav;
    }
}
Note: Spring MVC combines models and views with ModelAndView objects
**This view is index.jsp
Model data is message, content is "Hello Spring MVC"**
Step5: Prepare the index.jsp file
Modify the contents of index.jsp to
<%@ page language="java" contentType="text/html; charset=UTF-8"
    pageEncoding="UTF-8" isELIgnored="false"%>

<h1>${message}</h1>
The content is simple, using EI expressions to display the content of the message
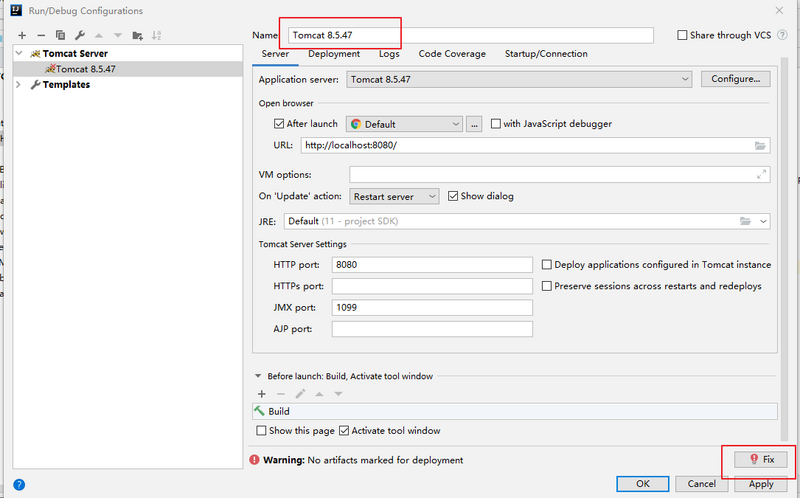
Step6: Deploying Tomcat and related environments
Find Edit Configurations under the Run menu item
Configuring the Tomcat environment

Select the local Tomcat server and change its name:
Under the Deployment tab, do the following:Add a project to start, you can change the project name by checking it after adding
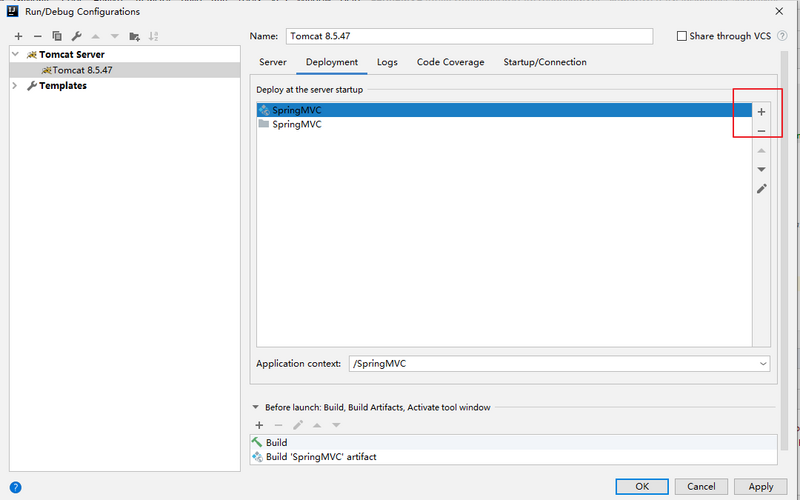
Click OK and we'll run the Tomcat server by clicking on the triangle in the upper right corner.

- A problem occurred: The Tomcat server could not start properly
- Reason: The Tomcat server could not find the associated jar package
- Solution: Clip the entire [lib] folder under [WEB-INF] and re-establish dependencies:

Step7: Restart the server
Restart the server, enter the address: localhost/hello
What I actually typed in is: localhost:8080/SpringMVC_war_exploded/hello
I don't know why, maybe it's not configured properly
Resolve request flow for Spring MVC
The following diagram shows the request process for Spring MVC:
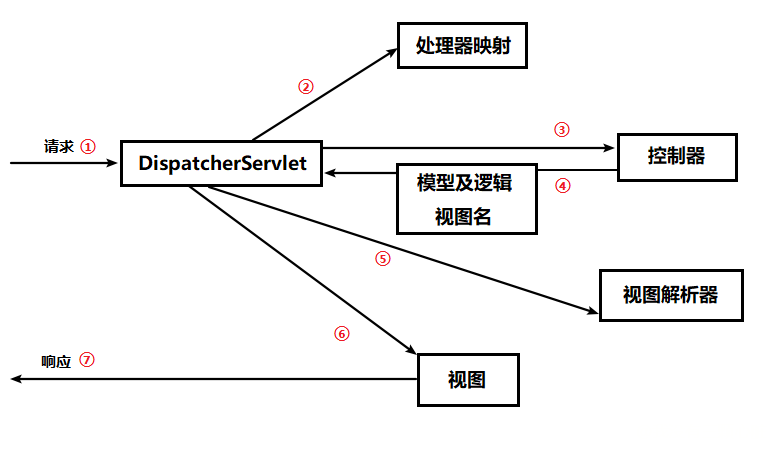
First stop: Dispatcher Servlet
After requests leave the browser, the first stop arrives at the Dispatcher Servlet, which intercepts all requests and sends them to the Spring MVC controller
<servlet>
    <servlet-name>dispatcher</servlet-name>
    <servlet-class>org.springframework.web.servlet.DispatcherServlet</servlet-class>
    <load-on-startup>1</load-on-startup>
</servlet>
<servlet-mapping>
    <servlet-name>dispatcher</servlet-name>
    <!-- Intercept all requests -->
    <url-pattern>/</url-pattern>
</servlet-mapping>
The task of the Dispatcher Servlet is to intercept requests sent to the Spring MVC controller.
Second station: Handler Mapping
- Question: There may be multiple controllers in a typical application. Which controller should these requests be sent to?
So Dispatcher Servlet queries one or more processor maps to determine where the next stop of the request is, and the processor maps make decisions based on the URL information that the request carries. For example, in this project, we configure simpleUrlHandlerMapping to give/hello addresses to helloController:
<beans xmlns="http://www.springframework.org/schema/beans"
       xmlns:xsi="http://www.w3.org/2001/XMLSchema-instance"
       xmlns:context="http://www.springframework.org/schema/context"
       xsi:schemaLocation="http://www.springframework.org/schema/beans http://www.springframework.org/schema/beans/spring-beans.xsd http://www.springframework.org/schema/context http://www.springframework.org/schema/context/spring-context.xsd">
    <context:component-scan base-package="controller"/>
    <!--To configure handle,Mapping " hello"request -->
    <bean name="/hello" class="controller.HelloController"/>
    <!-- Processing mappers will bean Of name As URl Find, need to configure Handle When specified name(That is url—)-->
    <bean class="org.springframework.web.servlet.handler.BeanNameUrlHandlerMapping"/>
    <!-- SimpleControllerHandlerAdapter Is a processor adapter, all processor adapters are implemented HandleAdapter Interface-->
    <bean class="org.springframework.web.servlet.mvc.SimpleControllerHandlerAdapter"/>
    <!-- view resolver -->
    <bean class="org.springframework.web.servlet.view.InternalResourceViewResolver"/>

</beans>
Third Station: Controller
Once the appropriate controller is selected, Dispatcher Servlet sends a request to the selected controller, which unloads its load (requests submitted by the user) and waits for the controller to finish processing the information:
 public ModelAndView handleRequest(javax.servlet.http.HttpServletRequest httpServletRequest, javax.servlet.http.HttpServletResponse httpServletResponse) throws Exception {
     //processing logic
        logger.info("handleRequest Called");
        ModelAndView mav = new ModelAndView("index.jsp");
        mav.addObject("message", "Hello Spring MVC");
        mav.setViewName("/WEB-INF/content/welcome.jsp");
        return mav;
    }
Station 4: Return to Dispatcher Servlet
When a controller completes its logical processing, it usually produces information that needs to be returned to the user and displayed on the browser, which is called a Model.It is not enough to simply return the original information, which needs to be formatted in a user-friendly manner, typically HTML, so the information needs to be sent a View, usually JSP.
The last thing the controller does is package the model data and represent the view name (logical view name) used to render the output.It then sends the request back to Dispatcher Servlet with the model and view names.
public ModelAndView handleRequest(javax.servlet.http.HttpServletRequest httpServletRequest, javax.servlet.http.HttpServletResponse httpServletResponse) throws Exception {
    // processing logic
    ....
    // Return to Dispatcher Servlet
    return mav;
}
Station 5: View Parser
This way, the controller does not want to be coupled with a particular view, and the view name passed to the Dispatcher Servlet does not directly represent a particular JSP.(In fact, he is not even sure that the view is JSP).Instead, it simply passes a logical name that will be used to find the real view that produces the result.
Dispatcher Servlet will use view resolver to match logical views to a specific view implementation, which may or may not be JSP.
This project is directly bound to the index.jsp view
Station 6: View
The Dispatcher Servlet has determined which view renders the result and the requested task is almost complete.
The final stop in the process is the implementation of the view, where the model data is delivered and the requested task is completed.The view uses model data to render the result, which is passed to the client through the response object.
<%@ page language="java" contentType="text/html; charset=UTF-8"
         pageEncoding="UTF-8" isELIgnored="false"%>

<h1>${message}</h1>
Configuring Spring MVC with annotations
The above project created the first Spring MVC program with xml configuration, and then tested the configuration of the annotation-based completion program:
Step 1: Create a new WorldController and add comments
package controller;

import org.springframework.stereotype.Component;
import org.springframework.stereotype.Controller;
import org.springframework.web.bind.annotation.RequestMapping;
import org.springframework.web.servlet.ModelAndView;

@Component
@Controller
public class WorldController {

    @RequestMapping(value = "/world")
    public ModelAndView handleRequest(javax.servlet.http.HttpServletRequest httpServletRequest, javax.servlet.http.HttpServletResponse httpServletResponse) throws Exception {
        ModelAndView mav = new ModelAndView("index.jsp");
        mav.addObject("message", "Spring MVC World!");
        mav.setViewName("/WEB-INF/content/welcome.jsp");
        return mav;
    }
}
-
annotation
-
@controller comment:
This annotation is used to declare the controller, but in fact it has little effect on the Spring MVC itself.(Spring actually says it's just an auxiliary implementation of component scanning and can be replaced with the @Component annotation, but I can't try it myself because the above example doesn't configure a JSP view parser and I still didn't have one myself...
-
@RequestMapping annotation
Indicates that path'/world'maps to this method
-
@controller comment:
Step 2: Uncomment the previous XML comment
In the dispatcher-servlet.xml file, comment out the previous configuration and add a component scan: <context:component-scan base-package="controller"/>
<?xml version="1.0" encoding="UTF-8"?> <beans xmlns="http://www.springframework.org/schema/beans" xmlns:xsi="http://www.w3.org/2001/XMLSchema-instance" xmlns:context="http://www.springframework.org/schema/context" xsi:schemaLocation="http://www.springframework.org/schema/beans http://www.springframework.org/schema/beans/spring-beans.xsd http://www.springframework.org/schema/context http://www.springframework.org/schema/context/spring-context.xsd"> <context:component-scan base-package="controller"/> <!--To configure handle,Mapping " hello"request --> <!-- <bean name="/hello" class="controller.HelloController"/>--> <!-- <!– Processing mappers will bean Of name As URl Find, need to configure Handle When specified name(That is url—)–>--> <!-- <bean class="org.springframework.web.servlet.handler.BeanNameUrlHandlerMapping"/>--> <!-- <!– SimpleControllerHandlerAdapter Is a processor adapter, all processor adapters are implemented HandleAdapter Interface–>--> <!-- <bean class="org.springframework.web.servlet.mvc.SimpleControllerHandlerAdapter"/>--> <!-- <!– view resolver –>--> <!-- <bean class="org.springframework.web.servlet.view.InternalResourceViewResolver"/>--> </beans>
Step 3: Restart the server
When the configuration is complete, restart the server and type / world after localhost to see the following results:
@RequestMapping annotation details
If @RequestMapping works on a class, it is equivalent to adding an address before all the mapped addresses configured for that class:
@Controller
@RequestMapping("/mvc")
public class HelloController {
    @RequestMapping("/hello")
    public ModelAndView handleRequest(....) throws Exception {
        ....
    }
}
Then access address: localhost/mvc/hello
Configure View Parser
According to Spring MVC's request flow, the view parser is responsible for locating the view and accepts a logical view name passed in by Dispatcher Servlet to match a particular view.
- Requirements:
Some pages we don't want to be accessed directly by users, such as those with important data or those supported by model data.
- Question:
We can put a page [test.jsp] under the root directory to simulate an important data. We don't need to do anything. Restart the server and type localhost/test.jsp into the page to access it directly. This will result in data leaking...
In addition, we can try typing localhost/index.jsp directly, which will be a blank page according to our program above, because it will be accessed directly without getting the ${message} parameter, which will affect the user experience
- Solution
We configure the JSP files in the [page] folder of the [WEB-INF] folder, [WEB-INF] is the default security directory on the Java Web and is not allowed to be accessed directly by users (that is, you say you will never be able to access it through localhost/WEB-INF/
We also need to tell the view parser this information, and we configure it in the dispatcher-servlet.xml file as follows:
<bean id="viewResolver"
      class="org.springframework.web.servlet.view.InternalResourceViewResolver">
    <property name="prefix" value="/WEB-INF/page/" />
    <property name="suffix" value=".jsp" />
</bean>
A view resolver built into Spring MVC is configured here that follows a convention that prefixes and suffixes are added to the view name to determine the physical path of view resources in a Web application.Let's actually see the effect:
Step 1: Modify the WorldController code
package controller;

import org.springframework.stereotype.Component;
import org.springframework.stereotype.Controller;
import org.springframework.web.bind.annotation.RequestMapping;
import org.springframework.web.servlet.ModelAndView;

@Component
@Controller
public class WorldController {

    @RequestMapping(value = "/world")
    public ModelAndView handleRequest(javax.servlet.http.HttpServletRequest httpServletRequest, javax.servlet.http.HttpServletResponse httpServletResponse) throws Exception {
        ModelAndView mav = new ModelAndView("index");//Originally index.jsp
        mav.addObject("message", "Spring MVC World!");
        mav.setViewName("/WEB-INF/content/welcome.jsp");
        return mav;
    }
}
Step 2: Configure the View Parser
<?xml version="1.0" encoding="UTF-8"?> <beans xmlns="http://www.springframework.org/schema/beans" xmlns:xsi="http://www.w3.org/2001/XMLSchema-instance" xmlns:context="http://www.springframework.org/schema/context" xsi:schemaLocation="http://www.springframework.org/schema/beans http://www.springframework.org/schema/beans/spring-beans.xsd http://www.springframework.org/schema/context http://www.springframework.org/schema/context/spring-context.xsd"> <!--<bean id="simpleUrlHandlerMapping"--> <!--class="org.springframework.web.servlet.handler.SimpleUrlHandlerMapping">--> <!--<property name="mappings">--> <!--<props>--> <!--<!– /hello Request for path handed over to id by helloController Controller handling–>--> <!--<prop key="/hello">helloController</prop>--> <!--</props>--> <!--</property>--> <!--</bean>--> <!--<bean id="helloController" class="controller.HelloController"></bean>--> <!-- scanning controller Components under --> <context:component-scan base-package="controller"/> <bean id="viewResolver" class="org.springframework.web.servlet.view.InternalResourceViewResolver"> <property name="prefix" value="/WEB-INF/page/" /> <property name="suffix" value=".jsp" /> </bean> </beans>
Step 3: Clip the index.jsp file
Create a new page folder under the WEB-INF folder and clip the index.jsp file into it:

Step 4: Update Resources Restart Server
Visit the localhost/world path and see the correct effect:

principle

The name of the logical view we passed in is index, plus the prefix'/WEB-INF/page/'and the suffix'.jsp' to determine the path of the physical view, so that we can put all the views in the [page] folder in the future!
- Note: Configuration at this point is only under dispatcher-servlet.xml
Controller receives request data
Using Controller Receive Parameters is often the first step in Spring MVC's development of business logic. Browser submission is a very common scenario. Now let's demonstrate how Spring MVC accepts data.
Structure Catalog

Step 1: Set up the entity class Product under the pojo package
package pojo;

public class Product {

    private int id;
    private String name;
    private float price;
    public int getId() {
        return id;
    }
    public void setId(int id) {
        this.id = id;
    }
    public String getName() {
        return name;
    }
    public void setName(String name) {
        this.name = name;
    }
    public float getPrice() {
        return price;
    }
    public void setPrice(float price) {
        this.price = price;
    }

}
Step 2: addProduct.jsp
Add Product.jsp, a page that adds items to the web directory (not WEB-INF)
Note: The name of the product name input should use name, not product.name
<%--
  Created by IntelliJ IDEA.
  User: 10224683
  Date: 2019/12/3
  Time: 16:56
  To change this template use File | Settings | File Templates.
--%>
<%@ page language="java" contentType="text/html; charset=UTF-8"
         pageEncoding="UTF-8" import="java.util.*" isELIgnored="false"%>

<form action="addProduct">

    //Product name: <input type="text" name="name" value="><br />
    //Product price: <input type="text" name="price" value="><br />

    <input type="submit" value="Increase Commodity">
</form>
Step 3: Create a ProductController under the controller package
Controller ProductController, prepare an add method mapping/addProduct path
Prepare a Product parameter for the add method to receive injection
Finally, jump to the showProduct page to display the data submitted by the user
Note: addProduct.jsp The submitted name and price are automatically injected into the parameter product
Note: The parameter product is added to ModelAndView as a value by default, which is equivalent to: mav.addObject ("product");
package controller;

import org.springframework.stereotype.Controller;
import org.springframework.web.bind.annotation.ModelAttribute;
import org.springframework.web.bind.annotation.RequestMapping;
import org.springframework.web.bind.annotation.RequestParam;
import org.springframework.web.servlet.ModelAndView;

import pojo.Product;

@Controller
public class ProductController {

    @RequestMapping("/addProduct")
    public ModelAndView add(Product product) throws Exception {
        ModelAndView mav = new ModelAndView("showProduct");
        return mav;
    }
}
Step 4: showProduct.jsp
Create showProduct.jsp in the WEB-INF/page directory
Display user submitted name and price using EL expression
<%--
  Created by IntelliJ IDEA.
  User: 10224683
  Date: 2019/12/3
  Time: 16:58
  To change this template use File | Settings | File Templates.
--%>
<%@ page language="java" contentType="text/html; charset=UTF-8"
         pageEncoding="UTF-8" isELIgnored="false"%>

//Product name: ${product.name}<br>
//Product price: ${product.price}
Step 5: Restart the server

Client Jump
In the previous example, whether / index jumps to index.jsp or / addProduct jumps to showProduct.jsp is a server-side jump.
Now start explaining how to do client jumps.
Step 1: Modify the WorldController
Map/jump to jump() method first
Write the following code in jump()
ModelAndView mav = new ModelAndView("redirect:/index");
redirect:/index
Meaning of client jump
Step 2: Use the jump method to jump
Access page:
http://localhost/springmvc/jump
As a result, the client jumped to: