Warning;
In modern C + +, we should avoid low-level memory operations as much as possible and use modern structures, such as containers and smart pointers.
Use dynamic memory
Warning:
As a rule of thumb, each time you declare a pointer variable, be sure to initialize it immediately with the appropriate pointer or nullptr!
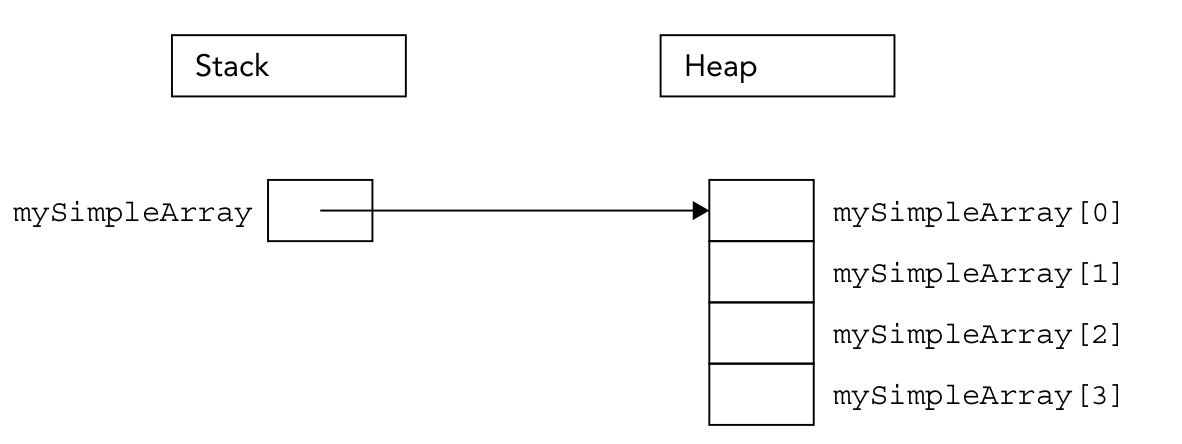
For example, Figure 7-1 shows the memory state after executing the following code. This line of code is in a function, so i is a local variable:
int i = 7;
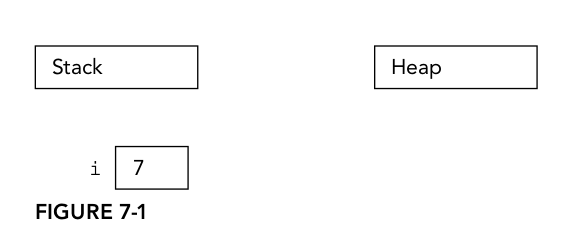
i is an automatic variable allocated on the stack. i is automatically released when the program flow leaves the scope in which the variable is declared.
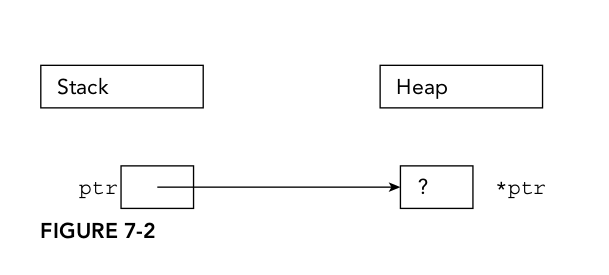
When using the new keyword, memory is allocated on the heap. The following code creates a variable ptr on the stack, and then allocates memory on the heap. ptr points to this memory.
int* ptr = nullptr;
ptr = new int;
It can also be reduced to one line:
int* ptr = new int;
Figure 7-2 shows the state of the memory after the code is executed. Note that the variable ptr is still on the stack, even if it points to memory in the heap. A pointer is just a variable that can be on the stack or heap, but it's easy to forget. However, dynamic memory is always allocated on the heap.
Warning:
As a rule of thumb, each time you declare a pointer variable, be sure to initialize it immediately with the appropriate pointer or nullptr!
The next example shows that pointers can be on the stack or on the heap.
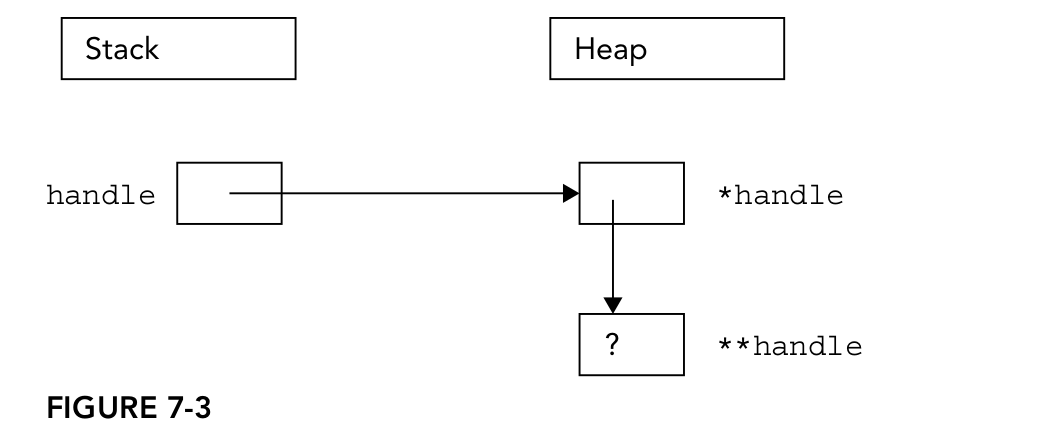
int** handle = nullptr;
handle = new int*;
*handle = new int;
The above code first declares a pointer variable handle that points to an integer pointer. Then, dynamically allocate enough memory to hold a pointer to the integer and hold the pointer to the new memory in the handle. Next, save another pointer of dynamic memory sufficient to hold integers in the memory location of * handle. Figure 7-3 shows this two-level pointer. One pointer is saved in the stack (handle) and the other pointer is saved in the heap (* handle).
Using new and delete
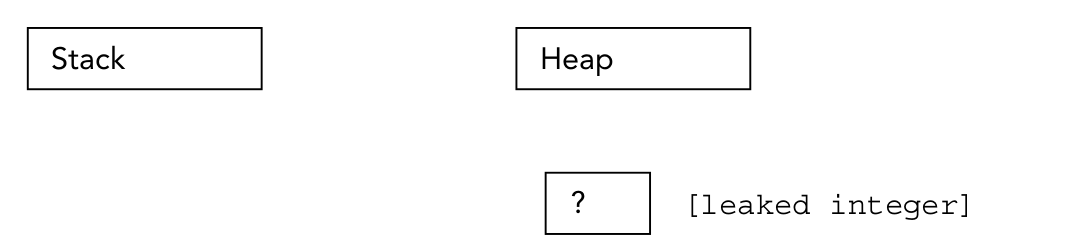
For example, the following code isolates a block of memory that holds int s. Figure 7-4 shows the memory state after code execution. When a data block in the heap cannot be accessed directly or indirectly from the stack, this memory is isolated (or leaked?).
void leaky()
{
	new int;
	cout<<"I just leaked an int"<<endl;
}
About malloc() function
If you're a C programmer, you might want to know what's wrong with the malloc () function. In C, a given number of bytes of memory is allocated through malloc(). In most cases, using malloc () is straightforward. Although malloc () still exists in C + +, it should be avoided. The main advantage of new over malloc () is that new not only allocates memory, but also builds objects. For example, consider the following two lines of code, which uses an imaginary class called Foo:
Foo* myFoo = (Foo*)malloc(sizeof(Foo));
Foo* myOtherFoo = new Foo():
After executing these lines of code, myFoo and myootherfoo point to an area of memory in the heap that is large enough to hold Foo objects. The data members and methods of Foo can be accessed through these two pointers. The difference is that the Foo object pointed to by myFoo is not a normal object because it has never been built. The malloc() function is only responsible for setting aside a certain size of memory. It does not know or care about the object itself. Instead, calling new not only allocates the correct size of memory, but also calls the corresponding constructor to build the object.
In C + +, there is a function realloc() inherited from C language. Don't use it! In C, realloc0 is used to change the size of the array. The method is to allocate new memory blocks of new size, then copy all old data to a new location, and then delete the old memory blocks. In C + +, this is extremely dangerous because user-defined objects do not adapt well to bitwise replication.
Warning:
Do not use realloc0) in C + +. This function is dangerous.
Array of objects
class Simple
{
	public:
		Simple(){cout<<"Simple constructor called!"<<endl;}
		~Simple(){cout<<"Simple destructor called!"<<endl;}

}
If you want to allocate an array containing four Simple objects, the Simple constructor will be called four times,
Simple* mySimpleArray = new Simple[4];
Delete array
Simple* mySimpleArray = new Simple[4];// Use mySimpleArray ...delete [] mySimpleArray;mySimpleArray = nullptr;
Multidimensional heap array
char** board = new char[i][j]; // BUG! Doesn't compile
[external chain picture transferring... (img-YQoyyAa7-1632236813906)]
There are many types of smart pointers. The simplest smart pointer type has unique ownership of resources. When the smart pointer leaves the scope or is reset, the referenced memory will be released. STD:: unique is provided in the standard library_ PTR, which is a smart pointer with "unique ownership" semantics. However, pointer management is not just about releasing pointers when they leave the scope. Sometimes, multiple objects or code segments contain multiple copies of the same pointer. This problem is called aliasing. In order to properly free all memory, the last code block using this resource should free the resource pointed to by the pointer.
However, it is often difficult to know which code block uses this memory last. Sometimes it is even impossible to determine the execution order of the code, because it depends on the input of the runtime. Therefore, a more mature smart pointer type implements "reference counting" to track the owner of the pointer. Each time this "reference count" smart pointer is copied, a new instance pointing to the same resource will be created and the reference count will be increased by 1. When such a smart pointer instance leaves the scope or is reset, the reference count is decremented by 1. When the reference count drops to 0, the resource no longer has an owner, so the smart pointer releases the resource. STD:: shared is provided in the standard library_ PTR, a smart pointer that uses reference counting and has "shared ownership" semantics. Standard shared_ptr is thread safe, but this does not mean that the resource pointed to is thread safe. Chapter 23 discusses multithreading.
be careful:
unique ptr should be used as the default smart pointer. Use shared only when you really need to share resources_ ptr.
Warning:
Never assign a resource allocation result to a normal pointer. No matter which resource allocation method is used, the resource pointer should be immediately stored in the smart pointer unique_ptr or shared_ ptr, or use other RAI classes. RAI stands for resource acquisition is initialization. The RAI class takes ownership of a resource and releases it when appropriate. This design technique is discussed in Chapter 28.
unique_ptr
As a rule of thumb, dynamically allocated objects are always saved in unique on the stack_ PTR instance. Create unique_ptrs considers the following function, which allocates a Simple object on the heap, but does not release the object, deliberately causing memory leakage.
void leak()
{
	Simple* mySimplePtr = new Simple();
	mySimplePtr->go();
}
Sometimes you might think that the code correctly frees up dynamically allocated memory. Unfortunately, this idea is almost always incorrect. Look at the following functions:
void couldBeLeaky()
{
	Simple* mySimplePtr = new Simple();
	mySimplePtr->go();
	delete mySimplePtr;
}
The above function dynamically allocates a Simple object, uses it, and then calls delete correctly. However, this example may still cause memory leakage! If the go (method throws an exception, delete will never be called, resulting in memory leakage. In both cases, unique ptr should be used. The object will not be explicitly deleted, but when the instance unique_ptr leaves the scope (at the end of the function, or because an exception is thrown), the Simple object will be automatically released in its destructor:
void notLeaky()
{
	auto mySimpleSmartPtr = make_unique<Simple>();
	mySimpleSmartPtr->go();
}
This code uses the make_unique(0) and auto keywords in C++14, so you only need to specify the type of pointer. In this case, it is Simple. If the Simple constructor needs parameters, put them in the parentheses of the make_uniqueO call. If the compiler does not support make_unique0, you can create your own unique_ptr, as shown below. Note that Simple must be written twice:
unique_ptr<Simple>mySimpleSmartPtr(new Simple());
Before C++17, make_unique() must be used. First, the type can only be specified once. Second, for security reasons! Consider the following call to foo() function
foo(unique_ptr<Simple>(new Simple()),unique_ptr<Bar>(new Bar(data())))
If the constructor of the Simple, Bar or data(0) function throws an exception (depending on the optimization settings of the compiler), it is likely that the Simple or Bar object has a memory leak. If you use make_unique(), there will be no memory leak;
foo(make_unique<Simple>(),make_unique<Bar>(data()));
In C++17, both calls to foo() are safe, but it is still recommended to use make_unique(), so that the code is easier to read.
be careful;
Always use make_unique() to create a unique_ptr.
\2. Use unique_ptrs
The biggest highlight of this standard smart pointer is that users can get great benefits without learning a lot of new syntax. Like the standard pointer, you can still use * or - > to dereference the smart pointer. For example, in the previous example, use the - > operator to call the go() method:
mySimpleSmartPtr->go()
Like the standard pointer, it can also be written,
(*mySimpleSmartPtr).go()
The get() method can be used to directly access the underlying pointer. This passes the pointer to a function that requires a normal pointer. For example, suppose you have the following functions:
void processData(Simple* simple){}
It can be called as follows:
auto mySimpleSmartPtr = make_unique<Simple>();processData(mySimpleSmartPtr.get());
You can release the underlying pointer of unique_ptr and use reset0 to change it to another pointer as needed. For example:
mySimpleSmartPtr.reset();// Free resource and set to nullptr
mySimpleSmartPtr.reset(new Simple()); // Free resource and set to a new  .
// Simple instance
You can use release(0) to disconnect the unique_ptr from the underlying pointer. The release() method returns the underlying pointer of the resource, and then sets the smart pointer to nullptr. In fact, the smart pointer loses ownership of the resource and is responsible for releasing the resource when you run out of resources. For example:
Simple* simple = mySimpleSmartPtr.release();
delete simple;
simple = nullptr;
Unique_ptr cannot be copied because it represents unique ownership! Using the std::move0 utility (discussed in Chapter 9), you can use the move semantics to move one unique_ptr to another. This is used to explicitly move ownership, as follows:
class Foo
{
	public:
    	Foo(unique_ptr<int> data):mData(move(data)){}
    private:
    	unique_ptr<int>mData;
};
auto myIntSmartPtr = make_unique<int>(42);
Foo f(move(myIntSmartPtr));
\3. unique_ptr and C-style array
unique ptr is suitable for storing dynamically allocated old C-style arrays. The following example creates a unique_ptr to store dynamically allocated C-style arrays containing 10 integers:
auto myVariableSizedArray = make_unique<int[]>(10);
Even if unique _ptr can be used to store dynamically allocated C-style arrays, it is recommended to use standard library containers, such as std::array and std::vector.
\4. User defined delete
By default, unique_ptr uses the standard new and delete operators to allocate and free memory. You can change this behavior to;
int* malloc_int(int value)
{
	int *p = (int *)malloc(sizeof(int));
	*p = value;
	return p;
}

int main()
{
    unique_ptr<int,decltype(free)*> myIntSmartPtr(malloc_int(42),free);
    return 0;
}
This code uses malloc_int() to allocate memory for integers. unique_ptr calls the standard free() function to free memory. As mentioned earlier, malloc() should not be used in C + + , use new instead. However, this feature of unique _ptris useful because it can also manage other types of resources, not just memory. For example, when unique _ptrleaves the scope, it can automatically close files or network sockets and any other resources. However, the syntax of unique ptr's custom delete is somewhat confusing. You need to refer to the type of custom delete as As the template type parameter. In this example, decltype(free) is used to return the free () type. The template type parameter should be the type of function pointer, so an additional * is attached, such as decltype(free) *. using shared_ptr's custom delete is much easier. Section 7.4.2, which discusses shared_ptr, will demonstrate how to use shared_ptr to automatically close files when shared_ptr leaves the scope.
shared_ptr
The usage of shared_ptr is similar to unique_ptr. To create shared_ptr, use make_shared0), which is more efficient than creating shared_ptr directly. For example:
auto mySimpleSmartPtr = make_shared<Simple>();
Warning;
Always use make_shared0 to create a shared_ptr.
Starting with C++17, like unique ptr, shared_ptr can be used to store pointers to dynamically allocated legacy C-style arrays. This was not possible before C++17. However, although this is possible in C++17, it is recommended to use standard library containers instead of C-style arrays. Like unique_ptr, shared ptr also supports get() and reset() Method. The only difference is that when reset0 is called, due to the reference count, the underlying resources are released only when the last shared_ptr is destroyed or reset. Note that shared_ptr does not support release(). use_count() can be used To retrieve the number of shared_ptr instances sharing the same resource. Like unique_ptr, shared_ptr uses standard new and delete operators to allocate and free memory by default; when storing C-style arrays in C++17, use new [] and delete []. You can change this behavior as follows:
// Implementation of malloc_int() as before.shared_ptr<int> myIntSmartPtr(malloc_int(42), free);
As you can see, it is not necessary to specify the type of a custom delete as a template type parameter, which is simpler than the custom delete of unique ptr. The following example uses shared_ptr to store file pointers. When shared ptr leaves the scope (in this case, out of scope), CloseFile() is called Function to automatically close file pointers. Recall that there are object-oriented classes in C + + that can operate on files (see Chapter 13). These classes will automatically close files when they leave the scope. This example uses the fppen() and fclose() functions of the old c language, just to demonstrate that shared_ptr can be used for other purposes besides managing pure memory:
void CloseFile(FILE* filePtr){ if(filePtr == nullptr) return; fclose(filePtr); cout<<"File closed."<<endl;}int main(){ FILE* f = fopen("data.txt","w"); shared_ptr<FILE>filePtr(f,CloseFile); if(filePtr == nullptr) { cerr<<"Error opening file"<<endl; } else { cout<<"File opened"<<endl; } return 0;}
- Cast shared_ptr
The functions that can be used to cast shared_ptrs are const_pointer_cast(), dynamic_pointer_cast(), and static_pointer_cast(). C++17 adds reinterpret_pointer_cast(). They behave and work like the non intelligent pointer conversion functions const_cast(), dynamic_cast(), static_cast(), and reinterpret_cast(). These methods are discussed in detail in Chapter 11.
- Necessity of reference counting
As a general concept, reference counting is used to track the number of instances of a class or specific objects being used. Smart pointers for reference counts track the number of smart pointers created to reference a real pointer (or an object). In this way, smart pointers can avoid double deletion.
The problem of double deletion is easy to occur. Consider the Simple class introduced earlier, which just prints out the message of creating or destroying an object. If you want to create two standard shared_ptrs and make them all point to the same Simple object, as shown in the following code. When destroying, two smart pointers will try to delete the same object
void doubleDelete()
{
	Simple* mySimple = new Simple();
	Shared_ptr<Simple> smartPtr1(mySimple);
	Shared_ptr<Simple> smartPtr2(mySimple);
}
Depending on the compiler, this code may collapse! If the output is obtained, the output is
Simple constructor called!
Simple destructor called!
Simple destructor called!
Cake! Call the constructor only once, but call the destructor twice? Using unique_ptr has the same problem. Shared with reference count_ The PTR class also works in this way. However, according to the C + + standard, this is the correct behavior. You should not create two shared objects pointing to the same object as the doubleDelete(0) function above_ PTR, but a copy should be created as follows:
void noDoubleDelete()
{
	auto smartPtr1 = make_shared<Simple>();
    shared_ptr<Simple> smartPtr2(smartPtr1);
}
The output of this code is as follows:
Simple constructor called!Simple destructor called!
Even if there are two shared objects pointing to the same Simple object_ PTR and Simple objects are destroyed only once. In retrospect, unique_ptr is not a reference count. In fact, unique_ptr does not allow the copy constructor to be used as in the noDoubleDelete() function. If you really need to write code like that in the previous doubleDelete() function, you need to implement your own smart pointer to avoid double deletion. However, to reiterate, it is recommended to use the standard shared_ptr templates share resources to avoid code like that in the doubleDelete0 function. You should use the copy constructor instead.
- alias
shared_ptr supports so-called aliases. This person allows a shared_ptr and another shared_ptr shares a pointer (owned pointer), but points to different objects (stored pointers). For example, this can be used to use a shared_ptr refers to a member of an object and owns the object itself, for example:
class Foo
{
	public:
		Foo(int value):mData(value){}
		int mData;
};
auto foo = make_shared<Foo>(42);
auto aliasing =	 shared_ptr<int>(foo,&foo->mData);
Only if two shared_ The foo object is destroyed only when PTRs (Foo and aliasing) are destroyed. "Owned pointer" is used for reference counting. When dereferencing a pointer or calling its get(), it will return "stored pointer". Stored pointers are used for most operations, such as comparison operators. You can use owner_ The before () method or the std::owner less class performs a comparison based on the owned pointer. This is useful in some cases, such as storing shared_ptrs() in std::set. Chapter 17 discusses the set container in detail.
Weak_ptr
In C + +, there is also a class with shared_ptr is related to the template, which is weak_ptr. weak_ptr can include shared_ References to PTR managed resources. weak_ptr does not own this resource, so shared cannot be blocked_ PTR releases resources. weak_ When PTR is destroyed (for example, when it leaves the scope), the resource it points to will not be destroyed. However, it can be used to determine whether the resource has been associated with the shared_ptr released. weak_ The constructor of PTR requires a shared_ptr or another weak_ptr as a parameter. To access weak_ The pointer saved in PTR needs to be weak_ Convert PTR to shared_ptr. There are two ways to do this: e use weak_ lock() method of PTR instance, which returns a shared_ptr. If both and weak are released at the same time_ PTR associated shared_ptr, returned shared_ptr is nullptr.. ee create a new shared_ptr instance, break_ PTR as shared_ Arguments to the PTR constructor. If released with weak_ptr associated shared_ptr, STD:: bad will be thrown_ weak_ptr exception. The following example demonstrates break_ Usage of PTR:
void useResource(weak_ptr<Simple>& weakSimple)
{
	auto resource = weakSimple.lock();
	if(resource)
	{
		cout<<"Resource still alive"<<endl;
	}
	else
	{
		cout<<"Resource has been freed!"<<endl;
	}
}
int main()
{
	auto sharedSimple = make_shared<Simple>();
	weak_ptr<Simple> weakSimple(sharedSimple);
	// Try to use the weak_ptr.
	useResource(weakSimple);
	// Reset the shared_ptr.
	// Since there is only 1 shared_ptr to the Simple resource,this will
	// free the resource,even though there is still a weak_ptr alive.
	sharedSimple.reset();
	// Try to use the weak_ptr a second time.
	useResource (weakSimple);
}
The output of the above code is as follows:
Simple constructor called!Resource still alive.Simple destructor called!Resource has been freed!
Starting with C++17, shared_ PTR supports C-style arrays; Similarly, weak_ptr also supports C-style arrays.
Mobile semantics
shared_ptr,unique_ptr and weak_ PTRs support mobile semantics, which makes them very efficient. Chapter 9 will explain mobile semantics in detail, which is not detailed here. All you need to know here is that it is also efficient to return such smart pointers from functions. For example, you can write the following function create() and use it as demonstrated in the main() function,
unique_ptr<Simple> create(){ auto ptr = make_unique<Simple>(); //Do something with ptr... return ptr;}int main(){ unique_ptr<Simple> mySmartPtr1 = create(); auto mySmartPtr2 = create(); return 0;}
enable_shared_ from_this
std::enable_shared_from_this mixed class allows methods on objects to safely return shared to themselves_ PTR or weak_ptr. Chapter 28 discusses mixed classes. enable_shared_from_this mixed class adds the following two methods to the class. shared_from_this(): returns a shared_ptr, which shares ownership of objects. weak_from_ this(): returns a weak_ptr, which tracks ownership of objects. This is an advanced function, which will not be detailed here. The following code briefly demonstrates its usage:
class Foo:public enable_shared_from_this<Foo>{ public: shared_ptr<Foo> getPointer() { return shared_from_shis(); }};int main(){ auto ptr1 = make_shared<Foo>(); auto ptr2 = ptr1->getPointer();}
Note that only if the pointer to the object is already stored in shared_ptr, shared on the object can be used_ from_ this(). In this case, use make in main()_ Shared() to create a shared named ptrl_ PTR (which contains Foo instances). Create this shared_ After PTR, it will be allowed to call shared on the Foo instance_ from_ this(). The implementation of the following getPointer() method is completely wrong:
class Foo{ public: shared_ptr<Foo> getPointer() { return shared_ptr<Foo>(this); }};
If you use the same code for main() as before, this implementation of Foo will result in double deletion. There are two completely independent shared_ptr(ptrl and ptr2) point to the same object, and they all try to delete the object when it is out of scope.
Old, obsolete / cancelled auto_ptr
Before C++ll, the old standard library included a simple implementation of smart pointer, called auto_ptr. Unfortunately, auto_ptr has some serious disadvantages. One disadvantage is that when used in a standard library container, such as vector, auto_ptr does not work properly. C++11 and C++14 have officially abandoned auto_ptr and C + + 17 completely cancel auto_ptr. auto_ptr has been shared_ ptr and unique_ptr substitution. Auto is mentioned here_ The reason for PTR is to make sure you know the smart pointer and never use it.
Warning:
Don't use the old auto_ptr smart pointer instead of using unique_ptr or shared_ptr!
Common memory traps
It's hard to pinpoint exactly where a memory related bug will result. Each memory leak or error pointer has subtle differences. There is no panacea for all memory problems, but there are some common types of problems that can be detected and solved.
Underallocated string
The most common problem associated with C-style strings is underallocation. In most cases, it is because the programmer did not allocate the tail \ 0 termination character. When the programmer assumes a fixed maximum size, insufficient string allocation will also occur. The basic built-in C-style string functions do not operate on a fixed size one by one, but write as much as there is. If it exceeds the end of the string, it will be written to unallocated memory. The following code demonstrates an underallocation of strings. It reads data from the network connection and writes a C-style string. This process is done in a loop because the network connection receives only a small amount of data at a time. In each loop, the getMoreData() function is invoked, which returns a pointer to dynamically allocated memory. When getMoreData0 returns nullptr, it indicates that all data has been received. strcat() is a C function that connects the C-style string of the second parameter to the tail of the C-style string of the first parameter. It requires that the target cache be large enough.
char buffer[1024] = {0};// Allocate a whole bunch of memory.
while(true)
{
    char* nextChunk = getMoreData();
    if(nextChunck == nullptr)
    {
        break;
    }
    else
    {
        strcat(buffer,nextChunk); // BUG! No guarantees against buffer overrunl
        delete[] nextChunk;
    }
}
There are three ways to solve the possible underallocation problem. In descending order of priority, the three methods are:
(1) Using C + + style strings, it can automatically process the memory associated with the connection string.
(2) Do not allocate buffers as global variables or on the stack, but on the heap. When the remaining space is insufficient, allocate a new group buffer, which is large enough to save at least the current content plus the content of the new memory block, copy the content of the original buffer to the new buffer, append the new content to the back, and then delete the original buffer.
(3) Create another version of getMoreData(), which receives a maximum count value (including \ 0 'characters), returns no more than this value, and then tracks the number of remaining space and the current position in the buffer.
Memory access out of bounds
As mentioned earlier in this chapter, the pointer is just a memory address, so the pointer may point to any location in memory. This is easy to happen. For example, consider a C-style string that accidentally loses the 0 termination character. The following function attempts to fill the string with m characters, but may actually continue to fill the string with m:
void fillWithM(char* inStr){ int i = 0; while(inStr[i] != '\0') { inStr[i] = 'm'; i++; }}
If an incorrect termination string is passed into this function, it is only a matter of time before an important part of memory is overwritten and the program crashes. Consider what happens if the memory associated with the object in the program is suddenly m overwritten. This is terrible! A bug caused by writing to the memory behind the end of the array is called a buffer error. This bug has been used by some high-risk malicious programs, such as viruses and worms. Wolf cat hackers can use the ability to rewrite part of memory to inject code into running programs. Many memory detection tools can also detect buffer overflows. Using advanced structures such as CH+ string and vector helps avoid some bugs related to C-style strings and arrays.
Warning:
Avoid using old C-style strings and arrays, which do not provide any protection; Instead, use secure modern structures such as C++ string and vector, which can automatically manage memory.
Memory leak
Another cursed problem encountered in C and C + + programming is to find and fix memory leaks. The program finally began to work and seemed to give the correct results. Then, as the program runs, it swallows more and more memory. This is because the program has a memory leak. Avoiding memory leakage through smart pointers is the preferred method to solve this problem.
If memory is allocated but not released, a memory leak occurs. At first, this sounds like the result of careless programming and should be easy to avoid. After all, if each new corresponds to a delete in each class written, there should be no memory leakage, right? This is not always the case. In the following code, the Simple class is written correctly, freeing the memory allocated at each location. When the doSomething() function is called, the outSimplePtr pointer is modified to point to another Simple object, but the original Simple object is not released. To demonstrate a memory leak, the doSomething() function deliberately did not delete the old object. Once the pointer to the object is lost, it is almost impossible to delete it
class Simple{ public: Simple(){ mIntPtr = new int(); } ~Simple(){ delete mIntPtr; } void setValue(int value){ *mIntPtr = value; } private: int* mIntPtr;};void doSomething(Simple*& outSimplePtr){ outSimplePtr = new Simple(); // BUG! Doesn't delete the original.}int main(){ Simple* simplePtr = new Simple();// Allocate a Simple object, doSomething(simplePtr); delete simplePtr; //Only cleans up the second object. return 0;}
Warning:
Remember, the above code is for demonstration purposes only! In the code of the production environment, mIntPtr and simplePtr should be made unique ptr, and outSimplePtr should be made unique ptr_ PTR reference.
In the above example, the memory leak may come from poor communication between programmers or poor code documents. The caller of doSomething() may not realize that the variable is passed by reference, so there is no reason to expect the pointer to be reassigned. If they notice that this parameter is a non const reference to a pointer, they may suspect that something strange will happen, but there is no comment around doSomething() to explain this behavior.
- Find and repair memory leaks in Windows with Visual C + +
Memory leaks are difficult to trace because it is not easy to see in memory which objects are in use and where the objects were originally allocated to memory. However, some programs can do this automatically. There are many memory leak detection tools, from expensive professional software packages to free downloadable tools. If you are using Visual C + + (there is a free version of Visual C + +, called Community Edition), its debugging library has built-in support of memory leak detection. This memory leak detection feature is not enabled by default unless an MFC project is created. To enable it in other projects, you need to add the following three lines of code at the beginning of the code
#define _CRTDBG_MAP_ALLOC #include <cstdlib>#include <crtdbg.h>
These lines should be in exactly the same order as above. Next, you need to redefine the new operator as follows:
#ifdef _DEBUG #ifndef DBG_NEW #define DBG_NEW new(_NORMAL_BLOCK,___FILE__,__LINE__) #define new DBG_NEW #endif#endif //DEBUG
Note that the newly defined new operator is in the "fdef _DEBUG" statement, so the new new operator will only be used when compiling the debug version of the application. This is usually what is needed. Distributions typically do not perform any detection of memory leaks. Finally, you need to add the following line to the first line of the main() function:
CrtSetDbgFlag(_CRTDBG_ALLOC_MEM_DF | _CRTDBG_LEAK_CHECK_DF);
This line of code tells the Visual C++ CRTI(C runtime) library to write all detected memory leaks to the debug output console when the application exits. For the previous program with memory leak, the debugging console should contain the following output:
Detected memory leaks!
Dumping objects ->
c:\leaky\leaky.cpp(15) : {147} normal block at 0x014FABF8, 4 bytes long.
Data: <> 00 00 00 00
c:\leaky\leaky.cpp(33) : {146} normal block at 0x014F5048, 4 bytes long.
Data: <Pa > 50 61 20 01
Object dump complete.
”The above output clearly indicates which line in which file memory is allocated but not freed. The number in parentheses after the file name is the line number. The number between braces is the counter of memory allocation. For example, {147} indicates that this is the 147th allocation after the program starts. Visual C + + is available_ The CrtSetBreakAlloc0 function tells Visual C + + to enter the debugger when a specific allocation is made. For example, add the following line of code to the beginning of the main() function to break the debugger at the 147th allocation:
_CrtSetBreakAlloc(147);
In this program with memory leaks, there are two leaks: the first Simple object is not released (line 33), and the integer created by this object in the heap is not released (line 15). In the debugger output window of Visual C + +, you only need to double-click a memory leak to automatically jump to the line in the code.
Of course, neither Visual C + + explained in this section nor Valgrind explained in the next section can actually repair memory leaks. Otherwise, what fun is there? Through the information provided by these tools, practical problems can be found. Usually, you need to track the code step by step to find where the pointer to an object has been rewritten, but the original object has not been released. Most debuggers provide a "watch poinb" function to interrupt the execution of programs when such events occur.
. find and fix memory leaks through Valgrind in Linux
Double deletion and invalid pointer
When the memory associated with a pointer is released through delete, the memory can be used by other parts of the program. However, the reuse of this pointer cannot be prohibited. This pointer becomes a dangling point . double deletion is also a problem. If the delete operation is performed on the same pointer for the second time, the program may release the memory reallocated to another object. Double deletion and the use of the released memory are difficult to trace because the symptoms may not appear immediately. If double deletion occurs in a short time, the program may produce undefined rows Yes, because the associated memory may not be reused so quickly. Similarly, if the deleted object is used immediately after deletion, the object is likely to remain intact. Of course, there is no guarantee that this behavior will continue. Once the object is deleted, the memory allocator has no obligation to save any object. Even if the program works properly, it is very bad to use the deleted object Cake programming style. Many memory leak detection programs (such as Visual C + + and Valgrind) , it will also detect the use of double deletion and released objects. If you do not use smart pointers in the recommended way, but use ordinary pointers, set the pointer to nullptr at least after freeing the memory associated with the pointer. This can prevent inadvertently deleting the same pointer twice and using invalid pointers. Note that calling delete on nullptr pointers is allowed, only this No effect.
Write class
When writing a class, you need to specify the behavior or method (the object applied to the class), as well as the attribute or data member (each object will contain). Writing a class has two elements: defining the class itself and defining the method of the class.
Class definition
Let's start by writing a simple SpreadsheetCell class, where each cell stores only one number:
class SpreadsheetCell{ public: void setValue(double inValue); double getValue() const; private: double mValue;}
#include <string>#include <string_view>class SpreadsheetCell{ public: void setValue(double inValue); double getValue() const; void setString(std::string_view inString); std::string getString() const; private: std::string doubleToString(double inValue) const; double stringToDouble(std::string_view inString) const; double mValue;};
be careful:
The above code uses the C++17 std::string view class. If your compiler is incompatible with C++17, const STD:: String & can be used instead of std::string_view.
This class version can only store double data. If the customer sets the data to string, the data will be converted to double. If the text is not a valid number, the double value will be set to 0.0. This class defines a new method to display two settings and obtain the text representation of the cell. There are also two new methods to convert double to string and string to double Helpful methods. Here are the implementations of these methods.
#include "SpreadsheetCell.h"
using namespace std;
void SpreadsheelCell::setString(string_view	inString)
{
	mValue = stringToDouble(inString);
}
string SpreadsheelCell::getString() const
{
	return doubleToString(mValue);
}
string SpreadsheetCell::doubleToString(double inValue) const
{
	return to_string(inValue);
}
double SpreadsheetCell::stringToDouble(string_view inString) const
{
	return strtod(inString.data(),nullptr);
}
If a method of an object calls a function (or method) and the function takes a pointer to the object as a parameter, the function can be called with this pointer. For example, suppose an independent printCell() function (not a method) is written, as follows:
void printCell(const SpreadsheetCell& cell){ cout<<cell.getString()<<endl;}
If you want to call printCell() with the setValue() method, you must pass the * this pointer as a parameter to printCell(), which points to the SpreadsheetCell object of the setValue() operation.
void SpreadsheetCell::setValue(double value){ this->value = value; printCell(*this);}
Use object
In C + +, a SpreadsheetCell "object" can be built according to the definition of the SpreadsheetCell class by declaring a variable of type SpreadsheetCell Just as construction workers can build multiple houses according to a given blueprint, programmers can create multiple SpreadsheetCell objects according to the SpreadsheetCell class. There are two ways to create and use objects: in the stack or in the heap.
- Objects in the stack
The following code creates and uses the SpreadsheetCell object in the stack
SpreadsheetCell myCell,anotherCell;
myCell.setValue(6);
anotherCell.setString("3.2");
cout<<"cell 1: "<<myCell.getValue()<<endl;
cout<<"cell 2: "<<anotherCell.getValue()<<endl;
- Objects in heap
You can also use new to dynamically allocate objects;
SpreadsheeCell* myCellp = new SpreadsheetCell();
myCellp->setValue(3.7);
cout<<"cell 1: "<<myCellp->getValue()<<" "<<myCellp->getString()<<endl;
delete myCellp;
myCellp = nullptr;
When an object is created in the heap, its members are accessed through the arrow operator.
Just as other memory allocated in the heap must be released, delete must be called on the object to release the memory allocated for the object in the heap. In order to avoid memory errors, it is strongly recommended to use smart pointers;
auto myCellp = make_unique<SpreadsheetCell>();myCellp->setValue(3.7);cout<<"cell 1: "<<myCellp->getValue()<<" "<<myCellp->getString()<<endl;
When using the smart pointer, there is no need to release the memory manually, and the memory will be released automatically.
Warning:
If you use new to allocate memory for an object, you should use delete to destroy the object after using the object, or use smart pointers to automatically manage memory.
be careful:
If a smart pointer is not used, it is best to reset the pointer to null when deleting the object pointed to by the pointer. This is not mandatory, but it can prevent accidental use of the pointer after deleting the object for debugging.
Using constructors in the heap
When the SpreadsheetCell object is dynamically allocated, the constructor can be used in this way;
auto smartCellp = make_unique<SpreadsheetCell>(4);// ... do something with the cell,no need to delete the smart pointer// Or with raw pointers,Wwithout smart pointers (not recommended)SpreadsheetCell* myCellp = new SpreadsheetCell(5);SpreadsheetCell* anotherCellp = nullptr;anotherCellp = new SpreadsheetCell(4);delete myCellp;myCellp = nullptr;delete anotherCellp;anotherCellp = nullptr;
Note that you can declare a pointer to the SpreadsheetCell object without calling the constructor immediately. Objects in the stack call the constructor when declared.
Whether you declare a pointer in the stack (in a function) or in a class (as a data member of the class), if you do not initialize the pointer immediately, you should initialize the pointer to nullptr as you declared othercellp earlier. If nullptr is not given, the pointer is undefined. Unexpected use of undefined pointers can lead to unpredictable and difficult to diagnose memory problems. If the pointer is initialized to nullptr, using this pointer in most operating environments will cause memory access errors, rather than unpredictable results. Similarly, remember to use delete or smart pointers for objects dynamically allocated using new.
- Default constructor
When do I need a default constructor
Consider an array of objects. Creating an object array requires two tasks: allocating contiguous memory space for all objects and calling the default constructor for each object. C + + does not provide any syntax for the code that creates the array to call different constructors directly. For example, if the default constructor of the SpreadsheetCell class is not defined, the following code cannot be compiled:
SpreadsheetCell cells[3]; //FAILS compilation without default constructor
SpreadsheetCell* myCellp = new SpreadsheetCell[10]; //Also FAILS
For stack based arrays, you can use the following initializer (initializeD) to bypass this restriction
SpreadsheetCell cells[3] = {SpreadsheetCell(0),SpreadsheetCell(23),SpreadsheetCell(41)};
However, if you want to create an array of objects for a class, it is best to define the default constructor for the class. If you do not define your own constructor, the compiler automatically creates a default constructor. Compiler generated constructors are discussed in the next section. If you want to store a class in a standard library container (such as std::vector), you also need a default constructor. You can also use the default constructor when creating class objects in other classes, as described in "5. Constructor initializer" in this section.
Warning;
When you create an object on the stack, you do not need parentheses to call the default constructor.
For objects in the heap, you can use the default constructor as follows:
auto smartCellp = make_unique<SpreadsheetCell>();SpreadsheetCell* myCellp = new SpreadsheetCell();delete myCellp;myCellp = nullptr;
Explicitly delete constructor
C + + also supports explicitly deleted constructors. For example, you can define a class with only static methods (see Chapter 9). This class does not have any constructors and does not want the compiler to generate a default constructor. In this case, you can explicitly delete the default constructor:
class MyClass
{
	public:
		MyClass() = delete;
};
| data type | explain |
|---|---|
| const data member | const variable cannot be assigned correctly after it is created. It must be provided with a value when it is created |
| Reference data member | If you don't point to something, the reference cannot exist |
| Object data member without default constructor | C + + tried to initialize member objects with default constructors. If there are no default constructors, they cannot be initialized |
| Base class without default constructor | It is described in Chapter 10 |
Warning:
The order in which data members are initialized with ctor initializer is as follows: in the order declared in the class definition, not in the ctor initializer list.
Pass objects by reference
When passing an object to a function or method, in order to avoid copying the object, you can let the function or method take the reference of the object as a parameter. Passing an object by reference is usually more efficient than passing an object by value, because only the address of the object needs to be copied, not the whole content of the object. In addition, passing by reference can avoid the problem of dynamic memory allocation of the object, which will be ignored It is described in Chapter 9. When an object is passed by reference, the function or method referenced by the object can modify the original object. If the object is passed by reference only for efficiency, the object can be declared const to eliminate this possibility. This is called passing an object by const reference, which has been done in many examples in this book.
Note that the SpreadsheetCell class has multiple methods to receive the std::string_view parameter. As described in Chapter 2, string_view is basically a pointer and length. Therefore, the replication cost is very low, and it is usually passed by value. In addition, basic types such as int and double should be passed by value. Passing these types by const reference will get nothing. The doubleto of the SpreadsheetCell class The string () method always returns a string by value because its implementation creates a local string object that is returned to the caller at the end of the method. The reference that returns this string is invalid because the string it references will be destroyed when the function exits.
Define the copy constructor as an explicit default or explicit deletion
The compiler generated copy constructor can be set as the default or deleted in the following way
SpreadsheetCell (const SpreadsheetCell& src) = default;
perhaps
SpreadsheetCell (const SpreadsheetCell& src) = delete;
By removing the copy constructor, the object will no longer be copied. This can be used to prohibit passing objects by value, as described in Chapter 9.
Delegating constructors
Delegating constructors allow constructors to call other constructors of the same class. However, this call cannot be placed in the constructor body, but must be placed in the constructor initializer, and must be the only member initializer in the list. An example is given below:
SpreadsheetCell::SpreadsheetCell(string_view initialValue) :SpreadsheetCell(stringToDouble(initialValue)) {}
When calling this sting_view constructor (delegate constructor), first delegate the call to the target constructor, that is, the double constructor. When the target constructor returns, execute the delegate constructor. When using the delegate constructor, be careful to avoid recursion of the constructor. For example;
class MyClass{ MyClass(char c):MyClass(1.2){} MyClass(double d):MyClass('m'){}}
The first constructor delegates the second constructor, which in turn delegates the first constructor. The C + + standard does not define the behavior of such code, depending on the compiler.
Note the lack of symmetry between the default constructor and the copy constructor. As long as the copy constructor is not explicitly defined, the compiler will automatically generate one. On the other hand, as long as any constructor is defined, the compiler will not generate the default constructor.
With move semantics, the compiler can use the move constructor instead of the copy constructor to return the string from getString(), which is more efficient. Chapter 9 discusses the move semantics.
Friends
class Foo { friend class Bar;};
Now, all members of the Bar class can access the private and protected data members and methods of the Foo class. A specific method of the Bar class can also be used as a friend. Assuming that the Bar class has a processfoo (const Foo & FBO) method, the following syntax will make the method a friend of the Foo class:
class Foo{ friend void Bar::processFoo(const Foo& foo);};
A stand-alone function can also be a friend of a class. For example, suppose you want to write a function to dump all the data of the Foo object to the console. You may want to put this function outside the Foo class to simulate external audit, but the function should be able to access the internal data members of the Foo object and check them appropriately. Here are the Foo class definition and dumpFoo() friend functions:
class Foo
{
	friend void dumpFoo(const Foo& foo);
};
The friend declaration in the class is used as a prototype for the function. You don't need to write prototypes elsewhere (of course, it won't hurt if you do that). Here is the function definition:
void dumpFoo(const Foo& foo)
{

}
friend classes and methods can easily be abused. Friends can violate the principle of encapsulation and expose the interior of a class to other classes or functions. Therefore, they should only be used in specific situations
The destructor has the same name as the class (and constructor), and the name is preceded by a tilde. Destructors have no parameters and can only have one destructor. Implicitly mark noexcept for destructors because they should not throw exceptions.
- Copy constructor for Spreadsheet class
class Spreadsheet
{
	public:
		Spreadsheet(const Spreadsheet& src);
};
- Assignment operator of Spreadsheet class
class Spreadsheet
{
	public:
		Spreadsheet& operator=(const Spreadsheet& rhs);
};
The following is an immature implementation:
class Spreadsheet
{
	// check for self-assignment
	if(this == &ths)
    {
        return *this;
    }
    //Free the old memory
    for(size_t i = 0;i < mWidth;i++)
    {
        delete[] mCells[i];
    }
    delete[] mCells;
    mCells = nullptr;

    //Allocate new memory
    mWidth = rhs.mWidth;
    mHeight = rhs.mHeight;

    mCells = new SpreadsheetCell*[mWidth];
    for(size_t i = 0; i < mWidth; i++)
    {
        mCells[i] = new SpreadsheetCell[mHeigh];
    }
    //Copy the data
    for(size_t i = 0; i < mWidth; i++)
    {
        for(size_t j = 0;j < mHeight; j++)
        {
            mCells[i][j] = rhs.mCells[i][j];
        }
    }
    return *this;
}
The code first checks the self assignment, then releases the current memory of this object, then allocates new memory, and finally copies each element. There are many problems and mistakes in this method. This object may enter an invalid state. For example, suppose the memory is released successfully, mWidth and mHeight are reasonably set, but the cycle of allocating memory is abnormal. If this happens, the rest of the method is no longer executed, but exits from the method. At this point, the Spreadsheet instance is damaged. Its mWidth and mHeight data members declare the specified size, but the mCells data member does not have the appropriate amount of memory. Basically, this code cannot safely handle exceptions!
We need an all or nothing mechanism; Either all succeed or the object remains unchanged. To implement such an assignment operator that can safely handle exceptions, it is recommended to use the "copy and exchange" idiomatic syntax. Here, the nonmember function swap() is implemented as a friend of the Spreadsheet class. If you do not use the nonmember function swap0, you can add the swap() method to the class. However, it is recommended that you practice implementing swap0 as a nonmember function, so that it can be used by various standard library algorithms. The following is the definition of the Spreadsheet class containing the assignment operator and the swap() function;
class Spreadsheet{ public: Spreadsheet& operator=(const Spreadsheet& rhs); friend void swap(Spreadsheet& first,Spreadsheet& second) noexcept;};
To implement the "copy and exchange" idiomatic syntax that can safely handle exceptions, the swap() function is required to never throw exceptions, so it is marked noexcept. The implementation of the swap() function uses the std::swap(0) tool function provided in the standard library (defined in the header file) to exchange each data
void swap(Spreadsheet& first,Spreadsheet& second) noexcept{ using std::swap; swap(first.mWidth,second.mWidth); swap(first.mHeigh,second.mHeight); swap(first.mCells,second.mCells);}
Now there is the swap() function that can safely handle exceptions, which can be used to implement the assignment operator:
Spreadsheet& Spreadsheet::operator=(const Spreadsheet& rhs){ if(this == &rhs) return *this; Spreadsheet temp(rhs); swap(*this,temp); return *this;}
This implementation uses the "copy and exchange" idiomatic syntax. In order to improve efficiency and sometimes correctness, the first line of the assignment operator checks self assignment. Next, copy the right side, called tmp. Then replace * this with this copy. This mode ensures that strong exception safety is handled "robustly" . this means that if any exception occurs, the current Spreadsheet object remains unchanged. This is achieved in three stages:
The first stage creates a temporary copy. This does not modify the state of the current Spreadsheet object, so if an exception occurs at this stage, there will be no problem.
The second stage uses the swap() function to exchange the created temporary copy with the current object. swap() never throws an exception.
The third stage destroys the temporary object (which now contains the original object due to the exchange) to clean up any memory.
In addition to replication, C + + also supports mobile semantics, which requires mobile constructors and mobile assignment operators. In some cases, they can be used to enhance performance, which will be discussed in detail in section 9.2.4 "using mobile semantics to deal with mobile".
- Assignment and passing by value are prohibited
When dynamically allocating memory in a class, if you only want to prevent others from copying objects or assigning values to objects, you only need to explicitly mark operator = and copy constructor as delete. With this method, the compiler will report an error when anyone else passes objects by value, returns objects from functions or methods, or assigns values to objects. The following Spreadsheet class definition Prohibit assignment and pass by value:
class Spreadsheet{ public: Spreadsheet(size_t width,size_t height); Spreadsheet(const Spreadsheet& src) = delete; ~Spreadsheet(); Spreadsheet& operator=(const Spreadsheet& rhs) = delete;};
There is no need to provide an implementation of the delete copy constructor and assignment operator. The linker will never view them because the compiler does not allow code to call them. When code copies or assigns an assignment to a Spreadsheet object, the compiler will give the following message:
"Spreadsheet 5Spreadsheet::operator =(const Spreadsheet 5) , : attempting to reference a deleted function
be careful:
If the compiler does not support explicit deletion of member functions, you can disable copying and assignment by marking the copy constructor and assignment operator private without providing any implementation.
- rvalue reference
In C + +, an lvalue is a quantity that can get its address, such as a named variable. It is called an lvalue because it often appears on the left of an assignment statement. In addition, all quantities that are not lvalues are rvalues , such as a literal, a temporary object, or a temporary value. Usually, the right value is on the right side of the assignment operator. For example, consider the following statement: int a=4* 2; in this statement, a is the left value, it has a name and its address is & a. the result of the right expression 4 * 2 is the right value. It is a temporary value and will be destroyed when the statement is completed. In this example, this temporary copy will be deleted Stored in variable a.
An R-value reference is an rvalue In particular, this is a concept applicable only when the right value is a temporary object. The purpose of the right value reference is to provide an optional specific function when the temporary object is involved. Because it is known that the temporary object will be destroyed, through the right value reference, some operations involving copying a large number of values can be realized by simply copying pointers to these values.
The function can use & & as part of the parameter description (for example, type & & name) to specify the R-value reference parameter. Usually, the temporary object is treated as const type &, but when the R-value reference is used by the function overload, the temporary object can be resolved for the function overload. The following example illustrates this. The code first defines two handlemessages () Function, one receives an lvalue reference and the other receives an lvalue reference:
void handleMessage(std::string& message)
{
	cout<<"handleMessage with lvalue reference: "<<message<<endl;
}
void handleMessage(std::string&& message)
{
	cout<<"handleMessage with rvalue reference: "<<message<<endl;
}
The handleMessage0) function can be called with a variable with a name as a parameter:
std::string a = "Hello ";
std::string b = "World";
handleMessage(a); //Calls handleMessage(string& value)
Since a is a named variable, when the handleMessage() function is called, it receives an lvalue reference. The handleMessage() function changes the value of a through any changes made by its reference parameters. You can also call the handleMessage() function with an expression as an argument. Number:
handleMessage(a + b); //Calls handleMessage(string&& value)
The literal can also be used as the parameter of the handleMessageO) call. In this case, the right value reference version will also be called, because the literal cannot be used as the left value (but the literal can be passed as the corresponding argument of the const reference parameter).
handleMessage("hello world"); //calls handleMessage(string && message)
handleMessage(std::move(b)); //Calls handleMessage(string && value)
\2. Implement mobile semantics
Mobile semantics is implemented by right value reference. In order to add mobile semantics to the class, we need to implement the mobile constructor and mobile assignment operator. The move constructor and move assignment operator should be marked with the noexcept qualifier, which tells the compiler that they will not throw any exceptions. This is very important for compatibility with the standard library, because if mobile semantics is implemented, full compatibility with the standard library will only move the stored objects and ensure that no exceptions are thrown. The following Spreadsheet class definition contains a move constructor and a move assignment operator. Two auxiliary methods cleanup() and moveFrom() are also introduced. The former is called in destructor and mobile assignment operator. The latter is used to move member variables from the source object to the target object, and then reset the source object.
class Spreadsheet
{
	public:
		Spreadsheet(Spreadsheet&& src) noexcept; //Move constructor
		Spreadsheet& operator=(Spreadsheet&& rhs) noexcept; //Move assign
	private:
		void cleanup() noexcept;
		void moveFrom(Spreadsheet& src) noexcept;
};
The implementation code is as follows
void Spreadsheet::cleanup() noexcept
{
	for(size_t i = 0;i < mWidth; i++)
    {
        delete[] mCells[i];
    }
    delete[] mCells;
    mCells = nullptr;
    mWidth = mHeight = 0;
}

void Spreadsheet::moveFrom(Spreadsheet & src) noexcept
{
    mWidth = src.mWidth;
    mHeigh = src.mHeight;
    mCells = src.mCells;

    src.mWidth = 0;
    src.mHeigh = 0;
    src.mCells = nullptr;
}

Spreadsheet::Spreadsheet(Spreadsheet&& src) noexcept
{
    moveFrom(src);
}
Spreadsheet* Spreadsheet::operator=(Spreadsheet && rhs) noexcept
{
    if(this == &rhs)
    {
        return *this;
    }
    cleanup();
    moveFrom(this);
    return *this;
}
Both the move constructor and the move assignment operator move the memory ownership of mCells from the source object to the new object. Both the move constructor and the move assignment operator of the source object move the memory ownership of mCells from the source object to the new object. These two methods move the memory ownership of the source object, for example, just like an ordinary constructor or a copy assignment operator, The move constructor and / or move assignment operator can be explicitly set to default or deleted, as described in Chapter 8. The compiler automatically generates a default move constructor for a class only if the class does not have a user declared copy constructor, copy assignment operator, move assignment operator, or destructor.
be careful:
You can use the noexcept flag function to indicate that an exception will not be thrown. For example:
void myNonThrowingFunction() noexcept {}
The destructor implicitly uses noexcept, so you don't have to add this key specifically. If the noexcept function does throw an exception, the program will terminate. For more information about noexcept and why you must avoid destructors throwing exceptions, see Chapter 14.
Zero rule
The 5 rules of five were introduced earlier. The previous discussion has been explaining how to write the following five special member functions: destructor, copy constructor, move constructor, copy assignment operator and move assignment operator. But in modern C + +, you need to accept the rule of zero. The "zero rule" points out that when designing a class, it should not need the above five special member functions. How to do this? Basically, you should avoid having any old-fashioned, dynamically allocated memory. Instead, use modern structures, such as standard library containers. For example, in the Spreadsheet class, replace the SpreadsheetCell * * data member with vector < vector >. The vector automatically handles memory, so the above five special member functions are not required.
Warning;
In modern C + +, zero rule should be applied!
More about methods
C + + provides many options for methods, and this section details these techniques.
Static method
Similar to data members, methods are sometimes applied to all class objects rather than a single object. In this case, static methods can be written like static data members. Take the SpreadsheetCell class in Chapter 8 as an example. This class has two auxiliary methods: stringToDouble() and doubleToString(). These two methods do not access the information of a specific object, so they can be static. The following class definition sets these methods to static;
class SpreadsheetCell{ //Omitter for brevity private: static std::string doubleToString(double inValue); static double stringToDouble(std::string_view inString);};
The implementation of these two methods is the same as the previous implementation. There is no need to repeat the static keyword before the method definition. However, note that the static method does not belong to a specific object, so there is no this pointer. When a static method is called with a specific object, the static method will not access the non static data members of the object. In fact, static methods are like ordinary functions. The only difference is that static methods can access private and protected static data members of classes. If other objects of the same type are visible to static methods (such as passing pointers or references to objects), static methods can also access private and protected non static data members of other objects.
Any method in the class can call static methods like ordinary functions, so the implementation of all methods in the SpreadsheetCell class has not changed. If you want to call a static method outside a class, you need to use the class name and scope resolution operator to limit the name of the method (just like static data members). The access control of the static method is the same as that of ordinary methods. Set stringToDouble() and doubleToString() to public so that code outside the class can also use them. At this point, these two methods can be called anywhere:
string str = SpreadsheetCell::doubleToString(5.0)
const method
The value of the const object cannot be changed. If you use constant objects, references to constant objects, and pointers to constant objects, the compiler will not allow anyone to call any methods of the object unless they promise not to change any data members. To ensure that the method does not change data members, you can mark the method itself with the const keyword. The following SpreadsheetCell class contains methods marked const that do not change any data members.
class SpreadsheetCell{ public: double getValue() const; std::string getString() const;};
const specification is a part of the method prototype and must be placed in the method definition:
double SpreadsheetCell::getValue() const{ return mValue;}std::string SpreadsheetCell:getString() const{ return doubleToString(mValue);}
Marking a method const is a contract with the customer code that promises not to change the internal value of the object within the method. If the method that actually modifies the data member is declared const, the compiler will report an error. Static methods cannot be declared const, such as the doubletostring0 () and stringToDouble() methods in section 9.3.1, because this is redundant. Static methods do not have instances of classes, so it is impossible to change internal values. Const works by marking the data members used in the method as const references. Therefore, if you try to modify the data members, the compiler will report an error. Non const objects can call const and non const methods. However, const objects can only call const methods. Here are some examples:
SpreadsheetCell myCell(5);
cout<<myCell.getValue()<<endl; //ok
myCell.setString("6"); //ok

const SpreadsheetCell& myCellConstRef = myCell;
cout<<myCellConstRef.getValue()<<endl; //ok
myCellConstRef.getString("6"); //Com
You should get into the habit of declaring all methods that do not modify objects as const, so that const objects can be referenced in your program. Note that const objects will also be destroyed and their destructors will be called, so destructors should not be marked const.
- const based overload
Also note that methods can be overloaded according to const. That is, you can write two methods with the same name and parameters, one of which is const and the other is not. If it is a const object, call the const method. If it is a non const object, call the non const method.
In general, the const version and the non const version have the same implementation. To avoid code duplication, use Scott Meyer's const_cast() mode. For example, the Spreadsheet class has a getCellAt() method that returns a non const reference to the SpreadsheetCell. You can add a const overloaded version that returns a const reference to the SpreadsheetCell.
class Spreadsheet
{
	public:
    	SpreadsheetCell& getCellAt(size_t x,size_t y);
    	const SpreadsheetCell& getCellAt(size_t x,size_t y) const;
};
For Scott Meyer's const_cast() mode, you can implement the const version as usual, and then pass the call to the const version through appropriate conversion to realize the non const version. Basically, you use STD:: as_const (0 (defined in) to convert * this into constspreadsheet &, call the const version of getCellAt(), and then use const_cast) , remove const from the result:
const SpreadsheetCell& Spreadsheet::getCellAt(size_t x,size_t y) const;
{
	verifyCoordinate(x,y);
	return mCells[x][y];
}

SpreadsheetCell& Spreadsheet::getCellAt(size_t x,size_t y)
{
	return const_cast<SpreadsheetCell&>(std::as_const(*this).getCellAt(x,y));
}
As of C++17, the std::as_const() function is available. If your compiler does not support this function, you can use the following static_cast() instead:
return const_cast<SpreadsheetCell&>(static_cast<const Spreadsheet&>(*this).getCellAt(x,y));
With these two overloaded getCellAt0, you can now call getCellAt() on const and non const Spreadsheet objects;
Spreadsheet sheet1(5,6);SpreadsheetCells& cell1 = sheet1.getCellAt(1,1);const Spreadsheet sheet2(5,6);const SpreadsheetCell& cell2 = sheet2.getCellAt(1,1);
\2. Explicitly delete overloads
Overloaded methods can be explicitly deleted, which can be used to prohibit calling member functions with specific parameters. For example, consider the following classes;
class MyClass{ public: void foo(int i);};
The foo() method can be called in the following way:
MyClass c;c.foo(123);c.foo(1.23);
In the third row, the compiler converts the double value (1.23) to integer value (0) and then calls foo(int i). The compiler may give a warning, but still perform the implicit transformation. Explicitly removing the double instance of foo() can prevent the compiler from performing this transformation.
class MyClass{ public: void foo(int i); void foo(double d) = delete;};
With this change, when foo() is called with double as a parameter, the compiler will give an error prompt instead of converting it to an integer.
- inline
Many C + + programmers understand the syntax of inline methods and use this syntax, but do not understand the results of marking methods as inline. Marking methods or functions as inline only prompts the compiler to inline functions or methods. The compiler will only inline the simplest methods and functions. If a method that the compiler does not want to inline is defined as an inline method, the compiler will automatically ignore this reference Before inlining methods or functions, modern compilers will consider indicators such as code expansion, so they will not inline any unprofitable methods.
Different data member types
C + + provides a variety of choices for data members. In addition to simply declaring data members in a class, you can also create static data members (shared by all objects of the class), static constant data members, reference data members, constant reference data members, and other members. This section explains these different types of data members.
Static data member
Sometimes it is unnecessary for all objects of a class to contain a copy of a variable. Data members may only be meaningful to the class, and it is inappropriate for each object to have its copy. For example, each Spreadsheet may need a unique digital ID, which requires a counter starting from 0, from which each object can get its own ID Counters do belong to the Spreadsheet class, but it is not necessary to make every Spreadsheet object contain a copy of this counter, because all counters must be kept synchronized. C + + solves this problem with static data members. Static data members belong to classes but not data members of objects. Static data members can be regarded as global variables of classes. The following is the Spreadsheet class , which contains the new static data member SCounter:
class Spreadsheet{ private: static size_t sCounter;};
Not only should static class members be listed in the class definition, but also memory should be allocated in the source file, usually the source file that defines class methods. Static members can also be initialized here, but note that unlike ordinary variables and data members, they will be initialized to 0 by default. Static pointers will be initialized to nullptr. The following is how to allocate space for SCounter and initialize Code starting with 0:
size_t Spreadsheet::sCounter;
Static data members are initialized to 0 by default, but they can be explicitly initialized to 0 if necessary, as shown below:
size_t Spreadsheet::sCounter = 0
This line of code is outside the function or method, which is very similar to declaring global variables, but uses the scope to resolve the Spreadsheet: it indicates that this is part of the Spreadsheet class.
- Inline variable
Starting with C++17, static data members can be declared as inline. The advantage of this is that they do not have to allocate space in the source file. Here is an example:
class Spreadsheet{ private: static inline size_t sCounter = 0;};
Note the inline keyword. With this class definition, you can delete the following code line from the source file;
size_t Spreadsheet::sCounter;
- Accessing static data members within class methods
Inside the class method, you can use static data members just like normal data members. For example, create an mld member for the Spreadsheet class and initialize it with the sSCounter member in the Spreadsheet constructor. Here is the Spreadsheet class definition containing the mld member:
class Spreadsheet
{
	public:
		size_t getId() const;
	private:
		static size_t sCounter;
		size_t mId = 0;
};
The following is the implementation of the Spreadsheet constructor. The initial ID is given here:
Spreadsheet::Spreadsheet(size_t width,size_t height)
	:mId(scounter++),mWidth(width),mHeight(height)
{
	mCells = new SpreadsheetCell*(mWidth);
	for(size_t i = 0;i < mWidth;i++)
	{
		mCells[i] = new SpreadsheetCell[mHeight];
	}
}
It can be seen that the constructor can access sCounter as if it were an ordinary member. In the copy constructor, you should also specify a new ID. because the Spreadsheet copy constructor delegates to the non copy constructor (a new ID will be created automatically) Therefore, this can be handled automatically. The ID should not be copied in the assignment operator. Once an ID is specified for an object, it should not be changed. It is recommended to set the mId as a const data member.
- Accessing static data members outside methods
The access control qualifier is applicable to static data members: sCounter is private, so it cannot be accessed outside the class method. If sCounter is public, it can be accessed outside the class method. Specifically, use the:: scope resolution operator to indicate that this variable is part of the Spreadsheet class:
int c = Spreadsheet::sCounter;
However, it is not recommended to use public data members (the exception is static constant data members discussed in section 9.4.2). Public get/set methods should be provided to grant access. If you want to access static data members, you should implement static get/set methods.
9.4.2 "static constant data members
The data member in a class can be declared const, which means that the value of the data member cannot be changed after creation and initialization. If a constant is only applicable to a class, a static constant (static const or const static) should be used Data members, not global constants. Static constant data members of integer and enumeration types can be defined and initialized in class definitions without specifying them as inline variables. For example, you may want to specify the maximum height and width of a Spreadsheet. If the user wants to create a Spreadsheet with a height or width greater than the maximum, use the maximum value instead. The maximum height can be And width are set to static const members of the Spreadsheet class:
class Spreadsheet
{
	public:
		static const size_t kMaxHeight = 100;
		static const size_t kMaxWidth = 100;
};
These new constants can be used in the constructor, as shown in the following code snippet:
Spreadsheet::Spreadsheet(size_t width,size_t height)
	:mId(sCounter++)
	,mWidth(std::min(width,kMaxWidth))
	,mHeigh(std::min(height,kMaxHeight))
{
	mCells = new SpreadsheetCell*[mWidth];
	for(size_t i =0;i < mWidth;i++)
	{
		mCells[i] = new SpreadsheetCell[mHeight];
	}
}
be careful;
When the height or width exceeds the maximum value, you can throw an exception in addition to automatically using the maximum height or width. However, when an exception is thrown in the constructor, the destructor is not called, so it needs to be handled with caution. This is explained in detail in Chapter 14.
kMaxHeight and kMaxWidth are public, so they can be accessed anywhere in the program as if they were global variables, but the syntax is slightly different. The scope resolution operator:: must be used to indicate that the variable is part of the Spreadsheet class:
cout<<"Maximum height is: "<<Spreadsheet::kNaxHeight<<endl;
These constants can also be used as default values for constructor parameters. Remember that you can only specify default values for a continuous set of parameters, starting with the rightmost parameter:
class Spreadsheet{ public: Spreadsheet(size_t width = kMaxWidth,size_t height = kMaxHeight);};
9.4.3 reference data members
Spreadsheets and SpreadsheetCells are good, but these two classes themselves do not make a very useful application. In order to control the whole Spreadsheet program with code, these two classes can be put together into the SpreadsheetApplication class. The implementation of this class is not important here. Now consider the problem with this architecture: how does a Spreadsheet communicate with an application? The application stores a set of spreadsheets, so it can communicate with spreadsheets. Similarly, each Spreadsheet should store references to application objects. The Spreadsheet class must know the SpreadsheetApplication class, and the SpreadsheetApplication class must also know the Spreadsheet class. This is a circular reference problem, which cannot be solved by ordinary #include. The solution is to use a pre declaration in one of the header files. The following is a new Spreadsheet class definition with pre declaration to inform the compiler about the SpreadsheetApplication class. Chapter 11 explains another advantage of pre declaration, which can shorten compilation and linking time.
class SpreadsheetApplication:
class Spreadsheet
{
	public:
		Spreadsheet(size_t width,size_t height,SpreadsheetApplication& theApp);
	private:
		SpreadsheetApplication& mTheApp;
};
This definition adds a SpreadsheetApplication reference as a data member. In this case, it is recommended to use a reference instead of a pointer, because spreadsheets always refer to a SpreadsheetApplication, which cannot be guaranteed by a pointer. Note that references to applications are stored only to demonstrate the use of references as data members. It is not recommended to combine Spreadsheet and SpreadsheetApplication classes in this way. Instead, use the MVC (model view controller) paradigm (see Chapter 4). In the constructor, each Spreadsheet gets an application reference. If you do not reference something, the reference cannot exist, so you must specify a value for mTheApp in the constructor's ctor initializer.
Spreadsheet::Spreadsheet(size_t width,size_t height,SpreadsheetApplication& theApp) :mId(sCounter++) ,mWidth(std::min(width,kMaxWidth)) ,mHeight(std::min(height,kMaxHeight)) ,mTheApp(theApp) { }
This reference member must also be initialized in the copy constructor. Since the Spreadsheet copy constructor delegates to the non copy constructor (initializing the reference member), this is handled automatically. Remember that after initializing a reference, the object it refers to cannot be changed, so it is impossible to assign a value to the reference in the assignment operator. This means that, depending on the use case, assignment operators may not be available for classes with reference data members. If this is the case, the assignment operator is usually marked deleted.
Constant reference data member
Just as a normal reference can reference a constant object, a reference member can also reference a constant object. For example, in order for the Spreadsheet to contain only constant references to application objects, you only need to declare mTheApp as a constant reference in the class definition:
class Spreadsheet{ public: Spreadsheet(size_t width,size_t height, const SpreadsheetApplication& theApp); private: const SpreadsheetApplication& mTheApp;}
There is an important difference between constant and non constant references. Constant reference SpreadsheetApplication data members can only be used to call constant methods on SpreadsheetApplication objects. If you try to call a non constant method through a constant reference, the compiler will report an error. You can also create static reference members or static constant reference members, but you generally do not need to do so.
Nested class
Class definitions can not only contain member functions and data members, but also write media sets and nested structures, declare typedef s, or create enumeration types. Everything declared in a class has a class scope. If the declared content is public, it can be accessed outside the class using ClassName:: scope resolution syntax. You can provide another class definition in the definition of a class. For example, suppose that the SpreadsheetCell class is actually part of the Spreadsheet class, so you might as well rename the SpreadsheetCell to Cell. Both can be defined as:
class Spreadsheet{ public: class Cell { public: Cell() = default; Cell(double initialValue); }; Spreadsheet(size_t width,size_t height,const SpreadsheetApplication& theApp);};
Now, the Cell class definition is located inside the Spreadsheet class, so the Cell referenced outside the Spreadsheet class must be named with the Spreadsheet:: scope, even when the method is defined. For example, the double constructor of Cell should be as follows;
Spreadsheet::Cell::Cell(double initialValue)
	:mValue(initialValue)
{

}
Even in the Spreadsheet class, the return type of a method (not a parameter) must use this syntax;
Spreadsheet::Cell& Spreadsheet::getCellAt(size_t x, size_t y)
{
	verifyCoordinate(x,y);
	return mCells[x][y];
}
If the nested Cell class is completely defined directly in the Spreadsheet class, the definition of the Spreadsheet class will be slightly swollen. To alleviate this, you only need to add a pre declaration for the Cell in the Spreadsheet, and then define the Cell class independently, as shown below:
class Spreadsheet
{
	public:
		class Cell;
		Spreadsheet(size_t width,size_t height,const SpreadsheetApplication* theApp);
};
class Spreadsheet::Cell
{
    public:
    	Cell() = default;
    	Cell(double initialValue);
};
Common access control also applies to nested class definitions. If a private or protected media set class is declared, this class can only be used in the peripheral class (outer class, that is, the class containing it). The class of the wind jacket has access to all private or protected members in the peripheral class; Outer classes can only access public members in nested classes.
Enumeration type within class
If you want to define many constants within a class, you should use enumeration types instead of a set of #define. For example, cell colors can be supported in the SpreadsheetCell class, as follows:
class SpreadsheetCell
{
	public:
		enum class Color{Red = 1,Green,Blue,Yellow};
		void setColor(Color color);
		Color getColor() const;
	private:
		Color mColor = Color::Red;
}
Operator overloading
It is often necessary to perform operations on objects, such as adding, comparing, inputting objects into or reading from files. For spreadsheets, only the ability to perform arithmetic operations, such as adding the entire row of cells, is really useful.
Example: adding for SpreadsheetCell
Overloading the operator + as a method
class SpreadsheetCell
{
	public:
		SpreadsheetCell operator+(const SpreadsheetCell& cell) const;
};
SpreadsheetCell SpreadsheetCell::operator+(const SpreadsheetCell& cell) const
{
    return SpreadsheetCell(getValue() + cell.getValue());
}
aThirdCell = myCell + 4;//Works fine
aThirdCell = myCell + 5.4;//Works fine
aThirdCell = 4 + myCell; //FAILS TO COMPILE!
aThirdCell = 5.6 + myCell; //FAILS TO COMPILE!
Third attempt: global operator+
SpreadsheetCell operator+(const SpreadsheetCell& lhs,const SpreadsheetCell& rhs)
{
	return SpreadsheetCell(lhs.getValue() + rhs.getValue());
}
Operator needs to be declared in header file:
SpreadsheetCell operator+(const SpreadsheetCell& lhs,const Spreadsheet& rhs);
In this way, the following four addition operations can run as expected
aThirdCell = myCell + 4;//Works fine
aThirdCell = myCell + 5.4;//Works fine
aThirdCell = 4 + myCell; //Works fine
aThirdCell = 5.6 + myCell; //Works fine
Create stable interfaces
Using interface classes and implementation classes
Even if estimates are made in advance and the best design principles are adopted, the C + + language is inherently unfriendly to abstract principles. Its syntax requires that the public interface and private (or protected) data members and methods be placed in a class definition, so as to disclose some internal implementation details of the class to customers. The disadvantage of this approach is that if new non-public methods or data members have to be added to the class, all customer code must be recompiled, which is a burden for larger projects.
The good news: you can create a clear interface and hide all implementation details to get a stable interface. Another bad news: it's a little complicated. The basic principle is to define two classes for each class you want to write: an interface class and an implementation class. The implementation class is the same as the written class (assuming that this method is not adopted). The interface class gives the same public method as the implementation class, but there is only one data member: a pointer to the implementation class object. This is called pimpl idiom(private implementation idiom) or bridge pattern. The implementation of interface class methods only calls the equivalent methods of implementation class objects. The result is that no matter how the implementation changes, it will not affect the public interface class, thus reducing the need for recompilation. When the implementation changes (only the implementation changes), customers using interface classes do not need to recompile. Note that this idiom is valid only if a single data member is a pointer to an implementation class. If it is a data member passed by value, the client code must be recompiled when the definition of the implementation class changes.
To apply this method to the Spreadsheet class, you need to define the following public interface class, Spreadsheet:
#include "SpreadsheetCell.h"
#include <memory>
class SpreadsheetApplication;
class Spreadsheet
{
	public:
    	Spreadsheet(const SpreadsheetApplication& theApp,size_t width = kMaxWidth,size_t height = kMaxHeight);
    	Spreadsheet(const Spreadsheet& src);
    	~Spreadsheet();

    	Spreadsheet& operator=(const Spreadsheet& rhs);
    	void setCellAt(size_t x,size_t y,const SpreadsheetCell& cell);
    	SpreadsheetCell& getCellAt(size_t x,size_t y);
    	size_t getId() const;
    	static const size_t kMaxHeight = 100;
    	static const size_t kMaxWidth = 100;

    	friend void swap(Spreadsheet& first,Spreadsheet& second) noexcept;
    private:
    	class Impl;
    	std::unique_ptr<Impl> mImpl;
};
The implementation class Impl is a private peak set class, because only Spreadsheet needs to know about this implementation class. The Spreadsheet now contains only one data member: a pointer to the Impl instance. The public method is the same as the old Spreadsheet. Nested Spreadsheet: the interface of Impl class is exactly the same as that of the original Spreadsheet class. However, since Impl is a private nested class of Spreadsheet, the following global friend function swap * () cannot be used, which exchanges two Spreadsheet::Impl objects;
friend void swap(Spreadsheet::Impl& first,Spreadsheet::Impl& second) noexcept;
Instead, define the private swap() method for the Spreadsheet::Impl class, as follows:
void swap(Impl& other) noexcept
The implementation is very simple, but remember that this is a nested class, so you need to specify Spreadsheet:Impl::swap(), not just Impl:swap(). The same is true for other members. For details, see the previous section on nested classes. Here is the swap () method:
void Spreadsheet::Impl::swap(Impl& other) noexcept{ using std::swap; swap(mWidth,other.mWidth); swap(mHeight,other.mHeight); swap(mCells,other.mCells);}
Note that the Spreadsheet class has a unique pointer to the implementation class_ PTR, the Spreadsheet class needs a user declared destructor. We do not need to process this destructor. We can set = default in the file, as shown below:
Spreadsheet::~Spreadsheet() = default;
This shows that = default can be set not only in the class definition, but also in the implementation file for special member functions. The implementation of Spreadsheet methods (such as setCellAt() and getCellAt()) only passes the request to the underlying Impl object:
void Spreadsheet::setCellAt(size_t x,size_t y,const SpreadsheetCell& cell){ mImpl->setCellAt(x,y,cell);}SpreadsheetCell& Spreadsheet::getCellAt(size_t x,size_t y){ return mImpl->getCellAt(x,y);}
The Spreadsheet constructor must create a new Impl instance to accomplish this task.
Spreadsheet::Spreadsheet(const SpreadsheetApplication& theApp,size_t width,size_t height){ mImpl = std::make_unique<Impl>(theApp,width,height);}Spreadsheet::Spreadsheet(const Spreadsheet& src){ mImpl = std::make_unique<Impl>(&src.Impl);}
The copy constructor looks a little strange because you need to copy the underlying Impl from the source Spreadsheet. Since the copy constructor takes a reference to Impl instead of a pointer, in order to get the object itself, you must dereference the mpipl pointer so that the constructor can use its reference as a parameter. The Spreadsheet assignment operator must pass the value to the underlying Impl in a similar way:
Spreadsheet& Spreadsheet::operator=(const Spreadsheet& rhs){ *mImpl = *rhs.mImpl; return *this;}
The technology that really separates the interface from the implementation is powerful. Although it's a little clumsy at first, once you get used to this technology, you feel it's natural to do so. However, this is not a routine practice in most work environments, so doing so will encounter some resistance from colleagues. The most powerful argument supporting this approach is not the beauty of separating interfaces, but the significant reduction in construction time after the change of class implementation. When a class does not use pimpl idiom, changes to the implementation class will trigger a long construction process. For example, adding data members to a class definition will trigger the reconstruction of all other source files (including class definitions); Using pimpl idiom, you can modify the definition of the implementation class. As long as the public interface class remains unchanged, it will not trigger a long construction process.
Using stable interface classes can shorten the construction time.
In order to separate the implementation from the interface, another method is to use the abstract interface and the implementation class that implements the interface; An abstract interface is an interface with only pure virtual methods. Chapter 10 discusses abstract interfaces.
Extension class
When writing a class definition in C + +, you can tell the compiler that the class inherits (or extends) an existing class. In this way, the class will automatically contain the data members and methods of the original class, which is called parent class, Base class or superclass. Extending an existing class can make the class (now called a Derived class or subclass) describe only the part different from the parent class. In C + +, to extend a class, you can specify the class to be extended when defining the class. To illustrate the syntax of inheritance, classes named Base and Derived are used here. Don't worry, there are many more interesting examples. First consider the definition of Base class:
class Base
{
	public:
		void someMethod();
	protected:
		int mPrectectedInt;
	private:
		int mPrivateInt;
};
If you want to build a new class Derived that inherits from the Base class, you should tell the compiler that the Derived class derives from the Base class using the following syntax:
class Derived : public Base{ public: void someOtherMethod();};
\1. Customers' views on inheritance
For customers or other parts of the code, an object of type Derived is still a Base object because the Derived class inherits from the Base class. This means that all public methods and data members of the Base class and all public methods and data members of the Derived class are available. When calling a method, the code using the Derived class does not need to know which class in the inheritance chain defines the method. For example, the following code calls two methods of the Derived object, one of which is defined in the Base class:
Derived myDerived;myDerived.someMethod();myDerived.someOtherMethod();
It is important to know that inheritance works in one direction. The Derived class has an explicit relationship with the Base class, but the Base class does not know any information about the Derived class. This means that objects of type Base do not support the public methods and data members of the Derived class because the Base class is not a Derived class. The following code will not compile because the Base class does not contain a public method named someOtherMethod():
Base myBase;myBase.someOtherMethod();//Error
A pointer or reference to an object can point to the object that declares the class or to the object of any of its Derived classes. This flexible topic will be described in detail later in this chapter. At this time, we need to understand the concept that the pointer to the Base object can point to the Derived object, and the same is true for references. Customers can still only access the methods and data members of the Base class, but through this mechanism, any code that operates on the Base object can operate on the Derived object.
For example, the following code can be compiled and run normally, although it seems that the types do not match;
Base* base = new Derived(); //Create Derived,store it in base pointer
However, the method of the Derived class cannot be called through the Base pointer. The following code cannot be run:
base->someOtherMethod();
The compiler will report an error because although the object is of Derived type and the someOtherMethod() method is defined, the compiler only regards it as the Base type, and the Base type does not define the someOtherMethod() method.
\2. Analyze inheritance from the perspective of derived classes
For the Derived class itself, its writing or behavior has not changed. You can still define methods and data members in Derived classes, just as this is an ordinary class. The previous definition of Derived class declares a method named someOtherMethod(0). Therefore, Derived class adds an additional method to extend Base class.
Derived classes can access the public and protected methods and data members declared in the Base class as if they were the derived class's own, because technically, they belong to the derived class. For example, the implementation of someOtherMethod(O) in the derived class can use the data member mProtectedInt declared in the Base class. The following code shows this implementation. Accessing data members and methods in the Base class is no different from accessing data members and methods in the derived class.
void Derived::someOtherMethod(){ cout<<"I can access base class data member mProtectedInt "<<endl; cout<<"Its value is "<<mProtectedInt<<endl;}
When Chapter 8 introduces access specifiers (public, private, and protected), the difference between private and protected can be confusing. Now that you understand derived classes, the difference becomes clearer. If the class declares data members and methods protected, derived classes can access them; If declared private, the derived class cannot be accessed.
The following someOtherMethod() implementation will not compile because a derived class attempts to access a private data member of the base class:
void Derived::someOtherMethod()
{
	cout<<"I can access base class data member mProtectedInt "<<endl;
	cout<<"Its value is "<<mProtectedInt<<endl;
	cout<<"The value of mPrivateInt is "<<mPrivateInt<<endl;//Error;
}
The private access descriptor controls how derived classes interact with base classes. It is recommended that all data members be declared private by default. If you want any code to access these data members, you can provide public fetchers and setters. If you only want derived classes to access them, you can provide protected getters and setters. The reason for setting data members to private by default is that this provides the highest level of encapsulation, which means that the representation of data can be changed, while the public or protected interfaces remain unchanged. Instead of directly accessing data members, you can easily add checks on input data in public or protected setters. Methods should also be set to private by default. Only methods that need to be exposed should be set to public, and only methods that need to be accessed by derived classes should be set to protected.
-3. Disable inheritance
C + + people allow classes to be marked final, which means that inheriting this class will lead to compilation errors. The way to mark a class as final is to use the final keyword directly after the class name. For example, the following Base class is marked final;
class Base final
{

};
The Derived class below attempts to inherit from the Base class, but this causes a compilation error because the Base class is marked final.
class Derived : public Base
{

};
\1. Set all methods to virtual, just in case
In C + +, overriding methods is a bit awkward because the keyword virtual must be used. Only methods declared as virtual in the Base class can be properly overridden by derived classes. The virtual keyword appears at the beginning of the method declaration, and the modified version of the Base class is displayed below,
class Base{ public: virtual void someMethod(); protected: int mProtectedInt; private: int mPrivateInt;};
The virtual keyword has some subtleties and is often used as a poorly designed part of the language. Experience has shown that it is best to set all methods to virtual. In this way, you don't have to worry about whether the rewriting method can run. The only disadvantage of doing so is that it has a slight impact on performance. The virtual keyword will run through this chapter. See "5. The truth of virtual" later. Even if the Derived class is unlikely to extend, it is best to set the method of this class to virtual just in case.
class Derived : public Base
{
	public:
		virtual void someOtherMethod();
};
According to experience, in order to avoid problems caused by missing the virtual keyword, all methods can be set to virtual (including destructors, but excluding construction grandchildren). Note that the destructor number generated by the compiler is not virtuall
\2. Syntax of rewriting method
In order to override a method, you need to redeclare the method in the definition of the derived class, as declared in the Base class, and provide a new definition in the implementation file of the derived class. For example, the Base class contains a someMethod() method. The definitions of the someMethod() method provided in Base.cpp are as follows:
void Base::someMethod()
{
	cout<<"This is Base's version of someMethod "<<endl;
}
Note that there is no need to reuse the virtual keyword in the method definition. If you want to provide a new definition of someMethod() in the Derived class, you should first add this method to the Derived class definition, as shown below:
class Derived : public Base
{
	public:
		virtual void someMethod() override;
		virtual void someOtherMethod();
};
It is recommended to add the override keyword at the end of the override method declaration. For the override keyword, see later in this chapter. The new definition of someMethod() method is given in Derived.cpp together with other methods of Derived class;
void Derived::someMethod()
{
	cout<<"This is Derived's version of someMethod() "<<endl;
}
Once methods or destructors are marked as virtual, they will always be virtual in all Derived classes, even if the virtual keyword is deleted in the Derived class. For example, in the Derived class below, someMethod() is still virtual and can be overridden by Derived classes because it is marked virtual in the Base class.
class Derived : public Base
{
	public:
		void someMethod() override;
};
Customer views on rewriting methods
After the previous changes, other code can still call someMethod(0) with the previous method, and this method can be called with the object of Base or Derived class. Now, however, the behavior of somemethod () will vary depending on the class to which the object belongs. For example, the following code can be run as before, calling someMethod() of Base version:
Base myBase;myBase.someMethod();//Calls Base's version of someMethod();
The output of this code is:
This is Base's Version of someMethod () .
If a Derived class object is declared, somemethod0 of the Derived class version will be called automatically:
Derived myDerived;myDerived.someMethod(); //Calls Derived's version of someMethod()
The output of this code is:
This is Derived's version of someMethod()
Other aspects of the Derived class object remain unchanged. Other methods inherited from the Base class still maintain the definitions provided by the Base class unless they are explicitly overridden in the Derived class.
As mentioned earlier, a pointer or reference can point to an object of a class or its Derived class. The object itself "knows" the class it belongs to, so as long as this method is declared as virtual, the corresponding method will be called automatically. For example, if a reference to a Base object actually refers to a Derived object, calling someMethod() will actually call the Derived class version, as shown below. If the virtual keyword is omitted from the Base class, the rewriting function will not work correctly.
Derived myDerived;
Base& ref = myDerived;
ref.someMethod(); //Calls Derived's version of someMethod();
Remember, even if the reference or pointer to the Base class knows that this is actually a derived class, it cannot access derived class methods or members that are not defined in the Base class. The following code cannot be compiled because the Base reference does not have a someOtherMethod() method:
Derived myDerived;Base& ref = myDerived;MyDerived.someOtherMethod(); //This is fineref.someOtherMethod(); //Error
. Non pointer or non reference objects cannot properly handle the characteristic information of Derived classes. You can convert a Derived object to a Base object or assign a Derived object to a Base object because the Derived object is also a Base object. However, this object will lose all the information of the Derived class:
Derived myDerived;Base assignedObject = myDerived; //Assigns a Derived to a BaseassignedObject.someMethod(); //Calls Base's version of someMethod()
To remember this seemingly strange behavior, consider the state of the object in memory. Treat the Base object as a box occupying a piece of memory. The Derived object is a slightly larger box because it has everything about the Base object and adds a little content. This box does not change for references or pointers to Derived objects - it's just accessible in a new way. However, if a Derived object is converted to a Base object, all the "unique features" of the Derived class will be thrown away in order to accommodate a smaller box.
be careful:
When a pointer or reference to a base class points to a derived class object, the derived class retains its override method. However, when a derived class object is converted to a base class object through type conversion, its unique characteristics will be lost. The loss of data from overridden methods and derived classes is called slicing
override keyword
Sometimes, you may accidentally create a new virtual method instead of overriding the method of the Base class. Consider the following Base and Derived classes, where the Derived class correctly overrides someMethod(), but does not use the override keyword:
class Base
{
	public:
		virtual void someMethod(double d);
};
class Derived : public Base
{
	public:
		virtual void someMethod(double d);
};
someMethod0) can be called by reference as follows:
Derived myDerived;
Base& ref = myDerived;
ref.someMethod(1.01);//Calls Derived's version of someMethod();
The above code can correctly call someMethod0 overridden by the Derived class. Now suppose that when you rewrite someMethod(), you use an integer (not a double) as a parameter, as follows:
class Derived : public Base
{
	public:
		virtual void someMethod(int i);
};
Instead of overriding someMethod() of the Base class, this code creates a new virtual method. If you try to call someMethod0) by reference as in the following code, you will call someMethod() of the Base class instead of the method defined in the Derived class.
Derived myDerived;
Base& ref = myDerived;
ref.someMethod(1.1); //Calls Base's version of someMethod()
This can happen if you modify the Base class but forget to update all Derived classes. For example, perhaps the first version of the Base class has a someMethod() method with an integer as a parameter. Then the someMethod() method is overridden in the Derived class, still taking an integer as a parameter. Later, it was found that the someMethod() method in the Base class needs a double rather than an integer, so the someMethod() in the Base class was updated. At this point, you may forget to update someMethod() in Derived classes to receive doubles instead of integers. Forgetting this, you actually create a new virtual method instead of rewriting it correctly. The override keyword can be used to avoid this, as follows:
class Derived : public Base
{
	public:
		virtual void someMethod(int i) override;
};
The definition of Derived class will cause compilation errors because the override keyword indicates that the someMethod() method of Base class is overridden, but the someMethod() method of Base class only receives double precision numbers, not integers. When renaming a method in the Base class but forgetting to rename the overriding method in the Derived class, the above problem of "accidentally creating a new method instead of correctly overriding the method" will occur.
Note: to override a base class method, always use the override keyword on the method.
Hide instead of overwrite
The following code shows a base class and a derived class, each with a method. A derived class attempts to override a method of a base class, but the method is not declared virtual in the base class.
class Base
{
	public:
		void go(){cout<<"go() called on Base"<<endl;}
};

class Derived : public Base
{
	public:
		void go() { cout<< "go() called on Derived"<<endl; }
};
There seems to be no problem trying to call the go() method with the Derived object.
Derived myDerived;
myDerived.go();
As expected, the result of this call is "go0 called on Derived". However, since this method is not virtual, it has not actually been rewritten. On the contrary, the Derived class creates a new method named go(), which has nothing to do with the go() method of the Base class. To verify this, simply call this method with a Base pointer or reference:
Derived myDerived;
Base& ref = myDerived;
ref.go();
You may want the output to be "go() called on Derived", but in fact, the output is "go() called on Base". This is because the ref variable is a Base reference and the virtual keyword is omitted. When the go() method is called, only the go() method of the Base class is executed. Since it is not a virtual method, it does not need to consider whether the derived class overrides this method.
Warning:
An attempt to override a non virtual method will "hide" the method defined by the base class, and the overridden method can only be used in a derived class environment.
How to implement virtual
To understand how to avoid hidden methods, you need to understand the real role of the virtual keyword. When C + + compiles a class, it creates a binary object containing all the methods in the class. In the non virtual case, the code that gives control to the correct method is hard coded, and the method will be called according to the type at compile time. This is called static binding, or early binding.
If the method is declared virtual, the correct implementation is called using a specific memory area called a virtual table (vtable). Each class with one or more virtual methods has a virtual table. Each object of this kind contains a pointer to the virtual table, which contains a pointer to the implementation of the virtual method. In this way, when a method is called with an object, the pointer also enters the virtual table, and then executes the correct version of the method according to the actual object type. This is called dynamic binding or late binding. To better understand how virtual tables implement method rewriting, consider the following Base and Derived classes:
class Base
{
	public:
		virtual void func1(){}
		virtual void func2(){}
		void nonVirtualFunc(){}
};
class Derived : public Base
{
	public:
		virtual void func2() override{}
		void nonVirtualFunc(){}
};
For this example, consider the following two examples;
Base myBase;
Derived myDerived;
Figure 10-4 shows a high-level view of the two instance virtual tables. The myBase object contains a pointer to the virtual table. The virtual table has two items: fun1() and func2(). These two items point to the implementation of Base::func1() and Base::func2().
[external chain picture transferring... (IMG ehonmahb-1632236813909)]
myDerived also contains a pointer to the virtual table, which also contains two items, one is func1() and the other is func2(). The func1 entry of the myDerived virtual table points to Base::func1 because the Derived class does not override f; But the func2 () entry of the myDerived virtual table points to
Reasons for using virtual
It was suggested that all methods should be declared as virtual. In that case, why use the virtual keyword? Can't the compiler automatically declare all methods as virtual? The answer is yes. Many people think that the C + + language should declare all methods as virtual, which is what the Java language does. The debate about the ubiquitous use of virtual, and the reason why the keyword was created first, is related to the overhead of virtual tables. To call a virtual method, the program needs to perform an additional operation, that is, to deapply the pointer to the appropriate code to be executed. In most cases, this will slightly affect performance, but C + + designers believe that it is best to let programmers decide whether it is necessary to affect performance. If a method is never rewritten, there is no need to declare it virtual, which affects performance. However, for today's CPUs, the impact on performance can be measured in billionths of a second, and future CPUs will further shorten the time. In most applications, the performance difference between using virtual methods and not using virtual methods is not noticeable, so you should follow the recommendation to declare all methods as virtual, including destructors.
However, in some cases, the performance overhead is not small and needs to be avoided. For example, suppose the Point class has a virtual method. If another data structure stores millions or even billions of Point objects, calling virtual methods on each Point object will bring great overhead. At this Point, it is best to avoid using virtual methods in the Point class. Virtual also has a slight impact on memory usage per object. In addition to the implementation of the method, each object also needs a pointer to the virtual table, which will take up a little space. In most cases, this is not a problem. But sometimes not. Look at the Point class and the container that stores millions of Point objects. At this Point, the incidental memory overhead will be large.
Requirements for virtual destructors
Even programmers who think that not all methods should be declared virtual insist that destructors should be declared virtual. The reason is that if the destructor is not declared virtual, it is easy to destroy an object without freeing memory. The only exception that allows destructors not to be declared virtual is when the class is marked final.
For example, the memory used by the derived class is dynamically allocated in the constructor and released in the destructor. If the destructor is not called, this memory cannot be released. Similarly, if a derived class has some members that are automatically deleted when the instance of the class is destroyed, such as std::unique ptrs, these members will not be deleted if the destructor has never been called. As shown in the following code, if the destructor is not virtual, it is easy to trick the compiler into ignoring the call of the destructor. As shown in the following code, if the destructor is not virtual, it is easy to trick the compiler into ignoring the call of the destructor.
class Base
{
	public:
		Base(){}
		~Base(){}
};
class Derived:public Base
{
	public:
		Derived()
		{
			mString = new char[30];
			cout<<"mString allocated"<<endl;
		}
		~Derived()
		{
			delete[]mString;
			cout<<"mString deallocated "<<endl;
		}
    private:
};
int main()
{
    Base* ptr = new Derived();
    delete ptr;
    return 0;
}
As can be seen from the output, the destructor of the Derived object has never been called:
mString allocated
In fact, in the above code, the behavior of the delete call is not defined in the standard. In such an ambiguous situation, the C + + compiler will do anything at will, but most compilers only call the destructor of the base class, not the destructor of the derived class.
be careful:
If you do nothing in the destructor and just want to set it to virtual, you can explicitly set "= default", for example:
class Base
{
	public:
		virtual ~Base() = default;
}
As described in Chapter 8, note that starting from C++1l, if the class has a user declared destructor, it is not allowed to generate copy constructors and copy assignment operators. In such cases, if you still need the compiler generated copy constructor or copy assignment operator, you can explicitly set them as the default. For brevity, this example in this chapter does not do so.
Attention;
Unless there is a special reason or the class is marked final, it is strongly recommended that all methods (including destructors, except constructors) be declared virtual. Constructors are not required and cannot be declared virtual because classes are always explicitly specified when creating objects.
\6. Disable override
C + + people allow methods to be marked final, which means that this method cannot be overridden in derived classes. Attempting to override the final() method will result in a compilation error. Consider the following Base classes:
class Base
{
	public:
		virtual ~Base() = default;
		virtual void someMethod() final;
};
Overriding someMethod() in the Derived class below will cause a compilation error because someMethod() is marked final in the Base class.
class Derived : public Base{ public: virtual void someMethod() override;//Error};
10.2 "reuse code using inheritance
After you are familiar with the basic syntax of inheritance, the following explains why inheritance is an important feature in C + + language. Inheritance is a tool to use existing code. This section gives the actual program to reuse code using inheritance. Suppose you want to write a simple weather forecast program, giving both Fahrenheit and Celsius temperatures. Weather forecasting may be beyond the programmer's research field, so programmers can use a third-party class library to predict the weather based on the current temperature and the distance between Mars and Jupiter (is this strange? No, it makes sense). In order to protect the intellectual property rights of the prediction algorithm, the third-party package is distributed as a compiled library, but the class definition can be seen. The WeatherPrediction class is defined as follows:
// Predicts the weather using proven new-age techniques given the current
// temperature and the distance from Jupiter to Mars. If these values are
// not provided, a guess is still given but it's only 99% accurate.
class WeatherPrediction
{
public:
// Virtual destructor
virtual ~WeatherPrediction();
// Sets the current temperature in Fahrenheit
virtual void setCurrentTempFahrenheit(int temp);
// Sets the current distance between Jupiter and Mars
virtual void setPositionOfJupiter(int distanceFromMars);
// Gets the prediction for tomorrow's temperature
virtual int getTomorrowTempFahrenheit() const;
// Gets the probability of rain tomorrow. 1 means
// definite rain. 0 means no chance of rain.
virtual double getChanceOfRain() const;
// Displays the result to the user in this format:
// Result: x.xx chance. Temp. xx
virtual void showResult() const;
// Returns a string representation of the temperature
virtual std::string getTemperature() const;
private:
int mCurrentTempFahrenheit;
int mDistanceFromMars;
};
Note that this class marks all methods as virtual because it assumes that these methods may be overridden in derived classes. This class solves most problems. However, as in most cases, it does not fully match the needs of the program. First, all temperatures are given in Fahrenheit, and the program also needs to deal with Celsius. Second, the result of the showResult() method may not be displayed in the way the program wants.
Add functionality to derived classes
When Chapter 5 talks about inheritance, the first skill described is to add functionality. Basically, the program needs a class similar to WeatherPrediction, and some ancillary functions need to be added. Reusing code using inheritance sounds like a good idea. First, define a new class MyWeatherPrediction, which inherits from the WeatherPrediction class:
#include "WeatherPrediction.h"
class MyWeatherPrediction : public WeatherPrediction
{

};
The previous class definition can be compiled successfully. The MyWeatherPrediction class can already replace the WeatherPrediction class. This class provides the same functionality, but no new functionality. When you begin to modify, you should add the information of Celsius temperature to the class. There's a little problem here because I don't know what's going on inside this class. If all internal calculations use Fahrenheit temperature, how to add support for Celsius temperature? One way is to use a derived class as an intermediate interface between the user (who can use both temperatures) and the base class (who only understands Fahrenheit). The first step in supporting Celsius temperature is to add a new method to allow customers to set the current temperature with Celsius temperature instead of Fahrenheit temperature, so as to obtain the weather forecast expressed in Celsius temperature instead of Fahrenheit temperature tomorrow. There is also a need for proprietary auxiliary methods that include conversion between Celsius and Fahrenheit. These methods can be static because they are the same for all instances of the class.
#include "WeatherPrediction.h"
class MyWeatherPrediction : public WeatherPrediction
{
	public:
		virtual void setCurrentTempCelsius(int temp);
		virtual int getTomorrorTempCelsius() const;
	private:
		static int convertCelsiusToFahrenheit(int celsius);
		static int convertFahrenheiToCelsius(int fahrenheit);
}
The new method follows the same naming convention as the parent class. Remember, from the perspective of other code, the MyWeatherPrediction object has all the functions defined by the MyWeatherPrediction and WeatherPrediction classes. The naming convention of parent class can provide a consistent interface. We leave the implementation of the oscillator / Fahrenheit temperature conversion method to the reader as an exercise - it's a pleasure. The other two methods are more interesting. In order to set the current temperature in Celsius, you first need to convert the temperature, and then pass it to the parent in units that the parent can understand.
void MyWeatherPrediction:setCurrentTempCelsius(int temp)
{
	int fahrenheitTemp = convertCelsiusToFahrenheit(temp);
	setCurrentTempFahrenheit(fahrenheitTemp);
}
It can be seen that after the temperature conversion, this method calls the existing functions in the base class. Similarly, the implementation of getTomorrowTempCelsius() uses the existing function of the parent class to obtain the Fahrenheit temperature, but converts it to Celsius before returning the result.
int MyWeatherPrediction::getTomorrowTempCeisius() const;
{
	int fahrenheitTemp = getTomorrowTempFahrenheit();
	return convertFahrenheitToCelsius(fahrenheitTemp);
}
Both of these new methods effectively reuse the parent class because they "encapsulate" the existing functions of the class in some way and provide new interfaces to use these functions. You can also add new functions independent of the existing functions of the parent class. For example, you can add a method to get other weather forecasts from Internet, or add a method to give recommended activities based on weather forecasts.
Replace functions in derived classes
Another major technique related to derived classes is to replace existing functions. The showResult() method in the WeatherPrediction class needs to be modified urgently. The MyWeatherPrediction class can override this method to replace the behavior in the original implementation. The new MyWeatherPrediction class is defined as follows:
class MyWeatherPrediction : public WeatherPrediction
{
	public:
		virtual void setCurrentTempCelsius(int temp);
		virtual int getTomorrowTempCelsius() const;
		virtual void showResult() const override;
	private:
		static int convertCelsiusToFahrenheit(int celsius);
		static int convertFahrenheitToCelsius(int fahrenheit);
};
Use parent class
When writing a derived class, you need to know how the parent and derived classes interact. Creation order, constructor chain, and type conversion are all potential bug s
Parent class constructor
Objects are not created suddenly. When creating an object, you must create both the parent class and the object contained in it. C + + defines the following creation order:
(1) If a class has a base class, the default constructor of the base class is executed. Unless you call the base class constructor in ctor-initializer, you call this constructor instead of the default constructor at this time.
(2) The non static data members of the class are created in the declared order.
(3) Execute the constructor of this class.
These rules can be used recursively. If the class has a grandfather class, the grandfather class is initialized before the parent class, and so on. The following code shows the creation order. It is generally recommended not to implement methods directly in class definitions, as shown in the following code. To make the example concise and easy to read, we violated our own rules. When the code executes correctly, the output is 123.
class Something
{
	public:
		Something(){cout<<"2";}
};
class Base
{
	public:
		Base() {cout<<"1";}
};
class Derived : public Base
{
	public:
		Derived(){cout<<"3";}
	private:
		Something mDataMember;
};
int main()
{
	Derived myDerived;
	return 0;
}
When creating the myDerived object, first call the Base constructor and output the string "1". Then, initialize mDataMember, call Something constructor, and output string "2". Finally, call the Derived constructor and export "3". Note that the Base constructor is called automatically. C + + will automatically call the default constructor of the parent class (if any). If the default constructor of the parent class does not exist, or there is a default constructor, but you want to use another constructor, you can link the constructor in the constructor initializer like initializing a data member. For example, the following code shows the Base version without a default constructor. The relevant version of derived must explicitly tell the compiler how to call the Base constructor, otherwise the code will not compile.
class Base
{
	public:
		Base(int i);
};

class Derived : public Base
{
	public:
		Derived();
};
Drived::Derived():Base(7)
{

}
In the previous code, the Derived constructor passed a fixed value to the Base constructor (7). If the Derived constructor requires a parameter, you can also pass a variable:
Derived::Derived(int i) : Base(i) {}
It's normal to pass constructor parameters from a derived class to a base class, but you can't pass data members. If you do, the code can be compiled, but remember that the data members are not initialized until the base class constructor is called. If you pass a data member as a parameter to the parent constructor, the data member is not initialized.
Warning:
The behavior of the virtual method is different in the constructor. If the derived class rewrites the virtual method in the base class and calls the virtual method from the base class constructor, it will invoke the base class implementation of the virtual method instead of the reversion version in the derived class.
Destructor of parent class
Since the destructor has no parameters, the destructor of the parent class can always be called automatically. Destructors are called in the reverse order of constructors
(1) Call the destructor of the class.
(2) Destroy the data members of the class in the reverse order of creation.
(3) If there is a parent class, call the destructor of the parent class.
These rules can also be used recursively. The lowest member of the chain is always the first to be destroyed. The following code adds a destructor to the previous example. It is important that all destructors are declared virtual, which will be discussed later in this example. When executed, the code will output "123321".
class Something
{
	public:
		Something(){cout<<"2";}
		virtual ~Something(){cout<<"2";}
};

class Base
{
	public:
		Base(){cout<<"1";}
		virtual ~Base(){cout<<"1";}
};

class Derived : public Base
{
	public:
		Derived(){cout<<"3";}
		virtual ~Derived(){cout<<"3";}
	private:
		Something mDataMember;
};
Even if the previous destructor is not declared virtual, the code can continue to run. However, if the code uses delete to delete a Base class pointer that actually points to a Derived class, the destructor call chain will be broken. For example, the following code is similar to the previous example, but the destructor is not virtual. A problem occurs when a pointer to the Base object is used to access the Derived object and delete the object.
Base* ptr = new Derived();
delete ptr;
The output of the code is very short, which is "1231". When the ptr variable is deleted, only the Base destructor is called because the destructor is not declared virtual. The result is that neither the derived destructor nor the destructor of its data member is called. From a technical point of view, declaring the Base destructor virtual corrects the above problem. Derived classes will be "virtualized" automatically. However, it is recommended to explicitly declare all destructors as virtual, so you don't have to worry about this problem.
Warning:
Declare all destructors as virtual! The default destructor generated by the compiler is not virtual, so you should define your own (or explicitly set it as the default) destructor, at least in the parent class.
Warning:
Like the constructor, the virtual method will behave differently when the virtual method is called in the destructor. If the derived class rewrites the virtual method in the base class, invoking the method in the destructor of the base class will execute the base class implementation of the method instead of the reversion version of the derived class.
Use parent method
When overriding a method in a derived class, it will effectively replace the original method. However, the parent version of the method still exists and these methods can still be used. For example, an overriding method may complete some tasks in addition to those completed by the parent implementation. Consider getTemperature() in the WeatherPrediction class Method, which returns a string representation of the current temperature:
class WeatherPrediction
{
	public:
		virtual std::string getTemperature() const;
};
In the MyWeatherPrediction class, you can override this method as follows:
class MyWeatherPrediction:public WeatherPrediction
{
	public:
		virtual std::string getTemperature() const override;
}
Suppose that the derived class needs to call the getTemperature() method of the base class first, and then add "F" to the string. For this purpose, write the following code;
string MyWeatherPrediction::getTemperature() const
{
	return getTemperature() + "\u00B0F"; //BUG
}
However, the above code cannot be run. According to the name resolution rule of C++, the local scope is first parsed and then the class scope. In this order, the function calls MyWeatherPrediction::getTemperature(). The result is infinite recursion until the stack space is consumed (some compilers will find this error and report error when compile).
In order for the code to run, you need to use the scope resolution operator, as shown below:
string MyWeatherPrediction::getTemperature() const
{
	return WeatherPrediction::getTemperature() + "\u00B0F";
}
In C++, calling the parent version of the current method is a common operation. If there is a derived class chain, each derived class may want to perform the operations already defined in the base class and add its own additional functions. Another example is the class hierarchy of the book type. Figure 10-5 shows this hierarchy. The way to get the first mock exam information in a book is actually to consider all levels in the hierarchy. For this reason, the parent class method can be invoked continuously. The following code demonstrates this pattern:
class Book
{
	public:
		virtual ~Book() = default;
		virtual string getDescription() const { return "book"; }
		virtual int getHeight() const { return 120; }
};
class Paperback:public Book
{
	public:
		virtual string getDescription() const override
		{
			return "Paperback "+Book::getDescription();
		}
};
class Romance : public Paperback
{
	public:
		virtual string getDescription() const override
		{
			return "Romance "+ Paperback::getDescription();
		}
		virtual int getHeight() const override
		{
			return Paperback::getHeight() / 2;
		}
};
class Techical : public Book
{
	public:
		virtual string getDescription( ) const override
		{
			return "Technical "+ Book::getDescription();
		}
};

int main()
{
    Romance novel;
    Book book;
    cout << novel.getDescription() << endl;
    cout << book.getDescription() << endl;
    cout << novel.getHeight() << endl;
    cout << book.getHeight() << endl;
	return 0;
}
The Book base class has two virtual methods: getDescription() and getHeight (). All derived classes override getDescription(). Only the Romance class overrides getHeight () by calling getHeight () of the parent class (Paperback), and then dividing the result by 2. The paperback class does not override getHeight (), so C + + will look up along the class hierarchy to implement getHeight () In this example, Paperback::getHeight() will resolve to Book::getHeight().
Upward and downward transformation
As mentioned earlier, an object can be converted to a parent object or assigned to a parent class. If the type conversion or assignment is performed on an ordinary object, truncation will occur
Base myBase = myDerived;
In this case, truncation will occur because the assignment result is a Base object, which lacks the additional functions defined in the Derived class. However, if a Derived class is used to assign a pointer or reference to the Base class, truncation will not occur:
Bases myBase = myDerived; // No slicingl!
This is the correct way to use derived classes through the base class, also known as upcasting. This is also why methods and functions use class references rather than class objects directly. When using references, derived classes are not truncated when passing.
Warning:
When transitioning up, use base class pointers or references to avoid truncation.
Converting a base class to its derived class is also called downcasting. Professional C + + programmers usually disapprove of this conversion because there is no guarantee that the object actually belongs to a derived class, and because downcasting is a bad design. For example, consider the following code;
void presumptuous(Base* base)
{
	Derived* myDerived = static_cast<Derived*>(base);
}
If the author of presumptuous() also wrote code to call presumptuous(), then everything might be normal, because the author knew that this function needed parameters of type Derived *. However, if other programmers called presumptuous() , they may pass Base *. Compile time detection cannot force the parameter type, so the function blindly assumes that inBase is actually a pointer to the Derived object.
Downward transformation is sometimes necessary and can be fully utilized in a controlled environment. However, if you intend to make downward transformation, you should use dynamic cast() to use the object's built-in type information and reject meaningless type transformation. This built-in information usually resides in a virtual table, which means dynamic_cast() It can only be used for objects with virtual tables, that is, objects with at least one virtual number. If dynamic_cast() for a pointer fails, the value of the pointer is nullptr, not pointing to some meaningless data. If dynamic_cast() for an object reference fails If it fails, an std::bad_cast exception will be thrown. Chapter 11 will discuss type conversion in detail. The previous example should be written as follows:
void lessPresumptuous(Base* base)
{
	Derived* myDerived = dynamic_cast<Derived*>(base);
    if(myDerived != nullptr)
    {

    }
}
Downward transformation is usually a sign of poor design. You should reflect and modify the design to avoid downward transformation. For example, lesspropumptuous() The function can only be used for Derived objects, so it should not receive the Base pointer, but the Derived pointer. This eliminates the need for downward transformation. If the function is used for different Derived classes inherited from Base, consider the solution of using polymorphism, as described below.
Warning;
Use downward transformation only if necessary, and be sure to use dynamic_cast().
Inheritance and polymorphism
After understanding the relationship between derived classes and parent classes, you can use inheritance polymorphism in the most powerful way. Chapter 5 said that polymorphism can interchangeably use objects with common parents and replace parent objects with objects.
Back to spreadsheet
Chapters 8 and 9 use spreadsheet programs as examples to illustrate object-oriented design. SpreadsheetCell represents a data element. Previously, this element always stores a single double precision value. A simplified SpreadsheetCell class definition is given below. Note that cells can be double precision values or strings, but the current value of cells in this example is always in words Returns as a string.
class SpreadsheetCell
{
	public:
		virtual void set(double inDouble);
		virtual void set(std::string_view inString);
		virtual std::string getString() const;
	private:
		static std::string doubleToString(double inValue);
		static double stringToDouble(std::string_view inString);
		double mValue;
};
In a real spreadsheet application, cells can store different data types, sometimes double values and sometimes text. What if the cell needs another type, such as a formula cell or a date cell?
\2. Pure virtual methods and abstract base classes
Pure virtual methods explicitly state in the class definition that the method does not need to be defined. If a method is set as a pure virtual method, it tells the compiler that there is no definition of this method in the current class. A class with at least one pure virtual method is called an abstract class because it has no instances. The compiler enforces the fact that if a class contains one or more pure virtual methods, it cannot build objects of this type. Use a special syntax to specify a pure virtual method: the method declaration is followed by = 0. You don't need to write any code.
class SpreadsheetCell
{
	public:
		virtual ~SpreadsheetCell() = default;
		virtual void set(std::string_view inString) = 0;
		virtual std::string getString() const = 0;
};
Now that the base class has become an abstract class, the SpreadsheetCell object cannot be created. The following code will not compile and give an error such as "error C2259:" SpreadsheetCell: cannot instantiate abstract class ".
SpreadsheetCell cel1; // Error! RARttempts creating abstract class instance
However, once the StringSpreadsheetCell class is implemented, the following code can be compiled successfully because it instantiates the derived class of the abstract base class;
std::unique_ptr<SpreadsheetCell> cell(new StringSpreadsheetCell());
be careful:
Abstract classes provide a method that prevents other code from directly instantiating objects, while its derived classes can instantiate objects.
Note that the SpreadsheetCellcpp source file is not required because there is nothing to implement. Most methods are pure virtual methods, and the destructor is explicitly set as the default in the class definition.
\1. StringSpreadsheetCell class definition
The first step in writing the definition of the StringSpreadsheetCell class is to inherit from the SpreadsheetCell class. The second step is to override the inherited pure virtual method, which is not set to 0 this time. The last step is to add a private data member mValue for the string cell, in which the actual cell data is stored. This data member is std::optional, which is defined in the header file starting from C++17.op The functional type is a class template, so you must specify the required actual type between angle brackets, such as optional. Chapter 12 discusses the class template in detail. By using the optional type, you can confirm whether the cell value has been set. Chapter 20 discusses the optional type in detail, but the basic usage is quite simple.
class StringSpreadsheetCell:public SpreadsheetCell
{
	public:
		virtual void set(std::string_view inString) override;
		virtual std::string getString() const override;
	private:
		std::optional<std::string> mValue;
};
\3. Definition and implementation of doublespreadsheetcell class
The double version follows a similar pattern, but has different logic. In addition to the set() method of the base class with string_view as the parameter, a new set() is provided Method to allow the user to set its value using double precision values. Two new private static methods are used to convert strings and double precision values. Like StringSpreadsheetCell, this class also has an mValue data member whose type is optional.
class DoubleSpreadsheetCell : public SpreadsheetCell
{
	public:
		virtual void set(double inDouble);
		virtual vois set(std::string_view inString) override;
	private:
		static 	std::string doubleToString(double inValue);
		static double stringToDouble(std::string_view inValue);
		std::optional<double> mValue;
};
The set() method with a double value as a parameter is simple and straightforward. The string_view version uses the private static method stringToDouble(). The getString() method returns the stored double value as a string; if no value is stored, it returns an empty string. It uses the has_value() of std::optional Method to query whether option has an actual value. If it has a value, use the value () method to get it.
Inherit from multiple classes
From a syntactic point of view, defining a class with multiple parent classes is simple. To do this, you only need to list the base classes when declaring the class name;
class Baz : public Foo,public Bar
{

};
Because multiple parent classes are listed, the Baz object has the following properties:
Baz objects support public methods of Foo and Bar classes and contain data members of these two classes.
Methods of the Baz class have access to protected data members and methods of the Foo and Bar classes.
Baz objects can be transformed up to Foo or Bar objects.
Creating a new Baz object will automatically call the default constructors of Foo and Bar classes in the order listed in the class definition.
Deleting the Baz object will automatically call the destructor of the Foo and Bar classes in the reverse order of the classes in the class definition.
Name conflicts and layer semantic base classes
The scenario of multiple inheritance crash is not hard to imagine. The following example shows some edge situations that must be considered.
\1. Name ambiguity
What happens if both Dog class and Bird class have an eat() method? Because Dog class and Bird class are irrelevant, one version of eat() method cannot override the other. Both methods exist in the derived class DogBird.
[external chain picture transferring... (img-IA3RMoTi-1632236813911)]
The following example shows a DogBird class, which has two parent classes - a Dog class and a Bird class, as shown in Figure 10-8. This is an idle example, but it should not be considered that multiple inheritance itself is trivial. Please judge for yourself.
class Dog
{
	public:
		virtual void bark(){cout<<"Woof!"<<endl;}
};
class Bird
{
	public:
		virtual void chirp(){cout<<"Chirp!"<<endl;}
};
class DogBird : public Dog,public Bird
{

};
Using a class object with multiple parents is no different from using a class object with a single parent. In fact, the customer code does not even need to know that this class has two parents. What needs to be concerned is the properties and behaviors supported by this class. In this case, the DogBird object supports all the public methods of the Dog and Bird classes.
DogBird myConfusedanimal;
myConfusedRnimal.bark();
myConfusedRnimal.chirp();
Woof!
Chirp!
Name conflicts and layer semantic base classes
The scenario of multiple inheritance crash is not hard to imagine. The following example shows some edge situations that must be considered.
\1. Name ambiguity
What happens if both the Dog class and the Bird class have an eat() method? Because the Dog class and the Bird class are irrelevant, one version of the eat() method cannot override the other. Both methods exist in the derived class DogBird. As long as the client code does not call the eat() method, there will be no problem. Although there are two versions of eat() Method, but the DogBird class can still compile correctly. However, if the client code attempts to call the eat() method of the DogBird class, the compiler will report an error indicating that the call to the eat() method is ambiguous. The compiler does not know which version to call. The following code has an ambiguous error:
class Dog
{
	public:
		virtual void bark(){cout<<"Woof!"<<endl;}
		virtual void eat(){cout<<"The dog ate "<<endl;}
};
class Bird
{
	public:
		virtual void chirp(){cout<<"Chirp!"<<endl;}
		virtual void eat(){cout<<"The bird ate"<<endl; }
};
class DogBird : public Dog,public Bird
{

};

int main()
{
	DogBird myConfusedAnimal;
	myConfusedAnimal.eat(); // Error! Rmbiguous call to method eat ()
	return 0;
}
To disambiguate, you can use dynamic_cast() to explicitly transform objects upward (essentially hiding redundant method versions from the compiler), or you can use disambiguation syntax. The following code shows two schemes for calling the Dog version of the eat() method:
dynamic_cast<Dog&> (myConfusedAnimal).eat(); // Calls Dog::eat()
myConfusedAnimal.Dog::eat(); //Calls Dog::eat()
Using the same syntax (:: operator) as accessing the parent class method, the method of the derived class itself can explicitly disambiguate different methods with the same name. For example, the DogBird class can define its own eat() method to eliminate ambiguity errors in other code. Inside the method, you can determine which parent class version to call:
class DogBird : public Dog,public Bird
{
	public:
		void eat() override;
};

void DogBird::eat()
{
	Dog::eat(); // Explicitly call Dog's version of eat()
}
Another way to prevent ambiguity errors is to use the using statement to explicitly specify which version of eat() method should be inherited in the DogBird class, as shown in the following DogBird class definition:
class DogBird : public Dog, public Bird
{
	public:
		using Dog::eat; // Explicit inherit Dog's version of eat()
};
\2. Ambiguous base class
Another case of ambiguity is to inherit from the same class twice. For example, if the Bird class inherits from the Dog class for some reason, the code of the DogBird class cannot be compiled because the Dog becomes an ambiguous base class.
class Dog {}
class Bird : public Dog {}
class DogBird : public Bird,public Dog {}; // Error
”Most cases of ambiguous base classes are either caused by artificial "what if" examples (as in the previous example), or by confusion in the class hierarchy. Figure 10-9 shows the class diagram in the previous example and points out the ambiguity.
Data members can also cause ambiguity. If the Dog and Bird classes have a data member with the same name, an ambiguity error occurs when the client code attempts to access this member.
Multiple parent classes themselves may also have a common parent. For example, Bird and Dog classes may both be derived from Animal class, as shown in Figure 10-10.
[external chain picture transferring... (img-2aJSOiNh-1632236813913)]
[external chain picture transferring... (img-XsW73n0K-1632236813914)]
C + + allows this type of class hierarchy, although there are still name ambiguities. For example, if the Animal class has a public method sleep(), the DogBird object cannot call this method because the compiler does not know whether to call the version inherited by the Dog class or the version inherited by the Bird class. The best way to use the "withered" class hierarchy is to set the top class as an abstract class and all methods as pure virtual methods. Since the class only declares methods without providing definitions, there is no method to call in the base class, so there is no ambiguity at this level. The following example implements the diamond class hierarchy, in which there is a pure virtual method eat) that each derived class must define. The DogBird class still has to explicitly specify which parent class's eat() method to use, but the reason why the Dog and Bird classes are ambiguous is that they have the same method, not because they inherit from the same class.
class Animal
{
	public:
		virtual void eat() = 0;
};
class Dog : public Animal
{
    public:
    	virtual void bark(){ cout<<"Woof!"<<endl; }
    	virtual void eat() override {cout<<"The dog ate "<<endl; }
};
class Bird : public Animal
{
    public:
    	virtual void chirp() {cout<<"Chirp!"<<endl; }
    	virtual void eat() override {cout<<"The bird ate "<<endl; }
};
class DogBird : public Dog,public Bird
{
    public:
    	using Dog::eat;
};
Virtual base classes are a better way to deal with item classes in the whip class hierarchy, which will be described at the end of this chapter.
\3. Use of multiple inheritance
Why do programmers use multiple inheritance in their code? The most direct use case of multiple inheritance is to define a class object that is "one" thing and "one" other things. As mentioned in Chapter 5, actual objects that follow this pattern are difficult to convert into code properly. The simplest and most powerful use of multiple inheritance is to implement mix in classes. See Chapter 5 for mixed classes. Another reason to use multiple inheritance is to emulate component-based classes. Chapter 5 gives an example of aircraft simulation. The aircraft class includes Engine, Fuselage, control system and other components. Although the typical implementation of the Airplane class treats these components as independent data members, multiple inheritance can also be used. Aircraft class can inherit from Engine, Fuselage and control system, so as to effectively obtain the behavior and properties of these components. It is not recommended to use this type of code, which confuses the "have a" relationship with inheritance, and inheritance is used for "is a relationship. The recommended solution is to make the aircraft class contain data members of Engine, fuse and Controls types.
Interesting and obscure inheritance problems
Extending a class raises a variety of questions. What characteristics of a class can and cannot be changed? What is non-public inheritance? What is a virtual base class? These questions will be answered below.
The main reason for rewriting a method is to modify the implementation of the method. However, sometimes it is to modify other characteristics of the method.
\1. Modify the return type of the method
As a rule of thumb, overriding a method needs to use a method declaration (or method prototype) that is consistent with the base class. The implementation can change, but the prototype remains unchanged. However, this may not always be the case. In C + +, if the original return type is a pointer or reference to a class, the overriding method can change the return type to a pointer or reference to a derived class. This type is called a covariant return type (covariant return types). It is convenient to use this feature if the base class and derived class are in a parallel hierarchy. A parallel hierarchy means that one class hierarchy does not intersect with another class hierarchy, but there is an association.
For example, consider a Cherry orchard simulator. Two class hierarchies can be used to simulate different but obviously related real objects. The first is the Cherry class hierarchy, and the Cherry base class has a derived class named BingCherry. Similarly, the base class of the other class hierarchy is CherryTree and the derived class is BingCherryTree. Figure 10-11 shows the two class hierarchies .
[external chain picture transferring... (img-yMskIG0g-1632236813916)]
Cherry* CherryTree::pick()
{
	return new Cherry();
}
be careful:
To demonstrate how to change the return type, this example does not return a smart pointer, but a normal pointer. The reason will be explained at the end of this section. Of course, the caller should immediately store the result in a smart pointer instead of a normal pointer.
In the derived class of BingCherryTree, this method needs to be overridden. Maybe the ice Cherry needs to be wiped when it is picked (let's say so). Since the ice Cherry is also a Cherry, in the following example, the prototype of the method remains unchanged and the method is overridden. The BingCherry pointer is automatically converted to the Cherry pointer. Note that this implementation uses unique_ptr to ensure polish() There was no memory leak when an exception was thrown.
Cherry* BingCherryTree::pick()
{
	auto theCherry = std::make_unique<BingCherry>();
	theCherry->polish();
	return theCherry.release();
}
The above implementation is very good, which is also the method the author wants to use. However, since the BingCherryTree class always returns the BingCherry object, you can indicate this to potential users of this class by modifying the return type, as shown below:
BingCherry* BingCherryTree::pick()
{
	auto theCherry = std::make_unique<BingCherry>();
	theCherry->polish();
	return theCherry.release();
}
The following is the usage of the BingCherryTree::pick() method:
BingCherryTree theTree;
std::unique_ptr<Cherry> theCherry(theTree.pick());
theCherry->printType();
To determine whether the return type of the rewriting method can be modified, you can consider whether the existing code can continue to run, which is called the Liskov Substitution Principle (LSP). In the above example, there is no problem modifying the return type, because it is assumed that pick () The method always returns Cherry * and can still be compiled successfully and run normally. Since ice Cherry is also Cherry, any code method of the caller based on the return value of pick() of CherryTree version can still be based on pick() of BingCherryTree version The return value is called. The return type cannot be modified to a completely unrelated type, such as void *. The following code cannot be compiled;
void* BingCherryTree::pick()
{
	auto theCherry = std::make_unique<BingCherry>();
	theCherry->polish();
	return theCherry.release();
}
This code will cause compilation errors as follows:
"BingCherryTree::pick': overriding virtual function return type differs and is not covariant from 'cherryTree::pick'
As mentioned earlier, this example is replacing the smart pointer with a normal pointer. This cannot be used in this example when std::unique_ptr is used as the and return type. Suppose CherryTree::pick() returns unique_ptr, as follows:
std::unique_ptr<Cherry> CherryTree::pick()
{
	return std::make_unique<Cherry>();
}
At this time, the return type of the BingCherryTree::pick() method cannot be changed to unique_ptr. The following code cannot be compiled:
void *BingCherryTree::pick() //ERROR
{
	auto theCherry = std::make_unique<BingCherry>();
	theCherry->polish();
	return theCherry.release();
}
This code will cause compilation errors as follows:
"BingCherryTree::pick': overriding virtual function return type differs and is not covariant from 'CherryTree::pick'
As mentioned earlier, this example is using a normal pointer to replace a smart pointer. STD:: unique_ When PTR is used as a return type, this cannot be used in this example. Suppose CherryTree::pick() returns unique_ptr, as follows:
std::unique_ptr<Cherry>CherryTree::pick()
{
	return std::make_unique<Cherry>();
}
At this time, the return type of the BingCherryTree::pick() method cannot be changed to unique_ptr. The following code cannot be compiled:
class BingCherryTree:public CherryTree
{
	public:
		virtual std::unique_ptr<BingCherry>pick() override;
};
The reason is that std:unique ptr is a class template, which will be discussed in detail in Chapter 12. Create unique_ Two instances of PTR class template unique_ptr and unique_ptr. These two instances are completely different types and completely irrelevant. You cannot change the return type of an override method to return a completely different type.
\2. Modify the parameters of the method
If the name of the virtual method in the parent class is used in the definition of the Derived class, but the parameters are different from those of the method with the same name in the parent class, this is not to override the method of the parent class, but to create a new method. Returning to the Base and Derived class examples earlier in this chapter, you can try to override the someMethod() method in the Derived class with a new parameter list, as shown below:
class Base
{
	public:
		virtual void someMethod();
};

class Derived : public
{
    public:
    	virtual void someMethod(int i); // Compiles,but doesn't override
    	virtual void  someOtherMethod();
}
The implementation of this method is as follows:
void Derived::someMethod(int i)
{
	cout<<"This is Derived's version of someMethod with argument "<<i<<"."<<endl;
}
The previous class definition can be compiled, but does not override the someMethod() method. Because of the different parameters, a new method is created that only exists in the Derived class. If you need the someMethod() method to take the int parameter and only apply this method to Derived class objects, the previous code has no problem.
In fact, the C + + standard states that when the Derived class defines this method, the original method is hidden. The following code cannot be compiled because the someMethod() method without parameters no longer exists.
Derived myDerived;
myDerived.someMethod();// Error! Won't compile because original method is hidden.
If you want to override the someMethod() method in the base class, you should use the override keyword as suggested earlier. If an error occurs when overriding a method, the compiler will report an error. A more astringent technique can be used to take both into account. That is, this technique can be used to effectively "override" a method with a new prototype in a derived class and inherit the base class version of the method. This technique uses the using keyword to explicitly include the base class definition of this method in the derived class;
class Base
{
	public:
		virtual void someMethod();
};

class Derived : public Base
{
	public:
		using Base::someMethod; // Explicity "inherits" the Base version
		virtual void someMethod(int i); // Adds a new version of someMethod
		virtual void someOtherMethod();
};
be careful;
It is rare that a method of a derived class has the same name as a method of a base class, but the parameter list is different.
inherited constructors
Section mentions that you can use the using keyword in a Derived class to explicitly include methods defined in the Base class. This applies to both normal class methods and constructors, allowing the constructor of the Base class to be inherited in Derived classes. Consider the following Base and Derived class definitions:
class Base
{
	public:
		virtual ~Base() = default;
		Base() = default;
		Base(std::string_view str);
};

class Derived:public Base
{
	public:
    	Derived(int i);
};
Base objects can only be built with the provided base constructor, either the default constructor or containing strings_ Constructor for the view parameter. In addition, the Derived object can only be created with the Derived constructor, which requires an integer as a parameter. Cannot use receive string in base class_ View to create the Derived object. For example:
Base base("Hello"); //Ok,calls string_view Base ctor
Derived derived(1); //Ok,calls integer Derived ctor
Derived derived2("hello"); //Error,Derived does not inherit string_view ctor
If you prefer to use string based_ The Base constructor of view constructs the Derived object. You can explicitly inherit the Base constructor in the Derived class, as shown below:
class Derived : public Base
{
	public:
		using Base::Base;
		Derived(int i);
};
using statement inherits all the construction axes except the default constructor from the parent header. Now, the Derived object can be constructed by the following two methods;
Derived derived1(1); // OK "calls integer Derived ctor
Derived derived2("Hello");  // OK,calls inherited string_view Base ctor
The constructor defined by the Derived class can have the same parameter list as the constructor inherited from the Base class. As with all overrides, the constructor of the Derived class takes precedence over the inherited constructor. In the following example, the Derived class inherits all constructors in the Base class except the default constructor using the using keyword. However, since the Derived class defines a constructor that uses floating-point numbers as parameters, the constructor inherited from the Base class that uses floating-point numbers as parameters is overridden.
class Base1
{
	public:
		virtual ~Base1() = default;
		Base1() = default;
		Base1(float f);
};

class Base2
{
	public:
		virtual ~Base2() = default;
		Base2() = default;
		Base2(std::string_view str);
		Base2(float f);
};

class Derived : public Base1,public Base2
{
	public:
		using Base1::Base1:
		using Base2::Base2;
		Derived(char c);
};
The first using statement in the Derived class definition inherits the constructor of the Basel class. This means that the Derived class has the following constructor:
Derived(float f); // Inherited from Basel
The second using clause in the Derived class definition attempts to inherit all constructors of the Base2 class. However, this causes compilation errors because it means that the Derived class has a second Derived(float) constructor. To solve this problem, you can explicitly declare the conflicting constructor in the Derived class, as follows:
class Derived : public Base1,public Base2
{
	public:
		using Base1::Base1;
		using Base2::Base2;
		Derived(char c);
		Derived(float f);
};
Now, the derived class explicitly declares a constructor that takes a floating-point number as a parameter, thus solving the ambiguity problem. If you want, the constructor that uses the floating point number as the parameter explicitly declared in the Derived class can still call the Basel and Base2 constructors in ctor-initializer, as shown below.
Derived::Derived(float f):Base1(f),Base2(f){}
When using an inherited constructor, make sure that all member variables are initialized correctly. For example, consider the following new definitions of the Base and Derived classes. This example does not initialize the mInt data member correctly, which is a serious error in any case.
class Base
{
	public;
		virtual ~Base() = default;
		Base(std::string_view str):mStr(str){}
	private:
		std::string mStr;
};

class Derived : public Base
{
	public:
		using Base::Base;
		Derived(int i) : Base(""),mInt(i){}
	private:
		int mInt;
}
You can create a Derived object as follows:
Derived s1(2);
This statement will call the Derived(int i) constructor, which will initialize the mInt data member of the Derived class, and call the Base constructor to initialize the mStr data member with an empty string-
Derived s2("Hello World")
This statement calls the constructor inherited from the Base class. However, the constructor inherited from the Base class only initializes the mStr member variable of the Base class, does not initialize the mInt member variable of the Derived class, and mInt is in an uninitialized state. This is not usually recommended. The solution is to use an in class member initializer, which is discussed in Chapter 8. The following code initializes mInt to 0 using an in class member initializer. The Derived(int) constructor can still modify this initialization behavior by initializing mInt to the value of parameter i.
class Derived : public Base
{
	public:
		using Base::Base;
		Derived(int i):Base(""),mInt(i){}
	private:
		int mInt = 0;
};
Special cases when overriding methods
When rewriting methods, you need to pay attention to several special cases. This section lists some situations that may be encountered.
- Static base class method
Static methods cannot be overridden in C + +. For most cases, it is sufficient to know this. However, some inferences need to be understood here. First, methods cannot be both static and virtual. For this reason, trying to rewrite a static method does not get the expected results. If the static method in the derived class has the same name as the static method in the base class, it is actually two independent methods. The following code shows two classes, both of which have a static method called beStatic(). The two methods have nothing to do with each other.
class BaseStatic
{
	public:
		static void beStatic()
		{
			cout<<"BaseStatic being static"<<endl;
		}
};
class DerivedStatic : public BaseStatic
{
	public:
		static void beStatic()
		{
			cout<<"DerivedStatic keepin's in static "<<endl;
		}
};
Because static methods belong to classes, when calling methods with the same name of two classes, their respective methods will be called.
BaseStatic::beStatic();
DerivedStatic::beStatic();
output
BaseStatic being static.
DerivedStatic keepin' it static-.
Everything is fine when accessing these methods with class names. When it comes to objects, this behavior is less obvious. In C + +, you can use an object to call a static method, but because the method is static, there is no this pointer and you cannot access the object itself. Calling a static method using an object is equivalent to calling a static method using classname::method(). Returning to the previous example, you can write the following code, but the results are surprising:
DerivedStatic myDerivedStatic;
BaseStatic& ref = myDerivedStatic;
myDerivedStatic.beStatic();
ref.beStatic();
The first call to bestatic () obviously calls the DerivedStatic version because the object that calls it is explicitly declared as a DerivedStatic object. The second call may not run as expected. This object is a BaseStatic reference, but points to a DerivedStatic object. In this case, the BaseStatic version of beStatic() is called. The reason is that when calling static methods, C + + doesn't care what the object is actually, but only the type at compile time. In this case, the type is a reference to a BaseStatic object. The output of the previous example is as follows:
DerivedStatic keepin's it static
BaseStatic being  static
be careful:
A static method belongs to the class that defines it, not to a specific object. When a method in a class calls a static method, the called version is determined through normal name resolution. When using object calls, the object does not actually involve calls, but is used to determine the type at compile time.
\2. Overloaded base class method
When you specify a name and a set of parameters to override a method, the compiler implicitly hides all other instances of the method with the same name in the base class. The idea is that if you override a method with a given name, you may want to override all methods with the same name, but you just forget to do so, so it should be treated as an error. It makes sense to consider why you should modify some versions of the method instead of others? Consider the following Derived class, which overrides a method without overriding the related sibling overloaded method:
class Base
{
	public:
		virtual ~Base() = default;
		virtual void overload(){cout<<"Base's overload()"<<endl;}
		virtual void overload(int i){cout<<"Base'overload(int i)"<<endl;}
};

class Derived : public Base
{
	public:
		virtual void overload() override
		{
			cout<<"Derived's overload()"<<endl;
		}
};
If you try to call the overload() version with an int value as a parameter with a Derived object, the code will not compile because the method is not explicitly overridden.
Derived myDerived;
myDerived.overload(2); //Error no mathing method for overload(int)
However, the method of accessing this version using Derived objects is feasible. You only need to use a pointer or reference to the Base object,
Derived myDerived;
Base& ref = myDerived;
ref.overload(7);
In C + +, hiding unimplemented overloaded methods is just a representation. Objects explicitly declared as subtype instances cannot use these methods, but they can be converted to base class types to use these methods.
If you want to change only one method, you can use the using keyword to avoid overloading all versions of the method. In the following code, an overload() version inherited from the Base class is used in the Derived class definition, and the other version is explicitly overridden:
class Base
{
	public:
		virtual ~Base() = default;
		virtual void overlaod(){cout<<"Base's overload()"<<endl;}
		virtual void overload(int i){cout<<"Base's overload(int i)"<<endl;}
};

class Derived : public Base
{
	public:
		virtual void overload() override
		{
			cout<<"Derived's overload()"<<endl;
		};
}
If you try to call the overload() version with an int value as a parameter with a Derived object, the code will not compile because the method is not explicitly overridden.
Derived myDerived;
myDerived.overload(2); //Error! No mathing method for overloaded(int)
However, the method of accessing this version using Derived objects is feasible. You only need to use a pointer or reference to the Base object,
Derived myDerived;
Base& ref = myDerived;
ref.overload(7);
In C + +, hiding unimplemented overloaded methods is just a representation. Objects explicitly declared as subtype instances cannot use these methods, but they can be converted to base class types to use these methods.
If you want to change only one method, you can use the using keyword to avoid overloading all versions of the method. In the following code, an overload() version inherited from the Base class is used in the Derived class definition, and the other version is explicitly overridden:
class Base
{
	public:
		virtual ~Base() = default;
		virtual void overload(){cout<<"Base's overload()"<<endl;}
		virtual void overload(int i) {cout<<"Base's overload(int i)"<<endl; }
};
class Derived : public Base
{
	public:
		using Base::overload;
		virtual void overload() override
		{
			cout<<"Derived's overload()"<<endl;
		}
};
The using clause is risky. Suppose a third overload() method was added to the Base class, which should have been overridden in the Derived class. However, due to the use clause, failure to override this method in the Derived class will not be regarded as an error. The Derived class explicitly states that "I will receive all other overloaded methods of the parent class."
Warning:
To avoid ambiguity bug s, you should rewrite all versions of overloaded methods, either explicitly or using keywords, but pay attention to the risks of using keywords.
\3. private or protected base class methods
There is certainly no problem rewriting the private or protected methods. Remembering the access descriptors of methods determines who can call them. Just because a derived class cannot call the private method of its parent class does not mean that this method cannot be overridden. In fact, rewriting private or protected methods is a common pattern in C + +. This pattern allows derived classes to define their own uniqueness, which is referenced in the base class. Note that Java and C # only allow public and protected methods to be overridden, not private methods. For example, the following class is part of the car simulation program, which calculates the mileage of the car according to the gasoline consumption and the remaining fuel.
class MileEstimator
{
	public:
		virtual ~MilesEstimator() = default;
		virtual int getMilesLeft() const;
		virtual void setGallonsLeft(int gallons);
		virtual int getGallonsLeft() const;
	private:
		int mGallonsLeft;
		virtual int getMilesPerGallon() const;
};
The implementation of these methods is as follows;
int MilesEstimator::getMilesLeft() const
{
	return getMilesPerGallon() * getGallonsLeft();
}
void MilesEstimator::setGallonsLeft(int gallons)
{
	mGallonsLeft = gallons;
}
int MilesEstimator::getGallonsLeft() const
{
	return mGallonsLeft;
}
int MilesEstimator::getMilesPerGallon() const
{
	return 20;
}
The getMilesLeft() method performs a calculation based on the returned results of the two methods. The following code uses miles estimator to calculate the mileage of two gallons of gasoline
MilesEstimator myMilesEstimator;
myMilesEstimator.setGallonsLeft(2);
cout<<"Normal estimator can go "<<myMilesEstimator.getMilesLeft()<<" more miles"<<endl;
The output of the code is as follows;
Normal estimator can go 40 more miles
To make the simulation more interesting, different types of vehicles, perhaps more efficient vehicles, can be introduced. The existing MilesEstimator assumes that all cars can run 20 kilometers after burning a bunker of gasoline. This value is returned from a separate method, so the derived class can override this method. The following is such a derived class;
class EfficientCarMilesEstimator : public MilesEstimator
{
	private:
		virtual int getMilesPerGallon() const override;
};
The implementation code is as follows:
int EfficientCarMilesEstimator::getMilesPerGallon() const
{
	return 35;
}
By overriding this private method, the new class completely modifies the behavior of the existing public method that has not been changed. The getMilesLeft() method in the base class will automatically call an overridden version of the private getMilesPerGallcn() method. Here is an example of using the new class:
EfficientCarMilesEstimator myEstimator;
myEstimator.setGallonsLeft(2);
cout<<"Efficient estimator can go "<<myEstimator.getMilesLeft()<<" more miles."<<endl;
The output at this time indicates the rewriting function:
Efficient estimator can go 70 more miles
be careful:
Overriding private or protected methods can change some of the properties of a class without major changes.
\4. The base class method has default parameters
Derived and base classes can have different default parameters, but the parameters used depend on the declared variable type, not the underlying object. The following is a simple example of a derived class that provides different default parameters in overridden methods:
class Base
{
	public:
		virtual ~Base() = default;
		virtual void go(int i = 2)
		{
			cout<<"Base's go with i="<<i<<endl;
		}
};
class Derived:public Base
{
	public:
		virtual void go(int i = 7) override
		{
			cout<<"Derived's go with i="<<i<<endl;
		}
};
Derived and base classes can have different default parameters, but the parameters used depend on the declared variable type, not the underlying object. The following is a simple example of a derived class that provides different default parameters in overridden methods:
class Base
{
	public:
		virtual ~Base() = default;
		virtual void go(int i = 2)
		{
			cout<<"Base's go with i="<<i<<endl;
		}
};
class Derived : public Base
{
	public:
		virtual void go(int i = 7) override
		{
			cout<<"Derived's go with i="<<i<<endl;
		}
};
If you call go() of the Derived object, the Derived version of go() will be executed. The default parameter is 7. If you call go() of the Base object, go() of the Base version will be executed. The default parameter is 2. However (somewhat bizarre), if you call go () with a Base pointer or Base reference that actually points to the Derived object, the Derived version of go () will be called, but the default parameter 2 of the Base version will be used. The following example shows this behavior;
Base myBase;
Derived myDerived;
Base& myBaseReferenceToDerived = myDerived;
myBase.go();
myDerived.go();
myBaseReferenceToDerived.go();
The output of the code is as follows:
Base's go with i = 2
Derived's go with i = 7
Derived's go with i = 2
The reason for this behavior is that C + + binds default parameters based on the compile time type of the expression, not the runtime type. In C + +, default parameters are not "inherited". If the Derived class above does not provide default parameters like the parent class, it will overload the go() method with a new non-0 parameter version.
be careful:
When overriding a method with a default parameter, you should also provide a default parameter, and the value of this parameter should be the same as the base class version. It is recommended to use a symbolic constant as the default value, so that the same symbolic constant can be used in derived classes.
\5. Derived class methods have different access levels
There are two ways to modify the access level of the method. One is to strengthen or relax the restrictions. In C + +, neither of these methods makes much sense, but there are reasonable reasons to do so. There are two ways to enforce the limitations of a method (or data member). One way is to modify the access specifier of the entire base class, which will be described later in this chapter. Another method is to redefine access restrictions in derived classes. The following Shy class demonstrates this method:
class Gregarious
{
	public:
		virtual void talk()
		{
			cout<<"Gregarious says hi!"<<endl;
		}
};
class Shy : public Gregarious
{
	protected:
		virtual void talk() override
		{
			cout<<"Shy reluctantly says hello"<<endl;
		}
};
The protected version of the talk() method in the Shy class appropriately overrides the Gregarious::talk() method. Any attempt by client code to call talk() using the Shy object will result in a compilation error.
Shy myShy;
myShy.talk(); //Error Attempt to access protected method .
However, this method is not fully protected. Protected methods can be accessed using Gregarious references or pointers.
Shy myShy;
Gregarious& ref = myShy;
ref.talk();
The output of the above code is as follows:
Shy reluctantly says hello
This shows that setting the method to protected in the derived class actually overrides the method (because the derived class version of the method can be called correctly). In addition, it also proves that if the base class sets the method to public, it cannot completely force access to the protected method.
be careful;
There is no (and no good reason) to restrict access to public methods of base classes.
be careful:
The above example redefines the method in the derived class because it wants to display another message. If you don't want to modify the implementation and just want to change the access level of the method, the preferred method is to add a using statement to the derived class definition with the required access level.
It is easier (and more meaningful) to relax access restrictions in derived classes. The simplest method is to provide a public method to call the protected method of the base class, as shown below:
class Secret
{
	protected:
		virtual void dontTell() {cout<<"I'll never tell"<<endl;}
};
class Blabber : public Secret
{
	public:
		virtual void tell() { dontTell();}
};
The client code calling the Blabber object's public method tell() can effectively access the protected method of the Secret class. Of course, this does not really change the access level of dontTell(), but only provides a public way to access this method. dontTell() can also be explicitly overridden in Blabber derived classes , and set this method to public. This makes more sense than lowering the access level, because it can clearly indicate what happens when using base class pointers or references. For example, suppose that the Blabber class actually sets the dontTell() method to public:
class Blabber : public Secret
{
	public:
		virtual void dontTell() override{cout<<"I'll tell all!"<<endl;}
};
Call the dontTell() method of the Blabber object:
myBlabber.dontTell(); // outputs "IT'11 tell alllm
If you don't want to change the implementation of the rewriting method, but just want to change the access level, you can use the using submultiple, for example,
class Blabber : public Secret
{
	public:
		using Secret::dontTell;
};
This also allows you to call the dontTell() method of the Blabber object, but this time, the output will be "l'll never tell.":
myBlabber.dontTell(); //outputs "l'll never tell"
However, in the above case, the protected method in the base class is still protected, because calling the dontTell() method of the Secret class using a Secret pointer or reference will not compile.
Blabber myBlabber;
Secret& ref = myBlabber;
Secret& ptr = &myBlabber;
ref.dontTell(); //Error Attempt to access protected method
ptr->dontTell();//Error Attempt to access protected method
be careful:
The only really useful way to modify the method access level is to provide looser access restrictions for protected methods.
Copy constructors and assignment operators in derived classes
As mentioned in Chapter 9, it is a good programming habit to provide copy constructors and assignment operators when using dynamic memory allocation in classes. When defining derived classes, you must pay attention to copy constructors and operator =.
If the derived class does not have any special data (usually pointers) that requires a non default copy constructor or operator = , no matter whether the base class has such data or not, they are not required. If the derived class omits the copy constructor or operator =, the data members specified in the derived class use the default copy constructor or operator =, and the data members in the base class use the copy constructor or operator =. In addition, if the copy constructor is specified in the derived class, it needs to be explicit The following code demonstrates this by explicitly linking to the copy constructor of the parent class. If you don't, the parent part of the object will be initialized with the default constructor (not the copy constructor!).
class Base
{
	public:
		virtual ~Base() = default;
		Base() = default;
		Base(const Base& src);
};
Base::Base(const Base& src)
{

}
class Derived:public Base
{
	public:
		Derived() = default;
		Derived(const Derived& src);
};
Derived::Derived(const Derived& src) : Base(src)
{

}
Similarly, if the derived class rewrites operator=, it is almost always necessary to invoke the operator= of the parent version. The only exception is that for some strange reason, assignment is only intended to assign part of the object. The following code shows how to call the assignment operator of the parent class in the derived class.
Derived& Derived::operator=(const Derived& rhs)
{
	if(&rhs == this)
	{
		return *this;
	}
	Base::operator=(rhs); //Calls parent's operator=
	return  *this;
}
Attention;
If the derived class does not specify its own copy constructor or operator =, the functions of the base class will continue to run. Otherwise, you need to explicitly reference the base class version.
be careful:
If the replication function is required in the inheritance hierarchy, the common practice of professional C + + developers is to implement the polymorphic clone() method, because it can not completely rely on the standard copy constructor and copy assignment operator to meet the needs. Chapter 12 will discuss the polymorphic clone() method.
”Runtime type tool
Compared with other object-oriented languages, C + + focuses on compile time. As mentioned earlier, rewriting method is feasible because of the interval between method and implementation, rather than because the object has built-in information about its own class. However, in C + +, some features provide a runtime perspective of the object. These features usually belong to a name called RunTime Type Information (RunTime Type Information, RTTI). RTTI provides many useful features for judging the class to which an object belongs. One of these features is dynamic_cast() mentioned earlier in this chapter, which can perform safe type conversion in the OO hierarchy. This point was discussed earlier in this chapter. If dynamic_cast() on a class is used , but there is no virtual table, that is, there is no virtual method, which will lead to compilation errors.
The second feature of RITI is the typeid operator, which can query objects at run time to determine the type of objects. In most cases, you shouldn't use typeid, because it's best to use virtual methods to deal with code running based on object types. The following code uses typeid to output messages according to the type of object:
#include <typeinfo>
class Animal{public: virtual ~Animal() = default; };
class Dog : public Animal{};
class Bird : public Animal{};
void spreak(const Animal &animal)
{
	if(typeid(animal) == typeid(Dog))
	{
		cout<<"Woof!"<<endl;
	}
	else if(typeid(animal) == typeid(Bird))
	{
		cout<<"Chirp!"<<endl;
	}
}
Once you see such code, you should immediately consider re implementing the function with virtual methods. In this case, a better implementation is to declare a speak() virtual method in the Animal class. Dog class will override this method and output "Woof!";, The Bird class will also override this method and output "Chimp!". This method is more suitable for object-oriented programs, and will give object-related functions to these objects.
Warning;
Class must have at least one virtual method for the typeid operator to function properly. If you use dynamic on a class without virtual methods_ Cast() causes compilation errors. The typeid operator also removes references and const qualifiers from the arguments.
One of the main values of the typeid operator is logging and debugging. The following code uses typeid for logging. The logObject() function takes a recordable object as an argument. The design is as follows: any recordable object inherits from the Loggable class and supports the getLogMessage() method.
class Loggable
{
	public:
		virtual ~Loggable() = default;
		virtual std::string getLogMessage() const = 0;
};
class Foo : public Loggable
{
	public:
		std::string getLogMessage() const override;
};
std::string Foo::getLogMessage() const
{
	return "Hello logger";
}
void logObject(const Loggable& loggableObject)
{
	cout<<typeid(loggableObject).name()<<":";
	cout<<loggableObject.getLogMessage()<<endl;
}
The logobject () function first writes the name of the class to which the object belongs to the output stream, followed by log information. In this way, when you read the log later, you can see the objects involved in each line of the file. When calling the logObject() function with a Foo instance, the output generated by Microsoft Visual C++ 2017 is as follows:
class Foo: Hello logger.
As you can see, the name returned by the typeid operator is class Foo. But the name varies from compiler to compiler. For example, if you compile the same code with GCC, the output will be as follows;
JFoo:Hello logger
be careful:
If you do not use typeid for logging or debugging, you should consider replacing typeid with a virtual method.
Non public inheritance
In all previous examples, the parent class is always listed with the public keyword. Can the parent class be private or protected? In fact, this can be done, although they are not as common as public. If no access specifier is specified for the parent class, it means that it is the private inheritance of the class and the public inheritance of the structure.
Declaring the relationship of the parent class as protected means that all public methods and data members of the base class become protected in the derived class. Similarly, specifying private inheritance means that all public, protected methods and data members of the base class become private in the derived class. There are many reasons for using this method to uniformly reduce the access level of the parent class, but most of the reasons are the design defects of the hierarchy. Some programmers abuse this language feature and often implement the "components" of the class together with multiple inheritance. Instead of allowing the aircraft class to contain engine data members and fuselage data members, they use the aircraft class as a protected engine and protected fuselage. In this way, the aircraft object does not look like an engine or fuselage to the customer code (because everything is protected), but the functions of the engine and fuselage can be used internally.
be careful:
Non public inheritance is rare. It is recommended to use this feature with caution because most programmers are not familiar with it.
virtual base class
We learned ambiguous parent classes earlier in this chapter. This happens when multiple base classes have common parent classes, as shown in Figure 10-12. Our proposed solution is to make the shared parent class itself have no own functions. In this way, the methods of this class can never be called, so there is no ambiguity. If you want the shared parent class to have its own functions, C + + provides another mechanism to solve this problem. If the shared base class is a virtual base class, there is no ambiguity. If you want the shared parent class to have its own functions, C + + provides another mechanism to solve this problem. If the shared base class is a virtual base class, there is no ambiguity. The following code adds the sleep() method to the Animal base class and modifies the Dog and Bird classes to inherit Animal as a virtual base class. If the virtual keyword is not used, calling sleep() with a DogBird object will cause ambiguity, resulting in compilation errors. Because the DogBird object has two sub objects of the Animal class, one from the Dog class and the other from the Bird class. However, if Animal is used as the virtual base class, the DogBird object has only one child of the Animal class, so there is no ambiguity in calling sleep().
class Animal
{
	public:
		virtual void eat() = 0;
		virtual void sleep(){cout<<"zzzzz...."<<endl;}
};
class Dog:public virtual Animal
{
	public:
		virtual void bark(){cout<<"Woof!"<<endl;}
		virtual void eat() override{cout<<"The dog ate"<<endl; }
};
class Bird:public virtual Animal
{
	public:
		virtual void chirp(){cout<<"Chirp!"<<endl;}
		virtual void eat() override{cout<<"The bird ate"<<endl;}
};
class DogBird : public Dog,public Bird
{
	public:
		virtual void eat() override{Dog::eat();}
};
int main()
{
	DogBird myConfuseAnimal;
	myConfusedAnimal.sleep();
	return 0;
}
be careful;
The common base class is a good way to avoid ambiguity in the class hierarchy. The only disadvantage is that many C + + programmers are not familiar with this concept.
Understand the flexible and strange C++
quote
Professional C + + code (including many codes in this book) will make extensive use of references. Now it's necessary to go back and think about what a reference is and how it works. In C + +, a reference is an alias for another variable. All changes to the reference change the value of the referenced variable. The reference can be regarded as an implicit pointer, which does not have the trouble of taking the variable address and dereferencing. You can also use the reference as another name for the original variable. You can create separate reference variables, use reference data members in classes, take references as parameters of functions and methods, or let functions or methods return references.
Reference variable
Reference variables must be initialized when they are created, as shown below:
int x = 3;
int& xRef = x;
After assignment, xRef is another name of x. Using xRef is to use the current value of x. Assigning a value to xRef changes the value of x. For example, the following code sets the value of x to 10 through xRef:
xRef = 107
You cannot declare a reference outside a class without initializing it:
int& emptyRef; // DOES NOT COMPIIE!
Warning;
You must always initialize a reference when you create it. References are usually initialized when declared, but for containing classes, reference data members need to be initialized in the constructor initializer. You cannot create a reference to an unnamed value, such as an integer face value, unless the reference is a const value. In the following example, unnamedRefl will not compile because it is a non const reference to a constant. This statement means that you can change the value of the constant $, which makes no sense. Since unnamedRef2 is a const reference, it can be run and "unnamedRef2 = 7" cannot be written.
int & unnamedRef1 = 5; //DOES NOT COMPILE
const int& unnamedRef2 = 5; //Works as expected
The same is true for temporary objects. You cannot have a non const reference to a temporary object, but you can have a const reference. For example, suppose the following function returns an std::string object:
std::string getString() { return "Hello world"; }
For the result of calling getString(), you can have a const reference; The std::string object will remain active until the const reference is out of scope
std::string& string1 = getString(); //DOES NOT COMPILE
const std::string& string2 = getString(); //Works as expected
\1. Modify reference
The reference always refers to the initialized variable. Once the reference is created, it cannot be modified. This rule leads to many confusing grammars. If a variable is "assigned" when declaring a reference, the reference points to the variable. However, if the reference is later assigned with a variable, the value of the referenced variable becomes the value of the assigned variable. The reference is not updated to point to this variable. The following is the sample code;
int x = 3,y = 4;
int& xRef = x;
xRef = y;//Changes value of x to 4 Doesn't make xRef refer to y
You may try to bypass this restriction by taking the address of y during assignment:
xRef = &y; // DOES NOT COMPILE!
The above code cannot be compiled. The address of y is a pointer, but xRef is declared as a reference to an int value, not a pointer. Some programmers go further and try to avoid the semantics of references. What happens if one reference is assigned to another? Does this make the first reference point to the variable to which the second reference refers? Write the following code:
int x = 3,z = 5;
int& xRef = x;
int& zRef = z;
zRef = xRef; //Rssigns values,not references
The last line of code does not change zRef, but sets the value of z to 3, because xRef points to x, and the value of X is 3.
Warning;
After initializing the reference, you cannot change the variable referred to by the reference, but only the value of the variable.
- References to pointers and pointers to references
You can create references of any type, including pointer types. The following is a reference to a pointer to an int value:
int* intP;
int*& ptrRef = inP;
ptrRef = new int;
*ptrRef = 5;
This syntax is a bit strange: you may not be used to seeing * and & adjacent to each other. However, the semantics are actually simple: ptrRef is a reference to intP, which is a pointer to an int value. Modifying pttRef changes the intP. References to pointers are rare, but useful in some situations, as discussed in section 11.1.3 of this chapter.
Note that the result of addressing a reference is the same as that of addressing a referenced variable. For example:
int x = 3;
int& xRef = x;
int* xPtr = &xRef; // Rddress of a reference is pointer to value
*xPtr = 100;
The above code makes Ptr point to x by taking the address referenced by x. Assign * xPtr to 100 and the value of x becomes 100. The comparison expression "xPtrxRef" will not compile because of type mismatch; xPtr is a pointer to an int value, and xRef is a reference to an int value. The comparison expressions "xPtr = = & xRef" and "xPtr & x" can be compiled correctly, and the results are true. Finally, note that you cannot declare a reference to a reference or a pointer to a reference. For example, int & & or int & *, are not allowed.
Reference data member
As mentioned in Chapter 9, the data members of a class can be references. A reference cannot exist without pointing to other variables. Therefore, reference data members must be initialized in the constructor initializer, not in the constructor body. Here is a simple example,
class MyClass
{
	public:
		MyClass(int &ref):mRef(ref){}
	private:
		int& mRef;
};
reference parameter
C + + programmers usually do not use reference variables or reference data members alone. References are often used as arguments to functions or methods. The default parameter passing mechanism is by value, and the function receives a copy of the parameter. When you modify these copies, the original parameters remain unchanged. References allow you to specify another semantics for passing parameters to functions: by reference. When a reference parameter is used, the function takes the reference as a parameter. If the reference is modified, the original parameter variable is also modified. For example, the following gives a simple exchange function to exchange the values of two int variables;
void swap(int &first,int &second)
{
	int temp = first;
	first = second;
	second = temp;
}
This function can be called in the following way:
int x  = 5,y = 6;
swap(x,y);
When the function swap0 is called with x and y as parameters, the first parameter is initialized as a reference to x and the second parameter is initialized as a reference to y. When first and second are modified with swap(0), x and y are actually modified. Just as ordinary reference variables cannot be initialized with constants, constants cannot be passed as parameters to functions passing as non const References:
swap(3,4); // DOES NOT COMPILE
Constants can be passed as arguments to functions using pass by const reference (discussed later in this chapter) or pass by R-value reference (discussed in Chapter 9).
-
Convert pointer to reference
A function or method needs to take a reference as a parameter, and you have a pointer to the passed value, which is a common dilemma. In this case, dereferencing the pointer and "converting" the pointer Is a reference. This behavior will give the value indicated by the pointer, and then the compiler initializes the reference parameter with this value. For example, swap() can be called as follows:
int x = 5,y = 6;
int *xp = &x,*yp = &y;
swap(*xp,*yp);
- Pass by reference and by value
If you want to modify parameters and modify the variables passed to a function or method, you need to use pass by reference. However, the purpose of pass by reference is not limited to this. Pass by reference does not need to copy a copy of the parameters to the function, which can bring two benefits in some cases. (D) efficiency: copying large objects or structures takes a long time. Passing by reference only passes the pointer to the object or structure to the function. (2) Correctness: not all objects are allowed to be passed by value. Even objects that are allowed to be passed by value may not support accurate deep copying This means that in order to support deep replication, objects that dynamically allocate memory must provide a custom copy constructor or copy assignment operator. If you want to take advantage of these benefits but do not want to modify the original object, you can mark the parameter const to pass the parameter by constant reference. This topic will be discussed in detail later in this chapter. These advantages of passing by reference This means that pass by value should be used only if the parameter is a simple built-in type (such as int or double) and there is no need to modify the parameter. Pass by reference should be used in all other cases.
Reference as return value
You can also let a function or method return a reference. The main reason for this is to improve efficiency. Returning a reference to an object instead of the entire object can avoid unnecessary replication. Of course, this technique can only be used if the object involved still exists after the function is terminated.
Warning: if the scope of a variable is limited to a function or method (for example, a variable automatically allocated in the stack will be destroyed at the end of the function), never return a reference to this variable. If the type returned from the function supports mobile semantics (see Chapter 9) , returning by value is almost as efficient as returning a reference. Another reason for returning a reference is that you want to assign the return value directly to the left of the assignment statement. Some overloaded operators usually return references. Chapter 9 lists some examples, and you can see more applications of this technology in Chapter 15.
rvalue reference
An rvalue is a non lvalue (dvaluej), such as a constant value, a temporary object, or a value. In general, the right value is to the right of the assignment operator. Chapter 9 discusses the right value reference, which is briefly reviewed here;
void handleMessage(std::string& message)
{
    cout<<"handleMessage with lvalue reference "<<message<<endl;
}
For this handleMessage() version, it cannot be called as follows:
handleMessage("Hello world");// A Literal is not an lvalue.
std::string a = "Hello ";
std::string b = "World";
helloMessage(a+b);// R temporary is not an lvalue.
Use reference or pointer
In C + +, references can be considered redundant: almost all tasks that can be done with references can be done with pointers. For example, you can write the previous swap() function as follows:
void swap(int *first,int *second)
{
	int temp = *first;
	*first = *second;
	*second = temp;
}
However, this code is not as clear as using referenced versions: references make the program neat and easy to understand. In addition, the reference is safer than the pointer, there can be no invalid reference, and there is no need to explicitly dereference, so there will be no dereference problem like the pointer. Some people say that citation is safer, but this argument holds only if it does not involve pointers. For example, the following function takes a reference to an int value as an argument:
void refcall(int& t) { ++t; }
You can declare a pointer and initialize it to point to a random location in memory. Then you can dereference this pointer and pass it to refcall() as a reference parameter. The following code can be compiled, but it will crash when trying to execute,
int *ptr = (int *)8;
refcall(*ptr);
In most cases, you should use references instead of pointers. References to objects can even support polymorphism like pointers to objects. However, there are some cases that require the use of pointers. One example is to change the position of the pointer, because the variable referred to by the reference cannot be changed. For example, when dynamically allocating memory, the results should be stored in pointers rather than references. Another case where pointers need to be used is optional parameters, that is, pointer parameters can be defined as optional parameters with the default value nullptr, while reference parameters cannot be defined in this way. Another case is to store polymorphic types in a container.
There is a way to determine whether to use pointers or references as parameters and return types, considering who has memory. If the code receiving the variable is responsible for releasing the memory of the related object, it must use a pointer to the object, preferably a smart pointer, which is the recommended way to pass ownership. If the code that receives variables does not need to free memory, you should use references.
be careful:
Use references first. That is, pointers are used only when references cannot be used. Consider a function that splits an int array into two arrays: an even array and an odd array. This function does not know how many odd and even numbers are in the source array, so it can dynamically allocate memory for the target array only after detecting the source array. In addition, it also needs to return the sizes of the two new arrays. Therefore, a total of four items need to be returned: pointers to two new arrays and the sizes of the two new arrays. Obviously, this function must be passed by reference and written in standard C language as follows:
void separateOddsAndEvens(const int arr[],size_t size,int** odds,size_t *numOdds,int **events,size_t numEvent)
{
	//Count the number of odds and events
	*numOdds = *numEvents = 0;
	for(size_t i = 0;i < size; ++i)
	{
		if(arr[i] % 2 == 1)
		{
			++(*numOdds);
		}
		else
		{
			++(*numEvents);
		}
	}
	//Allocate two new arrays of the appropriate size
	*odds = new int[*numOdds];
	*events = new int[*numEvents];
	size_t oddsPos = 0,evensPos = 0;
    for(size_t i = 0;i<size;++i)
    {
        if(arr[i] % 2 == 1)
        {
            (*odds)[oddsPos++] = array[i];
        }
        else
        {
            (*events)[eventsPos++] = arr[i];
        }
    }
}
The last four parameters of the function are reference parameters. In order to modify the value they point to, separateoddsandevens () must be dereferenced, which makes the syntax in the function body a little ugly. In addition, if you want to call separateOddsAndEvens(), you must pass the addresses of two pointers so that the function can modify the actual pointer and the addresses of two int values so that the function can modify the actual int value. Also note that the caller is responsible for deleting the two arrays created by separateOddsAndEvens()!
int unSplit[] = {1,2,3,4,5,6,7,8,9,10};
int* oddNums = nullptr;
int* eventNums = nullptr;
size_t numOdds = 0,numEvents = 0;
separateOddsAndEvens(unSplit,std::size(unSplit),&oddNums,&numOdds,&evenNums,&numEvens);
//Use the arrays...
delete[] oddNums;oddNums = nullptr;
delete[] eventNums;eventNums = nullptr;
If you find this syntax difficult to understand (it should be like this), you can use reference to realize real passing by reference, as shown below:
void separateOddsAndEvents(const int arr[],size_t size,int*&odds,size_t& numOdds,int*&events,size_t &numEvents)
{
	numOdds = numEvents = 0;
    for(size_t i = 0;i<size;++i)
    {
        if(arr[i] % 2 == 1)
            ++numOdds;
        else
            ++numEvents;
    }
    odds = new int[numOdds];
    events = new int[numEvents];
    size_t oddsPos = 0,eventsPos = 0;
    for(size_t i = 0;i < size;++i)
    {
        if(arr[i] % 2 == 1)
        {
            odds[oddsPos++] = arr[i];
        }
        else
        {
            events[eventsPos++] = arr[i];
        }
    }
}
In this case, the add and events parameters are references to int *. separateOddsAndEvensO can modify the intx used as a function parameter (by reference) without explicitly dereferencing. The same logic applies to numOdds and numEvens, which are references to int values. When using this version of function, it is no longer necessary to pass the address of pointer or int value, and the reference parameters will be processed automatically:
separateOddsAndEvens(unSplit,std::size(unSplit),oddNums,numOdds,eventNums,numEvens)
Although using reference parameters is always cleaner than using pointers, it is recommended to avoid dynamically allocating arrays as much as possible. For example, rewriting the previous separateOddsAndEvens() function using the vector container of the standard library can make it safer, more compact and easier to read, because all memory allocation and release are done automatically.
void separateOddsAndEvents(const vector<int>& arr,vector<int>& odds,vector<int>& events)
{
    for(int i : arr)
        if(i % 2 == 1)
            odds.push_back(i)
        else
            events.push_back(i);
}
This version of the function can be used as follows:
vector<int> vecUnSplit = {1,2,3,4,5,6,7,8,9,10};
vector<int> odds,evens;
separateOddsAndEvents(vecUnSplit,odds,evens);
Note that there is no need to release the odds and evens containers; This task is done by the vector class. This version is easier to use than the version that uses pointers or references. Chapter 17 discusses the vector container of the standard library in detail. Second, although the version using vector container is much better than the version using pointer or reference, it is usually necessary to avoid using output parameters as much as possible. If the function needs to return something, it returns directly instead of using output parameters. Since C++11 introduced mobile semantics, it has become very efficient to return values from functions, while C++17 introduced structured binding (see Chapter 1), which is very simple to return multiple values from functions. Therefore, the separateOddsAndEvens() function does not receive two output vectors (vecton, but returns vector pair. The std::pair utility class defined in will be discussed in Chapter 17 and its usage is quite simple. Basically, vector pair can store two values of the same type or two values of different types. It is a class template and needs to use the type placed between angle brackets to specify the type of value. std::make_pair(0) can be used Create a vector pair. The following separateOddsAndEvens() function returns the vector pair:
pair<vector<int>,vector<int>> separateOddsAndEvents(const vector<int> &arr)
{
	vector<int>odds,evens;
	for(int i : arr)
	{
		if(i % 2 == 1)
			odds.push_back(i)
		else
			evens.push_back(i);
	}
	return make_pair(odds,evens);
}
By using structured binding, the code calling separateoddsandevens () becomes more compact and easier to read and understand;
vector<int> vecUnSplit = {1,2,3,4,5,6,7,8,9,10};
auto[odds,evens] = separateOddsAndEvens(vecUnSplit);
Keyword questions
The two keywords const and static in C + + are very confusing. These two keywords have many different meanings, and each usage is very subtle. It is very important to understand this.
const keyword
Const is an abbreviation for constant, which refers to the quantity that remains unchanged. The compiler will implement this requirement, and any attempt to change a constant will be treated as an error. In addition, when optimization is enabled, the compiler can use this information to generate better code. The keyword const has two related uses. You can use this keyword to mark variables or parameters, or to mark parties This section will clearly discuss these two meanings.
- const variables and parameters
Const can be used to "protect" variables from being modified. An important use of this keyword is to replace #define to define constants, which is the most direct application of const. For example, you can declare the constant PI:
const double PI = 3.141592653589793238462;
Any variable can be marked const, including global variables and class data members, You can also use const to specify that the parameters of a function or method remain unchanged. For example, the following function receives a const parameter. The integer param cannot be modified in a function body. If you try to modify this variable, the compiler generates an error.
void func(const int param)
{
	//Not allowed to change param...
}
Two special const variables or parameters are discussed in detail below: const pointer and const reference.
int* ip;
ip = new int[10];
ip[4] = 5;
Suppose you want to apply const to let. For the time being, we don't consider whether it works, but what it means. Do you want to prevent the modification of the ip variable itself or the value referred to by the ip? That is, do you want to block line 2 or line 3 of the above example? In order to prevent the modification of the indicated value (line 3), the keyword const can be added to the ip declaration in this way;
const int* ip;
ip = new int[10];
ip[4] = 5;//DOES NOT COMPILE!
The value referred to by ip cannot be changed at this time. The following is another method of semantic equivalence;
int const* ip;
ip = new int[10];
ip[4] = 5;//DOES NOT COMPILE!
Whether const is placed before or after int does not affect its function.
If you want to mark the ip itself const (not the value that ip refers to), you can do this:
int* const ip = nullptr;
ip = new int[10]; //DOES NOT COMPILE
ip[4] = 5; //ERROR.dereferencing a null pointer
Now the ip itself cannot be modified. The compiler requires initialization when declaring the ip. You can use nullptr in the previous code or the newly allocated memory, as shown below:
int* const ip = new int[10];
int[4] = 5;
You can also mark the pointer and the indicated value as const, as follows:
const int* const ip = nullptr;
Although the syntax looks a bit confusing, the rule is actually very simple: apply the const keyword to anything directly to its left. Consider this line again;
int const * const ip = nullptr;
From left to right, the first const is directly to the right of int, so const is applied to the int referred to by ip, specifying that the value referred to by ip cannot be modified. The second const is directly to the right of *, so apply const to the pointer to the int variable, that is, let the variable. Therefore, the ip (pointer) itself cannot be modified.
This rule is puzzling with one exception: the first const can appear in front of the variable, as shown below.
const int* const ip = nullptr;
This "abnormal" syntax is more common than other grammars. This rule can be applied to indirect values at any level, such as:
const int * const * const * const ip = nullptr
be careful:
There is also an easy to remember rule for indicating complex variable declarations: read from right to left. Consider the example "int* const ip". Reading this sentence from right to left, you can know that "ip is a const pointer to the int value". In addition, "int const* ip" is read as "ip is a pointer to const int.?
const reference
Applying const to a reference is usually easier than applying it to a pointer for two reasons. First, the reference defaults to const and the object to which the reference refers cannot be changed. Therefore, it is not necessary to explicitly mark the reference const. Second, a reference to a reference cannot be created, so a reference usually has only one layer of indirect values. The only way to get multiple layers of indirect values is to create a pointer Therefore, when C + + programmers refer to "const reference", the meaning is as follows;
int z;
const int& zRef = z;
zRef = 4; //DOES NOT COMPILE
Const references are often used as parameters, which is very useful. If you want to pass a value by reference for efficiency, but you don't want to modify the value, you can mark it as const references. For example:
void doSomething(const BigClass& arg)
{
	//Implementation here
}
When you pass an object as a parameter, the default choice is const reference. Const can be ignored only when you explicitly need to modify the object.
- constexpr keyword
The concept of constant expression always exists in C + +, and constant expression is required in some cases. For example, when defining an array, the size of the array must be a constant expression. Due to this limitation, the following code is invalid in C + +:
const int getArraySize() { return 32; }
int main()
{
		int myArray[getArraySize()]; //Invalid in c++
		return 0;
}
You can use the constexpr keyword to redefine the getArraySize() function and turn it into a constant expression. The constant expression is evaluated at compile time.
constexpr int getArraySize() { return 32; }
int main()
{
    int myArray[getArraySize()];
    return 0;
}
This can even be done:
int myArray[getArraySize() + 1];//OK
Declaring a function as constexpr imposes some restrictions on the behavior of the function, because the compiler must evaluate the constexpr function during compilation, and the. Function is not allowed to have any side effects. The following are some restrictions;
The e function body does not contain goto statements, try catch blocks, uninitialized variables, variable definitions of non literal types, and does not throw exceptions, but other constexpr functions can be called. "Literal type" is the type of constexpr variables, which can be returned from the constexpr function. Literal types can be void (there may be a constvolatile qualifier) and scalar types (integer and floating-point types, enumeration types, pointer types, member pointer types, which have const/volatile qualifiers), reference types, literal array types, or class types. Class types may also have constvolatile qualifiers, which are generic (i.e., not user supplied) Destructor, with at least one constexpr constructor, all non static data members and base classes are literal types
The return type of the function should be literal
If the constexpr function is a member of a class, it cannot be a virtual function.
All arguments to the function should be literal
The constexpr function can only be called after it is defined in the translation unib, because the compiler needs to know the complete definition.
dynamic_cast() and reinterpret_cast() are not allowed.
new and delete expressions are not allowed.
By defining constexpr constructor, you can create constant expression variables of user-defined type. Constexpr constructor has many limitations, some of which are as follows:
Class cannot have any virtual base classes.
All arguments to the constructor should be literal.
Constructor body should not be function try block
The constructor body should meet the same requirements as the constexpr function body and be explicitly set to the default (= default).
All data members should be initialized with constant expressions.
For example, the following Rect class defines a constexpr constructor that meets the above requirements. In addition, it also defines a constexpr getArea() method to perform some calculations.
class Rect
{
	public:
		constexpr Rect(size_t width,size_t height)
			:mWidth(width),mHeigh(height){}
		constexpr size_t getArea() const { return mWidth * mHeight;}
	private:
		size_t mWidth,mHeight;
};
Using this class to declare constexpr objects is quite straightforward:
constexpr Rect r(8,2);
int myArray[r.getArea()]; //ok
static keyword
In C + +, static keyword has many uses, and there seems to be no relationship between these uses. Part of the reason for "overloading" keyword is to avoid introducing new keywords into the language.
- Static data members and methods
Static data members and methods of declarable classes. Static data members, unlike non static data members, are not part of an object. Instead, the data member has only one copy, which exists outside any object of the class. Static methods are similar, at the class level (not the object level). Static methods do not execute in a specific object environment. Chapter 9 provides examples of static data members and static methods.
- Static link
Before explaining the static keyword for links, first understand the concept of links in C + +. Each source file of C + + is compiled separately, and the compiled target files will be linked to each other. Each name in the C + + source file, including functions and global variables, has an internal or external link. An external link means that the name is valid in other source files, and an internal link (also known as a static link) means that it is invalid in other source files. By default, both functions and global variables have external links. However, internal (or static) links can be specified using the keyword static before the declaration. For example, suppose there are two source files, FirstFile.cpp and AnotherFile.cpp. Here is FirstFile.cpp:
void f();
int main()
{
	f();
	return 0;
}
Note that this file provides a prototype of the f() function, but does not give a definition. Here is AnotherFile.cpp:
#include <iostream>
void f();
void f()
{
	std::cout<<"f\n";
}
This file provides both the prototype and definition of the f() function. Note that it is legal to write prototypes of the same function in two different files. If you put the prototype in the header file and include the header file with #include in each source file, the preprocessor will automatically give the function prototype in each source file. The header file is used because it is easy to maintain (and keep synchronized) a copy of the prototype. However, this example does not use header files. Both source files can be compiled successfully, and the program link is no problem: because the f() function has an external link, the main() function can call this function from another file. Now assume that static is applied to the f() function prototype in AnotherFile.cpp. Note that you do not need to reuse the static keyword before the definition of the f() function. You only need to use this keyword before the first instance of the function name without repeating it:
#include <iostream>
static void f();
void f()
{
	std::cout<<"f\n";
}
Each source file can now be compiled successfully, but linking will fail because the function has an internal (static) link and FirstFile.cpp cannot use this function. If a static method is defined in the source file but not used, some compilers will give a warning (indicating that these methods should not be static because they may be used by other files). Another way to use static for internal links is to use anonymous namespaces . instead of using static, you can encapsulate variables or functions into a namespace without a name, as shown below:
#include <iostream>
namespace
{
	void f();
	void f()
	{
		std::cout<<"f\n";
	}
}
In the same source file, items in the namespace can be accessed anywhere after the anonymous namespace is declared, but not in other source files. This semantics is the same as that of the static keyword.
Warning:
To get internal links, it is recommended to use anonymous namespaces instead of the static keyword.
extern keyword
The extern keyword is like the antonym of static, specifying the name after it as an external link. This method can be used in some cases. For example, const and typedef are internal links by default, and extern can be used to make them external links. However, exterm is a little complex. When a name is specified as extern, the compiler treats this statement as a declaration Not a definition. For variables, this means that the compiler does not allocate space for this variable. You must provide a separate definition line for this variable without using the extem keyword. For example, the following is the content of AnotherFile.cpp:
extern int x;
int x = 3;
You can also initialize x in the extern line, which is both a declaration and a definition;
extern int x = 3;
extem in this case is not very useful because x has external links by default. extern is really used only when another source file FirstFile.cpp uses x;
#include <iostream>
extern int x;
int main()
{
	std::cout<<x<<std::endl;
}
FirstFile.cpp uses the extem declaration, so it can use X. the compiler needs to know the declaration of X before it can use this variable in the main() function. However, if the extem keyword is not used when declaring x, the compiler will consider it a definition, so it will allocate space for X and cause the link step to fail again (because there are two globally scoped x variables) . using extern, you can access this variable globally in multiple source files.
Warning;
However, it is not recommended to use global variables. Global variables can be confusing and error prone, especially in large programs!
Static variables in functions
The ultimate purpose of static keyword in C + + is to create local variables that can retain values when leaving and entering the scope. Static variables in a function are like global variables that can only be accessed inside a function. The most common usage of static variables is to "remember" whether a function has performed a specific initialization operation. For example, the following code uses this technology:
void performTask()
{
static bool initialized = false;
if(!initlized)
{
cout<<"initializing"<<endl;
initialized = false;
}
}
However, static variables are confusing. There are usually better ways to avoid using static variables when building code. In this case, you can write a class and use the constructor to perform the required initialization operations. Note: avoid using separate static variables and use objects instead in order to maintain state. However, sometimes they are very useful. An example is to implement Meyer's s s Ingleton (single example) design mode, see Chapter 29 for details.
be careful:
The implementation of performTask() is not thread safe. It contains a race condition. In a multithreaded environment, you need to use atoms or other mechanisms to synchronize multiple threads. See Chapter 23 for multithreading.
Initialization order of nonlocal variables
Before concluding the discussion on static data members and global variables, consider the initialization order of these variables. All global variables and static data members of classes in the program will be initialized before the start of the main() function. Given the variables in the source file, they will be initialized in the order they appear in the source file. For example, in the following file, Demo::x must be initialized before y:
class Demo
{
public:
static int x;
};
int Demo::x = 3;
int y = 4;
However, C + + does not provide a specification for the order in which nonlocal variables are initialized in different source files. If there is a global variable x in one source file and a global variable y in another source file, it is impossible to know which variable is initialized first. Generally, there is no need to pay attention to the lack of this specification, but if a global variable or static variable depends on another variable, it may cause problems. Object initialization means calling the constructor. The constructor of a global object may access another global object and assume that another global object has been built. If these two global objects are declared in different source files, one global object cannot be expected to be built before the other, and their initialization order cannot be controlled. Different compilers may have different initialization order, even different versions of the same compiler, and even adding another source file to the project may affect the initialization order.
Warning:
The initialization order of nonlocal variables in different source files is uncertain.
Destruction order of nonlocal variables
Nonlocal variables are destroyed in the reverse order of initialization. The initialization order of nonlocal variables in different source files is uncertain, so the destruction order is also uncertain.
Types and type conversions
Type alias
The type alias provides a new name for an existing type declaration. Type aliases can be treated as syntax for introducing synonyms as existing type declarations (no new types are created). Next, specify the new name IntPtr for the int * type declaration:
using IntPtr = int*;
New type names and alias definitions can be used interchangeably. For example, the following two lines are valid:
int * p1; intPtr p2;
Variables created with the new type name are fully compatible with variables created with the original type declaration. Given the above definition, it is perfectly legal to write the following code because they are not only "compatible" types, but they are the same type at all:
p1 = p2; p2 = p1;
The most common use of type aliases is to provide an easy to manage name when the declaration of the actual type is too clumsy, which usually occurs in templates. For example, Chapter 1 introduces std::vector in the standard library. To declare a string vector, you need to declare it as std::vector < STD:: String >. This is a template class, so as long as you want to use the vector type, you need to specify the template parameters, which will be discussed in detail in Chapter 12. In operations such as declaring variables and specifying function parameters, you must write std::vector < STD:: String >:
void processVector(const std::vector<std::string>& vec){}
int main()
{
std::vector<std::string>myVector;
processVector(myVector);
return 0;
}
Use type aliases to create shorter, more meaningful names:
using StringVector = std::vector<std::string>;
void processVector(const StringVector& vec){}
int main()
{
StringVector myVector;
processVector(myVector);
return 0;
}
Type aliases can include scope qualifiers. The above example shows this, including the scope std of StringVector. Type aliases are widely used in the standard library to provide short names for types. For example, std::string is actually such a type alias
using string = basic_string<char>;