1. What is the Pod lifecycle
The Pod can contain multiple containers, and the Pod can also have one or more init containers started before the application container. The init container is not different from the ordinary container. The main reason is that init runs first. The main container will not be started until init runs successfully. Therefore, the init container does not support Readiness. If the init container of the Pod fails to start, Kubernetes will continue to restart the Pod until the init container succeeds.
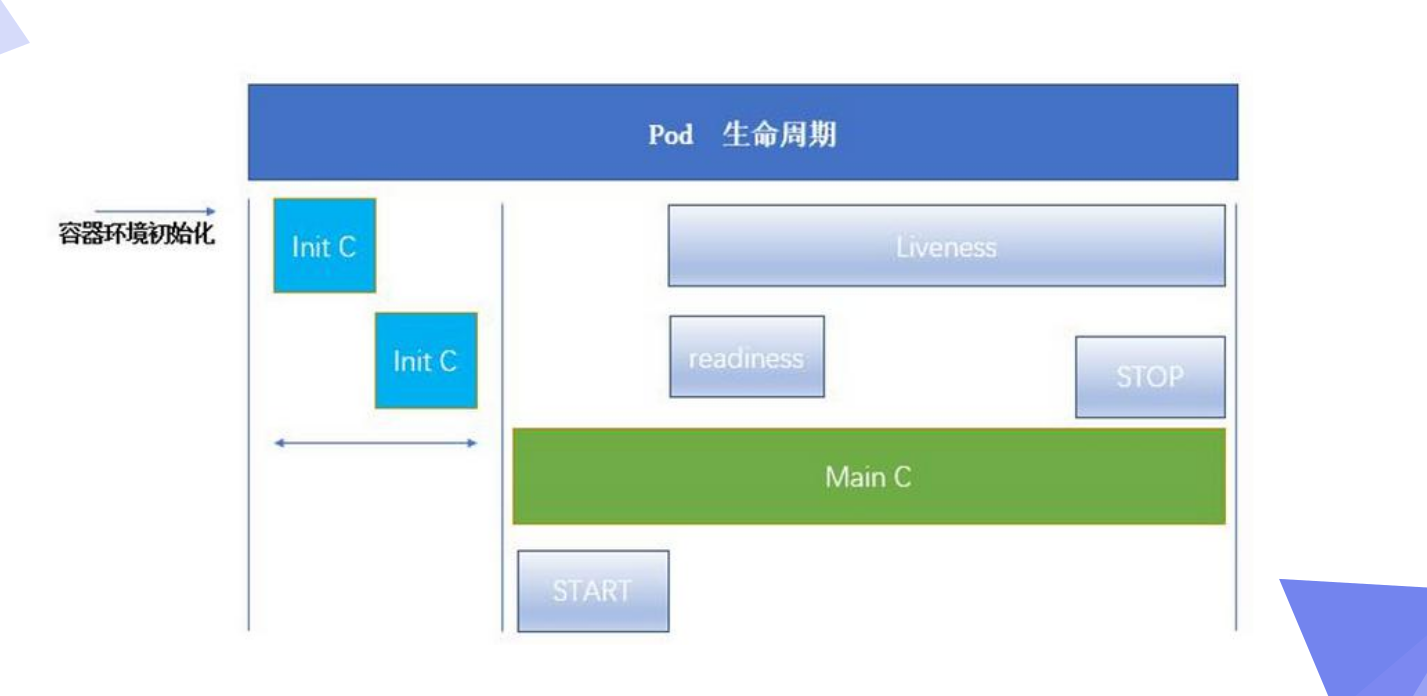 Advantages of Init container:
1. If you want to use some tools but don't want to put them in the main container, put these tools in the initial image init. After running, the initial image ends, and then use the main container
2. The Init container can safely run these tools to reduce risk
3. The creator and deployer of the application image can work independently
2. Pod lifecycle implementation
(1) init container
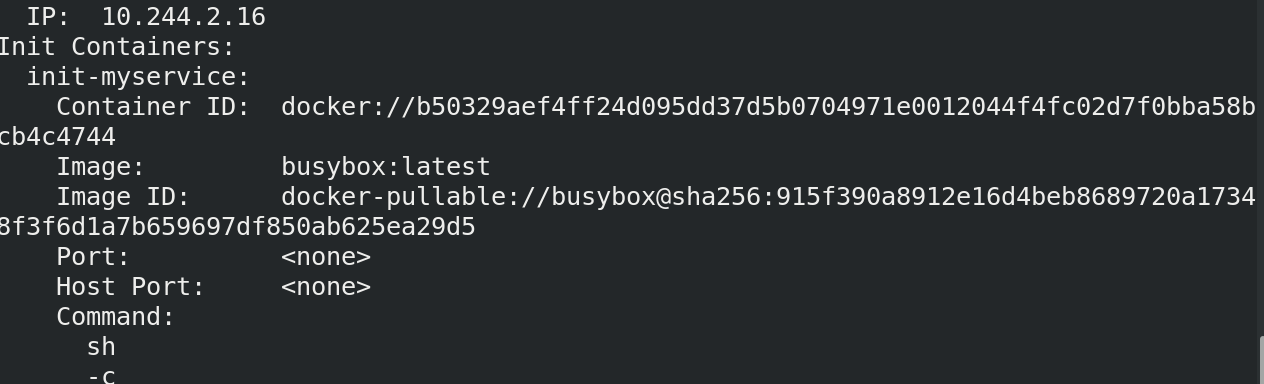
Write myapp Yaml file
[root@server2 ~]# cat myapp.yaml
apiVersion: v1
kind: Pod
metadata:
  name: myapp
spec:
  initContainers:  ## Execute init container first
  - name: init-myservice
    image: busybox:latest
    command: ['sh', '-c', "until nslookup myservice.default.svc.cluster.local; do echo waiting for myservice; sleep 2; done"]    ##Sleep for two seconds to detect do output information
  containers:
  - name: myapp-container
    image: myapp:v1
    imagePullPolicy: IfNotPresent

It is not running. It is currently initializing. There is only one initialization container that has been detecting and parsing.
Create svc and add the service required by init container
[root@server2 ~]# cat myservice.yaml
---   ##Markup language, representing splitting multiple lists
apiVersion: v1
kind: Service   ##Created service
metadata:
  name: myservice
spec:
  ports:
  - protocol: TCP
    port: 80  ##External port
    targetPort: 80    ##Port in container
[root@server2 ~]# kubectl apply -f myservice.yaml
service/myservice created
running!!

[root@server2 ~]# kubectl describe svc myservice
Name:              myservice
Namespace:         default
Labels:            <none>
Annotations:       <none>
Selector:          <none>
Type:              ClusterIP
IP Family Policy:  SingleStack
IP Families:       IPv4
IP:                10.98.205.219
IPs:               10.98.205.219
Port:              <unset>  80/TCP
TargetPort:        80/TCP
Endpoints:         <none>
Session Affinity:  None
Events:            <none>
(2) Survival probe
Indicates whether the container is running
Note: when the survival and ready probes exist at the same time, but only the survival probe passes, the container will run, but it can only run internally and cannot be accessed externally. Only when both probes run successfully can they be accessed externally.
Kubelet can choose whether to execute and respond to three probes running on the container: liveness probe: indicates whether the container is running. If the survival probe fails, kubelet will kill the container and the container will be affected by its restart policy. If the container does not provide a survival probe, the default state is Success.
[root@server2 ~]# cat myapp.yaml
apiVersion: v1
kind: Pod
metadata:
name: myapp
spec:
containers:
- name: myapp
image: myapp:v1
imagePullPolicy: IfNotPresent
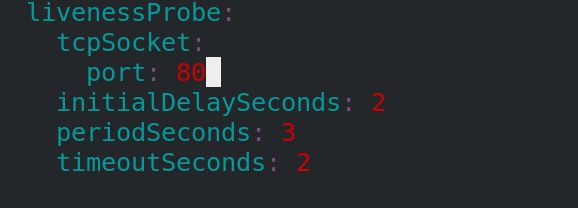
livenessProbe:
tcpSocket:
port: 8080
initialDelaySeconds: 2 ##How long after the container is started
periodSeconds: 3 ## Detection interval
timeoutSeconds: 2 ## Detection timeout
Because I changed the port, I can't detect it, so the container can't start all the time.
[root@server2 ~]# kubectl get pod -o wide
NAME    READY   STATUS             RESTARTS   AGE    IP            NODE      NOMINATED NODE   READINESS GATES
myapp   0/1     CrashLoopBackOff   5          111s   10.244.1.22   server3   <none>           <none>
Change back to port
Sure to succeed running

(3) Readiessprobe
readinessProbe: indicates whether the container is ready for Service requests. If the ready probe fails, the endpoint controller will delete the IP address of the Pod from the endpoints of all services matching the Pod. The ready state before the initial delay defaults to F.
The back-end can only be used after the ready probe is ready, otherwise svc will not expose the port.
apiVersion: v1
kind: Pod
metadata:
name: myapp
spec:
containers:
- name: myapp
image: myapp:v1
imagePullPolicy: IfNotPresent
livenessProbe:
tcpSocket:
port: 80
initialDelaySeconds: 2
periodSeconds: 3
timeoutSeconds: 2
readinessProbe:
httpGet:
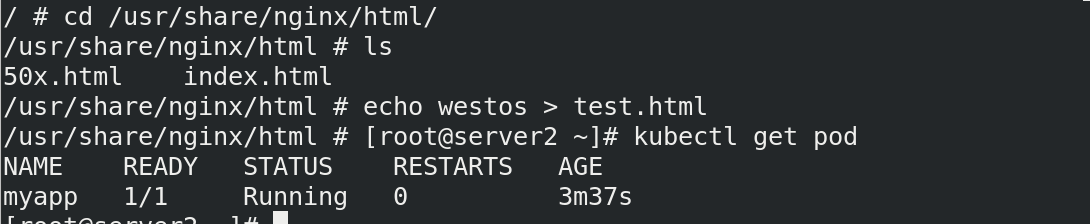
path: /test.html ##By monitoring / test HTML this file to determine whether it is ready
port: 80
initialDelaySeconds: 2
periodSeconds: 3
timeoutSeconds: 2
running but not ready, the survival probe is OK, the ready probe is not OK, and no test is detected HTML file, not ready.

Enter the container and add test HTML file
[root@server2 ~]# kubectl exec -it myapp -- sh
/ # ip addr
1: lo: <LOOPBACK,UP,LOWER_UP> mtu 65536 qdisc noqueue state UNKNOWN qlen 1000
    link/loopback 00:00:00:00:00:00 brd 00:00:00:00:00:00
    inet 127.0.0.1/8 scope host lo
       valid_lft forever preferred_lft forever
3: eth0@if9: <BROADCAST,MULTICAST,UP,LOWER_UP,M-DOWN> mtu 1450 qdisc noqueue state UP
    link/ether e2:57:bb:7e:a5:6d brd ff:ff:ff:ff:ff:ff
    inet 10.244.2.18/24 brd 10.244.2.255 scope global eth0
       valid_lft forever preferred_lft forever
Direct READYL
We can see the published content
