preface
One of the best things about Linux is its multi person and multi task environment. If you are exposed to Linux for the first time, what is the meaning of so many directories and files under Linux? Let me make a summary.
1, Manage user accounts
Compared with windows operating system, the functions of user account and group account in Linux system are essentially the same. They also control the access to resources based on user identity, but there are some differences in manifestation and individual details.
1. User account
In Linux, according to the requirements of system management, user accounts are divided into different types with different permissions, mainly including super users, ordinary users and program users
- Super user
The root user is the default super user account in the Linux system and has the highest authority on the host, similar to the Administrator user in the Windows system (for security reasons, it is recommended to use only the ordinary user account for daily transaction processing) - Ordinary users
Ordinary users are created by root users or other administrator users. Their rights are limited. Generally, they only have full permissions in their own host directory - Program user
When installing the Linux system and some applications, some specific low authority user accounts will be added. These users are generally not allowed to log in to the system and are only used to maintain the normal operation of the system or a program, such as bin, daemon, ftp, mail, etc
1.1 UID number
Each user account in the Linux system has a digital identity mark called UID (user ID number)
- For the system core, UID is the basic basis for distinguishing users. In principle, the UID number of each user should be unique
- The UID number of the root user account is a fixed value of 0
- The UID number of the program user account is 1 ~ 999 by default
- The UID number of ordinary user account is 1000 ~ 60000
1.2 user account file
The user account, password and other information in the Linux system are saved in the corresponding configuration file. The user account can be managed by directly modifying these files or using the management command.
- /etc/passwd
/etc/passwd is used to save basic information such as user name, host directory, login Shell, etc
For example, execute the following command to view the first few lines of the / etc/passwd file
[root@localhost ~]#head -3 /etc/passwd
root:x:0:0:root:/root:/bin/bash
bin:x:1:1:bin:/bin:/sbin/nologin
Each line of passwd file contains seven configuration fields separated by colon ":". The fields from left to right represent the following meanings respectively:
Paragraph 1: the name of the user account, which is also the identification name used when logging in to the system
Paragraph 2: encrypted user password string or password placeholder "x"
Paragraph 3: UID number of user account
Paragraph 4: GID number of the account number of the basic group to which it belongs
Paragraph 5: the full name of the user. You can fill in the description information related to the user
Paragraph 6: Host Directory, that is, the default working directory where the user logs in
Paragraph 7: login Shell and other information, the Shell used by the user after login
- /etc/shadow
/etc/shadow stores the user account password information, account validity and other information. The shadow file is also called "shadow file". Generally, only the root user can read the contents of the file by default, and it is not allowed to edit the contents of the file directly
For example, execute the following command to view the first few lines of the / etc/shadow file:
[root@localhost ~]#head -2 /etc/shadow
root:$6$y2pPNXfJJsH6drSA$nEiDLPIBr8rtJJpRsLj8PbpcJb.xDSMhcuwAQLp1QiQic9zzp7emfKM5g.n84k3ujEyguqH:99999:7:::
bin:*:17110:0:99999:7:::
Each line of the shadow file contains nine configuration fields separated by colons ":". The meaning from left to right is as follows:
Field 1: user account name.
Field 2: password string information encrypted with MD5, when it is "*" or "!" Indicates that this user cannot log in to the system.
Field 3: time of last password modification (from January 1, 1970)
Field 4: the minimum effective days of the password. After the password is modified this time, it must be at least this number of days before the password can be modified again. The default value is 0, which means no restriction.
Field 5: the longest valid days of the password. After the password is modified this time, the password must be modified again. The default value is 99999, which means no restriction.
Field 6: how many days in advance to warn the user that the password will expire. The default value is 7.
Field 7: how many days after the password expires to disable this user.
Field 8: account expiration time. This field specifies the number of days for the user to void (calculated from January 1, 1970). The default value is blank, indicating that the account is permanently available.
Field 9: reserved field, which has no specific purpose at present.
2. User account management
2.1 add user account - useradd
The useradd command is used to add a user account. The command format is as follows
useradd [option] user name
Common options: - u, - d, - e, - G, - G, - M, - s
| format | explain |
|---|---|
| -u | Specifies the UID number of the user. It is required that the UID number is not used by other users |
| -d | Specifies the location of the user's hosting directory (not effective when used with - M) |
| -e | Specify the user's account expiration time. You can use the date format of yyyy-mm-dd 2021-0101 |
| -g | Specify the user's base group name (or use GID number) |
| -G | Specify an additional group name for the user (or use a GID number) |
| -M | Do not create a host directory, even if / etc / login The host directory to be established has been set in the defs system configuration |
| -s | Specifies the login Shell of the user |
- case
The simplest use is to use only the user name as an argument to the command without adding any options.
For example, you can create a user account named yjs by performing the following operations, and view the changes of the new user account by viewing the passwd, shadow file and / home directory:
root@localhost ~]#useradd yjs
[root@localhost ~]#tail -1 /etc/passwd
yjs:x:1011:1012::/home/yjs:/bin/bash
[root@localhost ~]#tail -1 /etc/shadow
yjs:!!:18847:0:99999:7:::
[root@localhost ~]#ls -A /home/yjs
.bash_logout  .bash_profile  .bashrc  .mozilla
In account management, sometimes it is necessary to specify the validity period of the account, or it is required that the new account cannot log in to the system. At this time, you can use "- e" "-s" option
For example, you can create an FTP account named yjs (terminal login is prohibited) by performing the following operations, making the account invalid on August 8, 2021
[root@localhost ~]#useradd -e 2021-08-08 -s /sbin/nologin yjs
2.2 setting / changing user password - passwd
After adding a user account through the useradd command, you need to set a password for it to work normally.
The command format is as follows:
passwd [option] user name
The password of the current account can be modified without specifying the user name
Common options are as follows:
| format | explain |
|---|---|
| -d | Clear the password of the specified user and only use the user name to log in to the system |
| -l | Lock user account |
| -S | View the status of the user account (whether it is locked) |
| -u | Unlock user account |
case
Example ① change the login password of the user yjs
[root@localhost ~]#passwd yjs
 Change user yjs Your password.
New password:
Invalid password: the password did not pass the dictionary check - Oversimplification/systematization
 Re enter the new password:
passwd: All authentication tokens have been successfully updated.
Example ② lock and unlock the user account yjs through the passwd command
[root@localhost ~]#passwd -l yjs          #Lock account
 Lock user yjs Your password.
passwd: Operation succeeded
[root@localhost ~]#passwd -S yjs         #View user account status
yjs LK 2021-08-08 0 99999 7 -1 (The password is locked.)
[root@localhost ~]#passwd -u yjs         #Unlock account
 Unlock user yjs Your password.
passwd: Operation succeeded
[root@localhost ~]#passwd -S yjs        #Check whether the user is unlocked
yjs PS 2021-08-08 0 99999 7 -1 (Password set, use SHA512 Algorithm.)
2.3 modify user account attribute - usermod
For user accounts that already exist in the system, you can use the usermod command to reset various properties
The command format is as follows:
usermod [option] user name
Common parameters are as follows:
| format | explain |
|---|---|
| -u | Modify user's UID number |
| -d | Modify the user's host directory location |
| -e | To modify the user's account expiration time, you can use the date format of YYYY-MM-DD |
| -s | Specifies the login Shell of the user |
| -l | Change the user's account login name |
| -L | Lock user account |
| -U | Unlock user account |
When using the usermod command, most of the options correspond to the options of the useradd command, and the starting function is also similar. In general, the last three are used more.
case
Example ① transfer the host directory of admin user from / admin to / home/admin:
[root@localhost ~]#mv /admin/home                   #Migration directory
[root@localhost ~]#usermod -d /home/admin admin     #Specify host directory location
For example ②, change the login name of the admin user to webmaster, which will take effect the next time you log in
[root@localhost ~]#usermod -l webmaster admin             #Change user account login
[root@localhost ~]#grep "admin" /etc/passwd               #see
admin:x:1003:10::/admin:/bin/bash
2.4. Delete user account - userdel
At work, when an employee has resigned from the company and his user account no longer needs to be used, you can use the userdel command to delete the user account.
The command format is as follows:
userdel [-r] user name
When the - r option is used, the host directory can be deleted at the same time
case
Delete the user account named yjs and its host directory
[root@localhost ~]#userdel -r yjs
[root@localhost ~]#ls -ld /home/yjs
ls: cannot access/home/yjs: There is no such file or directory
2.5 initial configuration file of user account
After adding a new user account, the useradd command will create some initial configuration files in the user's host directory. These files come from the account template directory / etc/skel, which are basically hidden files.
Common initial configuration files include the following three:
-
". bash_logout": executed every time the user logs out
-
". bash_profile": executed every time the user logs in
-
". bashrc": executed every time the "/ bin/Bash" program is loaded (login Shell)
[root@localhost /etc/skel]#ls -a
.  ..  .bash_logout  .bash_profile  .bashrc  .mozilla
2, Management group account
1. Group account
For user accounts, the corresponding group accounts can be divided into two types: basic group (private group) and additional group (public group).
1.1 basic group and additional group
Basic group: if no user group is specified, a group with the same name as the user name will be created by default when creating a user. This group is the basic group
Additional group: in addition to the basic group, other groups of users are additional groups, and users can be deleted from the additional group.
Whether a user is in a basic group or an additional group, he or she will have the permissions of this group. A person can belong to multiple additional groups, but a user can only have one basic group.
1.2 group account file
The group account file is similar to the user account file, namely / etc/group and / etc/gshadow
- /etc/group: save the group account name, GID number, member and other basic information
- /etc/gshadow: save the password information of the group account (rarely used)
Perform the following operations to view which user members are included in the root group and which groups contain root users:
[root@localhost /etc/skel]#grep "^root" /etc/group
root:x:0:admin
[root@localhost /etc/skel]#grep "root" /etc/group
root:x:0:admin
2. Group account management
2.1 add group account - groupadd
The command format is as follows:
groupadd [-g GID] Group account name
case
Add a group account named yjs:
[root@localhost /etc/skel]#groupadd yjs
[root@localhost /etc/skel]#tail -1 /etc/group
yjs:x:1012:
2.2 adding and deleting group members - gpasswd
The command format is as follows:
gpasswd [option] Group account name
Common options
| format | explain |
|---|---|
| -a | Add a user to the group |
| -d | Remove a user member from the group |
| -M | Specify multiple member users of group accounts at the same time, separated by commas |
case
[root@localhost /etc/skel]#gpasswd -a gulei1 yjs             #Add the guilei1 user to the yjs group
 Transferring user“ gulei1"Add to“ yjs"Group
[root@localhost /etc/skel]#groups gulei1                     #Confirm that the gulei1 user has joined the yjs group
gulei1 : gulei1 yjs
[root@localhost /etc/skel]#gpasswd -d gulei1 yjs             #Remove the guilei1 user from the yjs group
 Transferring user“ gulei1"From“ yjs"Delete from group
[root@localhost /etc/skel]#groups gulei1                     #Confirm that the gulei1 user has exited the yjs group
gulei1 : gulei1
[root@localhost /etc/skel]#gpasswd -M gulei1,gulei2,gulei3 yjs    #Add three users to the yjs group
[root@localhost /etc/skel]#grep "^yjs" /etc/group                 #Confirm whether to join successfully
yjs:x:1012:gulei1,gulei2,gulei3
2.3 delete group account - groupdel
The command format is as follows:
groupdel Group account name
case
[root@localhost /etc/skel]#groupdel yjs
2.4 modify user account attribute - usermod
For an existing user account in the system, you can use the usermod command with options and user name to reset the group to which the account belongs.
The command format is as follows:
usermod [option] user name
Common options:
| format | explain |
|---|---|
| -u | Modify user's UID number |
| -d | Modify the user's host directory location |
| -e | To modify the user's account expiration time, you can use the date format of YYYY-MM-DD |
| -g | Modify the user's basic group name (or use GID number) |
| -G | Modify the user's additional group name (or use GID number) |
| -s | Specifies the login Shell of the user |
| -l | Change the login name of the user account |
| -L | Lock user account |
| -U | Unlock user account |
case
[root@localhost ~]#usermod -l GL gulei1        #Change login
[root@localhost ~]#tail -1 /etc/passwd         #see
GL:x:1006:1007::/home/gulei1:/bin/bash
[root@localhost ~]#usermod -L GL               #Lock user account


[root@localhost ~]#tail -2 /etc/shadow         #Check to see if it is locked
GL:!!:18846:0:99999:7:::
GL:!$6$owIlrMTP$4idHfFO2XScCT8E.sWVVP6apsPoNVX/NPAKlsPcxof/BIbgpSKtnaAZFNhYLS1XkClEIfzFaHbtyyxnicxYPD1:18847:0:99999:7:::                        #Added before string! Indicates locked
[root@localhost ~]#usermod -U GL               #Unlock user account
[root@localhost ~]#tail -1 /etc/shadow         #Check to see if it is unlocked
GL:$6$owIlrMTP$4idHfFO2XScCT8E.sWVVP6apsPoNVX/NPAKlsPcxof/BIbgpSKtnaAZFNhYLS1XkClEIfzFaHbtyyxnicxYPD1:18847:0:99999:7:::                         #! Removed and unlocked
From this, we can see the difference between passwd and usermod:
passwd -l add 2 "!" before the password
passwd -u remove the first two "!"
usermod -L adds 1 "!" before the password
usermod -U remove 1 "!" before password
Therefore, after locking the user with passwd -l, you need to execute usermod -U twice or passwd -u once
3, Query account information
In user management, although you can query relevant information by directly viewing the configuration files of user account and group account, it is not very intuitive. In Linux system, you can also use several common query command tools, such as id, groups, finger, w, last, etc.
1. Query the user account id
Use the ID command to quickly view the UID, GID and other identification information of the specified user account. For example, execute the "id root" command to view the user ID number, group ID number and additional group ID number of the root account:
[root@localhost ~]#id root
uid=0(root) gid=0(root) group=0(root)
2. Query the group to which the user account belongs - groups
Use the groups command to view which groups the specified user account belongs to. For example, view the group account information of the current user root and GL user:
[root@localhost ~]#groups
root
[root@localhost ~]#groups GL
GL : gulei1
3. Query the login attribute of user account - finger
Use the finger command to query the login properties and other details of the specified user account, including login name, full name, host directory, login Shell, etc. For example, to view the details of the root account:
[root@localhost ~]#finger root
Login: root           			Name: root
Directory: /root                    	Shell: /bin/bash
On since August 8-11:07 (CST) on :0 from :0 (messages off)
On since August 8-11:07 (CST) on pts/0 from :0
   4 hours 35 minutes idle
On since August 8-11:10 (CST) on pts/1 from 192.168.24.1
   1 second idle
New mail received I. July 26-16:34 2021 (CST)
     Unread since I. July 26 12:53 2021 (CST)
No Plan.
4. Query the user login status of the current host - w, who, users
- Use the w command to query the user login status in the current host, list the login account name, terminal, login time, source location and other information. The command output is as follows:
[root@localhost ~]#w
 15:45:23 up  4:38,  3 users,  load average: 0.00, 0.01, 0.05
USER     TTY      FROM             LOGIN@   IDLE   JCPU   PCPU WHAT
root     :0       :0               11:07   ?xdm?  57.65s  0.14s /usr/libexec/gnome-session-bin
root     pts/0    :0               11:07    4:38m  0.03s  0.03s bash
root     pts/1    192.168.24.1     11:10    3.00s  0.31s  0.00s w
- who,users
[root@localhost ~]#who
root     :0           2021-08-08 11:07 (:0)
root     pts/0        2021-08-08 11:07 (:0)
root     pts/1        2021-08-08 11:10 (192.168.24.1)
[root@localhost ~]#users
root root root
5. Query the user information of the login system - last
This command is used to list the information related to the users who logged in to the system in the past. The path of its command is: / usr/bin/last.
When the last instruction is executed, it will read the file named wtmp located in the / var/log directory, and display the contents of the file and the list of users logged in to the system.
By default, wtmp records are displayed. btmp can display more details. You can display remote login, such as ssh login.
-
The utmp file stores the information of users currently in the system.
-
The wtmp file stores the information of users who have logged in to the system.
Common options are as follows:
| format | explain |
|---|---|
| -a | The host name or IP address of the login system is displayed in the last line |
| -d | Convert IP address to host name |
| -f | Specify record file |
| -i | -i displays the login status of a specific ip. Tracking displays the login of a specific ip with - i. Tracking |
| -o | Read an old-type wtmp file (written by linux-libc5 applications). |
| -n | -N < display rows > or - < display rows > sets how many rows of records are displayed |
| -w | Display full user and domain names in the output |
| -R | Do not display the host name or IP of the login system (omit the field of hostname) |
| -t | Display information before YYYYMMDDHHMMSS |
| -x | Displays the history of system shutdown, user login and logout |
case
Display the last 10 records logged into the system:
[root@localhost ~]#last -10
root     pts/1        192.168.24.1     Sun Aug  8 11:10   still logged in
root     pts/0        :0               Sun Aug  8 11:07   still logged in
root     :0           :0               Sun Aug  8 11:07   still logged in
reboot   system boot  3.10.0-693.el7.x Sun Aug  8 11:06 - 16:01  (04:54)
root     pts/0        192.168.24.1     Sat Aug  7 08:29 - crash (1+02:37)
root     :0           :0               Sat Aug  7 08:29 - crash (1+02:37)
reboot   system boot  3.10.0-693.el7.x Sat Aug  7 08:28 - 16:01 (1+07:32)
root     pts/0        192.168.24.1     Fri Aug  6 08:56 - 00:42  (15:45)
root     :0           :0               Fri Aug  6 08:56 - down   (15:46)
reboot   system boot  3.10.0-693.el7.x Fri Aug  6 08:54 - 00:42  (15:48)

wtmp begins Sat Jul 24 22:04:23 2021
[root@localhost ~]#
4, Manage the properties of directories and files
In the security model of Linux file system, two attributes are given to the files in the system: access permission and file owner, which are referred to as "permission" and "ownership". The Linux system controls the process of users accessing data according to the access rights and ownership of files or directories.
- Access permissions include three basic types: read, write and executable.
- Attribution includes owner (user account with the file) and group (group account with the file).
1. View the permissions and ownership of directories and files
When using ls command with "- l" option, the file details will be displayed in long format, including parameters such as permission and ownership of the file.
For example, list the details of the / etc/passwd file:
[root@localhost ~]#ls -l /etc/passwd
-rw-r--r-- 1 root root 2557 8 August 15:23 /etc/passwd
In the above output information, the data in the 3rd and 4th fields indicates that the file belongs to the master and array, and the / etc/passwd file belongs to the root user and root group; The data in the first field represents the access rights of the file, such as "- rw-r – R --". The permission field consists of four parts, with the following meanings:
- The first character: indicates the type of the file. It can be d (directory), B (block device file), C (character device file), - (ordinary file), letter "l" (linked file), etc.
- Characters 2 ~ 4: indicates the access right of the file's owner User to the file.
- Characters 5 ~ 7: indicates the access rights of each member user (Group) in the group to which the file belongs.
- Characters 8 ~ 10: indicates the access right of any Other user (Other) to the file.
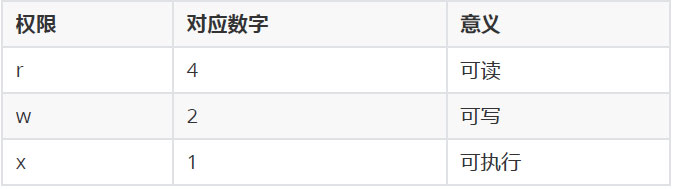
Three different permission characters are mainly used when indicating the access rights of the owner, users in the group or other users to the file: r, w and x, which respectively represent readable, writable and executable. r, w and x permission characters can also be expressed as octal digits 4, 2 and 1 respectively. When indicating a permission combination, the digits need to be accumulated. If you need to remove the corresponding permission, use "-".
2. Set file and directory permissions - chmod
The command format is as follows:
chmod [ugoa] [+-=] [rwx] File or directory
or
chmod nnn File or directory
- "ugoa" means master, group, other users and all users respectively
- "± =" indicates adding, removing and setting permissions respectively
- "nnn" refers to the specific permission value to be set, such as "777"
Common options: - R recursively modify the permissions of all children in the specified directory
case
For example ①, copy the mkdir command program as mymkdir, and verify the change of executable permission by removing the "x" permission of mymkdir file:
[root@localhost ~]#cp /bin/mkdir mymkdir
[root@localhost ~]#ls -l mymkdir
-rwxr-xr-x 1 root root 79768 8 August 16:57 mymkdir
[root@localhost ~]#./mymkdir dir01                    #new file
[root@localhost ~]#ls -ld dir01/
drwxr-xr-x 2 root root 6 8 August 16:58 dir01/
[root@localhost ~]#chmod ugo-x mymkdir                #Remove all "x" permissions
[root@localhost ~]#ls -l mymkdir
-rw-r--r-- 1 root root 79768 8 August 16:57 mymkdir    #The operation cannot be performed because the "x" permission is removed
[root@localhost ~]#./mymkdir dir02
-bash: ./mymkdir: insufficient privilege
For example ②, when the permissions of different categories of users on files are set to different values, commas can be used to separate them; In addition, we can express permissions in digital form, which is more convenient:
[root@localhost ~]#chmod u+x,o-r mymkdir
[root@localhost ~]#ls -l mymkdir
-rwxr----- 1 root root 79768 8 August 16:57 mymkdir
[root@localhost ~]#chmod 777 mymkdir
[root@localhost ~]#ls -l mymkdir
-rwxrwxrwx 1 root root 79768 8 August 16:57 mymkdir
3. Set the ownership of files and directories - chown
The command format is as follows:
chown Owner[:[Genus group]] File or directory
- Common option - R: recursively modify all files in the specified directory and the ownership of subdirectories
- When the owner and group are set at the same time, the user name and group name are separated by colon ":
- If you only set a group, you need to use the form of ": group name"
- If you need to set the owner of a directory or file, you can directly indicate the ownership by user name.
case
4.umask application
umask is the default value that specifies the permissions of the current user when creating a new file or directory
- To directly execute the "umask" command is to view the default permissions of the current system
- Execute "umask 022" to set the default permissions of the current user
Note: the score of umask refers to the "permission to be subtracted from the default value". r, w and x are 4, 2 and 1 respectively. If "umask 022" is executed, the permission "2" of group and other is removed, that is, the permission "write" is removed.
The cases are as follows:
[root@localhost ~]#umask
0022
[root@localhost ~]#umask 000                        #Executing umask 000 means that the default permission is "777", and the highest permission is
[root@localhost ~]#mkdi
mkdict  mkdir
[root@localhost ~]#mkdir /umask1
[root@localhost ~]#ls -ld /umask1/
drwxrwxrwx 2 root root 6 8 August 17:29 /umask1/
[root@localhost ~]#umask 022                        #Executing umask 022 means that the default permission is "755" and there is no "write" permission
[root@localhost ~]#mkdir /umask2
[root@localhost ~]#ls -ld /umask2/
drwxr-xr-x 2 root root 6 8 August 17:29 /umask2/
summary
- Linux operating system resources can be used by different users. Each user has specific permissions on his own resources and does not affect each other.
- When we use the command, there are many things in common. For example, the option - R of the find command ls and the option - R of the set permission command chmod mean to perform some operation in a recursive manner. Therefore, in Linux system, there is no absolute method. There are many solutions to a problem.