Linux system is Multi-users and Multi-tasks. The purpose is that a Linux host can provide services to many users and run multiple services at the same time. But how can we distinguish each user? As an administrator, what permissions do I have for Linux systems? As an ordinary user, what can you do with Linux system? This involves the user category and privilege management of linux. This blog explains user and rights management in detail.
User and group types
In linux system, there are two concepts: user and group. User is included in group.
Users can be divided into the following two categories:
Administrator: That's what we call root.
Ordinary users: system users (in order to enable some background processes or service processes to run as non-administrators, it is usually necessary to create multiple ordinary users for this purpose, such users never need to log in to the system) and logged in users
As legal residents, they should have their own ID number. In linux, users also have their own UID, which is identified by the binary digits of 16 bits. So the range of values is 0-65535. The range of values for different types of users is as follows:
Administrator: 0
Ordinary users:
System users: 1-499 (centos6), 1-999 (centos7)
Login users: 500-60000 (centos6), 1000-60000 (centos7)
Groups can be divided into three types according to different classifications:
1. Combining common user groups by administrators
Administrator group: A group that has administrative authority over the system
Ordinary User Groups: There are also System Groups and Login Groups corresponding to Ordinary Users
Groups also have their own GID s, and the range of values for different groups is as follows (same as the range of values for users)
2. By basic group and additional group
Basic Groups: Users create a basic group with the same name by default when they create it
Additional Groups: When a user can belong to a basic group, he can also add other groups, which are called additional groups of the user.
3. By number of users
Private Group: Group Name Common User Name with only one User
Public Groups: Groups contain multiple users
Now let's talk about how the system recognizes that the user is a legitimate user. When the user logs in, he must type in his username and password. The system will compare the password provided by the user with the password in the configuration file of the system (of course, this is not a simple plain text comparison). If the same, it will be allowed to log in, otherwise it will not be allowed. Administrators should follow the following criteria when defining user passwords (although linux allows users to set Weak-type passwords):
1. Use random passwords
2. Minimum length should not be less than 8 bits
3. At least three of the four types of characters should be used: capital letters, lowercase letters, numbers and punctuation marks.
4. Regular replacement
As we all know, the passwords defined are plaintext, so are they stored in the configuration file in plaintext? That's certainly not true. Passwords are usually encrypted by algorithms. In centos, there are the following encryption algorithms. The bit bits encrypted by passwords are different. The longer the security is, the higher the encryption level is (1-6). Before encrypting, a random number is added to encrypt. By default, CentOS encrypts with sha512:
You can use commands to encrypt a paragraph of plaintext:
[root@localhost ~]# echo "Frank" | sha512sum
d373aa36ac1061fab63c4a8ee098102476de1ff1bdff11be3629c54ccb14a35d27f658a4745a61ec183fbbd1077561a5bfcba5ead0fa4b32e2e63492e8fed3ea  -
Relevant configuration files for users and groups
/etc/passwd
Let's first look at this document:
[root@localhost ~]# cat /etc/passwd
root:x:0:0:root:/root:/bin/bash
bin:x:1:1:bin:/bin:/sbin/nologin
daemon:x:2:2:daemon:/sbin:/sbin/nologin
adm:x:3:4:adm:/var/adm:/sbin/nologin
lp:x:4:7:lp:/var/spool/lpd:/sbin/nologin
sync:x:5:0:sync:/sbin:/bin/sync
shutdown:x:6:0:shutdown:/sbin:/sbin/shutdown
halt:x:7:0:halt:/sbin:/sbin/halt
mail:x:8:12:mail:/var/spool/mail:/sbin/nologin
operator:x:11:0:operator:/root:/sbin/nologin
......(Ellipsis)
tcpdump:x:72:72::/:/sbin/nologin
claire:x:1001:1001::/home/claire:/bin/bash
You can see that a line is divided into seven parts by colons from left to right. Here's an explanation of these seven parts. Let's take the last action as an example:
1.claire, which is the user name
2.x, password placeholder, password is not not not saved under this file, I will talk about it later.
3.1001, UID, or User ID
4.1001, GID, or group ID
5. Empty. This is usually annotated information. It may be the full name of the user.
6./home/claire, user's home directory
7./bin/bash, default shell for user login
We can see that the administrator root whose UID is 0 is in front of us, and those whose UID is less than or equal to 999, such as bin 1, are system users, whose default shell is / nologin, that is, they are not allowed to log in.
/etc/shadow
Let's first look at this document:
[root@localhost ~]# cat /etc/shadow
root:$6$0CIKvP15hvSin5V5$oc.amWyL11jfB1pYxYiaGNfyN8HVq2s0iaVW0KiUd5RrS2SwKmWhTTqUzJ5uNnHi7.pc3OEqO/BMeLIFPOnpJ.::0:99999:7:::
bin:*:17110:0:99999:7:::
daemon:*:17110:0:99999:7:::
adm:*:17110:0:99999:7:::
lp:*:17110:0:99999:7:::
sync:*:17110:0:99999:7:::
.....(Ellipsis)
tcpdump:!!:17348::::::
claire:$6$ZZ5ZKnr4$UI7/gW2z6rtmZygBpH81V8MawY7oLgPTaU65w.zmNyi8Bd9rWVgLQPuZtB1.Q6p6T5KOcd9wnCEJapqcAKCLj.:17357:0:99999:7:::
You can see that a line is coloned into nine parts. Let's take claire as an example.
1.claire, username
2. The user's password is encrypted. The first $and $are in the encryption level, the second $and the third $are in the random number (also known as salt), and the second $and the third $are in the encrypted ciphertext. When the password is preceded by'!'or'*' it means that the user is disabled.
3. The date of the user's latest password modification, expressed in days, indicates the number of days between January 1, 1970 and the day of modification. The days can be converted into specific dates by the following methods:
[root@localhost ~]# date -u -d "1970-01-01 UTC $((17357 * 86400 )) seconds"
Mon Jul 10 00:00:00 UTC 2017
4. The shortest password usage days, "0" means that the password can be changed at any time. If "3", it means that the user can only change the password three days after the last modification.
5. The longest password use days, "9999999" does not need to be changed, it is permanent for you.
6. Password alarm time, that is, the longest use of your password, reminds you how many days ago, if the longest use of your password is 100 days, password alarm time is 7 days, then in 94 days, the user will be prompted to change the password.
7. Password expiration forgiveness time, if the value here is 2, when you have not changed the password after the end of the alarm time, then within 2 days, you can also use this password to login.
8. Account expiration time is also based on the number of days on January 1, 1970. When users reach this time, they will not be able to use it. This item will generally be used in the charging service system. When it exceeds this time, the account will not be used.
9. Reserved bits may be used in the future.
/etc/group
Let's see what's under this configuration file first.
[root@localhost ~]# cat /etc/group
root:x:0:
bin:x:1:
daemon:x:2:
sys:x:3:
adm:x:4:
......(Ellipsis)
slocate:x:21:
tcpdump:x:72:
claire:x:1001:
Each line is divided into four parts by a colon from left to right, or is it illustrated by the last line:
1.claire: By default, if you create a user, you create a group with the same name.
2.x, group password placeholder, password is not put here oh
3.1001, GID, group ID
4. A comma-separated list of users, with this group as an additional group
/etc/gshadow
First open the file and see:
[root@localhost ~]# cat /etc/gshadow
root:::
bin:::
daemon:::
sys:::
......
avahi:!::
slocate:!::
tcpdump:!::
claire:!::
Each line is divided into four parts by a colon from left to right, or is it illustrated by the last line:
1.claire: By default, if you create a user, you create a group with the same name.
2. If it is'! "Or" *", then other users can join the group without a password. If the group is a set password, it's a string of ciphertext. If it's empty, it means that only the members of the group can get the permission of the group.
3. User Group Administrator is a comma-separated list of users. User Group Administrator can modify passwords and group members, and other members of the group have the same privileges.
4. Membership is a comma-separated list of users, and the list of users with this group as an additional group should be the same as the list of users under / etc/group.
Common User and Group Management Commands
As an administrator, we can add and delete users, add and delete groups, modify user and group attributes. Here we introduce the common user and group management commands.
groupadd
NAME: Create a new group
SYNOPSIS: groupadd [options] group
Common Options:
- g GID: Specify GID, default is GID+1 of the previous group
- r: Create system groups
Examples are as follows:
[root@localhost ~]# groupadd my_group
[root@localhost ~]# tail -2 /etc/group
claire:x:1001:
my_group:x:1002:    #By default, the last group number plus one, note that it must be the same type of group, where all logged-in user groups.
[root@localhost ~]# groupadd -g 1500 cloud    #Specify GID 1500
[root@localhost ~]# tail -2 /etc/group
my_group:x:1002:
cloud:x:1500:    #GID is designated 1500
[root@localhost ~]# groupadd -r my_sys    #Create system user group my_sys
[root@localhost ~]# tail -2 /etc/group
cloud:x:1500:
my_sys:x:983:    #The GID of the system user group is 983
groupmod
NAME: Modify the attributes of a group
SYNOPSIS: groupmod [options] GROUP
Common Options:
- g GID: Modify GID
- n new_name: Modify the group name
Examples are as follows:
[root@localhost ~]# tail -3 /etc/group
my_group:x:1002:
cloud:x:1500:
my_sys:x:983:
[root@localhost ~]# groupmod -g 1003 cloud    #Modify GID to 1003
[root@localhost ~]# tail -3 /etc/group
my_group:x:1002:
cloud:x:1003:
my_sys:x:983:
[root@localhost ~]# groupmod -n  my_system my_sys    #Modify the group name my_sys to my_system
[root@localhost ~]# tail -3 /etc/group
my_group:x:1002:
cloud:x:1003:
my_system:x:983:
groupdel
NAME: Delete a group
SYNOPSIS: groupdel [options] GROUP
Examples are as follows:
[root@localhost ~]# tail -3 /etc/group
my_group:x:1002:
cloud:x:1003:
my_system:x:983:
[root@localhost ~]# groupdel my_system   #Delete system group my_system
[root@localhost ~]# tail -3 /etc/group
claire:x:1001:
my_group:x:1002:
cloud:x:1003:
useradd
NAME: Create a user or update user information
SYNOPSIS: useradd [options] LOGIN
useradd -D
useradd -D [options]
Common Options:
- u:--uid UID: Specify UID
- g:--gid GROUP: Specify the base group, which must exist beforehand.
- G:--groups GROUP 1 [, GROUP 2,... [, GROUP N]]: Specify additional groups to which users belong, separated by commas between groups
- c:--comment COMMENT: Indicates annotation information
- d:--home HOME_DIR: The specified path is the user's home directory: by copying/etc/skel and renaming it, the specified home directory path will copy the environment configuration file for the user if it exists in advance.
- s:--shell SHELL: Specifies the user's default shell, which can be stored under / etc/shells with all shells
- r:--system: Create system users
For instance
Create a group ID of 1200, a basic group of cloud (already existing), an additional group of "my_group", annotation information of "my_test", home directory of "/ home/my_home", shell of csh, user name of my_test
[root@localhost ~]# useradd -u 1200 -g cloud -G my_group -c "my_test" -d /home/my_home  -s /bin/csh my_test
[root@localhost home]# id my_test    id I'll talk about it later on in the command.
uid=1200(my_test) gid=1003(cloud) groups=1003(cloud),1002(my_group)
[root@localhost home]#
[root@localhost home]# tail -1 /etc/passwd
my_test:x:1200:1003:my_test:/home/my_home:/bin/csh
[root@localhost home]# tail -3 /etc/group
claire:x:1001:
my_group:x:1002:my_test
cloud:x:1003:
[root@localhost home]# ll -a  /home/my_home/
total 12
drwx------. 3 my_test cloud  78 Jul 10 06:23 .
drwxr-xr-x. 5 root    root   48 Jul 10 06:23 ..
-rw-r--r--. 1 my_test cloud  18 Aug  2  2016 .bash_logout
-rw-r--r--. 1 my_test cloud 193 Aug  2  2016 .bash_profile
-rw-r--r--. 1 my_test cloud 231 Aug  2  2016 .bashrc
drwxr-xr-x. 4 my_test cloud  39 Jul  1 07:56 .mozilla
Note: When creating a user, the default configuration file is / etc/login.defs, such as:
PASS_MAX_DAYS    99999
PASS_MIN_DAYS    0
PASS_MIN_LEN    5
PASS_WARN_AGE    7
#
# Min/max values for automatic uid selection in useradd
#
UID_MIN                  1000
UID_MAX                 60000
# System accounts
SYS_UID_MIN               201
SYS_UID_MAX               999
#
# Min/max values for automatic gid selection in groupadd
#
GID_MIN                  1000
GID_MAX                 60000
# System accounts
SYS_GID_MIN               201
SYS_GID_MAX               999
.....
CREATE_HOME    yes
UMASK           077
ENCRYPT_METHOD SHA512
You can also use useradd-D to display the default configuration for creating users
[root@localhost home]# useradd -D
GROUP=100
HOME=/home
INACTIVE=-1
EXPIRE=
SHELL=/bin/bash
SKEL=/etc/skel
CREATE_MAIL_SPOOL=yes
Modify default properties
useradd -D
Options:
- b,--base-dir: Home directory
- e, - expiredate: Account expiration time
- f,--inactive: Forgiveness time for password expiration
- g,--gid: When creating a new user, it usually automatically creates a group with the same name. When creating a user, it uses - N/--no-user-group, i.e. no group is created or the USERGROUPS_ENAB variable in / etc/login.defs is set to no, then the group specified by default (default is group 100,user) is specified to change the user's group.
[root@localhost ~]# useradd -N no_group
[root@localhost ~]# id no_group
uid=1201(no_group) gid=100(users) groups=100(users)
- s,--shell: shell for user login
usermod
NAME: Modify a user's attributes
SYNOPSIS: usermod [options] LOGIN
Common Options:
With the useradd type, I won't say much here.
userdel
NAME: Delete a user and its associated files
SYNOPSIS: userdel [options] LOGIN
Common Options:
- r: Delete user's home directory when deleting user, not deleting by default
[root@localhost home]# userdel no_group
[root@localhost home]# ll /home/
total 0
drwx------. 3 claire  claire 78 Jul 10 03:35 claire
drwx------. 2 frank   frank  62 Jun 30 10:17 frank
drwx------. 3 my_test cloud  78 Jul 10 06:23 my_home
drwx------. 3    1201 users  78 Jul 10 06:49 no_group
passwd
NAME: Modify user authentication information
SYNOPSIS: passwd [-k] [-l] [-u [-f]] [-d] [-e] [-n mindays] [-x maxdays] [-w warndays] [-i inactivedays] [-S] [--stdin] [username]
passwd only applies. Modify the user's own password. Enter the password twice and the password is hidden.
[root@localhost home]# passwd
Changing password for user root.
New password:
Retype new password:
passwd: all authentication tokens updated successfully.
passwd USERNAME: Modify the password of the specified user, usually only the administrator root can be modified.
Common Options:
- l,-u: Lock and unlock users
- d: Clear user passwords
- e DATE: Account expiration time, date, can also use January 1, 1970 to the present days, try not available, if the brothers try to be available, please inform me, you can set / etc/default/useradd EXPIRE day number, default is not set, when set to "999999", create account Never_user default account expiration time is set to "99999", you can also use the following life. Let's chage, after that!
[root@localhost home]# cat /etc/default/useradd
# useradd defaults file
GROUP=100
HOME=/home
INACTIVE=-1
EXPIRE=99999
SHELL=/bin/bash
SKEL=/etc/skel
CREATE_MAIL_SPOOL=yes
[root@localhost home]# useradd Never_user
[root@localhost home]# tail -1 /etc/shadow   #User failure time is set to 99999
Never_user:!!:0:0:99999:7::99999:
- i DAYS: Forgiveness Time for Password Expiration
The above pro-test (except - e) can be set.
stdin: Standard input, avoid repeating passwords twice
Usage method:
[root@localhost home]# echo "Never_user" | passwd --stdin Never_user
Changing password for user Never_user.
passwd: all authentication tokens updated successfully.
[root@localhost home]# tail -1 /etc/shadow
Never_user:$6$vogq3txX$7pcR5l4sb6YMRbE9CK2gNg2ZR12tCeqdgMWb3vmhlZmcnw2hfgjozcSellI7w7QLTHoQpuik1EGFkAn.74py30:17357:0:99999:7::99999:
gpasswd
NAME: Group passwords can be set
SYNOPSIS: gpasswd [option] group
Common Options:
- a USERNAME: Adding Users to Groups
- d USERNAME: Remove Users from Groups
For example, we add the user "Never_user" to the group "cloud"
[root@localhost home]# gpasswd -a Never_user cloud
Adding user Never_user to group cloud
[root@localhost home]# tail -3 /etc/group
my_group:x:1002:my_test
cloud:x:1003:Never_user
Never_user:x:1201:
[root@localhost home]#
newgrp
NAME: Temporary Switching Basic Group
SYNOPSIS: newgrp [-] [group]
Common Options:
- It simulates a user's re-login to initialize its working environment, returns to its previous state, and exit s
#When we switch to Never_user, the basic groups of Never_user are Never_user and cloud.
[Never_user@localhost ~]$ id
uid=1201(Never_user) gid=1201(Never_user) groups=1201(Never_user),1003(cloud) context=unconfined_u:unconfined_r:unconfined_t:s0-s0:c0.c1023
[Never_user@localhost ~]$ touch test.txt
[Never_user@localhost ~]$ ll     #We can see that the group of files created is Never.
total 0
-rw-rw-r--. 1 Never_user Never_user 0 Jul 10 08:07 test.txt
[Never_user@localhost ~]$ newgrp - cloud   #Switch to Group cloud
[Never_user@localhost ~]$
[Never_user@localhost ~]$ touch test1.txt   #The user group for the test1 file is cloud
[Never_user@localhost ~]$ ll
total 0
-rw-r--r--. 1 Never_user cloud      0 Jul 10 08:07 test1.txt
-rw-rw-r--. 1 Never_user Never_user 0 Jul 10 08:07 test.txt
chage
NAME: Outdated information for modifying user passwords
SYNOPSIS: chage [options] LOGIN
Common Options:
- d: Modify the last password change time
- E: Modify user failure time
- I: Password expiration time
- W: Revision of alarm days
- m: Minimum number of days of password modification
- M: Maximum number of days for password modification
For example, the time to modify the invalidation of Never_user account is July 30, 2017
[root@localhost home]# chage  -E  2017-07-30 Never_user
[root@localhost home]# tail -1 /etc/shadow   #July 30, 2017, automatic conversion to the number of days from January 1, 1970 to July 30, 2017
Never_user:$6$vogq3txX$7pcR5l4sb6YMRbE9CK2gNg2ZR12tCeqdgMWb3vmhlZmcnw2hfgjozcSellI7w7QLTHoQpuik1EGFkAn.74py30:17357:0:99999:7::17377:
id
NAME: Displays real and valid user and group ID s
SYNOPSIS: id [OPTION]... [USER]
Common Options:
- u: Display only valid UID s
- g: Display only the user's base group ID
- G: Display only the ID of all groups to which the user belongs
[root@localhost home]# id frank
uid=1000(frank) gid=1000(frank) groups=1000(frank)
[root@localhost home]# id -u frank
1000
[root@localhost home]# id -g frank
1000
[root@localhost home]# id -G frank
1000
su
NAME: Switching Users
SYNOPSIS: su [options...] [-] [user [args...]]
Switching on login mode will be reinitialized by reading the configuration file of the target user
su - USERNAME
Switch when not logged in, do not read the configuration file of the target user for initialization
su USERNAME
Administrators can switch to any other user without a password
- c'COMMADN': Run commands made here only as specified users
[root@localhost home]# su -c "whoami" Never_user
Never_user
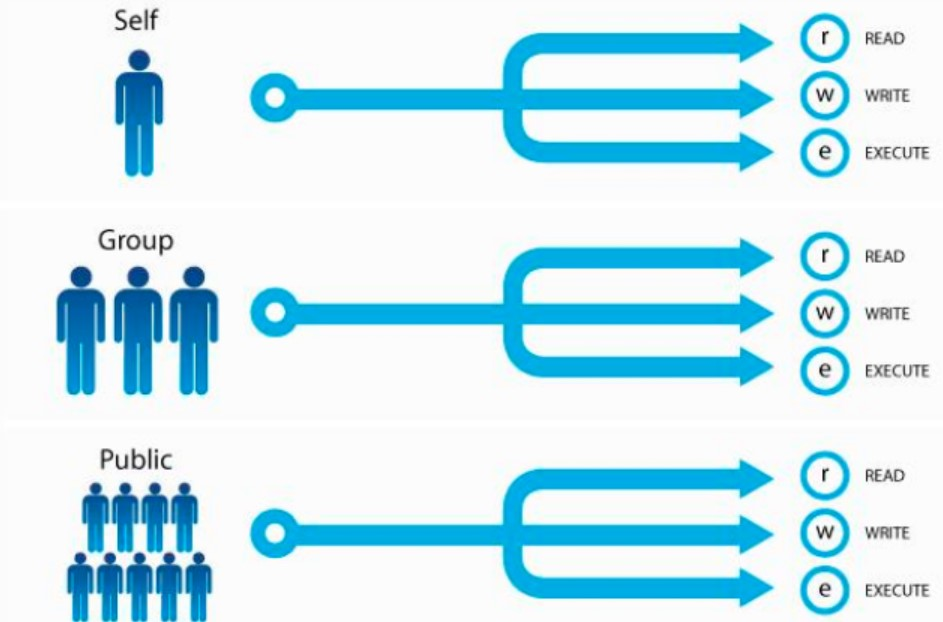
Definition of authority
Let's first take a look at the files in the directory at will:
[root@localhost ~]# ll /etc/default/
total 12
-rw-r--r--. 1 root root  254 Jun 30 10:19 grub
-rw-r--r--. 1 root root 1756 Nov  4  2016 nss
-rw-r--r--. 1 root root  124 Jul 10 07:20 useradd
The left-most bit of each line is the file type. - Represents an ordinary file. So what's the next nine?
The left three: define owner's authority, which is user's
The middle three: define the rights of the group
The right three: define the rights of others
The process runs as its initiator, and its access to files depends on the privileges of the user who initiated the process; when a process is used to operate on a file, whether the initiator of the comparison is the same as the owner of the file, if it is the same, then the owner's privileges are applied, and if it is not, whether the initiator of the comparison process belongs to the file or not. If they belong to a subgroup, the permissions of the subgroup are executed, and if they are not, the permissions of others can only be applied. Users can only modify those files that belong to themselves.
So what does rwx stand for?
r: readable, readable
w: writable, writable
x: excutable, executable
rwx operates differently on files and directories:
For documents:
r: Data for this file can be obtained
w: Modifiable file data
x: This file can be executed
For catalogues:
R: You can use the ls command to go back to the list of all the files under it. If only r, you can only see the list of file names under the directory.
W: You can modify the list of files in this file directory, that is, you can delete and create files, provided you have the permission of x. If only w, you can't do anything.
X: And you can use ls-l to get the detailed attribute information of all files, provided you have the privilege of r. If only x, only cd can go to the directory.
Table of Corresponding Relations between Permissions and Binary and Octal Systems

Authority management orders
chmod
NAME: change file mode bits, modify file permissions
SYNOPSYS:
First, let's look at the following letters in the command to represent the corresponding user type
u: Owner
g: genus group
o: Others
a:
(1) RWX can be directly assigned to the corresponding user type, such as: u=rwx,g=x,o =, empty represents that the bit has no permission.
For instance:
[root@localhost ~]# cd /tmp/read/
[root@localhost read]# ll
total 4
-rw-r--r--. 1 root root 4 Jul 10 09:49 read.txt
[root@localhost read]# chmod u=rwx,g=rw,o= /tmp/read/read.txt
[root@localhost read]# ll
total 4
-rwxrw----. 1 root root 4 Jul 10 09:49 read.txt
(2) Direct manipulation of a privilege bit of a class of users
[root@localhost read]# ll
total 4
-rwxrw----. 1 root root 4 Jul 10 09:49 read.txt
[root@localhost read]# chmod u-x /tmp/read/read.txt
[root@localhost read]# ll
total 4
-rw-rw----. 1 root root 4 Jul 10 09:49 read.txt
2.chmod [OPTION]... OCTAL-MODE FILE...
Directly specify octal
For instance:
[root@localhost read]# chmod 777 /tmp/read/read.txt
[root@localhost read]# ll
total 4
-rwxrwxrwx. 1 root root 4 Jul 10 09:49 read.txt
3.chmod [OPTION]... --reference=RFILE FILE...
Permissions to Refer to Other Documents
[root@localhost read]# chmod --reference=/etc/passwd  /tmp/read/read.txt
[root@localhost read]# ll
total 4
-rw-r--r--. 1 root root 4 Jul 10 09:49 read.txt
Common Options:
- R:--recursive: recursive modification
chown
Only Administrators can modify the ownership and ownership groups of files
NAME: The owner and subgroup of the modified file
SYNOPSIS:
For instance:
[root@localhost read]# ll
total 4
-rw-r--r--. 1 root root 4 Jul 10 09:49 read.txt
[root@localhost read]# chown frank:frank ./read.txt
[root@localhost read]# ll
total 4
-rw-r--r--. 1 frank frank 4 Jul 10 09:49 read.txt
Common Options:
- R: If you want to modify the directory and recursively modify the following files, use this parameter
chgrp
[root@localhost read]# umask
0022
The permission for new files is 666-umask=644=rw-r--r--
[root@localhost read]# touch test.txt
[root@localhost read]# ll
total 4
-rw-r--r--. 1 frank frank 4 Jul 10 09:49 read.txt
drwxr-xr-x. 2 root  root  6 Jul 10 10:36 test
-rw-r--r--. 1 root  root  0 Jul 10 10:37 test.txt
Permissions for new directories are 777-umask=755=rwxr-xr-x
[root@localhost read]# mkdir ./test
[root@localhost read]# ll
total 4
-rw-r--r--. 1 frank frank 4 Jul 10 09:49 read.txt
drwxr-xr-x. 2 root  root  6 Jul 10 10:36 test
You can use umask MASK to set umask, which is only valid for the current Shell process, of course.
Supplementary orders:
install
NAME: Copy files and set properties. You can also create directories. You cannot copy directories and copy recursively.
SYNOPSYS:
Similar to the usage of cp, there is no longer Aoshu here. The new usage is that install-d can create directories.
Common Options:
- m: Set the properties of the target file, default property is 755
- o: Set the owner of the target file
- g: Setting the subgroup of the target file
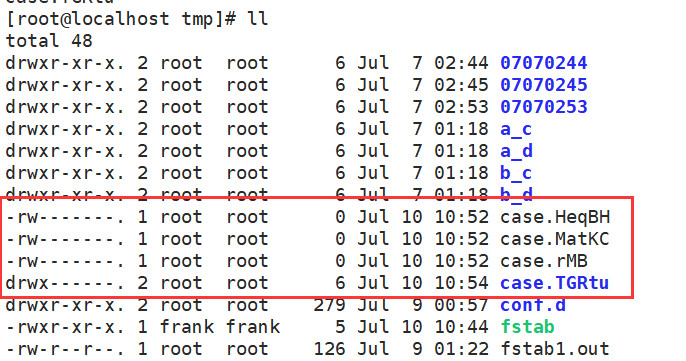
[root@localhost read]# install -o frank -g frank /etc/fstab /tmp/
[root@localhost read]# ll /tmp/
total 48
drwxr-xr-x. 2 root  root      6 Jul  7 02:44 07070244
drwxr-xr-x. 2 root  root      6 Jul  7 02:45 07070245
drwxr-xr-x. 2 root  root      6 Jul  7 02:53 07070253
drwxr-xr-x. 2 root  root      6 Jul  7 01:18 a_c
drwxr-xr-x. 2 root  root      6 Jul  7 01:18 a_d
drwxr-xr-x. 2 root  root      6 Jul  7 01:18 b_c
drwxr-xr-x. 2 root  root      6 Jul  7 01:18 b_d
drwxr-xr-x. 2 root  root    279 Jul  9 00:57 conf.d
-rwxr-xr-x. 1 frank frank     5 Jul 10 10:44 fstab
-rw-r--r--. 1 root  root    126 Jul  9 01:22 fstab1.out
mktemp
NAME: Create temporary files or directory files and return the file name directly
SYNOPSIS: mktemp [OPTION]... [TEMPLATE]
TEMPLATE is: name.XXXX name can be customized, XXXX must be capitalized X and at least three.
[root@localhost tmp]# mktemp case.XXX
case.rMB
[root@localhost tmp]# mktemp case.XXXXX
case.HeqBH
[root@localhost tmp]# mktemp case.XXXXX
case.MatKC
Common Options:
- d: Create temporary directories
[root@localhost tmp]# mktemp -d case.XXXXX
case.TGRtu
That's all for today. If there are any mistakes, I hope you guys can give us more advice.