I Logical volume manager LVM
1. Introduction to LVM
Baidu Encyclopedia explains:
Logical volume manager is essentially a virtual device driver. It is a new level of abstraction added between block devices and physical devices in the kernel, as shown in the figure.
It can combine several disks (physical volume) to form a storage pool or volume group. LVM can create new logical devices by dividing logical volumes of different sizes from the volume group each time.
The underlying original disk is no longer directly controlled by the kernel, but by the LVM layer. For upper layer applications, volume groups replace disk blocks and become the basic unit of data storage. LVM manages the physical extents of all physical volumes and maintains the mapping between logical extents and physical extents. LVM logical devices provide the same functions as physical disks to upper layer applications, such as file system creation and data access. However, LVM logical devices are not limited by physical constraints. Logical volumes do not have to be continuous space. It can span many physical volumes and can be resized at any time. Compared with physical disk, it is easier to manage disk space.
characteristic:
1. Dynamic online capacity expansion (key)
2. Offline clipping
3. Data striping
4. Data mirroring
2. Related noun emphasis
-
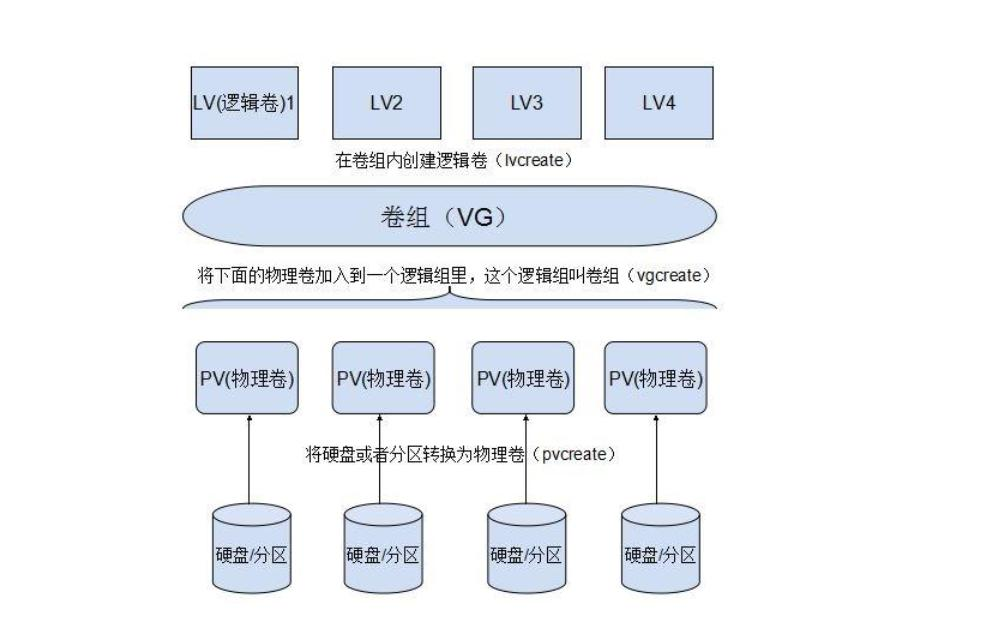
Physical Volume (PV)
Physical volume is a device that really provides capacity and stores data at the bottom. It can be the whole hard disk, partition on the hard disk, etc. -
Volume group (VG)
Volume groups are built on top of physical volumes and consist of one or more physical volumes. That is, physical volumes are consolidated to provide capacity allocation.
An LVM system can have only one volume group or multiple volume groups. -
Logical volume (LV)
A logical volume is built on a volume group, which is a piece of space "cut out" from the volume group. It is a logical device used by the end user. After a logical volume is created, its size can be scaled. -
Physical area PE (physical extent)
Each physical volume is divided into basic units called PE (physical extensions). PE with unique number is the smallest unit that can be addressed by LVM. The size of PE can be specified, and the default is 4 MB. Once the PE size is determined, it cannot be changed. The PE size of all physical volumes in the same volume group is the same.
4MB=4096kb=4096kb/4kb=1024 block s
explain:
- The minimum unit of hard disk read data is 512 bytes in one sector
- Minimum unit of data read by operation: 1 data block = 8 * 512 bytes = 4096 bytes = 4KB
- lvm addressing minimum unit: 1 PE=4MB
- Logical area LE (logical extent)
Logical volumes are also divided into addressable basic units called LE (logical extensions). In the same volume group, the size of LE and PE are the same and correspond to each other one by one.
3.LVM establishment
Realization idea:
- Physical device
- Making physical devices into physical volumes
- Create a volume group and add physical volumes to it
- Create logical volume
- Format logical volume
- Mount and use
# Tips: use the following command to see the effect
watch -n 1 "df -h /test;echo ===;pvs;echo =====;vgs;echo ===;lvs"

# 1. Add a new hard disk / dev/sdb with a size of 10G.
# Create a 3-master + 1 expansion (3-master size: 2G, 2G) on the new hard disk, and set the partition type to lvm
fdisk /dev/sdb
# After the partition is established, press t to modify the partition type

# 2. Create physical volumes
pvcreate /dev/sdb1 /dev/sdb2

# 3. Create a volume group and add physical volumes to it
# Set the pe size to 2m, pe is large, the reading speed is fast, but it wastes space.
vgcreate vg01 -s 2M /dev/sdb1 /dev/sdb2

# 4. Create logical volumes
# -L specify size - n specify name
lvcreate -n lv01 -L 2.5G vg01

########################################################################
# At this time, two places will be mapped at the operating system level:
[root@server ~]# ll /dev/mapper/vg01-lv01
lrwxrwxrwx 1 root root 7 Jan  7 11:16 /dev/mapper/vg01-lv01 -> ../dm-2
[root@server ~]# ll /dev/vg01/lv01
lrwxrwxrwx 1 root root 7 Jan  7 11:16 /dev/vg01/lv01 -> ../dm-2
########################################################################

# 5. Format logical volumes
mkfs.xfs /dev/vg01/lv01

# 6. Mount and use
mount /dev/vg01/lv01 /test
# /test is the newly created mount point
4.LVM dynamic capacity expansion
Idea:
- Check which logical volume corresponds to the / test directory. / dev/mapper/vg02-lv01
- Check whether there is enough space left in the volume group vg01 where the current logical volume is located
- If vg01 space is insufficient, the volume group must be expanded first, and then the logical volume must be expanded
- If vg01 space is enough, expand the logical volume directly
# 1. Check which volume group the / test directory belongs to
df -h

# 2. View the remaining space of the volume group
vgs

####################################################################
# When the volume group does not have enough free space:
# 1) First, there must be a physical device / dev/sdb3
# 2) Making physical devices into physical volumes
pvcreate /dev/sdb3

# 3) Adding physical volumes to a volume group (volume group expansion)
vgextend vg01 /dev/sdb3
####################################################################

# 3. Expand logical volume
lvextend -L 4G /dev/vg01/lv01		#-L 4G final size
 perhaps
lvextend -L +1.5G /dev/vg01/lv01		#-L +1.5G   2.5+1.5=4

# 4. View results
lvs

# 5. Synchronize file system
xfs_growfs /dev/vg01/lv01

# 6. Review the verification again
df -h
be careful:
# When the file system is ext4, use the following command to synchronize the file system:
resize2fs /dev/vg01/lv01
5.LVM reduction
xfs file system does not support reduction, and ext file system supports reduction.
# 1. Unmount the logical volume
umount /test

# 2. Scan the contents of this device, otherwise direct reduction will cause damage
e2fsck -f /dev/vg01/lv01

# 3. Reduce file system
resize2fs /dev/vg01/lv01 1500M

# 4. Reduce lvm equipment
lvreduce -L 1500M /dev/vg01/lv01

# 5. Re mount
mount /dev/vg01/lv01  /test

# 6. Remove / dev/sdb3 from vg
vgreduce vg01 /dev/sdb3

# 7. Remove / dev/sdb3 from pv
pvremove /dev/sdb3
6.LVM snapshot
Create a snapshot:
# 1. Establish test files on LVM
mount /dev/vg01/lv01 /test
touch /test/file{1..10}

# 2. Uninstall first and then take a snapshot
umount /test
lvcreate -L 128M -n lv01.bak -s /dev/vg01/lv01

# 3. Mount snapshot
mount /dev/vg01/lv01.bak /test

# Test:
cd /test
rm -fr *				# Delete all files on the snapshot

umount /test			# uninstall
# After deleting the snapshot, make the snapshot again
lvremove /dev/vg01/lv01.bak
lvcreate -L 128M -n lv01.bak -s /dev/vg01/lv01

mount /dev/vg01/lv01.bak /test		#Remount
ls /test							#Restore all files
7.LVM deletion
# 1. Unload the equipment
umount /test

# 2. Delete lv
lvremove /dev/vg01/lv01

# 3. Delete vg
vgremove vg01

# 4. Delete pv
pvremove /dev/sdb3

# 5. Delete the partition. After entering, press d to delete the partition
fdisk /dev/sdb
8.LVM banding
Question:
Disk conflicts may occur when multiple processes access a disk at the same time. The disk system limits the number of accesses (IO operations per second, IOPS) and data transfer rate (read / write rate, TPS).
When these limits are reached, subsequent processes that need to access the disk need to hang and wait, which is disk conflict. Avoiding disk conflicts is an important goal of optimizing I/O performance.
Striping technology is a technology that automatically balances the I/0 load to multiple physical disks. Striping technology divides a piece of continuous data into many small parts and stores them on different disks. In this way, multiple processes can access multiple different parts of data at the same time without disk conflict, and maximize I/0 performance.
Striping of LVM: for the sake of performance, the data is stored across multiple disks, that is, the continuous data on LV is divided into blocks of the same size, and then stored on each disk PV in turn, which is similar to the data storage form of RAID0 to realize the concurrency of data reading and writing; The administrator defines the data block size and distributes the number of PV disks according to his own data requirements, so as to optimize the reading and writing performance.
realization:
pvcreate /dev/sdb[12]
vgcreate vg01 /dev/sdb[12]
lvcreate -n lv01 -L 1G vg01 -i 2 /dev/sdb[12]
# -i parameter: give the number of striping
mkfs.ext4 /dev/vg01/lv01
mount /dev/vg01/lv01 /test

Test:
yum -y install sysstat
iostat -m -d /dev/sdb[12] 1
# -d view disk
# -At what speed is M displayed, M per second
#  1 display every 1s

dd if=/dev/zero of=/test/testfile bs=1M count=1000		#Analog write data
iostat -m -d /dev/sdb[12] 1
II Virtual data optimizer VDO
1. Introduction to VDO
VDO (virtual data optimization) is a new storage related technology launched on RHEL8/Centos8 (first tested in the 7.5 beta), which is the technology of Permabit company acquired by Redhat.
The main function of VDO is to save disk space. For example, 1T disk can hold 1.5T data, so as to reduce the cost of data center.
2.VDO implementation
# 1. Install VDO
dnf install vdo

# 2. Create a VDO named vdo1
vdo create --name=vdo1 --device=/dev/sdb
vdo status --name=vdo1 | less
Deduplication:enabled 			#Enabled when detecting and deleting duplicate data
Compression: enabled			#Data compression function on

# 3. Use VDO
mkfs.xfs -K /dev/mapper/vdo1
mkdir /test_vdo
mount /dev/mapper/vdo1 /test_vdo/

# 4. Test VDO performance
watch -n 1 "df -H /westos;echo  ====;vdostats --human-readable"
# Select a large file and copy it to / test created above_ Under VDO directory, copy more times
# View occupied capacity

# 5. Delete VDO
vdo remove --name=vdo1
Boot auto mount
vim /etc/fstab
# Add the following line
/dev/mapper/vdo1 /test_vdo xfs defaults,x-systemd.requires=vdo.service 0 0