file
Directory tree
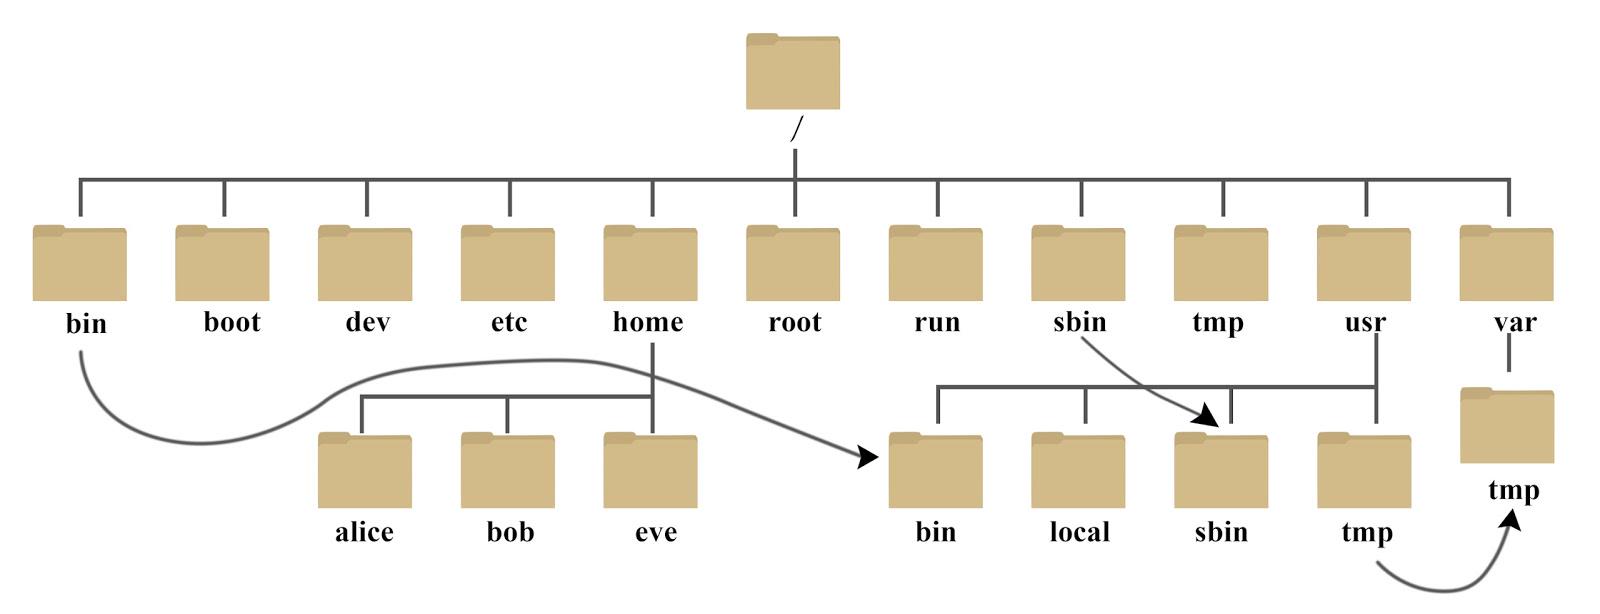
- /Bin: bin is the abbreviation of Binaries. This directory stores the most frequently used commands.
- /boot: here are some core files used when starting Linux, including some connection files and image files.
- /Dev: dev is the abbreviation of device. External devices of Linux are stored in this directory. The way to access devices and files in Linux is the same.
- /Etc: etc is the abbreviation of etcetera (etc.), which is used to store all configuration files and subdirectories required for system management.
- /Home: the user's home directory. In Linux, each user has its own directory. Generally, the directory name is named after the user's account, such as alice, bob and eve in the above figure.
- /Lib: lib is the abbreviation of library. This directory stores the most basic dynamic connection shared library of the system, which is similar to the DLL file in Windows. Almost all applications need these shared libraries.
- /lost+found: this directory is generally empty. When the system shuts down illegally, some files are stored here.
- /usr/src: the default placement directory for kernel source code.
- /var: var is the abbreviation of variable. This directory stores expanding things. We are used to putting those directories that are often modified in this directory, including various log files, which will expand over time.
- /media: the Linux system will automatically identify some devices, such as U SB flash disk, optical drive, etc. when identified, Linux will mount the identified devices to this directory.
- /opt: the directory where the third-party software is placed.
The file system places the data of the disk partition in the directory through mounting, and then you can access the data through the directory tree.
User groups and users, permissions
After logging into the system, each user will start from the home directory, and each user belongs to at least one group.
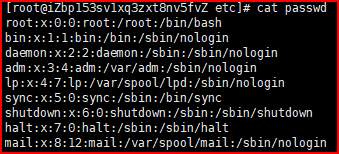
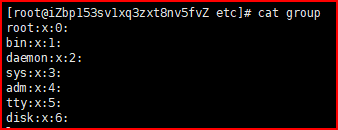
The user's configuration information will be placed in / etc/passwd, while / etc/group will store the group configuration information, and the user's password will be placed in / etc/shadow.
/etc/passwd: user name: x (encrypted password): user id: group id: Home Directory: shell interpreter
/etc/group: Group Name: group password: group id: (users belonging to this group, invisible)
View file information:
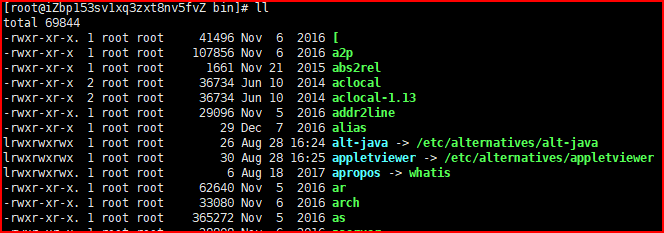

first:
- d: Catalogue
- -: file
- l: Link file
- b: Devices for storage
- c: Serial port device
Next, there are three groups, representing the file owner, the same user group as the file owner, and different groups.
- r: read 4
- x: execute 2
- w: write 1
Second: number of links.
Third: owner.
Fourth: user group.
Fifth: file size kb.
Sixth to last: last modification date.
command
User, user group, permission:
chgrp {-R recursion} User group name file name #Modify file user group
chown {-R recursion} User name file name #Modify file owner
chmod {-R recursion} Permission file name #Modify permissions
#Column: chmod 754 test.txt or chmod u=rwx,g=rx,o=r test.txt
useradd -Option user name #If no home directory is specified, the system will automatically create a folder with the same name under home as the home directory, which is the same as a group. If no home directory is specified, a group with the same name will be created.
#-c comment specifies an annotative description.
#-d directory specifies the user's home directory. If this directory does not exist, use the - m option to create a home directory.
#-g user group specifies the user group to which the user belongs.
#-G user group, user group specifies the additional group to which the user belongs.
#-The s Shell file specifies the login Shell of the user.
#-u user number specifies the user number of the user. If the - o option is also available, the identification numbers of other users can be reused.
userdel {-r Delete home directory} user name #By default, users are deleted, but the home directory is retained
usermod {-g,-d} user name #Modify the information of existing users
#Columns: usermod -g group name user name modify user's group, usermod -d Directory User Name modify login directory
groupadd {-g Specifies the group identification number for the new user group( GID)} User group
groupdel User group #delete
newgrp Destination user group #Switch user's group
passwd {-l Lock password and disable account,-u Password unlock,-d Unlock account,-f Force the user to change the password at the next login} user name #User password
id user name #You can view user information
su user name #Switch to the specified user


Batch add users
1. First edit a text user file in the same format as etc/passwd equally
2. with root implement/usr/sbin/newusers < user.txt
3. take shadow The generated password is decrypted and written back passwd And passwd of shdow Delete the password and enter the command directly pwunconv
4. Edit the password file to the user name:Form of password
5. then/usr/sbin/chpasswd < passwd.txt
6. pwconv
Compression and decompression:
tar -Options file/catalogue
-c Generate package file
-x decompression   #c. x cannot appear at the same time
-z adopt gzip Realize decompression
-v Displays the file name during the process
-f Specify file name
-C Extract to the specified directory
-zcvf Compressed files,-zxvf Unzip to the current directory,-zxvf file -C Extract the directory to the specified directory
 Columns: tar -zcvf test.tar.gz a.c  compress a.c File as test.tar.gz
Create, view, copy, find:
mkdir {-m Configure permissions directly,-p You can create the required directory recursively, or you can go up one level,-v Show process} file name #create folder
rmdir file name #Only empty folders can be deleted. To delete non empty folders, use rm -rf file name
cp Document purpose document #If the same file is found in the target directory, it will be promoted and directly \ cp xxx will be forcibly overwritten
cat {-n Display line number content} file name
head file #The default is to view the contents of the first 10 lines. At the same time, head -n x file name x can also be the first X lines
tail {-f Tracking file updates} file #Similarly, tail is the last 10 lines displayed
find Specify directory -name file name #Query files in the specified directory
find Specify directory -user user name #Find all files belonging to this user
find Specify directory -size {+n greater than,-n less than,n be equal to} #Find a file of the corresponding size.
find Specify directory -amin n #Read in the last n minutes
find Specify directory -anewer file name #A file that was read later than the file file
find Specify directory -atime n #Files read in the past n days
find Specify directory -cmin n #Has been modified in the last n minutes
find Specify directory -cnewer file name #File newer than file
find Specify directory -ctime n #Documents modified in the past n days
find Specify directory -type {f file,d catalogue,l link} #Find by type
touch file name #Modify the file time attribute to the current system time. If the specified file does not exist, a new blank file will be created.
mv {-i,-f,-n,-u} source file/Directory destination file/catalogue #Command is used to rename a file or directory, or to move a file or directory to another location.
#-i: If the source directory or file you specify to move has the same name as the destination directory or file, you will first be asked whether to overwrite the old file
#-f: If the specified source directory or file has the same name as the target directory or file, the old file will be overwritten without asking.
#-n: Do not overwrite any existing files or directories.
#-u: The move operation is performed only when the source file is newer than the target file or the target file does not exist.
#Column: MV source_ Directory dest_ File error command. mv info/ logs put the info directory into the logs directory. Note that if the logs directory does not exist, the command renames info to logs. Move all files and directories under / usr/runoob to the current directory. The command line is mv /usr/runoob / *
diff File or directory file or directory {-c Show all the text and mark the differences,-i Do not check case differences,-q Only differences are displayed, and detailed information is not displayed } #Used to compare file differences
file file name #Used to identify file types
disk
Files and disks
File systems usually put permissions and attributes in inode s and actual data in data blocks.
- Super block: contains inode and data area information, as well as other related information.
- indoe: records the file attribute. One inode is occupied by one file, and the block number where the file data is located will be recorded at the same time.
- Data block: store actual data.
After reading the inode, you can find the data block corresponding to the file and read the data. This method is called indexed file system. For example, EXT2 is an indexed file system.
After the disk is partitioned, it needs to be formatted before the operating system can use it.
The lsblk command can observe the disk partition status.
EXT, NTFS and XFS
EXT2, 3 and 4 are the file systems used before CentOS 7, XFS is used after CentOS 7, and NTFS is the file system used by windows.
- EXT: as the disk capacity becomes larger, the format is very slow, and then it is replaced by XFS.
- XFS: log file system, suitable for high-capacity disks and large files.
- NTFS: NTFS is a journaling file system, which means that in addition to writing information to disk, the file system also keeps a log of all changes that have occurred.
command
df -Options file/catalogue #Command is used to display the statistics of file system disk usage on Linux system
-h, --human-readable Use a human readable format
-i, --inodes list inode Information, do not list used block
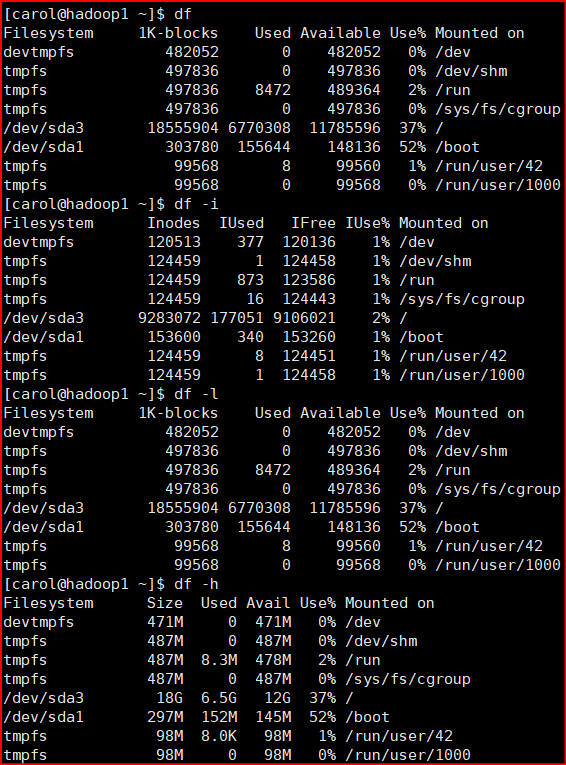
du -Options file/catalogue #Query the disk usage of the specified directory
-s Specify catalog size Rollup
-h --human-readable Use a human readable format
-a Include each specific file
--max-depth=1 Subdirectory depth
-c Show details and summary
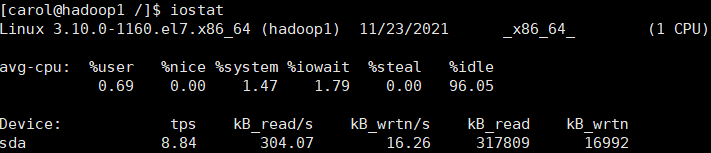
avg-cpu: population cpu Usage statistics, for multi-core cpu,Here for all cpu Average of.
iowait: express CPU wait for IO Total time CPU Percentage of cycles. If iowait Value exceeds 50%,Or significantly greater than%system,%user as well as%idle,express IO There may be a problem.
tps: Number of messages issued by the process per second IO Number of read and write requests.

iostat {option} Number of time intervals #Displays information about CPU and disk IO
-c: Display system only CPU Statistics, i.e. separate output avg-cpu Results, excluding device result
-d: Separate output Device Results, excluding cpu result
-x:Output more detailed io Equipment Statistics
 Columns: iostat -x -k -d 1 2. Every 1 S Output disk IO A total of 2 samples were taken.
system management
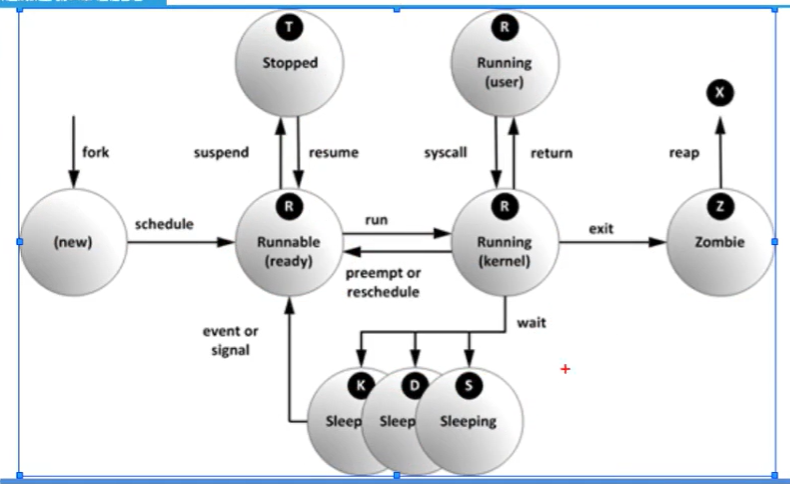
Process management
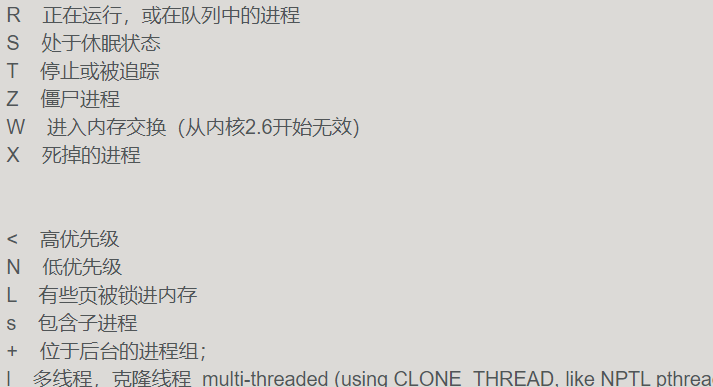
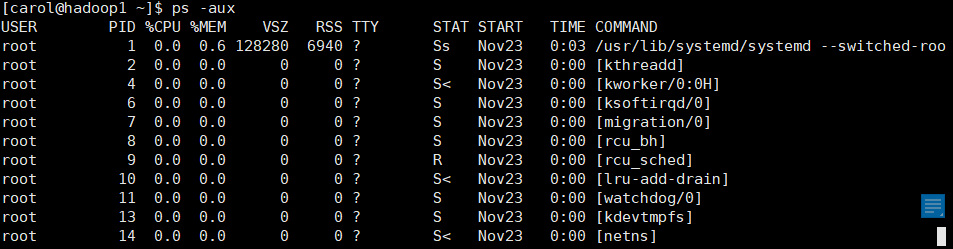
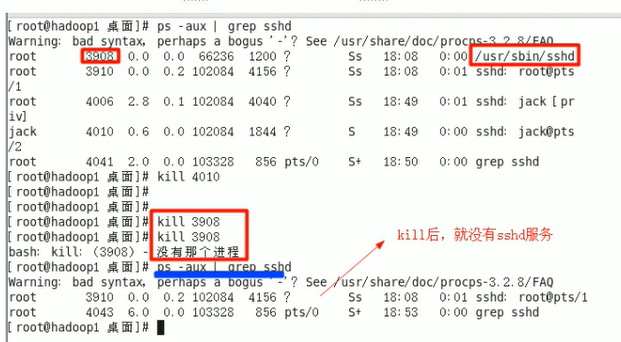
ps -option #Process view
ps -aux
#Format:
#USER PID %CPU %MEM VSZ RSS TTY STAT START TIME COMMAND
#VSZ: virtual memory size occupied
#RSS: memory size occupied
#TTY: minor device number of TTY
#STAT: status of the trip:

ps -elf #ef only prints processes elf prints all threads
kill -Option process number #Kill process
kill -1 #Reload configuration
kill -9 #Unconditional compulsory termination
kill - 15 #Normal termination
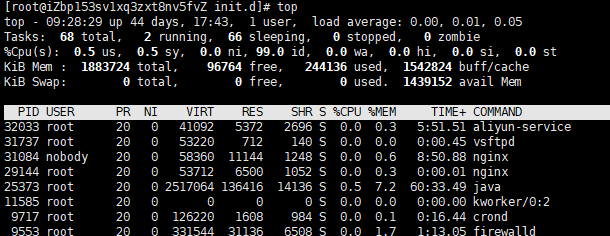
top -option #The running process can dynamically monitor the process
-p Monitor specified processes ID Process of

top Enter in:
u You can choose to display the process under the user name
k input pid Kill the corresponding process
m Ranked by memory usage
n with pid sort
q sign out top
-
The first line: the current time is up 44days 17:43. It has been running for 44 days and 17:43 minutes. 1 user
load average data is the number of active processes checked every 5 seconds, and then calculated according to a specific algorithm. If this number is divided by the number of logical CPU s, when the result is higher than 5, it indicates that the system is overloaded. The following three numbers are the load conditions of 1 minute, 5 minutes and 15 minutes respectively.
-
Line 2: omitted
-
Line 3: us - percentage of CPU occupied by user space. sy - percentage of CPU occupied by kernel space. ni - percentage of CPU occupied by processes with changed priority id - percentage of idle CPU wa - percentage of CPU occupied by IO waiting hi - percentage of CPU occupied by Hardware IRQ si - percentage of CPU occupied by Software Interrupts.
Software management
Source code installation:
- When making, make will look for makefiles in the current directory. The makefile records how the source code is compiled. The makefile is generated after detecting the user environment through the detection program, which is configure. Configure will check whether the user environment has the appropriate compiler, function library and other data.
- Steps:
- ./configure
- Make clean (optional) performs the clean program operation
- make performs the default action
- make install execute install
rpm: red package manager
rpm -Options file name
-i install
-v Show details
-h Display installation progress
--test Test whether there is a problem with the software installation, as follows: rpm -ivh xxx.rpm --test
-q Check to see if it is installed
-qa View all installed software
-qc List all profiles
-ql Lists the paths where files and directories are located
-qR List files that depend on the software
-qf Follow the file name to see which software the file belongs to
-e Deletion is often unsuccessful due to dependency
yum: shell front-end package manager based on rpm package management, which can automatically handle dependencies and install required dependent packages at one time.
yum.repos.d is the core configuration file of yum. Specify where to get the software.
centos-base.repo is the basic package and epel is the expansion package.
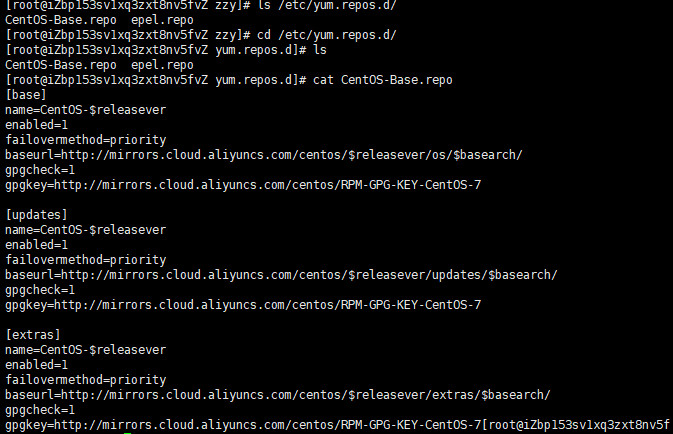
Replace with aliyun:
- Back up a copy of centos-base.repo and delete the original.
- Download the new CentOS-Base.repo to / etc/yum.repos.d /: wget xxxxxxx
- Add EPEL: wget xxxxxx
- Generate a new cache and install it: yum makecache, yum install
yum info Software name #View information about installed software
yum check-update #List new software that can be updated
yum update #Update all software
yum list #List installable software
yum remove packagename #delete
yum search packagename #lookup
yum clean packages #Clear software in cache
yum clean headrs #Clear header under cache
yum clean oldheadrs #Clear old header under cache
task scheduling
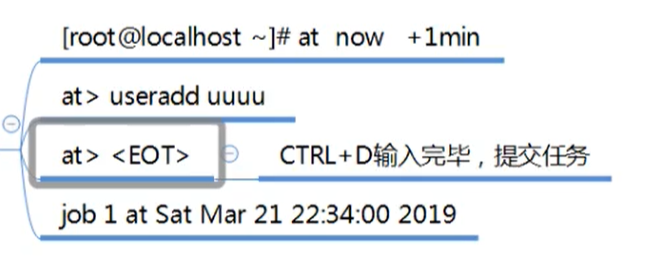
At: provided by the atd service, write the task as a text file, such as / var/spool/at /, and then wait for the atd service to execute.
Workflow:
- Find / etc/at.allow, and users in the file can use at.
- If at.allow does not exist, find at.deny. At cannot be used in the file.
- If both files exist, only root can use them.
at -option TIME
 Options:
-m at After completing the task, send email To users
-l Lists the of the current user at task
-d Cancel one at task
-c The task number is followed to display the specific content of the task

Crontab: provided by the crond service, the task is recorded in / var/spool/cron /. Each task of crontab is recorded in / var/log/cron. There are also allow and deny files.

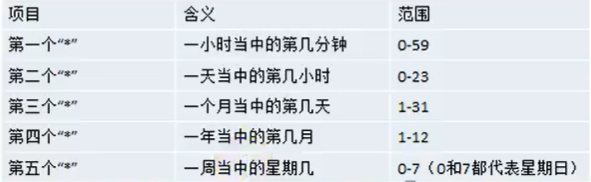
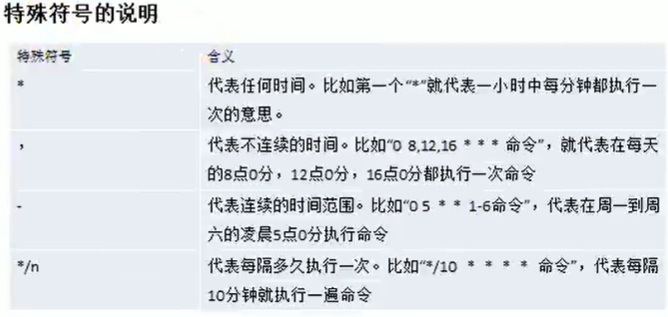
crontab -l #List tasks
crontab -e #Edit task
crontab -r #Delete tasks for the current user
 Writing format:* * * * * program
 Columns:
0 17 * * 1-5 mail -s "hi" alex@domain.name < /tmp/maildata
 5 p.m. every day from Monday to Friday:00 Send a letter to alex@domain.name

0 6-12/3 * 12 * /usr/bin/backup
 Every 3 hours and 0 minutes from 6 a.m. to 12 a.m. in December/usr/bin/backup
0 2 * * 5/test.sh (test.sh is executed at two o'clock on Friday every month)
crontab -e is actually the file / etc/crontab. crontab -e can be used for personal needs. For system maintenance and operation, the method of editing / etc/crontab is still used.
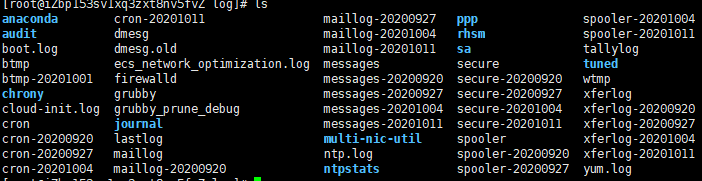
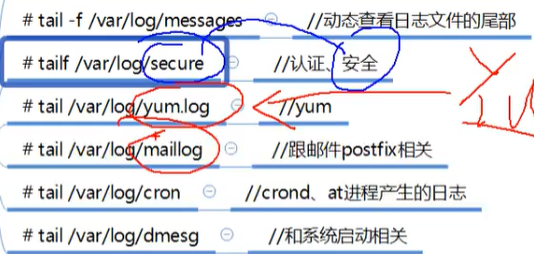
var/log / stores various logs, which can be roughly divided into two types: one is the log file customized by the software developer, and the other is generated through the system, such as rsyslog.service of centos. Logs will not be saved all the time. Log rotation tool is used to automatically handle log problems.
All services started by systemd will be recorded in binary form by the journal.service of the system, and then this information will be sent to rsyslog.service.
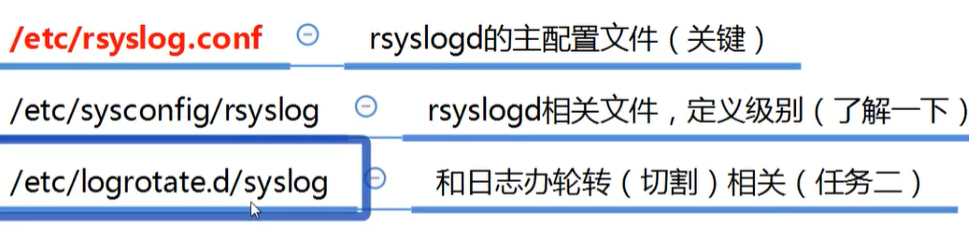
Rsyslog configuration file: / etc/rsyslog.conf

RULES is the RULES for generating logs. The format is authprive.* /var/log/secure - > facility.level file
There are many facilities in the system. Each facility corresponds to many programs. The logs of these programs will save the information to the corresponding log according to the configuration of rsyslog.conf. Each facility has a level. Rsyslog will collect logs according to the level.
- *Means collect all
- LOG_DEBUG
- LOG_INFO
- . . . . .
The higher the level, the less information, the lower the more.
After modifying rsyslog.conf, you can use kill -1 xxxx and kill -1 to reload the process without shutting down, so that the whole service will not be affected.

; Indicates juxtaposition, none indicates exclusion, and * indicates collection of all.
Synthesis is to store the info level information of other devices except mail, authpriv and cron into the log.
logrotate log rotation:
- The disk is limited and the log can be unlimited. logrotate can clear the logs with earlier time, so as to ensure the hard disk space all the time.
- The main configuration file: / etc/logrotate.conf program depends on the main configuration file, and the sub configuration file and independent parameters will overwrite the default configuration.
- The sub configuration file: / etc/logrotate.d / * generally implements custom operations here. This file will be include d in the main file. Under this file, there are many program log files. We can set them differently, so that we can have fault tolerance opportunities.
/etc/logrotate.conf:
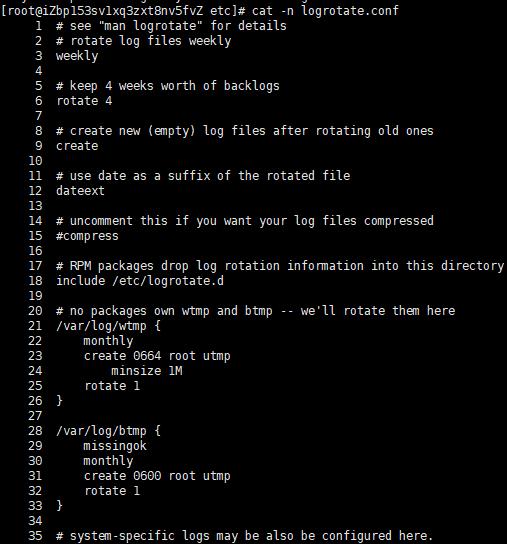
weekly
#Log files are rotated once a week

rotate 4
#keep 4 weeks worth of backlogs rotate 4
#Save 4 log files, that is, if 5 log rotations are performed, the first backup log will be deleted

create
#create new (empty) log files after rotating old ones create
#Automatically create a new log file when the log is rotated

datexte
#use date as a suffix of the rotated file dateext
#Use date as suffix of log rotation file

#uncomment this if you want your log files compressed #compress
#Whether the log file is compressed. If you uncomment, the log is compressed while being dumped

#The above log configuration is the default configuration. If independent parameters are not set for the logs to be rotated, the above parameters will be followed
#If the rotation log is configured with independent parameters, the independent parameters have higher priority
#RPM packages drop log rotation information into this directory include /etc/logrotate.d
#Contains all the sub configuration files in the / etc/logrotate.d / directory. In other words, all sub configuration files in this directory will be read in and log rotation will be performed
#no packages own wtmp and btmp -- we'11 rotate them here

#The following two rotation logs have their own independent parameters. If they conflict with the default parameters, the independent parameters will take effect
/var/log/wtmp {
#The following parameters are valid for this directory only
monthly
#Log files are rotated once a month
create 0664 root utmp
#For the new log file created, the permission is 0664, and the umask value has four groups of numbers. The first group of numbers is used to define special permissions, which are generally not considered. The last three groups of numbers related to general permissions. The owner is root and the group belongs to utmp group
minsize 1M
#The minimum rotation size of log files is 1MB. That is, the log must exceed 1MB before rotation. Otherwise, even if the time reaches one month, the log rotation will not be carried out
rotate 1
#Keep only one log backup. That is, only wtmp and wtmp.1 logs are retained)
/var/log/btmp {
#The following parameters are valid only for / var/log/btmp
missingok
#If the log does not exist, the warning message of the log is ignored
monthly
create 0600 root utmp
rotate 1
}
# system-specific logs may be also be configured here.
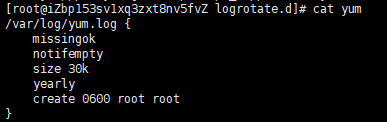
/etc/logrotate.d/*:
Implement custom settings using yum or up2date. Notempty empty files can be transferred.
Rotation rules:
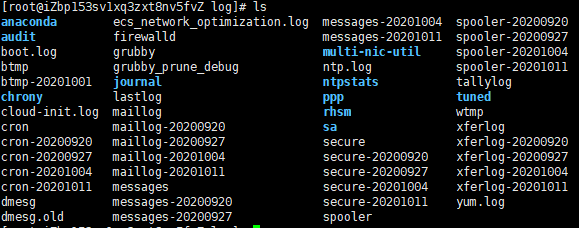
Take xferlog as an example. Set the rotation weekly (the time is just 7 days). For example, today is 20201018. After 24 o'clock, the system will mv xferlog xferlog-20201018, and then touch xferlog. If rotate 4, 4 copies will be saved and 920 copies will be deleted.
The next article summarizes the services, shell, and kernel sections.