preparation
# Switch the directory to / export / and empty the contents
cd /export/ && rm -rf /export/* && tree

# Add a directory and switch directories and add files
mkdir -p /export/aaa/bbb/ccc/ddd/eee/
touch /export/aaa/bbb/ccc/ddd/eee/abc.txt
touch /export/aaa/123.txt
touch /export/aaa/312.txt

# View the contents of the / export directory
tree /export
1, Search command
1.find search
1.1 objectives
- Use the find command to search for qualified files in a specific directory (including its descendant directory)
1.2 path
- Step 1: search the specified directory. The file is ABC Txt file
- Step 2: search the file with 1 in the file name under the specified directory
- Step 3: search the specified directory, and all the files will be displayed in txt file with extension
- Step 4: search for files starting with the number 1 in the specified directory
1.3 implementation: search by name in the specified directory
select * from table name
[where condition]
-
Command format
| Serial number | Command format | effect |
|---|---|---|
| 01 | find [path] - name '* txt’ | Find the extension under the specified path is txt files, including subdirectories |
- If the path is omitted, it means to find it under the current folder
- The wildcards learned earlier are also available when using the find command
-
Step 1: search the specified directory. The file is ABC Txt file
# ===================Achieve goals============================
# Method 1: specify the full directory
find /export/ -name 'abc.txt'
# Method 2: current directory
find . -name 'abc.txt'
# Method 3: the current directory can be omitted
find -name 'abc.txt'
-
Step 2: search the file with 1 in the file name under the specified directory
# =================Implementation directory===============
find /export/ -name "*1*"
-
Step 3: search the specified directory, and all the files will be displayed in txt file with extension
find /export/ -name "*.txt"
-
Step 4: search for files starting with the number 1 in the specified directory
find /export -name "1*"
1.3 summary
- Search for files by name through find [path] -name "*1 *"
Decompression command
- preparation
# Empty the contents of the specified directory
cd /export/ && rm -rf *

# Create test file
touch 1.txt 2.txt 3.txt

# Create a test directory with content
mkdir -p /export/aaa/
touch /export/aaa/4.txt /export/aaa/5.txt

# View results
tree /export
1. Objectives
- Compress backup files by packaging
Jar: compressed package of Java rar java project
War: compressed package of Web rar web project
Path 2
-
2.1 step 1: packaging and unpacking
-
**2.2 step 2: package compression and unpack decompression**
3. Realization
3.1 step 1: packaging and unpacking
3.1.1 packaging
-
Similar to putting winter clothes in bags
-
The packaged large file needs to be packaged in End. tar
tar packaging command format
# Package a series of files into a large file
tar -cvf Package name.tar Packaged directory
tar -cvf Package name.tar Packaged file 1 packaged file 2 packaged file 3
tar option description
| command | english | meaning |
|---|---|---|
| c | create | Generate archive file and create package file |
| v | Verbosely | Report progress like "Tang Monk" |
| f | file | Specify the file name of the file, which must be followed by f tar file, so it must be put in the back left |
Exercise 1: Will 1.txt,2.txt,3.txt Package into 123.tar file

Exercise 2: There will be content aaa Catalog packaged as aaa.tar file
[root@node01 export]# tar -cvf 123.tar 1.txt 2.txt 3.txt
1.txt
2.txt
3.txt
[root@node01 export]# ll
total 16
-rw-r--r--. 1 root root 10240 Jul 31 06:04 123.tar
-rw-r--r--. 1 root root     0 Jul 31 06:03 1.txt
-rw-r--r--. 1 root root     0 Jul 31 06:03 2.txt
-rw-r--r--. 1 root root     0 Jul 31 06:03 3.txt
drwxr-xr-x. 2 root root  4096 Jul 31 06:03 aaa
[root@node01 export]# tar -cvf aaa.tar aaa/
aaa/
aaa/4.txt
aaa/5.txt
[root@node01 export]# ll
total 28
-rw-r--r--. 1 root root 10240 Jul 31 06:04 123.tar
-rw-r--r--. 1 root root     0 Jul 31 06:03 1.txt
-rw-r--r--. 1 root root     0 Jul 31 06:03 2.txt
-rw-r--r--. 1 root root     0 Jul 31 06:03 3.txt
drwxr-xr-x. 2 root root  4096 Jul 31 06:03 aaa
-rw-r--r--. 1 root root 10240 Jul 31 06:04 aaa.tar
[root@node01 export]# rm -rf *.txt aaa
[root@node01 export]# ll
total 24
-rw-r--r--. 1 root root 10240 Jul 31 06:04 123.tar
-rw-r--r--. 1 root root 10240 Jul 31 06:04 aaa.tar
[root@node01 export]#
[root@node01 export]# tree
.
├── 123.tar
└── aaa.tar
3.1.2 unpacking
- Similar to taking winter clothes out of the bag
tar unpacking command format
# Decompose a packaged into a series of small files in the current directory
tar -xvf Package name.tar

# Decompose a packaged into a series of small files in the specified directory
tar -xvf Package name.tar -C Unpacking path location
| command | english | meaning |
|---|---|---|
| x | extract | Unpack |
| C (capital C) | directory | Save to the current directory by default. Change the decompression directory through - C. note: the decompression directory must exist |
Exercise 1: Will 123.tar Extract to the current directory

Exercise 2: take aaa.tar Unpack to /export/test/a1/b1/c1/ In the directory
[root@node01 export]# ll
total 24
-rw-r--r--. 1 root root 10240 Jul 31 06:04 123.tar
-rw-r--r--. 1 root root 10240 Jul 31 06:04 aaa.tar
[root@node01 export]# tar -xvf 123.tar
1.txt
2.txt
3.txt
[root@node01 export]# ll
total 24
-rw-r--r--. 1 root root 10240 Jul 31 06:04 123.tar
-rw-r--r--. 1 root root     0 Jul 31 06:03 1.txt
-rw-r--r--. 1 root root     0 Jul 31 06:03 2.txt
-rw-r--r--. 1 root root     0 Jul 31 06:03 3.txt
-rw-r--r--. 1 root root 10240 Jul 31 06:04 aaa.tar
[root@node01 export]# mkdir -p /export/test/a1/b1/c1
[root@node01 export]# tree
.
├── 123.tar
├── 1.txt
├── 2.txt
├── 3.txt
├── aaa.tar
└── test
    └── a1
        └── b1
            └── c1

4 directories, 5 files
[root@node01 export]# tar -xvf aaa.tar -C /export/test/a1/b1/c1
aaa/
aaa/4.txt
aaa/5.txt
[root@node01 export]# tree
.
├── 123.tar
├── 1.txt
├── 2.txt
├── 3.txt
├── aaa.tar
└── test
    └── a1
        └── b1
            └── c1
                └── aaa
                    ├── 4.txt
                    └── 5.txt
Summary
pack: tar -cvf Packaged file name.tar   Packaged directory or file name

Unpack: tar -xvf Packaged file name.tar  [ -C  Specify unpacking location ]
-
preparation
# Empty the contents of the specified directory
cd /export/ && rm -rf *

# Create test file
touch 1.txt 2.txt 3.txt

# Create a test directory with content
mkdir -p /export/aaa/
touch /export/aaa/4.txt /export/aaa/5.txt

# View results
tree /export
3.2 step 2: compress and decompress using gzip format
-
Packaging and compression are two things
-
It is similar to putting winter clothes into compressed bags first, and then extracting the air from them
-
In Linux, the most commonly used compressed file format is XXX tar. gz
-
There is an option - z in the tar command, which can call gzip, so it is convenient to realize the functions of compression and decompression
The command format is as follows
# Compressed file
tar -zcvf Packed compressed file name.tar.gz Compressed file/catalogue

# Decompress the file (memory knocking: Zhixiao Weifang)
tar -zxvf Packed File .tar.gz

# Extract to the specified path
tar -zxvf Packed File .tar.gz -C Directory path
Description of tar options
| command | english | meaning |
|---|---|---|
| z | gzip | Compress and decompress using gzip |
| j | bzip2 | Compress and decompress using bzip2 |
Demand 1: Will 1.txt,2.txt,3.txt Pack and compress into 123.tar.gz file(gzip Compression format)

Demand 2: There will be content aaa Catalog packaged as aaa.tar.gz file(gzip Compression format)

Demand 3: Will 123.tar.gz Extract to the current directory(gzip Compression format)

Demand 4: take aaa.tar.gz Unpack to /export/bbb In the directory(gzip Compression format)
Answers to requirements 1 and 2
[root@node01 export]# tree
.
├── 1.txt
├── 2.txt
├── 3.txt
└── aaa
    ├── 4.txt
    └── 5.txt

1 directory, 5 files
[root@node01 export]# tar -zcvf 123.tar.gz 1.txt 2.txt 3.txt
1.txt
2.txt
3.txt
[root@node01 export]# tar -zcvf aaa.tar.gz aaa/
aaa/
aaa/4.txt
aaa/5.txt
[root@node01 export]# ll
total 12
-rw-r--r--. 1 root root  122 Jul 31 06:11 123.tar.gz
-rw-r--r--. 1 root root    0 Jul 31 06:10 1.txt
-rw-r--r--. 1 root root    0 Jul 31 06:10 2.txt
-rw-r--r--. 1 root root    0 Jul 31 06:10 3.txt
drwxr-xr-x. 2 root root 4096 Jul 31 06:10 aaa
-rw-r--r--. 1 root root  142 Jul 31 06:11 aaa.tar.gz
Empty useless content
[root@node01 export]# tree
.
├── 123.tar.gz
├── 1.txt
├── 2.txt
├── 3.txt
├── aaa
│   ├── 4.txt
│   └── 5.txt
└── aaa.tar.gz

1 directory, 7 files
[root@node01 export]# rm -rf *.txt aaa/
[root@node01 export]# tree
.
├── 123.tar.gz
└── aaa.tar.gz
Answers to requirements 3 and 4
[root@node01 export]# tree
.
├── 123.tar.gz
├── 1.txt
├── 2.txt
├── 3.txt
└── aaa.tar.gz

0 directories, 5 files
[root@node01 export]# mkdir -p /export/bbb
[root@node01 export]# tar -zxvf aaa.tar.gz -C /export/bbb/
aaa/
aaa/4.txt
aaa/5.txt
[root@node01 export]# tree
.
├── 123.tar.gz
├── 1.txt
├── 2.txt
├── 3.txt
├── aaa.tar.gz
└── bbb
    └── aaa
        ├── 4.txt
        └── 5.txt
Summary
Packing compression: tar -zcvf Packaged file name.tar.gz   The directory or file name that is packaged and compressed

Unpack and decompress: tar -zxvf Packaged file name.tar.gz  [ -C  Specify unpacking location ]
-
preparation
# Empty the contents of the specified directory
cd /export/ && rm -rf *

# Create test file
touch 1.txt 2.txt 3.txt

# Create a test directory with content
mkdir -p /export/aaa/
touch /export/aaa/4.txt /export/aaa/5.txt

# View results
tree /export
3.3 step 3: compress and decompress using bzip2 format
- bzip is the second way of compression
- It is similar to putting winter clothes into compressed bags first, and then extracting the air from them
- In Linux, the bzip2 compressed file format is XXX tar. bz2
- In the tar command, there is an option - j to call bzip2, which can easily realize the functions of compression and decompression
The command format is as follows
# Compressed file
tar -jcvf Packed compressed file name.tar.bz2 Compressed file/catalogue

# Unzip file (Weifang)
tar -jxvf Packed File .tar.bz2

# Extract to the specified path
tar -jxvf Packed File .tar.bz2 -C Directory path
Description of tar options
| command | english | meaning |
|---|---|---|
| z | gzip | Compress and decompress using gzip |
| j | bzip2 | Compress and decompress using bzip2 |
Exercise 1: Will 1.txt,2.txt,3.txt Pack and compress into 123.tar.bz2 file(bzip2 Compression format)

Exercise 2: There will be content aaa Catalog packaged as aaa.tar.bz2 file(bzip2 Compression format)

Exercise 3: Will 123.tar.bz2 Extract to the current directory(bzip2 Compression format)

Exercise 4: take aaa.tar.bz2 Unzip to /export/bbb In the directory(bzip2 Compression format)
Answers to requirements 1 and 2
[root@node01 export]# tar -jcvf 123.tar.bz2 1.txt 2.txt 3.txt
1.txt
2.txt
3.txt
[root@node01 export]# tar -jcvf aaa.tar.bz2 aaa/
aaa/
aaa/4.txt
aaa/5.txt
[root@node01 export]# tree
.
├── 123.tar.bz2
├── 1.txt
├── 2.txt
├── 3.txt
├── aaa
│   ├── 4.txt
│   └── 5.txt
└── aaa.tar.bz2
Empty content
[root@node01 export]# rm -rf *.txt
[root@node01 export]# rm -rf aaa/
[root@node01 export]# tree
.
├── 123.tar.bz2
└── aaa.tar.bz2
Answers to requirements 3 and 4
[root@node01 export]# tar -jxvf 123.tar.bz2
1.txt
2.txt
3.txt
[root@node01 export]# mkdir -p /export/bbb
[root@node01 export]# tar -jxvf aaa.tar.bz2 -C /export/bbb/
aaa/
aaa/4.txt
aaa/5.txt
[root@node01 export]# tree
.
├── 123.tar.bz2
├── 1.txt
├── 2.txt
├── 3.txt
├── aaa.tar.bz2
└── bbb
    └── aaa
        ├── 4.txt
        └── 5.txt
Summary
Packing compression: tar -jcvf Packaged file name.tar.bz2   The directory or file name that is packaged and compressed

Unpack and decompress: tar -jxvf Packaged file name.tar.bz2  [ -C  Specify unpacking location ]
Shut down
halt
restart
reboot
VI editor_ Terminal editor (key)
target
- vi introduction
- Open and new files
- Three working modes
- Common command query
1 Introduction
1.1 purpose of learning vi
-
In work, to make simple modifications to the files on the server, you can use ssh to log in to the remote server and use vi editor for simple editing
-
Documents to be modified include
- source code
- configuration file
- For example: configuration file of tomcat server
- For example: configuration file of network card information
In the environment without graphical interface, vi is the best choice to edit files
Every programmer using linux should learn some common commands of vi more or less
1.2 vi and vim
- In many linux distributions, vi is directly made into the soft connection of vim
1.2.1 VI
-
vi is the abbreviation of visual interface and the most classic text editor in linux
-
vi's core design idea
- By keeping the programmer's fingers in the core area of the keyboard, all editing operations can be completed

-
Characteristics of vi
- Only the text content can be edited, and the font paragraph cannot be typeset
- Mouse operation is not supported
- No menu
- Only command
-
When vi editor manages and edits files in the system management server, its function is never comparable to that of the graphical interface editor
1.2.2 VIM
vim = vi improved
viM is a text editor developed from vi. it supports code completion, compilation, error jump and other convenient programming functions. It is widely used by programmers and is called the God of editor
2 opening and creating new files
- Enter vim in the terminal, followed by the file name
vim file name
- If the file already exists, it will be opened directly
- If the file does not exist, a new file will be created when saving and exiting
1 vim No file name
2 Edit content
	2.1 Write class
	2.2 Output one line statement
	2.3 Copy and paste 2.2 Content 19 times
	2.4 Save and exit
3 see
Note: this section focuses on opening and creating files. Other commands will be explained later
[root@node01 export]# cd /export/ && rm -rf *
[root@node01 export]# vim Hello.java
public class Hello {

        public static void main(String[] args) {
                System.out.println("Hello World!");
                // 1 move the cursor to the previous line and press yy
                // 2 press ESC to exit the editing mode
                // 3 press 19p
                System.out.println("Hello World!");
                System.out.println("Hello World!");
                System.out.println("Hello World!");
                System.out.println("Hello World!");
                System.out.println("Hello World!");
                System.out.println("Hello World!");
                System.out.println("Hello World!");
                System.out.println("Hello World!");
                System.out.println("Hello World!");
                System.out.println("Hello World!");
                System.out.println("Hello World!");
                System.out.println("Hello World!");
                System.out.println("Hello World!");
                System.out.println("Hello World!");
                System.out.println("Hello World!");
                System.out.println("Hello World!");
                System.out.println("Hello World!");
                System.out.println("Hello World!");
                System.out.println("Hello World!");
                // 1 press ESC to exit the editing mode
                // 2 press: enter the silent mode
                // 3. Enter wq(write quit) to save and exit. Press enter to execute
        }
}
2.1 open the file and locate the line
- In daily work, you may encounter the situation of opening a file and locating to the specified line
- For example, in development, if you know that there is an error in a line of code, you can quickly locate the location of the error code
- At this time, you can open the file with the following command
vim file name +Number of rows
[root@node01 export]# vim Hello.java +10
2.2 exception handling
- If vi exits abnormally, swap files may be saved on disk
- The next time you use vi to edit a file, you will see the following screen information. Press the letter d to delete the exchange file
Tip: when pressing the keyboard, pay attention to turn off the input method

- How to produce
- Edit the file without exiting. Close the reply window

2.3 three working modes of VI
- VI has three working modes
- Command mode
- When opening a file, you first enter the command mode, which is the entry to use vi
- Perform routine editing operations on files through commands, such as positioning, turning pages, copying, pasting, deleting
- In other graphic editors, the operations realized by shortcut keys or mouse are realized in command mode
- Last line mode – perform operations such as saving and exiting
- To exit vi and return to the console, you need to enter a command in silent mode
- The last line mode is the exit of vi
- Edit mode – normal text editing
Working mode switching
2.4 last line mode command
| command | english | function |
|---|---|---|
| w | write | preservation |
| q | quit | Exit. If not saved, exit is not allowed |
| q! | quit | Forcibly exit without saving |
| wq | write & quit | Save and exit (Mo line mode) |
| x | Save and exit (Mo line mode) | |
| ZZ | Save and exit (command mode) |
4 common commands
Command wiring diagram
- Number of repetitions
- In the command mode, first enter a number and then add a command, which can be repeated n times, such as 19p
- Move and select (practice more)
The key to the speed of vi is that it can quickly locate the line of code to be edited
The move command can be used in combination with the edit operation - Edit operation
- Delete copy paste replace indent
- Undo and repeat
- Replacement found
- edit
Learning tips
- There are many vi commands. Don't expect to remember them all at once. Forgetting individual commands will only affect the editing speed
. when using the vi command, pay attention to turn off the Chinese input method
4.1 movement
To be proficient in vi, you should first learn how to move the cursor quickly in command mode
The edit operation command can be used with the move command
1) Up, down, left and right
| command | function | finger |
|---|---|---|
| h | towards the left | index finger |
| j | down | index finger |
| k | Upward | middle finger |
| l | towards the right | ring finger |
2) Intra line movement
| command | english | function |
|---|---|---|
| w | word | Move one word backward |
| b | back | Move one word forward |
| 0 | Line beginning | |
| ^ | At the beginning of a line, the first position that is not a blank character | |
| $ | End of line |
3) Row number movement
| command | english | function |
|---|---|---|
| gg | go | Top file |
| G | go | end of file |
| Digital gg | go | Move to the number of rows corresponding to the number |
| Digital G | go | Move to the number of rows corresponding to the number |
| : number | Move to the number of rows corresponding to the number |
4) Screen movement
| command | english | function |
|---|---|---|
| Ctrl + b | back | Page up |
| Ctrl + f | forward | Page down |
| H | Head | Top of screen |
| M | Middle | Middle of screen |
| L | Low | bottom of screen |
4.2 mobile (program)
1) Paragraph movement
-
Empty lines are used in vim to distinguish paragraphs
-
During program development, a piece of function related code is usually written together - there is no blank line between them
command function { the preceding paragraph } Next paragraph
2) Bracket switching
-
In the program world, * * (), [], {} * * are highly used, and they all appear in pairs
command function % Bracket matching and switching
3) Mark
- During development, a piece of code may need to be processed later, such as editing and viewing
- At this time, try m to add a mark first, so that you can quickly jump back or perform other editing operations when necessary
- The tag name can be a ~ Z or any letter between a ~ Z
- If the marked line is deleted, the mark will be deleted at the same time
- If a tag with the same name is added to another row, the tag added earlier will also be replaced
| command | english | function |
|---|---|---|
| mx | mark | Add or edit x, where x is any letter of A~Z or A~Z |
| 'x | Navigate directly to the location of the mark x |
4.3 selected text (visual mode)
- Before learning the copy command, you should first learn how to select the code to copy
- To select text in vi, you need to display the visual command to switch to visual mode
- vi provides three visual modes, which can facilitate programmers to choose the way to select text
- Press ESC to discard the selection and return to command mode
| command | pattern | function |
|---|---|---|
| v | Visual Modes | Select the text in normal mode starting from the cursor position |
| V | Visualization mode | Select the complete line that the cursor passes through |
| Ctrl + v | But block mode | Select text vertically |
- In visual mode, it can be used in conjunction with mobile commands. For example, ggVG can select all contents
4.4 revocation and recovery (life saving instruction)
Before learning editing commands, you should know how to undo the previous wrong editing operation
| command | english | function |
|---|---|---|
| u | undo | Undo the last command (ctrl + z) |
| Ctrl + r | uredo | 10dd resume undone command |
4.5 delete text
| command | english | function |
|---|---|---|
| x | cut | Delete the character where the cursor is located or the selected text |
| D (move command) | delete | Delete corresponding content |
| dd | delete | Delete the line where the cursor is located. You can ndd delete multiple lines |
| D | delete | Delete to end of line |
Tip: if you have selected a piece of text in visual mode, you can delete the selected text whether you use d or x
The delete command can be used in conjunction with the move command. The following are common combined commands (extensions):
| command | effect |
|---|---|
| dw | Delete from cursor position to end of word |
| d0 | Delete from cursor position to the beginning of a line |
| d} | Delete from cursor position to end of paragraph |
| ndd | Delete n rows consecutively from the cursor position |
| d'a | Delete all codes from the line where the cursor is located to the mark a |
4.6 copying and cutting
- vi provides a buffer for copied text
- The copy command saves the selected text in a buffer
- Delete command the deleted text will be saved in the buffer
- Use the paste command to insert the text of the buffer pair into the position of the cursor at the desired position
| command | english | function |
|---|---|---|
| Y (copy command) | copy | copy |
| yy | copy | Copy one line, you can nyy copy multiple lines |
| D (cut command) | delete | shear |
| DD (shear) | delete | Cut one line, you can ndd cut n lines |
| p | paste | paste |
Tips:
- The commands d and x are similar to the cutting operation of the graphical interface – ctrl + x
- The command y is similar to the copy operation of the graphical interface – Ctrl+
- The command p is similar to the paste operation of the graphical interface – Ctrl + v
- If there is only one content in the. vi buffer that has been cut and copied, it will be replaced
be careful
- The text buffer in vi is not the same as the system clipboard
- Therefore, the content copied by Ctrl + C in other software can no longer be pasted by p command in vi
- You can paste with the right mouse button in edit mode
4.7 replacement
| command | english | function | Working mode |
|---|---|---|---|
| r | replace | Replace current character | Command mode |
| R | replace | Replace the character after the current line cursor | Replacement mode |
- The R command can enter the replacement mode. After the replacement is completed, press ESC, and press ESC to return to the command mode
- The function of the replace command is to make lightweight modifications to the file without entering the edit mode
4.8 indent and repeat
| command | function |
|---|---|
| >> | Increase Indent right |
| << | Indent left |
| . | Repeat last command |
- Indent command when developing programs, it is more useful to uniformly increase the indent of code!
- Adding four spaces in front of the selected code at one time is called adding indentation
- Deleting four spaces before the selected code at one time is called less indentation
- In visual mode, the indent command needs to use a > or<
In programs, indentation is often used to indicate the ownership of code
- The less space in front, the higher the level of code
- The more spaces in the front, the lower the level of code
4.9 search
General search
| command | function |
|---|---|
| /str | Find str |
-
After finding the specified content, use Next to find the Next location
- n: find next
- N: find previous
-
If you don't want to see the highlight, you can just look for something that doesn't exist in a file
-
Fast word matching
| command | function |
|---|---|
| * | Find the word of the current cursor backward |
| # | Look forward to the word where the current cursor is located |
- In development, through word quick matching, you can quickly see that the word has been used in other places
4.10 find and replace
- Find and replace commands in vi need to be executed in last line mode
- Memory command format
:%s///g
- Global replacement
-
Replace all the old text that appears in the file at once
-
The command format is as follows
:%s/Old text/new text/g
- Visual area replacement
- First select the range of text to replace
- The command format is as follows
:s/Old text/new text/g
- Confirm replacement:
c confirm
-
If you change the g at the end to gc, you will be prompted when replacing it! Recommended use
-
The command format is as follows
:%s/Old text/new text/gc
- y - yes substitution
- n - no replace
- a - all replace all
- q -quit quit replace
- l - last and move the cursor to the beginning of the line
- ^E scroll down
- ^Y scroll up
4.11 insert command (key)
- In vi, in addition to the common i to enter the editing mode, the following commands are also provided to enter the editing mode
| command | english | function | Commonly used |
|---|---|---|---|
| i | insert | Insert text before current character | Commonly used |
| I | insert | Insert text at the beginning of the line | More commonly used |
| a | append | Add text after current character | |
| A | append | Add text at the end of the line | More commonly used |
| o | Insert an empty line after the current line | Commonly used | |
| O | Inserts an empty line before the current line | Commonly used |
Insert picture description here
4.12 practice
Exercise 1 – editing commands with numbers
- In development, you may encounter continuous input of N same characters
- For example: ********** 10 consecutive asterisks
To achieve this effect, in command mode:
- Enter 10 to repeat 10 times
- Enter i to enter editing mode
- Enter * that is, duplicate text
- Press ESC to return to the command mode. After returning, vi will repeat steps 2 and 3 for 10 times
Tip: during normal development, do not press the number before entering the editing mode
Walkthrough 2 – using visual blocks to annotate multiple lines of code
- If you encounter more than one line of comment in the development, you may add one line to the code
In java, to add comments to the code, you can
Add one before//
This effect can be achieved in command mode
- Move to the first line of code where you want to add comments, and press ^ to get to the beginning of the line
- Press Ctrl + v to enter visualization mode
- Use j to continuously select the lines of code to be added
- Enter I to enter editing mode and insert at the beginning of the line. Note: be sure to use I
- Enter / / which is the comment symbol
- Press ESC to return to the command:: mode. After returning, vi will be inserted in front of each line of code previously selected//
Exercise 3: tank battle case (save as backup)
- The last command you have learned
| command | english | function |
|---|---|---|
| : w file | Save as | |
| :w | write | Save (ctrl + s) |
| :q | quit | Exit. If not saved, exit is not allowed |
| :q! | quit | Forcibly exit without saving |
| :wq | write & quit | Save and exit |
| :x | Save and exit |
In actual development, you can use the w command to backup the code periodically
User authority related commands
target
- Understand the basic concepts of users and permissions
- User management terminal command
- Group management terminal command
- Modify authority terminal command
01. Basic concepts of users and permissions
1.1 basic concepts
-
User is an important part of Linux system. User management includes user and group management
-
In Linux system, whether it is logged in by the same level or remotely, each system must have an account and have different permissions for different system resources
-
Permissions for files / directories include:
| Serial number | jurisdiction | english | abbreviation | Digital serial number |
|---|---|---|---|---|
| 01 | read | read | r | 4 |
| 02 | write | write | w | 2 |
| 03 | implement | execute | x | 1 |
| 04 | No permission | - | 0 |
- In Linux, you can specify different permissions for different files or directories for each user
1.2 group
- In order to facilitate user management, the concept of group is proposed, as shown in the figure below

1.3 ls -l extension

-
ls -l you can view the details of the files under the folder, from left to right:
- Permission. If the first character is d, it indicates the directory
- The number of hard links, in popular terms, is the number of ways to access the current directory and files
- Owner: the owner of the file / Mulan road under the home directory is usually the current user
- Group. In linux, the group name and user name are often the same. I'll talk about it later
- size
- time
- name


02. Group management terminal command
Essence: assign permissions to users of the same type
| Serial number | command | effect |
|---|---|---|
| 01 | groupadd group name | add group |
| 02 | groupdel group name | delete group |
| 03 | cat /etc/group | Confirm group information |
| 04 | chgrp group name file / directory name | Modify the group to which the file / directory belongs |
Tips:
- The group information is saved in the / etc/group file
- /The etc directory is a directory dedicated to storing system configuration information
- In practical application, you can set permissions for groups in advance, and then add different users to the corresponding groups, so you don't have to set permissions for each user in turn
chgrp : change group
Drill objectives
- Create aaa directory under the specified directory
- New dev group
- Change the group of aaa directory to dev
[root@node01 export]# mkdir -p aaa/
[root@node01 export]# ll
total 4
drwxr-xr-x. 2 root root 4096 Jul 31 06:48 aaa
[root@node01 export]# chgrp dev aaa/
[root@node01 export]# ll
total 4
drwxr-xr-x. 2 root dev 4096 Jul 31 06:48 aaa
03. User management terminal command
3.1 create user / set password / delete user
| command | effect | explain |
|---|---|---|
| useradd -m -g group new user name | Add new user | -m automatically create user home directory -g specify the group where the user belongs, otherwise a group with the same name will be established |
| passwd user name | Set user password | If you are an ordinary user, You can change your account and password directly with passwd |
| userdel -r username | delete user | -The r option will automatically delete the user's home directory |
| cat /etc/passwd | grep user name | Confirm user information | After creating a new user, the user information will be saved in the / etc/passwd folder |
Tips:
- If you forget to add the - m option to specify the new user's home directory when creating a new user - the easiest way is to delete the user and recreate it
- When creating a user, a group name with the same name as the user name will be created by default
- The user information is saved in the / etc/passwd file
/The etc/passwd file stores the user's information, which is composed of seven pieces of information divided into six parts, namely

- user name
- Password (x for encrypted password)
- UID (user ID)
- GID (group flag)
- Full user name or local account
- Home directory
- The Shell used for login is the terminal command used after login
demand
1 Create user zhangsan, Assigned to dev group
2 Set user zhangsan Password for
3 Check whether users are added in the configuration file zhangsan observation zhangsan Create your home directory
4 delete zhangsan user
[root@node01 export]# useradd -m -g dev zhangsan
[root@node01 export]# passwd zhangsan
Changing password for user zhangsan.
New password:
BAD PASSWORD: it is too simplistic/systematic
BAD PASSWORD: is too simple
Retype new password:
passwd: all authentication tokens updated successfully.

[root@node01 export]# cat /etc/passwd | grep zhangsan
zhangsan:x:500:500::/home/zhangsan:/bin/bash
[root@node01 export]# tree /home
/home
└── zhangsan

[root@node01 export]# userdel -r zhangsan
[root@node01 export]# cat /etc/passwd | grep zhangsan
[root@node01 export]# tree /home
/home
3.2 viewing user information
| Serial number | command | effect |
|---|---|---|
| 01 | id [user name] | View user UID and GID information |
| 02 | who | View the list of all currently logged in users |
| 03 | whoami | View the account name of the currently logged in user |
[root@node01 ~]# useradd -m -g dev lisi
[root@node01 ~]# passwd lisi
Changing password for user lisi.
New password:
BAD PASSWORD: it is too simplistic/systematic
BAD PASSWORD: is too simple
Retype new password:
passwd: all authentication tokens updated successfully.
[root@node01 ~]# id lisi
uid=500(lisi) gid=500(dev) groups=500(dev)
[root@node01 ~]# who
root     pts/0        2019-07-31 07:02 (192.168.100.2)
[root@node01 ~]# whoami
root
3.3 su switching users

- Because ordinary users cannot use certain permissions, they need to switch users
| Serial number | command | effect | explain |
|---|---|---|---|
| 01 | su - user name | Switch users and plan directories | -You can switch to the user's home directory, otherwise the location remains unchanged |
| 02 | exit | Exit the currently logged in user |
- su can switch to root without receiving the user name, but it is not recommended because it is unsafe
- The schematic diagram of exit is as follows:
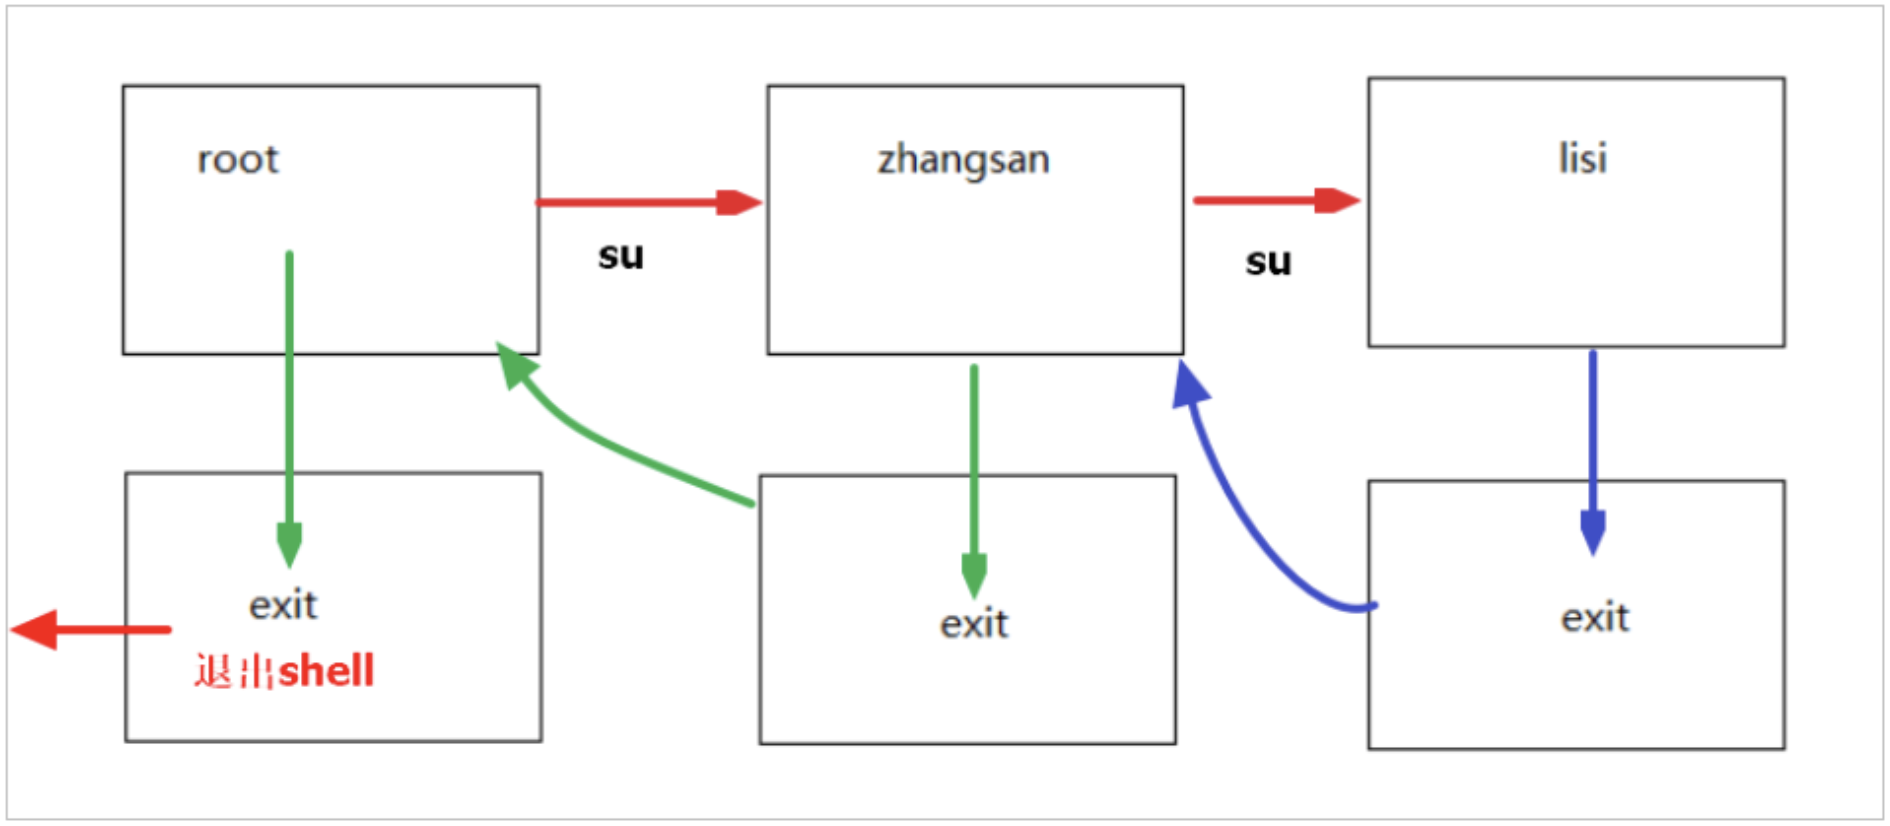
[lisi@node01 ~]$ whoami
lisi
[lisi@node01 ~]$ su - root
Password:
[root@node01 ~]# whoami
root
[root@node01 ~]# exit
logout
[lisi@node01 ~]$ whoami
lisi
3.4 sudo
- Although you can switch to the root user through su -u root, there are serious security risks
-
The root account in linux system is usually used for system maintenance and management, and has access to all resources of the operating system
-
If you accidentally use rm -rf, It could paralyze the system
-
In most versions of linux, it is not recommended to log in to the system directly with only the root account
-
The sudo command is used to execute commands in other identities. The default identity is root
-
When using sudo, the user must first enter the password, and then the validity period of 5 minutes. If the expiration period is exceeded, the user must re-enter the password
Tip: if its unauthorized user attempts to use sudo, a warning email will be sent to the administrator
3.4.1 grant permissions to designated users
- Essence: notify the server to assign temporary administrator privileges to specific users
vim /etc/sudoers
# Default: the root user has all permissions
root    ALL=(ALL)       ALL

# Grant all permissions to lisi users
lisi    ALL=(ALL)       ALL
[the external chain picture transfer fails. The source station may have an anti-theft chain mechanism. It is recommended to save the picture and upload it directly (IMG rnitkhdq-1644755627469) (day02. Assets / 1564499316459. PNG)]
3.4.2 log in with user lisi and operate administrator commands
- Temporary access: essential
# You can also complete the function of adding users without switching the root user
sudo useradd -m -g dev zhaoliu
[lisi@node01 ~]$ sudo useradd -m -g dev zhaoliu

We trust you have received the usual lecture from the local System
Administrator. It usually boils down to these three things:

    #1) Respect the privacy of others.
    #2) Think before you type.
    #3) With great power comes great responsibility.

[sudo] password for lisi:
[lisi@node01 ~]$ sudo cat /etc/passwd | grep zhaoliu
zhaoliu:x:501:500::/home/zhaoliu:/bin/bash
Preparation: use root user operation
# Empty contents of directory
rm -rf /export/*

# Create test directory
mkdir -p /export/aaa/

# Create test file
touch /export/aaa/01.txt /export/aaa/02.txt

# View the contents of the specified directory
tree /export
04. Modify user permissions
| Serial number | command | effect |
|---|---|---|
| 01 | chmod | Modify permissions |
4.1 method 1: modify user permissions
-
chmod can modify the permissions of users / groups on files / directories
-
The command format is as follows:
chmod +/- rwx file name|Directory name
Tip: the previous method will modify the owner / group permission to the user once
Target drill:
# 1. Use root to delete the readable, writable and executable permissions of the directory

# 2. Other users such as lisi cannot switch to this directory

# 3. Use root to increase the execution permission of the directory, and then use lisi to switch to the directory again
Answer: # 1 Use root to remove the read, write, and executable permissions of the directory
[root@node01 export]# ll
total 4
drwxr-xr-x. 2 root root 4096 Jul 31 07:10 aaa
[root@node01 export]# chmod -rwx aaa/
[root@node01 export]# ll
total 4
d---------. 2 root root 4096 Jul 31 07:10 aaa
Answer to requirement 2: other users such as lisi cannot switch to this directory
[lisi@node01 ~]$ cd /export/
[lisi@node01 export]$ ll
total 4
d---------. 2 root root 4096 Jul 31 07:10 aaa
[lisi@node01 export]$ cd aaa/
-bash: cd: aaa/: Permission denied
Answer to requirement 3: use root to increase the execution permission of the directory, and then use lisi to switch to the directory again
[root@node01 export]# chmod +x aaa/
[root@node01 export]# ll
total 4
d--x--x--x. 2 root root 4096 Jul 31 07:10 aaa
[lisi@node01 export]$ cd aaa/
[lisi@node01 aaa]$ pwd
/export/aaa
4.2 mode II
- Although the method is always used to modify the read, write and execute permissions of files and directories, it cannot be accurate to the owner, group and other permissions
- The command format is as follows: (u indicates the user / g indicates the group / o indicates other)
chmod -R u=rwx,g=rx,o=rwx file|catalogue
| Serial number | jurisdiction | english | abbreviation | Digital serial number |
|---|---|---|---|---|
| 01 | read | read | r | 4 |
| 02 | write | write | w | 2 |
| 03 | implement | execute | x | 1 |
| 04 | No permission | - | 0 |
Target drill:
# 1. Use the root user to assign readable, writable and executable permissions to its users,
    The group to which you belong is assigned readable and executable permissions,
    Assign readable and executable permissions to others
[root@node01 export]# chmod u=rwx,g=rx,o=rx aaa/
[root@node01 export]# ll
total 4
drwxr-xr-x. 2 root root 4096 Jul 31 07:10 aaa
4.3 mode 3: simplified mode 2
- The command format is as follows:
chmod -R 755 file|catalogue
- Description: the first number is owner permission, the second number is group permission, and the third number is other user permission
[the external chain picture transfer fails. The source station may have an anti-theft chain mechanism. It is recommended to save the picture and upload it directly (img-8tC50VGc-1644755627469)(assets/1558487247085.png)]
Common combinations of numbers are (u for user / g for group / o for others)
- 777 ===> u=rwx, g=rwx, o=rwx
- 755 ===> u=rwx, g=rx, o=rx
- 644 ===> u=rw, g=r, o=r
Target drill:
# 1. Use the root user to assign readable, writable and executable permissions to its users,
    The group to which you belong is assigned readable and executable permissions,
    Assign readable and executable permissions to others
[root@node01 export]# chmod 755 bbb/
[root@node01 export]# ll
total 8
drwxr-xr-x. 2 root root 4096 Jul 31 07:10 aaa
drwxr-xr-x. 3 root root 4096 Jul 31 07:19 bbb
System information related commands
- The purpose of this section is to check the current system date and time / disk space occupation / program execution on the server when maintaining the server through the remote terminal
- In this summary, the learning terminal commands are query commands, through which we can have an understanding of the use of system resources
target
- Time and date
- date
- cal
- Disk and directory space
- df
- du
- Process information
- ps
- top
- kill
1. Time and date
1.1 date time
| command | effect |
|---|---|
| date | View system time (default) |
| date +"%Y-%m-%d %H:%M:%S" | View system time (specify format) |
| date -s "time string" | Set system time |
Step 1: display the current time
# Display time
date

# Displays the time in the specified format
date +"%Y-%m-%d %H:%M:%S"
Step 2: set the system time
date -s "Time string"
[root@node01 export]# date
Wed Jul 31 07:20:31 CST 2019
[root@node01 export]# date +"%Y-%m-%d %H:%M:%S"
2019-07-31 07:20:49
[root@node01 export]# date -s '2019-07-31 20:21:49'
Wed Jul 31 20:21:49 CST 2019
[root@node01 export]# date +"%Y-%m-%d %H:%M:%S"
2019-07-31 20:21:52
1.2 cal calendar
| Serial number | command | effect |
|---|---|---|
| 01 | cal | View the calendar of the current month |
| 02 | cal -y | View the calendar of the current year |
| 03 | cal 2020 | View calendar for 2020 |
| 04 | cal 10 2020 | View the calendar for October 2020 |
02. Disk information
| Serial number | command | effect |
|---|---|---|
| 01 | df -h | disk free displays the remaining disk space |
| 02 | du -h [directory name] | disk usage displays the size of the directory under the directory |
| 03 | free -h | View memory usage |
- Option description
| parameter | meaning |
|---|---|
| -h | Displays the size of the file in a user-friendly manner |
03. Process information
- The so-called process, popularly speaking, is a process currently being implemented
| Serial number | command | effect |
|---|---|---|
| 01 | ps aux | View process status details |
| 02 | top | Dynamic display of running processes and sorting |
| 03 | kill [-9] process code | Terminate the process with the specified code - 9 indicates forced termination |
ps by default, only the applications launched by the current user through the terminal will be displayed
-
ps option description function