1, A brief analysis of the source code of the built-in key driver
The Linux kernel also comes with a KEY driver. If you want to use the KEY driver of the kernel, you need to configure the Linux kernel. However, the KEY driver is enabled by default in the Linux kernel, but we still need to check it. Follow the following path to find the corresponding configuration options:
-> Device Drivers
	-> Input device support
		-> Generic input layer (needed for keyboard, mouse, ...) (INPUT [=y])
			-> Keyboards (INPUT_KEYBOARD [=y])
				->GPIO Buttons
Select the "GPIO Buttons" option and compile it into the Linux kernel, as shown in the following figure:
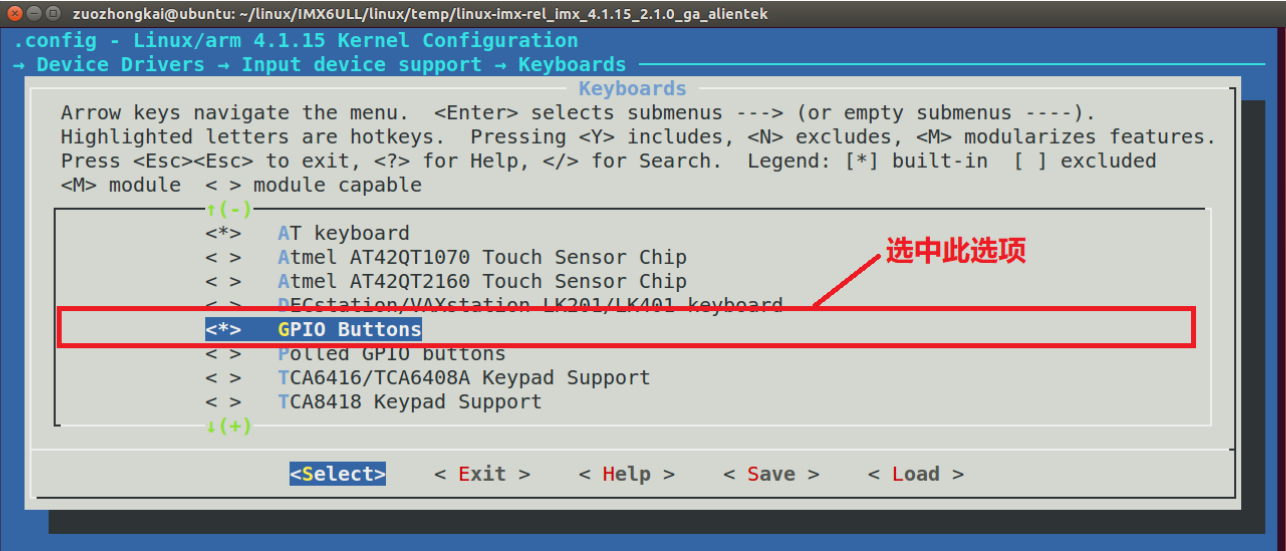
When selected, it will be displayed in the The line "CONFIG_KEYBOARD_GPIO=y" appears in the config file, and the Linux kernel will compile the KEY driver file into the Linux kernel according to this line.
The KEY driver file of Linux kernel is drivers/input/keyboard/gpio_keys.c,gpio_ keys. C adopts the platform driver framework, and the KEY driver is implemented by the input subsystem.
In gpio_keys.c the following contents can be found in the document:
static const struct of_device_id gpio_keys_of_match[] = {
	{ .compatible = "gpio-keys", },
	{ },
};
MODULE_DEVICE_TABLE(of, gpio_keys_of_match);

static struct platform_driver gpio_keys_device_driver = {
	.probe		= gpio_keys_probe,
	.remove		= gpio_keys_remove,
	.driver		= {
		.name	= "gpio-keys",
		.pm	= &gpio_keys_pm_ops,
		.of_match_table = of_match_ptr(gpio_keys_of_match),
	}
};

static int __init gpio_keys_init(void)
{
	return platform_driver_register(&gpio_keys_device_driver);
}

static void __exit gpio_keys_exit(void)
{
	platform_driver_unregister(&gpio_keys_device_driver);
}
As can be seen from the above code, this is a standard platform driven framework. If you want to use the device tree to describe the KEY device information, the compatible attribute value of the device node should be set to "GPIO keys". When the device and driver match, GPIO_ keys_ The probe function will execute. gpio_ keys_ The probe function is as follows:
static int gpio_keys_probe(struct platform_device *pdev)
{
	struct device *dev = &pdev->dev;
	const struct gpio_keys_platform_data *pdata = dev_get_platdata(dev);
	struct gpio_keys_drvdata *ddata;
	struct input_dev *input;
	size_t size;
	int i, error;
	int wakeup = 0;

	if (!pdata) {
        /* Get the KEY related device node from the device tree */
		pdata = gpio_keys_get_devtree_pdata(dev);
		if (IS_ERR(pdata))
			return PTR_ERR(pdata);
	}

	size = sizeof(struct gpio_keys_drvdata) +
			pdata->nbuttons * sizeof(struct gpio_button_data);
	ddata = devm_kzalloc(dev, size, GFP_KERNEL);
	if (!ddata) {
		dev_err(dev, "failed to allocate state\n");
		return -ENOMEM;
	}

    /* Application input_dev */
	input = devm_input_allocate_device(dev);
	if (!input) {
		dev_err(dev, "failed to allocate input device\n");
		return -ENOMEM;
	}

	ddata->pdata = pdata;
	ddata->input = input;
	mutex_init(&ddata->disable_lock);

	platform_set_drvdata(pdev, ddata);
	input_set_drvdata(input, ddata);

    /* Initialize input_dev */
	input->name = pdata->name ? : pdev->name;
	input->phys = "gpio-keys/input0";
	input->dev.parent = &pdev->dev;
	input->open = gpio_keys_open;
	input->close = gpio_keys_close;

	input->id.bustype = BUS_HOST;
	input->id.vendor = 0x0001;
	input->id.product = 0x0001;
	input->id.version = 0x0100;

	/* Enable auto repeat feature of Linux input subsystem */
	if (pdata->rep)
		__set_bit(EV_REP, input->evbit);	// EV set_ Rep event

	for (i = 0; i < pdata->nbuttons; i++) {
		const struct gpio_keys_button *button = &pdata->buttons[i];
		struct gpio_button_data *bdata = &ddata->data[i];

        /* Set input_ EV of dev_ KEY event code (set EV_KEY event and KEY type) */
		error = gpio_keys_setup_key(pdev, input, bdata, button);
		if (error)
			return error;

		if (button->wakeup)
			wakeup = 1;
	}

	error = sysfs_create_group(&pdev->dev.kobj, &gpio_keys_attr_group);
	if (error) {
		dev_err(dev, "Unable to export keys/switches, error: %d\n",
			error);
		return error;
	}

    /* Register input with Linux system_ dev */
	error = input_register_device(input);
	if (error) {
		dev_err(dev, "Unable to register input device, error: %d\n",
			error);
		goto err_remove_group;
	}

	device_init_wakeup(&pdev->dev, wakeup);

	return 0;

err_remove_group:
	sysfs_remove_group(&pdev->dev.kobj, &gpio_keys_attr_group);
	return error;
}
After everything is ready, the rest is to wait for the key to be pressed, and then report the event to the Linux kernel. The event is reported in GPIO_ keys_ irq_ Completed in ISR function. The contents of this function are as follows:
// gpio_keys_irq_isr is the key interrupt handling function
static irqreturn_t gpio_keys_irq_isr(int irq, void *dev_id)
{
	struct gpio_button_data *bdata = dev_id;
	const struct gpio_keys_button *button = bdata->button;
	struct input_dev *input = bdata->input;
	unsigned long flags;

	BUG_ON(irq != bdata->irq);

	spin_lock_irqsave(&bdata->lock, flags);

	if (!bdata->key_pressed) {
		if (bdata->button->wakeup)
			pm_wakeup_event(bdata->input->dev.parent, 0);

		input_event(input, EV_KEY, button->code, 1);
		input_sync(input);

		if (!bdata->release_delay) {
            /* Report ev to Linux system_ Key event, indicating that the key is pressed. */
			input_event(input, EV_KEY, button->code, 0);
            /* Using input_ The sync function reports ev to the system_ Rep synchronization event */
			input_sync(input);
			goto out;
		}

		bdata->key_pressed = true;
	}

	if (bdata->release_delay)
		mod_timer(&bdata->release_timer,
			jiffies + msecs_to_jiffies(bdata->release_delay));
out:
	spin_unlock_irqrestore(&bdata->lock, flags);
	return IRQ_HANDLED;
}
2, Use of built-in key driver
It's easy to use the key driver that comes with the Linux kernel, just according to the documentation / devicetree / bindings / input / GPIO keys Txt file. Add the specified device node to the device tree. The node requirements are as follows:
1. The node name is "GPIO keys".
2. The compatible attribute value of GPIO keys node must be set to "GPIO keys".
3. All keys are child nodes of GPIO keys. Each child node can describe itself with the following attributes:
- gpios: GPIO information connected by KEY.
- interrupts: GPIO interrupt information used by KEY is not required and can not be written.
- label: KEY name
- linux,code: KEY the KEY to simulate
4. If you want to support continuous pressing, you should add autorepeat.
3, Examples
gpio_keys: gpio_keys@0 {
	compatible = "gpio-keys";
	pinctrl-names = "default";
	pinctrl-0 = <&pinctrl_gpio_keys>;
	#address-cells = <1>;
	#size-cells = <0>;
	autorepeat;

	key1@1 {
		label = "USER-KEY1";
		linux,code = <114>;
		gpios = <&gpio1 18 GPIO_ACTIVE_LOW>;
		gpio-key,wakeup;
	};
};