4G communication
There are many restrictions on using wired network or WIFI, because to route, even WIFI has to route first, and then connect to a router. Therefore, in the case of inconvenient wiring, you can connect to the network through 4G. The following describes how to use 4G in I.MX6U-ALPHA development board to realize networking function
1, 4G network connection
4G modules are generally MiniPCIE interfaces. Although MiniPCIE interfaces are used, the actual communication interfaces are USB, so the drivers of 4G modules are converted to USB drivers. 4G module manufacturers have provided detailed documents to explain how to use 4G modules under Linux and how to modify the Linux kernel and add 4G module drivers.
1. The mx6u-alpha development board also has a 4G module interface in the form of MiniPCIE. Although the appearance is MiniPCIE, the heart is USB. 1. The schematic diagram of 4G module of mx6u-alpha development board is shown in the figure below:
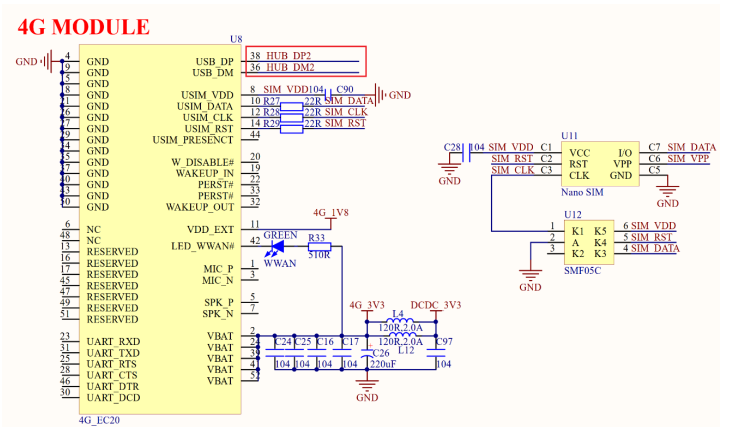
It can be seen from the figure above that the interface between the dmu811 and the Mini USB 850 is the interface between the dmu2 and the Mini USB 850
2, Introduction to 4G module
ME3630 4G module is a 4G LTE module produced by Shenzhen gaoxinxing IOT (formerly ZTE IOT), which is an LTE cat 4 seven mode all Netcom 4G module can provide 50Mbps uplink rate and 150Mbps downlink rate in LTE mode, and support fallback to 3G or 2G network. Its characteristics are as follows:
– one way USB2 0 interface
– one UART interface
– SIM card interface supports 1.8/3.0V
– built in TCP, UDP, FTP, HTTP and other protocols
– support RAS/ECM/NDIS
– support AT instruction
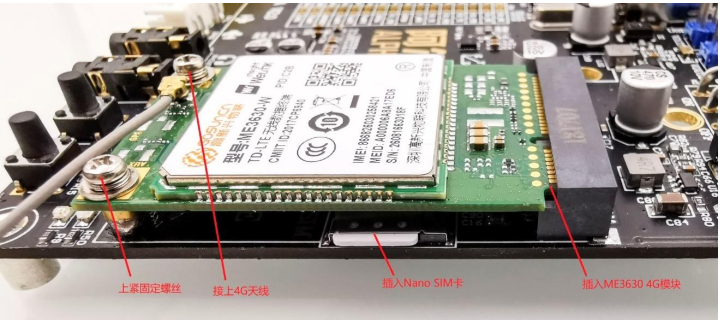
The ME3630 4G module has a variety of configurations. Here, the data communication function of the ME3630 is mainly used. Before using the ME3630 4G module, you need to insert it into the MiniPCIE seat of the development board, tighten the screw, insert the Nano SIM card and connect the antenna, as shown in the following figure:
3, 4G module experiment
3.1 module driven modification
- Add USB device information: Drivers / USB / serial / option of Linux source code Option in C file_ Add PID and VID of ME3630 to IDS array
{ USB_DEVICE(0x19d2, 0x0117) }, /* ME3630*/
{ USB_DEVICE(0x19d2, 0x0199) },
{ USB_DEVICE(0x19d2, 0x1476) },

- Add ECM support program: it supports ECM interface and can be easily networked through this interface. In drivers / USB / serial / option C file option_ Add the following content to the probe function
/* EM3630 */
if (serial->dev->descriptor.idVendor == 0x19d2 &&
	serial->dev->descriptor.idProduct == 0x1476 &&
	serial->interface->cur_altsetting->desc. bInterfaceNumber == 3)
	return -ENODEV;

if (serial->dev->descriptor.idVendor == 0x19d2 &&
	serial->dev->descriptor.idProduct == 0x1476 &&
	serial->interface->cur_altsetting->desc. bInterfaceNumber == 4)
	return -ENODEV;

if (serial->dev->descriptor.idVendor == 0x19d2 &&
	serial->dev->descriptor.idProduct == 0x1509 &&
	serial->interface->cur_altsetting->desc. bInterfaceNumber == 4)
	return -ENODEV;

if (serial->dev->descriptor.idVendor == 0x19d2 &&
	serial->dev->descriptor.idProduct == 0x1509 &&
	serial->interface->cur_altsetting->desc. bInterfaceNumber == 5)
	return -ENODEV;

- To configure the Linux kernel:
Enable USBNET function
-> Device Drivers
	-> -*- Network device support
		-> USB Network Adapters
			-> -*- Multi-purpose USB Networking Framework
Enable USB serial port GSM and CDMA driver
-> Device Drivers
	-> [*] USB support
		-> <*> USB Serial Converter support
			-> <*> USB driver for GSM and CDMA modems
Enable CDC ACM mode of USB
-> Device Drivers
	-> [*] USB support
		-> <*> Support for Host-side USB
			-> <*> USB Modem (CDC ACM) support
- Compile the Linux kernel and start the development board with the new zImage. If the ME3630 is plugged in, the following information will be output after the system is started

As can be seen from the above, ME3630 virtualizes three USB devices, namely ttyUSB0~ttyUSB2. In ECM mode, you can check the corresponding network card by running ifconfig -a command. The name may be usbX/ecmX/ethX, etc. if it exists, it indicates that the ECM interface driver is loaded successfully

3.2 PPP networking test
- Enable the ppp function of Linux kernel: support ppp dial-up Internet access. Configure and recompile the kernel as follows
-> Device Drivers
	-> [*] Network device support
		-> <*> PPP (point-to-point protocol) support
			-> <*> PPP BSD-Compress compression
			-> <*> PPP Deflate compression
			-> [*] PPP filtering
			-> <*> PPP MPPE compression (encryption)
			-> [*] PPP multilink support
			-> <*> PPP over Ethernet
			-> <*> PPP support for async serial ports
			-> <*> PPP support for sync tty ports
- Transplant pppd software: realize ppp dial-up Internet access through pppd software
Delete / usr/sbin/chat before migration (generated when Busybox makes the root file system), because pppd will also compile chat software. If it is not deleted, there will be an error
Put the source code ppp-2.4.7 tar. Copy GZ to Ubuntu and unzip it. Enter the unzipped folder for configuration and compilation
cd ppp-2.4.7/
./configure 						//to configure
make CC=arm-linux-gnueabihf-gcc 	//compile
/************************************************/
/*If bison and flex are prompted with "not found", install the two libraries*/
sudo apt-get install bison
sudo apt-get install flex
After compilation, chat/chat, pppd/pppd, pppdump/pppdump and
pppstats/pppstats: copy the four files to the / usr/bin directory in the root file system of the development board
sudo cp chat/chat /home/andyxi/linux/nfs/rootfs/usr/bin/ -f
sudo cp pppd/pppd /home/andyxi/linux/nfs/rootfs/usr/bin/ -f
sudo cp pppdump/pppdump /home/andyxi/linux/nfs/rootfs/usr/bin/ -f
sudo cp pppstats/pppstats /home/andyxi/linux/nfs/rootfs/usr/bin/ -f
After completion, enter "pppd -v" to view the version number. If the pppd version number displays normally, it indicates that the pppd migration is successful
- ppp Internet test
Before using pppd for dial-up Internet access, you need to create four files, which must be placed in the same directory. Create the / etc/gosuncn directory under the root file system of the development board
In the / etc/gosuncn directory, create a shell script file named "PPP on"
#!/bin/sh
clear
OPTION_FILE="gosuncn_options"
DIALER_SCRIPT=$(pwd)/gosuncn_ppp_dialer
exec pppd file $OPTION_FILE connect "chat -v -f ${DIALER_SCRIPT}"
In the / etc/gosuncn directory, create a file named "gosuncn_options"
/dev/ttyUSB2		//ttyUSB2 for China Unicom or mobile card and ttyUSB0 for Telecom Card
115200
crtscts
modem
persist
lock
noauth
noipdefault
debug
nodetach
user Anyname				//Telecom Card, to be changed to "user card"
password Anypassword		//Telecom Card, to be changed to "password card"
ipcp-accept-local
ipcp-accept-remote
defaultroute
usepeerdns
noccp
nobsdcomp
novj
dump
In the / etc/gosuncn directory, create a file named "gosuncn_ppp_dialer"
ABORT "NO CARRIER"
ABORT "ERROR"
TIMEOUT 120
"" ATE
SAY "ATE"
ECHO ON
OK ATH
OK ATP
//"3GNET" is the APN code of China Unicom card. For mobile card, it should be changed to "CMNET"
//If it is a telecommunication card, the following line should be changed to OK "AT+ZCAPN=card,card"
OK AT+CGDCONT=1,\"IP\",\"3GNET\"
OK ATD*99#		//Telecom Card, to be changed to "ATD#777"
CONNECT
In the / etc/gosuncn directory, create a script file named "disconnect"
#!/bin/sh
killall pppd
Finally, you should also give the executable permissions of PPP on and disconnect files
chmod 777 ppp-on disconnect
Use/ The following problems may occur when the PPP on & command is connected to the 4G network

#Prompt: "Can't create lock file /var/lock/LCK..ttyUSB2" cannot be created
#Check whether / var/run and / var/lock exist in the root file system. If not, create these two folders
mkdir /var/run //Create / var/run folder
mkdir /var/lock //Create / var/lock folder

#Use `/ PPP on & ` after command reconnection
#Prompt: the file "/ etc/ppp/resolv.conf" cannot be found. Create the file manually in the relevant directory
touch resolv.conf
Restart the development board after creation! Enter the / etc/gosuncn directory and use/ The PPP on & command completes dial-up Internet access. After success, a network card named "ppp0" will be generated

The 4G network test needs to turn off other network cards, otherwise there may be problems, but now the system is started through the network and the root file system is mounted through NFS, so other network cards cannot be turned off. In order to solve this problem, only uboot, Linux kernel The dtb device tree and root file system are written to the EMMC or NAND of the board, and then directly start the system on the EMMC or NAND, so that other network cards are not required to work. For burning method, please refer to System burning A penny.
After the system is written, set the development board to start from EMMC. After starting, connect the 4G module to the network according to the previous steps. Ensure that the current development board has only one ppp0 network card corresponding to ME3630. Finally, ping Baidu's official website directly. The results are shown in the figure below

3.3 ECM networking test
For modules that support ECM interface, you can directly access the Internet through ECM. ME3630 module supports ECM interface. Restart the development board. Enter "ifconfig -a" command to see that there is a network card named "usb0", which is the network card corresponding to ECM interface

Use minicom to input the AT command. First open ttyUSB1 with minicom. ttyUSB1 is the AT command serial port of ME3630. The baud rate is set to 115200, and then input the following commands in sequence:
Input AT command: this step is not required if the module has been set to ECM mode
AT+ZSWITCH=L
Use AT instruction + CGDCONT to set data parameters
//The APN of Unicom card is 3GNET
//The APN of the telecommunication card is CTNET
//The APN of the mobile card is CMNET
AT+CGDCONT=1, "IP" , "CMNET"
Send connect AT command
AT+ZECMCALL=1
After the connection is successful, open the usb0 network card and obtain the IP address
ifconfig usb0 up 	//Open usb0 network card
udhcpc -i usb0		//Get IP address
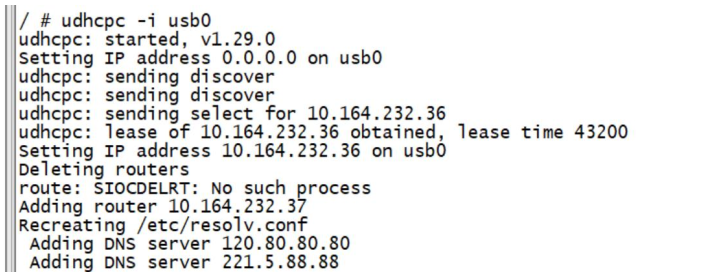
After the IP address is obtained successfully, Ping Baidu's official website. If you can ping it, it indicates that the ECM interface of ME3630 is connected successfully. If you are prompted with "bad address' www.baidu.com '", you can check whether the DNS server address is set correctly and open / etc / resolv Conf file, add "nameserver 114.114.114.114"
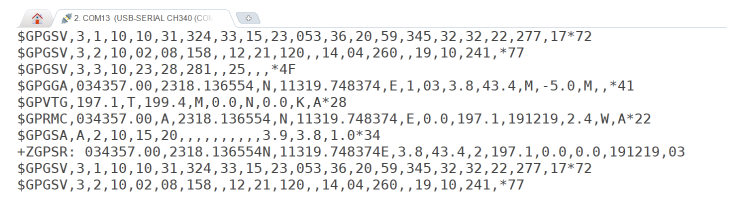
3.4 GNSS positioning test
GNSS function, that is, GPS positioning. When transplanting ME3630 driver on it, we know that three ttyUSB devices will eventually appear, namely ttyUSB0~ttyUSB2, of which ttyUSB1 is GNSS interface. The GPS module is output through serial port, so you can directly use minicom to view the GNSS information output by ttyUSB1. Minicom is configured as follows:
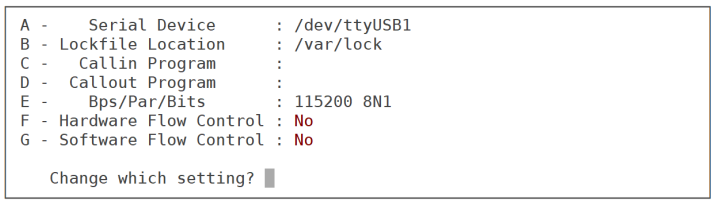
When minicom opens the serial port, it sometimes prompts the error of "/ dev/ttyUSB1 is locked". It is because minicom was not closed correctly last time, resulting in the existence of LCK... XXX file in the / var/lock directory (XXX is the specific serial port device file name, such as ttyUSB1). Enter "/ var/lock" and delete the file
If the ME3630 turns off the GNSS positioning output function by default, it must be configured with the AT command first. After minicom opens the serial port, enter the following AT command for configuration:
ATI 			//View firmware information
Manufacturer: GOSUNCNWELINK
Model: ME3630-W
Revision: ME3630C3CV1.0B03
IMEI: 864863045876287
OK
AT+ZGINIT 		//Initialize GPS
OK
AT+ZGPSEVENT=1 	//Enable GPS event reporting
OK
AT+ZGMODE=3 	//Set positioning mode
OK
AT+ZGPORT=0 	//The positioning information is reported from AT, MODEM and UART AT the same time
OK
AT+ZGNMEA=31 	//Set GPS data to NMEA format
OK
AT+ZGPSR=1 		//Enable ZGPSR data
OK
AT+ZGRUN=2 		//Continuous positioning mode
OK
After the above AT command configuration is completed, the ME3630 will start searching for satellites. Note: the GPS antenna must be placed outdoors! The ME3630 will output the positioning information in NEMA format after the satellite search