Author: Daoge, a 10 + year embedded development veteran, focusing on: C/C + +, embedded and Linux.
Pay attention to the official account below, reply to books, get classic books in Linux and embedded domain, and reply to PDF to get all original articles (PDF format).
Other people's experience, our ladder!
Hello, I'm brother Dao. Today, I'll explain to you the technical knowledge point: how to send signals to applications in the driver layer.
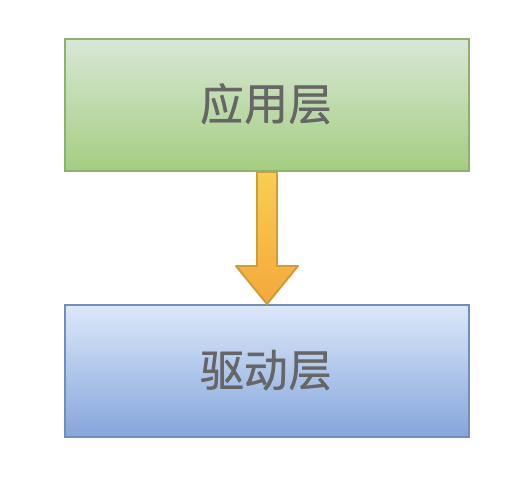
In the last article, we discussed how to send instructions to control the GPIO of the driver layer in the application layer Linux driver practice: how to write [GPIO] device driver? . The control direction is from the application layer to the driver layer:
So, if you want the execution path of the program from bottom to top, that is, from the driver layer to the application layer, how should you implement it?
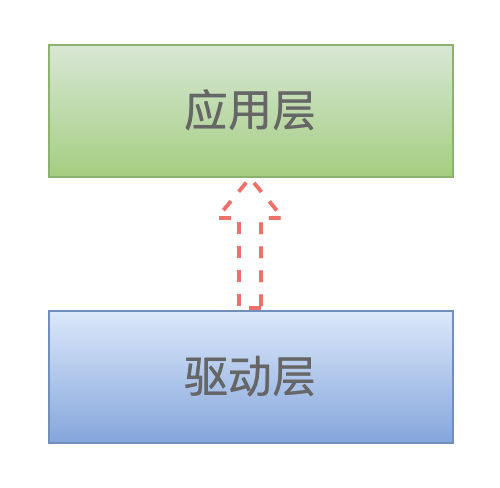
The easiest and simplest way is to send a signal!
This article continues with a complete code example to demonstrate how to implement this function.
kill commands and signals
Use the kill command to send a signal
As for the signal of Linux operating system, every programmer knows this instruction: use the kill tool to "kill" a process:
$ kill -9 <Process PID>
The function of this instruction is to send a signal 9 to a specified process. The default function of this signal is to stop the process.
Although this signal is not actively processed in the application, the default processing action of the operating system is to terminate the execution of the application.
In addition to transmitting signal 9, the kill command can also transmit any other signal.
In Linux system, all signals are represented by an integer value, and the file / usr / include / x86 can be opened_ 64-linux-gnu/bits/signum. H (your system may be located in other directories) check the following common signals:
/* Signals.  */
#define	SIGINT		2	/* Interrupt (ANSI).  */
#define	SIGKILL		9	/* Kill, unblockable (POSIX).  */
#define	SIGUSR1		10	/* User-defined signal 1 (POSIX).  */
#define	SIGSEGV		11	/* Segmentation violation (ANSI).  */
#define	SIGUSR2		12	/* User-defined signal 2 (POSIX).  */
...
...
#define SIGSYS		31	/* Bad system call.  */
#define SIGUNUSED	31

#define	_NSIG		65	/* Biggest signal number + 1
				   (including real-time signals).  */

/* These are the hard limits of the kernel.  These values should not be
   used directly at user level.  */
#define __SIGRTMIN	32
#define __SIGRTMAX	(_NSIG - 1)
Signal 9 corresponds to SIGKILL, and signal 11 (SIGSEGV) is the most annoying segment fault!
There is another point to note here: real-time signal and non real-time signal. The main differences between them are:
-
Non real time signal: the operating system does not ensure that the application can receive it (i.e. the signal may be lost);
-
Real time signal: the operating system ensures that the application program can receive it;
If our program design completes some functions through signal mechanism, in order to ensure that the signal will not be lost, we must use real-time signal.
From the file Signum As can be seen in H, the real-time signal from__ SIGRTMIN (value: 32) starts.
Signals in multithreading
Although we did not receive and process the SIGKILL signal when writing an application, once someone else sent the signal, our program will be stopped by the operating system. This is the default action.
Then, in the application, you should be able to actively claim to receive and process the specified signal. Here is the simplest example.
In an application, there may be multiple threads;
When a signal is sent to this process, all threads may receive it, but only one thread can process it;
In this example, there is only one main process to receive and process signals;
Signal registration and processing functions
By convention, all application files are created in the ~ / tmp/App directory.
// File: tmp/App/app_handle_signal/app_handle_signal.c

#include <stdio.h>
#include <stdlib.h>
#include <unistd.h>
#include <sys/ioctl.h>
#include <signal.h>

// Signal processing function
static void signal_handler(int signum, siginfo_t *info, void *context)
{
	// Print the received signal value
    printf("signal_handler: signum = %d \n", signum);
}

int main(void)
{
	int count = 0;
	// Register signal processing function
	struct sigaction sa;
	sigemptyset(&sa.sa_mask);
	sa.sa_sigaction = &signal_handler;
	sa.sa_flags = SA_SIGINFO;
	sigaction(SIGUSR1, &sa, NULL);
	sigaction(SIGUSR2, &sa, NULL);

	// Printing information circularly all the time, waiting for receiving and sending signals
	while (1)
	{
		printf("app_handle_signal is running...count = %d \n", ++count);
		sleep(5);
	}

	return 0;
}
The signals received by this example program are SIGUSR1 and SIGUSR2, that is, the values 10 and 12.
Compilation and execution:
$ gcc app_handle_signal.c -o app_handle_signal
$ ./app_handle_signal
At this point, the application starts executing and waits for the signal to be received.
In another terminal, the kill instruction is used to transmit the signal SIGUSR1 or SIGUSR2.
kill sends a signal. You need to know the PID of the application. You can use the instruction: ps -au | grep app_handle_signal.

15428 is the PID of the process.
Execute the command to send signal SIGUSR1:
$ kill -10 15428
At this time, the following printing information can be seen in the terminal window of the application:

This indicates that the application has received the SIGUSR1 signal!
Note: we use the kill command to send signals. Kill is also an independent process. The execution path of the program is as follows:
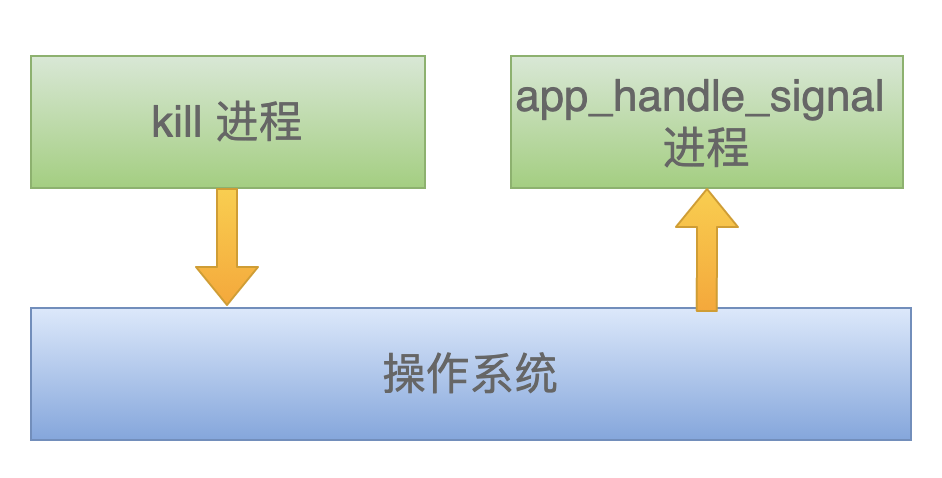
In this execution path, the controllable part is the application layer. As for how the operating system receives the kill operation and then sends a signal to the app_ handle_ We don't know the of the signal process.
Let's continue to see how to actively send signals in the driver layer through the example code.
Driver code example: send signal
functional requirement
In the simple example just now, the following information can be obtained:
-
Signal sender: must know to whom [PID] to send the signal and which signal to send;
-
Signal receiver: the signal processing function must be defined and registered with the operating system: which signals to receive;
Of course, the sender is the driver. In the example code, continue to use the SIGUSR1 signal to test.
So how does the driver know the PID of the application? The application can actively tell its PID to the driver through the oil function:
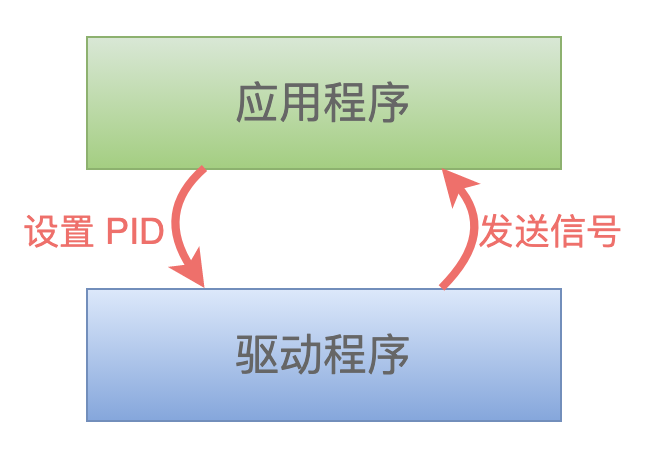
Driver
The sample code here is modified on the basis of the previous article. Change the contents of some parts and use macros to define MY_SIGNAL_ENABLE is controlled to facilitate viewing and comparison.
The working directory of all the following operations is the same as the previous article, that is, ~ / tmp/linux-4.15/drivers /.
$ cd ~/tmp/linux-4.15/drivers/
$ mkdir my_driver_signal
$ cd my_driver_signal
$ touch my_driver_signal.c
my_driver_signal.c the contents of the file are as follows (there is no need to knock by hand, and there is a code download link at the end of the text):
#include <linux/module.h>
#include <linux/kernel.h>
#include <linux/ctype.h>
#include <linux/device.h>
#include <linux/cdev.h>

// New header file
#include <asm/siginfo.h>
#include <linux/pid.h>
#include <linux/uaccess.h>
#include <linux/sched/signal.h>
#include <linux/pid_namespace.h>

// GPIO hardware related macro definitions
#define MYGPIO_HW_ENABLE

// Add a new part and use this macro to control it
#define MY_SIGNAL_ENABLE

// Equipment name
#define MYGPIO_NAME			"mygpio"

// There are 4 gpios in total
#define MYGPIO_NUMBER		4

// Equipment class
static struct class *gpio_class;

// Used to save the device
struct cdev gpio_cdev[MYGPIO_NUMBER];

// Used to save the equipment number
int gpio_major = 0;
int gpio_minor = 0;

#ifdef MY_SIGNAL_ENABLE
// It is used to save who to send signals to. The application sets its own process ID through ioctl.
static int g_pid = 0;
#endif

#ifdef MYGPIO_HW_ENABLE
// The hardware initialization function is called when the driver is loaded (gpio_driver_init)
static void gpio_hw_init(int gpio)
{
	printk("gpio_hw_init is called: %d. \n", gpio);
}

// Hardware release
static void gpio_hw_release(int gpio)
{
	printk("gpio_hw_release is called: %d. \n", gpio);
}

// Set the status of hardware GPIO, and be investigated when controlling GPIO (gpio_ioctl)
static void gpio_hw_set(unsigned long gpio_no, unsigned int val)
{
	printk("gpio_hw_set is called. gpio_no = %ld, val = %d. \n", gpio_no, val);
}
#endif

#ifdef MY_SIGNAL_ENABLE
// Used to send signals to applications
static void send_signal(int sig_no)
{
	int ret;
	struct siginfo info;
	struct task_struct *my_task = NULL;
	if (0 == g_pid)
	{
		// This indicates that the application has not set its own PID
	    printk("pid[%d] is not valid! \n", g_pid);
	    return;
	}

	printk("send signal %d to pid %d \n", sig_no, g_pid);

	// Construct signal structure
	memset(&info, 0, sizeof(struct siginfo));
	info.si_signo = sig_no;
	info.si_errno = 100;
	info.si_code = 200;

	// Obtain your own task information and use the RCU lock
	rcu_read_lock();
	my_task = pid_task(find_vpid(g_pid), PIDTYPE_PID);
	rcu_read_unlock();

	if (my_task == NULL)
	{
	    printk("get pid_task failed! \n");
	    return;
	}

	// Send signal
	ret = send_sig_info(sig_no, &info, my_task);
	if (ret < 0)
	{
	       printk("send signal failed! \n");
	}
}
#endif

// Called when the application opens the device
static int gpio_open(struct inode *inode, struct file *file)
{

	printk("gpio_open is called. \n");
	return 0;
}

#ifdef MY_SIGNAL_ENABLE
static long gpio_ioctl(struct file* file, unsigned int cmd, unsigned long arg)
{
	void __user *pArg;
	printk("gpio_ioctl is called. cmd = %d \n", cmd);
	if (100 == cmd)
	{
		// Describes the PID of the application setup process
		pArg = (void *)arg;
		if (!access_ok(VERIFY_READ, pArg, sizeof(int)))
		{
		    printk("access failed! \n");
		    return -EACCES;
		}

		// Copy user space data to kernel space
		if (copy_from_user(&g_pid, pArg, sizeof(int)))
		{
		    printk("copy_from_user failed! \n");
		    return -EFAULT;
		}

		printk("save g_pid success: %d \n", g_pid);
		if (g_pid > 0)
		{
			// Send signal
			send_signal(SIGUSR1);
			send_signal(SIGUSR2);
		}
	}

	return 0;
}
#else
// Called when the application controls GPIO
static long gpio_ioctl(struct file* file, unsigned int val, unsigned long gpio_no)
{
	printk("gpio_ioctl is called. \n");

	if (0 != val && 1 != val)
	{
		printk("val is NOT valid! \n");
		return 0;
	}

	if (gpio_no >= MYGPIO_NUMBER)
	{
		printk("dev_no is invalid! \n");
		return 0;
	}

	printk("set GPIO: %ld to %d. \n", gpio_no, val);

#ifdef MYGPIO_HW_ENABLE
	gpio_hw_set(gpio_no, val);
#endif

	return 0;
}
#endif

static const struct file_operations gpio_ops={
	.owner = THIS_MODULE,
	.open  = gpio_open,
	.unlocked_ioctl = gpio_ioctl
};

static int __init gpio_driver_init(void)
{
	int i, devno;
	dev_t num_dev;

	printk("gpio_driver_init is called. \n");

	// Dynamically apply for the equipment number (if it is more rigorous, the return value of the function should be checked)
	alloc_chrdev_region(&num_dev, gpio_minor, MYGPIO_NUMBER, MYGPIO_NAME);

	// Get master device number
	gpio_major = MAJOR(num_dev);
	printk("gpio_major = %d. \n", gpio_major);

	// Create device class
	gpio_class = class_create(THIS_MODULE, MYGPIO_NAME);

	// Create device node
	for (i = 0; i < MYGPIO_NUMBER; ++i)
	{
		// Equipment number
		devno = MKDEV(gpio_major, gpio_minor + i);

		// Initialize cdev structure
		cdev_init(&gpio_cdev[i], &gpio_ops);

		// Register character device
		cdev_add(&gpio_cdev[i], devno, 1);

		// Create device node
		device_create(gpio_class, NULL, devno, NULL, MYGPIO_NAME"%d", i);
	}

#ifdef MYGPIO_HW_ENABLE
	for (i = 0; i < MYGPIO_NUMBER; ++i)
	{
		// Initial hardware GPIO
		gpio_hw_init(i);
	}
#endif

	return 0;
}

static void __exit gpio_driver_exit(void)
{
	int i;
	printk("gpio_driver_exit is called. \n");

	// Delete device node
	for (i = 0; i < MYGPIO_NUMBER; ++i)
	{
		cdev_del(&gpio_cdev[i]);
		device_destroy(gpio_class, MKDEV(gpio_major, gpio_minor + i));
	}

	// Release device class
	class_destroy(gpio_class);

#ifdef MYGPIO_HW_ENABLE
	for (i = 0; i < MYGPIO_NUMBER; ++i)
	{
		gpio_hw_release(i);
	}
#endif

	// Logout equipment number
	unregister_chrdev_region(MKDEV(gpio_major, gpio_minor), MYGPIO_NUMBER);
}

MODULE_LICENSE("GPL");
module_init(gpio_driver_init);
module_exit(gpio_driver_exit);
Most of the code here has been described clearly in the last article. Here we focus on these two functions: gpio_ioctl and send_signal.
(1) Function gpio_ioctl
When the application calls ioctl(), GPIO in the driver_ IOCTL will be called.
A simple protocol is defined here: when cmd in the application call parameter is 100, it means the PID used to tell the driver.

The driver defines a global variable g_pid, which is used to save the parameter PID passed in by the application.
The function copy needs to be called_ from_ User (&g_pid, PARG, sizeof (int)), copy the parameters in user space into kernel space;
After the PID is successfully obtained, the function send is called_ Signal sends a signal to the application.
This is only for demonstration purposes. In the actual project, the signal may be sent after receiving the hardware trigger.
(2) Function send_signal
This function mainly does three things:
-
Construct a signal structure variable: struct siginfo;
-
Obtain the task information through the PID passed in by the application: pid_task(find_vpid(g_pid), PIDTYPE_PID);
-
Send signal: send_ sig_ info(sig_no, &info, my_task);
Driver module Makefile
$ touch Makefile
The contents are as follows:
ifneq ($(KERNELRELEASE),)
	obj-m := my_driver_signal.o
else
	KERNELDIR ?= /lib/modules/$(shell uname -r)/build
	PWD := $(shell pwd)
default:
	$(MAKE) -C $(KERNELDIR) M=$(PWD) modules
clean:
	$(MAKE) -C $(KERNEL_PATH) M=$(PWD) clean
endif
Compile driver module
$ make
Get driver: my_driver_signal.ko .
Load driver module
$ sudo insmod my_driver_signal.ko
View the print information of the driver module through the dmesg command:
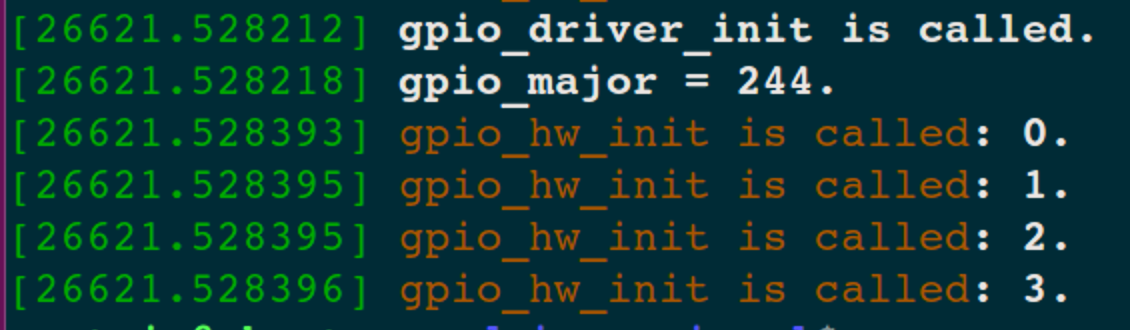
Because the example code is modified on the basis of the previous GPIO, the device node file created is the same as the previous article:

Application code example: receive signal
Register signal processing function
The application is still in the ~ / tmp/App / directory.
$ mkdir ~/tmp/App/app_mysignal
$ cd ~/tmp/App/app_mysignal
$ touch mysignal.c
The contents of the document are as follows:
#include <stdio.h>
#include <stdlib.h>
#include <unistd.h>
#include <assert.h>
#include <fcntl.h>
#include <sys/ioctl.h>
#include <signal.h>

#define MY_GPIO_NUMBER		4

char gpio_name[MY_GPIO_NUMBER][16] = {
	"/dev/mygpio0",
	"/dev/mygpio1",
	"/dev/mygpio2",
	"/dev/mygpio3"
};

// Signal processing function
static void signal_handler(int signum, siginfo_t *info, void *context)
{
	// Print the received signal value
    printf("signal_handler: signum = %d \n", signum);
    printf("signo = %d, code = %d, errno = %d \n",
	         info->si_signo,
	         info->si_code,
	         info->si_errno);
}

int main(int argc, char *argv[])
{
	int fd, count = 0;
	int pid = getpid();

	// Open GPIO
	if((fd = open("/dev/mygpio0", O_RDWR | O_NDELAY)) < 0){
		printf("open dev failed! \n");
		return -1;
	}

	printf("open dev success! \n");

	// Register signal processing function
	struct sigaction sa;
	sigemptyset(&sa.sa_mask);
	sa.sa_sigaction = &signal_handler;
	sa.sa_flags = SA_SIGINFO;

	sigaction(SIGUSR1, &sa, NULL);
	sigaction(SIGUSR2, &sa, NULL);

	// set PID
	printf("call ioctl. pid = %d \n", pid);
	ioctl(fd, 100, &pid);

	// Sleep for 1 second and wait for the signal to be received
	sleep(1);

	// Turn off the device
	close(fd);
}
As you can see, the application mainly does two things:
(1) First, the signals SIGUSR1 and SIGUSR2 are registered with the operating system through the function sigaction(). Their signal processing functions are the same: signal_handler().
In addition to the sigaction function, the application can also use the signal function to register the signal processing function;
(2) Then through IOCTL (FD, 100, & PID); Set your own PID to the driver.
Compile the application:
$ gcc mysignal.c -o mysignal
Execute application:
$ sudo ./mysignal
According to the driver code just now, when the driver receives the command to set PID, it will immediately send two signals:

Let's take a look at the print information of the driver in dmesg:
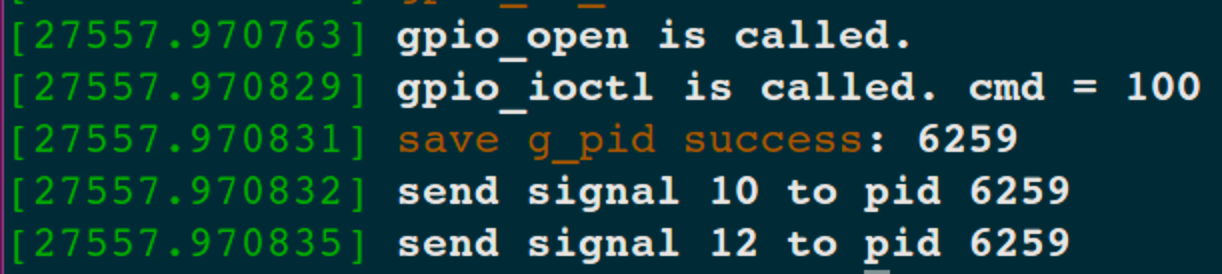
It can be seen that the driver sends these two signals (10 and 12) to the application (PID=6259).
The output information of the application is as follows:
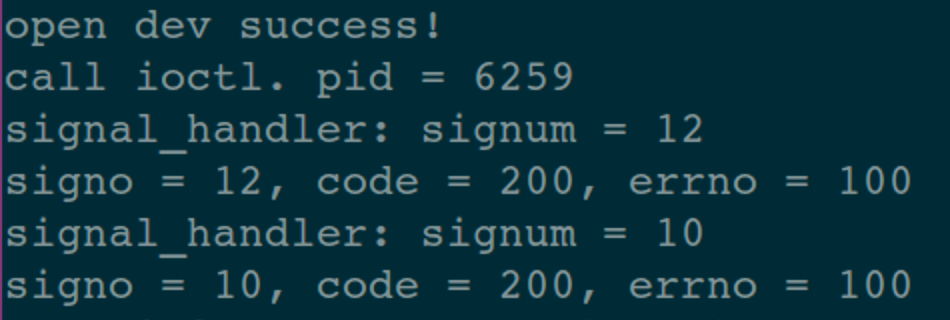
It can be seen that the application receives signals 10 and 12 and correctly prints out some information carried in the signal!
------ End ------
The test code in this article has been placed on the network disk.
In the official account [IOT Internet of things] background reply keyword: 1205, you can get download address.
thank you!
Recommended reading
[3] The underlying debugging principle of gdb is so simple
[4] Is inline assembly terrible? After reading this article, end it!
Other albums: Selected articles,Application design,Internet of things, C language.