catalogue
- API function
- Write driver
- Writing applications
- Unloading the driver module
- Summary
Today, we continue to discuss the driver of character device in Linux.
In the last article Linux driver practice: do you know two ways to write [character device driver]? We said: the driver of character device has two different sets of API functions, and this paper demonstrates in detail the use of old API functions to write the driver.
In this article, we continue this topic and actually demonstrate how to use another set of API functions of character device driver.
API function
Here we mainly focus on the following three functions:
// Static registration device
int register_chrdev_region(dev_t from, unsigned count, const char *name);

// Dynamic registration device
int alloc_chrdev_region(dev_t *dev, unsigned baseminor, unsigned count,const char *name);

// Uninstall device
void unregister_chrdev_region(dev_t from, unsigned count);
The main difference between static and dynamic registration is: who will dominate the allocation of the main equipment number!
Static registration: our driver specifies the master device number, that is, parameter 1: from; Dynamic registration: it is allocated by the operating system, and the driver provides a variable to receive the device number, that is, parameter 1: dev pointer;
In addition, in the later kernel version of Linux 2.6, cdev structure is introduced to describe a character device. Its structure members are:
struct cdev {
    struct kobject kobj;    // Embedded kobject object
    struct module *owner;   // Module
    const struct file_operations *ops;//File operation structure
    struct list_head list;  // Linked list handle
    dev_t dev;              // Equipment number
    unsigned int count;
};
The processing functions related to this structure are:
void cdev_init(struct cdev *,struct file_operations *); Initialize cdev members, mainly setting file_operations. strcut cdev *cdev_alloc(void); Dynamically request cdev memory. void cdev_put(strcut cdev *p); Operations related to count. int cdev_add(struct cdev *,dev_t ,unsigned ); Add a cdev to the system to register the character device, which needs to be called when the driver is loaded. void cdev_del(struct cdev *); Delete a cdev from the system and log off the character device, which needs to be called when the driver is unloaded.
Later in the code demonstration, you can see how the cdev structure is used.
Write driver
As usual, we still follow the steps to discuss how to use the above APIs to handwrite the driver of a character device.
The working directory of all the following operations is the same as the previous article, that is, ~ / tmp/linux-4.15/drivers /.
Create driver directories and drivers
$ cd linux-4.15/drivers/
$ mkdir my_driver2
$ cd my_driver2
$ touch driver2.c
The contents of driver2.c file are as follows (there is no need to knock by hand, and there is a code download link at the end of the text):
#include <linux/module.h>
#include <linux/kernel.h>
#include <linux/ctype.h>
#include <linux/device.h>
#include <linux/cdev.h>

static struct cdev my_cdev;
static dev_t dev_no;

int driver2_open(struct inode *inode, struct file *file)
{
	printk("driver2_open is called. \n");
	return 0;
}

ssize_t driver2_read(struct file *file, char __user *buf, size_t size, loff_t *ppos)
{
	printk("driver2_read is called. \n");
	return 0;
}

ssize_t driver2_write (struct file *file, const char __user *buf, size_t size, loff_t *ppos)
{
	printk("driver2_write is called. \n");
	return 0;
}

static const struct file_operations driver2_ops={
	.owner = THIS_MODULE,
	.open  = driver2_open,
	.read  = driver2_read,
	.write = driver2_write,
};

static int __init driver2_init(void)
{
	printk("driver2_init is called. \n");

	// Initialize cdev structure
	cdev_init(&my_cdev, &driver2_ops);

	// Register character device
	alloc_chrdev_region(&dev_no, 0, 2, "driver2");
	cdev_add(&my_cdev, dev_no, 2);

	return 0;
}

static void __exit driver2_exit(void)
{
	printk("driver2_exit is called. \n");

	// Logout device
	cdev_del(&my_cdev);

	// Logout equipment number
	unregister_chrdev_region(dev_no, 2);
}

MODULE_LICENSE("GPL");
module_init(driver2_init);
module_exit(driver2_exit);
Here, take a look at Driver2 called when the driver module is loaded_ Init() function, where cdev_init is used to associate the cdev structure with file_operations.
Calling alloc_chrdev_region(), the operating system assigns the master device number and saves it in dev_no variable, and then cdev_add() associates the device number with the cdev structure.
Create Makefile file
$ touch Makefile
The contents are as follows:
ifneq ($(KERNELRELEASE),)
	obj-m := driver2.o
else
	KERNELDIR ?= /lib/modules/$(shell uname -r)/build
	PWD := $(shell pwd)
default:
	$(MAKE) -C $(KERNELDIR) M=$(PWD) modules
clean:
	$(MAKE) -C $(KERNEL_PATH) M=$(PWD) clean
endif
Compile driver module
$ make
Get the driver: driver2.ko.
Load driver module
Before loading the driver module, first check several places related to the driver equipment in the system.
Let's take a look at the / dev directory. At present, there is no device node (/ dev/driver2).
$ ll /dev/driver2
ls: cannot access '/dev/driver2': No such file or directory
Check the / proc/devices directory again, and there is no device number of driver2 device.
$ cat /proc/devices
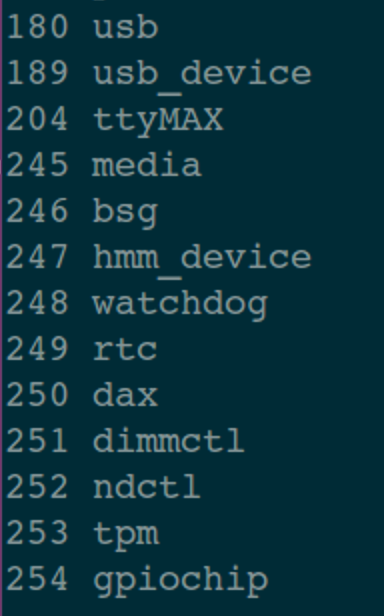
/proc/devices file: lists the main device numbers of character and block devices and the device names assigned to these device numbers.
To facilitate viewing the print information, clean up the dmesg output information:
$ sudo dmesg -c
Execute the following command to load the driver module:
$ sudo insmod driver2.ko
When the driver is loaded, use module_init() registered function driver2_init() will be executed, and the print information will be output.
You can also view the print information of the driver module through the dmesg command:
$ dmesg

At this time, the driver module has been loaded!
To view the device number displayed in the / proc/devices Directory:
$ cat /proc/devices
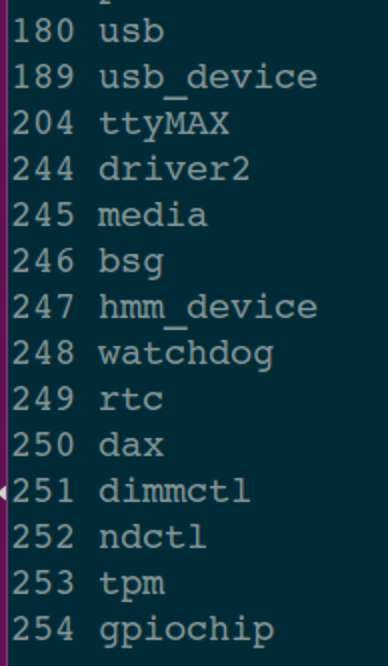
The device has been registered. The main device number is 244.
However, at this time, there is no device node in the / dev directory.
As described in the previous article, you can also use the udev service in Linux user mode to automatically create device nodes.
Now let's create the device node manually:
$ sudo mknod -m 660 /dev/driver2 c 244 0
The master device number 244 was found from / proc/devices.
Check whether the creation is successful:
$ ll /dev/driver2

Now that the device driver has been loaded and the device node has been created, the application can operate (read and write) the device.
application program
The application is still in the ~ / tmp/App / directory.
$ mkdir ~/tmp/App/app_driver2
$ cd ~/tmp/App/app_driver2
$ touch app_driver2.c
The contents of the document are as follows:
#include <stdio.h>
#include <unistd.h>
#include <fcntl.h>


int main(void)
{
	int ret;
	int read_data[4] = { 0 };
	int write_data[4] = {1, 2, 3, 4};
	int fd = open("/dev/driver2", O_RDWR);
	if (-1 != fd)
	{
		ret = read(fd, read_data, 4);
		printf("read ret = %d \n", ret);

		ret = write(fd, write_data, 4);
		printf("write ret = %d \n", ret);
	}
	else
	{
		printf("open /dev/driver2 failed! \n");
	}

	return 0;
}
The next step is to compile and test:
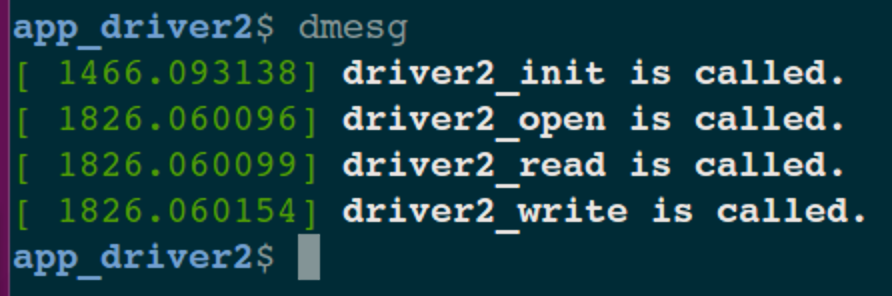
$ gcc app_driver2.c -o app_driver2
$
$ sudo ./app_driver2
[sudo] password for xxx: <Enter user password>
read ret = 0
write ret = 0
From the return value, the device is successfully opened, and the call of read function and write function is successful!
Continue to check with the dmesg command:
Unloading the driver module
Uninstall command:
$ sudo rmmod driver2
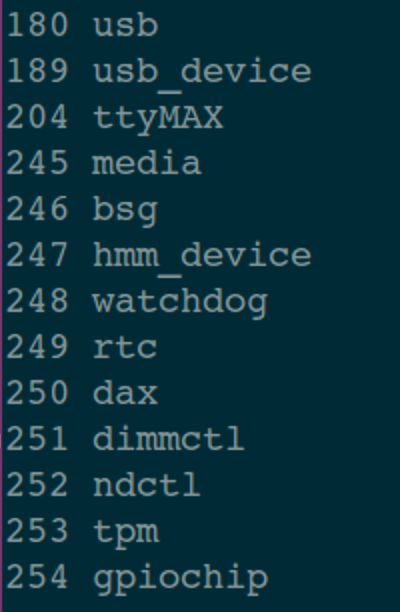
At this time, driver2 of master device No. 244 under / proc/devices no longer exists.
Let's take another look at the print information of dmesg:
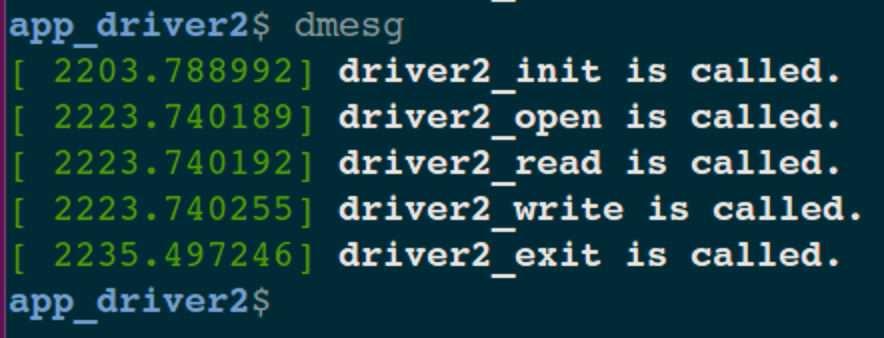
You can see Driver2 in the driver_ Exit() is called and executed!
Summary
The above is to use the "new" API function to write the driver of character device.
The code structure is still very clear, thanks to the good driver architecture design of Linux! This is also where every architect needs to learn and strive to imitate.