The origin of Trojan horse attack
I have bought Alibaba cloud server for three years (at Alibaba cloud official website It has been used for more than a year. It is usually used to build websites, and sometimes used to learn technology and develop tests. It has been used very stably. Until recently, when I installed docker on my server and deployed the springboot+mysql+nginx project, I was attacked. But on May 14 this year, my server was attacked by a Trojan horse and then taken to mining. The cpu of my server is maintained at 100% of CPU100% The consequence is that my website can't request and respond normally. And the root permission of the Linux server was stolen.
Hacker on server / root / ssh key files that cannot be deleted even by root users are generated in the ssh directory (in essence, special permissions are added by using the chatr command), which can log in without password. The consequence is that the control of my server is controlled by others. It can be tolerated, but it can't be tolerated. It must be solved.

This is the first time I have encountered such a disgusting problem. I don't know how hackers stare at my server. Maybe I am a victim of aimless attack. As an old bird and programmer, I have to deal with it. Because I am engaged in front-end, I study Linux skills in my spare time. Therefore, the solution of this problem is still a test of learning ability.
The general process is divided into two major steps:
- Step 1: clear the Trojan back door (ssh login free key)
- Step 2: kill the Trojan process and clear the Trojan files (mining virus crypto and worm virus pnscan)
The tools I use
- Alibaba cloud server: Alibaba cloud server , the largest cloud brand in China, used it to get started and learn programming technology. Of course, I use it. Otherwise, who is the victim of the virus. Of course, it doesn't mean that you will be poisoned after buying Alibaba cloud servers, because the virus poisoning is caused by your Linux security awareness and improper use. This time I'm because docker is used or simply broken, because ssh brute force cracking has something to do with it. So you switch to other cloud servers, such as Tencent cloud server , there is also the possibility of being attacked. Afterwards, we must learn some basic safety protection skills.
- Pagoda panel: pagoda panel is a very important tool. I won't talk about it here. The introduction and use tutorials are summarized as follows: Pagoda panel installation and introduction tutorial summary
- FinalShell client: Download address The client can be updated to the latest version after installation.
- A copy of chatr source code file (c program): you need to compile the chatr file to crack the special attributes i attached to the virus's chatr. i have given the source code address in the article and download it myself. Linux system can tap the command line to compile the source code file of c program.
Step 1: delete the login free ssh key file (Trojan back door)
1. Download the C file first( https://github.com/posborne/linux-programming-interface-exercises/blob/master/15-file-attributes/chattr.c ), upload to any directory on the server
2. Compile CC chatr, get the file a.out, and change the name to chatr
An error occurred in this step: collect2: fatal error: cannot find 'ld' compilation terminated
The solution is (two commands):
 yum -y install binutils
 ln -s /usr/bin/ld.gold /usr/bin/x86_64-nptl-linux-gnu-ld.gold
reference material: collect2: fatal error: cannot find 'ld' when running gcc

3. Run the compiled file and remove the hidden attributes that cannot be modified from the tampered file/ Chatr - IA / usr / bin / chatr compiled file. The running command is: ". / chatr" use the instruction/ a.out execute the program
reference material: Compiling and running C language programs in Linux Environment
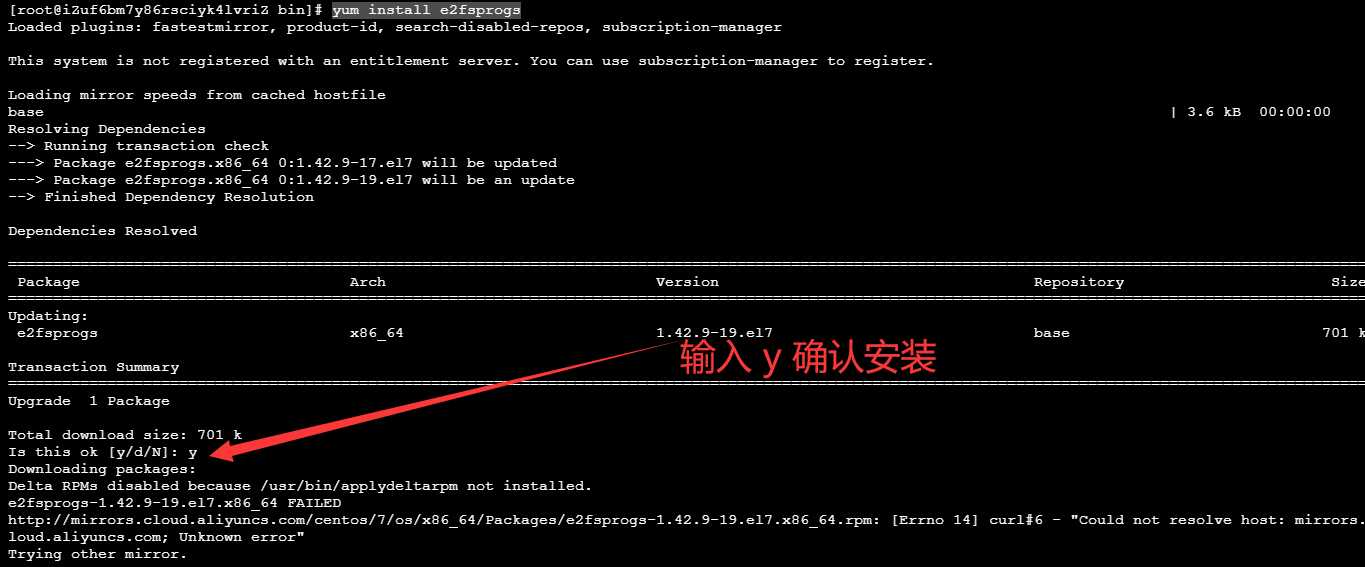
4. Then put the compiled file back to / usr/bin /. I didn't choose to overwrite the chattr file at this step. Instead, I chose to delete the rm -f chattr file first, and then execute the installation command: yum install e2fsprogs to install chattr and lsattr Then you can modify and delete / root / The key file in SSH / directory. Kill the hacker's root privileges.
Chatr file directory: / usr / bin / chatr
SSH key file directory: / root / ssh
Source directory for compiling chatr files: / root (this directory can be selected at will)

After compiling and installing chattr, you can use the chattr command normally
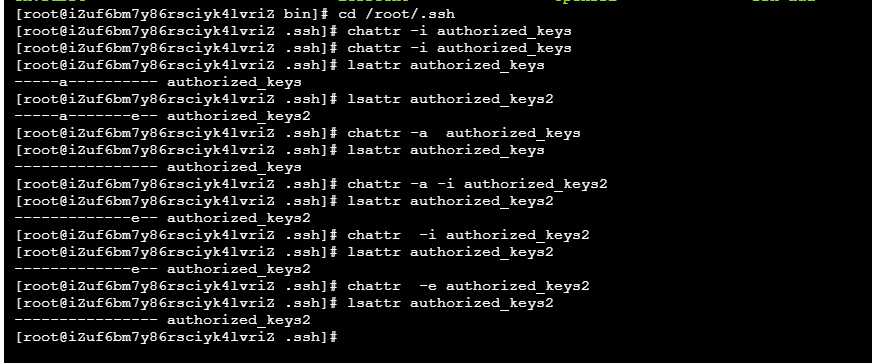
#View file properties
lsattr authorized_keys
# Remove a attribute
chattr -a  authorized_keys
# Remove i attribute
chattr -i  authorized_keys
# Remove e attribute
chattr -e  authorized_keys
The file permission without modifying special attributes is 600. root cannot delete and modify. By removing the special attributes one by one through the chatr command above, you can modify and delete the key file normally.
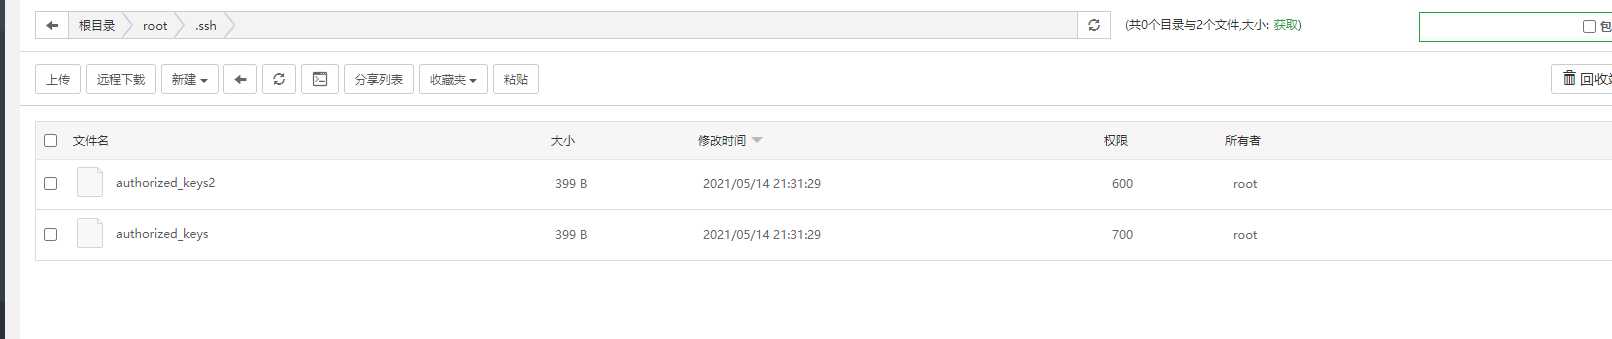
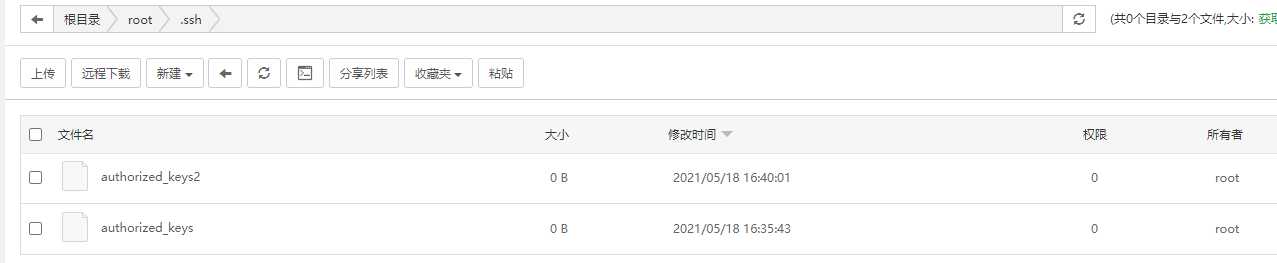
The contents of the key file have been cleared by me. These two files can be modified at last.
Reference tutorial:
- The chatr command was tampered with Mainly inspired by this article
- Detailed explanation of lsattr command
- Explain the Linux chatr command in detail and modify it arbitrarily beyond the authority
Step 2: kill virus crypto and pnscan virus process
Find out the reason why CPU100 is exhausted
Mining virus crypto and pnscan invade linux host, leaving / root / SSH / key login free back door.
Step 1: clear the root login free permission. We have done this step.
Step 2: delete the crypto and pnscan files of mining virus.
crypto file directory location: / urs/share/
pnscan file directory location: / usr/local/bin
If the Trojan file is not in these two locations, you can use the command to find it:
The commands whereis pnscan and whereis crypto will display the Linux path where the file is located
These two virus related files can be deleted directly with rm -f file name. They do not have chatr special permissions.

I downloaded all the virus files to be deleted to the window computer. Is to give you a screenshot of which files to delete. Note that the pnscan virus directory and the crypto virus directory are not in the same directory. I downloaded them to the window and put them in the same directory.
I deleted the two virus related files on my Alibaba cloud server (crypto is 5 files and pnscan is 1 file). This step is complete.
Step 3: kill the crypto and pnscan processes, and the cpu will come down. Not 100% exhausted.
Use the top command to find out the processes with high cpu consumption. It is obvious that crypto and pnscan processes occupy high cpu.
The crypto process may disguise other names and need to be carefully discovered. pnsan process may not be killed. You need to delete two virus files before killing the virus process. The effect will be better.
# Linux executes top to query cpu process occupancy
top

Tip: is too laggy. I didn't use finalshell to manipulate these commands this time, because cpu occupies 100 of the command line, and the Linux directory view is not visible. So I use the terminal of the pagoda panel to write ssh commands, mainly to see the Linux file directory view.

Through the top command, you can clearly see the high cpu utilization of the virus process. Remember their process pid
# Kill two virus processes and the server CPU returns to normal. This is a key step
sudo kill -9 27220 24131
If you run the Kill Command above, you will also be prompted with an error that kill fails without permission. There is no doubt that the key commands of the linux system have been added with the special attribute of chatr. It is necessary to remove its i attribute before executing the above virus killing process command. After killing the virus process, use the top command to monitor. After finding that there are no processes with high cpu occupancy, you can observe the pagoda panel and other FinalShell clients, and the cpu will be running normally.
# Find kill path
whereis kill
# lsattr view special properties
lsattr /usr/bin/kill
# Chatr removes additional special attributes i
chattr -i /usr/bin/kill
# chmod grant permission
chmod 755 /usr/bin/kill
# Now you can execute the kill Command normally.
Display of ssh command terminal on pagoda panel:
[root@iZuf6bm7y86rsciyk4lvriZ ~]# lsattr /bin/kill
----i--------e-- /bin/kill
[root@iZuf6bm7y86rsciyk4lvriZ ~]# chattr -i /usr/bin/kill
[root@iZuf6bm7y86rsciyk4lvriZ ~]# lsattr /usr/bin/kill
-------------e-- /usr/bin/kill
[root@iZuf6bm7y86rsciyk4lvriZ ~]# chmod +x /usr/bin/kill
[root@iZuf6bm7y86rsciyk4lvriZ ~]# lsattr /usr/bin/kill
-------------e-- /usr/bin/kill
[root@iZuf6bm7y86rsciyk4lvriZ ~]# sudo ls -l /bin/kill
---xr-xr-x. 1 root root 33608 Apr  1  2020 /bin/kill
FinalShell terminal command display:
[root@iZuf6bm7y86rsciyk4lvriZ ~]# whereis kill
kill: /usr/bin/kill /usr/share/man/man1/kill.1.gz
[root@iZuf6bm7y86rsciyk4lvriZ ~]# lattr /usr/bin/kill
-bash: lattr: Command not found
[root@iZuf6bm7y86rsciyk4lvriZ ~]# lsattr /usr/bin/kill
-------------e-- /usr/bin/kill
[root@iZuf6bm7y86rsciyk4lvriZ ~]# chattr -i /usr/bin/kill
[root@iZuf6bm7y86rsciyk4lvriZ ~]# chmod 755 /usr/bin/kill
[root@iZuf6bm7y86rsciyk4lvriZ ~]#

The command used: netstat will also encounter problems similar to the kill command. The solution is similar:
[root@iz8vb8rrw7wiwqtau1dp8jz bin]# netstat -nltp
-bash: /usr/bin/netstat: Permission denied
[root@iz8vb8rrw7wiwqtau1dp8jz bin]# chmod 755 /usr/bin/netstat
chmod: changing permissions of '/usr/bin/netstat': Operation not permitted
[root@iz8vb8rrw7wiwqtau1dp8jz bin]# lsattr /usr/bin/netstat
-------i------e-- /usr/bin/netstat
[root@iz8vb8rrw7wiwqtau1dp8jz bin]# chattr -i /usr/bin/netstat
[root@iz8vb8rrw7wiwqtau1dp8jz bin]# chmod 755 /usr/bin/netstat

# Use the netstat command to check the port status. The netstat command has attributes attached to it. You can check the data
[root@iz8vb8rrw7wiwqtau1dp8jz bin]# netstat -nltp
Active Internet connections (only servers)
Proto Recv-Q Send-Q Local Address           Foreign Address         State       PID/Program name
tcp        0      0 0.0.0.0:6379            0.0.0.0:*               LISTEN
[root@iz8vb8rrw7wiwqtau1dp8jz bin]#
After killing the virus process, the CPU finally returned to the normal level and finally succeeded. I'm so happy because the process is still tortuous.
The FinalShell client shows that the cpu is normal.

The pagoda panel shows that the cpu is running normally.

Conclusion: after this security incident, I should learn some basic security protection skills. For example, I can't operate Linux system with root user, log in to the account with account and password, disable it, and then log in with ssh key. For example, use relevant security tools to protect it.
Reference tutorial:
- Remember a case where Alibaba cloud server was attacked by [mining virus crypto and pnscan] due to Redis, with solutions attached
- The process of clearing the mining Trojan horse [crypto] in linux
- netstat permission problem
Original source: https://www.yundashi168.com/272.html