1, Introduction to HAProxy
HAProxy provides high availability, load balancing and proxy based on TCP and HTTP applications. It supports virtual hosts. It is a free, fast and reliable solution. HAProxy is especially suitable for web sites with heavy load, which usually need session persistence or seven layer processing. HAProxy runs on the current hardware and can fully support tens of thousands of concurrent connections. And its operation mode makes it easy and safe to integrate into your current architecture, and can protect your web server from being exposed to the network.
Advantages and disadvantages of HAProxy
advantage:
1. Support two proxy modes: TCP (layer 4) and HTTP (layer 7), and support virtual host;
2. Support Session retention and Cookie guidance; It also supports detecting the status of the back-end server by obtaining the specified url. It can supplement some shortcomings of Nginx.
3.HAProxy is similar to LVS. It is only a load balancing software; In terms of efficiency, HAProxy has better load balancing speed than Nginx, and is also better than Nginx in concurrent processing.
4.HAProxy can load balance Mysql, detect and load balance backend DB nodes.
5. There are many haproxy load balancing strategies, such as dynamic round robin, weighted source hash, weighted URL hash and weighted parameter hash
6. Free and open source, with very good stability, which can be comparable to LVS;
7. The page with powerful monitoring server status is provided. In the actual environment, we conduct email or SMS alarm in combination with Nagios;
Disadvantages:
1. POP/SMTP protocol SPDY protocol is not supported;
2. It cannot be used as a Web server, that is, it does not support HTTP cache function;
3. The function of overload configuration needs to restart the process. Although it is also soft restart, it is smoother and more friendly than Nginx's reload;
4. Multi process mode support is not good enough;
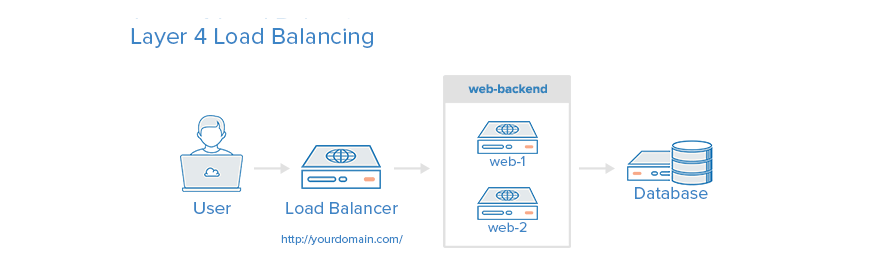
Layer 4 load balancing
The easiest way to load balance network traffic to multiple servers is to use layer 4 (transport layer) load balancing. Load balancing in this way will forward user traffic according to IP range and port. The user accesses the load balancer, which forwards the user's request to the Web back-end group of the back-end server. No matter which backend server is selected, it will directly respond to the user's request. In general, all servers in the Web backend should provide the same content - otherwise users may receive inconsistent content.
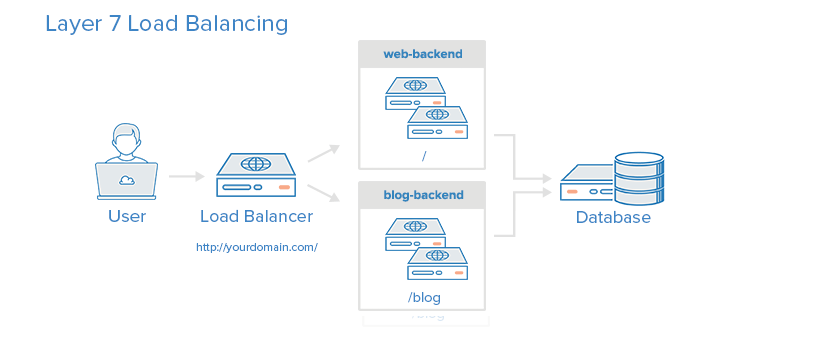
 Layer 7 load balancing
Layer 7 load balancing is a more complex load balancing. Network traffic uses layer 7 (application layer) load balancing, which allows the load balancer to forward requests to different back-end servers according to the contents of user requests. This load balancing mode allows multiple Web application servers to run under the same domain and port.
Comparison between Nginx and Haproxy
Haproxy features
support TCP And Http Protocol, working in network layers 4 and 7
support Session Sharing Cookies guide
Support through URL Health testing
Eight load balancing strategies are supported
Support heartbeat detection
Nginx features
support Http Protocol, working in network layer 7
Support port health detection
Support strong regular matching rules
support WebSocket agreement
support Http Cache
Note: for Http protocol, the processing efficiency of Haproxy is higher than that of Nginx. Therefore, when there are no special requirements or general scenarios, it is recommended to use Haproxy to load the Http protocol! But if it is Web, it is recommended to use Nginx!
2, How HAProxy works
HAProxy has a front end and a back end. There can be multiple front ends and back ends, or there can be only one listen block to implement the front end and back end at the same time.
The front end area can define some rules according to the header information of HTTP requests, and then forward the requests that meet certain rules to the corresponding back end for processing. Therefore, HAProxy can realize dynamic and static separation (dynamic and static separation simply means forwarding static requests to the corresponding static resource server and dynamic requests to the dynamic resource server). LVS mentioned in the previous article does not have this function.
3, Implement HAProxy load balancing
1. Configure and deploy haproxy
Install haproxy on server1
Edit the configuration file of haproxy
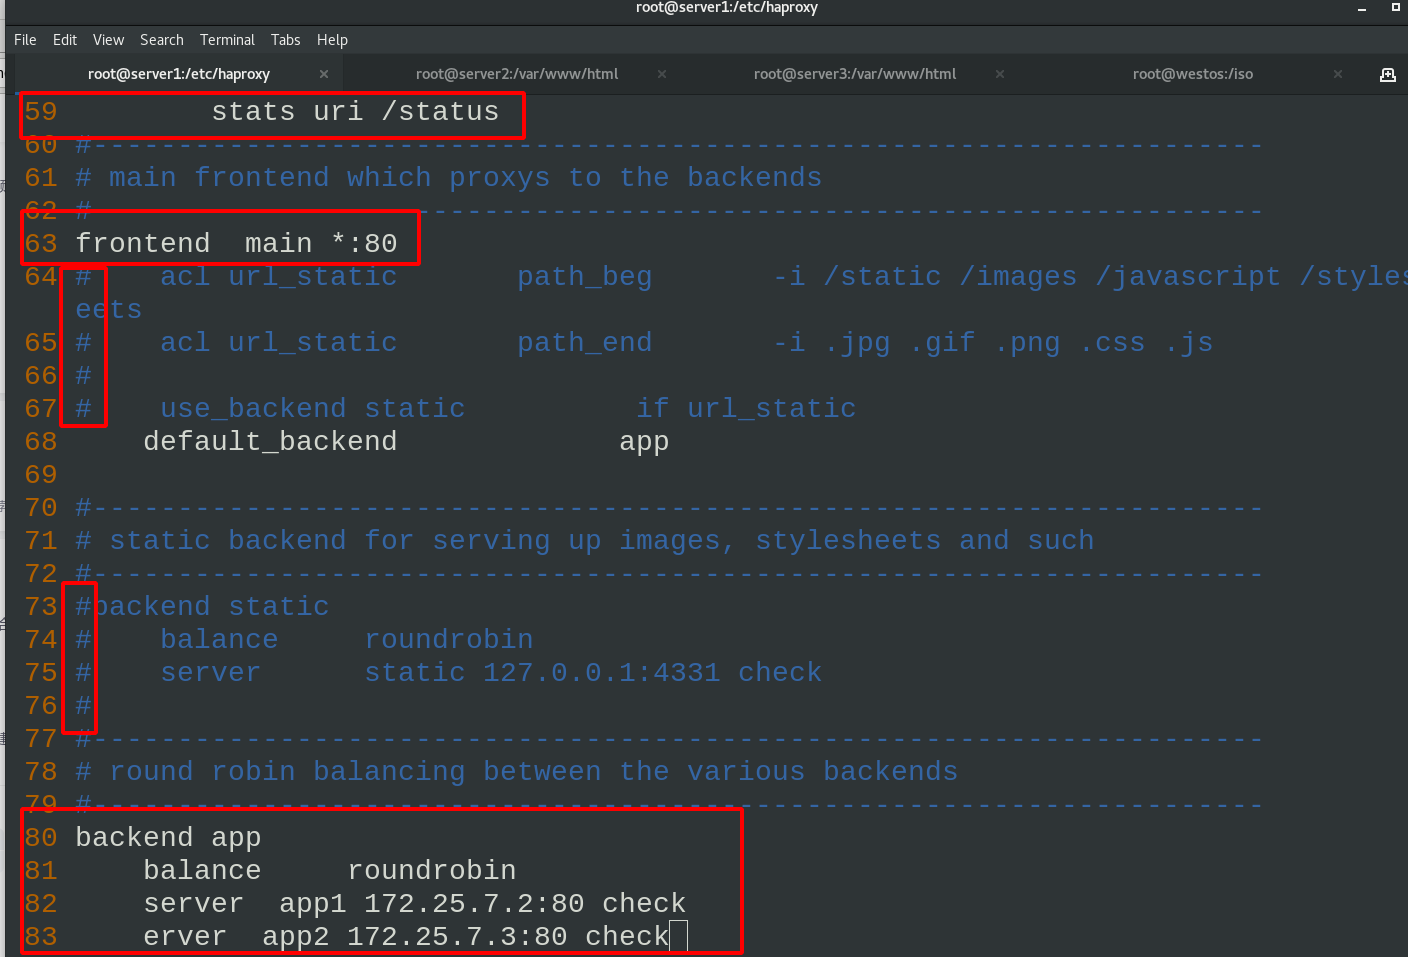
yum install -y haproxy

vim /etc/haproxy/haproxy.cfg
\\\
stats uri /status                     #Set the uri of the statistics page to / status
frontend main *:80                   #The listening address is 80
default_backend  app                 #The default request forwarding address is called app
backend app                          #Define a back-end part called app, which needs to be connected with the configuration item default of frontend_ The backend value is consistent. The algorithm is polling, and the dynamic request is transferred to either of the following two servers
server app1 172.25.33.2:80 check     #Multiple backend defined
server app2 172.25.33.3:80 check     #Multiple backend defined
\\\
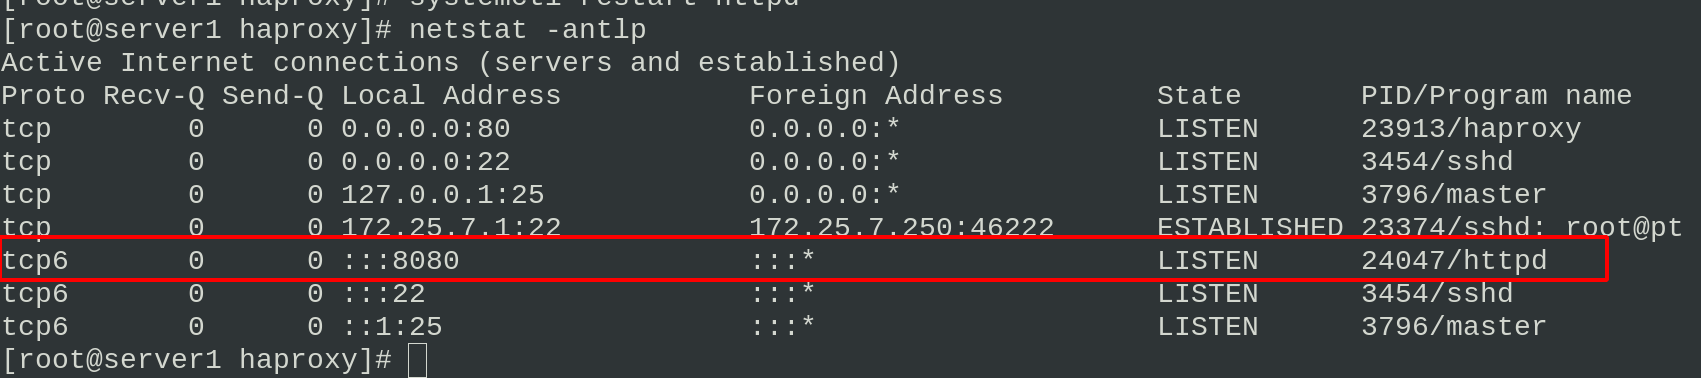
server1 starts the haproxy service and sees that the port is listening
systemctl restart haproxy.service
netstat -antlp

Install http for server2 and server3, write server2/server3 in the web page publishing file respectively, and then start the httpd service
 #server2
 echo server2 > /var/www/html/index.html
 systemctl status httpd
 #server3
  echo server3 > /var/www/html/index.html
 systemctl status httpd
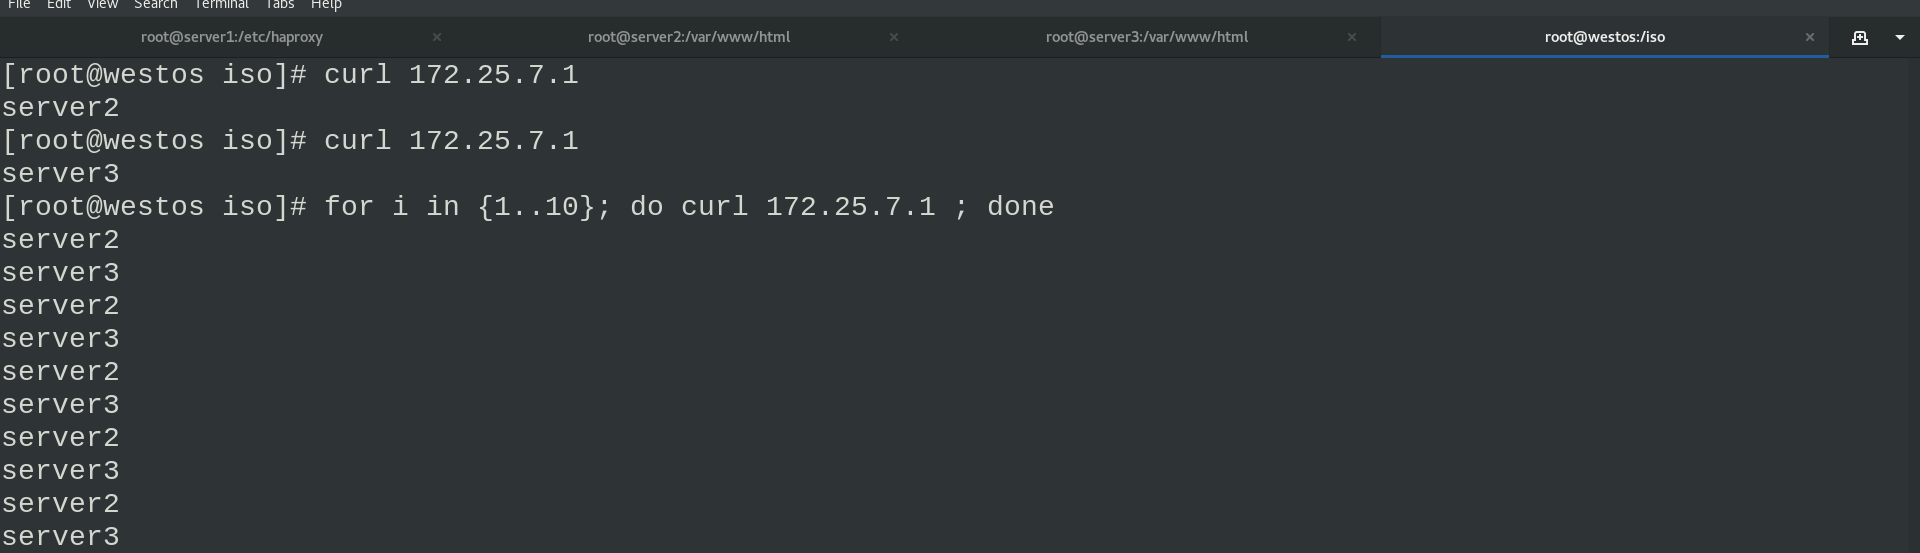
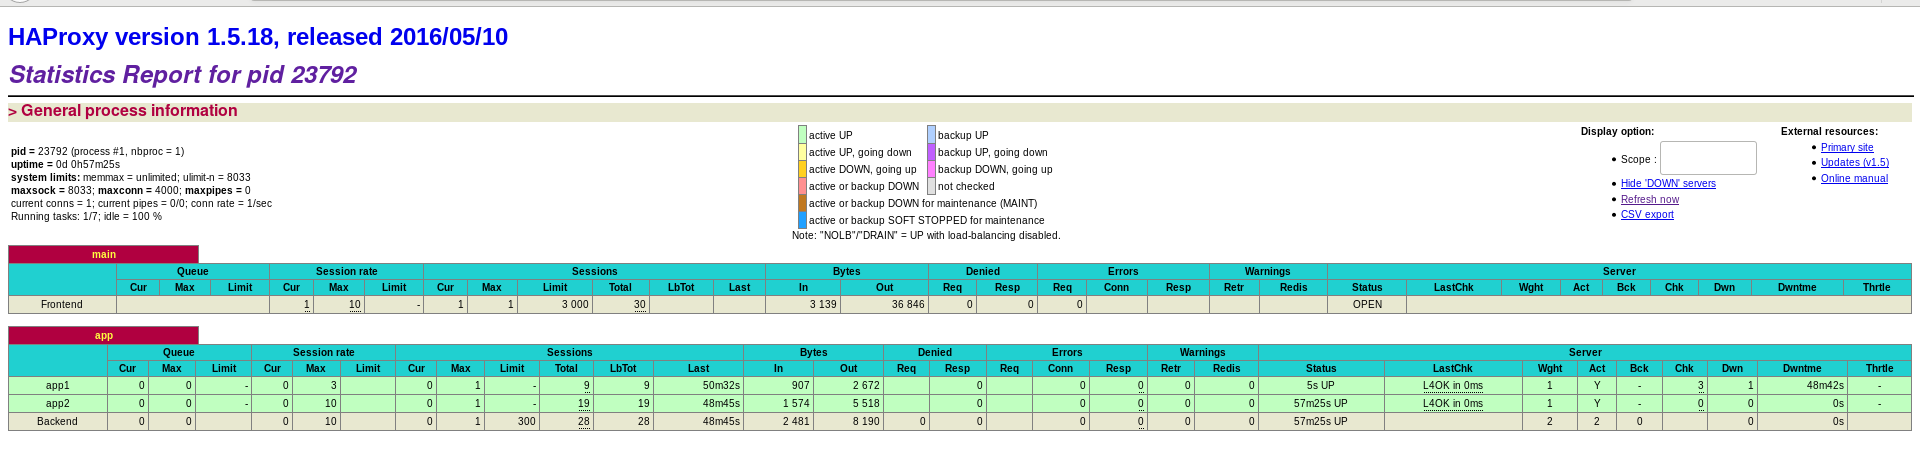
The real machine accesses 172.25.7.1 to test and sees the polling request
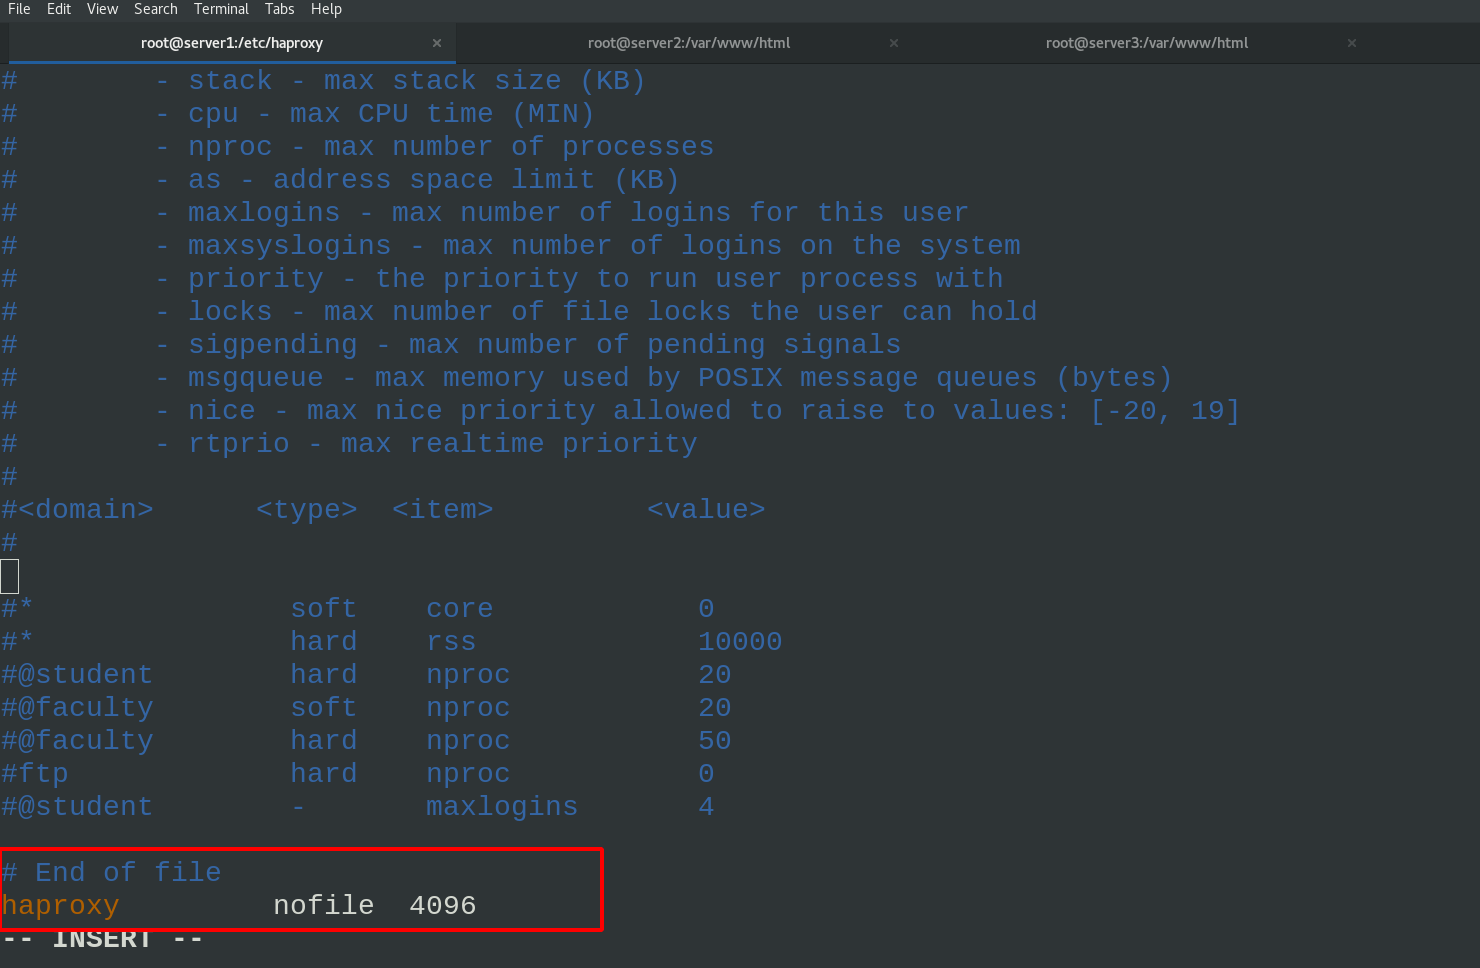
Modify the system file / etc/security/limits.conf in server1 and add the following configuration
vim /etc/security/limits.conf
\\\
# End of file
haproxy         nofile  4096
\\\
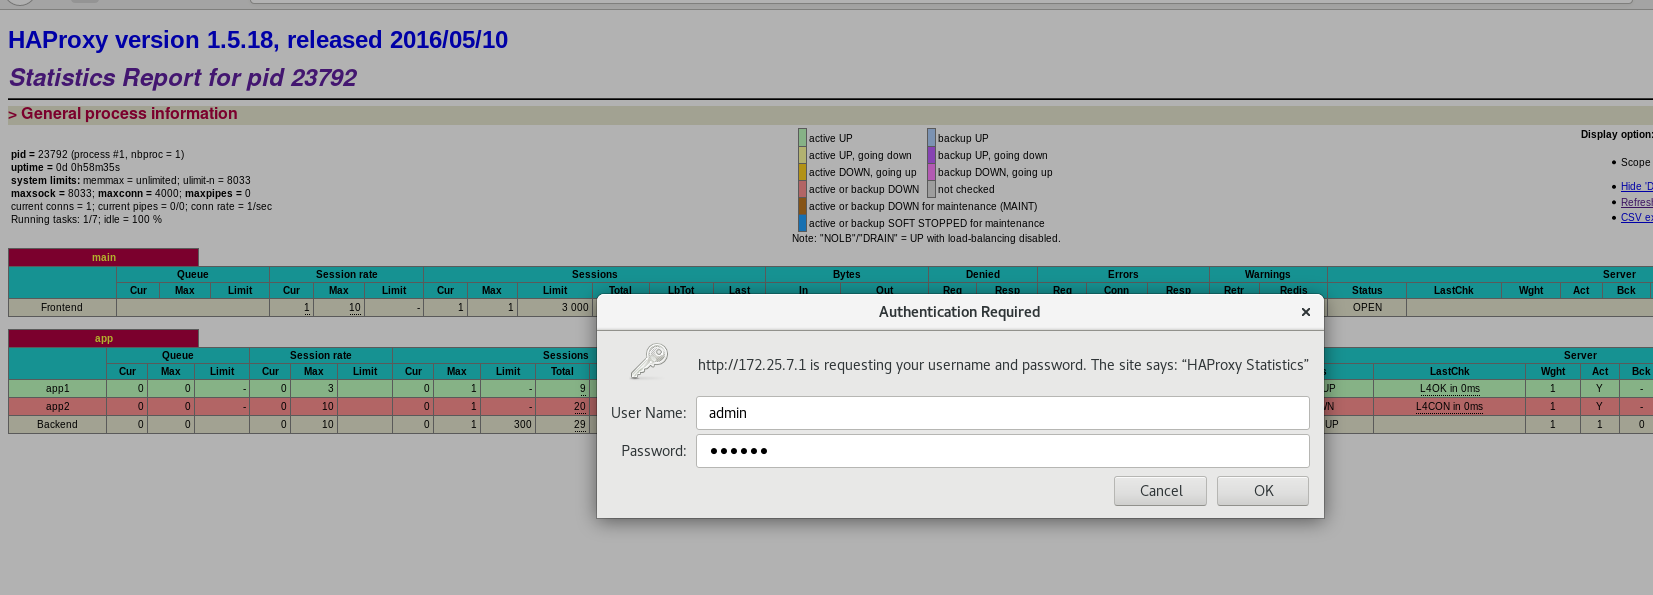
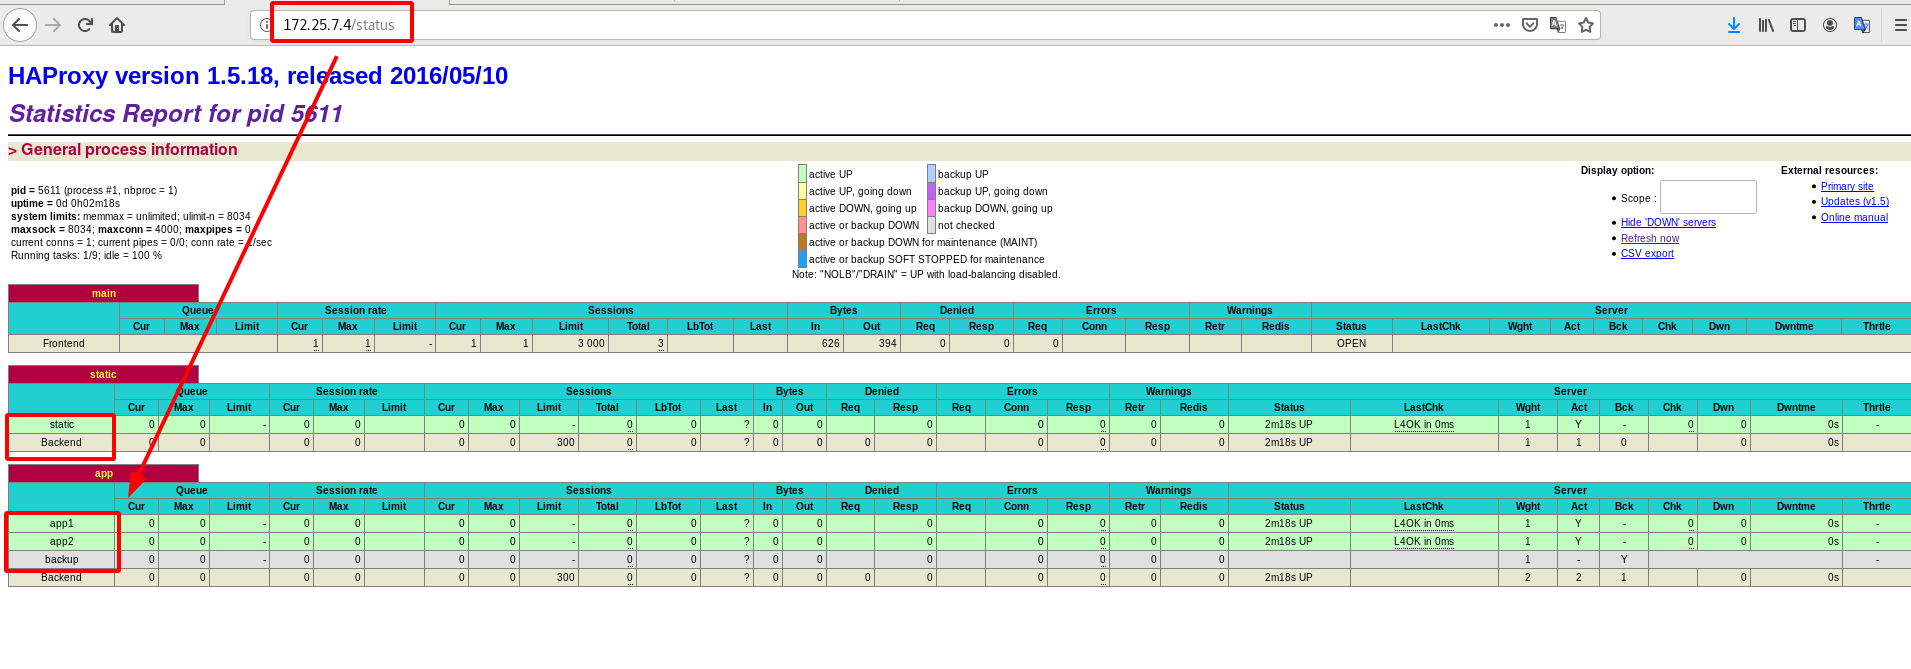
The browser accesses the statistics page 172.25.7.1/status
Turn off the httpd service of server3
On the web statistics page, you can also see that app1 is marked red, that is, there is a problem and it can't work
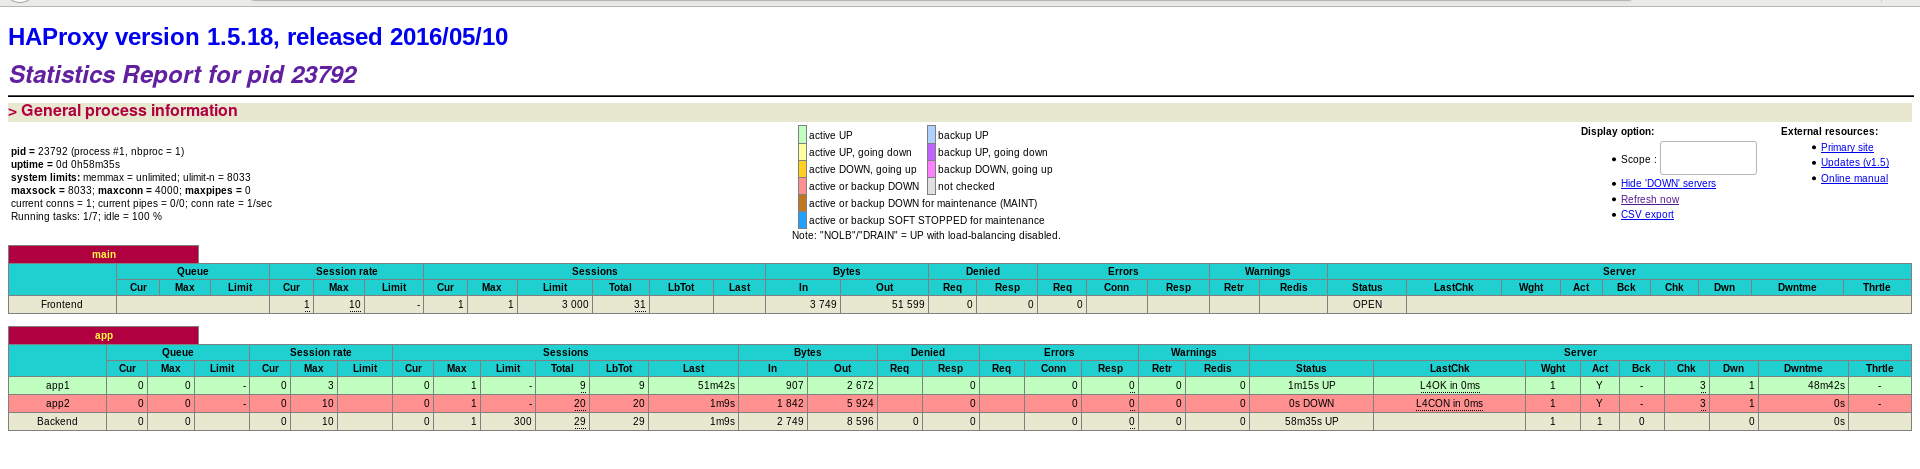
The real machine accesses 172.25.7.1 for testing, and it is found that only server2 is working

2. Authentication
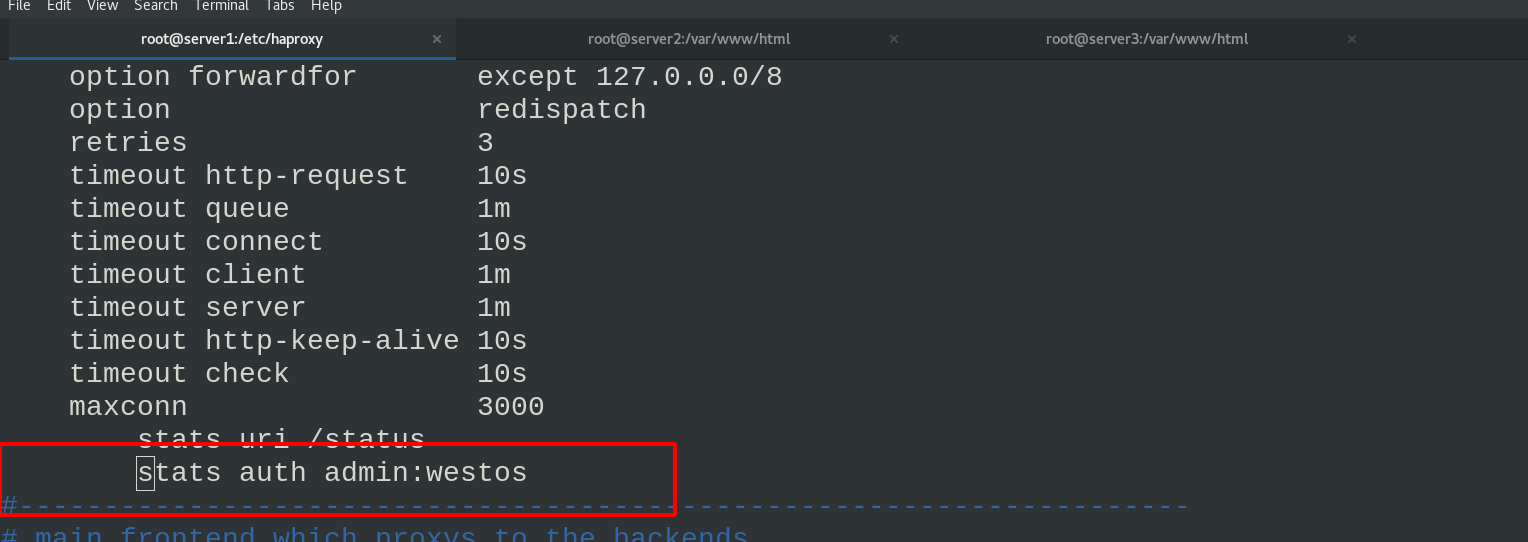
Compile the haproxy configuration file and enter the user name and password
Note: after modifying the haproxy configuration file, reload must be used instead of restart, otherwise the connection will be disconnected.)
vim haproxy.cfg
\\\
stats auth admin:westos
\\\
systemctl reload haproxy.service       ##reload reloads the configuration file. If you cannot restart, the connection will be disconnected
Browser access authenticates
3. Custom routing monitor
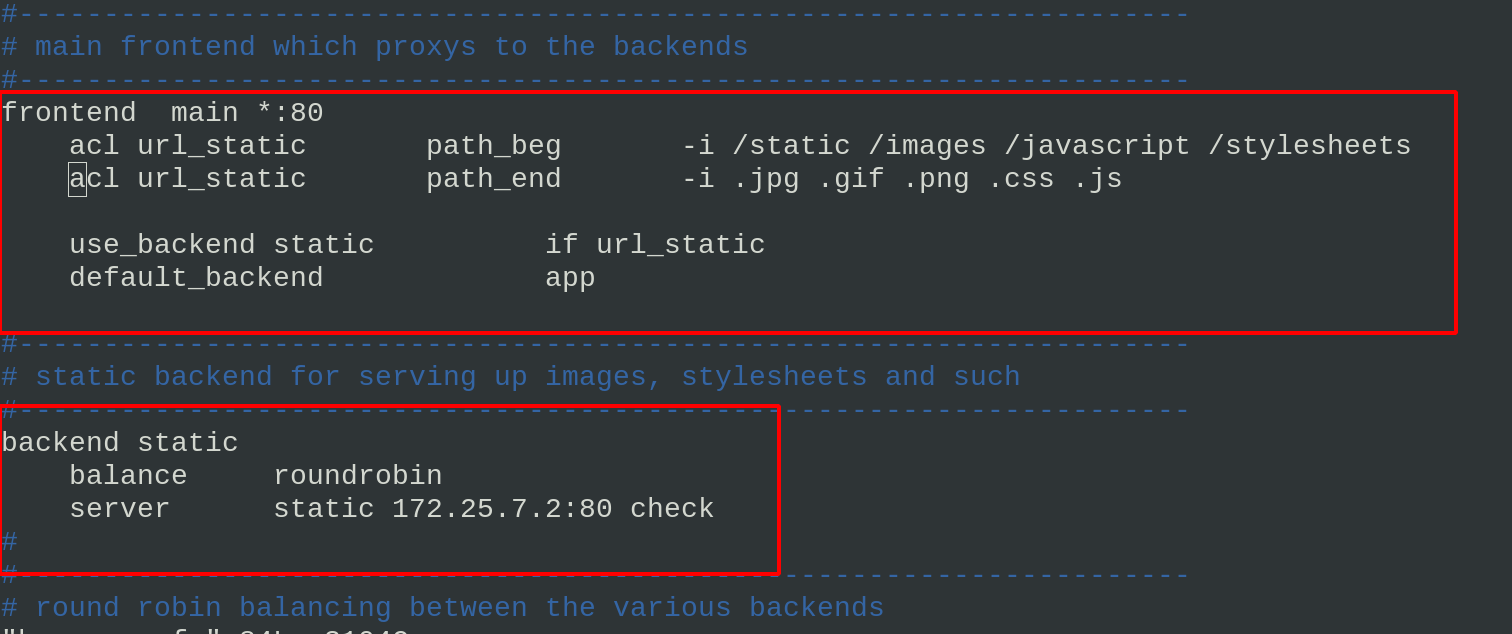
Customize the url that meets the monitoring conditions and forward it to the specified server
Compile the haproxy configuration file and reload the service: when the access path starts with / static /images and ends with. Jpg. GIF, jump into the backend static module and the server in the module provides services
vim haproxy.cfg
\\\
frontend  main *:80
    acl url_static       path_beg       -i /static /images /javascript /stylesheets
    acl url_static       path_end       -i .jpg .gif .png .css .js

    use_backend static          if url_static
    default_backend             app

#---------------------------------------------------------------------
# static backend for serving up images, stylesheets and such
#---------------------------------------------------------------------
backend static
    balance     roundrobin
    server      static 172.25.7.2:80 check
\\\

 systemctl reload haproxy.service    #Reload
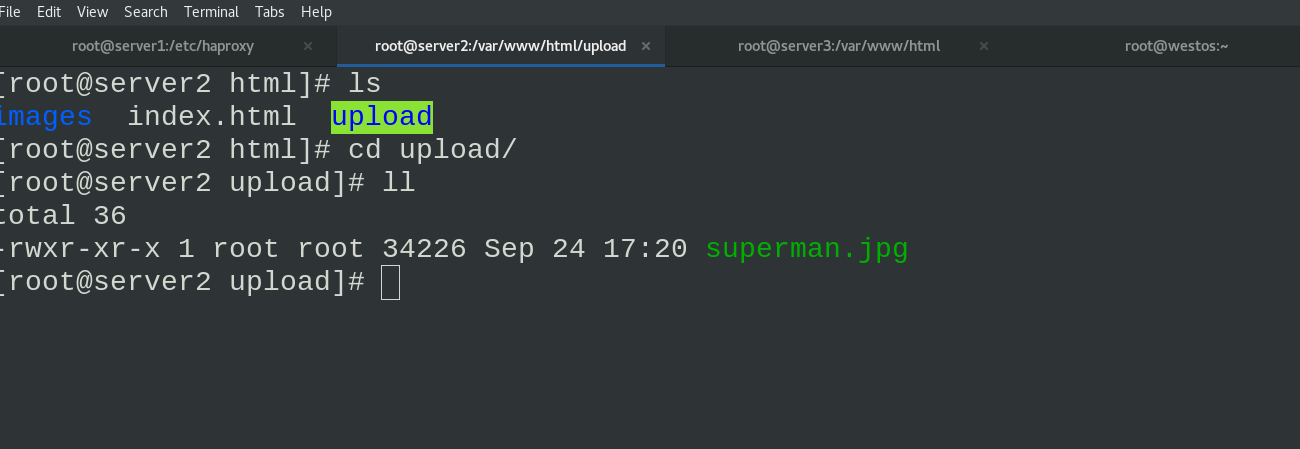
Create the images folder in the server2 website directory and put a jpg image

Visit 172.25.7.1/images/superman.jpg by browser

If the pictures downloaded by yourself cannot be accessed in the browser, the permission may not be enough. Just give sufficient permission
4. Load balancing weight
vim haproxy.cfg
Set the weight value of the back-end server. Here, set the weight of app1 (that is, server2) to 2
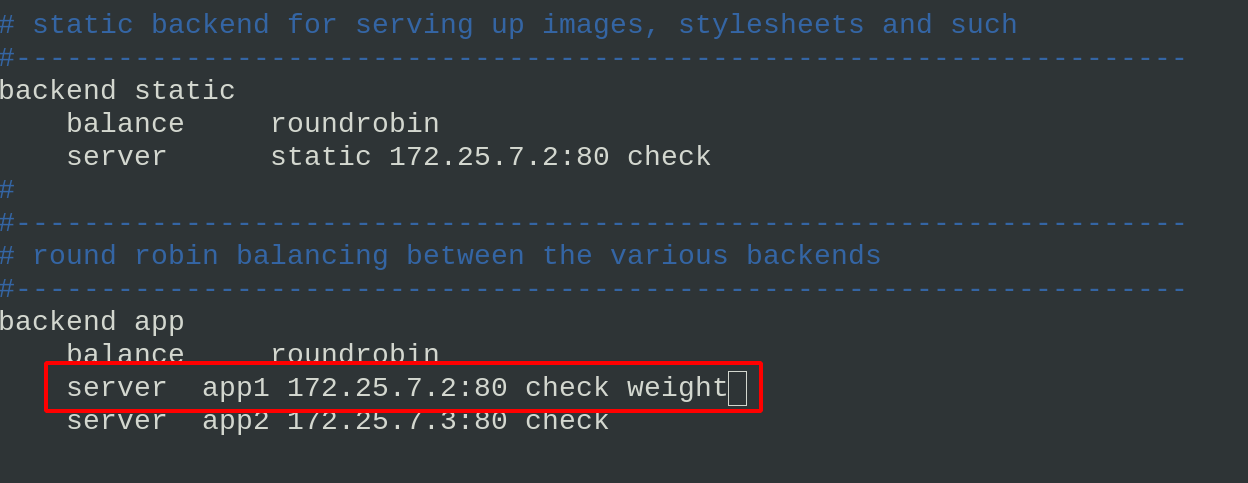
That is, when accessing the server, the probability of haproxy assigning to the back-end server through the weight value is 2:1
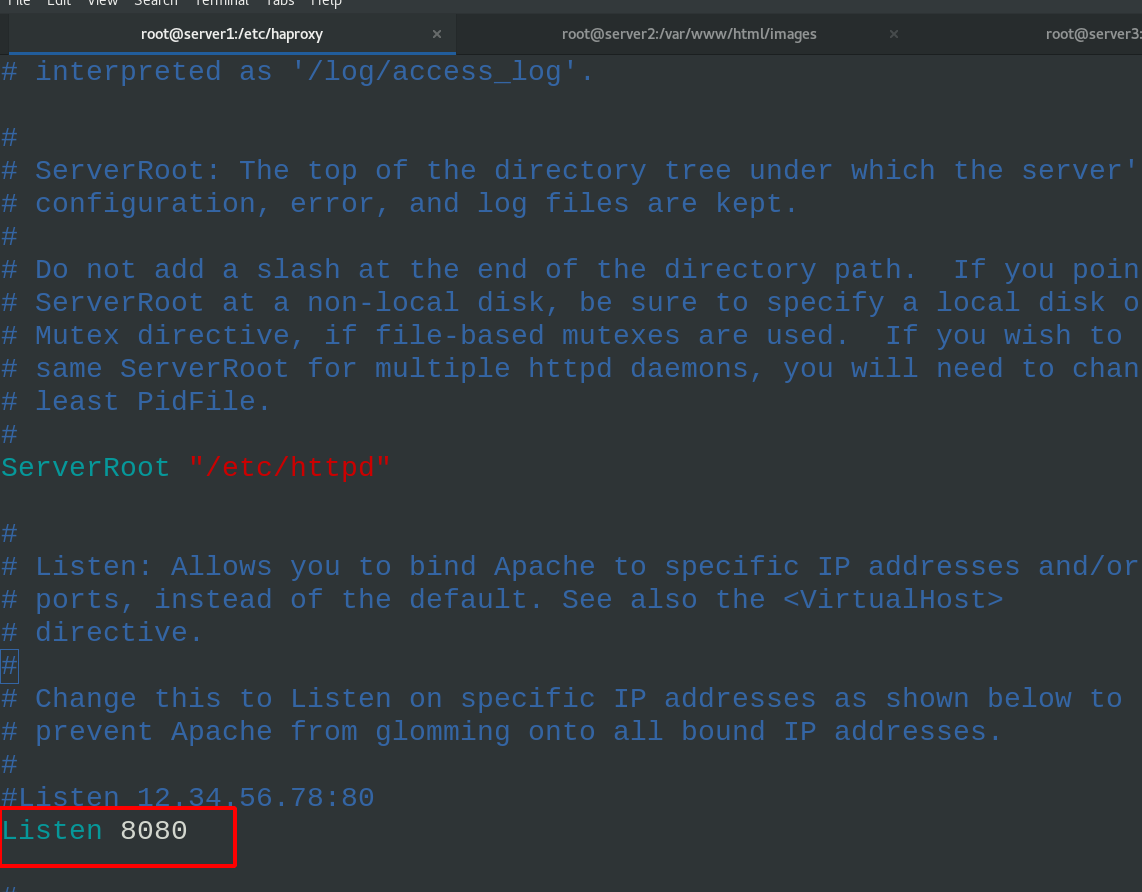
5. Set up backup server
Add the following backup servers to the haproxy configuration file
vim haproxy.cfg
\\\
server  backup 172.25.7.1:8080 backup      #Because the port used by haproxy is 80, http uses port 8080 here
\\\

systemctl reload haproxy.service

Edit the http configuration file in server1
vim /etc/httpd/conf/httpd.conf
\\\
Listen 8080
\\\

echo server1 > /var/www/html/index.html
systemctl restart httpd     #Restart the httpd service of server1. Now you can see that port 8080 is listening
netstat -antlp
Visit 172.25.7.1 to see that the backup server is effective

6. Access blacklist and error redirection
In reality, we need to hack some malicious Ip access servers
Therefore, you can directly put the IP into the blacklist or redirect it to other web addresses by mistake
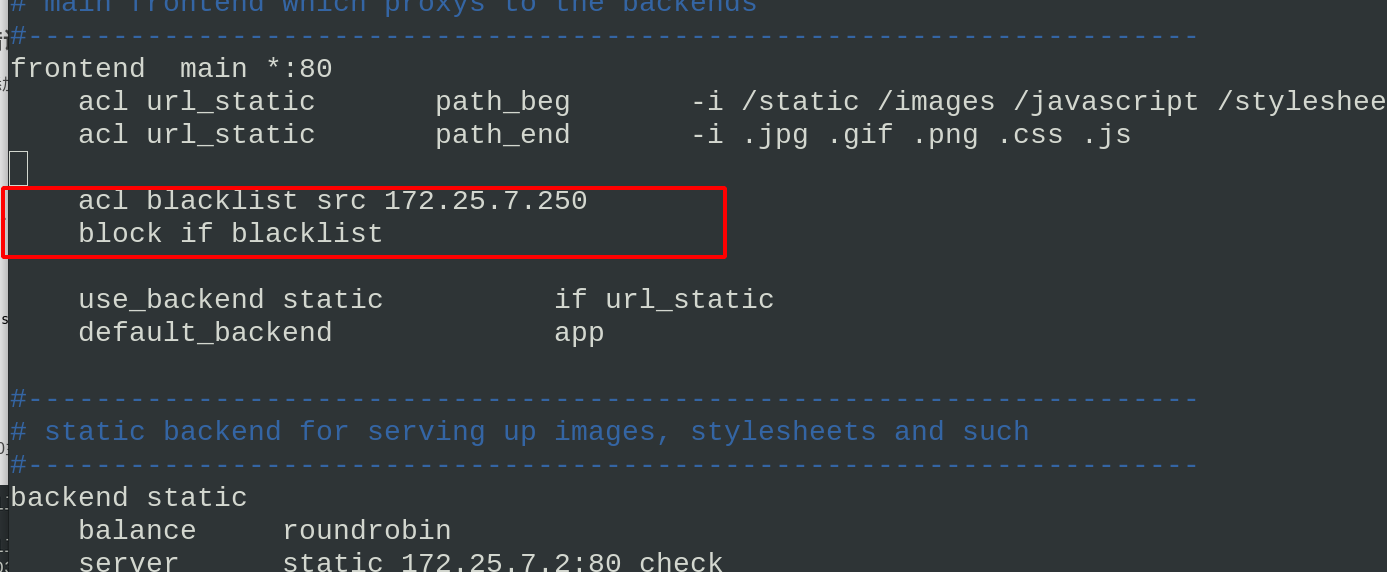
Edit the configuration file of haproxy and add the blacklist
vim haproxy.cfg
\\\
    acl blacklist src 172.25.7.250
    block if blacklist

\\\
systemctl reload haproxy.service
Access to the IP 172.25.7.250 host in the blacklist is found to be denied 403


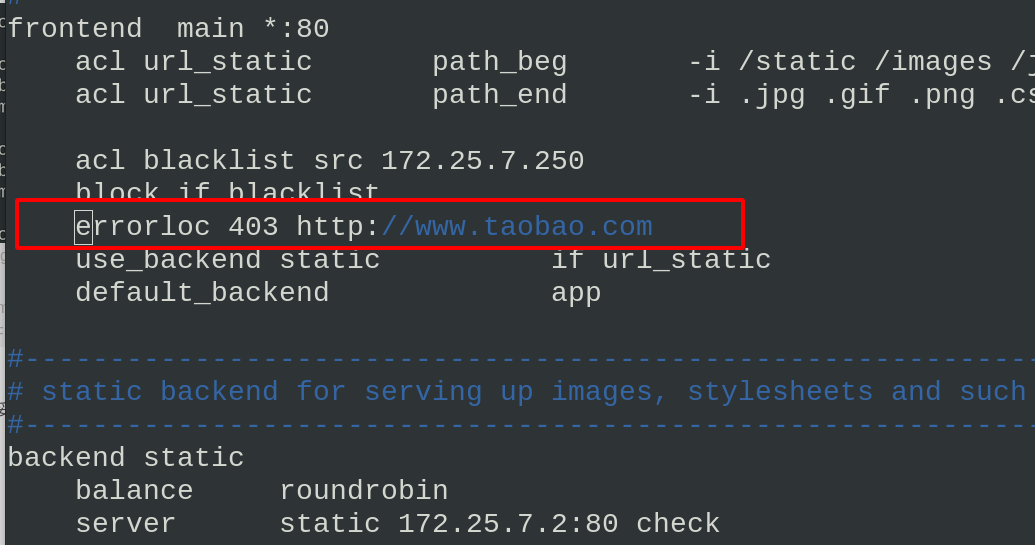
If you think it is inappropriate to directly refuse to access the failed page, you can directly redirect and jump to another page. We can transfer the blacklist access redirection bar to other web addresses in the configuration file
vim haproxy.cfg
\\\
    errorloc 403 http://www.taobao.com # add error redirection
\\\
systemctl reload haproxy.service
Visit 172.25.7.1 with a browser on the blacklist host. You can see that the page does not report an error, but directly jumps to Taobao website. Let him go shopping!!!

7. Access redirection
vim haproxy.cfg
\\\
    redirect location http://172.25.7.1:8080/rewrite.html
\\\
systemctl reload haproxy.service

Browser access found redirected to a new page

8. Read write separation
Target: access traffic is directed to server3 server, and data is directed to server2 server when writing data
Edit the haproxy configuration file of server1 to enable server3 to receive access traffic. When writing data, switch to server2

systemctl reload haproxy
Reload haproxy service
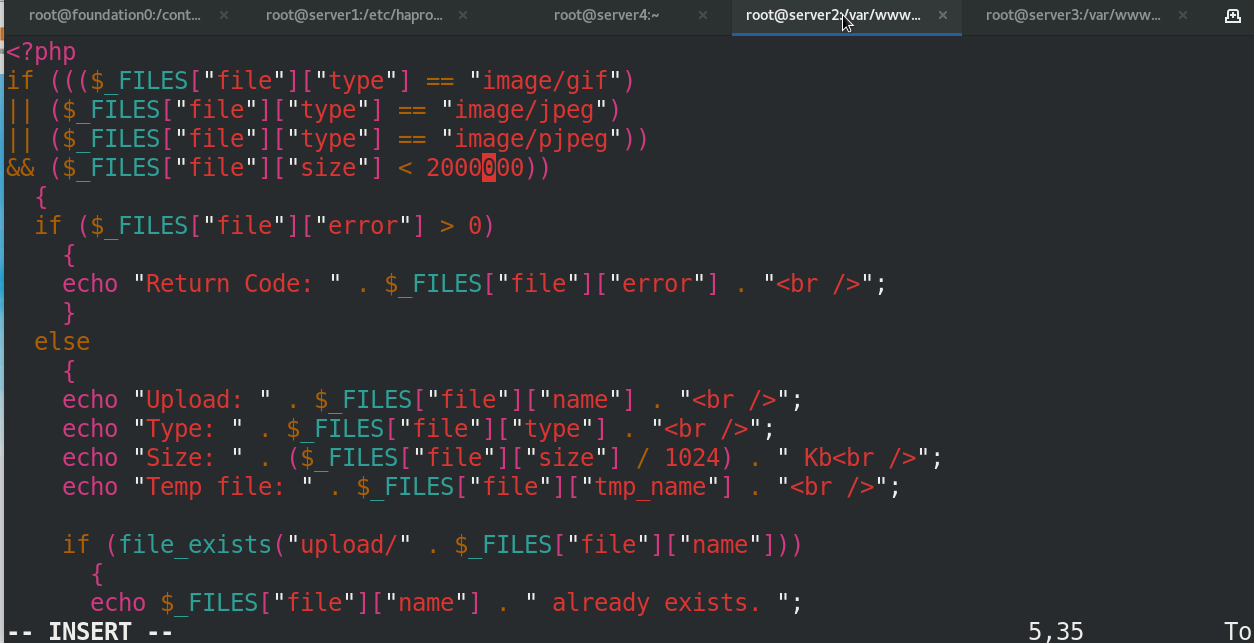
Install php on both server2 and server3
Create index.php and upload in the server2 website directory_ File.php, create an upload folder and grant permissions to receive files uploaded by visitors
index.php and upload_ The source code of file.php needs to be downloaded. Here you only need to understand


Edit upload_file.php
Change the upload directory to the directory you created

Send the files and folders created on server2 in the previous step to server3


Restart httpd service
The browser accesses 172.25.7.1 for upload test

The Superman image before uploading can be viewed in the upload directory specified by server2
Empty in server3
4, HAProxy high availability
Prepare the folder of highly available plug-ins on the real host
Mount the resources in the real machine in the network warehouse
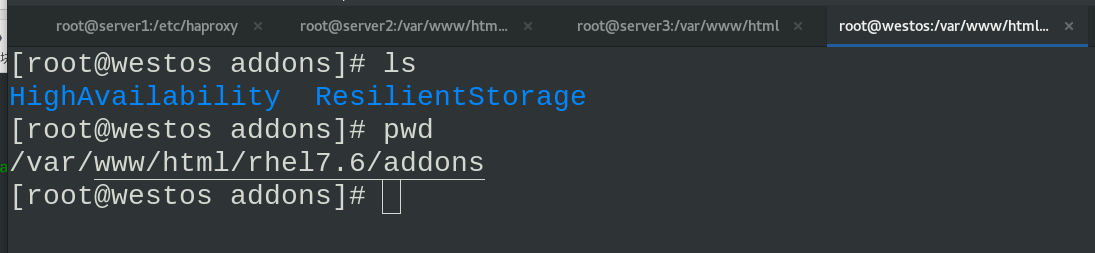
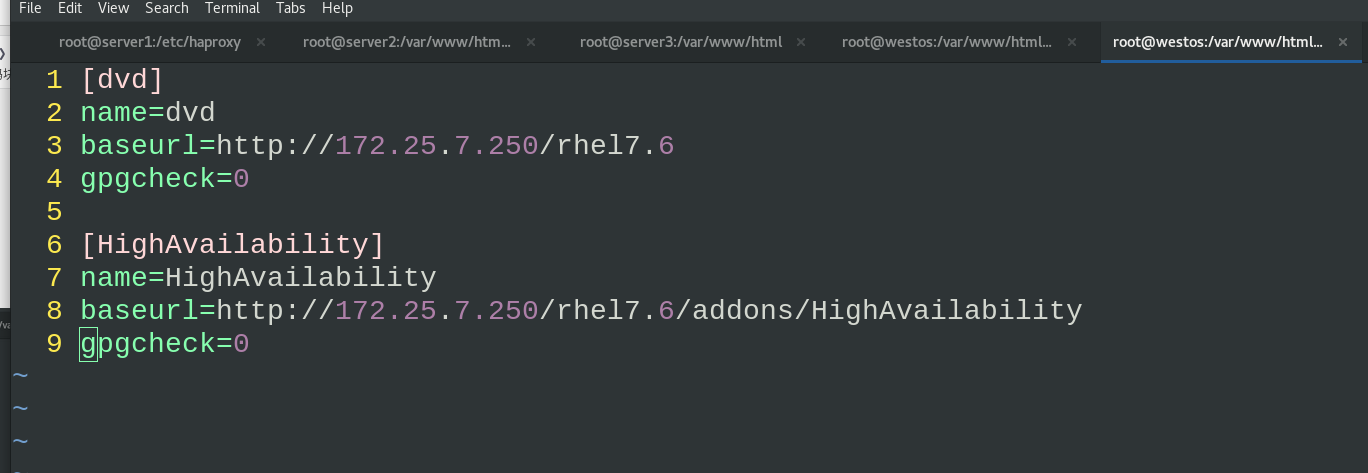
Transfer the network warehouse to server1

Install the high availability plug-in pacemaker in server1
For the convenience of operation, server1 generates a secret free operation key and sends it to server4
Send the warehouse configuration file of server1 to server4
yum install -y pacemaker pcs psmic policycoreutils-python
ssh server4 yum install -y pacemaker pcs psmic policycoreutils-python
Start the pcsd services of server1 and server4. You can use the pcs command
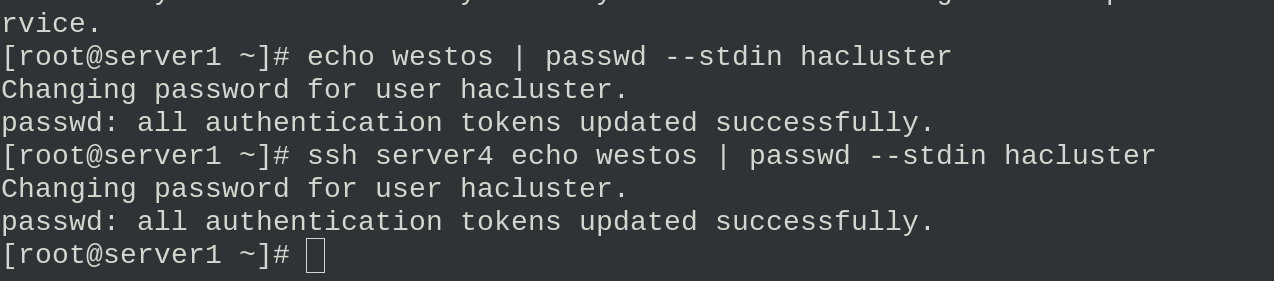
Modify the hacluster authentication password of server1 and server4, and then authenticate
systemctl enable --now pcsd.service         ##Start service
ssh server4 systemctl enable --now pcsd.service
echo westos | passwd --stdin hacluster      ##Change Password
ssh server4 echo westos | passwd --stdin hacluster
pcs cluster auth server4 server1     ##authentication


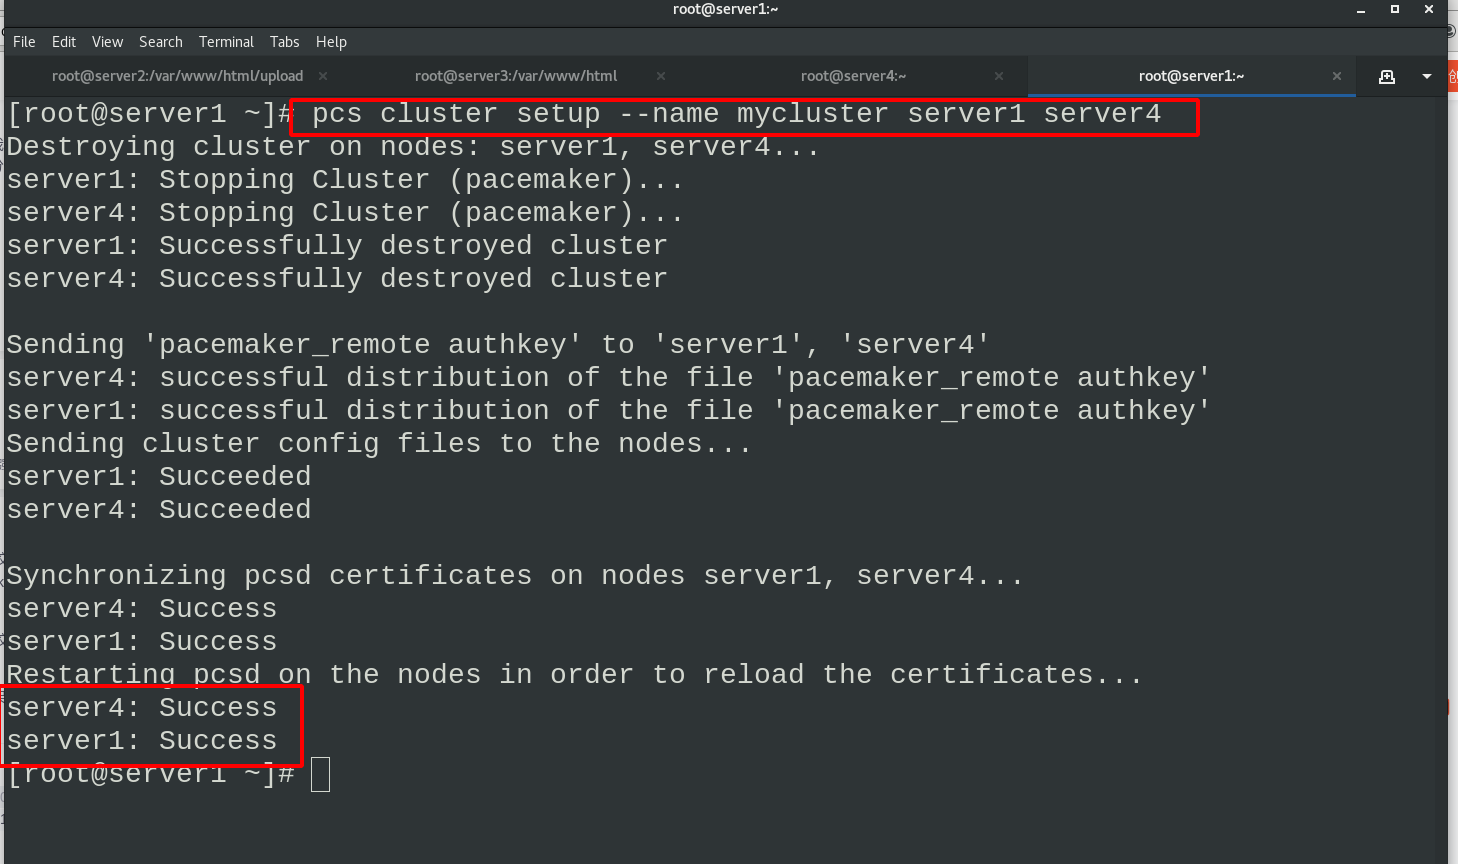
Set the name of the cluster as mycluster. There are server1 and server4 devices in the cluster
pcs cluster setup --name mycluster server1 server4
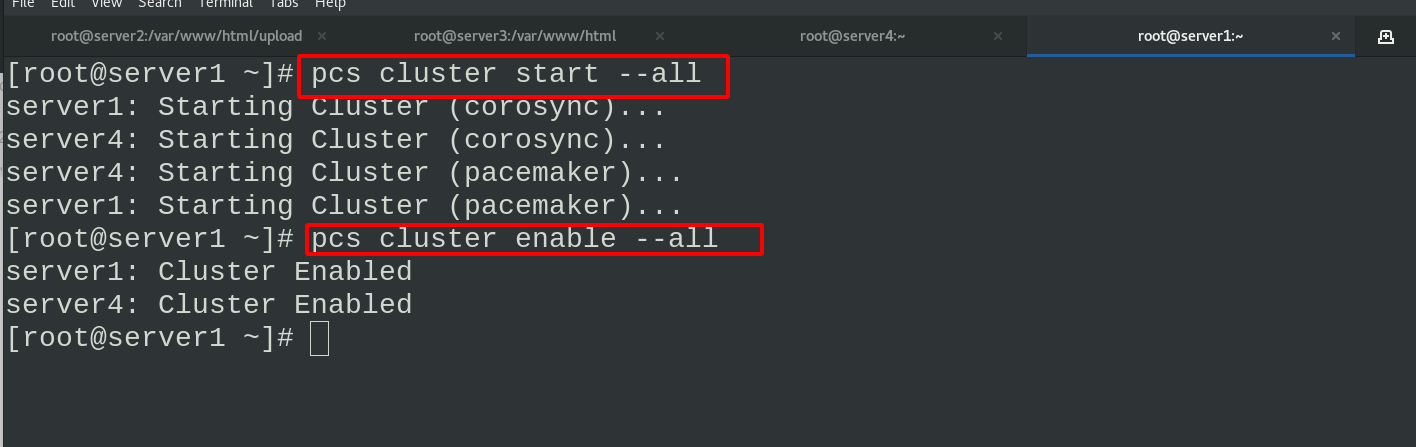
Start all service nodes in the cluster
pcs cluster start --all
pcs cluster enable --all
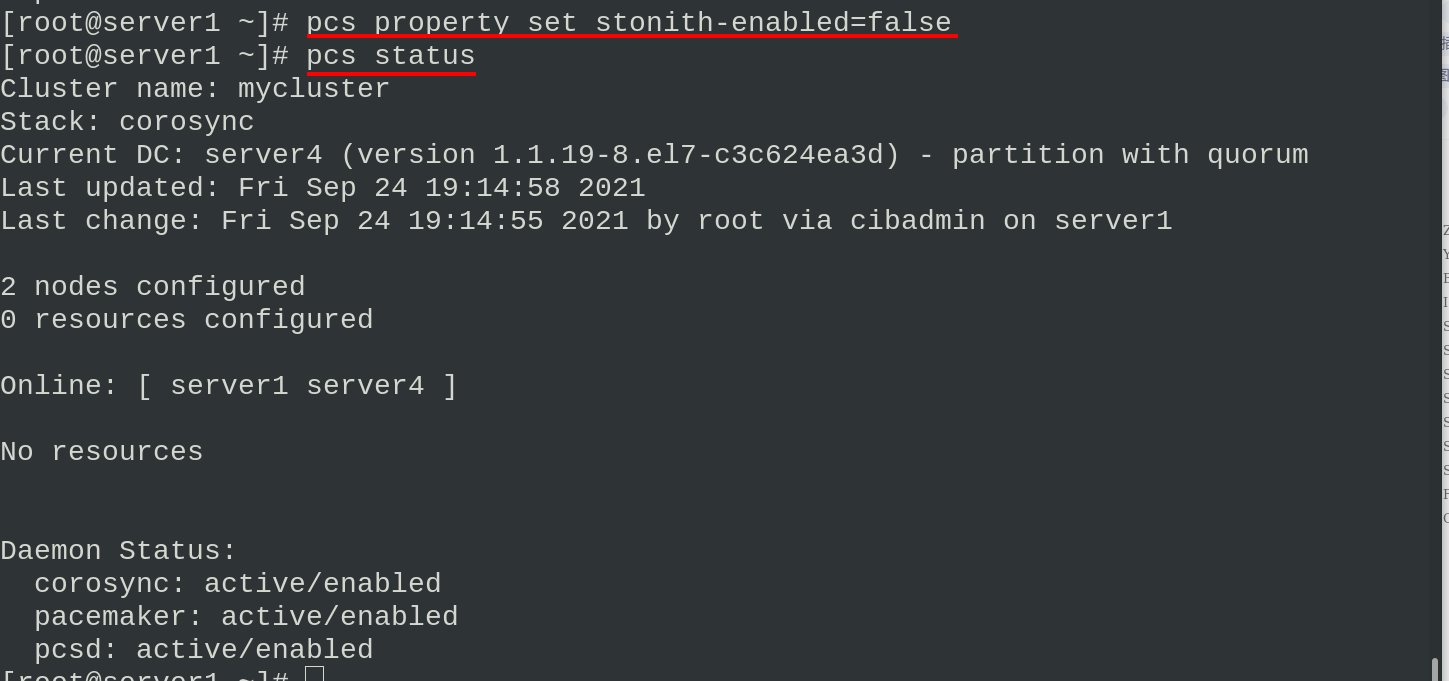
When viewing the status, the following error will appear. This is because the stoneith function is not disabled when there is no fenced device. Just disable it
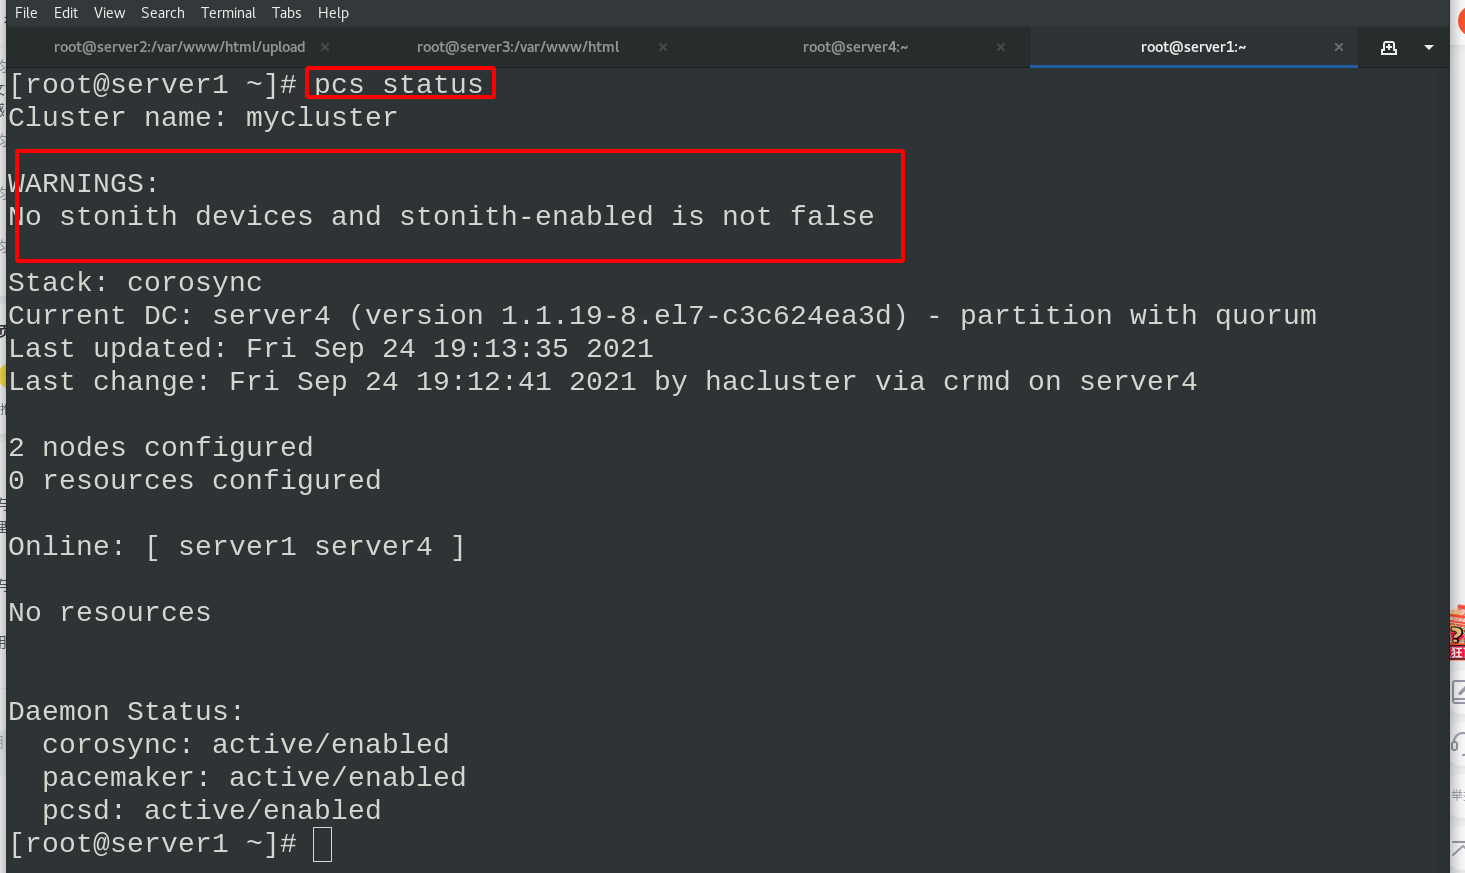
pcs property set stonith-enabled=false    ##The stonith function is disabled and there are no alarms now
pcs status   #View status
Install haproxy on server4 and send the haproxy configuration file of server1 to server4
In server1
scp haproxy.cfg server4:/etc/haproxy/
Start haproxy load balancing on server1 and server4. Check the network status. You can see that port 80 is listening

Accessing tests in the browser
Configure cluster management VIP
Now haproxy has a standby load balancing server. We can set up a VIP to track the haproxy in use by accessing the VIP. The fixed VIP is convenient for users to access
Set VIP
pcs resource create vip ocf:heartbeat:IPaddr2 ip=172.25.7.100 op monitor interval=30s     #Set VIP
ip addr #see
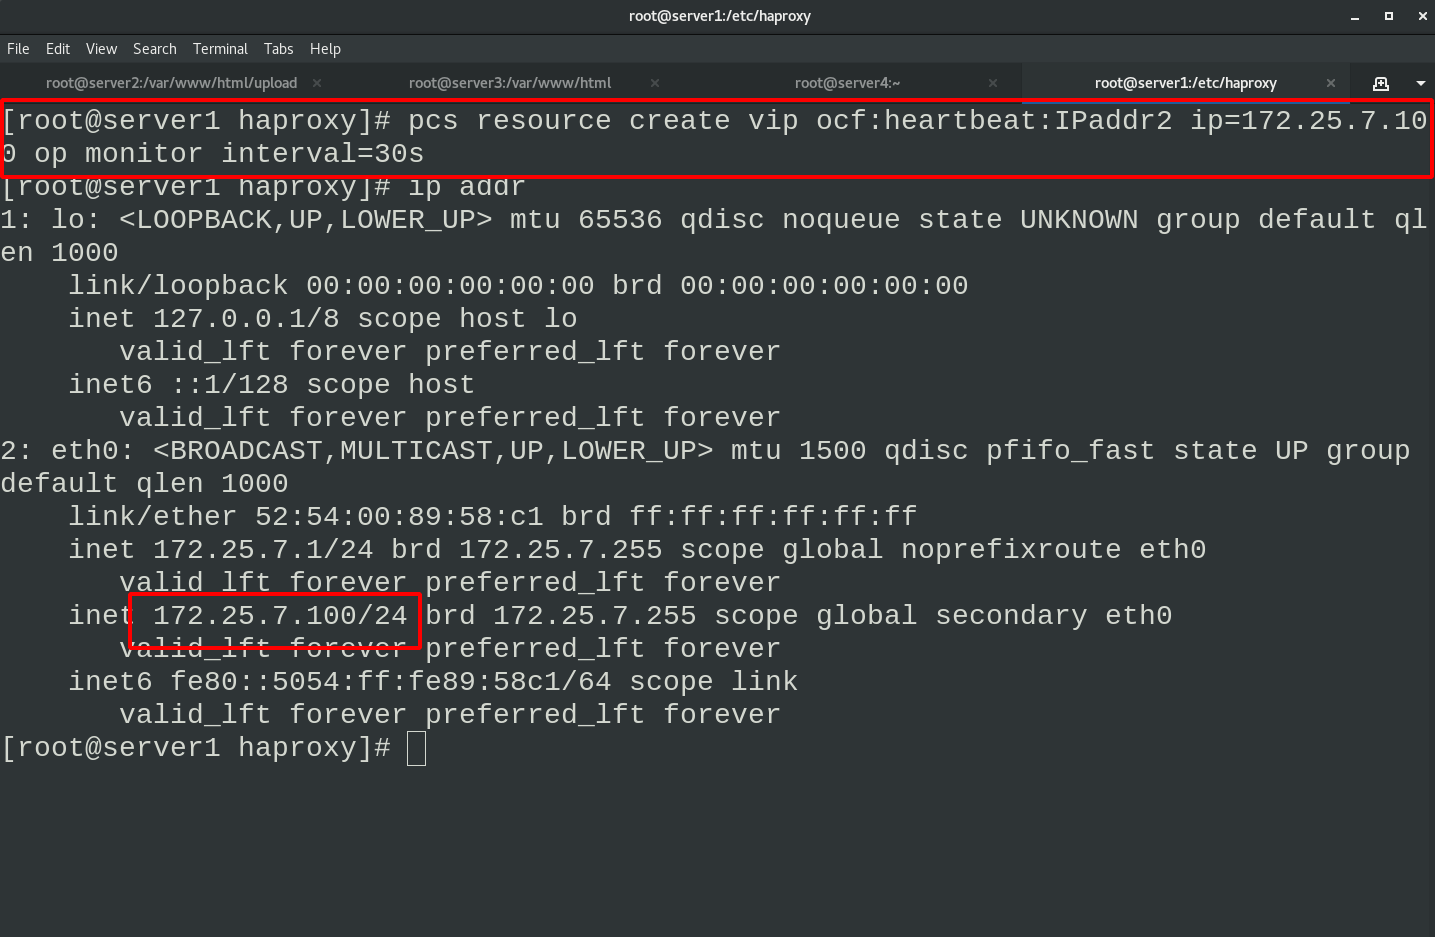
You can see that the VIP information has been obtained in the cluster status, and the test access service has been successfully started
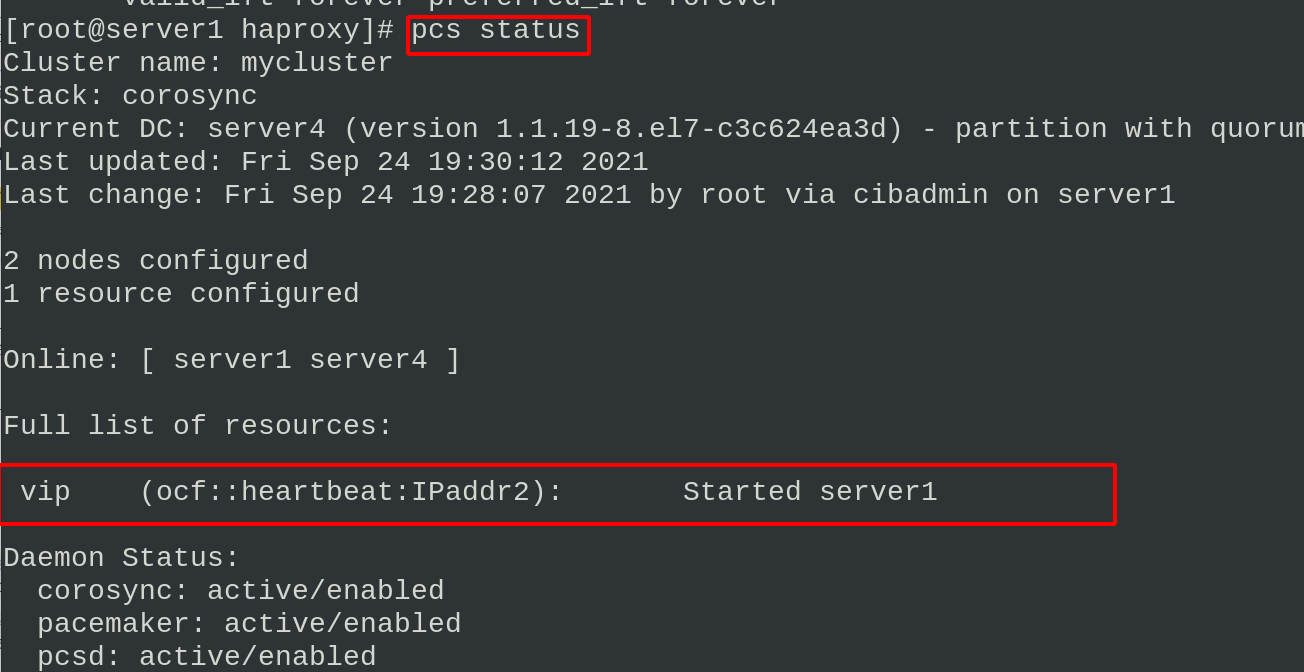
It can already be accessed by VIP in the browser

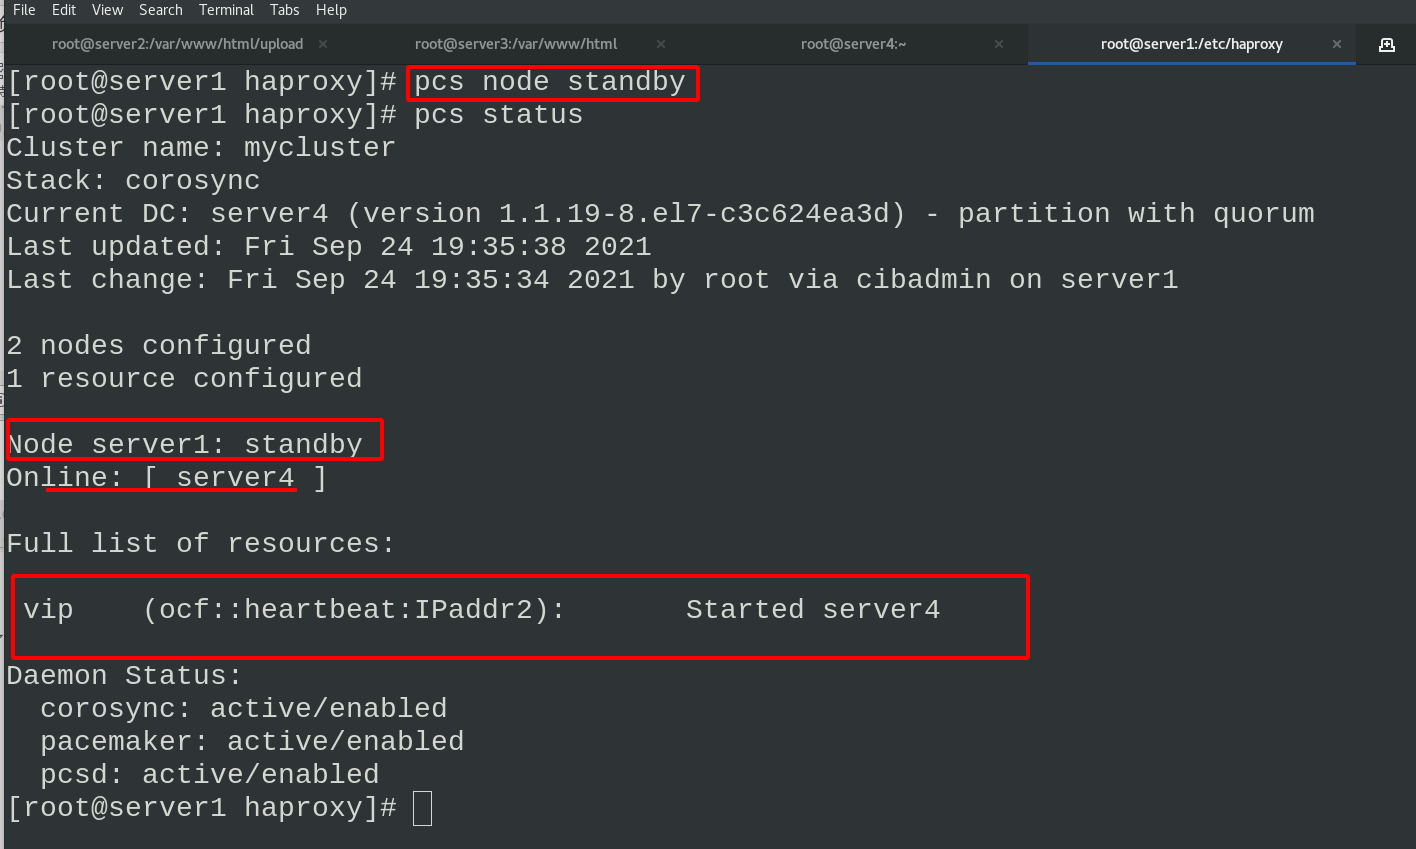
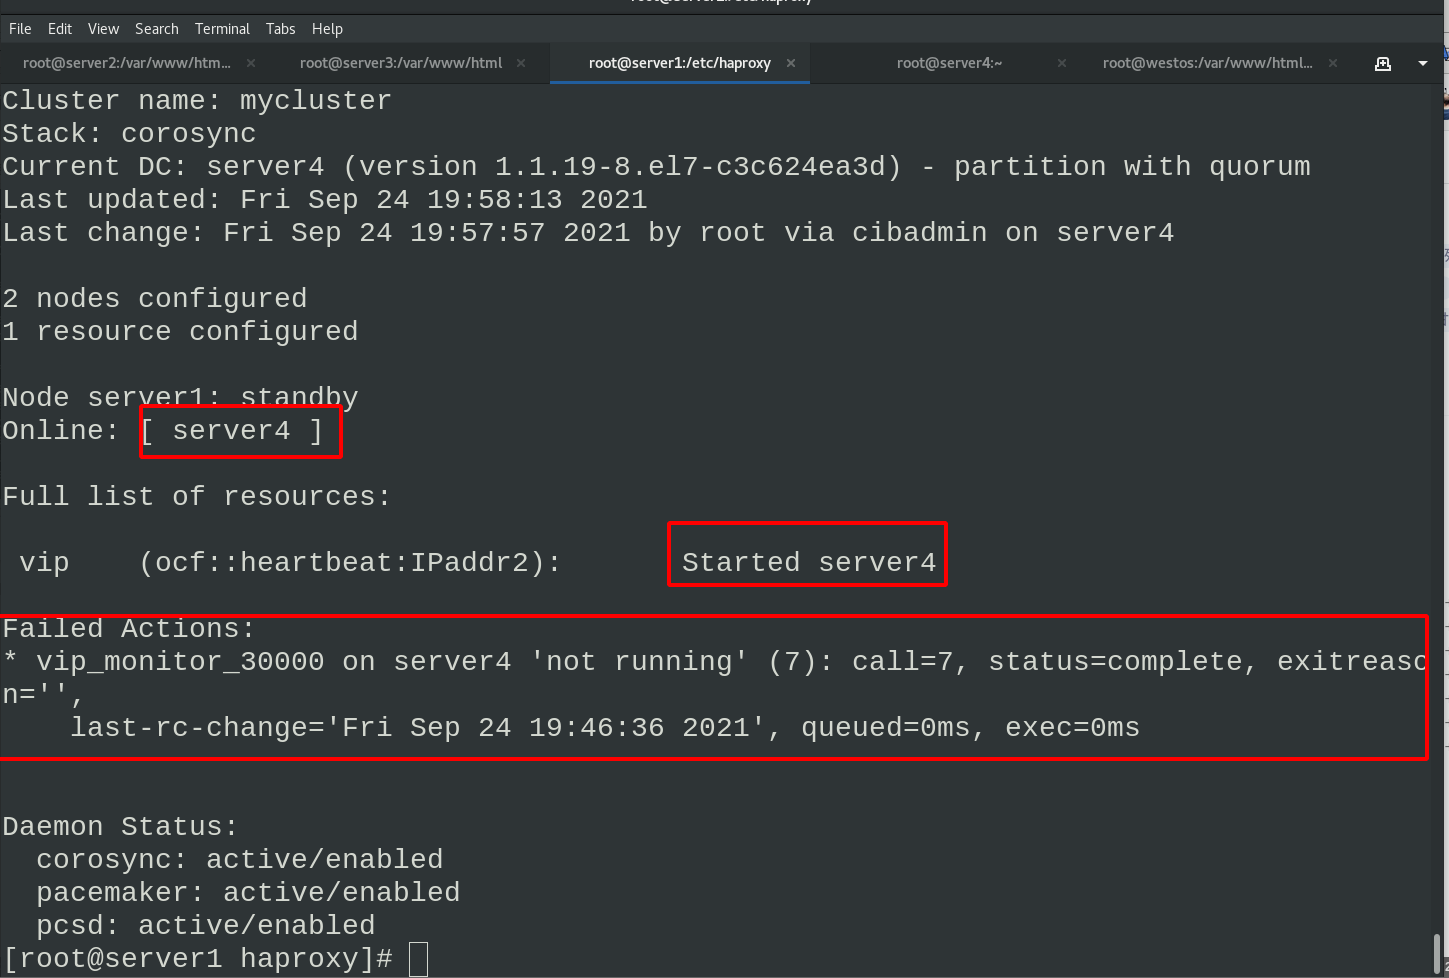
Set the node to standby state in server1
pcs status view the cluster status and see that vip is now running on the server4 node
Delete the vip network interface in server4. Because the server1 node is in standby status, the vip network interface information will be generated automatically
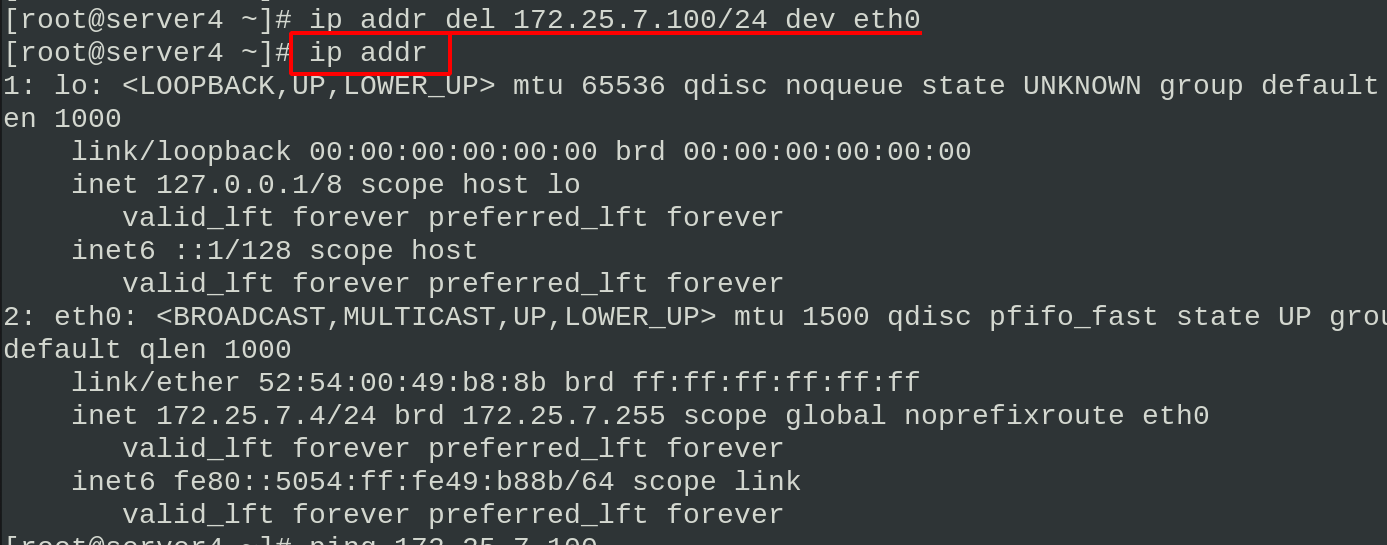
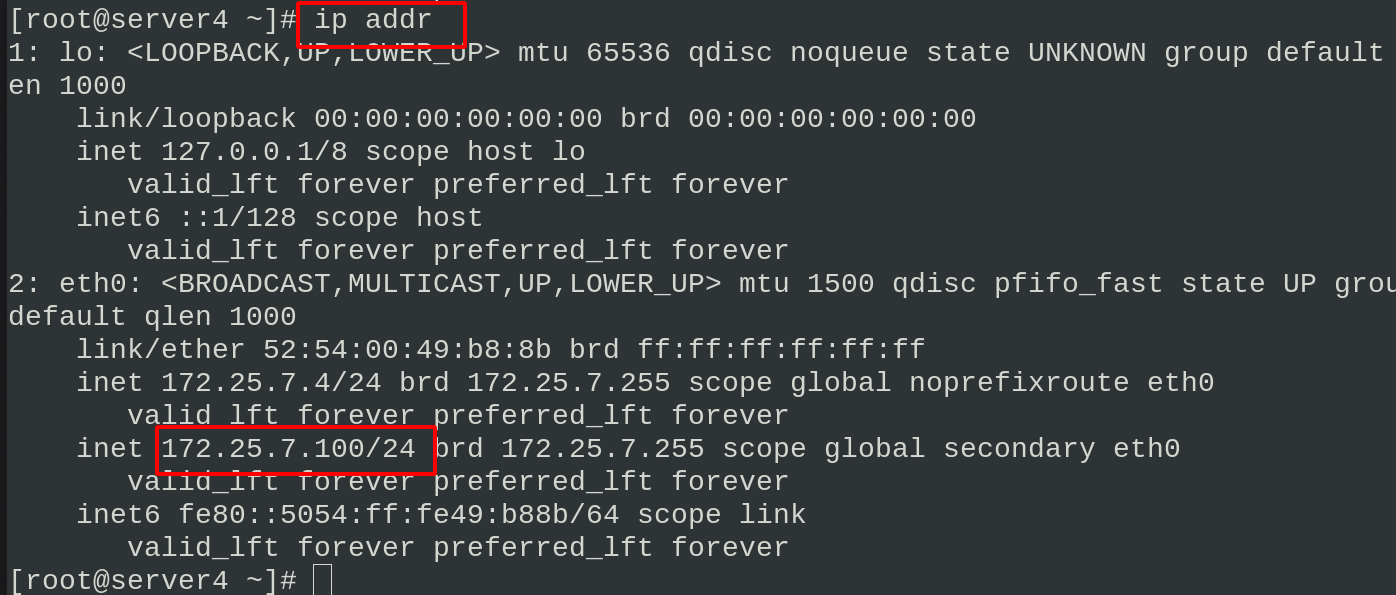
Stop the haproxy of server4 and an error will be reported
server1 cancels node fallback status
Close the haproxy services of server1 and server4

In server1
Add haproxy to cluster management
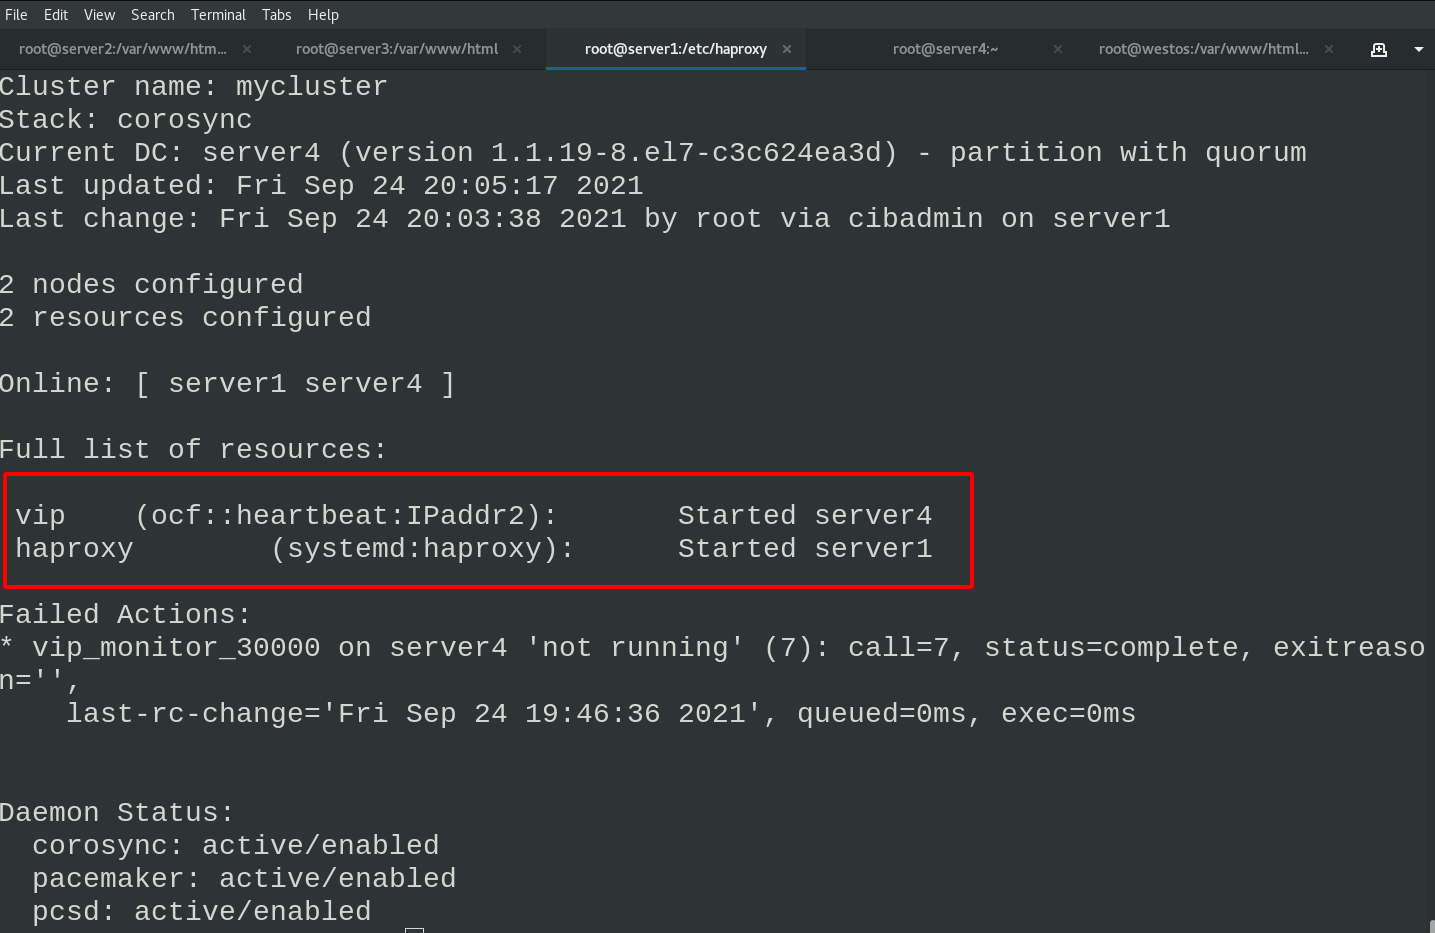
pcs resource create haproxy systemd:haproxy op monitor interval=60s
pcs status     #View cluster status
Check the status and find that vip runs on server4 node and haproxy runs on server1 node
We need to put vip and haproxy into the same group to solve the problem of out of synchronization
pcs resource group add hagroup vip haproxy   #Put vip and haproxy in the hagroup group
pcs status
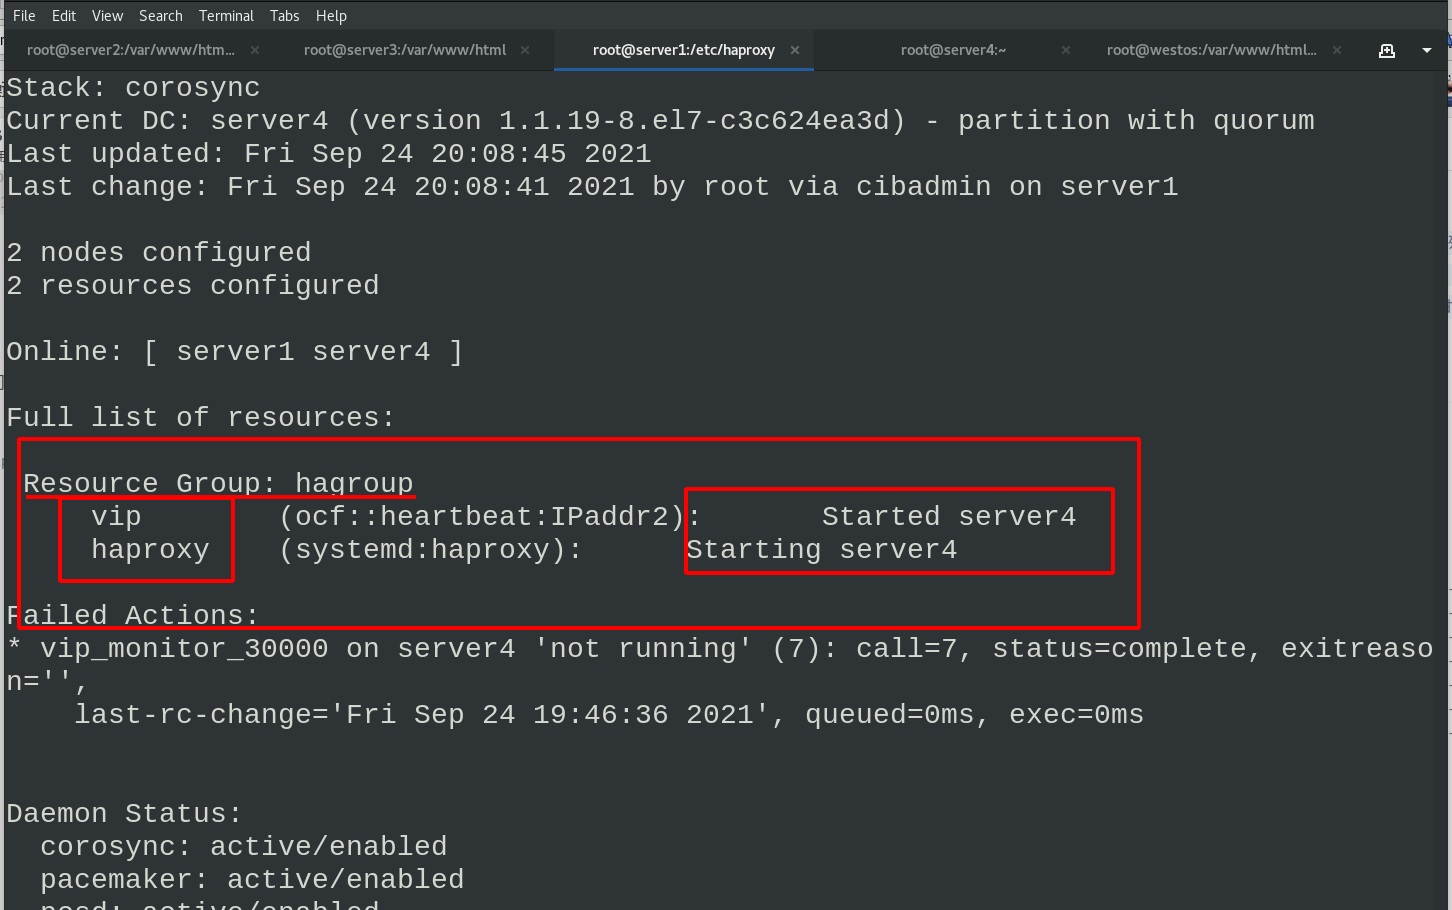
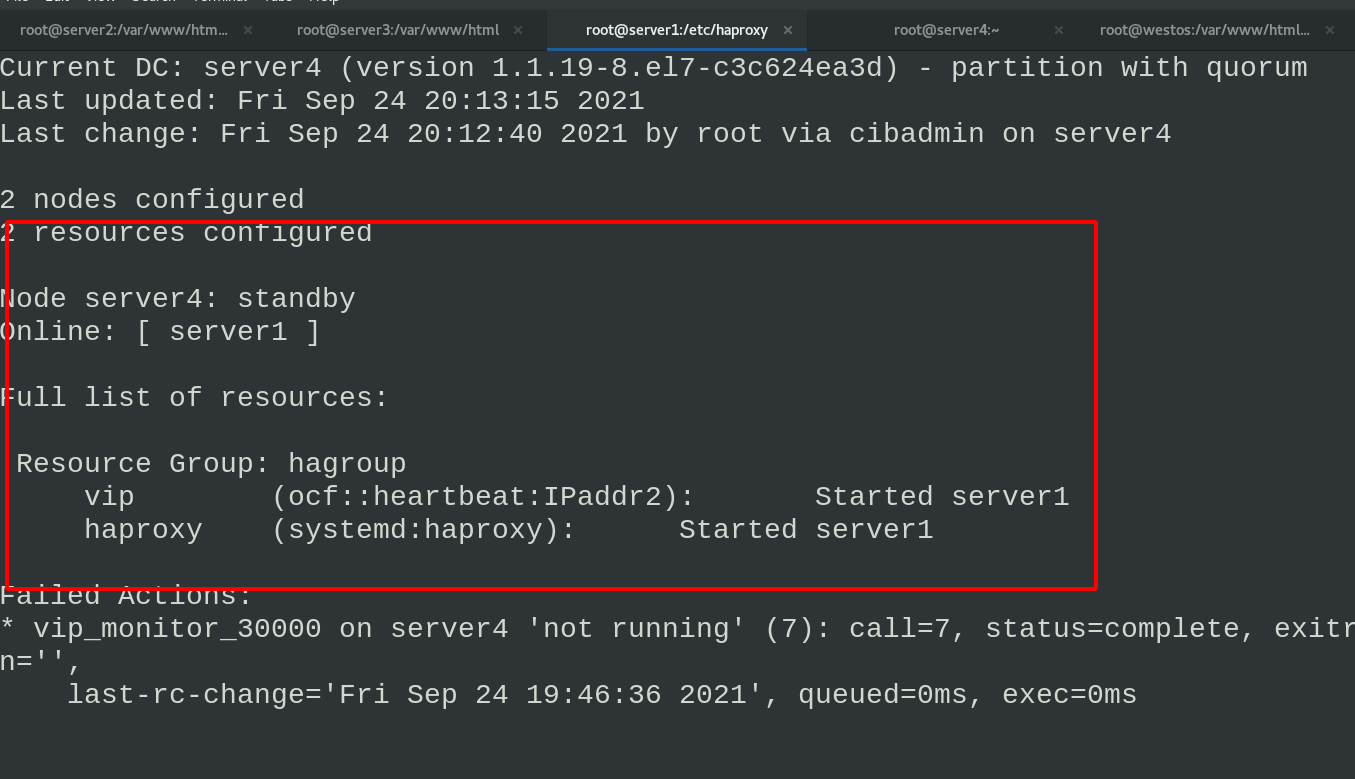
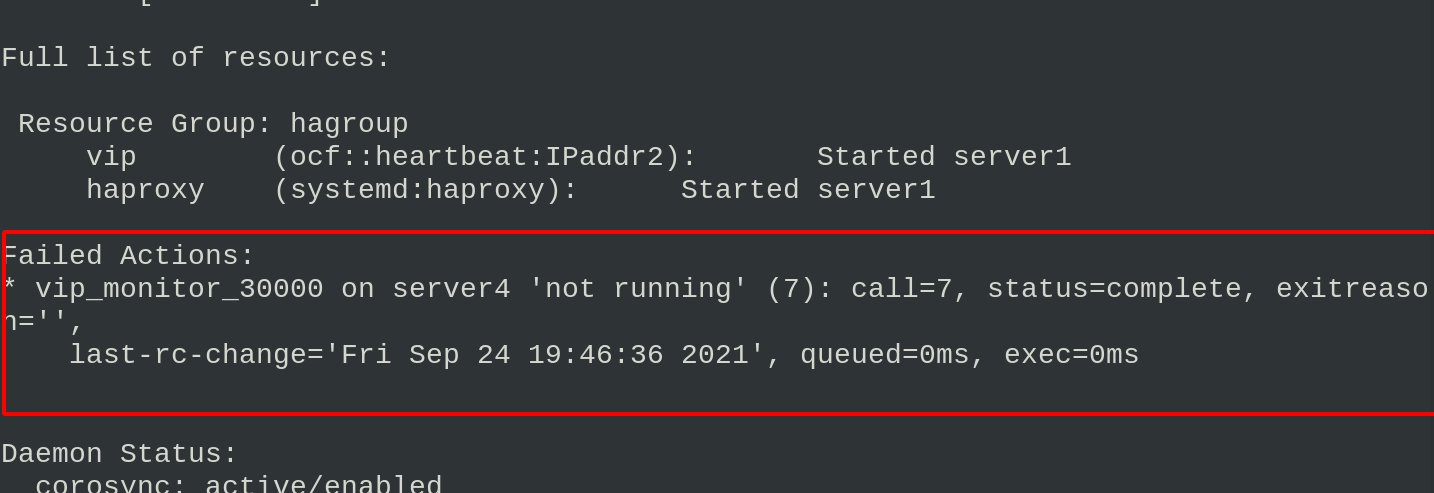
Then we set server4 as the standby server, and we can see that both vip and haproxy are running on the server1 node
#server4
pcs node standby
#server1
pcs status
Shut down the haproxy service of server1 again and check the cluster operation status. You can see that there are errors and warnings in the operation
Enter in srever1
echo C > /proc/sysrqtrigger #Crash the system
Viewing the cluster status in ser4ver4, you can see that both vip and haproxy services are transferred to the node of server4
5, fence prevent brain crack
Fence is mainly used to prevent two systems from writing data to resources at the same time
Destroy the security and consistency of resources, resulting in brain fissure
Install the client fence on server1 and server4
yum install fence-virt
stonith admin -I  #View fence devices
stonith admin -M -a fence_xvm    #View metadata of fence device
Installing the fence plug-in on a real host
dnf install -y fence-virtd-libvirt fence-virtd-multicast fence-virtd
fence_virtd -c    #Configure fence (select br0 interface in the bridge, and press enter for the rest)
After configuration, you can see the fence to be generated_ Storage location of xvm.key file
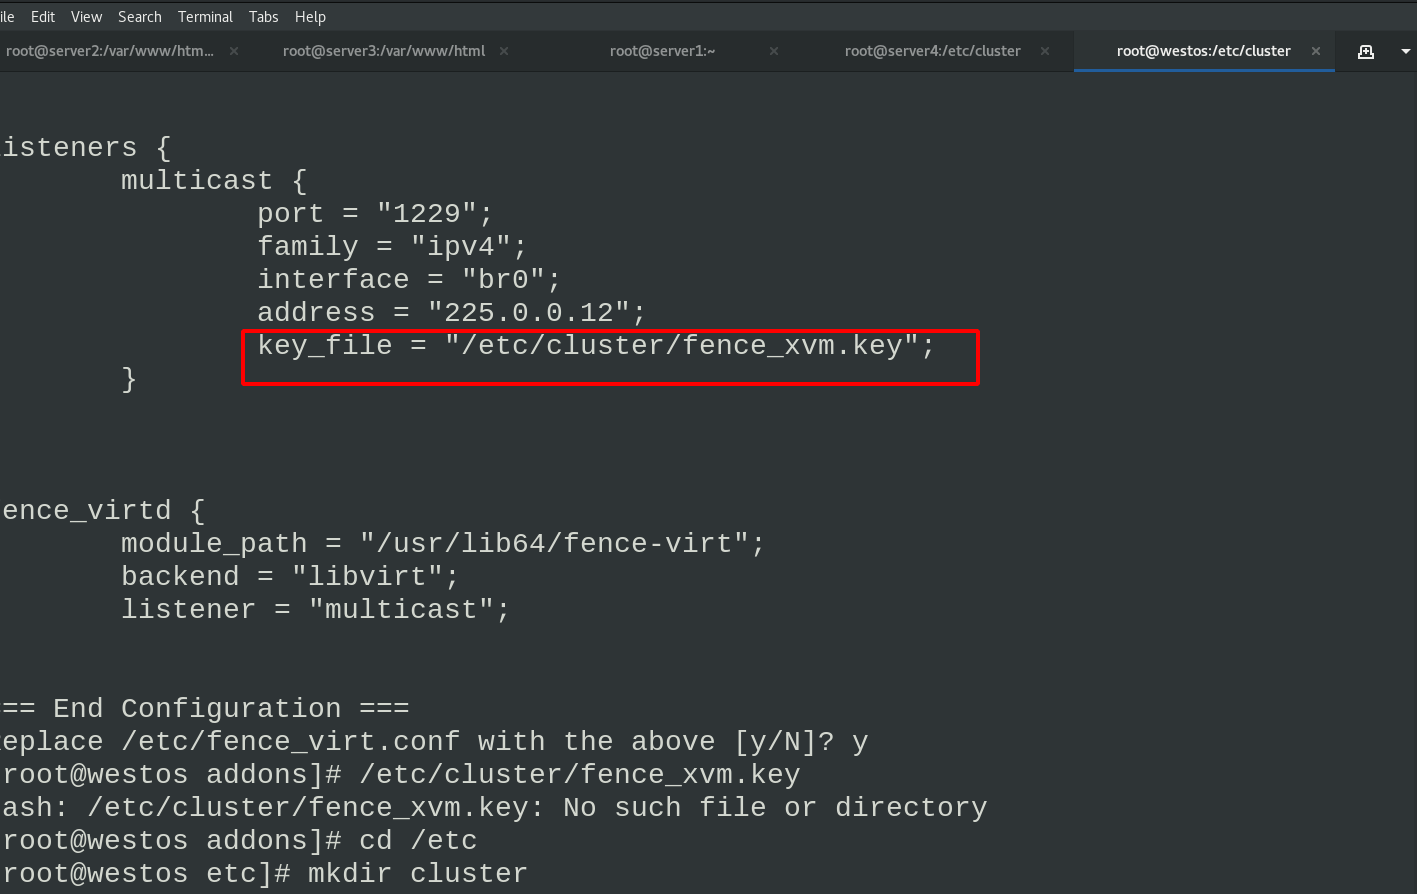
Create fence_ The storage directory of xvm.key and generate fence_xvm.key file, restart fence service
The real host sends the generated key file to server1 and server4
mkdir /etc/cluster
dd if=/dev/urandom of=fence_xvm.key bs=128 count=1
systemctl restart fence_virtd.service
scp fence_xvm.key server1:/etc/cluster/
scp fence_xvm.key server4:/etc/cluster/
Add the server1 and server4 nodes to the fence in server1
pcs stonith create vmfence fence_xvm pcmk_host_map="server1:server1;server4:server4" op monitor interval=60s
Viewing the cluster status, you can see that haproxy and vip are running on server1 and fence is running on server4
Test and close the server1 network card
ip link set down eth0
After restarting server4, the fence is still on server1 to prevent contention for resources