The previous article "linux introduction series 15 - vsftp services for file transfer" explained file transfer, and this article continues to explain the knowledge of file sharing.
File sharing is very common in life and work. For example, different members of the same team need to maintain the same document together. In windows environment, third-party collaboration tools are usually used, such as Tencent documents, graphite documents, etc.
I explained the ftp based file transfer before. Why do I explain file sharing separately? Just think about it. If we want to modify a file on the server, if we use ftp, we need to download it for modification, and then upload it to the server. This is very tedious. At this time, you can use file sharing to solve this problem.
There are essential differences between file transfer and file sharing. File transfer based on ftp protocol can realize file transfer and copy between different machines, which will produce multiple copies. File sharing has only one copy, and all clients connect to the sharing server to operate on the same file.
Under Linux environment, file sharing can be realized through Samba service or NFS service, which are described below.
1, File sharing service Samba
1.1 Samba overview
In order to solve the problem of sharing files, printers and other resources in LAN, Microsoft and Intel jointly formulated the SMB (Server Messages Block) protocol in 1987, which makes it easy to share files among multiple hosts.
In 1991, in order to solve the problem of file sharing between Linux system and Windows system, a foreign high school student developed SMBServer service program based on SMB protocol. It is an open source file sharing software, which only needs simple configuration to realize file sharing.
Later, the author registered it as Samba, which has now become the best choice for sharing files between Linux and Windows systems.
1.2 Samba installation and configuration files
Plan and prepare the experimental environment before installation
| role | operating system | ip address | Host name |
|---|---|---|---|
| Samba server | Centos7 | 192.168.78.101 | sambaserver |
| Samba client | Centos7 | 192.168.78.102 | cliet |
| Samba client | Windows10 | Host machine |
The name of Samba service program is the name of the software package. The name of the installed Service is smb. On the sambaserver host, check whether the system has been installed through the rpm name. If not, install through the Yum software warehouse.
[root@sambaserver ~]# rpm -q samba
package samba is not installed
[root@sambaserver ~]# yum install samba
Loaded plugins: fastestmirror, langpacks
...Omit part of the content
Installed:
  samba.x86_64 0:4.1.1-31.el7
Complete!
[root@sambaserver yum.repos.d]# ^C
[root@sambaserver yum.repos.d]# rpm -q samba
samba-4.1.1-31.el7.x86_64
[root@sambaserver yum.repos.d]#
After the installation, the directory of the configuration file is / etc/samba /, and the main configuration file is: smb.conf
[root@sambaserver yum.repos.d]# ll /etc/samba/
total 20
-rw-r--r--. 1 root root    20 Dec  3 01:48 lmhosts
-rw-r--r--. 1 root root   706 Dec  3 01:48 smb.conf
-rw-r--r--. 1 root root 11327 Dec  3 01:48 smb.conf.example
[root@sambaserver yum.repos.d]#
Next, let's take a look at the main contents of the configuration file. According to the old rules mentioned in 2.4.1 in "linux introduction series 15 - vsftp service for file transfer", remove the comments and blank line information to facilitate the observation of configuration items.
[root@sambaserver yum.repos.d]# mv /etc/samba/smb.conf /etc/samba/smb.conf.bak
[root@sambaserver yum.repos.d]# cat /etc/samba/smb.conf.bak | grep -v "#" |grep  -v ";" | grep -v "^$">/etc/samba/smb.conf
The above script reversely selects via grep command-v parameter, removes the comment information starting with #, semicolon, filters the blank line with ^ $, filters the useless information, and then writes it to the original configuration file through redirection.
Next, let's look at the contents of the main configuration file:
[root@sambaserver yum.repos.d]# cat /etc/samba/smb.conf
[global]
        workgroup = SAMBA #Team name
        security = user  #There are four ways of security verification: share, user, server, domain
        passdb backend = tdbsam #There are three types of user background: smbpasswd, tdsam and ldapsam
        printing = cups
        printcap name = cups
        load printers = yes #Set whether to share printer devices when Samba service starts
        cups options = raw  #Printer options
[homes]  #Shared parameters
        comment = Home Directories #Descriptive information
        valid users = %S, %D%w%S
        browseable = No #Specifies whether shared information is visible in my network places
        read only = No
        inherit acls = Yes
[printers] #Printer sharing parameters
        comment = All Printers
        path = /var/tmp
        printable = Yes
        create mask = 0600
        browseable = No
[print$]
        comment = Printer Drivers
        path = /var/lib/samba/drivers
        write list = @printadmin root
        force group = @printadmin
        create mask = 0664
        directory mask = 0775
[root@sambaserver yum.repos.d]#
I add comments directly to the back of each configuration for easy viewing.
Among them, the [homes] parameter is the home directory sharing information of the visiting user, and the [printers] parameter is the shared printer device. You can delete it directly if you don't need to.
1.3 Samba file sharing practice
As you can see above, the main configuration file of Samba service program includes global configuration parameters and regional configuration parameters. As the name implies, the global configuration parameter is used to set up the overall resource sharing environment, which is valid for each independent shared resource; the regional configuration parameter is used to set up a separate shared resource, which is only valid for that resource.
Let's configure and use the Samba service
1.3.1 file sharing server configuration
(1) Samba main profile configuration
[root@sambaserver yum.repos.d]# cd /etc/samba/
[root@sambaserver samba]# vim smb.conf
...Omit the original content
[database]   #Set share name to database
        comment=Do not modify the database at will  #Prompt information
        path=/home/database  #Shared directory / home/database
        public=no    #Turn off all visible
        writeable=yes #Allow write operations
Add the above and save to exit.
Add the two parameters of global configuration in the main configuration file, security and passdb backend.
As you can see from the main configuration file mentioned in 1.2, their default values are user and tdbsam, respectively.
There are four ways to install and authenticate security, as follows:
-
share: the visiting host does not need to verify the password, which is convenient, but the security is very poor
-
user: it can only be accessed after the password provided by the visiting host is verified, which improves the security
-
server: use the independent remote host to verify the password provided by the visiting host (centralized management account)
-
Domain: use domain controller for authentication
There are three ways to define the type of user background: passdb backend
-
Smbpasswd: use the smbpasswd command to set the password of the Samba service program for system users
-
tdbsam: the user who creates the database file and uses the pdbedit command to build the Samba service program
-
ldapsam: account verification based on LDAP service
Next, we will use the default user authentication mode to set up. Other modes will not be explained temporarily.
(2) Create an account to access shared resources
It can be seen from the default configuration file that Samba adopts the default user authentication mode in RHEL7, which can ensure that only users with password and trust can access the shared resources. The account information database needs to be established first, and the account must already exist in the current system.
Similar to the previous explanation of ftp, users are required to exist in the current system to avoid errors caused by confusion of file permission attributes when creating files.
The command used to manage the account information database of the SMB service program is: pdbedit.
Syntax format:
pdbedit [parameter] account
Parameters:
| parameter | Effect |
|---|---|
| -a | Setting up Samba users |
| -x | Delete Samba user |
| -L | List accounts |
| -Lv | List of account details |
First create user samba and set the password to 123456
[root@sambaserver samba]# useradd -s /sbin/nologin samba
[root@sambaserver samba]# passwd samba
Changing password for user samba.
New password:
BAD PASSWORD: The password is shorter than 8 characters
Retype new password:
passwd: all authentication tokens updated successfully.
[root@sambaserver samba]# id samba
uid=1001(samba) gid=1001(samba) groups=1001(samba)
[root@sambaserver samba]#
The password of the user who uses the function pdbedit to create the samba service is 888888 (note that the password here is not the password for the samba system user to log in. Although the password can also be set to the same as the previous password, it must be clear that the two passwords are separate and do not confuse)
[root@sambaserver samba]# pdbedit -a -u samba
new password: #Enter the password here. It is not necessary to give samba users the same password to log in to the system
retype new password: #Repeat password
Unix username:        samba
NT username:
Account Flags:        [U          ]
User SID:             S-1-5-21-3641161961-465911512-1567372236-1000
Primary Group SID:    S-1-5-21-3641161961-465911512-1567372236-513
Full Name:
Home Directory:       \\sambaserver\samba
HomeDir Drive:
Logon Script:
Profile Path:         \\sambaserver\samba\profile
Domain:               SAMBASERVER
Account desc:
Workstations:
Munged dial:
Logon time:           0
Logoff time:          Wed, 06 Feb 2036 23:06:39 CST
Kickoff time:         Wed, 06 Feb 2036 23:06:39 CST
Password last set:    Wed, 22 Jan 2020 14:45:50 CST
Password can change:  Wed, 22 Jan 2020 14:45:50 CST
Password must change: never
Last bad password   : 0
Bad password count  : 0
Logon hours         : FFFFFFFFFFFFFFFFFFFFFFFFFFFFFFFFFFFFFFFFFF
[root@sambaserver samba]#
(3) Create a directory for shared resources
In the first step, we configured the shared directory as / home/database. Therefore, when we create this directory, we need to consider the file read-write permission.
[root@sambaserver samba]# mkdir /home/database
[root@sambaserver samba]# chown -Rf samba:samba /home/database/
[root@sambaserver samba]#
(4) SELinux context and policy settings
Since the / home directory is the home directory of ordinary users in the system, it is necessary to not only consider the file read and write permissions, but also pay attention to the limitations brought by SELinux security context and domain policy (the original main configuration file contains the configuration instructions on SELinux security context Policy).
Set SELinux security context
[root@sambaserver samba]# semanage fcontext -a -t samba_share_t /home/database
[root@sambaserver samba]# restorecon -Rv /home/database/
restorecon reset /home/database context unconfined_u:object_r:home_root_t:s0->unconfined_u:object_r:samba_share_t:s0
[root@sambaserver samba]#
In addition to setting the context, you need to set SELinux domain related policies. Just turn on the related policies
[root@sambaserver samba]# getsebool -a |grep samba
samba_create_home_dirs --> off
samba_domain_controller --> off
samba_enable_home_dirs --> off
samba_export_all_ro --> off
samba_export_all_rw --> off
samba_portmapper --> off
samba_run_unconfined --> off
samba_share_fusefs --> off
samba_share_nfs --> off
sanlock_use_samba --> off
use_samba_home_dirs --> off
virt_sandbox_use_samba --> off
virt_use_samba --> off
[root@sambaserver samba]# setsebool -P samba_enable_home_dirs on
[root@sambaserver samba]#
(5) Firewall settings
samba service name is smb, restart and set to power on, clear the firewall policy
[root@sambaserver samba]# systemctl restart smb
[root@sambaserver samba]# systemctl enable smb.service
Created symlink from /etc/systemd/system/multi-user.target.wants/smb.service to /usr/lib/systemd/system/smb.service.
[root@sambaserver samba]# iptables -F
At this point, the client can use samba service to realize file sharing
First prepare a file in the shared directory for client sharing
[root@sambaserver home]# cd database/
[root@sambaserver database]# ll
total 0
[root@sambaserver database]# echo "samba server">samba.txt
[root@sambaserver home]# chown -Rf samba:samba /home/database/
[root@sambaserver database]# ll
total 4
-rw-r--r--. 1 samba samba 13 Jan 22 15:44 samba.txt
This allows the client to view and edit the shared file.
Samba supports file sharing among Windows, Linux and Mac OS. Next, we will show that the client is Linux and Windows.
1.3.2 Linux client access file sharing service
After installing the client on the prepared samba client host, you can share the file with the previous samba account password.
(1) Install shared client
[root@cliet ~]# yum install cifs-utils
Loaded plugins: fastestmirror, langpacks
Loading mirror speeds from cached hostfile
...Omit part of the content
Installed:
  cifs-utils.x86_64 0:6.2-10.el7
Complete!
[root@cliet ~]#
(2) Create certification file
[root@cliet ~]# vim auth.smb
username=samba
password=888888
domain=SAMBA
Save and exit. The user password is the samba user created in step 2 of 1.3.1 and the corresponding password. Domain is the domain in the main configuration file.
In order to ensure that it is not seen by others at will, the authority of the authentication file is modified to read and write only by root management.
[root@cliet ~]# ll auth.smb
-rw-r--r--. 1 root root 44 Jan 22 15:37 auth.smb
[root@cliet ~]# chmod 600 auth.smb
[root@cliet ~]# ll auth.smb
-rw-------. 1 root root 44 Jan 22 15:37 auth.smb
[root@cliet ~]#
(3) Create directory locally to mount Samba shared directory
[root@cliet ~]# mkdir /database
[root@cliet ~]# vim /etc/fstab
//192.168.78.101/database /database cifs credentials=/root/auth.smb 0 0
#Save and exit
[root@cliet ~]# mount -a
This allows you to view and modify content within the shared server
[root@cliet ~]# ll /database/
total 4
-rw-r--r--. 1 root root 13 Jan 22 15:44 samba.txt
[root@cliet ~]# cat /database/samba.txt
samba server
[root@cliet ~]#
1.3.3 Windows access file sharing service
This demonstration takes win10 as an example
Enter the shared server address in the start menu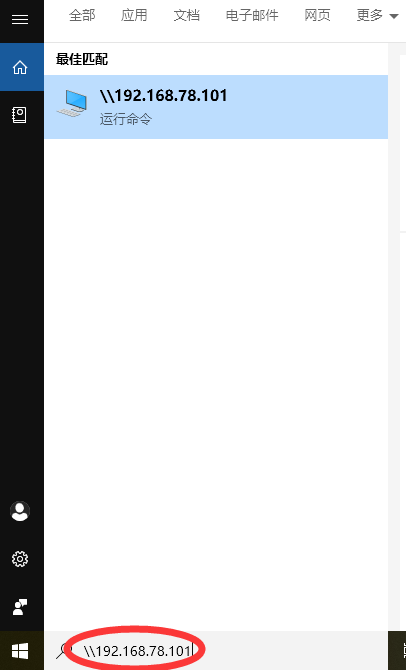
Enter the correct account password in the pop-up login box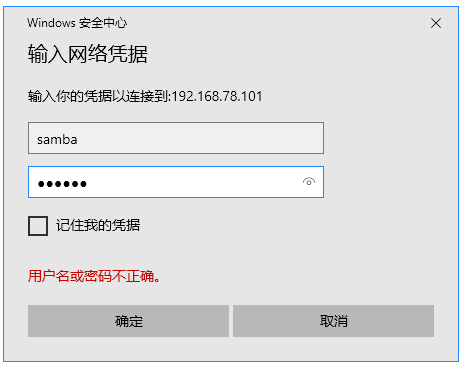
Enter shared directory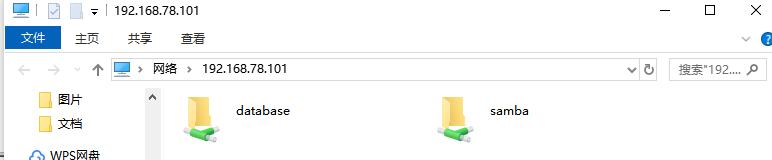
After entering the directory, you can view, write, rename, delete files and other operations. You can see the changes of files in samba server and other corresponding clients. So file sharing is implemented.
2, Network file system NFS
If you just share files between Linux hosts, NFS will be simpler.
NFS (Network File System) service can mount the file sharing resources on the remote Linux system to the directory of the local host, so that the client can read and write the shared files on the remote Linux system as if using the resources on the local host based on the TCP/IP protocol.
Virtual machine preparation: two virtual machines can be cloned separately. Here, I will use the original two machines directly. Just note that in order to avoid the interference of the previous experiment, the former Samba client is used as the server of nfs and the samba server is used as the client of nfs. The plan is as follows:
| role | operating system | ip address | Host name |
|---|---|---|---|
| NFS clients | Centos7 | 192.168.78.101 | sambaserver |
| NFS server | Centos7 | 192.168.78.102 | cliet |
2.1 NFS server configuration
(1) Installing NFS
By default, NFS service has been installed in RHEL7 system, which can be viewed through rpm command. Of course, you can directly execute the following installation commands. If there is a new package, it will be updated automatically. If it is the latest version, you will be prompted "Nothing to do".
[root@cliet ~]# rpm -q nfs-utils
nfs-utils-1.3.0-0.65.el7.x86_64
[root@cliet ~]# yum install nfs-utils
Loaded plugins: fastestmirror, langpacks
Loading mirror speeds from cached hostfile
 * base: mirrors.aliyun.com
 * extras: mirrors.aliyun.com
 * updates: mirrors.aliyun.com
Package 1:nfs-utils-1.3.0-0.65.el7.x86_64 already installed and latest version
Nothing to do
[root@cliet ~]#
The NFS package name is NFS utils.
(2) Create shared directory on server for NFS
[root@cliet ~]# mkdir /nfs
[root@cliet ~]# chmod -Rf 777 /nfs/
[root@cliet ~]# echo "nfs server">/nfs/nfs.txt
[root@cliet ~]# chmod -Rf 777 /nfs/
[root@cliet ~]# ll /nfs/
total 4
-rwxrwxrwx. 1 root root 11 Jan 22 23:11 nfs.txt
[root@cliet ~]#
Create directories, modify permissions, and create shared files.
(3) NFS service configuration
The NFS server configuration file is / etc/exports, which is empty by default. Define the directory to share and the corresponding permissions in the following format.
Format: path of shared directory NFS clients allowed to access (share permission parameter)
Relevant parameters and functions are as follows
| parameter | Effect |
|---|---|
| ro | read-only |
| rw | Read and write |
| root_squash | When NFS client is accessed as root administrator, it is mapped as anonymous user of NFS server |
| no_root_squash | When NFS client is accessed as root administrator, it is mapped as root administrator of NFS server |
| all_squash | No matter what account access client for NFS uses, it is mapped as anonymous user of server for NFS |
| sync | Write the data to the memory and hard disk at the same time to ensure no data loss |
| async | Save data to memory first, then write to hard disk; this is more efficient, but data may be lost |
According to the above syntax format, share the NFS directory created in the first step to all hosts in the 192.168.78.0/24 network segment, so that these hosts have read and write permissions. In order to ensure that the data is not lost to the greatest extent, the operation will not be completed until the data is written to the hard disk of the NFS server. At the same time, the root administrator of the visiting client is mapped to the local anonymous user. The configuration is as follows:
[root@cliet ~]# vim /etc/exports
/nfs 192.168.78.*(rw,sync,root_squash)
Save and exit, noting that there is no space between the ip address and the permission.
(4) Set firewall policy
Clear the default policy of iptables firewall directly to avoid that the default firewall policy prohibits normal NFS shared services.
[root@cliet ~]# iptables -F
(5) Start NFS server
[root@cliet ~]# systemctl restart rpcbind
[root@cliet ~]# systemctl enable rpcbind
[root@cliet ~]# systemctl start nfs-server
[root@cliet ~]# systemctl enable nfs-server
Before using NFS service for file sharing, RPC (Remote Procedure Call) service is needed to send the I address and port number of NFS server to the client.
Therefore, before starting the NFS service, you need to restart and enable the rpcbind service program, and add both services to the boot entry.
At this point, the server-side configuration for NFS is complete, and then configure the client for NFS.
2.2 NFS client use
(1) View server for NFS
To view the NFS server remote share information, use the showmount command.
Syntax:
showmount [parameter] server ip
Parameters:
| parameter | Effect |
|---|---|
| -e | Displays the list of shares for server for NFS |
| -a | Displays the status of the file resources mounted on this computer |
| -v | Display version number |
The output format is: "shared directory name allows client address"
[root@sambaserver database]# showmount -e 192.168.78.102
Export list for 192.168.78.102:
/nfs 192.168.78.*
[root@sambaserver database]#
(2) Create directory and mount
[root@sambaserver database]# mkdir /nfs
[root@sambaserver database]# mount -t nfs 192.168.78.102:/nfs /nfs
[root@sambaserver database]# ll /nfs/
total 4
-rwxrwxrwx. 1 root root 11 Jan 22 23:11 nfs.txt
Use the mount command and the - t parameter to specify that the type of file system to mount is nfs, and write the IP address of the server, the shared directory on the server and the directory / nfs to mount to the local system after the command, so that you can see the shared directory file.
(3) Mount information persistence
In order to ensure that the mount of the previous step can take effect all the time, it needs to be written to the fstab file.
[root@sambaserver database]# vim /etc/fstab
...Omit extraneous content
192.168.78.102:/nfs /nfs nfs defaults 0 0
This completes the file sharing of the server locally.
3, Auto mount service autofs
3.1 overview of autofs
No matter the installation of local yum source or Samba and NFS services described in this article, you need to connect the mount information to the / etc/fstab file, so that the shared resources will be automatically mounted when the server is powered on.
However, if there are too many remote resources, it will bring great pressure on the network bandwidth and hardware resources. If it is not used for a long time after mounting, it will cause waste of resources.
In order not to cause waste, you can mount manually only when you need to use it every time, but this operation is very cumbersome. In order to solve this problem, autofs auto mount service came into being.
Different from the mount command, the autofs service program is a kind of Linux system daemons. When the user view is detected to access a file system that has not been mounted, the file system will be mounted automatically.
In short, after the mount information is written into the / etc/fstab file, the system will automatically mount it every time it is powered on, and the autofs service program dynamically mounts when the user needs to use the file system, thus saving the network resources and the hardware resources of the server.
3.2 autofs installation and configuration files
3.2.1 autofs installation
[root@sambaserver database]# yum install autofs
Loaded plugins: fastestmirror, langpacks
...Omit part of the content
Installed:
  autofs.x86_64 1:5.0.7-106.el7
Dependency Installed:
  hesiod.x86_64 0:3.2.1-3.el7
Complete!
[root@sambaserver database]#
3.2.2 configuration file interpretation
The main configuration file of autofs service program is: /etc/auto.master, which is generally configured in the way of main configuration and sub configuration. The reason is that in the production environment, it is possible to manage the mount operations of many devices at the same time. If all the mount information is written into the main configuration file, it will be difficult to manage once there is too much content, and it is not conducive to the efficiency of service execution.
The main configuration file is filled in the format of "Mount directory sub configuration file". The mount directory is the upper level directory of the device mount location. For example, the CD-ROM device is usually mounted in the / media/cdrom directory, so the mount directory in the main configuration file can be written as / media.
The sub configuration file needs to be customized by the user. There is no strict requirement for the file name. The suffix is suggested to end with. misc. The format is: "Mount directory mount file type and permission: device name".
Next, take auto mount CD-ROM drive as an example to demonstrate the use of autofs
3.3 demonstration of sutofs using optical drive as an example
3.3.1 autofs configuration
Master profile
[root@sambaserver database]# vim /etc/auto.master
#
# Sample auto.master file
# This is a 'master' automounter map and it has the following format:
# mount-point [map-type[,format]:]map [options]
# For details of the format look at auto.master(5).
#
/media /etc/iso.misc
/misc   /etc/auto.misc
#
# NOTE: mounts done from a hosts map will be mounted with the
#       "nosuid" and "nodev" options unless the "suid" and "dev"
#       options are explicitly given.
#
/net    -hosts
#
# Include /etc/auto.master.d/*.autofs
# The included files must conform to the format of this file.
#
+dir:/etc/auto.master.d
#
# Include central master map if it can be found using
# nsswitch sources.
#
# Note that if there are entries for /net or /misc (as
# above) in the included master map any keys that are the
# same will not be seen as the first read key seen takes
# precedence.
#
+auto.master
[root@sambaserver database]#
Add / media /etc/iso.misc to save and exit, the rest remains the same.
Sub profile
[root@sambaserver database]# vim /etc/iso.misc
iso -fstype=iso9660,ro,nosuid,nodev :/dev/cdrom
Save and exit.
Note: to mount the CD-ROM device to the / media/iso directory, the sub configuration file can write the mount directory as ISO, while - fstype is the file system format parameter, iso9660 is the CD-ROM device format, ro, nosuid and nodev are the specific permission parameters of the CD-ROM device, and / dev/cdrom is the device name to be mounted.
3.3.2 start autofs service
After the configuration is completed, start the autofs service and join the startup
[root@sambaserver database]# systemctl start autofs
[root@sambaserver database]# systemctl enable autofs
Created symlink from /etc/systemd/system/multi-user.target.wants/autofs.service to /usr/lib/systemd/system/autofs.service.
[root@sambaserver database]#
3.3.3 using autofs service
After the above operations, we have configured and enabled the autofs service. Let's see if we have attached the CD-ROM device
[root@sambaserver database]# df -h
Filesystem               Size  Used Avail Use% Mounted on
/dev/mapper/centos-root   18G  4.3G   14G  25% /
devtmpfs                 905M     0  905M   0% /dev
tmpfs                    914M   76K  914M   1% /dev/shm
tmpfs                    914M   29M  886M   4% /run
tmpfs                    914M     0  914M   0% /sys/fs/cgroup
/dev/sda1                497M  120M  377M  25% /boot
192.168.78.102:/nfs       18G  4.6G   13G  26% /nfs
[root@sambaserver media]# ls /media/
[root@sambaserver media]#
You can see that the cursor device is not mounted, and there is no iso subdirectory in the / media directory
Next, we go directly to the mounted / media/iso directory to see if there is any content
[root@sambaserver media]# cd /media/
[root@sambaserver media]# ll
total 0
[root@sambaserver media]# cd iso
[root@sambaserver iso]# ls
CentOS_BuildTag  GPL       LiveOS    RPM-GPG-KEY-CentOS-7
EFI              images    Packages  RPM-GPG-KEY-CentOS-Testing-7
EULA             isolinux  repodata  TRANS.TBL
[root@sambaserver iso]# df -h
Filesystem               Size  Used Avail Use% Mounted on
/dev/mapper/centos-root   18G  4.3G   14G  25% /
devtmpfs                 905M     0  905M   0% /dev
tmpfs                    914M   76K  914M   1% /dev/shm
tmpfs                    914M   29M  886M   4% /run
tmpfs                    914M     0  914M   0% /sys/fs/cgroup
/dev/sda1                497M  120M  377M  25% /boot
192.168.78.102:/nfs       18G  4.6G   13G  26% /nfs
/dev/sr0                 3.9G  3.9G     0 100% /media/iso
[root@sambaserver iso]#
The above demonstration shows that when you switch to the iso directory, that is to say, autofs will mount automatically only when you use mount resources. When the system restarts, you can see that it is not mounted, and when you switch to the / media/iso directory again, it will mount automatically. In this way, on-demand allocation is realized, which saves bandwidth and other resources.
After explaining file sharing, the next article will share how to build a mail system using Postfix and Dovecot.

