preface
1. Server and system version
Article based Tencent cloud Server linux centos7 nine
2. Why reinstall the system
When Tencent cloud first bought, the security group was fully open by default and the firewall was closed by default
When I operated redis, I allowed external access without setting a password. It was easy to be invaded. Authorized was modified through redis_ Keys file to achieve secret free login. After looking at the ip addresses of South Korea and the United States
Virtual currency is very rampant recently. What you know and don't know is unproductive and meaningless, but it wastes a lot of resources
Check your server / usr/share directory and open config_background.json file to see if it has been mined
They can't even connect me. They can't log in to the remote Tencent cloud. They can only log in through VNC. The VNC remote login of Tencent cloud engineers can't be solved. They simply reinstall the system directly
3. Article version
5-17-v1: build some necessary software, which are effective for personal testing
Chapter I construction of Linux basic environment
1.1 installation of zsh and oh my zsh
How many shell s are there in the viewing system
cat /etc/shells
Install zsh
sudo yum install zsh
#Default installation location
/bin/zsh
Set zsh as the system default shell for root user:
chsh -s /bin/zsh root
sudo chsh -s /bin/zsh
View the default shell
echo $SHELL
If you want to go back to bash
chsh -s /bin/bash root
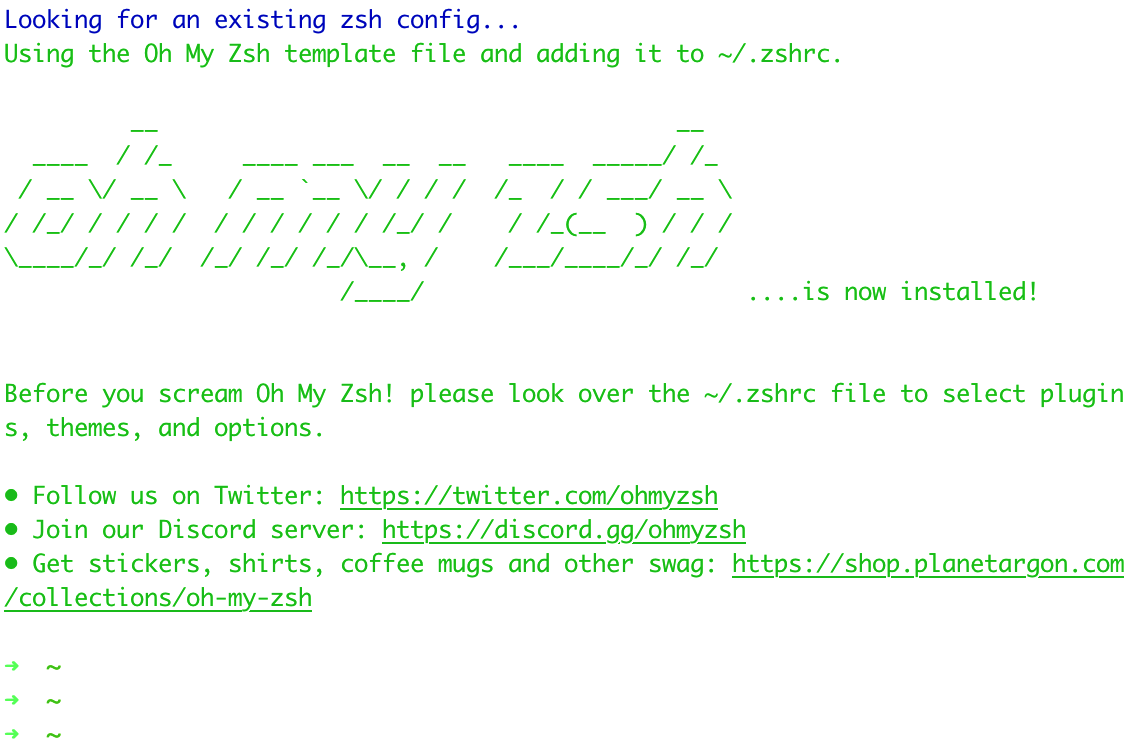
Installing the zsh frame oh my zsh
#You need to install git. Sometimes this domain name cannot be accessed in the mainland
sh -c "$(curl -fsSL https://raw.githubusercontent.com/robbyrussell/oh-my-zsh/master/tools/install.sh)"
#Installation position
/root/.oh-my-zsh
#Powerful d command, which will list the history of the directory we recently entered
d
Modify theme
# vim .zshrc
#Default theme
ZSH_THEME="robbyrussell"
#Set it to "random". Each time you log in oh-my-zsh, you will randomly select a theme
#[reference article]( https://zhuanlan.zhihu.com/p/63585679)
Installation effect
1.2 update sudo
#Fix vulnerability number CVE-2021-3156
yum update sudo
1.3 installing git
yum install git
#View installation location
find . -name "git" |grep git
#Default installation location
/usr/bin/git
#[reference article]( https://cloud.tencent.com/developer/article/1640614)
Install jdk 1.4
Mode 1:
#View the version of jdk that can be installed
yum list | grep java
#The default installation location is / usr / lib / JVM / java-11-openjdk-11.0.11.0.9-1 el7_ 9.x86_ 64/bin/java
yum install -y java-11-openjdk.x86_64
Mode 2:
#decompression
tar -zxvf jdk-8u211-linux-x64.tar.gz
#Configure environment variables
vim /etc/profile
export JAVA_HOME=/DATA/jdk/jdk1.8.0_211
export CLASSPATH=$:CLASSPATH:$JAVA_HOME/lib/
export PATH=$PATH:$JAVA_HOME/bin
#Refresh environment variables
source /etc/profile
#query
java -version
1.5 set password free login of local computer
Password free login method 1:
#Locally generated rsa
ssh-keygen
#Upload the local public key to the server. Enter the root password here
ssh-copy-id    -i    ~/.ssh/id_rsa.pub    root@xxx.xxx.xxx.xxx
#Password free login
ssh  root@xxx.xxx.xxx.xxx
#[Key login]( https://goodgoodstudy.blog.csdn.net/article/details/113694654)
Password free login mode 2:
#Add ~ /. To your local computer ID in ssh directory_ rsa. Content in pub (i.e. public key)
#Copy to ~ /. Of ECS Authorized in ssh directory_ Keys file
be careful:
docker and redis can easily be invaded in this way if they open ports and do not set passwords.
1.6 modify hostname
# Re login takes effect
# 1. Method 1
vi /etc/hostname
# cloudserver,: wq save exit
hostname -F /etc/hostname
# 2. Method 2
hostname -b cloudserver
1.7 increase connection timeout
vim /etc/ssh/sshd_config
#The following configuration items were found in this file:
#ClientAliveInterval 0
#ClientAliveCountMax 3
#Remove the note and change to
#These two lines mean
#1. How many seconds does the server send heartbeat data to the client
#2. How many times does the client fail to respond, and the server automatically disconnects
ClientAliveInterval 30
ClientAliveCountMax 120
#Restart sshd service
service sshd restart
#Reference articles
#https://cloud.tencent.com/developer/article/1163845
1.8 flow monitoring gadget iftop
- Execute the following command to install iftop tool (iftop tool is a traffic monitoring gadget under Linux server).
#If it is an Ubuntu system, please execute the command 'apt get install iftop - y'.
yum install iftop -y
- Execute the following command to install lsof.
yum install lsof -y
- Execute the following command to run iftop. As shown in the figure below:
iftop
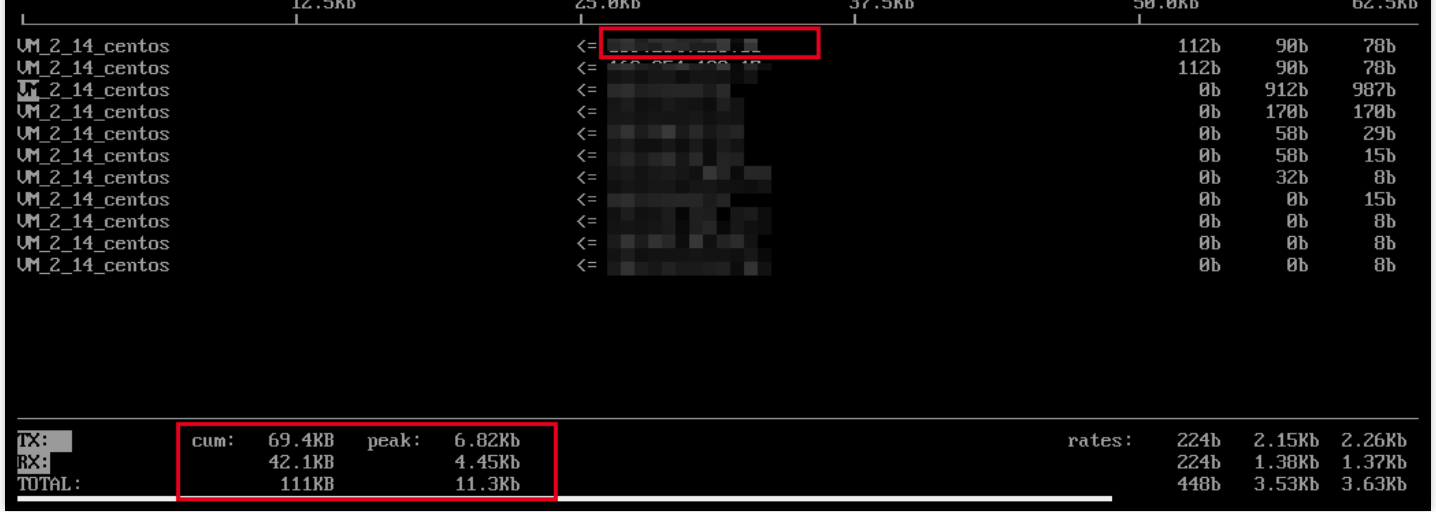
- According to the IP that consumes traffic in iftop, execute the following command to view the process connected to the IP.
lsof -i | grep IP
- If the IP that consumes traffic is 201.205.141.123, execute the following command:
lsof -i | grep 201.205.141.123
- According to the returned results, it is known that the bandwidth of this server is mainly consumed by the SSH process.
sshd       12145    root    3u  IPV4  3294018       0t0   TCP 10.144.90.86:ssh->203.205.141.123:58614(ESTABLISHED)
sshd       12179  ubuntu    3u  IPV4  3294018       0t0   TCP 10.144.90.86:ssh->203.205.141.123:58614(ESTABLISHED)
1.9 configuring security groups
Configure the new security rules to open only some commonly used ports

1.10 configure firewall
View firewall status
firewall-cmd --state
Turn on the firewall
#open
systemctl start firewalld
#close
systemctl stop firewalld
Add ports that need to be open
#In the running state, add the ports that need to be opened to the firewall
#Permanently add the port. Removing -- permanent means temporary.
firewall-cmd --permanent --zone=public --add-port=8080/tcp
firewall-cmd --zone=public --add-port=3306/tcp --permanent
Close open ports
firewall-cmd --zone=public --remove-port=8080/tcp --permanent
Load the firewall configuration to make the modification effective
firewall-cmd --reload
Check whether a port of the firewall is open
firewall-cmd --zone=public --query-port=80/tcp
#View all open ports
firewall-cmd --permanent --zone=public --list-ports
1.11 installation nginx
#First, install PCREPCRE to enable Nginx to support Rewrite.
#Download nginx
wget http://nginx.org/download/nginx-1.20.0.tar.gz
#Download pcre
wget https://ftp.pcre.org/pub/pcre/pcre-8.44.tar.bz2
#decompression
tar zxvf nginx-1.20.0.tar.gz
tar xvf pcre-8.44.tar.bz2
#Installation dependency
yum -y install gcc zlib zlib-devel pcre-devel openssl openssl-devel
yum install -y gcc-c++
#Compile and install pcre
cd pcre-8.44
./configure
make && make install
#Generate Makefile
cd ../nginx-1.20.0
./configure --prefix=/usr/local/nginx --with-http_stub_status_module --with-http_ssl_module --with-pcre=../pcre-8.44
# Compile and install
make
make install
#Installation position
usr/local/nginx
#nginx three main commands
# start-up
/usr/local/nginx/sbin/ ./nginx
# Stop Nginx
/usr/local/nginx/sbin/ ./nginx -s stop
# Reload configuration file
/usr/local/nginx/sbin/ ./nginx -s reload
#[reference article]( https://www.runoob.com/linux/nginx-install-setup.html)
1.12 installing tomcat
wget https://mirrors.tuna.tsinghua.edu.cn/apache/tomcat/tomcat-9/v9.0.46/bin/apache-tomcat-9.0.46.tar.gz
tar zxvf apache-tomcat-9.0.46.tar.gz
1.13 installing mysql
#centos7 doesn't have mysql by default. Download c7 from the yum source
#https://dev.mysql.com/downloads/repo/yum/
#Download yum source
wget https://dev.mysql.com/get/mysql80-community-release-el7-3.noarch.rpm
#You need to switch the root user for software installation: use the root account to install the yum source
rpm -vih mysql80-community-release-el7-3.noarch.rpm
#Check whether the yum source is successfully installed
yum  repolist  enabled | grep "mysql.*-community.*"
#View the default installation version
yum repolist all | grep mysql
#Select installation version
##Disable version 8.0
yum-config-manager --disable mysql80-community
##Enable version 5.7
yum-config-manager --enable mysql57-community
#Start installation
yum install mysql-community-server
#mysql start
systemctl start mysqld
#Check whether mysql is started
systemctl status mysqld
#Restart mysql
systemctl restart mysqld.service
#View mysql temporary password
cat /var/log/mysql.log
#Or search mysql temporary password
grep 'temporary password' /var/log/mysqld.log
#A temporary password is generated for root@localhost: A&0&cSh_F,AB
#Log in to mysql
mysql -uroot -p'A&0&cSh_F,AB'
#If the password is not changed, an error will be reported
#You must reset your password
#You have an error in your SQL syntax;
show databases;
#The password must be changed
ALTER USER 'root'@'localhost' IDENTIFIED BY 'mysql5@Root';
flush privileges;
#Re login
mysql -uroot -pmysql5$Root
Create authorized user
create user "lane"@"IP" identified by "Mysql@1234";
#Create user xsge with password SQLxsge1 Any permission Library (*%), any permission Library (%), all permissions allowed (*)
grant  all  on  *.*  to  'lane'@'%'  identified  by  'Mysql@1234';
##Modify the xsge host access permission range (provided that the user lane already exists)
#Modify the access scope of xsge account: localhost can only be accessed locally in Linux system
 update  mysql.user  set  host='localhost'  where  user='lane';
#Modify permissions
#Authorize lane to query and update all tables in the test database (test. *)
Grant select,update on test.*  to  'lane'@'%';
Prohibit MySQL from updating
#Put the following code in your / etc / yum.com Conf file
exclude=mysql-community-client,mysql-community-common,mysql-community-libs,mysql-community-server
Set firewall open port
####Set firewall open port
firewall-cmd --permanent --zone=public --add-port=3306/tcp
firewall-cmd --reload
Database garbled problem
#Log in to MySQL to check the encoding problem
show variables like 'character_set%';
#Modify mysql configuration file / etc / my cnf
vim  /etc/my.cnf
#Change to utf8
[mysqld]
character-set-server=utf8
[client]
default-character-set=utf8
[mysql]
default-character-set=utf8
Set password free login
#/etc/my.cnf add the following
[client]
  host=localhost
  user='root'
  password='youpassword'
  default-character-set=utf8
[mysql]
default-character-set=utf8
Set startup
systemctl enable mysqld
systemctl daemon-reload
Reference articles
CentOS7 install MySQL - Jianshu (jianshu.com) using yum or up2date
1.14 installing redis
#download
wget https://download.redis.io/releases/redis-6.2.2.tar.gz
#decompression
tar zxvf redis-6.2.2.tar.gz
#Jump
cd redis-6.2.2
#compile
make
#create a file
mkdir /usr/local/redis
mkdir /usr/local/redis/bin
mkdir /usr/local/redis/conf
#move file
mv redis.conf /usr/local/redis/conf
mv src/redis-benchmark /usr/local/redis/bin
mv src/redis-check-aof /usr/local/redis/bin
mv src/redis-check-rdb /usr/local/redis/bin
mv src/redis-cli /usr/local/redis/bin
mv src/redis-sentinel /usr/local/redis/bin
mv src/redis-server /usr/local/redis/bin
mv src/redis-trib.rb /usr/local/redis/bin
#Jump to bin file
cd /usr/local/redis/bin
#Start redis without occupying the window
./redis-server ../conf/redis.conf  &
./redis-cli
#test
set aa aa
get aa
##Close the server connection
127.0.0.1:6379> shutdown
not connected> exit
#Set password
vim ./conf/redis.conf
#Modify requirepass redispass
#You can delete the source file rm -rf redis-6.2.2
1.15 installing docker
# install
yum -y install docker
# start-up
systemctl start docker.service
# Power on self start
systemctl enable docker.service
# verification
docker info
#Installation position
/var/lib/docker
#Reference articles ()
Chapter II Linux start state
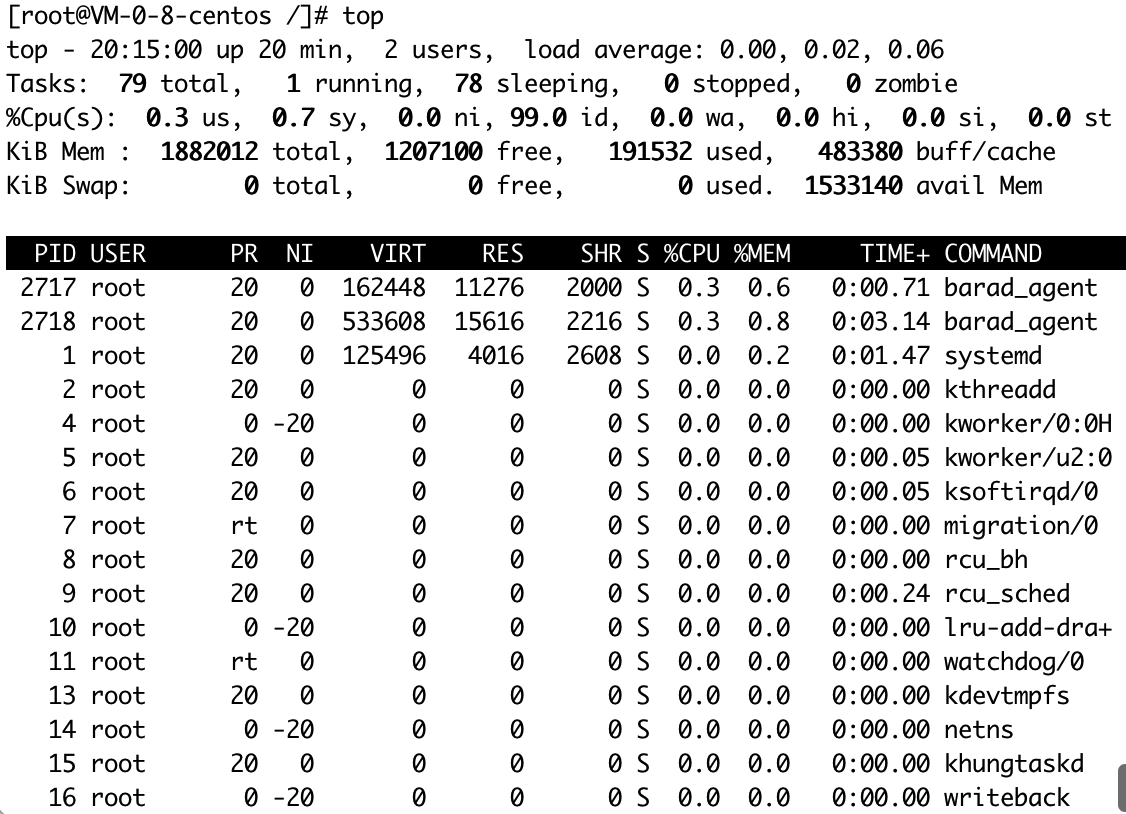
2.1 top command
2.2 free command

3.3 ip connection command
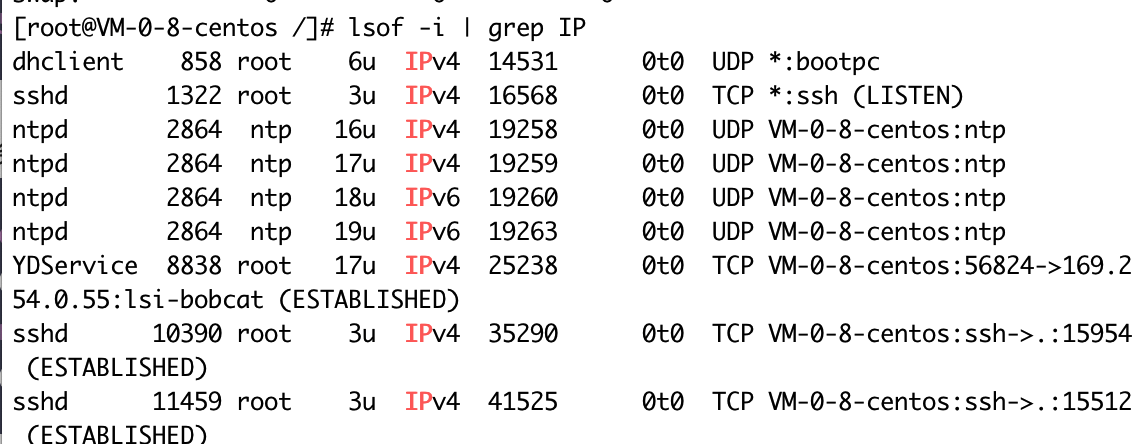
lsof -i | grep IP
3.4 initial folder
