Source: pixels
Application and practice of disk quota
What is disk quota
General purpose of disk quotas
- Limit the maximum disk quota that a user group can use
- Limit the maximum disk quota for a user
- Limit the maximum disk quota for a directory
Disk quota is a tool that provides administrators with disk utilization and allows administrators to manage disks.
Usage limit of disk quota
-
ext file system can only be used for the entire file system
xfs can set disk quotas for directories using project mode.
-
The kernel must support disk quotas
CentOS7. The X kernel is supported.
-
Only valid for general users
-
If SELinux is started, not all directories can set disk quotas
SELinux will be enabled in the new version of CentOS. In this case, only the / home directory can set the disk quota.
Specification setting options for disk quotas
For xfs file system, disk quota can be limited in these aspects:
- Users, user groups, and individual directories (user, group, and project)
- Capacity limit or number of files (block or inode)
- Soft limit and hard limit (soft/hard)
- hard: the user's usage must not exceed this value. If it exceeds this value, the user's right to use the disk will be locked and no data can be written.
- Soft: the user's disk usage can exceed this value, but will receive a warning message when logging in to the system again, and it is necessary to reduce the usage below this value within a grace time. If it still exceeds this value after the grace period, the system will replace the soft value with the value set by hard and lock the user's disk usage permission.
Disk quota practice of an xfs file system
Before actual combat, you need to prepare the environment you need to use. This is the script I wrote (refer to brother bird's private dishes):
#!/bin/bash
# add account before quota test
group_name='my_quota_group'
groupadd $group_name
accounts=('myquota1' 'myquota2' 'myquota3' 'myquota4' 'myquota5')
for account in ${accounts[@]}
do
        useradd -g $group_name $account
        echo 'password' | passwd --stdin $account
done
project_dir='/home/myquota'
mkdir $project_dir
chmod 2770 $project_dir
chgrp $group_name $project_dir
exit 0
Execute the script using the root account:
[root@xyz ~]# cd ~icexmoon/
[root@xyz icexmoon]# cd shell_scripts/
[root@xyz shell_scripts]# sh add_account.sh
 Change user myquota1 Your password.
passwd: All authentication tokens have been successfully updated.
Change user myquata2 Your password.
passwd: All authentication tokens have been successfully updated.
Change user myquota3 Your password.
passwd: All authentication tokens have been successfully updated.
Change user myquota4 Your password.
passwd: All authentication tokens have been successfully updated.
Change user myquota5 Your password.
passwd: All authentication tokens have been successfully updated.
[root@xyz shell_scripts]# grep myquota* /etc/passwd
myquota1:x:1508:1511::/home/myquota1:/bin/bash
myquota3:x:1510:1511::/home/myquota3:/bin/bash
myquota4:x:1511:1511::/home/myquota4:/bin/bash
myquota5:x:1512:1511::/home/myquota5:/bin/bash
[root@xyz shell_scripts]# grep quota /etc/group
my_quota_group:x:1511:
[root@xyz shell_scripts]# ll -d /home/myquota
drwxrws---. 2 root my_quota_group 6 8 June 23-16:57 /home/myquota
After the user, user group and project directory are configured correctly, we proceed to the next step.
Actual combat 1: file system support and viewing
Enable the disk quota function for the xfs file system where the / home directory is located:
[root@xyz shell_scripts]# vim /etc/fstab
...ellipsis...
#filesystem name                                mount point             type
...ellipsis...
/dev/mapper/centos-home                         /home                   xfs     defaults,usrquota,grpquota      0 0
...ellipsis...
[root@xyz ~]# umount /home
[root@xyz ~]# mount -a
[root@xyz ~]# mount | grep home
/dev/mapper/centos-home on /home type xfs (rw,relatime,seclabel,attr2,inode64,usrquota,grpquota)
It should be noted that when uninstalling the / home directory, you need to switch to a directory other than / home. If you switch to root through su -, the working directory of the user before switching must not be in / home, otherwise umount: /home: target busy will be displayed..
The options defaults, usrquota and grpquota added in fstab actually correspond to the disk quota restrictions mentioned earlier:
- uquota/usrquota/quota: restrictions on user accounts
- gquota/grpquota: restrictions on user groups
- pquota/prjquota: restrictions on a single directory (cannot be used in conjunction with restrictions on user groups)
Actual combat 2: view disk quota report data
You can use XFS_ The quota command checks which file systems have disk quota enabled:
[root@xyz ~]# xfs_quota -x -c 'print'
Filesystem          Pathname
/                   /dev/mapper/centos-root
/srv/myproject      /dev/sda4
/boot               /dev/sda2
/home               /dev/mapper/centos-home (uquota, gquota)
The - x parameter here is used for "expert mode". Only when this parameter is used can the - c parameter be used to execute each subcommand.
You can also view the usage of a specified file system:
[root@xyz ~]# xfs_quota -x -c 'df -h' /home
Filesystem     Size   Used  Avail Use% Pathname
/dev/mapper/centos-home
               5.0G   1.1G   3.9G  22% /home
Kind of like df-h.
To view the current disk quota settings of the file system:
[root@xyz ~]# xfs_quota -x -c 'report -ubih' /home
User quota on /home (/dev/mapper/centos-home)
                        Blocks                            Inodes
User ID      Used   Soft   Hard Warn/Grace     Used   Soft   Hard Warn/Grace
---------- --------------------------------- ---------------------------------
root            0      0      0  00 [------]      4      0      0  00 [------]
icexmoon     1.0G      0      0  00 [------]   2.8k      0      0  00 [------]
user1         20K      0      0  00 [------]     13      0      0  00 [------]
chagetest     20K      0      0  00 [------]     13      0      0  00 [------]
myuser1       20K      0      0  00 [------]     13      0      0  00 [------]
myuser2       12K      0      0  00 [------]      7      0      0  00 [------]
myuser3       12K      0      0  00 [------]      7      0      0  00 [------]
pro1          20K      0      0  00 [------]     13      0      0  00 [------]
pro2          12K      0      0  00 [------]      7      0      0  00 [------]
pro3          12K      0      0  00 [------]      7      0      0  00 [------]
myquota1      12K      0      0  00 [------]      7      0      0  00 [------]
myquata2      12K      0      0  00 [------]      7      0      0  00 [------]
myquota3      12K      0      0  00 [------]      7      0      0  00 [------]
myquota4      12K      0      0  00 [------]      7      0      0  00 [------]
myquota5      12K      0      0  00 [------]      7      0      0  00 [------]
The parameters of the subcommand report represent:
- u: User
- g: User group
- p: project
- b: block
- i: inode
- h: human, similar to the function of the h parameter in df -h.
xfs_ Almost all the quota subcommands support the above parameters.
The print quota is divided into two parts: Blocks on the left, that is, the limit on capacity, and Inodes on the right, that is, the limit on the number of files.
To view the status of the disk quota feature:
[root@xyz ~]# xfs_quota -x -c 'state' /home
User quota state on /home (/dev/mapper/centos-home)
  Accounting: ON
  Enforcement: ON
  Inode: #200363 (3 blocks, 3 extents)
Group quota state on /home (/dev/mapper/centos-home)
  Accounting: ON
  Enforcement: ON
  Inode: #200364 (3 blocks, 3 extents)
Project quota state on /home (/dev/mapper/centos-home)
  Accounting: OFF
  Enforcement: OFF
  Inode: #200364 (3 blocks, 3 extents)
Blocks grace time: [7 days]
Inodes grace time: [7 days]
Realtime Blocks grace time: [7 days]
You can see that the disk quota function of users and user groups has been turned on, And directory The disk quota function of (Project) is turned off. In addition, Accounting means the function of recording the current quota usage, and Enforcement means the processing of situations exceeding Soft or Hard. Generally speaking, it will be turned on and off at the same time, but under special circumstances, we can turn off Enforcement separately to make Accounting effective. At this time, the disk quota function Only quota overruns will be recorded, but the limit operation will not be actually performed.
Practice 3: limit value setting
Add a disk quota limit to the user previously added through the script:
[root@xyz ~]# xfs_quota -x -c 'limit -u bsoft=250M bhard=300M myquota1' /home
[root@xyz ~]# xfs_quota -x -c 'limit -u bsoft=250M bhard=300M myquota2' /home
[root@xyz ~]# xfs_quota -x -c 'limit -u bsoft=250M bhard=300M myquota3' /home
[root@xyz ~]# xfs_quota -x -c 'limit -u bsoft=250M bhard=300M myquota4' /home
[root@xyz ~]# xfs_quota -x -c 'limit -u bsoft=250M bhard=300M myquota5' /home
[root@xyz ~]# xfs_quota -x -c 'report -ubih' /home
User quota on /home (/dev/mapper/centos-home)
                        Blocks                            Inodes
User ID      Used   Soft   Hard Warn/Grace     Used   Soft   Hard Warn/Grace
---------- --------------------------------- ---------------------------------
root            0      0      0  00 [------]      4      0      0  00 [------]
icexmoon     1.0G      0      0  00 [------]   2.8k      0      0  00 [------]
user1         20K      0      0  00 [------]     13      0      0  00 [------]
chagetest     20K      0      0  00 [------]     13      0      0  00 [------]
myuser1       20K      0      0  00 [------]     13      0      0  00 [------]
myuser2       12K      0      0  00 [------]      7      0      0  00 [------]
myuser3       12K      0      0  00 [------]      7      0      0  00 [------]
pro1          20K      0      0  00 [------]     13      0      0  00 [------]
pro2          12K      0      0  00 [------]      7      0      0  00 [------]
pro3          12K      0      0  00 [------]      7      0      0  00 [------]
myquota1      12K   250M   300M  00 [------]      7      0      0  00 [------]
myquota2      12K   250M   300M  00 [------]      7      0      0  00 [------]
myquota3      12K   250M   300M  00 [------]      7      0      0  00 [------]
myquota4      12K   250M   300M  00 [------]      7      0      0  00 [------]
myquota5      12K   250M   300M  00 [------]      7      0      0  00 [------]
bsoft=250M means that the soft limit of the block is 250M, and bhard is the hard limit of the block. Correspondingly, the soft and hard limit parameters of inode are isoft and ihard.
Similarly, you can set disk quotas for user groups:
[root@xyz ~]# xfs_quota -xc 'limit -g bsoft=950M bhard=1G my_quota_group' /home
[root@xyz ~]# xfs_quota -xc 'report -gbih' /home
Group quota on /home (/dev/mapper/centos-home)
                        Blocks                            Inodes
Group ID     Used   Soft   Hard Warn/Grace     Used   Soft   Hard Warn/Grace
---------- --------------------------------- ---------------------------------
root            0      0      0  00 [------]      3      0      0  00 [------]
icexmoon     1.0G      0      0  00 [------]   2.8k      0      0  00 [------]
user1         20K      0      0  00 [------]     13      0      0  00 [------]
chagetest     20K      0      0  00 [------]     13      0      0  00 [------]
myuser1       20K      0      0  00 [------]     13      0      0  00 [------]
myuser2       12K      0      0  00 [------]      7      0      0  00 [------]
myuser3       12K      0      0  00 [------]      7      0      0  00 [------]
pro1          20K      0      0  00 [------]     13      0      0  00 [------]
pro2          12K      0      0  00 [------]      7      0      0  00 [------]
pro3          12K      0      0  00 [------]      7      0      0  00 [------]
my_quota_group    60K   950M     1G  00 [------]     36      0      0  00 [------]
If you want to modify the grace time of a disk quota, you can:
[root@xyz ~]# xfs_quota -xc 'timer -b -u 14days' /home
[root@xyz ~]# xfs_quota -xc 'timer -b -g 14days' /home
[root@xyz ~]# xfs_quota -xc 'state'
User quota state on /home (/dev/mapper/centos-home)
  Accounting: ON
  Enforcement: ON
  Inode: #200363 (3 blocks, 3 extents)
Group quota state on /home (/dev/mapper/centos-home)
  Accounting: ON
  Enforcement: ON
  Inode: #200364 (3 blocks, 3 extents)
Project quota state on /home (/dev/mapper/centos-home)
  Accounting: OFF
  Enforcement: OFF
  Inode: #200364 (3 blocks, 3 extents)
Blocks grace time: [14 days]
Inodes grace time: [7 days]
Realtime Blocks grace time: [7 days]
The time unit received by the subcommand timer is seconds by default, but some common time strings can be used, such as 14days.
Switch to myquota1 user to test:
[root@xyz ~]# su - myquota1
[myquota1@xyz ~]$ dd if=/dev/zero of=./quota_test bs=1M count=310
dd: write in"./quota_test" error: Disk quota exceeded
 Recorded 300+0 Read in
 299 were recorded+0 Writing
313524224 byte(314 MB)Copied, 1.36042 Seconds, 230 MB/second
[myquota1@xyz ~]$ ll -h
 Total consumption 299 M
-rw-r--r--. 1 myquota1 my_quota_group 299M 8 June 23-18:05 quota_test
[myquota1@xyz ~]$ exit
 Logout
[root@xyz ~]# xfs_quota -xc 'report -ubih' /home
User quota on /home (/dev/mapper/centos-home)
                        Blocks                            Inodes
User ID      Used   Soft   Hard Warn/Grace     Used   Soft   Hard Warn/Grace
---------- --------------------------------- ---------------------------------
root            0      0      0  00 [0 days]      4      0      0  00 [------]
icexmoon     1.0G      0      0  00 [------]   2.8k      0      0  00 [------]
user1         20K      0      0  00 [------]     13      0      0  00 [------]
chagetest     20K      0      0  00 [------]     13      0      0  00 [------]
myuser1       20K      0      0  00 [------]     13      0      0  00 [------]
myuser2       12K      0      0  00 [------]      7      0      0  00 [------]
myuser3       12K      0      0  00 [------]      7      0      0  00 [------]
pro1          20K      0      0  00 [------]     13      0      0  00 [------]
pro2          12K      0      0  00 [------]      7      0      0  00 [------]
pro3          12K      0      0  00 [------]      7      0      0  00 [------]
myquota1   299.0M   250M   300M  00 [13 days]     14      0      0  00 [------]
myquota2      12K   250M   300M  00 [------]      7      0      0  00 [------]
myquota3      12K   250M   300M  00 [------]      7      0      0  00 [------]
myquota4      12K   250M   300M  00 [------]      7      0      0  00 [------]
myquota5      12K   250M   300M  00 [------]      7      0      0  00 [------]
Practice 4: limitation of project
To use the project disk quota, first modify / etc/fstab and remount / home:
[root@xyz ~]# vim /etc/fstab
...ellipsis...
/dev/mapper/centos-home                         /home                   xfs     defaults,usrquota,prjquota      0 0
...ellipsis...
[root@xyz ~]# umount /home
[root@xyz ~]# mount -a
[root@xyz ~]# mount | grep /home
/dev/mapper/centos-home on /home type xfs (rw,relatime,seclabel,attr2,inode64,usrquota,prjquota)
[root@xyz ~]# xfs_quota -xc 'state' /home
User quota state on /home (/dev/mapper/centos-home)
  Accounting: ON
  Enforcement: ON
  Inode: #200363 (3 blocks, 3 extents)
Group quota state on /home (/dev/mapper/centos-home)
  Accounting: OFF
  Enforcement: OFF
  Inode: #200364 (3 blocks, 3 extents)
Project quota state on /home (/dev/mapper/centos-home)
  Accounting: ON
  Enforcement: ON
  Inode: #200364 (3 blocks, 3 extents)
Blocks grace time: [14 days]
Inodes grace time: [7 days]
Realtime Blocks grace time: [7 days]
You can see that the disk quota function of the user group has been turned off, and the disk quota related to Project has been turned on.
To configure the project disk quota, you also need to set a project disk quota_ Name and project_id:
[root@xyz ~]# echo 'myquotaproject:11' >> /etc/projid
[root@xyz ~]# echo '11:/home/myquota' >> /etc/projects
Initialize project:
[root@xyz ~]# xfs_quota -xc 'project -s myquotaproject'
Setting up project myquotaproject (path /home/myquota)...
Processed 1 (/etc/projects and cmdline) paths for project myquotaproject with recursion depth infinite (-1).
Setting up project myquotaproject (path /home/myquota)...
Processed 1 (/etc/projects and cmdline) paths for project myquotaproject with recursion depth infinite (-1).
Setting up project myquotaproject (path /home/myquota)...
Processed 1 (/etc/projects and cmdline) paths for project myquotaproject with recursion depth infinite (-1).
Setting up project myquotaproject (path /home/myquota)...
Processed 1 (/etc/projects and cmdline) paths for project myquotaproject with recursion depth infinite (-1).
In this way, one can be set up in XFS_ The project used in quota is. You can view it:
[root@xyz ~]# xfs_quota -xc 'print' /home
Filesystem          Pathname
/home               /dev/mapper/centos-home (uquota, pquota)
/home/myquota       /dev/mapper/centos-home (project 11, myquotaproject)
[root@xyz ~]# xfs_quota -xc 'report -pbih' /home
Project quota on /home (/dev/mapper/centos-home)
                        Blocks                            Inodes
Project ID   Used   Soft   Hard Warn/Grace     Used   Soft   Hard Warn/Grace
---------- --------------------------------- ---------------------------------
#0           1.3G      0      0  00 [------]   3.0k      0      0  00 [------]
myquotaproject      0      0      0  00 [------]      1      0      0  00 [------]
The subcommand print can display the directory with disk quota set in the / home directory and the corresponding method.
Next, add the disk quota limit of myquota project:
[root@xyz ~]# xfs_quota -xc 'limit -p bsoft=450M bhard=500M myquotaproject' /home
[root@xyz ~]# xfs_quota -xc 'report -pbih' /home
Project quota on /home (/dev/mapper/centos-home)
                        Blocks                            Inodes
Project ID   Used   Soft   Hard Warn/Grace     Used   Soft   Hard Warn/Grace
---------- --------------------------------- ---------------------------------
#0           1.3G      0      0  00 [------]   3.0k      0      0  00 [------]
myquotaproject      0   450M   500M  00 [------]      1      0      0  00 [------]
To test, add a 510M file in the / home/myquota Directory:
[root@xyz myquota]# dd if=/dev/zero of=./quota_test bs=1M count=510
dd: write in"./quota_test" error: There is no space on the device
 501 recorded+0 Read in
 500 recorded+0 Writing
524288000 byte(524 MB)Copied, 1.45692 Seconds, 360 MB/second
[root@xyz myquota]# df -h /home
 file system                 Capacity used available used% Mount point
/dev/mapper/centos-home  5.0G  1.9G  3.2G   38% /home
[root@xyz myquota]# xfs_quota -xc 'report -pbih' /home
Project quota on /home (/dev/mapper/centos-home)
                        Blocks                            Inodes
Project ID   Used   Soft   Hard Warn/Grace     Used   Soft   Hard Warn/Grace
---------- --------------------------------- ---------------------------------
#0           1.3G      0      0  00 [------]   3.0k      0      0  00 [------]
myquotaproject   500M   450M   500M  00 [13 days]      2      0      0  00 [------]
The limit we set does work. Even if we are currently operating with root, we cannot create files that exceed the quota.
Additional commands for disk quotas
If you need to turn off disk quota temporarily, you can:
[root@xyz myquota1]# xfs_quota -xc 'disable -up' /home
[root@xyz myquota1]# xfs_quota -xc 'state' /home
User quota state on /home (/dev/mapper/centos-home)
  Accounting: ON
  Enforcement: OFF
  Inode: #200363 (3 blocks, 3 extents)
Group quota state on /home (/dev/mapper/centos-home)
  Accounting: OFF
  Enforcement: OFF
  Inode: #200364 (3 blocks, 3 extents)
Project quota state on /home (/dev/mapper/centos-home)
  Accounting: ON
  Enforcement: OFF
  Inode: #200364 (3 blocks, 3 extents)
Blocks grace time: [14 days]
Inodes grace time: [7 days]
Realtime Blocks grace time: [7 days]
You can see that although Accounting is on, Enforcement is off, and there is no actual disk quota limit.
Actually test:
[root@xyz myquota1]# !724
dd if=/dev/zero of=./quota_test bs=1M count=510
 510 were recorded+0 Read in
 510 were recorded+0 Writing
534773760 byte(535 MB)Copied, 1.01029 Seconds, 529 MB/second
[root@xyz myquota1]# ll -h
 Total consumption 510 M
-rw-r--r--. 1 root root 510M 8 June 23-19:02 quota_test
project restrictions no longer work.
It is also easy to re enable:
[root@xyz myquota1]# xfs_quota -xc 'enable -up' /home
[root@xyz myquota1]# xfs_quota -xc 'state' /home
User quota state on /home (/dev/mapper/centos-home)
  Accounting: ON
  Enforcement: ON
  Inode: #200363 (3 blocks, 3 extents)
Group quota state on /home (/dev/mapper/centos-home)
  Accounting: OFF
  Enforcement: OFF
  Inode: #200364 (3 blocks, 3 extents)
Project quota state on /home (/dev/mapper/centos-home)
  Accounting: ON
  Enforcement: ON
  Inode: #200364 (3 blocks, 3 extents)
Blocks grace time: [14 days]
Inodes grace time: [7 days]
Realtime Blocks grace time: [7 days]
If you want to turn off disk quotas completely:
[root@xyz myquota1]# xfs_quota -xc 'off -up' /home
[root@xyz myquota1]# xfs_quota -xc 'state' /home
[root@xyz myquota1]# xfs_quota -xc 'enable' /home
XFS_QUOTAON: Function not implemented
After closing, the state subcommand will not print any information, and cannot be re enabled through enable. If you want to re enable it, you can only enable it by unloading and reloading the file system:
[root@xyz myquota1]# cd /
[root@xyz /]# umount /home
[root@xyz /]# mount -a
[root@xyz /]# xfs_quota -xc 'state' /home
User quota state on /home (/dev/mapper/centos-home)
  Accounting: ON
  Enforcement: ON
  Inode: #200363 (3 blocks, 3 extents)
Group quota state on /home (/dev/mapper/centos-home)
  Accounting: OFF
  Enforcement: OFF
  Inode: #200364 (3 blocks, 3 extents)
Project quota state on /home (/dev/mapper/centos-home)
  Accounting: ON
  Enforcement: ON
  Inode: #200364 (3 blocks, 3 extents)
Blocks grace time: [7 days]
Inodes grace time: [7 days]
Realtime Blocks grace time: [7 days]
If you want to remove a set disk quota limit:
[root@xyz /]# xfs_quota -xc 'off -up' /home
[root@xyz /]# xfs_quota -xc 'remove -p' /home
[root@xyz /]# umount /home
[root@xyz /]# mount -a
[root@xyz /]# xfs_quota -xc 'report' /home
User quota on /home (/dev/mapper/centos-home)
                               Blocks
User ID          Used       Soft       Hard    Warn/Grace
---------- --------------------------------------------------
root                0          0          0     00 [--------]
icexmoon      1091852          0          0     00 [--------]
user1              20          0          0     00 [--------]
chagetest          20          0          0     00 [--------]
myuser1            20          0          0     00 [--------]
myuser2            12          0          0     00 [--------]
myuser3            12          0          0     00 [--------]
pro1               20          0          0     00 [--------]
pro2               12          0          0     00 [--------]
pro3               12          0          0     00 [--------]
myquota1           20     256000     307200     00 [--------]
myquota2           12     256000     307200     00 [--------]
myquota3           12     256000     307200     00 [--------]
myquota4           12     256000     307200     00 [--------]
myquota5           12     256000     307200     00 [--------]

Project quota on /home (/dev/mapper/centos-home)
                               Blocks
Project ID       Used       Soft       Hard    Warn/Grace
---------- --------------------------------------------------
#0            1092048          0          0     00 [--------]
myquotaproject          0          0          0     00 [--------]
It should be noted that to use the remove subcommand, you must first use off to turn off the disk quota function. Although we only remove the relevant configuration of the project, we need to use off to turn off all the functions of the project and user. Then uninstall and reload / home to re enable the disk quota feature. Finally, you can see that the quota settings related to the project have been eliminated, while the quota settings related to the user are still there.
Do not modify the disk quota instance of the existing system
As mentioned earlier, generally, we can only use the disk quota in the / home directory, and cannot use a project quota limit for two directories, but we can achieve similar requirements through another method, such as moving a directory to a / home subdirectory configured with project quota, Then set up a soft link from the original location to the new location.
However, this setting may still be limited by SELinux. It may be necessary to close SELinux first and restart it after processing.
Software disk array
What is RAID
The full name of RAID is Redundant Arrays of Independent Disks, which translates into Redundant Arrays of Independent Disks. The general meaning should be to combine multiple independent disks to form a redundant storage system.
RAID not only has the function of data storage, but also has the function of data protection.
Raid is divided into many levels due to different functions and usage scenarios. The following are several common RAID types:
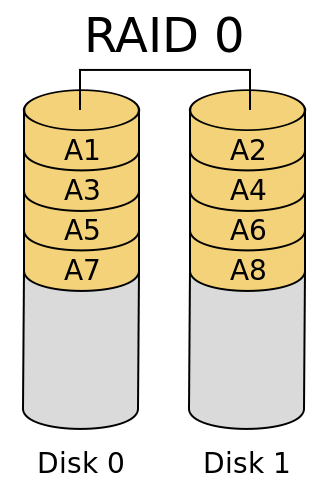
RAID0
RAID0 is easy to understand. Usually, when we buy a notebook, we will choose the model with dual channel memory. The so-called dual channel is to have two memory modules of the same model installed on the memory slot of the motherboard. In this way, the reading and writing speed of the CPU to the data in the memory will double, and the performance is naturally better than that of a notebook with single channel memory. The principle of RAID0 is the same as that of dual channel memory. By mounting more than two hard disks, when the CPU transmits the output from the data bus to disk storage, the data will be divided into multiple blocks and stored on multiple disks constituting RAID0 at the same time. If the performance of the data bus is not a bottleneck, the data transmission speed will be n times that of a single disk, and N is the number of disks constituting RAID0.
The whole RAID0 system can be represented by the following figure:
Source: What are the RAID types? What's the difference?
It should be noted that when RAID0 is stored, the data will be "evenly" stored on each disk in chunks, so it is best that each disk has the same size, because the maximum storage capacity of the whole disk column is "minimum disk capacity * N".
The advantage of RAID0 is good read-write performance, which is obvious. The disadvantages are also obvious. If you do not use RAID, you will store files sequentially. When one disk is full, you will store another. If one disk is damaged, it will only affect the data in the disk. However, after using RAID0, all data is evenly stored on each disk after segmentation, so once a disk is damaged, all data will be damaged.
RAID1
RAID0 focuses on read-write performance, while RAID1 focuses on data security.
Generally speaking, RAID1 consists of two disks. For each data written to RAID1 from the data bus, a copy will be copied while writing to one disk and saved in another disk. The whole system can be represented by the following figure:
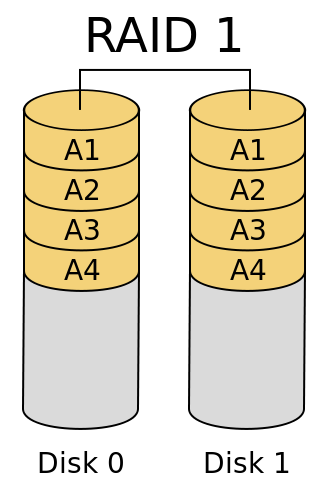
Source: What are the RAID types? What's the difference?
As a result, one disk can be seen as a mirror image of another disk.
RAID1 has obvious advantages. After one disk is damaged, the number on the other disk is still complete. They backup each other, and the probability of simultaneous damage of two disks is still very low, so it can be regarded as a data security structure. In addition, in terms of data reading, the performance is still good, because a piece of data can be read into two parts from two hard disks respectively, and the reading performance is doubled.
However, the disadvantages are also obvious. Compared with the non RAID scheme, it does not improve the data writing performance. On the contrary, it may require the South Bridge of the CPU to copy more data and transmit it through the data bus, which not only increases the burden of the CPU, but also occupies the bandwidth of the data bus, resulting in the decline of the writing performance. Of course, if the hardware disk array card is used to copy and distribute data through the chip of the array card at the end of the disk instead of the CPU and data bus, there will be no upper problems and will not significantly affect the write performance. However, on the one hand, the write speed will not be improved. On the other hand, the disk array card is very expensive.
RAID1+0(RAID10)
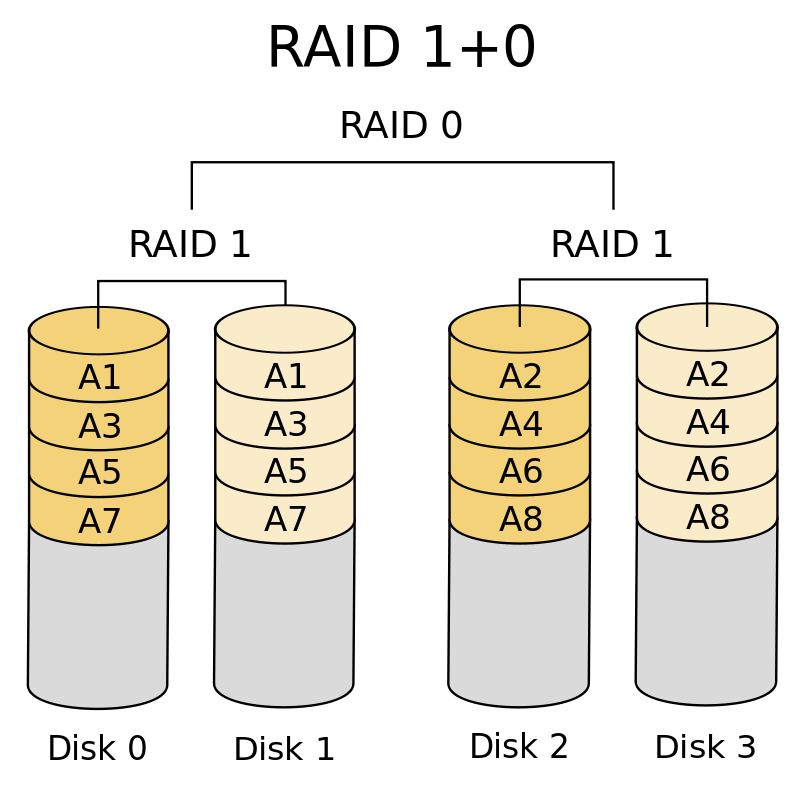
Now someone must have asked whether it can not only improve the reading and writing speed, but also have the advantages of data security.
The answer is yes. RAID1+0 is one of them. The so-called 1 + 0 is to use two hard disks to form a RAID1, that is, backup each other. Then use multiple groups of RAID1 to form a RAID0, which can naturally improve the read-write performance. If the hardware disk array card is used and the impact of RAID1 on the write speed is ignored, the read and write performance of the whole system is improved by N/2 times on the basis of data security (n is the number of disks in the whole disk array).
The whole system can be represented by the following figure:
Source: What are the RAID types? What's the difference?
This scheme has the advantages of RAID0 and RAID1 at the same time, but the disadvantage is that it requires a large number of disks, because the capacity of the whole system is "the capacity of a single disk * N/2", and half of the disks in the system are used for backup, which can be said to have a high storage cost.
RAID0+1(RAID01)
RAID0+1 and RAID1+0 are composed in reverse order. First, RAID0 is composed of one hard disk, and then two groups of RAID0 are composed of RAID1. The whole system can be represented by the following figure:

Source: What are the RAID types? What's the difference?
RAID0+1 has the same disadvantages as RAID1+0.
RAID5
RAID5 can be regarded as a compromise between RAID0 and RAID1. For each data to be written to RAID5, it will be cut into n-1 copies, and a verification data will be generated according to the N-1 copies of data. Each time the data is written, the verification data will be evenly distributed in the disk constituting RAID5. If a disk is damaged, The data on the damaged disk can be restored through the data and verification data on other N-1 disks. The whole system can be represented by the following figure:
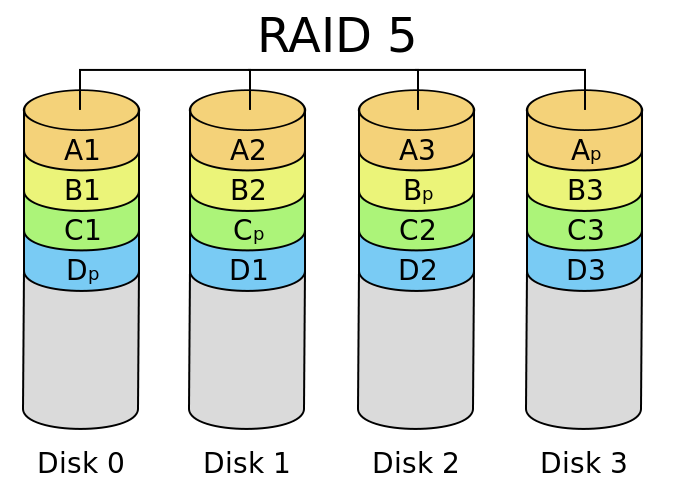
Source: What are the RAID types? What's the difference?
RAID5 has the advantages of high read-write performance (N-1 times), data security and low storage cost. The total capacity of the whole system is "capacity of a single disk * (N-1)".
The disadvantage is that if more than one disk is damaged, the data cannot be restored. However, generally speaking, the probability of simultaneous damage of two disks is almost negligible. If combined with other technologies of automatic replacement of supplementary disks, this disadvantage is considered acceptable. In addition, there is another disadvantage. The calculation of verification data consumes a lot of computing resources. If it is implemented by software instead of disk array card, it will consume some CPU computing resources.
In any case, RAID5 is a good solution. At present, many commercial storage uses RAID5.
RAID6
RAID6 can be regarded as an extended version of RAID5, but it cannot be simply regarded as a substitute for RAID5, because their shortcomings are very different, so the applicable scenarios are also different.
RAID6 will also generate verification data through calculation. The difference is that in order to solve the problem that RAID5 will cause all data damage when two hard disks are damaged, RAID6 adopts double verification: that is, two verification data are calculated using two different algorithms and evenly distributed in the disk array. Even if two hard disks are damaged at the same time, data recovery can be carried out.
A real system can be represented by the following figure:
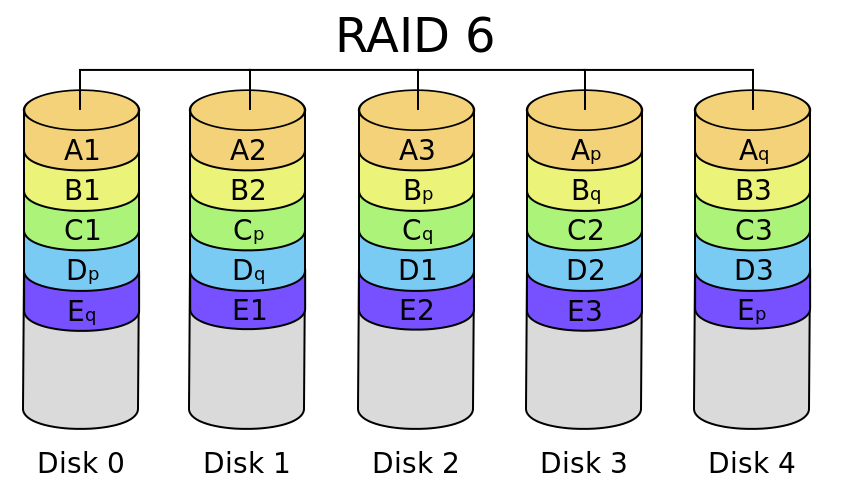
Source: What are the RAID types? What's the difference?
In the figure, Ap and Aq respectively represent the verification data calculated by two different verification algorithms.
The main advantage of RAID6 is that it has a high data security under a low storage cost, and the disadvantage is also obvious. The way to calculate the verification data is more complex than RAID5, and naturally it also needs to consume more computing resources. If it depends on CPU computing, it will be a drag on the performance of the host.
Generally speaking, RAID6 will be applied to scenarios that require a high level of data security.
Hot backup disk
When introducing RAID5, I said that because RAID5 cannot recover data when more than one disk is damaged, when one of the disks is damaged, it is necessary to replace the disk and recover the data in time. It is obviously unrealistic to have someone on duty at all times. For an operation that may not occur in a few years, but should be carried out in time once it occurs, people are obviously unreliable.
At this time, it depends on the hot backup disk. By setting a hot backup disk that is not normally used in RAID, when there is a disk problem, the system can automatically remove the problem disk, replace the location of the problem disk with the hot backup disk, and then recover the data.
RAID selection
As for the selection of different RAID schemes, my personal suggestions are:
- For unimportant personal data, such as downloaded movies and games, RAID0 can be used.
- For important personal data, such as photos, if you only have two hard drives, use RAID1. If you have more than two hard drives, use RAID5.
- Business data, using RAID5.
Hardware RAID
As we said before, raid realized by using hardware devices such as disk array cards is called hardware raid. On the contrary, raid realized by software is called software RAID.
The advantage of hardware RAID is that a separate hardware device is used to complete the verification data calculation or data replication required to form RAID, which will not affect the host performance and has good performance. The disadvantage is that it costs money
The advantage of software RAID is to save money, but the disadvantage is that there will be performance loss.
The software disk array program provided by CentOS is mdadm, which can form a disk array in partition or disk units. In other words, we can experimentally use multiple partitions to form a disk array without multiple disks. However, it should be noted that the disk array with multiple partition components of one disk can only be used for experimental simulation, and does not have the advantage of improving read-write performance.
In addition, in addition to all RAID schemes mentioned above, mdadm also supports hot plug, that is, partition replacement and data recovery without restarting the system.
Finally, it should be noted that the device file names allocated by hardware raid and software RAID are different in Linux system. Generally speaking, hardware raid will be regarded as a large physical disk, so the allocated device file name is / dev/sd[a-p]. Software RAID is realized by software, and the allocated device file names are / dev/md0, / dev/md1, etc.
Software disk array settings
Before building a disk array, we need to use partitioning tools such as gdisk to partition the partitions to be used. The specific partitioning process will not be repeated. You can refer to Linux journey 5: disk and file system management . The final partition result is as follows:
Number  Start (sector)    End (sector)  Size       Code  Name
   1            2048            6143   2.0 MiB     EF02
   2            6144         2103295   1024.0 MiB  0700
   3         2103296        65026047   30.0 GiB    8E00
   4        65026048        67123199   1024.0 MiB  8300  Linux filesystem
   5        67123200        69220351   1024.0 MiB  FD00  Linux RAID
   6        69220352        71317503   1024.0 MiB  FD00  Linux RAID
   7        71317504        73414655   1024.0 MiB  FD00  Linux RAID
   8        73414656        75511807   1024.0 MiB  FD00  Linux RAID
   9        75511808        77608959   1024.0 MiB  FD00  Linux RAID
That is, five 1G partitions are divided, of which four are used to form a disk array and one is standby.
It should be noted that when partitioning, it is best to set the GUID of the partition to fd00, that is, the Linux RAID type. Although it's not a problem to set it this way, it may not be recognized by some programs that can automatically recognize and load RAID.
Create RAID
The way to create RAID is simple:
[root@xyz ~]# mdadm --create /dev/md0 --auto=yes --level=5 --chunk=256K --raid-devices=4 --spare-devices=1 /dev/sda{5,6,7,8,9}
mdadm: Defaulting to version 1.2 metadata
mdadm: array /dev/md0 started.
The meaning of the parameter is:
- --auto=yes: refers to creating by specifying the file name of the RAID device (- - create /dev/md0).
- --level=5: indicates that the created level is RAID5.
- --chunk=256K: the smallest data unit in RAID is chunk, and the size of each chunk is 256K.
- --RAID devices = 4: the whole RAID consists of 4 devices (partitions).
- --Spare devices = 1: there is 1 hot backup device (partition).
You can view RAID information:
[root@xyz ~]# mdadm --detail /dev/md0
/dev/md0:
           Version : 1.2
     Creation Time : Tue Aug 24 14:15:21 2021
        Raid Level : raid5
        Array Size : 3139584 (2.99 GiB 3.21 GB)	# Total capacity of RAID
     Used Dev Size : 1046528 (1022.00 MiB 1071.64 MB)	# Capacity of a single device (partition)
      Raid Devices : 4	# Number of devices that make up RAID
     Total Devices : 5	# Total number of devices
       Persistence : Superblock is persistent

       Update Time : Tue Aug 24 14:15:31 2021
             State : clean	# Current RAID usage status
    Active Devices : 4	# Number of active devices
   Working Devices : 5	# Number of devices ready to use
    Failed Devices : 0	# Number of damaged devices
     Spare Devices : 1	# Number of hot backup devices

            Layout : left-symmetric
        Chunk Size : 256K	# Size of a single chunk

Consistency Policy : resync

              Name : xyz.icexmoon.centos:0  (local to host xyz.icexmoon.centos)
              UUID : 06ade86c:edac1ae0:b215697f:374ef009
            Events : 18

    Number   Major   Minor   RaidDevice State
       0       8        5        0      active sync   /dev/sda5
       1       8        6        1      active sync   /dev/sda6
       2       8        7        2      active sync   /dev/sda7
       5       8        8        3      active sync   /dev/sda8

       4       8        9        -      spare   /dev/sda9
I annotated the important information in the way of annotation.
It takes time to create a disk array. If you use mdadm --detail /dev/md0 for the first time and no information is printed, please try again later.
In addition to using the above methods to view RAID information, you can also:
[root@xyz ~]# cat /proc/mdstat
Personalities : [raid6] [raid5] [raid4]
md0 : active raid5 sda8[5] sda9[4](S) sda7[2] sda6[1] sda5[0]
      3139584 blocks super 1.2 level 5, 256k chunk, algorithm 2 [4/4] [UUUU]

unused devices: <none>
The file name of raid is clearly shown here as md0. The level is raid5. The active devices are sda8, sda9, sda7, sda6 and sda5. Where sda9 is the hot backup device. The raid numbers corresponding to the device are: [5], [4], [2], [1], [0]. There are 3139584 data blocks in total (the size of each block is 1KB), so the total capacity is 3G. There are 4 devices in total, and 4 devices are in normal operation ([4 / 4]). [UUUU] indicates the specific operation status of the 4 devices, U indicates normal operation, and indicates abnormal operation.
Formatting and mounting
Similar to using ordinary disks, we also need to format the RAID and mount it before it can be used normally:
[root@xyz ~]# mkfs.xfs -f -d su=256k,sw=3 -r extsize=768k /dev/md0
meta-data=/dev/md0               isize=512    agcount=8, agsize=98048 blks
         =                       sectsz=512   attr=2, projid32bit=1
         =                       crc=1        finobt=0, sparse=0
data     =                       bsize=4096   blocks=784384, imaxpct=25
         =                       sunit=64     swidth=192 blks
naming   =version 2              bsize=4096   ascii-ci=0 ftype=1
log      =internal log           bsize=4096   blocks=2560, version=2
         =                       sectsz=512   sunit=64 blks, lazy-count=1
realtime =none                   extsz=786432 blocks=0, rtextents=0
The method used is similar to that of formatting ordinary partitions, but it should be noted that some additional parameters should be specified here:
- -f: Force format
- -d: The following sub settings related to data
- su=256k: su is stripe unit. As mentioned earlier, RAID5 will split the data written each time into multiple copies for storage. The smallest unit split is stripe unit. This value cannot be too large or too small. It can be set according to the evaluation I/O of the system.
- sw=3: sw is the stripe width. For raid, this value is generally the number of data disks. For RAID5, it is N-1, and su*sw is the data volume of a stripe.
- -r: real_time_section_options, followed by the relevant sub settings of the real time area in the xfs file system
- extsize=768: the size of a sector in the Real time area should be a multiple of block.
Read more about stripe concepts Stripe and stripe unit in the array.
Mount as follows:
[root@xyz ~]# mkdir /srv/raid
[root@xyz ~]# mount /dev/md0 /srv/raid
[root@xyz ~]# df -h /srv/raid
 file system        Capacity used available used% Mount point
/dev/md0        3.0G   33M  3.0G    2% /srv/raid
Simulate RAID data recovery
To simulate data recovery, we need to write some data first:
[root@xyz ~]# cp -a /etc /var/log /srv/raid
[root@xyz ~]# ll /srv/raid
 Total consumption 16
drwxr-xr-x. 139 root root 8192 8 November 24:23 etc
drwxr-xr-x.  18 root root 4096 8 December 24:34 log
[root@xyz ~]# df /srv/raid
 file system         1K-Block used    Available used% Mount point
/dev/md0       3127296 105168 3022128    4% /srv/raid
Set disk to error state
Use the mdadm command to set a device to a damaged state:
[root@xyz ~]# mdadm --manage /dev/md0 --fail /dev/sda7
mdadm: set /dev/sda7 faulty in /dev/md0
[root@xyz ~]# mdadm --detail
mdadm: No devices given.
[root@xyz ~]# mdadm --detail /dev/md0
... ellipsis...
    Number   Major   Minor   RaidDevice State
       0       8        5        0      active sync   /dev/sda5
       1       8        6        1      active sync   /dev/sda6
       4       8        9        2      active sync   /dev/sda9
       5       8        8        3      active sync   /dev/sda8

       2       8        7        -      faulty   /dev/sda7
You can see that / dev/sda7 is in the fault state, and the original hot standby device dev/sda9 replaces / dev/sda7.
Because the amount of data here is relatively small, the automatic recovery speed of the system is very fast. Otherwise, it may take a long time to wait for RAID to rebuild the data.
Delete the wrong device and add it to the new device
After raid automatically uses the hot standby device to replace the damaged device, we need to remove the damaged device from raid and add a new device as the hot standby device. In the RAID system composed of real disks, this means that we need to uninstall the disk, unplug the disk body from the USB interface, insert a new disk, and then load it. But now we use partition for simulation, so we don't need physical operation.
Just execute:
[root@xyz ~]# mdadm --manage /dev/md0 --remove /dev/sda7
mdadm: hot removed /dev/sda7 from /dev/md0
[root@xyz ~]# mdadm --manage /dev/md0 --add /dev/sda7
mdadm: added /dev/sda7
[root@xyz ~]# mdadm --detail /dev/md0
/dev/md0:
...ellipsis...
    Number   Major   Minor   RaidDevice State
       0       8        5        0      active sync   /dev/sda5
       1       8        6        1      active sync   /dev/sda6
       4       8        9        2      active sync   /dev/sda9
       5       8        8        3      active sync   /dev/sda8

       6       8        7        -      spare   /dev/sda7
Boot automatically starts RAID and mounts
Most of the new Linux distributions will automatically find and load the RAID device of / dev/md[0-9] at boot time, but manual setting is still recommended.
The configuration file corresponding to mdadm is / etc / mdadm conf.
To add RAID configuration in the configuration file of mdadm, you need to query the uuid of raid first:
[root@xyz ~]# mdadm --detail /dev/md0 | grep -i uuid
              UUID : 06ade86c:edac1ae0:b215697f:374ef009
It should be noted that the UUID of RAID is different from that of the xfs file system above it.
To modify the configuration file of mdadm:
[root@xyz ~]# vim /etc/mdadm.conf
ARRAY /dev/md0 UUID=06ade86c:edac1ae0:b215697f:374ef009
Add file system auto mount:
[root@xyz ~]# blkid | grep md0
/dev/md0: UUID="873913d8-2e18-4e14-9b69-e4ee63fdb9ce" TYPE="xfs"
[root@xyz ~]# vim /etc/fstab
...ellipsis...
UUID=873913d8-2e18-4e14-9b69-e4ee63fdb9ce       /srv/raid               xfs     defaults                        0 0
...ellipsis...
[root@xyz ~]# umount /srv/raid
[root@xyz ~]# mount -a
[root@xyz ~]# mount | grep raid
/dev/md0 on /srv/raid type xfs (rw,relatime,seclabel,attr2,inode64,logbsize=256k,sunit=512,swidth=1536,noquota)
Turn off software RAID
Uninstall and delete the auto mount information in fstab first:
[root@xyz ~]# umount /srv/raid
[root@xyz ~]# vim /etc/fstab
[root@xyz ~]# mount -a
[root@xyz ~]# df
 file system                   1K-block    Used    Available used% Mount point
devtmpfs                  480712       0  480712    0% /dev
tmpfs                     497836       0  497836    0% /dev/shm
tmpfs                     497836    8556  489280    2% /run
tmpfs                     497836       0  497836    0% /sys/fs/cgroup
/dev/mapper/centos-root 10475520 6585624 3889896   63% /
/dev/sda4                1038336   32992 1005344    4% /srv/myproject
/dev/sda2                1038336  185940  852396   18% /boot
/dev/mapper/centos-home  5232640 1126540 4106100   22% /home
tmpfs                      99568      12   99556    1% /run/user/42
tmpfs                      99568       0   99568    0% /run/user/1000
Use the dd command to overwrite the metadata of RAID and the super block of xfs file system:
[root@xyz ~]# dd if=/dev/zero of=/dev/md0 bs=1M count=50
 Recorded 50+0 Read in
 Recorded 50+0 Writing
52428800 byte(52 MB)Copied, 0.514041 Seconds, 102 MB/second
[root@xyz ~]# mdadm --stop /dev/md0
mdadm: stopped /dev/md0
[root@xyz ~]# dd if=/dev/zero of=/dev/sda5 bs=1M count=10
 Ten were recorded+0 Read in
 Ten were recorded+0 Writing
10485760 byte(10 MB)Copied, 0.0335274 Seconds, 313 MB/second
[root@xyz ~]# dd if=/dev/zero of=/dev/sda6 bs=1M count=10
 Ten were recorded+0 Read in
 Ten were recorded+0 Writing
10485760 byte(10 MB)Copied, 0.0201498 Seconds, 520 MB/second
[root@xyz ~]# dd if=/dev/zero of=/dev/sda7 bs=1M count=10
 Ten were recorded+0 Read in
 Ten were recorded+0 Writing
10485760 byte(10 MB)Copied, 0.0209833 Seconds, 500 MB/second
[root@xyz ~]# dd if=/dev/zero of=/dev/sda8 bs=1M count=10
 Ten were recorded+0 Read in
 Ten were recorded+0 Writing
10485760 byte(10 MB)Copied, 0.042459 Seconds, 247 MB/second
[root@xyz ~]# dd if=/dev/zero of=/dev/sda9 bs=1M count=10
 Ten were recorded+0 Read in
 Ten were recorded+0 Writing
10485760 byte(10 MB)Copied, 0.0181525 Seconds, 578 MB/second
[root@xyz ~]# cat /proc/mdstat
Personalities : [raid6] [raid5] [raid4]
unused devices: <none>
[root@xyz ~]# vim /etc/mdadm.conf
The reason why RAID is turned off by writing an empty file in dd to overwrite the super block is that some Linux distributions can automatically identify and load devices that have been organized into RAID.
Finally, you need to modify the mdadm configuration file to delete the RAID configuration.
Logical Volume Manager
LVM can flexibly adjust the capacity of the file system. By consolidating multiple disks, these disks look like one disk. You can also dynamically delete or add a physical disk to the disk managed by LVM in the future.
Related concepts of LVM
PV (Physical Volume)
PV is the lowest part of LVM. The partition (or disk) needs to modify the system ID to 8e (LVM identifier), and then use pvcreate to convert it to PV.
VG (Volume Group)
Multiple PV S can form a VG, which is the "big disk" created by LVM.
PE (physical extension)
LVM is the smallest unit of stored data.
LV (Logical Volume)
Finally, we need to cut the VG into multiple LVS before they can be formatted and used. LVS are like VG partitions.
The size of LV is related to the total number of PE s in it. The device name of LV is usually / dev/vgname/lvname.
LV can realize "PE exchange", that is, PE in LV can be moved to other devices to reduce capacity, or PE can be moved from other devices to increase capacity.
LVM usage process
The use process of the whole LVM can be represented by the following figure:
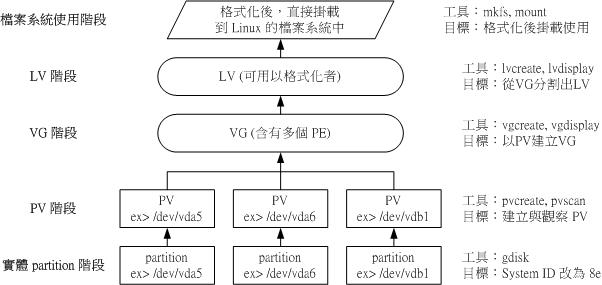
Source: Bird's private dishes
Some people may notice that the way to integrate multiple physical disks into a logically large disk is somewhat similar to RAID0. In fact, LVM can be used in two ways:
-
linear mode:
The default mode of LVM will write data linearly in turn in the disks that make up LVM, so it will not improve the read-write performance.
-
Staggered mode:
Similar to RAID0, data will be split and written to multiple disks constituting LVM at the same time, which also has the effect of improving read-write performance.
Although interleaving mode can make LVM have the advantages of Raid0, it also has the disadvantages of Raid0. In addition, unlike RAID, the main purpose of LVM is to combine multiple disks and flexibly adjust capacity, rather than improve read-write performance, so interleaving mode is not recommended.
LVM actual combat
Actual combat 0: prepare partition
The partition to be converted to PV needs to be prepared first, and the final partition is as follows:
Number  Start (sector)    End (sector)  Size       Code  Name
   1            2048            6143   2.0 MiB     EF02
   2            6144         2103295   1024.0 MiB  0700
   3         2103296        65026047   30.0 GiB    8E00
   4        65026048        67123199   1024.0 MiB  8300  Linux filesystem
   5        67123200        69220351   1024.0 MiB  8E00  Linux LVM
   6        69220352        71317503   1024.0 MiB  8E00  Linux LVM
   7        71317504        73414655   1024.0 MiB  8E00  Linux LVM
   8        73414656        75511807   1024.0 MiB  8E00  Linux LVM
   9        75511808        77608959   1024.0 MiB  8E00  Linux LVM
You can modify the partition type by entering the command T > 5 > 8e00 in gdisk.
Practice 1: create PV
Creating a PV is simple:
[root@xyz ~]# pvscan
  PV /dev/sda3   VG centos          lvm2 [30.00 GiB / 14.00 GiB free]
  Total: 1 [30.00 GiB] / in use: 1 [30.00 GiB] / in no VG: 0 [0   ]
[root@xyz ~]# pvcreate /dev/sda{5,6,7,8}
  Physical volume "/dev/sda5" successfully created.
  Physical volume "/dev/sda6" successfully created.
  Physical volume "/dev/sda7" successfully created.
  Physical volume "/dev/sda8" successfully created.
[root@xyz ~]# pvscan
  PV /dev/sda3   VG centos          lvm2 [30.00 GiB / 14.00 GiB free]
  PV /dev/sda8                      lvm2 [1.00 GiB]
  PV /dev/sda5                      lvm2 [1.00 GiB]
  PV /dev/sda6                      lvm2 [1.00 GiB]
  PV /dev/sda7                      lvm2 [1.00 GiB]
  Total: 5 [34.00 GiB] / in use: 1 [30.00 GiB] / in no VG: 4 [4.00 GiB]
To view the details of a specific PV, you can:
[root@xyz ~]# pvdisplay /dev/sda5
  "/dev/sda5" is a new physical volume of "1.00 GiB"
  --- NEW Physical volume ---
  PV Name               /dev/sda5
  VG Name
  PV Size               1.00 GiB
  Allocatable           NO	# Has it been assigned to VG
  PE Size               0	# PE size
  Total PE              0	# How many PE S can be divided
  Free PE               0
  Allocated PE          0	# PE that can be assigned
  PV UUID               spO7yF-5HpV-GTHW-1MQP-T02w-GzO8-OE30vq
Specific PE settings can only be generated when they are divided into VGS (the PE in VG is the same size), so the PE related information here is 0.
Practice 2: create VG
VG can be created by using the command vgcreate:
[root@xyz ~]# vgcreate -s 16M myvg /dev/sda{5,6,7}
  Volume group "myvg" successfully created
[root@xyz ~]# vgscan
  Reading volume groups from cache.
  Found volume group "myvg" using metadata type lvm2
  Found volume group "centos" using metadata type lvm2
[root@xyz ~]# pvscan
  PV /dev/sda5   VG myvg            lvm2 [1008.00 MiB / 1008.00 MiB free]
  PV /dev/sda6   VG myvg            lvm2 [1008.00 MiB / 1008.00 MiB free]
  PV /dev/sda7   VG myvg            lvm2 [1008.00 MiB / 1008.00 MiB free]
  PV /dev/sda3   VG centos          lvm2 [30.00 GiB / 14.00 GiB free]
  PV /dev/sda8                      lvm2 [1.00 GiB]
  Total: 5 [33.95 GiB] / in use: 4 [32.95 GiB] / in no VG: 1 [1.00 GiB]
[root@xyz ~]# pvdisplay /dev/sda5
  --- Physical volume ---
  PV Name               /dev/sda5
  VG Name               myvg
  PV Size               1.00 GiB / not usable 16.00 MiB
  Allocatable           yes
  PE Size               16.00 MiB
  Total PE              63
  Free PE               63
  Allocated PE          0
  PV UUID               spO7yF-5HpV-GTHW-1MQP-T02w-GzO8-OE30vq
The - s parameter (size) of vgcreate specifies the size of PE in VG.
If you want to add unallocated PV to VG, you can:
[root@xyz ~]# pvscan
  PV /dev/sda5   VG myvg            lvm2 [1008.00 MiB / 1008.00 MiB free]
  PV /dev/sda6   VG myvg            lvm2 [1008.00 MiB / 1008.00 MiB free]
  PV /dev/sda7   VG myvg            lvm2 [1008.00 MiB / 1008.00 MiB free]
  PV /dev/sda3   VG centos          lvm2 [30.00 GiB / 14.00 GiB free]
  PV /dev/sda8                      lvm2 [1.00 GiB]
  Total: 5 [33.95 GiB] / in use: 4 [32.95 GiB] / in no VG: 1 [1.00 GiB]
[root@xyz ~]# vgextend myvg /dev/sda8
  Volume group "myvg" successfully extended
[root@xyz ~]# pvscan
  PV /dev/sda5   VG myvg            lvm2 [1008.00 MiB / 1008.00 MiB free]
  PV /dev/sda6   VG myvg            lvm2 [1008.00 MiB / 1008.00 MiB free]
  PV /dev/sda7   VG myvg            lvm2 [1008.00 MiB / 1008.00 MiB free]
  PV /dev/sda8   VG myvg            lvm2 [1008.00 MiB / 1008.00 MiB free]
  PV /dev/sda3   VG centos          lvm2 [30.00 GiB / 14.00 GiB free]
  Total: 5 [<33.94 GiB] / in use: 5 [<33.94 GiB] / in no VG: 0 [0   ]
Actual combat 3: dividing LV
To divide LV from VG:
[root@xyz ~]# lvcreate -L 2G -n mylv1 myvg
  Logical volume "mylv1" created.
The parameter - L is used to specify the size of the divided LV, and - n is the name of the new Lv.
If you want to view the LV created:
[root@xyz ~]# lvscan
  ACTIVE            '/dev/myvg/mylv1' [2.00 GiB] inherit
  ACTIVE            '/dev/centos/swap' [1.00 GiB] inherit
  ACTIVE            '/dev/centos/home' [5.00 GiB] inherit
  ACTIVE            '/dev/centos/root' [10.00 GiB] inherit
If you want to view the details of LV, you can:
[root@xyz ~]# lvdisplay /dev/myvg/mylv1
  --- Logical volume ---
  LV Path                /dev/myvg/mylv1
  LV Name                mylv1
  VG Name                myvg
  LV UUID                knGtsK-OGld-4yDc-h3Up-nuuL-xMwq-MOqKOz
  LV Write Access        read/write
  LV Creation host, time xyz.icexmoon.centos, 2021-08-24 16:55:01 +0800
  LV Status              available
  # open                 0
  LV Size                2.00 GiB
  Current LE             128
  Segments               3
  Allocation             inherit
  Read ahead sectors     auto
  - currently set to     8192
  Block device           253:3
Actual combat 4: format
The format of LV is exactly the same as that of ordinary partitions:
[root@xyz ~]# mkfs.xfs /dev/myvg/mylv1
meta-data=/dev/myvg/mylv1        isize=512    agcount=4, agsize=131072 blks
         =                       sectsz=512   attr=2, projid32bit=1
         =                       crc=1        finobt=0, sparse=0
data     =                       bsize=4096   blocks=524288, imaxpct=25
         =                       sunit=0      swidth=0 blks
naming   =version 2              bsize=4096   ascii-ci=0 ftype=1
log      =internal log           bsize=4096   blocks=2560, version=2
         =                       sectsz=512   sunit=0 blks, lazy-count=1
realtime =none                   extsz=4096   blocks=0, rtextents=0
[root@xyz ~]# mkdir /srv/lvm
[root@xyz ~]# mount /dev/myvg/mylv1 /srv/lvm
[root@xyz ~]# df -Th /srv/lvm
 file system               Type capacity used available used% Mount point
/dev/mapper/myvg-mylv1 xfs   2.0G   33M  2.0G    2% /srv/lvm
[root@xyz ~]# cp -a /etc /var/log /srv/lvm
[root@xyz ~]# df -Th /srv/lvm
 file system               Type capacity used available used% Mount point
/dev/mapper/myvg-mylv1 xfs   2.0G  102M  1.9G    6% /srv/lvm
It can be seen that although the underlying layer uses multiple 1G sized partitions, the LV created through LVM can be 2G in size.
Enlarge LV capacity
As mentioned earlier, one of the advantages of using LVM is that it can flexibly adjust the capacity. Specifically, if you want to expand the file system on an LV, you need the following steps:
-
VG has remaining capacity
If not, the VG can be expanded by adding PV and adding new PV with vgextend command.
-
LV has more available capacity
If not, you can use the lvresize command to expand the LV.
-
File system stage zoom in
If it is an xfs file system, you need to use xfs_ The growfs command enlarges the xfs file system to identify the newly added capacity.
At present, xfs file system can only be enlarged, not reduced.
[root@xyz ~]# lvdisplay /dev/myvg/mylv1 | grep vg
  LV Path                /dev/myvg/mylv1
  VG Name                myvg
[root@xyz ~]# vgdisplay myvg | grep -i free
  Free  PE / Size       124 / <1.94 GiB
[root@xyz ~]# lvresize -L +500M /dev/myvg/mylv1
  Rounding size to boundary between physical extents: 512.00 MiB.
  Size of logical volume myvg/mylv1 changed from 2.00 GiB (128 extents) to 2.50 GiB (160 extents).
  Logical volume myvg/mylv1 successfully resized.
[root@xyz ~]# lvdisplay /dev/myvg/mylv1 | grep -i size
  LV Size                2.50 GiB
The lvresize command does not need to specify the VG to which the LV belongs. It will automatically expand the capacity from the rest of the VG.
However, if you view the file system size at this time:
[root@xyz ~]# df -Th /srv/lvm
 file system               Type capacity used available used% Mount point
/dev/mapper/myvg-mylv1 xfs   2.0G  102M  1.9G    5% /srv/lvm
The file system does not automatically recognize the newly added part of LV, so you need to:
[root@xyz ~]# xfs_growfs /srv/lvm
meta-data=/dev/mapper/myvg-mylv1 isize=512    agcount=4, agsize=131072 blks
         =                       sectsz=512   attr=2, projid32bit=1
         =                       crc=1        finobt=0 spinodes=0
data     =                       bsize=4096   blocks=524288, imaxpct=25
         =                       sunit=0      swidth=0 blks
naming   =version 2              bsize=4096   ascii-ci=0 ftype=1
log      =internal               bsize=4096   blocks=2560, version=2
         =                       sectsz=512   sunit=0 blks, lazy-count=1
realtime =none                   extsz=4096   blocks=0, rtextents=0
data blocks changed from 524288 to 655360
[root@xyz ~]# df -Th /srv/lvm
 file system               Type capacity used available used% Mount point
/dev/mapper/myvg-mylv1 xfs   2.5G  102M  2.4G    4% /srv/lvm
Using LVM thin Volume
Although LV can be flexibly expanded in theory, as we said before, xfs file system itself can only be expanded and cannot be compressed, which means that if we allocate a large space to one LV at the beginning, but after using it for a period of time, we find that it does not need to be so large, on the contrary, another LV needs more space, It's embarrassing (if you're still using the xfs file system).
LVM thin Volume gives us an additional option, We can create a disk capacity storage pool first (thin pool), and then use this storage pool to generate an Lv of a specified size. The interesting thing about this scheme is that we can arbitrarily specify the size of the LV generated by the storage pool. Even if it exceeds the size of the storage pool, it is allowed, but in fact, the space actually occupied is the size of the data stored on it, that is, how much it is used, and All space comes from the storage pool. If you want to continue to store more data, continue to request space from the storage pool.
This is undoubtedly more flexible.
Let's look at how to create. First query the remaining space of VG, and then create a thin pool:
[root@xyz ~]# vgdisplay myvg | grep -i free
  Free  PE / Size       92 / <1.44 GiB
[root@xyz ~]# lvcreate -L 1G -T myvg/mythinpool
  Thin pool volume with chunk size 64.00 KiB can address at most 15.81 TiB of data.
  Logical volume "mythinpool" created.
[root@xyz ~]# lvdisplay myvg/mythinpool
  --- Logical volume ---
  LV Name                mythinpool
  VG Name                myvg
  LV UUID                PBsWgG-CoL5-Xcnl-VuvW-BJaS-2AWq-OkEwhB
  LV Write Access        read/write
  LV Creation host, time xyz.icexmoon.centos, 2021-08-24 20:41:24 +0800
  LV Pool metadata       mythinpool_tmeta
  LV Pool data           mythinpool_tdata
  LV Status              available
  # open                 0
  LV Size                1.00 GiB
  Allocated pool data    0.00%	# Percentage of allocated capacity
  Allocated metadata     10.23% # Percentage of metadata allocated
  Current LE             64
  Segments               1
  Allocation             inherit
  Read ahead sectors     auto
  - currently set to     8192
  Block device           253:6
From the information of thin pool, you can see the information related to capacity allocation, which means that thin pool, as a special LV, can allocate capacity again (just like VG).
You can view all lvs in VG through the command lvs:
[root@xyz ~]# lvs myvg
  LV         VG   Attr       LSize Pool Origin Data%  Meta%  Move Log Cpy%Sync Convert
  mylv1      myvg -wi-ao---- 2.50g
  mythinpool myvg twi-a-tz-- 1.00g             0.00   10.23
The output information also contains information about capacity allocation such as Data% and Meta%.
Next, create a new LV using thin pool:
[root@xyz ~]# lvcreate -V 10G -T myvg/mythinpool -n poollv1
  WARNING: Sum of all thin volume sizes (10.00 GiB) exceeds the size of thin pool myvg/mythinpool and the size of whole volume group (<3.94 GiB).
  WARNING: You have not turned on protection against thin pools running out of space.
  WARNING: Set activation/thin_pool_autoextend_threshold below 100 to trigger automatic extension of thin pools before they get full.
  Logical volume "poollv1" created.
Parameter - V (virtual size) specifies a virtual size for LV, and parameter - T specifies the thin pool to which LV belongs.
You can see that many warning messages appear when creating this Lv. This is because the created LV exceeds the actual size of the thin pool, which is unsafe. If the actual amount of data used by the created LV exceeds 1G of the maximum capacity of the thin pool, data corruption will occur and bring some unstable factors, Unless we expand the thin pool before that.
Format and mount LV as follows:
[root@xyz ~]# mkfs.xfs /dev/myvg/poollv1
Discarding blocks...Done.
meta-data=/dev/myvg/poollv1      isize=512    agcount=16, agsize=163840 blks
         =                       sectsz=512   attr=2, projid32bit=1
         =                       crc=1        finobt=0, sparse=0
data     =                       bsize=4096   blocks=2621440, imaxpct=25
         =                       sunit=16     swidth=16 blks
naming   =version 2              bsize=4096   ascii-ci=0 ftype=1
log      =internal log           bsize=4096   blocks=2560, version=2
         =                       sectsz=512   sunit=16 blks, lazy-count=1
realtime =none                   extsz=4096   blocks=0, rtextents=0
[root@xyz ~]# mkdir /srv/poollv
[root@xyz ~]# mount /dev/myvg/poollv1 /srv/poollv
[root@xyz ~]# df -h /srv/poollv
 file system                  Capacity used available used% Mount point
/dev/mapper/myvg-poollv1   10G   33M   10G    1% /srv/poollv
Next, create a 500M file on the LV for testing (no more than 1G):
[root@xyz poollv]# dd if=/dev/zero of=pool_test bs=1M count=500
 500 recorded+0 Read in
 500 recorded+0 Writing
524288000 byte(524 MB)Copied, 8.6242 Seconds, 60.8 MB/second
[root@xyz poollv]# ll -h
 Total consumption 500 M
-rw-r--r--. 1 root root 500M 8 April 24-21:04 pool_test
[root@xyz poollv]# lvs myvg
  LV         VG   Attr       LSize  Pool       Origin Data%  Meta%  Move Log Cpy%Sync Convert
  mylv1      myvg -wi-ao----  2.50g
  mythinpool myvg twi-aotz--  1.00g                   49.92  11.82
  poollv1    myvg Vwi-aotz-- 10.00g mythinpool        4.99
It can be seen that although poolv1 shows that only 4.99% of the capacity is used, 49.92% of the capacity of mythinpool has been used. It can be seen that the standard capacity (10G) of poolv1 is indeed false.
Using this feature of thin pool, we can create multiple LVS in one thin pool, so that we can use disk space more efficiently, as long as we ensure that the total amount of data actually stored by all LVS does not exceed thin pool. To some extent, this can avoid the embarrassment that the PV of an xfs file system has too much remaining space but cannot compress space.
LV disk snapshot
LVM has an interesting function: snapshot LV.
The so-called snapshot records the data status on the LV at a certain moment to generate a snapshot, and then all subsequent data modifications will move the original data into the storage space of the snapshot, while the unchanged data will still be stored in the original storage, but the snapshot will "reference" it.
Through this mechanism, less space can be used to reserve the LV data "backup" at a certain time. It should be noted that it is not really a complete data backup, but more like the concept of "view" in the programming field, which only provides us with a way to "observe" the data at that moment.
The relationship between the snapshot and the LV generating the snapshot can be represented by the following figure:

Source: Bird's private dishes
Because the principle of snapshot will use "PE exchange", the snapshot should be under the same VG as the LV generating the snapshot.
In addition, if disk storage pool is involved, there will be some other restrictions. There is no more discussion here, only ordinary LV snapshots are discussed.
Let's create a snapshot:
[root@xyz poollv]# vgdisplay myvg | grep -i free
  Free  PE / Size       26 / 416.00 MiB
[root@xyz poollv]# lvcreate -s -l 26 -n mysnap1 /dev/myvg/mylv1
  WARNING: Sum of all thin volume sizes (10.00 GiB) exceeds the size of thin pools and the size of whole volume group (<3.94 GiB).
  WARNING: You have not turned on protection against thin pools running out of space.
  WARNING: Set activation/thin_pool_autoextend_threshold below 100 to trigger automatic extension of thin pools before they get full.
  Logical volume "mysnap1" created.
Here myvg only 26 PE S remain, all of which are used to create snapshots.
The - s parameter in the lvcreate command means snap, that is, a snapshot is created- L specify 26 PE S for.
You can view the details of the snapshot:
[root@xyz poollv]# lvdisplay /dev/myvg//mysnap1
  --- Logical volume ---
  LV Path                /dev/myvg/mysnap1
  LV Name                mysnap1
  VG Name                myvg
  LV UUID                igMos9-hlmT-UQcQ-wMq7-IqUE-GvJC-7gbs2M
  LV Write Access        read/write
  LV Creation host, time xyz.icexmoon.centos, 2021-08-24 21:25:34 +0800
  LV snapshot status     active destination for mylv1
  LV Status              available
  # open                 0
  LV Size                2.50 GiB # The capacity of the LV that generated the snapshot
  Current LE             160
  COW-table size         416.00 MiB	# Capacity of snapshot area
  COW-table LE           26
  Allocated to snapshot  0.01% # Used capacity of snapshot area
  Snapshot chunk size    4.00 KiB
  Segments               1
  Allocation             inherit
  Read ahead sectors     auto
  - currently set to     8192
  Block device           253:11
Because of the principle mentioned earlier, although the actual capacity occupied by the snapshot itself may be much smaller than the LV generating the snapshot, the snapshot can provide a function similar to "window" to let us see the complete content of the LV at the moment of generating the snapshot. Now let's mount the snapshot and try:
[root@xyz poollv]# mkdir /srv/snapshot1
[root@xyz poollv]# mount -o nouuid /dev/myvg/mysnap1 /srv/snapshot1
[root@xyz poollv]# ll /srv/snapshot1/
Total consumption 16
drwxr-xr-x. 139 root root 8192 8 June 24-16:08 etc
drwxr-xr-x.  18 root root 4096 8 December 24:34 log
[root@xyz poollv]# df -h /srv/snapshot1/
file system                  Capacity used available used% Mount point
/dev/mapper/myvg-mysnap1  2.5G  102M  2.4G    4% /srv/snapshot1
It can be seen that both the capacity and usage of the file system and the data in the actual directory are consistent with the data in the LV when we snapshot the Lv.
It should be noted that the - o nouuid parameter needs to be used when mounting the snapshot, because the UUID of the snapshot file system is exactly the same as that of the LV file system being snapshot, so you must use this parameter to ignore the UUID before mounting.
One purpose of snapshot is to use it as a backup to restore data when needed.
First modify the data in the LV to be snapshot:
[root@xyz poollv]# cp -a /usr/share/doc /srv/lvm
[root@xyz poollv]# rm -rf /srv/lvm/log
[root@xyz poollv]# rm -rf /srv/lvm/etc/sysconfig
[root@xyz poollv]# df -Th /srv/lvm /srv/snapshot1/
file system                 Type capacity used available used% Mount point
/dev/mapper/myvg-mylv1   xfs   2.5G  175M  2.4G    7% /srv/lvm
/dev/mapper/myvg-mysnap1 xfs   2.5G  102M  2.4G    4% /srv/snapshot1
[root@xyz poollv]# ll /srv/lvm /srv/snapshot1/
/srv/lvm:
Total dosage 60
drwxr-xr-x. 931 root root 32768 8 June 20:53 doc
drwxr-xr-x. 138 root root  8192 8 April 24-21:41 etc

/srv/snapshot1/:
Total consumption 16
drwxr-xr-x. 139 root root 8192 8 June 24-16:08 etc
drwxr-xr-x.  18 root root 4096 8 December 24:34 log
[root@xyz poollv]# lvdisplay /dev/myvg/mysnap1
  --- Logical volume ---
  LV Path                /dev/myvg/mysnap1
  LV Name                mysnap1
  VG Name                myvg
  LV UUID                igMos9-hlmT-UQcQ-wMq7-IqUE-GvJC-7gbs2M
  LV Write Access        read/write
  LV Creation host, time xyz.icexmoon.centos, 2021-08-24 21:25:34 +0800
  LV snapshot status     active destination for mylv1
  LV Status              available
  # open                 1
  LV Size                2.50 GiB
  Current LE             160
  COW-table size         416.00 MiB
  COW-table LE           26
  Allocated to snapshot  24.63%
  Snapshot chunk size    4.00 KiB
  Segments               1
  Allocation             inherit
  Read ahead sectors     auto
  - currently set to     8192
  Block device           253:11
You can see that the data in mylv1 has changed, and the changed data has been moved to the snapshot, so the capacity used by the snapshot has increased (24.63%).
As we said, a snapshot is only a "view" and cannot be directly restored in the way of data coverage, so we need to use the snapshot to make a complete backup file first:
[root@xyz poollv]# xfsdump -l 0 -L lvm1 -M lvm1 -f /home/lvm.dump /srv/snapshot1
xfsdump: using file dump (drive_simple) strategy
xfsdump: version 3.1.7 (dump format 3.0) - type ^C for status and control
xfsdump: level 0 dump of xyz.icexmoon.centos:/srv/snapshot1
xfsdump: dump date: Tue Aug 24 21:47:01 2021
xfsdump: session id: 5f78be5f-bc06-424d-b002-0642a174b555
xfsdump: session label: "lvm1"
xfsdump: ino map phase 1: constructing initial dump list
xfsdump: ino map phase 2: skipping (no pruning necessary)
xfsdump: ino map phase 3: skipping (only one dump stream)
xfsdump: ino map construction complete
xfsdump: estimated dump size: 72060992 bytes
xfsdump: creating dump session media file 0 (media 0, file 0)
xfsdump: dumping ino map
xfsdump: dumping directories
xfsdump: dumping non-directory files
xfsdump: ending media file
xfsdump: media file size 66677872 bytes
xfsdump: dump size (non-dir files) : 64217144 bytes
xfsdump: dump complete: 8 seconds elapsed
xfsdump: Dump Summary:
xfsdump:   stream 0 /home/lvm.dump OK (success)
xfsdump: Dump Status: SUCCESS
Then use this backup file to restore:
[root@xyz poollv]# umount /srv/snapshot1
[root@xyz poollv]# lvremove /dev/myvg/mysnap1
Do you really want to remove active logical volume myvg/mysnap1? [y/n]: y
  Logical volume "mysnap1" successfully removed
[root@xyz poollv]# umount /srv/lvm
[root@xyz poollv]# mkfs.xfs -f /dev/myvg/mylv1
meta-data=/dev/myvg/mylv1        isize=512    agcount=4, agsize=163840 blks
         =                       sectsz=512   attr=2, projid32bit=1
         =                       crc=1        finobt=0, sparse=0
data     =                       bsize=4096   blocks=655360, imaxpct=25
         =                       sunit=0      swidth=0 blks
naming   =version 2              bsize=4096   ascii-ci=0 ftype=1
log      =internal log           bsize=4096   blocks=2560, version=2
         =                       sectsz=512   sunit=0 blks, lazy-count=1
realtime =none                   extsz=4096   blocks=0, rtextents=0
[root@xyz poollv]# mount /dev/myvg/mylv1 /srv/lvm
[root@xyz poollv]# xfsrestore -f /home/lvm.dump -L lvm1 /srv/lvm
xfsrestore: using file dump (drive_simple) strategy
xfsrestore: version 3.1.7 (dump format 3.0) - type ^C for status and control
xfsrestore: using online session inventory
xfsrestore: searching media for directory dump
xfsrestore: examining media file 0
xfsrestore: reading directories
xfsrestore: 769 directories and 3724 entries processed
xfsrestore: directory post-processing
xfsrestore: restoring non-directory files
xfsrestore: restore complete: 1 seconds elapsed
xfsrestore: Restore Summary:
xfsrestore:   stream 0 /home/lvm.dump OK (success)
xfsrestore: Restore Status: SUCCESS
[root@xyz poollv]# ll /srv/lvm
 Total consumption 16
drwxr-xr-x. 139 root root 8192 8 June 24-16:08 etc
drwxr-xr-x.  18 root root 4096 8 December 24:34 log
Because the snapshot itself will affect our restore of mylv1, we need to uninstall and remove the snapshot first. Then uninstall and format mylv1, then load it again, and restore it using a backup.
In addition to the above purposes, in fact, the snapshot can also be used to create a teaching environment. For example, we can use Lv to create a complete practice environment, then take a snapshot of the LV, create multiple snapshots and provide them to students for practice. No matter how students play, they can only delete the snapshot and create another one even if it is broken.
Closing of LVM
The closing and deletion of LVM related content is also very simple. The order is roughly the reverse of the creation order:
[root@xyz /]# umount /srv/poollv /srv/lvm
[root@xyz /]# lvs
  LV         VG     Attr       LSize  Pool       Origin Data%  Meta%  Move Log Cpy%Sync Convert
  home       centos -wi-ao----  5.00g
  root       centos -wi-ao---- 10.00g
  swap       centos -wi-ao----  1.00g
  mylv1      myvg   -wi-a-----  2.50g
  mythinpool myvg   twi-aotz--  1.00g                   49.92  11.82
  poollv1    myvg   Vwi-a-tz-- 10.00g mythinpool        4.99
[root@xyz /]# lvremove myvg/poollv1
Do you really want to remove active logical volume myvg/poollv1? [y/n]: y
  Logical volume "poollv1" successfully removed
[root@xyz /]# lvremove myvg/mythinpool
Do you really want to remove active logical volume myvg/mythinpool? [y/n]: y
  Logical volume "mythinpool" successfully removed
[root@xyz /]# lvremove myvg/mylv1
Do you really want to remove active logical volume myvg/mylv1? [y/n]: y
  Logical volume "mylv1" successfully removed
[root@xyz /]# vgchange -a n myvg
  0 logical volume(s) in volume group "myvg" now active
[root@xyz /]# vgremove myvg
  Volume group "myvg" successfully removed
[root@xyz /]# pvremove /dev/sda{5,6,7,8}
  Labels on physical volume "/dev/sda5" successfully wiped.
  Labels on physical volume "/dev/sda6" successfully wiped.
  Labels on physical volume "/dev/sda7" successfully wiped.
  Labels on physical volume "/dev/sda8" successfully wiped.
Finally, change the type of 5 ~ 8 partitions back to Linux filesystem, and it will return to the same as before the establishment of LVM.
The above is the content related to disk management. Thank you for reading.