Timer is the most commonly used function. It is generally used to complete the timing function. In this chapter, we will learn the timer API functions provided by the Linux kernel. Through these timer API functions, we can complete many applications requiring timing. The Linux kernel also provides short latency functions, such as Microsecond, nanosecond and millisecond delay functions. In this chapter, we will learn these time-related functions.
1, Introduction to linux time management and kernel timer
1. Introduction to kernel time management
There are a large number of functions in the Linux kernel that need time management, such as periodic scheduler, delay program, and the most commonly used timer for our driver writers.
The hardware timer provides the clock source. The frequency of the clock source can be set. After setting, the timing interrupt will be generated periodically. The system uses the timing interrupt to time. The frequency generated periodically by the interrupt is the system frequency, also known as the tick rate (some data are also called the system frequency). For example, 1000Hz, 100Hz and so on are the system beat rate. The system beat rate can be set in Hz,
When compiling the Linux kernel, we can set the system beat rate through the graphical interface, and open the configuration interface according to the following path:
-> Kernel Features
-> Timer frequency ( [=y])
Select "Timer frequency" and open it as shown in the figure
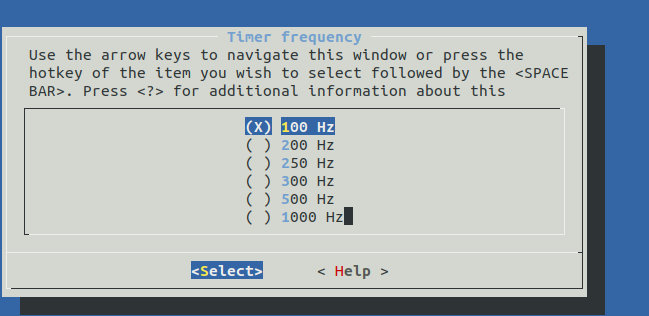
The optional system beat rates are 100Hz, 200Hz, 250Hz, 300Hz, 500Hz and 1000Hz. 100Hz is selected by default. After setting, open the Linux kernel source code in the root directory config file, in which
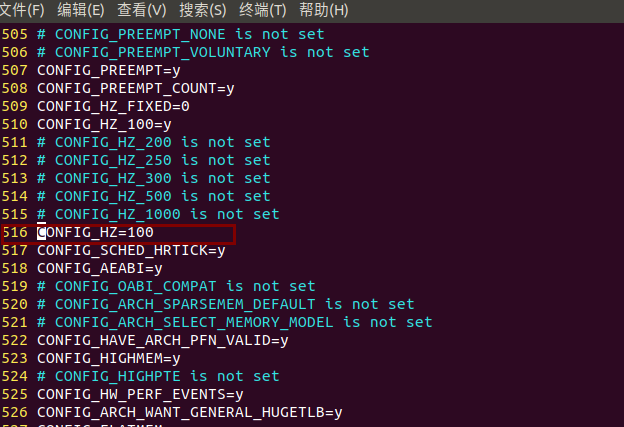
The Linux kernel uses CONFIG_HZ to set its own system clock. Open the file include / ASM generic / param h. The contents are as follows:
6 # undef HZ
7 # define HZ CONFIG_HZ
8 # define USER_HZ 100
9 # define CLOCKS_PER_SEC (USER_HZ)
Line 7 defines a macro HZ, which is CONFIG_HZ, so HZ=100. We will often use HZ when writing Linux drivers later, because HZ represents the number of beats per second, that is, the frequency
Advantages and disadvantages of high beat rate and low beat rate:
① High beat rate will improve the time accuracy of the system. If 100Hz beat rate is adopted, the time accuracy is 10ms. If 1000Hz is adopted, the time accuracy is 1ms, and the accuracy is increased by 10 times. High precision clock has many advantages. For those functions with strict time requirements, it can run with higher accuracy and time measurement is more accurate.
② High beat rate will lead to more frequent interrupts, which will aggravate the burden of the system. Compared with the system beat rate of 1000Hz and 100Hz, the system will spend 10 times of "energy" to deal with interrupts. The interrupt service function takes up more processor time, but the current processor performance is very powerful, so the system beat rate of 1000Hz will not increase too much load pressure. Select the appropriate system beat rate according to your actual situation. In this tutorial, we all use the default 100Hz system beat rate.
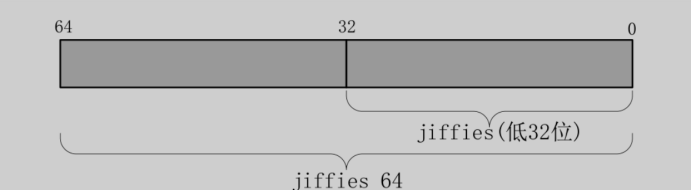
The Linux kernel uses the global variable jiffies to record the number of system beats since the system was started. When the system is started, jiffies will be initialized to 0. Jiffies are defined in the file include / Linux / jiffies H, as defined below:
76 extern u64 __jiffy_data jiffies_64;
77 extern unsigned long volatile __jiffy_data jiffies;
Line 76 defines a 64 bit jiffies_64.
Line 77 defines a 32-bit jiffies of type unsigned long.
jiffies_64 and jiffies are actually the same thing, jiffies_64 for 64 bit systems and jiffies for 32-bit systems. In order to be compatible with different hardware, jiffies is actually jiffies_64 lower 32 bits, jiffies_ The structure of 64 and jiffies is shown in the figure:
When we visit jiffies, we actually visit jiffies_64, using get_jiffies_64 this function can get jiffies_64. Read the value of jiffies on a 32-bit system and jiffies and jiffies on a 64 bit system_ 64 represents the same variable, so you can also read the value of jiffies directly. Therefore, whether it is a 32-bit system or a 64 bit system, jiffies can be used.
As mentioned earlier, HZ represents the beats per second, and jiffies represents the jiffies beats of the system, so jiffies/HZ is the system running time, in seconds. Both 32-bit and 64 bit jiffies have the risk of overflow. After overflow, the count will start from 0 again, which is equivalent to rounding back. Therefore, some data also call this phenomenon rounding back.
If the HZ is the maximum value of 1000, the 32-bit jiffies only need 49.7 days to detour. For 64 bit jiffies, it will take about 580 million years to detour, so jiffies_ The detour of 64 is ignored. It is particularly important to deal with the loopback of 32-bit jiffies,
The Linux kernel provides several API functions as shown in the table to handle loopback.

If unkown exceeds known, time_ The after function returns true, otherwise it returns false.
If unkown does not exceed known time_ The before function returns true, otherwise it returns false.
time_after_eq function and time_ The after function is similar, except that more judgment is equal to this condition.
Similarly, time_before_eq function and time_ The before function is similar.
For example, if we want to judge whether the execution time of a piece of code has timed out, we can use the following code:
1 unsigned long timeout;
2 timeout = jiffies + (2 * HZ); /* Time point of timeout */
3
4 /*************************************
5 Specific code
6 ************************************/
7
8 /* Determine whether there is a timeout */
9 if(time_before(jiffies, timeout)) {
10 /* Timeout did not occur */
11 } else {
12 /* Timeout occurred */
13 }
Timeout is the timeout point. For example, if we want to judge whether the code execution time exceeds 2 seconds, the timeout point is jiffies+(2*HZ). If jiffies is greater than timeout, it means timeout, otherwise there is no timeout. Lines 4 to 6 are specific code snippets. Line 9 passes the function time_before to judge whether jiffies is less than timeout. If less than, it means that there is no timeout.
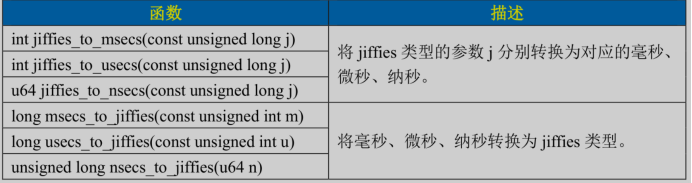
In order to facilitate development, the Linux kernel provides several conversion functions between jiffies and ms, us and ns, as shown in the table:
2. Introduction to kernel timer
Timer is a very common function, which is used for work requiring periodic processing. The Linux kernel timer is implemented by the system clock, which is not the PIT and other hardware timer explained in the bare metal article.
The Linux kernel timer is very simple to use. You only need to provide the timeout time (equivalent to the timing value) and the timing processing function. When the timeout time reaches, the set timing processing function will execute. Just like the routine of using the hardware timer, using the kernel timer does not need to do a lot of register initialization. When using the kernel timer, it should be noted that the kernel timer does not run periodically and will close automatically after timeout. Therefore, if you want to realize periodic timing, you need to restart the timer in the timing processing function.
The Linux kernel uses timer_ The list structure represents the kernel timer, timer_list defined in file
include/linux/timer.h As defined below(Omit conditional compilation):

struct timer_list {
struct list_head entry;
unsigned long expires; /* Timer timeout, in beats */
struct tvec_base *base;
void (*function)(unsigned long); /* Timing processing function */
unsigned long data; /* Parameters to pass to the function function */
int slack;
};
To use the kernel timer, first define a timer_list variable, indicating timer, tiemr_ The expires member variable of the list structure represents the timeout, and the unit is the number of beats. For example, we now need to define a timer with a cycle of 2 seconds, so the timeout of this timer is jiffies+(2HZ), so expires=jiffies+(2HZ). Function is the timing processing function after the timer times out. What we need to do is put in this function. We need to write this timing processing function.
After defining the timer, you need to initialize the timer through a series of API functions. These functions are as follows:
1.init_timer function
init_ The timer function initializes the timer_list type variable, when we define a timer_ After the list variable, you must use init first_ Timer initialization. init_ The prototype of timer function is as follows:
void init_timer(struct timer_list *timer)
Function parameters and return values have the following meanings:
Timer: to initialize the timer.
Return value: no return value.
2.add_timer function
add_ The timer function is used to register a timer with the Linux kernel, using add_ After the timer function registers the timer with the kernel, the timer will start running. The function prototype is as follows:
void add_timer(struct timer_list *timer)
Function parameters and return values have the following meanings:
Timer: the timer to register.
Return value: no return value.
3.del_timer function
del_timer function is used to delete a timer. This function can be used to delete a timer whether it is activated or not. On multiprocessor systems, the timer may run on other processors, so del is called_ The timer function waits for the timer processor function of other processors to exit before deleting the timer. del_ The prototype of timer function is as follows:
int del_timer(struct timer_list * timer)
Function parameters and return values have the following meanings:
Timer: the timer to delete.
Return value: 0, the timer has not been activated; 1. The timer has been activated.
4.del_timer_sync function
del_timer_ The sync function is del_ The synchronous version of timer function will wait for other processors to use the timer before deleting it, del_timer_sync cannot be used in an interrupt context.
del_ timer_ The prototype of sync function is as follows:
int del_timer_sync(struct timer_list *timer)
Function parameters and return values have the following meanings:
Timer: the timer to delete.
Return value: 0, the timer has not been activated; 1. The timer has been activated.
5.mod_timer function
mod_ The timer function is used to modify the timing value. If the timer has not been activated, mod_timer function will activate timer!
The function prototype is as follows:
int mod_timer(struct timer_list *timer, unsigned long expires)
Function parameters and return values have the following meanings:
Timer: the timer to modify the timeout (timing value).
expires: the modified timeout.
Return value: 0, call mod_timer is not activated before timer function; 1. Call mod_ The timer has been activated before the timer function.
These are the common API functions of kernel timer. The general use process of kernel timer is as follows
1 struct timer_list timer; /* Define timer */
2
3 /* Timer callback function */
4 void function(unsigned long arg)
5 {
6 /*
7 * Timer processing code
8 */
9
10 /* If the timer needs to run periodically, use mod_timer
11 * Function resets the timeout value and starts the timer.
12 */
13 mod_timer(&dev->timertest, jiffies + msecs_to_jiffies(2000));
14 }
15
16 /* Initialization function */
17 void init(void)
18 {
19 init_timer(&timer); /* Initialization timer */
20
21 timer.function = function; /* Set timing processing function */
22 timer.expires=jffies + msecs_to_jiffies(2000);/* Timeout 2 seconds */
23 timer.data = (unsigned long)&dev; /* Take the equipment structure as a parameter */
24
25 add_timer(&timer); /* Start timer */
26 }
27
28 /* Exit function */
29 void exit(void)
30 {
31 del_timer(&timer); /* Delete timer */
32 /* Or use */
33 del_timer_sync(&timer);
34 }
3.linux kernel short delay function
Sometimes we need to implement short latency in the kernel, especially in linux drivers. The Linux kernel provides millisecond, microsecond and nanosecond delay functions, as shown in the table:

2, Hardware schematic analysis
3, Experimental programming
In this chapter, we use the kernel timer to turn on and off the LED lights on the development board periodically. The flashing cycle of the LED lights is set by the kernel timer. The test application can control the kernel timer cycle.
1. Modify the equipment tree file
2. Timer Driver Programming
Create a new folder named "12_timer", and then_ The vscode project is created in the timer folder, and the workspace is named "timer". Create a new timer after the project is created C file, in timer C enter the following contents:
#include <linux/types.h>

#include <linux/kernel.h>

#include <linux/delay.h>

#include <linux/ide.h>

#include <linux/init.h>

#include <linux/module.h>

#include <linux/errno.h>

#include <linux/gpio.h>

#include <linux/cdev.h>

#include <linux/device.h>

#include <linux/of.h>

#include <linux/of_address.h>

#include <linux/of_gpio.h>

#include <linux/semaphore.h>

#include <linux/timer.h>

#include <asm/mach/map.h>

#include <asm/uaccess.h>

#include <asm/io.h>

/***************************************************************

Copyright © ALIENTEK Co., Ltd. 1998-2029. All rights reserved.

file name 		:  timer.c

author 	  	:  Zuo Zhongkai

edition 	   	:  V1.0

describe 	   	:  Linux kernel timer experiment

other 	   	:  nothing

Forum 	   	:  www.openedv.com

journal 	   	:  First edition v1 0 created by Zuo Zhongkai on July 24, 2019

***************************************************************/

#define TIMER_CNT 		 one 		/*  Number of equipment numbers 	*/

#define TIMER_NAME 		 "timer" 	/*  name 		*/

#define CLOSE_CMD  		 (_IO(0XEF, 0x1)) 	/*  Turn off the timer*/

#define OPEN_CMD 		 (_IO(0XEF, 0x2)) 	/*  Turn on the timer*/

#define SETPERIOD_CMD 	 (_IO(0XEF, 0x3)) 	/*  Set timer cycle command*/

#define LEDON  			 one 		/*  Turn on the light*/

#define LEDOFF  			 0 		/*  Turn off the lights*/


/* timer Equipment structure */

struct timer_dev{

	dev_t devid;			/* Equipment number 	 */

	struct cdev cdev;		/* cdev 	*/

	struct class *class;	/* class 		*/

	struct device *device;	/* equipment 	 */

	int major;				/* Main equipment No	  */

	int minor;				/* Secondary equipment No   */

	struct device_node	*nd; /* Device node */

	int led_gpio;			/* key GPIO number used		*/

	int timeperiod; 		/* Timing period, in ms */

	struct timer_list timer;/* Define a timer*/

	spinlock_t lock;		/* Define spin lock */

};


struct timer_dev timerdev;	/* timer equipment */


/*

 * @description	: Initialize the LED light IO, when the open function turns on the driver

 * 				  Initialize the GPIO pin used by the LED.

 * @param 		: nothing

 * @return 		: nothing

 */

static int led_init(void)

{

	int ret = 0;


	timerdev.nd = of_find_node_by_path("/gpioled");

	if (timerdev.nd== NULL) {

		return -EINVAL;

	}


	timerdev.led_gpio = of_get_named_gpio(timerdev.nd ,"led-gpio", 0);

	if (timerdev.led_gpio < 0) {

		printk("can't get led\r\n");

		return -EINVAL;

	}


	/* IO used to initialize led */

	gpio_request(timerdev.led_gpio, "led");		/* Request IO 	*/

	ret = gpio_direction_output(timerdev.led_gpio, 1);

	if(ret < 0) {

		printk("can't set gpio!\r\n");

	}

	return 0;

}


/*

 * @description		: open device

 * @param - inode 	: inode passed to driver

 * @param - filp 	: The device file has a file structure called private_ Member variable of data

 * 					  Generally, private is used when open ing_ Data points to the device structure.

 * @return 			: 0 success; Other failures

 */

static int timer_open(struct inode *inode, struct file *filp)

{

	int ret = 0;

	filp->private_data = &timerdev;	/* Set private data */


	timerdev.timeperiod = 1000;		/* The default period is 1s */

	ret = led_init();				/* Initialize LED IO */

	if (ret < 0) {

		return ret;

	}


	return 0;

}


/*

 * @description		: ioctl Function,

 * @param - filp 	: Device file to open (file descriptor)

 * @param - cmd 	: Commands sent by the application

 * @param - arg 	: parameter

 * @return 			: 0 success; Other failures

 */

static long timer_unlocked_ioctl(struct file *filp, unsigned int cmd, unsigned long arg)

{

	struct timer_dev *dev =  (struct timer_dev *)filp->private_data;

	int timerperiod;

	unsigned long flags;


	switch (cmd) {

		case CLOSE_CMD:		/* off timer  */

			del_timer_sync(&dev->timer);

			break;

		case OPEN_CMD:		/* Turn on the timer */

			spin_lock_irqsave(&dev->lock, flags);

			timerperiod = dev->timeperiod;

			spin_unlock_irqrestore(&dev->lock, flags);

			mod_timer(&dev->timer, jiffies + msecs_to_jiffies(timerperiod));

			break;

		case SETPERIOD_CMD: /* Set timer cycle */

			spin_lock_irqsave(&dev->lock, flags);

			dev->timeperiod = arg;

			spin_unlock_irqrestore(&dev->lock, flags);

			mod_timer(&dev->timer, jiffies + msecs_to_jiffies(arg));

			break;

		default:

			break;

	}

	return 0;

}


/* Device operation function */

static struct file_operations timer_fops = {

	.owner = THIS_MODULE,

	.open = timer_open,

	.unlocked_ioctl = timer_unlocked_ioctl,

};


/* Timer callback function */

void timer_function(unsigned long arg)

{

	struct timer_dev *dev = (struct timer_dev *)arg;

	static int sta = 1;

	int timerperiod;

	unsigned long flags;


	sta = !sta;		/* Reverse each time to reverse the LED light */

	gpio_set_value(dev->led_gpio, sta);


	/* restart timer  */

	spin_lock_irqsave(&dev->lock, flags);

	timerperiod = dev->timeperiod;

	spin_unlock_irqrestore(&dev->lock, flags);

	mod_timer(&dev->timer, jiffies + msecs_to_jiffies(dev->timeperiod));

 }


/*

 * @description	: Drive entry function

 * @param 		: nothing

 * @return 		: nothing

 */

static int __init timer_init(void)

{

	/* Initialize spin lock */

	spin_lock_init(&timerdev.lock);


	/* Register character device driver */

	/* 1,Create device number */

	if (timerdev.major) {		/*  Defines the equipment number */

		timerdev.devid = MKDEV(timerdev.major, 0);

		register_chrdev_region(timerdev.devid, TIMER_CNT, TIMER_NAME);

	} else {						/* No device number defined */

		alloc_chrdev_region(&timerdev.devid, 0, TIMER_CNT, TIMER_NAME);	/* Application equipment No */

		timerdev.major = MAJOR(timerdev.devid);	/* Gets the master device number of the assigned number */

		timerdev.minor = MINOR(timerdev.devid);	/* Get the secondary device number of the assigned number */

	}


	/* 2,Initialize cdev */

	timerdev.cdev.owner = THIS_MODULE;

	cdev_init(&timerdev.cdev, &timer_fops);


	/* 3,Add a cdev */

	cdev_add(&timerdev.cdev, timerdev.devid, TIMER_CNT);


	/* 4,Create class */

	timerdev.class = class_create(THIS_MODULE, TIMER_NAME);

	if (IS_ERR(timerdev.class)) {

		return PTR_ERR(timerdev.class);

	}


	/* 5,Create device */

	timerdev.device = device_create(timerdev.class, NULL, timerdev.devid, NULL, TIMER_NAME);

	if (IS_ERR(timerdev.device)) {

		return PTR_ERR(timerdev.device);

	}


	/* 6,Initialize timer and set timer processing function. If the cycle has not been set, all timers will not be activated */

	init_timer(&timerdev.timer);

	timerdev.timer.function = timer_function;

	timerdev.timer.data = (unsigned long)&timerdev;

	return 0;

}


/*

 * @description	: Drive exit function

 * @param 		: nothing

 * @return 		: nothing

 */

static void __exit timer_exit(void)

{


	gpio_set_value(timerdev.led_gpio, 1);	/* Turn off the LED when unloading the drive */

	del_timer_sync(&timerdev.timer);		/* Delete timer */

#if 0

	del_timer(&timerdev.tiemr);

#endif


	/* Unregister character device driver */

	cdev_del(&timerdev.cdev);/*  Delete cdev */

	unregister_chrdev_region(timerdev.devid, TIMER_CNT); /* Logout equipment number */


	device_destroy(timerdev.class, timerdev.devid);

	class_destroy(timerdev.class);

}


module_init(timer_init);

module_exit(timer_exit);

MODULE_LICENSE("GPL");

MODULE_AUTHOR("luatao");
Function timer_open, corresponding to the open function of the application. This function will be executed when the application calls the open function to open the / dev/timer driver file. This function sets the file private data to timerdev, and initializes the timing cycle by one second, and finally calls led_. The init function initializes the IO used by the LED.
Function timer_unlocked_ioctl, corresponding to the ioctl function of the application. The application calls the ioctl function to send control information to the driver. This function responds and executes. This function has three parameters: filp, cmd and Arg. filp is the corresponding device file, cmd is the command information sent by the application, and arg is the parameter sent by the application. In the routines in this chapter, Arg parameter represents the timing cycle.
There are three commands: CLOSE_CMD,OPEN_CMD and SETPERIOD_CMD, these three commands are to close the timer, open the timer and set the timing cycle. The left and right of these three commands are as follows:
CLOSE_CMD:: close timer command, call del_ timer_ The sync function turns off the timer.
OPEN_CMD: open the timer command and call mod_ The timer function opens the timer. The timing period is the timeperiod member variable of timerdev. The default timing period is 1 second.
SETPERIOD_CMD: set the timer cycle command. The parameter arg is the new timing cycle. Set the timeperiod member variable of timerdev to Arg, indicating the timing cycle. And use mod_timer reopens the timer to make the timer run in a new cycle.
Timer driven operation function set timer_fops.
Function timer_function, timer service function. This function has a parameter arg. In this routine, Arg parameter is the address of timerdev, so you can access the device structure through Arg parameter. When the timing period is up, this function will be called. In this function, the state of LED lamp is reversed to realize the effect of LED lamp flashing. Because the kernel timer is not a loop timer, it ends after one execution, so mod is called again_ The timer function restarts the timer
Function timer_init, drive the entry function. Initialize the timer and set the timer processing function as timer_function. In addition, set the function to be passed to timer_ The parameter of function function is the address of timerdev. Timer is not called in this function_ Add function to start the timer, so the timer is off by default unless the application sends an open command.
Drive the exit function and turn off the LED, that is, the LED is off after unloading the drive. Call del_timer_ The sync function deletes the timer, or del can be used_ Timer function.
3. Write test APP
To test the APP, we want to achieve the following:
① After running the APP, prompt us to enter the command to be tested. Enter 1 to close the timer, enter 2 to open the timer, and enter 3 to set the timer cycle.
② If you want to set the timer cycle, you need to let the user enter the cycle value to be set, in milliseconds.
Create a new named timerapp C, and then enter the following:
#include "stdio.h"

#include "unistd.h"

#include "sys/types.h"

#include "sys/stat.h"

#include "fcntl.h"

#include "stdlib.h"

#include "string.h"

#include "linux/ioctl.h"

/***************************************************************

Copyright © ALIENTEK Co., Ltd. 1998-2029. All rights reserved.

file name 		:  timerApp.c

author 	  	:  Zuo Zhongkai

edition 	   	:  V1.0

describe 	   	:  Timer test application

other 	   	:  nothing

usage method 	: ./ timertest /dev/timer open test App

Forum 	   	:  www.openedv.com

journal 	   	:  First edition v1 0 created by Zuo Zhongkai on July 24, 2019

***************************************************************/


/* Command value */

#define CLOSE_CMD  		 (_IO(0XEF, 0x1)) 	/*  Turn off the timer*/

#define OPEN_CMD 		 (_IO(0XEF, 0x2)) 	/*  Turn on the timer*/

#define SETPERIOD_CMD 	 (_IO(0XEF, 0x3)) 	/*  Set timer cycle command*/


/*

 * @description		: main main program

 * @param - argc 	: argv Number of array elements

 * @param - argv 	: Specific parameters

 * @return 			: 0 success; Other failures

 */

int main(int argc, char *argv[])

{

	int fd, ret;

	char *filename;

	unsigned int cmd;

	unsigned int arg;

	unsigned char str[100];


	if (argc != 2) {

		printf("Error Usage!\r\n");

		return -1;

	}


	filename = argv[1];


	fd = open(filename, O_RDWR);

	if (fd < 0) {

		printf("Can't open file %s\r\n", filename);

		return -1;

	}


	while (1) {

		printf("Input CMD:");

		ret = scanf("%d", &cmd);

		if (ret != 1) {				/* Parameter input error */

			gets(str);				/* Prevent jamming */

		}


		if(cmd == 1)				/* Turn off the LED */

			cmd = CLOSE_CMD;

		else if(cmd == 2)			/* Turn on the LED */

			cmd = OPEN_CMD;

		else if(cmd == 3) {

			cmd = SETPERIOD_CMD;	/* Set cycle value */

			printf("Input Timer Period:");

			ret = scanf("%d", &arg);

			if (ret != 1) {			/* Parameter input error */

				gets(str);			/* Prevent jamming */

			}

		}

		ioctl(fd, cmd, arg);		/* Controls the opening and closing of the timer */

	}


	close(fd);

}
The while(1) loop allows the user to enter the command to be tested, and then send it to the driver through the ioctl function. If it is set timer cycle command SETPERIOD_CMD, then the arg parameter of ioctl function is the cycle value entered by the user.
4, Run test
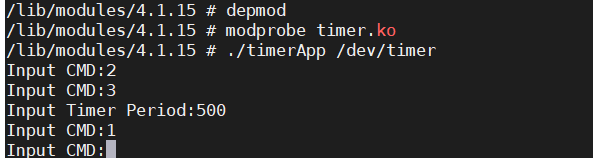
depmod //This command needs to be run when the driver is loaded for the first time
modprobe timer.ko //Load driver

After the driver is loaded successfully, test with the following command:
./timerApp /dev/timer
After inputting the above command, the terminal prompts to input the command, as shown in the figure:

Enter "2" to turn on the timer, and the LED will start flashing in the default 1-second cycle.
Enter "3" to set the timing period, and enter the period value to be set according to the prompt, as shown in the figure:
Input "500" to set the timer cycle value to 500ms. After setting, the LED light will start flashing at an interval of 500ms. Finally, the timer can be turned off by entering "1",
You can verify the results yourself.