-
Email sending process
E-mail is a kind of information transmission behavior that uses the network to transmit information to remote servers. We usually use "account @ host name" for e-mail. However, due to "malicious mail" and "spam flooding", we are not allowed to directly use the host's ip address to send mail. Therefore, the mail server must have a legally registered host name.
-
Usually, a normal e-mail transmission is composed of two parts, sending and receiving e-mail.
A Send message to B
A.qq.com  --- > B.qq.com
===> A Email to qq.com This mail server, A Mail server and send it to B On your mail server, and then B Get mail from its mail server
-
How does the mail server deliver mail through DNS information
When we send an email, the host will first analyze the target host of the email DNS,
Get first MX Flag, and then take the highest priority(minimum)MX The host sends the letter.

Suppose we find the target host DNS The following information is available:
lxb.com  IN MX  10  mail1.lxb.com
lxb.com  IN MX  20  mail2.lxb.com
lxb.com  IN A       ip address
 When there is a letter to send to XXX@lxb.com When,
①because MX The lowest record mark is preferred, so the letter will be sent to mail1.lxb.com On this host.
②If mail1.lxb.com I failed to accept this letter for various reasons,
The letter will be given second priority MX Host to transmit, that is mail2.lxb.com.
③If all MX If the host is not responsible, the letter will A The logo is transmitted directly to yourself

A@qq.com Message sent --->  Sender A + Mail server qq.com
qq.com  +  mail    --->  adopt MX Record of mail.qq.com(Comparison priority)
Then send the mail to mail.qq.com This mail server
-
Components and related protocols required for mail transmission
-
MUA
There are two methods for MUA (Mail User Agent) client to send mail. The first is to log in directly to the mail server (such as ssh) to actively send mail; The second is to send the letter to the mail server through MUA. MUA communicates with the server using SMTP, IMAP, or POP3 protocols. The main function of MUA is to receive e-mail from the mail host and provide users with browsing and writing e-mail.
-
WebMail
WebMail is a Web-based E-mail sending and receiving system, which plays the role of E-mail user agent. WebMail system provides mail sending and receiving, user online service and system service management. The interface of WebMail is intuitive and friendly. It does not need the help of the client, which eliminates the trouble when users configure the E-mail client software. As long as they can surf the Internet, they can use WebMail to facilitate users to receive and send mail.
-
MTA
MTA (Mail Transfer Agent) MUA sends the user's mail to the mail host. If the mail host can help the user send the mail, it is an MTA. Mail server is an MTA. The protocol used by the MTA is SMTP (Simple Mail Transfer Protocol).
-
Functions of MTA:
- Receive mail: MTA will receive mail from the client or other MTAS. At this time, the MTA uses the SMTP protocol and the port number is 25
- If the message does not meet the MTA's authority, the message will be forwarded to the next host, and the message will be forwarded to the next host. This is the function of Relay.
-
MDA
MDA (Mail Delivery Agent) in fact, MDA is a small program hanging under the MTA. Its main function is to analyze the header or content of the mail received by the MTA to determine the destination of the mail.
After MDA analysis, it is found that the target of this email is MTA, so MDA will put this email in the user's mailbox; If not, be ready to forward it.
MDA also has the function of analyzing and filtering mail:
- Filter spam
- Automatic reply
However, each major MTA program has its own MDA function.
Common MDA's include ProcMail (postfix's default mail delivery tool) and MailDrop (a relatively professional delivery agent tool)
-
Mailbox
Mailbox e-mail is a mail collection file dedicated to an account. The default system mailbox in linux is placed in / var/spool/mail / user account.
-
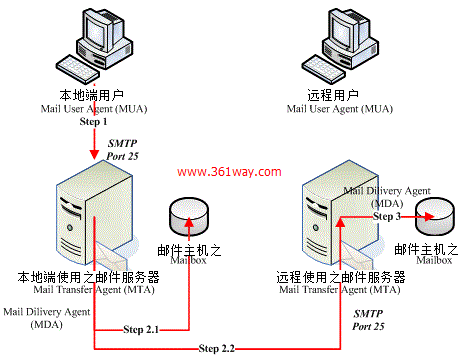
The process of sending mail to the email mailbox of the other party through the MUA at the local end:
① when the local MUA wants to use MTA to send mail, it must first obtain the authority of MTA, that is, it needs to register an email account with MTA.
② after the user writes the email on the MUA and sends it to the MTA, the email data mainly includes the email title and email content. When you press the send button, your email will be placed in the MTA queue and waiting to be sent.
- If the target of this email is the local MTA's own account, the MDA will send this email to the corresponding user's Mailbox.
- If the target of the message is another target MTA, start the relay forwarding process.
- The MTA will first judge whether the packet is legal. If it has permission, the MDA will start mail forwarding, that is, the email will be sent to the next MTA (SMTP (port 25)) through our MTA.
- If the message is sent successfully, delete the message in the queue.
③ the remote MTA will receive the letter sent by our MTA and place the email in the correct mailbox for users to read or download.
At this time, this email is left on the other party's MTA, not on the MUA.
-
Process of receiving letters from users:
-
MRA
MRA (Mail Retrieval Agent) users can receive their own mail through POP provided by MRA server, or keep their mail on the mail host through IMAP protocol, and further carry out advanced work such as establishing mail data folder.
* POP: Post Office Protocol, postal service agreement
* IMAP: Intenet Message Access Protocol
-
Receive mail using POP3 protocol:
- MUA connects to port 110 of MRA through POP3 protocol, and enters account and password to obtain correct authentication and authorization.
- After MRA confirms that there is no problem with the user's account and password, it will go to the user's Mailbox to obtain the user's email and send it to the user's MUA software.
- When all mail is delivered, the data in the user's Mailbox will be deleted.
Because the received mail will be deleted by using POP3 protocol, IMAP (port number 143) appears. This protocol allows you to store the mailbox data in the user's home directory on your host, that is, after the client receives the mail, the mail will still remain on the server.
SMTP, POP3 and IMAP are all plaintext transmission. Especially in POP3 and IMAP, users must enter an account and password to send and receive mail. Therefore, POP3s and IMAPs communication protocols appear. They are implemented through ssl encryption.
Since POP3 and IMAP are only related to MRA and their own users, as long as the MRA protocol used by users and servers is set to be consistent, it will not affect other servers. However, MTA is different, because MTA must communicate with other MTAS. Therefore, if you use SMTPs, all the world needs to change to SMTPs communication protocol to communicate with your MTA. There is no way to achieve this at present. If it is a special case, the data can be encrypted and then transferred by MTA.
-
Importance of Relay and authentication mechanism
When you need MTA to help you forward mail to the next MTA, this operation becomes mail Relay forwarding. When everyone can use this MTA to help Relay, this situation is called Open Relay operation. When an Open Relay occurs on an MTA and the MTA is connected to the Internet, the following problems are likely to occur:
- The normal connection speed of the host network will slow down, because the network bandwidth is consumed by advertising and spam.
- The host may run out of resources due to a large number of emails, which is prone to downtime and other problems.
- The local MTA will be defined as a "blacklist" by the Internet society. From then on, many normal emails will not be sent or received.
Therefore, at present, almost all distributions start MTA by default to only listen to internal loop interfaces, and also cancel the function of Open Relay. Therefore, when you want to use the forwarding function of MTA, you must obtain the permission to legally use this MTA. There are several ways to set Relay:
- Specify that the IP or network segment of a specific client can use Relay.
- If the IP address of the client is not fixed, the authentication mechanism can be used
- Build MUA on MTA, such as the MUA function of Web interfaces such as OpenWebMail.
There are two common authentication mechanisms: SMTP mail authentication mechanism and SMTP after POP. No matter which mechanism, it basically determines that the user has the right to legally use the MTA by asking the user to enter the account and password for authentication, and then turns on relay support for authenticated users.
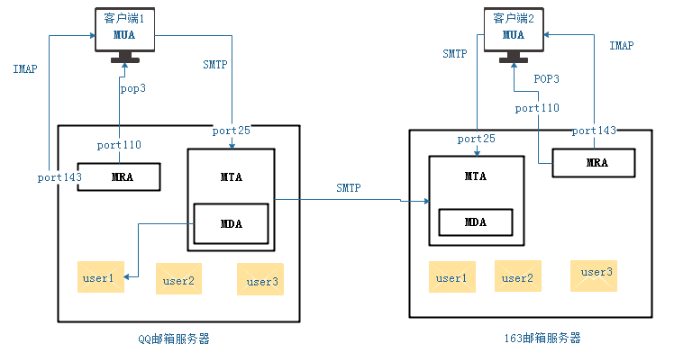
client1 sends an email to client2:
MUA: client1 ---> client2
mua must first register with the MTA
Write an email for client1 on MUA and deliver it to MTA
MTA to judge: client2@163.com --->Who is the recipient? MTA management. The current MTA is 163 com,
① The same server as the sender -- > MTA will put the mail sent by client1 into the mailbox of client2 in the mail server
② Not the same server as the sender (the recipient is QQ. Com) - > belongs to QQ Com this MTA, 163 The MTA will deliver the email sent by client1 to client2 to QQ. Com COM, and QQ's MTA at this time client2@qq.com If it is managed by it, it will be placed in the mailing list of client2
!!! Configure the mail server. The permission of the user under / home / must be 600, otherwise you can't send and receive mail normally!!!
-
Configure mail server:
-
postfix file
//Download mail server
[root@localhost etc]# yum install postfix -y
//At this time, there are multiple service files in the postfix package, and the main configuration file is in / etc/postfix

/etc/postfix/master.cf
    Main provisions postfix The working parameters of each program are ready by default and usually do not need to be changed

/etc/postfix/access
    Can set open Relay Or reject the external configuration file of the source or destination address of the connection, but the file is in/etc/postfix/main.cf It will not take effect until it is started, and after setting, you need to postmap To become a database file

/etc/aliases                As a mail alias, it can also be used as a mail group setting

/usr/sbin/postconf
This command lists your postfix You can only view the modified data of some default parameters and non default values postconf -n

/usr/sbin/postfix         postfix You can use this command to start or reread the configuration file
postfix check             inspect postfix Whether the relevant documents and permissions are correct
postfix start/stop/reload
postfix flush             Force mail currently in the mail queue to be sent out

/etc/sbin/postalias
        Command to set alias database because MTA The efficiency of reading files in database format is better, so it is necessary to ASCII The file in format is rebuilt into a database.
stay postfix In, this command is mainly used for conversion/etc/aliases Become a database file. postaliases hash:/etc/aliases(hash For a database format, and then/etc/aliases Will be automatically updated)

/usr/sbin/postcat        It is mainly used to check the mail content placed in the queue
/usr/sbin/postmap        transformation/etc/postfix/access Database of files
/usr/sbin/postqueue      similar mailq Output results of, for example postqueue -p

Set the requirements for the master profile:
"#”Symbols are notes;
The first character of each line cannot be a blank character. The method of setting    "Parameters = There should be a space character on both sides of the equal sign of "set value";
Can use“ $"To reference variable values, for example myorigin = $myhostname;
If the parameter supports more than two data, use the space character or comma to separate;
Multiple lines can be used to represent the same setting value. As long as there is a comma in the first line and the beginning of the second line is a space character, the data can be extended to the second line to continue writing; If an item is set repeatedly, the later setting value shall prevail

To make postfix To send and receive mail, you need to start the following parameters:
myhostname          Host name, mydomain Set default access $myhostname Name after the first decimal point
myorigin            When sending a message, "sending source host", that is, it represents the host MTA Outgoing messages will be subject to this setting
inet_interfaces
set up postfix Monitoring interface. By default, your postfix Only listen for native interfaces (127).0.0.1),If all interfaces are open, they can be written as all
inet_protocol      set up postfix monitor IP Protocol, if you want to listen ipv4 Address writable inet_protocols = ipv4
mydestination
    Set the host name of the recipient, that is, what host name should be written when someone sends you an email. If DNS The settings in the are MX Flag, you'd better write the host name in mydestination Otherwise, error messages are easy to appear.
mynetworks:        Specify trusted clients.
relay_domains:
    Specifications can help relay Next station MTA Host address. By default, this setting value is $mydestination.
Log file:/var/log/maillog-
mail file
[root@localhost ~]#yum install mailx -y

mailx Corresponding to mua
mailx Command related commands are: mail,sendmail.
    Syntax:    mailx [option] [name]
    [root@localhost ~]# echo "nihao" | mail -s "new from root" lxb@openlab.com
                           #Mail information   #mail    #Mail content       #Sending server
 explain:
This command is used to send and receive mail. The name is the recipient's user name. This command has many internal commands. The options are described as follows:

-A: The name of the command executing the account after the startup file is read
-a: The given file is attached to the message
-B: Make standard input and standard output lines-buffer
-b: Send a list of confidential copies. The list should be a comma separated list of names
-c: Send carbon copy to address list
-D: Start in disconnect mode; See the description options for the disconnected variable
-d: Enable the actual delivery of debug messages and close messages. No-v,This option is for development purposes only
-e: Just check whether there is a mail system mailbox. If yes, it returns zero; otherwise, a non-zero value exits the state
-E: If the outgoing message does not contain any text in its first or only message part, do not discard it, but it is quietly and effectively set at the time of program startup skipemptybody Variable. This is a useful script for sending messages from the start cron of
-f: Read the contents (or files, if specified) in the user's mailbox for processing; When mailx Exit, write it to the undeleted message, and restore the file. The string is treated as a file and described as a folder command as follows
-F: Save a file named for the local part of the address of the first recipient in the message to be sent
-H: The print head summarizes all messages and exits
-h: Invoked sendmail Matches the specified metric. This option is not in use SMTP Effect of sending mail
-i: TTY Ignore interrupt signal. use mailx This is very useful for noisy telephone lines
-I: "Newsgroups:'or' article ID: 'In the header summary field. Only with-f Applicable when used in combination
-n: No reading/etc/mail.rc At startup. This option should apply to calls to multiple computers mailx Because of the contents of the file, they may be different
-N: Disable the initial display of message headers when reading messages or editing mail folders
-q: Starts a message with the contents of the specified file. Can be given only in send mode
-r: Set the sender address. Ignore any environment variables or startup files from the specified variables. Wave escape is disabled. Should-r The address option is passed to the mail transfer agent unless used SMTP. This option has unique compatibility;It is recommended to set the slave variable instead of directly
-R: If you open read-only folders, open them
-s: Command line for the specified topic (only after-s Flag as the first parameter of the subject, note that the subject with spaces should be referenced)
-S: Sets the value of the optional value of the internal option variable
-T: Write "mail" ID: "And "articles" ID: 'Read in file name ??Each header field of the. The folder commands that imply the processing of my compressed files are as follows
-t: The message to be sent is expected to contain a header "to:", "CC" or "BCC:" field to the recipient. Recipients specified on the command line will be ignored
-u: Read user's mailbox
-v: Detailed mode. The details of the delivery are displayed on the user's terminal
-V: Display version information and exit
- ?: Enable wave escape, even if not in interactive mode-
Operation of mail file in virtual machine:
               mail commands
type <message list>             type messages
next                            goto and type next message
from <message list>             give head lines of messages
headers                         print out active message headers
delete <message list>           delete messages
undelete <message list>         undelete messages
save <message list> folder      append messages to folder and mark as saved
copy <message list> folder      append messages to folder without marking them
write <message list> file       append message texts to file, save attachments
preserve <message list>         keep incoming messages in mailbox even if saved
Reply <message list>            reply to message senders
reply <message list>            reply to message senders and all recipients
mail addresses                  mail to specific recipients
file folder                     change to another folder
quit                            quit and apply changes to folder
xit                             quit and discard changes made to folder
!                               shell escape
cd <directory>                  chdir to directory or home if none given
list                            list names of all available commands

A <message list> consists of integers, ranges of same, or other criteria
separated by spaces.  If omitted, mail uses the last message typed.
&
-
Simple linux server configuration
-
Use the root user of the mail server to send mail to the client user
//First configure the main configurator (remove these comments)
[root@localhost postfix]# vim main.cf
myhostname = mail.new.com                    //Mailbox server
mydomain = new.com                            //domain name
myorigin = $myhostname
mydestination = $myhostname, localhost.$mydomain, localhost, $mydomain
inet_interfaces = all
inet_protocols = all
mynetworks = 192.168.220.0/24, 127.0.0.0/8            //Allowed ip segment
relay_domains = $mydestination                        //Accept domain

//Then configure the DNS server (I set the mailbox of the DNS service as the local IP of the virtual machine)
[root@localhost postfix]# nslookup mail.new.com
Server:		192.168.220.134
Address:	192.168.220.134#53

Name:	mail.new.com
Address: 192.168.220.134

[root@localhost postfix]# vim main.cf
[root@localhost postfix]# nslookup mail.new.com
Server:		192.168.220.134
Address:	192.168.220.134#53

Name:	mail.new.com
Address: 192.168.220.134

//Then configure a new user
[root@localhost ~]# useradd client
[root@localhost ~]# echo "123" | passwd --stdin client
Changing password for user client.
passwd: all authentication tokens updated successfully.

//Then download the mailbox mail plug-in and configure the restart service
[root@localhost ~]# yum install mail -y
[root@localhost postfix]# systemctl restart postfix

//Check the mail on the host first
[root@localhost ~]# mail
No mail for root

//Then write the mail under root
[root@localhost ~]# echo "nihao" | mail -s "new from root" client@new.com
[root@localhost ~]# echo "nihao" | mail -s "new from root" lxb@new.com

//At this point, open lxb and client users to view the mail respectively
//client user
[root@localhost ~]# su - client
[client@localhost ~]$ mail
Heirloom Mail version 12.5 7/5/10.  Type ? for help.
"/var/spool/mail/client": 1 message 1 new
>N  1 root                  Sun Dec 26 09:37  18/584   "new from root"
&

//lxb user
[root@localhost ~]# su - lxb
[lxb@localhost ~]$ mail
Heirloom Mail version 12.5 7/5/10.  Type ? for help.
"/var/spool/mail/lxb": 5 messages 5 new
>N  1 root                  Sun Dec 26 09:31  18/575   "new from root"
 N  2 root                  Sun Dec 26 09:31  18/575   "new from root"
 N  3 root                  Sun Dec 26 09:31  18/575   "new from root"
 N  4 root                  Sun Dec 26 09:31  18/560   "new from root"
 N  5 root                  Sun Dec 26 09:37  18/575   "new from root"
&

//At this point, type address to view the message content
//And relay is the reply content

//!!! If main is not configured CF parameters, you will not be able to send mail successfully!!!
-
Use the root user of the mail server to send mail to the wrokgroup group
//At this time, you send a message to the wrokgroup group. You need to write the group information first
//The configuration of group information is in / etc/aliases, and the group information is added in the last line
[root@localhost ~]# vim /etc/aliases
wrokgroup:      client1,client2,client3

//At this time, you need to configure the group information as database information
[root@localhost etc]# postalias /etc/aliases

//ls -l view
[root@localhost etc]# ls -l aliases*
-rw-r--r--. 1 root root  1569 Dec 27 06:32 aliases
-rw-r--r--. 1 root root 12288 Dec 27 06:32 aliases.db

//Then restart the service and add client1, client2 and client3 users
[root@localhost ~]# useradd client1
[root@localhost ~]# useradd client2
[root@localhost ~]# useradd client3

//Send mail information on the server
[root@localhost etc]# echo "group mail" | mail -s "group"  wrokgroup@openlab.com


//At this time, go to the client to view the information

//client1
[root@localhost ~]# su - client1
[client1@localhost ~]$ mail
Heirloom Mail version 12.5 7/5/10.  Type ? for help.
"/var/spool/mail/client1": 2 messages 1 new 2 unread
 U  1 root                  Mon Dec 27 06:37  19/594   "group"
>N  2 root                  Mon Dec 27 06:39  18/590   "group"
&

//client2
[root@localhost ~]# su - client2
[client2@localhost ~]$ mail
Heirloom Mail version 12.5 7/5/10.  Type ? for help.
"/var/spool/mail/client2": 1 message 1 new
>N  1 root                  Mon Dec 27 06:39  18/590   "group"
&

//client3
[client3@localhost ~]$ mail
Heirloom Mail version 12.5 7/5/10.  Type ? for help.
"/var/spool/mail/client3": 1 message 1 new
>N  1 root                  Mon Dec 27 06:39  18/590   "group"
&


//!!! I made a mistake. I mistyped the workgroup and used it so that the message could not be sent (error correction found later)
[root@localhost ~]# mail
Heirloom Mail version 12.5 7/5/10.  Type ? for help.
"/var/spool/mail/root": 6 messages 6 new
>N  1 Mail Delivery System  Mon Dec 27 06:28  76/2427  "Undelivered Mail Returned to Sender"
 N  2 Mail Delivery System  Mon Dec 27 06:29  75/2438  "Undelivered Mail Returned to Sender"
 N  3 Mail Delivery System  Mon Dec 27 06:30  76/2450  "Undelivered Mail Returned to Sender"
 N  4 Mail Delivery System  Mon Dec 27 06:31  76/2450  "Undelivered Mail Returned to Sender"
 N  5 Mail Delivery System  Mon Dec 27 06:32  76/2450  "Undelivered Mail Returned to Sender"
 N  6 Mail Delivery System  Mon Dec 27 06:34  75/2398  "Undelivered Mail Returned to Sender"
& 1
//error message
-
Send and receive mail using MUA agent
When using MUA agent to send and receive e-mail, I need an e-mail agent software. I use Foxmail. MUA communicates with the server using SMTP, IMAP, or POP3 protocols. The mail sent by MUA uses SMTP protocol, that is, MUA uses SMTP to communicate with MTA. MUA uses IMAP or POP3 protocol to communicate with MRA when receiving mail. You need to install dovecot plug-in to start POP3 and IMAP.
To send and receive mail using MUA, you need to log in to the mail server, so the server needs to open SASL authentication. SASL is a mechanism used to expand the verification capability of C/S mode. In postfix, you can use SASL to determine whether users have the right to use the forwarding service, or identify who is using your server. Software package Cyrus SASL for SASL module
postfix provides MTA function of mail server
dovecot provides the MRA function of mail server
Software package Cyrus SASL of SASL module --- responsible for SASL certification
How does MUA send and receive e-mail
user1 sends mail. At this time, the mail information is resolved through the DNS deployed on the local Linux. At this time, after the mail server receives the mail, the mail will be accepted through MTA (postfix plug-in). At this time, MTA determines whether the mail information belongs to the management domain information of the DNS mail. If so, it will be put into the user's mailbox (/ var/spool/mail/user2). If the MUA is used for acceptance, the mail will be synchronized by the dovecot of the MRA to the specified file in the user's home directory (/ home/user2/mail/.imap in the INBOX file), and user2 downloads the mail file from the MRA through the MUA, and the user needs to provide SASL password authentication to log in to the MUA.
And / home / user2 / mail / The INBOX file under IMAP needs to be created on Linux!!!
//To configure mua proxy mail, you need to download two plug-ins
//Plug in ① dovecot
[root@localhost /]# yum install dovecot  -y

//The dovecot plug-in generates a / etc/dovecot folder
[root@localhost /]# cd /etc/dovecot/
[root@localhost dovecot]# ll
total 12
drwxr-xr-x. 2 root root 4096 Dec 27 07:25 conf.d
-rw-r--r--. 1 root root 4391 Dec 27 07:25 dovecot.conf
//The main configuration file is in the directory of conf.d (similar to httpd)

//Configure the main configuration file for dovecot
[root@localhost ~]# vim /etc/dovecot/dovecot.conf

protocols = imap pop3 lmtp submission            #At this point, set the protocol that allows you to log in
login_trusted_networks = 192.168.220.0 /24       #Set the ip allowed to access


//Plug in ② Cyrus sasl -- to start sasl authentication, you need to modify some configurations on postfix
[root@localhost conf.d]# yum install cyrus-sasl* -y

//Cyrus SASL package is mainly used to encrypt postmail
//The configuration needs to be in / etc / postfix / main CF next, add
[root@localhost ~]# cd /etc/postfix/
[root@localhost postfix]# vim main.cf

broken_sasl_auth_clients = yes                            #Enable sasl to authenticate clients
smtpd_sasl_auth_enable = yes                              #Enable sasl authentication
smtpd_client_restrictions = permit_sasl_authenticated     #Set to sasl authentication
smtpd_sasl_security_options = noanonymous                 #Disable anonymous users
smtpd_recipient_restrictions = permit_sasl_authenticated,permit_mynetworks,reject_unauth_destination     #Define recipient qualification

//At this time, you also need to modify the login format under / etc/sysconfig/saslauthd
[root@localhost dovecot]# vim /etc/sysconfig/saslauthd
MECH=shadow                                    #Set as password login

//Then edit the user's email address
[root@localhost ~]# vim /etc/dovecot/conf.d/10-mail.conf

mail_location = mbox:~/mail:INBOX=/var/mail/%u    #This is the location where MRA files are stored and needs to be created

//Add a few more users with passwords
//Restart service - three services need to be restarted at this time
[root@localhost ~]# systemctl restart postfix
[root@localhost ~]# systemctl restart dovecot
[root@localhost ~]# systemctl restart saslauthd

//At this time, the IAMP service is enabled, and the domain name is new com

//For convenience, I set the cache on the physical machine to generate corresponding mapping
192.168.220.134    mail.new.com
At this time, log in to Foxmail to view the mail network set by the local DNS we use
At this time, our E-mail address is client1@new.com --- password is 123
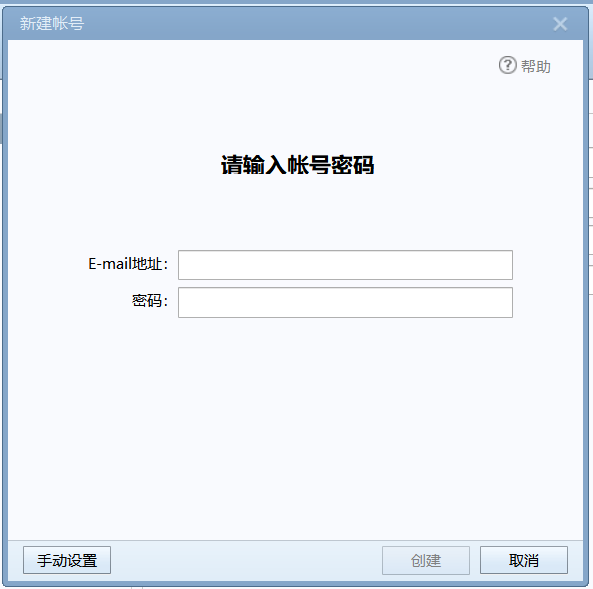
At this time, enter to set the agreement number,
- IMAP is the protocol for accepting mail - the ip address is set to the mail address - reason: the previously set mapping
- SMTP is the protocol for sending mail - the ip address is set to the mail address - reason: the previously set mapping
- At this point, we directly enter the user and password on Linux

At this time, login is successful. View the account information:
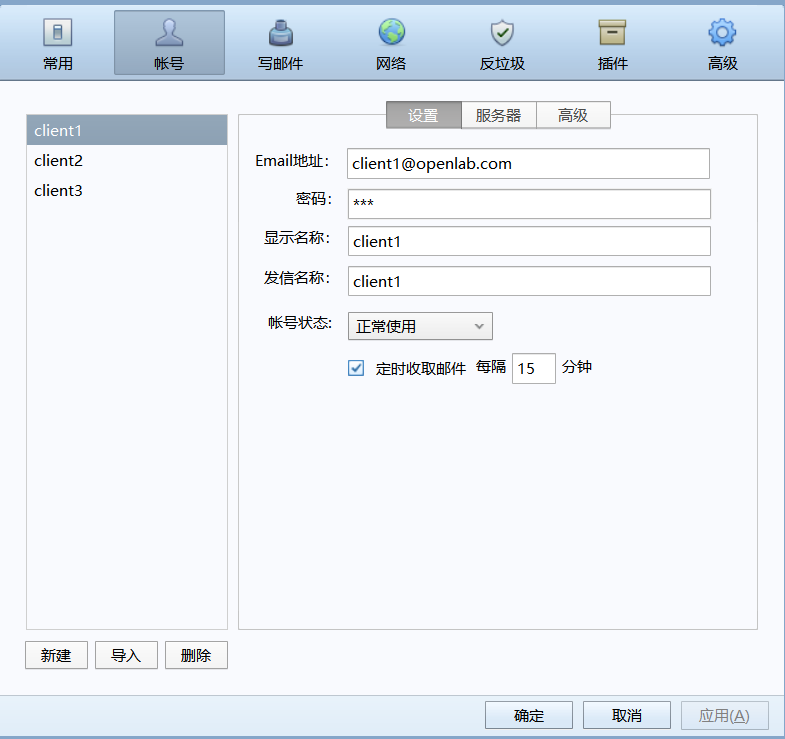
Through the previous settings, the mailbox service settings (mainly the INBOX folder settings) have been completed at this time
You can see that there is information acceptance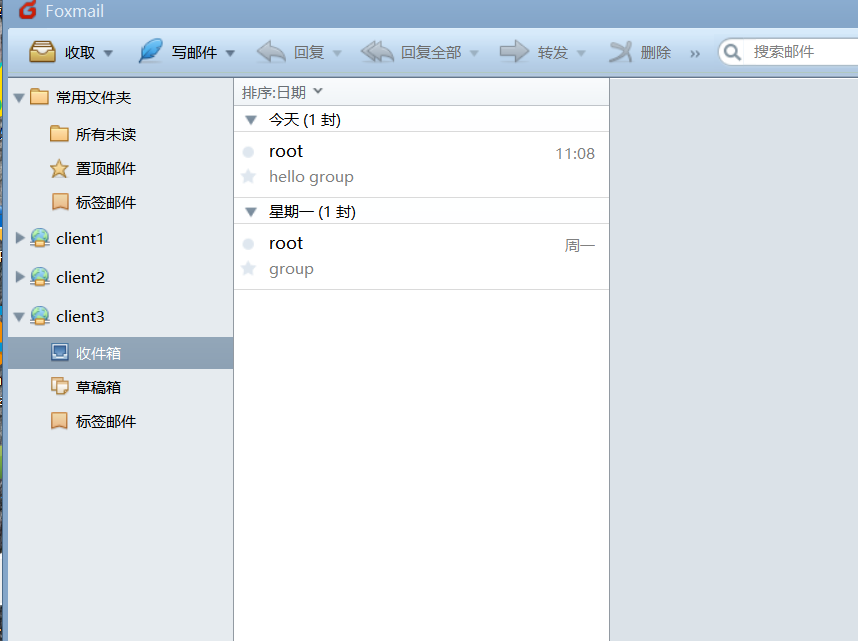
-
Send mail between domains
//Configure DNS and mail for two virtual machines
mail.new.com Your host does not need to be configured
mail.old.com The host configuration of is as follows:
[root@localhost ~]# yum install dovecot -y
[root@localhost ~]# yum install cyrus-sasl* -y
[root@localhost ~]# vim /etc/postfix/main.cf
myhostname = mail.ceshi.com
mydomain = ceshi.com
myorigin = $mydomain
inet_interfaces = all
mydestination = $myhostname, $mydomain
mynetworks = 192.168.220.0/24
relay_domains = $mydestination
#Enable SASL authentication
broken_sasl_auth_clients = yes
smtpd_sasl_auth_enable = yes
smtpd_sasl_security_options = noanonymous
smtpd_recipient_restrictions = permit_sasl_authenticated,permit_mynetworks,reject_unauth_destination

[root@localhost ~]# vim /etc/dovecot/dovecot.conf
protocols = imap pop3 lmtp
login_trusted_networks = 192.168.220.0/24
[root@localhost ~]# vim /etc/dovecot/conf.d/10-mail.conf
     mail_location = mbox:~/mail:INBOX=/var/mail/%u

[root@localhost ~]# systemctl restart postfix
[root@localhost ~]# systemctl restart dovecot
[root@localhost ~]# systemctl restart saslauthd
[root@localhost ~]# systemctl stop firewalld
[root@localhost ~]# setenforce 0
[root@localhost ~]# chmod 0600 /var/mail/*

//Then configure the DNS server
[root@localhost ~]# yum install bind -y

[root@localhost ~]# vim /var/named/chroot/etc/named.conf
zone "old.com" IN  {
	type master ;
	file "old.zone";
};

[root@localhost named]# vim /var/named/chroot/var/named/old.zone
$TTL 1D
@  IN  SOA  dns1.old.com. lianxi.163.com. (
                                     10
                                     1D
                                     1H
                                     1W
                                     3H )

        IN   NS dns1.old.com.
        IN   MX  10  mail.old.com.
dns1    IN   A  192.168.220.234
www.openlab.com.  IN   A  192.168.220.234
web     IN   CNAME  www
mail    IN   A     192.168.220.234

//Restart NDS, postfix, dovecot, sal services-
Virtual alias domain
[root@localhost ~]# vim /etc/postfix/main.cf
virtual_alias_domains = new1.com,old1.com
        #This parameter specifies the name of the virtual alias domain
virtual_alias_maps = hash:/etc/postfix/virtual
        #This parameter is used to specify the file path containing the virtual alias domain definition

stay new.com Do the following on the virtual machine of the domain:
[root@localhost ~]# vim /etc/postfix/virtual
Add the following
@new1.com       @new.com
        #Indicates that it will be sent to the virtual domain new1 COM is actually delivered to the real local domain new com
@old1.com       @old.com
        #Indicates that will be sent to the virtual domain old1 Com mail is actually delivered to the real local domain old com
AAA@new1.com  client1,client2,server1,server2@old.com
        #Users in this domain do not need to add suffixes, while users in other domains need to add suffixes
        #All issued AAA@new1 All emails will be forwarded to client1, client2server1 and server2
BBB@old1.com  client1,client3,server1,server2@old.com
        #All issued BBB@old1 All emails will be forwarded to client1, client3, Server1 and server2

//Convert virtual domain
[root@localhost ~]# postmap /etc/postfix/virtual
//Restart service
[root@localhost ~]# systemctl restart postfix

//Then in old Configure on COM domain:
[root@localhost ~]# vim /etc/postfix/virtual
 Add the following
@new1.com       @new.com
@old1.com       @old.com
AAA@new1.com  client1,client2,server1,server2@old.com
BBB@old1.com  client1,client3,server1,server2@old.com

[root@localhost ~]# postmap /etc/postfix/virtual
[root@localhost ~]# systemctl reload postfix