1. Server configuration
1. Reset the server password
After purchasing a server (take Alibaba cloud as an example), a service will be generated in the server list. Click the server to enter server management (the interface may be different for different Linux versions). The default server initialization password is empty, so you need to set a server first
Password to facilitate remote connection.
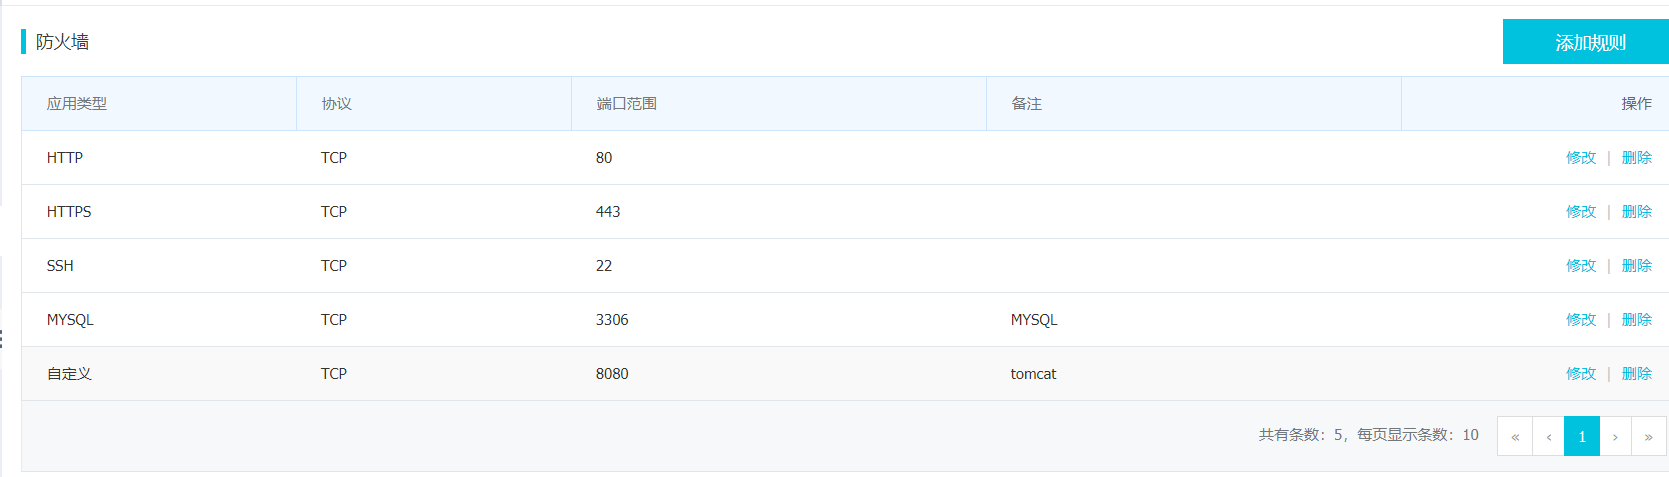
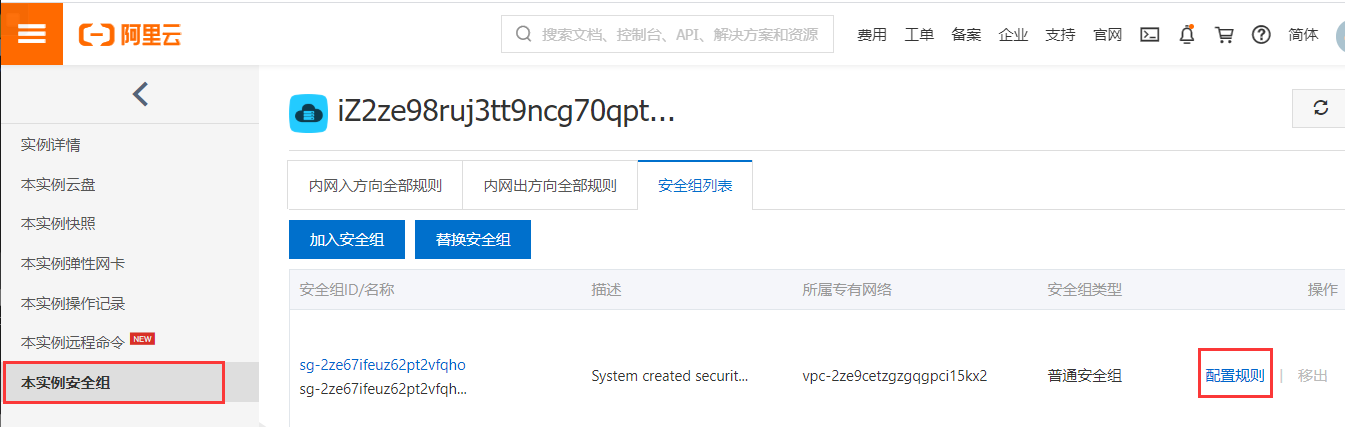
2. Set server firewall
Add rules add allowed ports (centOS adds rules in the firewall). You can view the ports developed by the server through the command
netstat -ano | grep 8000

3. Connect to the server
After setting, download the tool finalShell
Use finalShell to remotely connect to the server, create a new connection, fill in the server external network ip of the host, and then enter the root and server password to successfully connect to the server
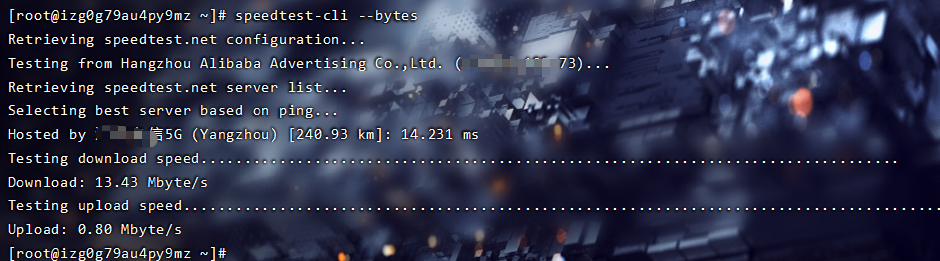
4. Test server network speed
Installation command:
yum install python-pip –y
pip install speedtest-cli
Run command:
speedtest-cli --bytes
2. Install JDK
1. Configure environment variables
Execute the following yum command to install
1. First update the YUM source (it's slow and can be ignored)
yum -y update
2. List jdk1 Version 8
yum list Java*
3. Install jdk1 eight
yum install java-1.8.0-openjdk* -y
2. Verify whether the installation is successful (if the java version appears, the java environment deployment is successful)
java -version
3. Download and configure Tomcat
1. Configuration directory
1. First in usr Directory:
cd /usr
2. Create a new folder:
mkdir project
3. Enter the new folder:
cd project/
mkdir tomcat
cd tomcat/
2. Download Tomcat
Version number can be queried Official website
1. Download and install Tomcat
#Download tomcat. If the website fails, find the installation package on the Internet, transfer it to / usr/java with Xftp, and then decompress it

wget https://mirrors.cnnic.cn/apache/tomcat/tomcat-8/v8.5.39/bin/apache-tomcat-8.0.53.tar.gz

Or use:

wget https://archive.apache.org/dist/tomcat/tomcat-8/v8.5.39/bin/apache-tomcat-8.5.39.tar.gz

wget https://archive.apache.org/dist/tomcat/tomcat-7/v7.0.107/bin/apache-tomcat-7.0.107.tar.gz
2. Unzip the downloaded compressed package
tar -xvf apache-tomcat-8.5.39.tar.gz
3. Rename the file
mv apache-tomcat-8.5.39 tomcat8
3. Run Tomcat
1. Switch to Tomcat's bin directory
cd tomcat8/bin
2. Execute the following command to start Tomcat
./startup.sh
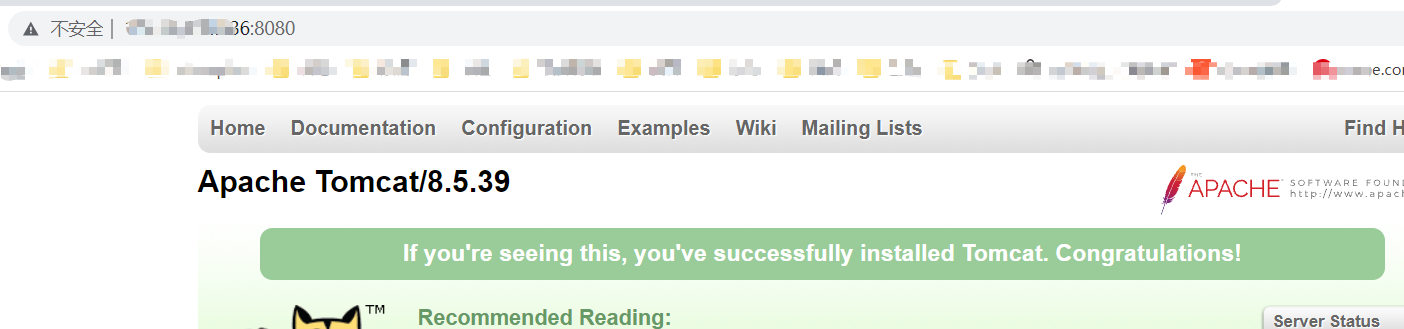
3. If there is no error message, Tomcat is started successfully.

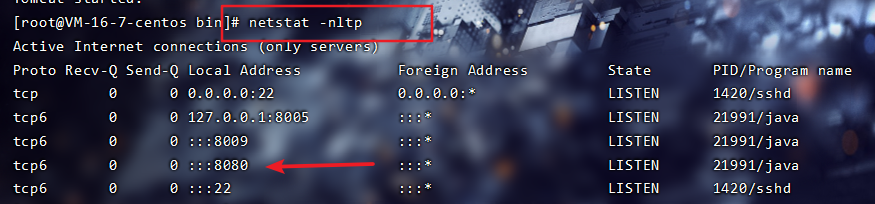
4. View process by command
netstat -nltp
5. Switch to the Tomcat logs directory and execute the command to view the Tomcat running log
cd /usr/project/tomcat/tomcat8/logs/
tail -f catalina.out
6. The browser can be accessed by entering http: / / public ip:8080
4. Uninstall Tomcat
1. View Tomcat process through command
netstat -nltp
2. End the Tomcat process by command: kill -9 21991 (process number)
kill -9 21991
3. Enter the Tomcat directory and delete the file
cd /usr/project/tomcat
rm -rf file name
4. MySQL environment
1. Inspection before installation
1. First check whether MySQL has been installed
yum list installed | grep mysql
2. If it is installed, uninstall it first: yum -y remove the file found above
yum -y remove file name
3. Check MySQL installed in other ways
rpm -qa | grep mysql
4. If yes, uninstall it through rpm -e command or rpm -e --nodeps command
rpm -e Checked out name #Normal delete mode
rpm -e --nodeps Checked out name #Strong deletion mode: if you use the above command to delete and prompt other dependent files, you can use this command to strongly delete them
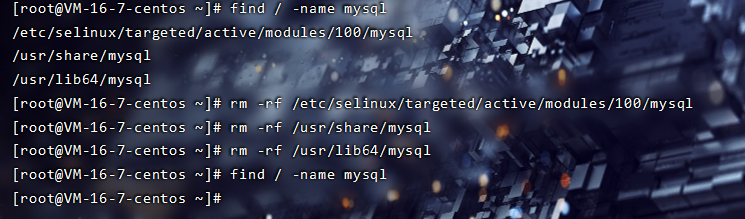
5. Query and delete MySQL related directories through the command
find / -name mysql

6. Delete related files through - RM, RF
7. Check again. Nothing indicates that the uninstall is successful
rpm -qa | grep -i mysql
2. Database installation process
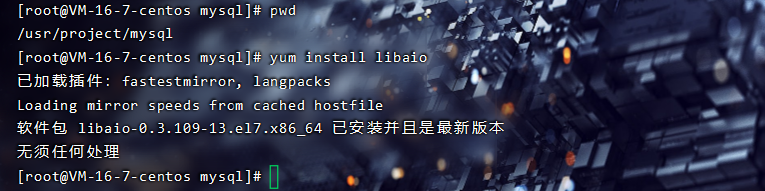
1. MySQL relies on libaio, so install libaio first
yum install libaio
2. MySQL download source
wget http://repo.mysql.com/mysql57-community-release-el7-7.noarch.rpm

// Select the second method
wget http://dev.mysql.com/get/mysql57-community-release-el7-8.noarch.rpm
3. Install mysql57-community-release-el7-8 noarch. RPM package
rpm -ivh mysql57-community-release-el7-7.noarch.rpm  --nodeps --force

// In the previous step, select the second method and use the following command
yum localinstall mysql57-community-release-el7-8.noarch.rpm
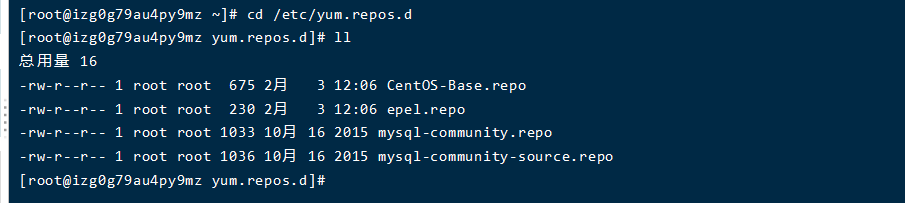
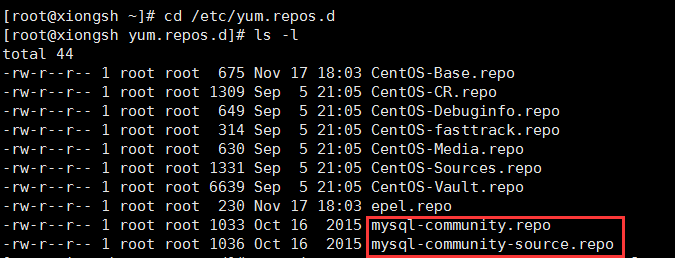
4. After installing this package, you will get two yum repo sources of MySQL and enter yum repos. D directory
cd /etc/yum.repos.d
5. View the files in the current directory
ll
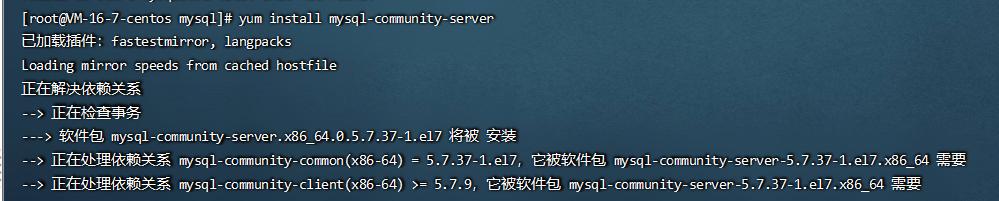
6. Install MySQL
yum install -y mysql-server

// The second way is to use the following command
yum install mysql-community-server
Note: if you start after installation, the following error will be reported (Mysql failure: GPG key has been installed, but it is not applicable to this software package), you can refer to and modify it( file)
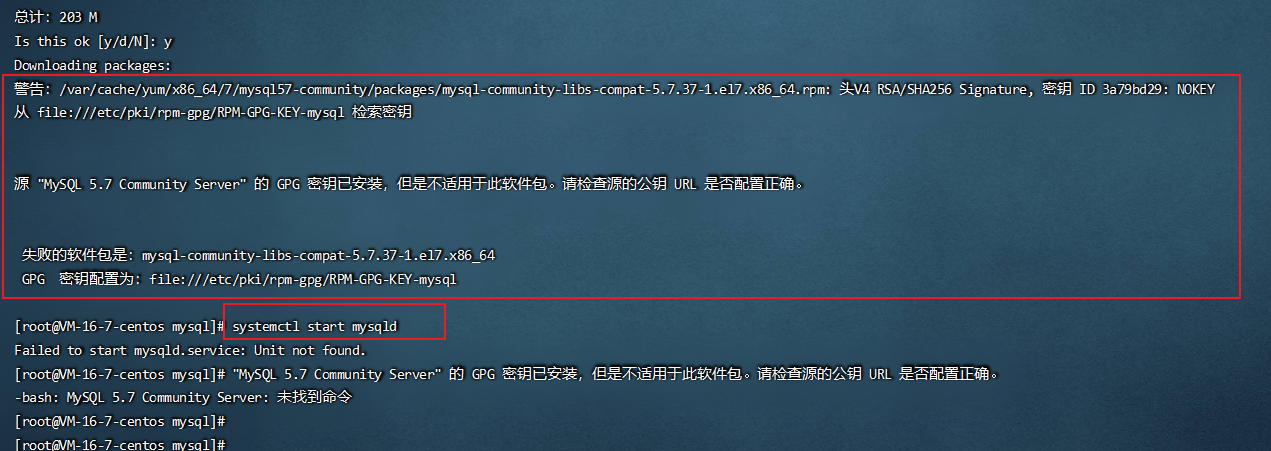
Solution: GPG verification fails, because the public key corresponding to the software package configured locally is wrong, and signature verification fails. I searched the keyword GPG on the mysql official website and found a solution. The main idea is that if you use RPM of version 4.1 or above, in addition to importing mysql public key into the configuration of individual users, you also need to import mysql public key into the configuration of RPM, and then install it again.
rpm --import https://repo.mysql.com/RPM-GPG-KEY-mysql-2022

7. In MySQL configuration file / etc / my Add character set server = utf8 to [mysqld] of CNF
vim /etc/my.cnf
character-set-server=utf8
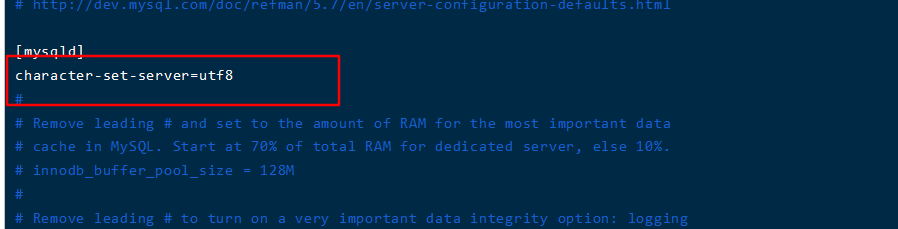
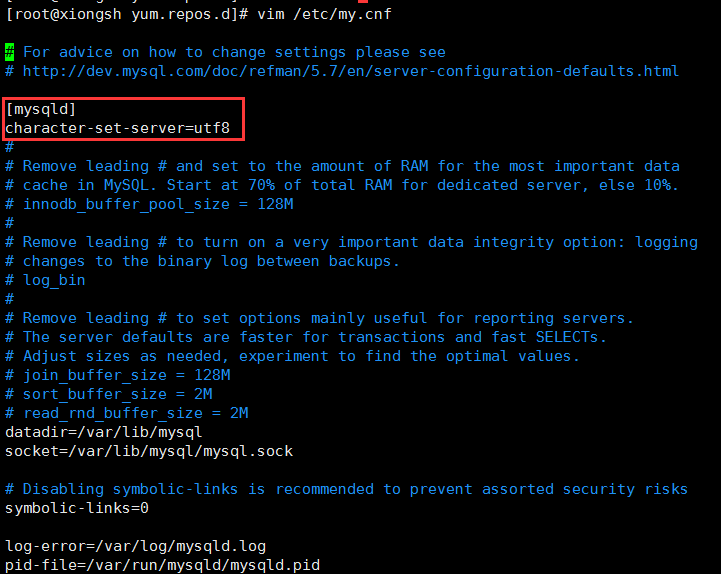
(if you are prompted: bash: vim: no command found, use: yum -y install vim * to install)
8. Start the MySQL service and check whether the MySQL service has been started
systemctl start mysqld
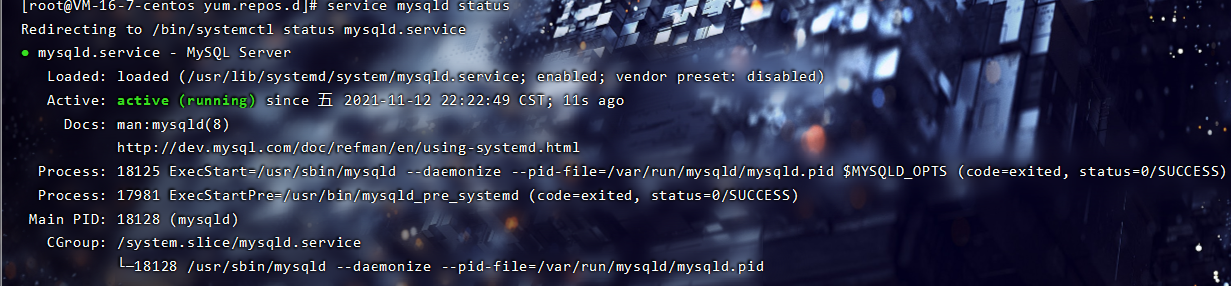
9. Check the running status of MySQL
service mysqld status
3. Set MySQL password
1. Reset the root password
MySQL5.7 will generate a random password for the root user after installation, rather than an empty password like the previous version. You can change the root login password in safe mode or login with random password to change the password.
View the random password generated by MySQL for root user through the command
grep 'temporary password' /var/log/mysqld.log

2. Log in to MySQL through the user name and password. User name: root, password: the random password just queried
mysql -u root -p
Enter password: (enter the random password just queried)
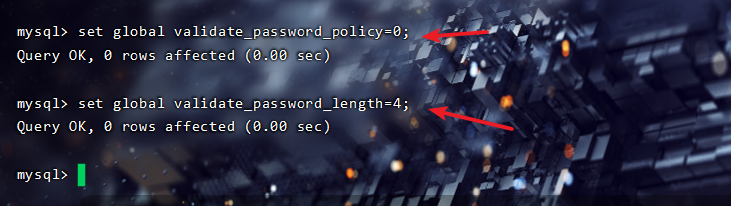
3. Modify the password of root user: (the password policy of MySQL is complex, and too simple password will be rejected). First, modify the security policy to avoid too simple passwords being rejected
set global validate_password_policy=0;
set global validate_password_length=4;
4. Modify MySQL password
alter user 'root'@'localhost' identified by 'Liyh123';
5. After modification, refresh the system permissions of MySQL, save and exit
flush privileges;

quit;
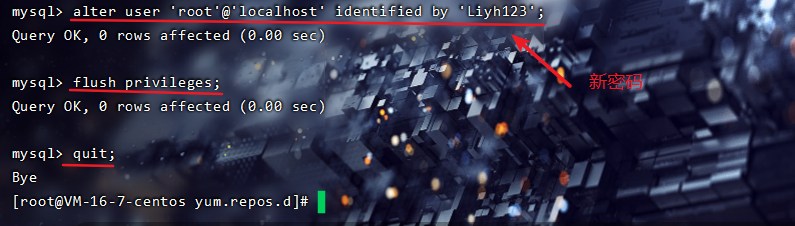
6. Log in with the new password you just set
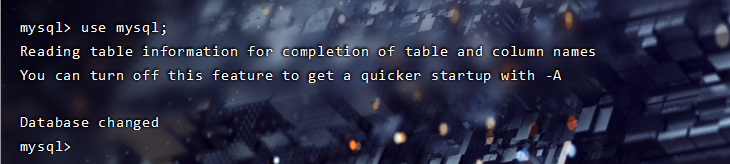
mysql -u root -p

use mysql;
#The following prompt appears if you are operating:

#You must reset your password using ALTER USER statement before executing this statement.

#Just set the password again:

set password = password('Liyh123');
4. Configure MySQL
1. Open port 3306, allow user name: root, password: Liyh123, connect to MySQL server from any host, refresh MySQL system permissions, save and exit
GRANT ALL PRIVILEGES ON *.* TO 'root'@'%' IDENTIFIED BY 'Liyh123' WITH GRANT OPTION;
flush privileges;
quit;
2. Install mysql jdbc Driver
yum install -y mysql-connector-java

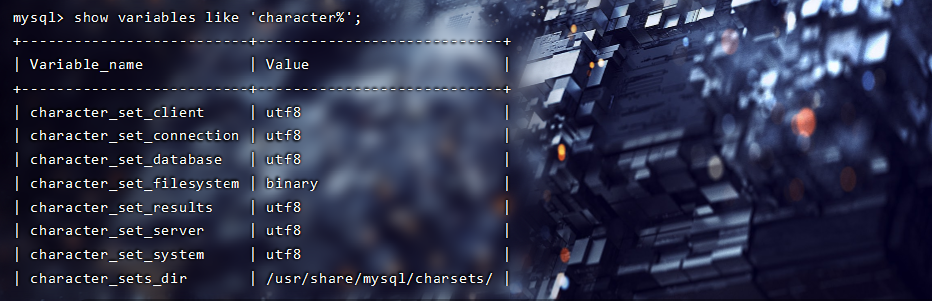
3. Here, MySQL installation and configuration are completed. Finally, log in and check whether the database code is changed to UTF-8
mysql -u root -p
show variables like 'character%';
4. How to start / stop / restart MySQL?

1, Start command
1,use service Start: service mysqld start

2,use mysqld Script start:/etc/inint.d/mysqld start

3,use safe_mysqld Start: safe_mysqld&
2, Stop command
1,use service Start: service mysqld stop

2,use mysqld Script start:/etc/inint.d/mysqld stop

3,mysqladmin shutdown
3, Restart command
1,use service Start: service mysqld restart

2,use mysqld Script start:/etc/inint.d/mysqld restart
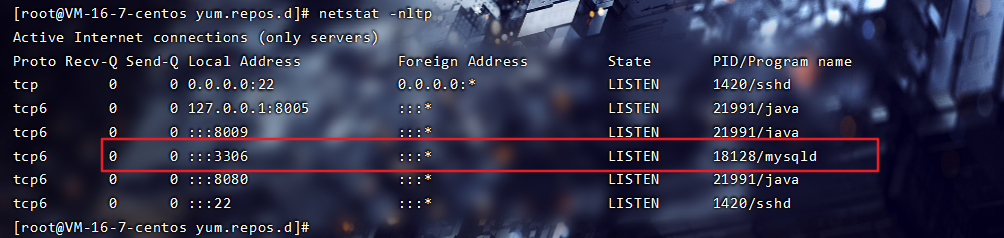
5. Check whether MySQL is running through the command (netstat -nltp)
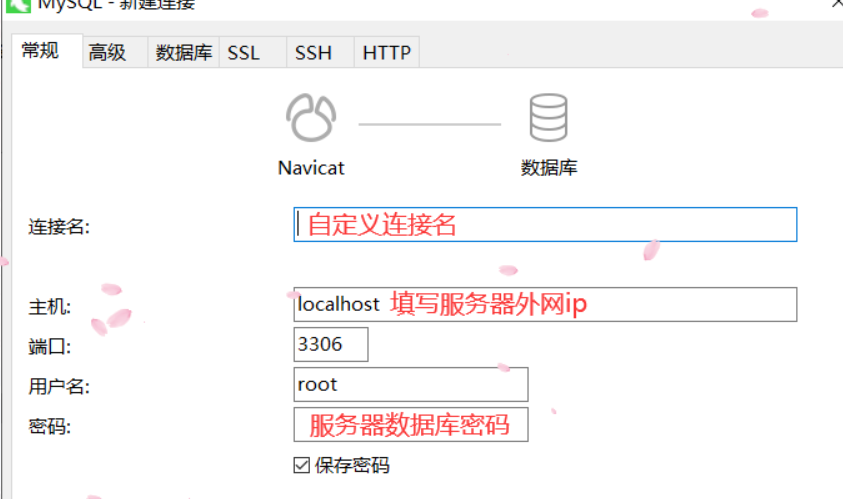
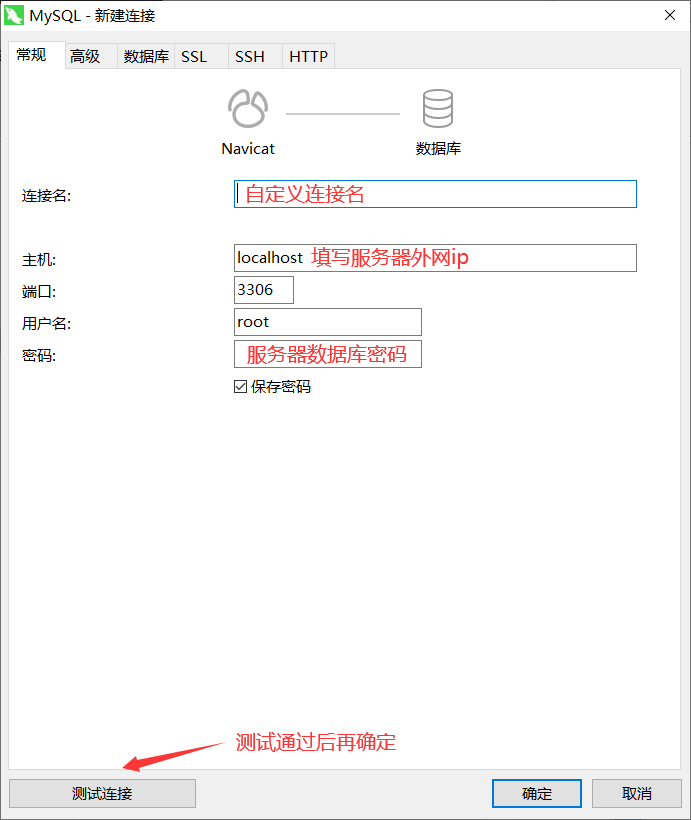
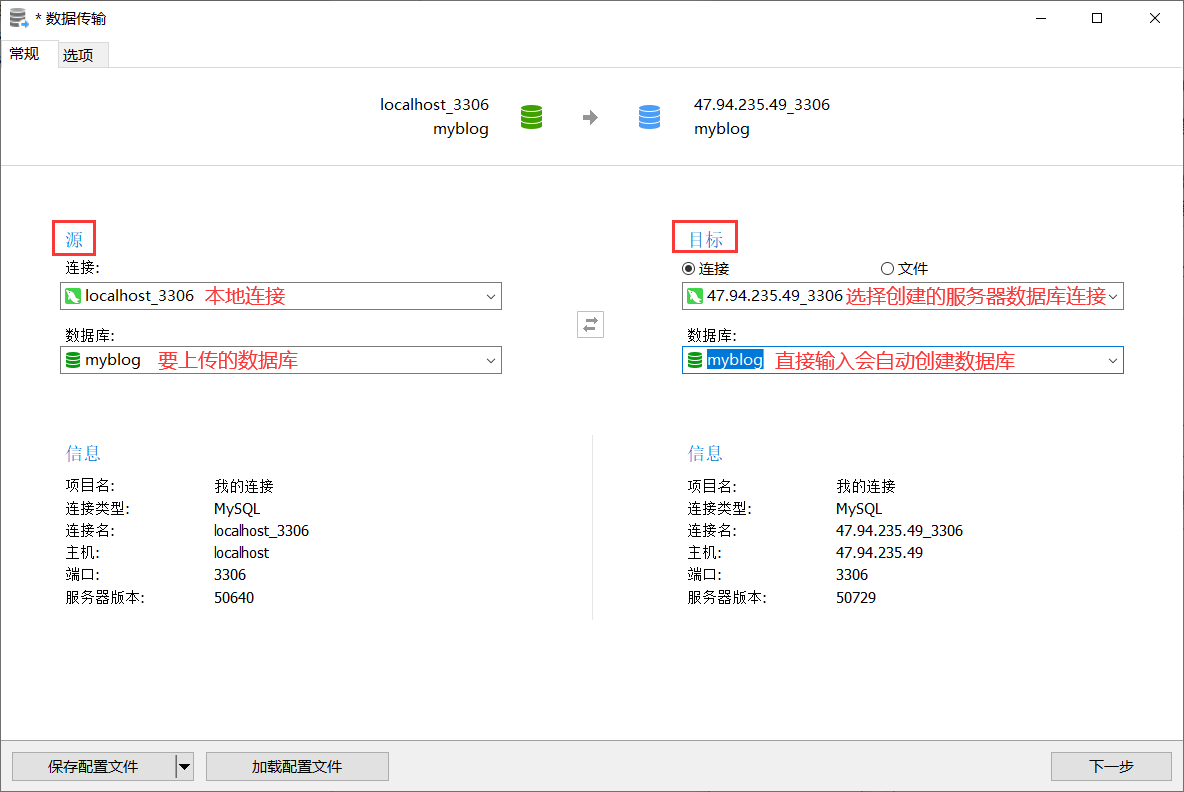
5. Use Navicat to manage database
After downloading and installing the tool Navicat for MySQL, create a new connection to connect to the server database
Baidu online disk ——Extraction code: 4mb8
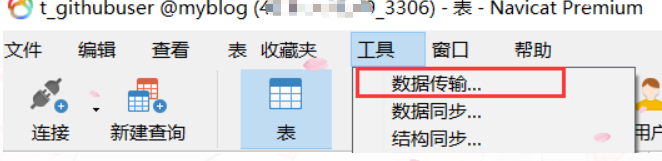
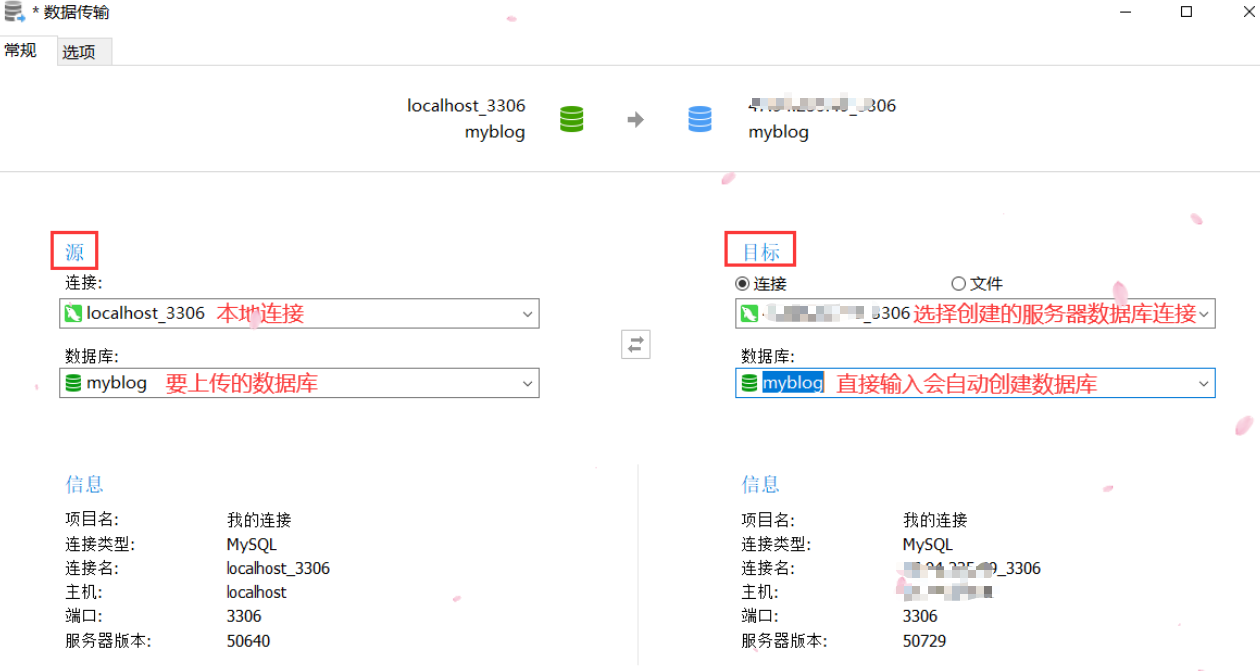
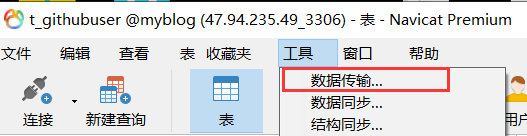
6. Use Navicat to upload the local database to the server
Select data transfer from the toolbar
5. Install Redis
1. First in usr Directory:
cd /usr
2. Create a new folder:
mkdir project
3. Enter the new folder:
cd project/

mkdir redis

cd redis/
4. Obtain redis resources
wget http://download.redis.io/releases/redis-4.0.8.tar.gz
5. Unzip the downloaded compressed package
tar xzvf redis-4.0.8.tar.gz
6. After installation, enter the command make to execute the compilation command
cd redis-4.0.8

make

cd src

make install PREFIX=/usr/project/redis
(if you use the make command to report an error, it is because Redis is implemented in C and needs gcc to compile, so the reason is that gcc is not installed in the system and is executed in order, * because there are many dependencies on gcc, execute it just in case)
yum install cpp

yum install binutils

yum install glibc

yum install glibc-kernheaders

yum install glibc-common

yum install glibc-devel

yum install gcc

yum install make
7. Move the configuration file to the installation directory
cd ../

mkdir /usr/project/redis/etc

mv redis.conf /usr/project/redis/etc
8. Configure redis to be started in the background, and change "daemon no" to "daemon yes"
vi /usr/project/redis/etc/redis.conf
9. Add redis to startup and add / usr / project / redis / bin / redis server / usr / project / redis / etc / redis Conf (which means to call this command to start redis after startup)
vi /etc/rc.local
/usr/project/redis/bin/redis-server
/usr/project/redis/etc/redis.conf
10. Enable redis
/usr/project/redis/bin/redis-server /usr/project/redis/etc/redis.conf
11. Copy redis server and redis cli to bin so that the redis cli instruction can be used directly in any directory
cp /usr/project/redis/bin/redis-server /usr/local/bin/
cp /usr/project/redis/bin/redis-cli /usr/local/bin/
12. Set redis} password (optional)
redis-cli
View the existing} redis password (optional)
config get requirepass

Set the redis password and run the command: config set requirepass * * * * (* * * * is the password you want to set). If the setting is successful, the word "OK" will be returned and exit through exit
config set requirepass 123456
The following two commands can restart the redis service (the password set for you by 123456)
redis-cli -h 127.0.0.1 -p 6379 -a 123456
redis-cli
auth 123456
13. Enable the external network (server ip) to access redis( Firewall related commands)
Turn on the firewall and check the commands of the firewall
systemctl start firewalld

firewall-cmd --state
Configure firewall: firewall CMD -- zone = public -- add port = 6379 / TCP -- permanent (open 6379 port)
firewall-cmd --zone=public --add-port=6379/tcp --permanent
Restart the firewall for the configuration to take effect immediately
systemctl restart firewalld
View all open ports of the system
firewall-cmd --zone=public --list-ports
At this time, although the firewall has opened port 6379, the external network is still inaccessible, because redis listens to 127.0.0.1:6379 and does not listen to requests from the external network.
(1) Put redis in the folder directory Add # comment before bind 127.0.0.1 in conf configuration file
vi /usr/project/redis/etc/redis.conf
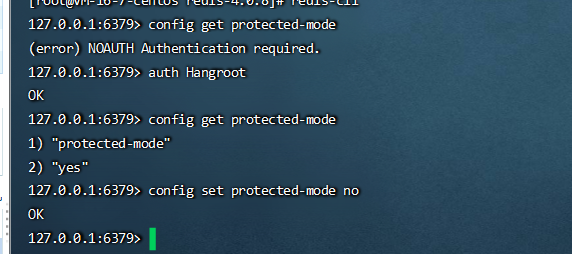
(2) Command: after redis cli connects to redis, check whether the protected mode is no through config get. If not, use config set to change the configuration name attribute to No.
config get protected-mode
config set protected-mode no
(3) ip access via Linux server
redis-cli -h 66.66.66.66 -p 6379 -a 123456
14. Common redis commands
redis-server /usr/project/redis/etc/redis.conf  //Start redis

pkill redis   //Stop redis

rm -rf /usr/local/redis   //Delete installation directory
6. Install Nginx using yum or up2date
1. Install Nginx:
1. Install nginx using yum or up2date (the installation directory is / etc/nignx)
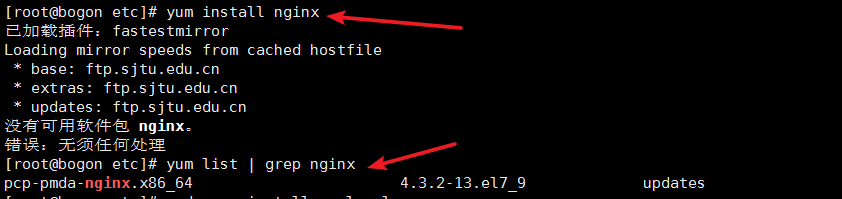
yum install nginx
(if you cannot install using yum install nginx, view the available installation packages through the command: yum list | grep nginx). You can see from the query results that nginx is not in the official yum source list of centos.
First install epel: sudo Yum install epel release, then update: yum -y update, and finally install it again: yum install nginx)
2. Start the # nginx# service
sudo systemctl start nginx
3. Restart nginx service
sudo service nginx restart
4. Stop nginx service
sudo systemctl stop nginx
5. Check nginx{status
sudo systemctl status nginx
6. nginx configuration
# For more information on configuration, see:
#   * Official English Documentation: http://nginx.org/en/docs/
#   * Official Russian Documentation: http://nginx.org/ru/docs/

user nginx;
worker_processes auto;
error_log /var/log/nginx/error.log;
pid /run/nginx.pid;

# Load dynamic modules. See /usr/share/doc/nginx/README.dynamic.
include /usr/share/nginx/modules/*.conf;

events {
    worker_connections 1024;
}

http {
    log_format  main  '$remote_addr - $remote_user [$time_local] "$request" '
                      '$status $body_bytes_sent "$http_referer" '
                      '"$http_user_agent" "$http_x_forwarded_for"';

    access_log  /var/log/nginx/access.log  main;

    sendfile            on;
    tcp_nopush          on;
    tcp_nodelay         on;
    keepalive_timeout   65;
    types_hash_max_size 4096;

    include             /etc/nginx/mime.types;
    default_type        application/octet-stream;

    # Load modular configuration files from the /etc/nginx/conf.d directory.
    # See http://nginx.org/en/docs/ngx_core_module.html#include
    # for more information.
    include /etc/nginx/conf.d/*.conf;

    server {
        listen       80;
        listen       [::]:80;
        server_name  _;
        root         /usr/share/nginx/html;

        # Load configuration files for the default server block.
        include /etc/nginx/default.d/*.conf;

        error_page 404 /404.html;
        location = /404.html {
        }

        error_page 500 502 503 504 /50x.html;
        location = /50x.html {
        }
    }

# Settings for a TLS enabled server.
#
#    server {
#        listen       443 ssl http2;
#        listen       [::]:443 ssl http2;
#        server_name  _;
#        root         /usr/share/nginx/html;
#
#        ssl_certificate "/etc/pki/nginx/server.crt";
#        ssl_certificate_key "/etc/pki/nginx/private/server.key";
#        ssl_session_cache shared:SSL:1m;
#        ssl_session_timeout  10m;
#        ssl_ciphers HIGH:!aNULL:!MD5;
#        ssl_prefer_server_ciphers on;
#
#        # Load configuration files for the default server block.
#        include /etc/nginx/default.d/*.conf;
#
#        error_page 404 /404.html;
#            location = /40x.html {
#        }
#
#        error_page 500 502 503 504 /50x.html;
#            location = /50x.html {
#        }
#    }

}
2. Uninstall nginx
1. First enter the command ps -ef | grep nginx to check whether the nginx service is running.
ps -ef | grep nginx

2. Stop nginx# service (both commands are OK)
/usr/sbin/nginx -s stop
sudo systemctl stop nginx
3. Find and delete nginx# related files
whereis nginx
find / -name nginx
Delete all directories found by find in sequence: rm -rf /usr/sbin/nginx
Clean up again using yum 4
yum remove nginx
3. View nginx logs
cat /var/log/nginx/error.log
cat /var/log/nginx/access.log