1. Foreword
When setting up a cluster, you need to ensure that there is no problem in setting up a stand-alone version of redis. You can refer to Linux server Redis 6.x installation and configuration
2. Benefits of master-slave replication
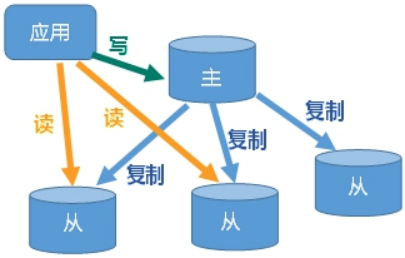
- Read write separation, performance expansion
Disaster recovery and rapid recovery
The master library is responsible for writing and the slave library is responsible for reading.
3. Server preparation
Set up redis with one master and one slave, which is divided into three groups. In practice, three groups of instances can be set up on different servers. In order to demonstrate the operation this time, all redis instances are on one server and distinguished by ports
Note: if the ECS requires security group ports and firewall open redis clients and the ports (+ 10000) of the reids bus, for example, the ports of the reids bus are 7001-7006, and the ports of the reids bus are 17001-17006, so the ports to be opened are 7001-7006 and 17001-17006
4. Environment construction
4.1. Create cluster working directory
mkdir /usr/local/redis/cluster -p
4.2. Build a stand-alone environment
Create a redis7001 directory in the cluster directory and successfully build a stand-alone redis with the port set to 7001
4.3 cluster configuration
Close the 7001 stand-alone instance and modify the configuration file
vim /usr/local/redis/cluster/redis7001/config/redis.conf
The contents are as follows:
daemonize  yes
 notes bind 127.0.0.1
protected-mode no
daemonize yes
cluster-enabled yes
logfile "/usr/local/redis/cluster/redis7001/log/redis.log"

port 7001
# Just specify it directly without manually creating a conf file
cluster-config-file nodes-7001.conf

#IP (extranet IP) and port of the cluster to the external network
cluster-announce-ip 111.xxx.xxx.175
cluster-announce-port 7001
4.4. Copy instance
Copy the redis7001 instance directory as redis7002~redis7006 respectively
cp redis7001/ redis7002 -r
...
...
cp redis7001/ redis7006 -r

4.5. Modify other instance configuration files
Other instances are copied from redis7001, so you only need to modify the differences in the configuration file, as follows:
# Modify redis700x in logfile to the corresponding folder, such as redis7002
logfile "/usr/local/redis/cluster/redis700x/log/redis.log"

# Change 700x to the port of the corresponding instance, such as 7002
port 700x

# Change 700x to the port of the corresponding instance, such as 7002
cluster-config-file nodes-700x.conf

# Change 700x to the port of the corresponding instance, such as 7002
cluster-announce-port 700x
4.6. Create batch startup / shutdown scripts
Since all redis instances are in one server, in order to facilitate unified management, create batch startup and shutdown scripts. The script directory is: / usr/local/redis/cluster
1. Cluster startup script:
vim start-all.sh
Content:
cd redis7001/bin
./redis-server ../config/redis.conf
cd ../..
cd redis7002/bin
./redis-server ../config/redis.conf
cd ../..
cd redis7003/bin
./redis-server ../config/redis.conf
cd ../..
cd redis7004/bin
./redis-server ../config/redis.conf
cd ../..
cd redis7005/bin
./redis-server ../config/redis.conf
cd ../..
cd redis7006/bin
./redis-server ../config/redis.conf
cd ../..
to grant authorization:
chmod u+x start-all.sh
2. Cluster shutdown script:
vim shutdow-all.sh
Content:
redis7001/bin/redis-cli -p 7001 shutdown
redis7001/bin/redis-cli -p 7002 shutdown
redis7001/bin/redis-cli -p 7003 shutdown
redis7001/bin/redis-cli -p 7004 shutdown
redis7001/bin/redis-cli -p 7005 shutdown
redis7001/bin/redis-cli -p 7006 shutdown
to grant authorization:
chmod u+x shutdow-all.sh
4.7. Create a cluster
1. Start all nodes
sh start-all.sh

2. Create cluster connection
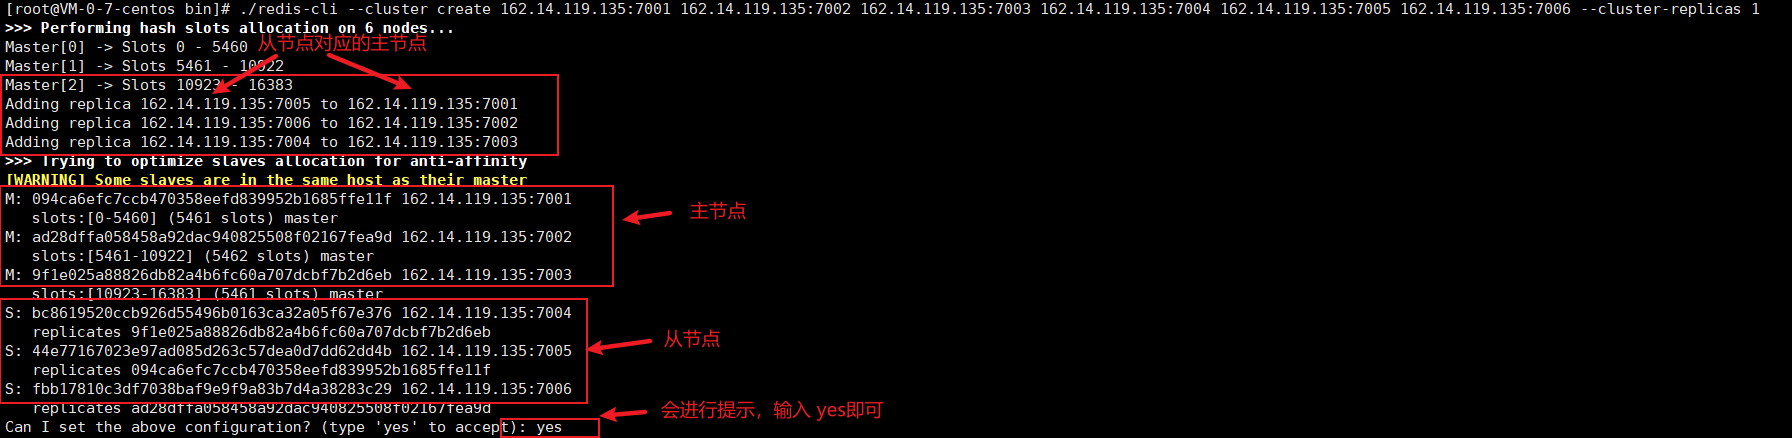
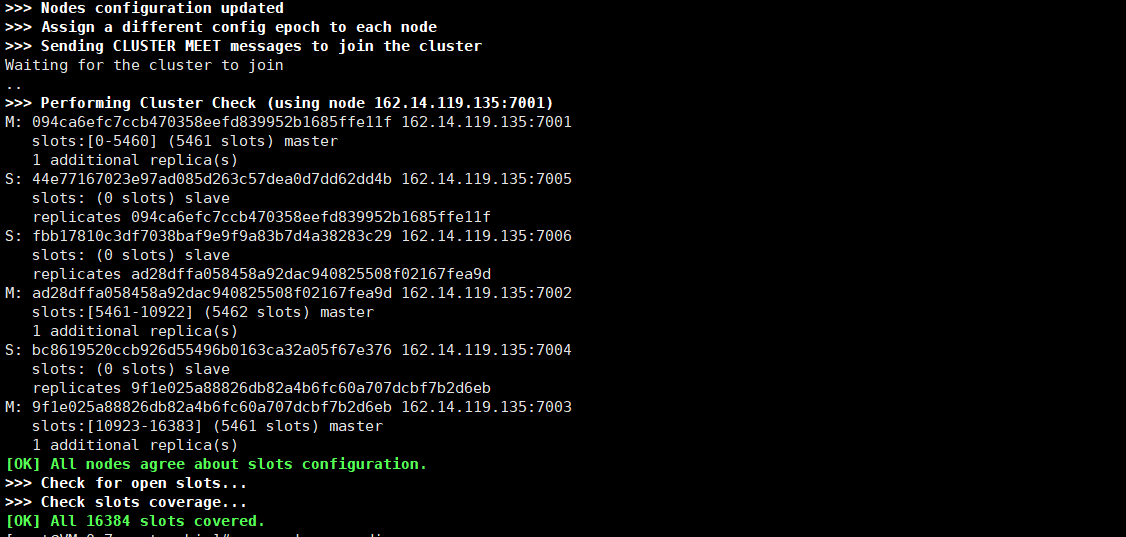
# Enter cluster directory
cd /usr/local/redis/cluster/redis7001/bin

# When building a cluster, it is required to have at least three master nodes (because of the voting mechanism), and the six instances are automatically assigned the master-slave relationship
# --Cluster replicas 1 indicates the number of slave libraries in the master database. A value of 1 indicates that there is a slave library
./redis-cli --cluster create 162.14.119.135:7001 162.14.119.135:7002 162.14.119.135:7003 162.14.119.135:7004 162.14.119.135:7005 162.14.119.135:7006 --cluster-replicas 1
3. Cluster connection test
Connect to any node
cd redis7001/bin
./redis-cli -h 162.14.119.135 -c -p 7001
It can be seen that in the 7001 node, set ting a value will automatically jump to the 7002 node, and the value can be taken out, indicating that the current value is stored in the 7002 node;
We use it again/ Redis cli - H 162.14.119.135 - C - P 7001 enters the 7001 node and obtains the name value. You can see that redis will automatically take values from the 7002 node;

5. Integrate SpringBoot
For the SpringBoot integrated stand-alone version of reids, please refer to Integrating Redis with SpringBoot In fact, the difference between the integrated cluster version and the stand-alone version lies in the configuration of yaml files. The configuration is as follows:
spring:
  redis:
    cluster:
      nodes:
        - 162.14.119.135:7001
        - 162.14.119.135:7002
        - 162.14.119.135:7003
        - 162.14.119.135:7004
        - 162.14.119.135:7005
        - 162.14.119.135:7006
    #Connection timeout
    timeout: 3600ms
    #password
    password:
    lettuce:
      pool:
        # Maximum number of connections in the connection pool (negative value indicates no limit)
        max-active: 8
        # Maximum blocking wait time of connection pool (negative value indicates no limit)
        max-wait: -1ms
        # Maximum free connections in the connection pool
        max-idle: 8
        # Minimum free connections in connection pool
        min-idle: 1
      #Shutdown timeout
      shutdown-timeout: 500ms
6. Delete and add nodes
Before deleting a node, you need redis cli -- cluster check IP: port to query the cluster status and obtain the id and master-slave relationship of the corresponding node.
6.1. Delete slave node
Delete command: redis cli -- cluster del node IP: port ID
# For example, delete 7006 slave nodes
./redis-cli --cluster del-node 162.14.119.135:7006 fbb17810c3df7038baf9e9f9a83b7d4a38283c29

6.2. Add a slave node
After the deleted node is restarted, it cannot automatically join the cluster. It is already an independent master node;
The newly added slave node can be a previously deleted node or a newly added redis instance;
If you want to join a cluster, you need to perform cluster reset on the node first, and then add it with add node for incremental synchronous replication;
To facilitate the demonstration, we directly rejoin the previously deleted '7006' node into the cluster. If you don't want to join the previously deleted node, you can add an instance and then join the cluster;
Reset node:
# Ensure that the deleted node is in the startup state, such as 7006 node
# Enter 7006 client
./redis-cli -h 162.14.119.135 -c -p 7006

# Execute reset command
cluster reset

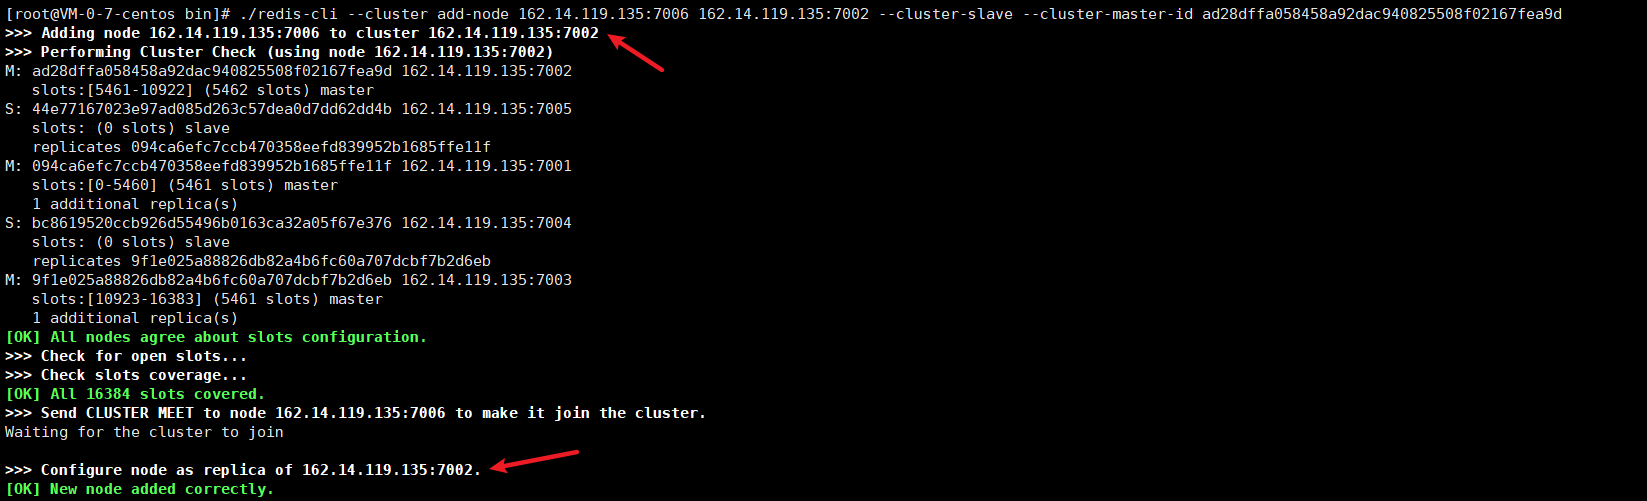
Join the cluster:
# The join cluster command specifies that 7006 join the 7002 node:
./redis-cli --cluster add-node 162.14.119.135:7006 162.14.119.135:7002 --cluster-slave --cluster-master-id d882c3ab7f37613663d7f063c4d7eae5cefd7fb7

#Add node: followed by the newly added slave and the master corresponding to the slave
#Cluster Slave: indicates that the slave node is joined
#--Cluster master ID: node ID of the master corresponding to the slave
#If the master node ID is not specified through -- cluster master ID, it will be randomly assigned to any master node
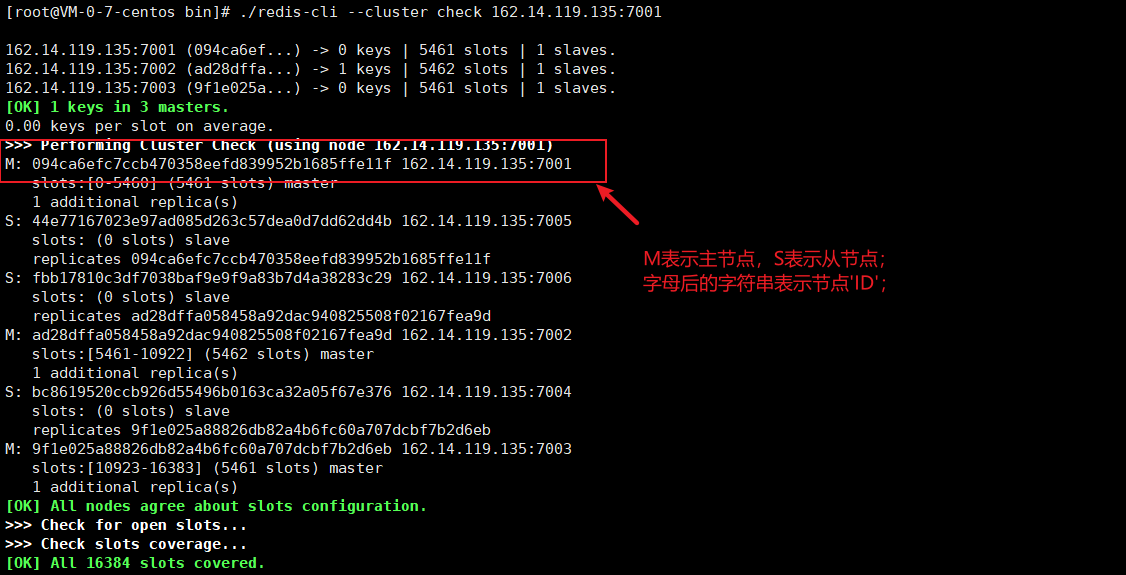
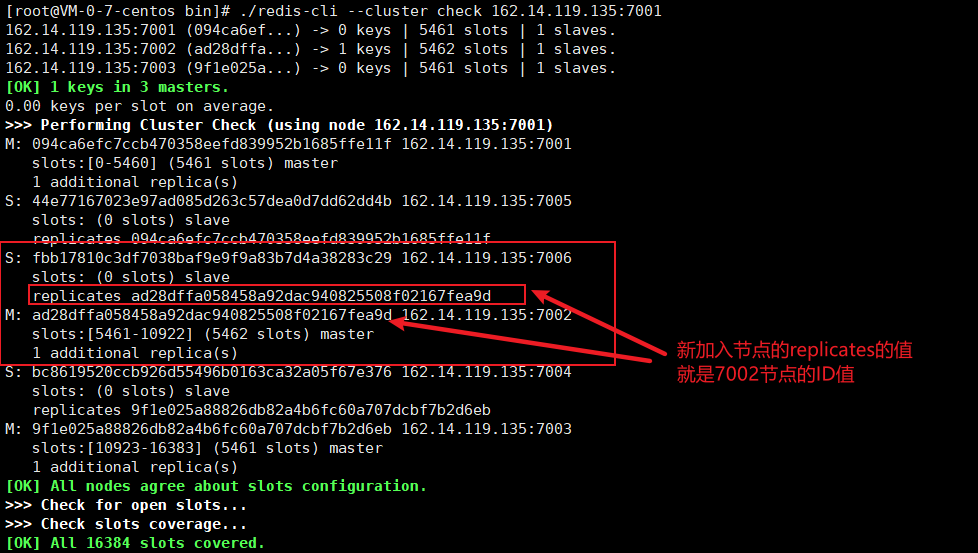
View cluster status:
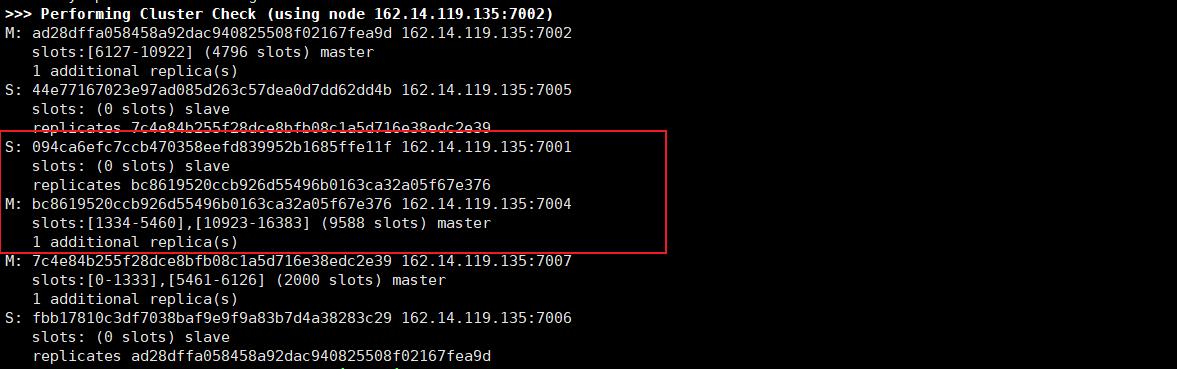
# View the cluster again:
./redis-cli --cluster check 162.14.119.135:7001
6.3. Delete primary node
When deleting the primary node, you need to do more. You need to transfer the slot points before deleting them. For details, refer to the following screenshot
For example, delete the 7003 master node whose ID is 9f1e025a88826db82a4b6fc60a707dcbf7b2d6eb

# Slot point transfer
./redis-cli --cluster reshard 162.14.119.135:7003
The following screenshot is the screenshot of other systems, but the operating principle and steps are the same as when deleting 7003 node
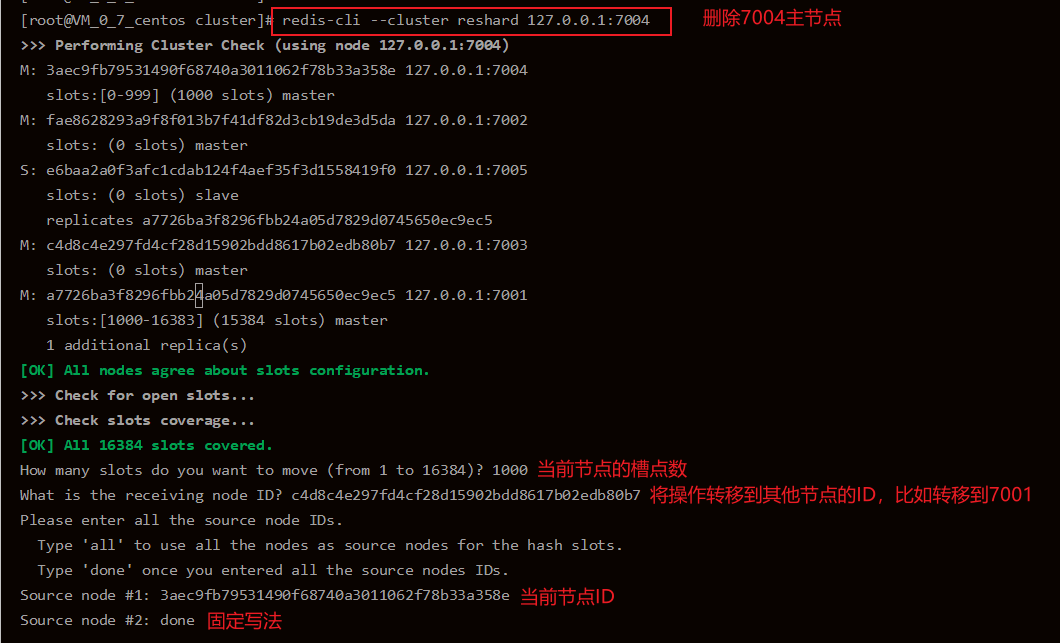
# Delete the 7003 node. After the transfer of the primary node slot point is completed, you can delete the node as much as possible. Execute the command:
./redis-cli --cluster del-node 162.14.119.135:7003 9f1e025a88826db82a4b6fc60a707dcbf7b2d6eb

When you check the cluster again, there are no 7003 nodes
6.4. Add a master node
This is demonstrated in the previous add slave node. Add the previously deleted node. This time, the new master node adopts the method of adding an instance.
Preconditions:
Copy a copy of redis7001 to redis7007, modify the configuration file of redis7007, and then start the instance;
Join the cluster:
# Add 7007 to the cluster, and the following 111.229.160.175:7001 is any primary node ip:port in the cluster
./redis-cli --cluster add-node 162.14.119.135:7007 162.14.119.135:7001
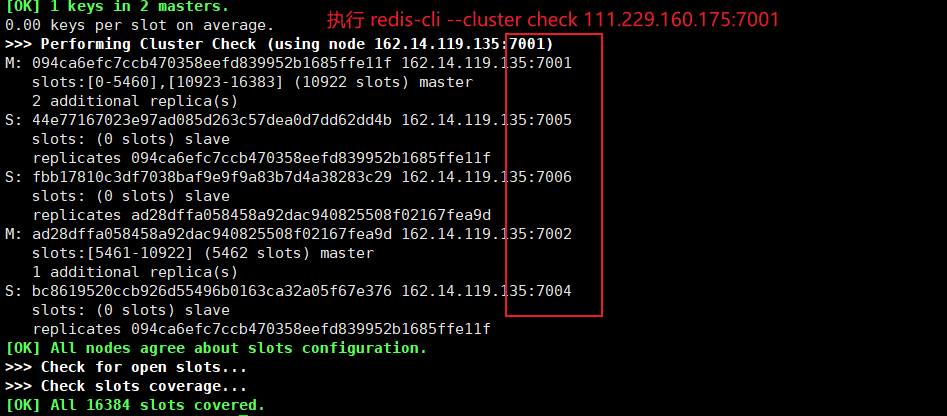
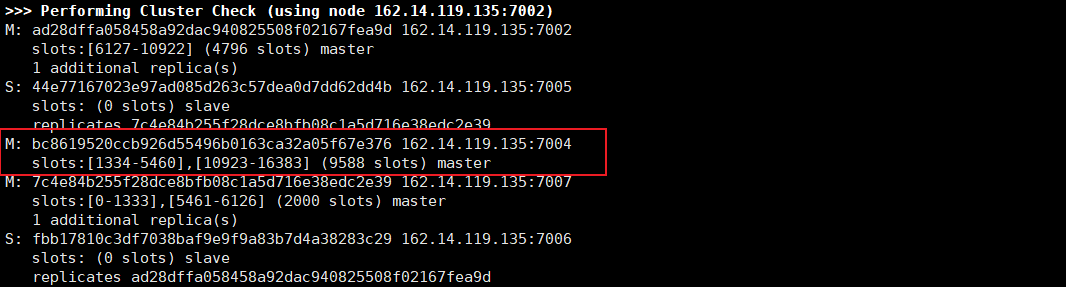
View cluster status:
./redis-cli --cluster check 162.14.119.135:7001
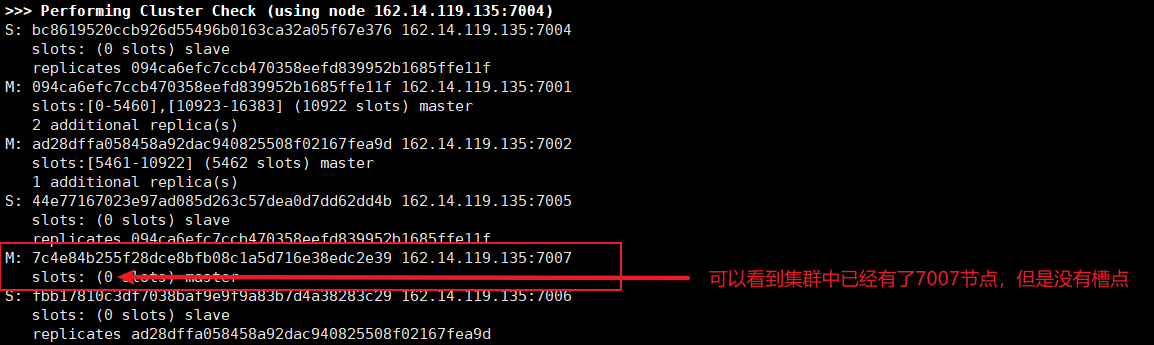
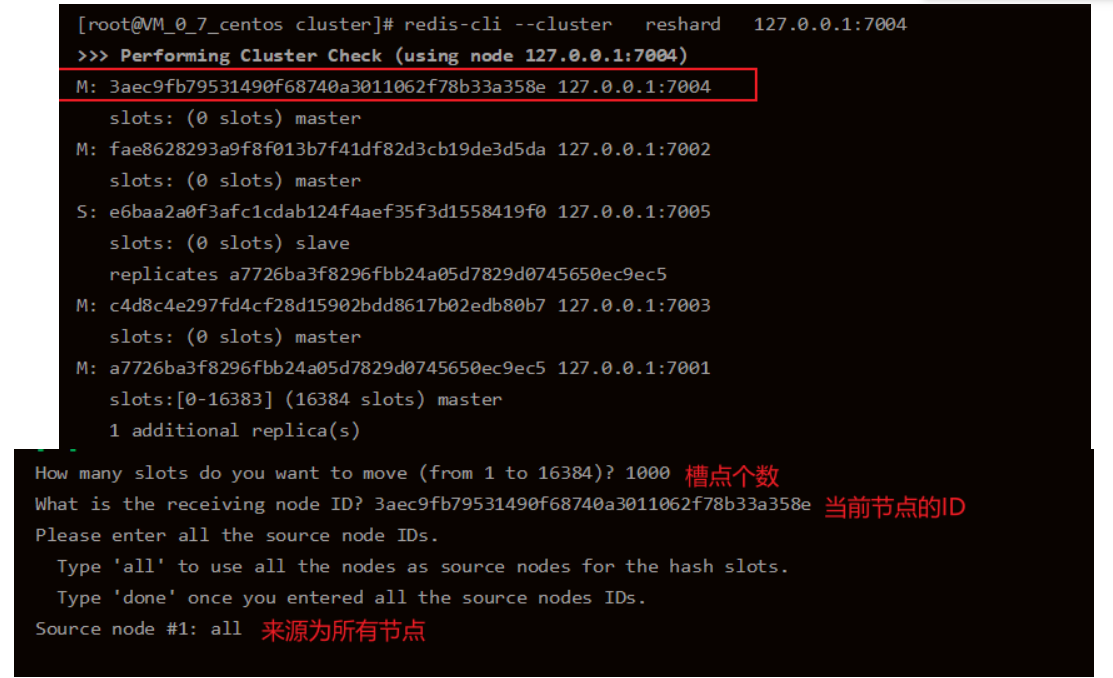
Assign slot points:
# When allocating slot points, the process is complex, and the specific process is shown in the screenshot below:
./redis-cli --cluster reshard 162.14.119.135:7007
The following screenshots are taken when other systems are built, but the operating principle and steps are the same as those when 7007 nodes are added
Assign slave nodes:
When allocating slot points to the master node, if there are redundant slave nodes in the cluster, they will automatically become the slave nodes of the new master node;
If not, it can be specified by adding a slave node. For the specific process, refer to 6.2 adding a slave node;
7. Voting mechanism
Each hash slot has a master node and multiple slave nodes
**For example: * * if there are six nodes, there are three master nodes a, B and C, and A1, B1 and C1 are the corresponding slave nodes. When a fails, the cluster will promote A1 as the master node, and A1 will inherit the data of node A. in fact, A1 is equivalent to a copy of a, allowing the cluster to continue working.
The voting process involves the participation of all the master nodes in the cluster. If more than half of the master nodes have timed out their communication with the failed master node, it is considered that the current master node is dead. Therefore, the cluster needs at least three master nodes, each master node needs at least one slave node, and all require at least six redis instances.
When the entire cluster is unavailable:
a: If any master node of the cluster hangs up and there is no slave node The cluster enters the fail state
b: If more than half of the master nodes of the cluster hang up, the cluster will enter the fail state whether there are slave nodes or not
ps: when the cluster is unavailable, all operations on the cluster are unavailable, and a ((error) CLUSTERDOWN The cluster is down) error is received.
8. Primary node downtime demo
- When a master node hangs, the corresponding slave node will be automatically upgraded to the master node. Then, after starting the node again, the node will automatically join the cluster and become the slave node of a master node (the node upgraded from the original slave node to the master node).
- After the slave node hangs up and starts the node again, the current node can be added to the cluster and continue to be the slave node of the original master node.
Before downtime
We can see: master node 7001, slave node 7004;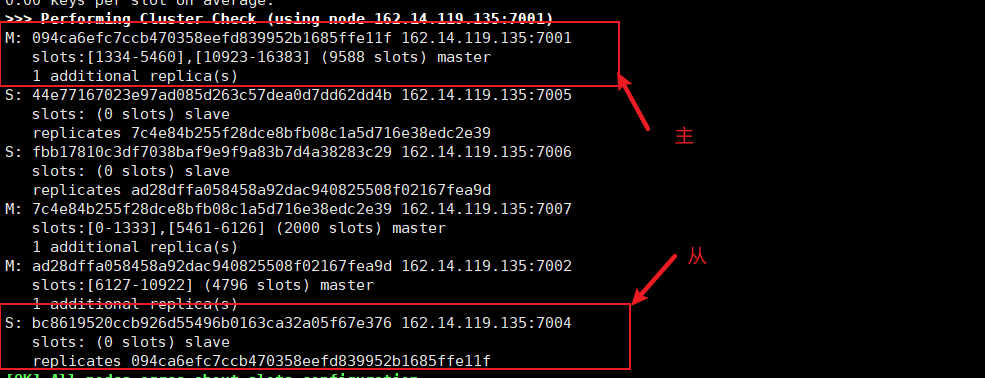
After downtime
After 7001 goes down [simulate manual shutdown], after a period of time (15s by default), the 7004 slave node will automatically become the master node and inherit the data of the master node. Later, when 7001 node goes online, it will automatically become the slave node of 7004 node.
Note: you can set the time through cluster node timeout;
Recovery after downtime
Simulate restarting 7001 node, and 7001 will automatically become the slave node of 7004 node;
9. Reset cluster
1. Close all instances in the cluster
2. Delete aof, rdb and nodes in the bin directory Conf file
3. To re-establish a cluster:
# New cluster
./redis-cli --cluster create 162.14.119.135:7001 162.14.119.135:7002 162.14.119.135:7003 162.14.119.135:7004 162.14.119.135:7005 162.14.119.135:7006 --cluster-replicas 1

# View cluster status
./redis-cli --cluster check 162.14.119.135:7001
10. Cluster principle
Redis cluster is to automatically fragment data to different redis master node instances, and then synchronize the master node to the slave node to achieve high data availability.
A Redis cluster contains 16384 hash slot s, and each key in the database belongs to one of these 16384 slots;
The cluster uses the hash algorithm to calculate which slot the key belongs to, store the value in the specified slot or obtain the value from the specified slot;
Each node in the cluster is responsible for processing a portion of the slots. For example, if a cluster can have three primary nodes, including:
Node A handles slots 0 through 5460.
Node B handles slots 5461 to 10922.
Node C handles slots 10923 to 16383.